1
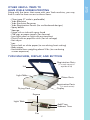
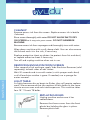
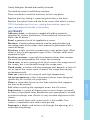
USER MANUAL • MANUEL D’UTILISATEUR
MANUAL DEL USUARIO • BENUTZER HANDBUCH
model yudu
www.whatdoYudu.com
1
START
INTRODUCTION
The Yudu™ screen-printing system is the easiest, cleanest way
to let everyone know who you are—and how you see the world.
Unsilence yourself today—with apparel, home décor, art prints,
posters, cards, schoolwork, and more. This instruction manual will
walk you through the screen-printing process so you can use Yudu
to let your voice be heard.
UNPACK YOUR BOX
Your box should contain the following:
A. Yudu machine
B. Adult t-shirt platen
C. Blank ink-jet transparency
D. 110 mesh screen
E. Squeegee
F. 2 fl oz black ink
G. Platen adhesive sheet
H. Instructional DVD
I. Quick start guide
J. Emulsion sheet
B
A
D
G
C
I F
H
E
J
1 1
Along with the items that come with your Yudu machine, you may
find it useful to have access to these items.
Clear tape (2" wide is preferable)
Yudu Blockout
• Yudu Emulsion Remover
• Yudu Registration Panels (for multicolored designs)
• Spray bottle
• Sponge
• Large sink or tub with spray head
• Old rags or paper towels (for cleanup)
• Low light room or light safe environment
• Plastic knife or popsicle stick (for ink salvage)
• Hair dryer
• Iron
• Extra cloth or white paper (to use during heat setting)
• Baby wipes
• Household item weighing about 5 lbs (to use during
screen exposure)
•
•
Yudu MACHINE, display, and buttons
Registration Posts
(1 in each corner of
topside of lid)
Lid
Light Table
Platen Posts
Registration Posts
(1 in each corner)
Display
Drying Rack
Expose
Light Table
Add Time
Subtract Time
Fan
2
2
START
Other useful items to
have while Screen-printing
START
***READ ALL INSTRUCTIONS BEFORE USING***
**ONLY USE Yudu INKS**
DANGER
The Yudu machine is electrically live even when the switch is off.
To reduce risk of death or injury by electric shock:
1. Always unplug appliance immediately after using.
2. Do not place or store appliance where it can fall or be pulled
into a tub or sink.
3. Do not place in, or drop into, water or other liquid.
4. If an appliance falls into water, unplug it immediately. Do not
reach into the water.
WARNING
To reduce risk of burns, electrocution, fire, or injury to persons:
1. This appliance should never be left unattended while plugged in.
2. Use this appliance only for its intended use as described in this
manual. Do not use attachments not recommended by
the manufacturer.
3. Never operate this appliance if it has a damaged cord or
plug, if it is not working properly, or if it has been dropped,
damaged, or dropped into water.
4. Keep the cord away from heated surfaces. Do not pull, twist, or
wrap line cord around machine, even during storage.
5. Never block the air openings of the appliance or place it on a soft
surface, such as a bed or couch, where the air openings may
be blocked. Keep the air openings free of lint, dust, and other
obstructions.
6. Do not use with a voltage converter.
CAUTION
NEVER allow the power supply cord to be pulled, twisted,
or severely bent. Never wrap the cord around the appliance.
Damage will occur at the high flex point of entry into the machine,
causing it to rupture and short. Inspect the cord frequently
for damage. Stop use immediately if damage is visible or
unit stops or operates intermittently. No repairs should be
attempted by the consumer.
STORAGE
When not in use, appliance should be disconnected, allowed to
cool, and stored in a safe, dry location. Do not wrap cord around
appliance. Allow the cord to hang or lie loose and straight at the
point of entry into the appliance.
3 3
Do not use generic textile or fabric inks with your Yudu screens.
Using non-Yudu inks can permanently damage your screen.
ink testing results
Yudu Inks
Perfect consistency to produce a nice,
crisp image
• Screw off top allows for ink salvage
• Ink easily washes out of screen when
cleaned up prior to ink drying
• Allows screens to be saved for
future use
• Water-based inks make cleanup easy
•
Textile INKS
Very runny
Couldn’t easily save ink
• Ink bled through t-shirt onto platen
•
•
Fabric Paint
Design was faded
Not a nice, crisp image
• Ink dried instantly onto screen and
ruined screen
- Hard to clean off
- Plugged up image on screen
• Stained squeegee
•
•
Fashion Paint
Opening in bottle is too small to
reuse ink
• Ink plugged up and ruined screen
•
Ruined Screen
This screen has been washed, but the
fabric inks have remained lodged in the
screen, ruining it for further use.
4
4
START
CAUTION
DESIGN
RECOMmENDED Materials to screen-Print
Yudu inks are designed for use with textile fabric: cotton, 50/50 poly/
cotton blend, and similar fabrics. Yudu water-based inks are
water soluble and easy to clean up.
OTHER MATERIALS TO TRY
-Wood
-Paper
-Porous fabric
CAUTION
Printing on materials other than textile fabric may yield
different results.
1. Create design
Create design on computer.
For multicolored designs, separate
colors into different layers.
TIP: Not all designs need to be created
on the computer. Be creative by drawing
freehand on your transparency.
LAYER 1
Print design in black on Yudu blank
transparencies. For multicolored designs,
print each layer separately.
Print on dull side of transparency. A
moist finger will stick to dull side of
transparency.
LAYER 2
TIP: For multicolored designs, you may
find it helpful to create registration marks
on each layer in the exact same spot.
This will allow you to easily line up layer 1
and layer 2 later.
5 5
2. PREPARE SCREEN
DIRTY
Make sure the screen is clean and free of
dust, lint, and oil.
BACK
FRONT
All screen preparation MUST be done
on the back.
TIP: The back of your screen is completely
flush with the metal edge. The front is
slight lower than the edge.
Spray the screen with water. It should be
completely wet, but not dripping.
TIP: You can use a spray bottle to wet screen.
TIP: Run squeegee up and down back and
front of screen to remove excess water.
3. apply emulsion to screen:
Remove the emulsion sheet from the
black plastic bag in a dimly lit area.
Apply the dull/sticky side to the back of
the wet screen.
TIP: There are two sides to the sheet, one
shiny and one dull. If you can’t tell which
is which, wet your fingers and touch the
corner. The sticky side is the dull side.
TIP: Center the emulsion on the screen. Do
not allow mesh to touch anything while
applying emulsion.
6
6
PREPARE
CLEAN
Run squeegee over the shiny surface of
the emulsion.
PREPARE
TIP: Inspect front of the screen for any bubbles or dry
areas. Dry areas will have a spiderweb pattern. Use spray
bottle with water to lightly mist any dry areas. Squeegee
both sides of screen to eliminate excess water prior to
drying. Dry edges of screen with a paper towel or cloth.
Place screen in drying rack of Yudu machine.
Press fan button to begin a 20 minute drying
cycle. The fan will stop and the machine will beep at the
close of the cycle. In drier climates the screen may dry
after as little as one cycle. In more humid climates the
drying process may require several cycles. For humid
climates you may blot moisture from the underside
of the screen with a dry cloth towel and/or squeegee
excess moisture from the screen to speed the drying
process. Test for dryness before moving on to the next
steps. After emulsion has dried, remove plastic film.
TIP: A hair dryer can be used to accelerate the
drying process.
TIP: Leaving door open while drying will speed up
the process. Repeat the drying process if necessary.
4. single colored DESIGNS:
Adhere transparency, printed side up,
to the glass on the Yudu machine using
clear tape.
For single color designs, go to "Exposing
Screen" on page 8.
5. Multicolored DESIGNS:
Press light table button.
Place first registration panel on
registration posts.
Mount first design layer to registration
panel with clear tape.
Tape second design layer to second registration
panel, stacking the images, and ensuring it is
registered with first layer. Repeat for each
design layer.
When design layers are secured to registration
panels, remove all but the first panel.
7 7
6. exposing screen:
After emulsion has completely dried,
remove protective plastic sheet from
unexposed, emulsified screen.
TIP: If plastic sheet does not remove
easily, the emulsion is not dry.
Add extra weight to top of platen to
ensure proper exposure (approximately
5 lbs). Using up and down buttons on
timer, set exposure time (approximately
8 minutes).
Press exposure button.
WARNING: Turn off machine for 1 minute
between exposures to allow unit to
cool down.
When machine beeps and exposure light
turns off, remove weight, platen, and
screen from machine. Exposed emulsion
will turn from green to blue after
exposure. Design will remain green.
7. Wash and dry screen:
Wet both sides of screen with COOL
water and let it sit for a minute. Spray
screen with cool water to remove green
emulsion from design area. It may be
necessary to gently rub both sides of
screen by hand or use a soft sponge to
remove emulsion in detailed design areas.
Blot screen with lint-free towel. Place
screen in drying rack.
Press fan button.
It will take one drying cycle or more for
screen to dry. Touch screen with fingers to
make sure it is dry. A hair dryer or fan may
be used for additional drying.
For multicolored designs, use new
screen and repeat exposure, wash, and
drying steps for each artwork layer.
8
8
PREPARE
Place screen front side up/emulsion side
down on registration posts. Place platen
on platen posts, foam side down, on top
of screen.
8. PRINT SCREEN
Insert the first screen onto top lid (make
sure screen fits over registration posts,
front side up).
TIP: Tape the back of the screen around
edges to seal any open screen areas.
TIP: Use Yudu Blockout (sold separately)
or small pieces of tape to fill any holes,
scratches, and registration marks in emulsion.
CREATE
Before using platen, remove protective
sheet from platen adhesive sheet.
Mount t-shirt or other material on
platen. Open lid and place platen on
platen posts. Close lid.
TIP: Material should be completely
adhered to platen with platen adhesive
sheets to keep material from shifting.
TIP: When adhesive sheet is no longer
sticky, peel off and replace. (Adhesive
sheets sold separately. )
Apply generous bead of ink onto screen
just above design. Make sure bead of ink
is at least as wide as design.
TIP: For large open areas of design,
you may find it necessary to be more
generous with ink.
Flood screen with ink by gently pulling
squeegee across design.
TIP: Hold lid up at a slight angle while
flooding screen. Make sure material is not
touching the screen before you flood image.
9 9
Lower lid and grasp squeegee with
both hands. Using firm, even, downward
pressure, pull squeegee across screen.
TIP: When using light ink on a darker
material, pull ink across screen multiple
times before lifting lid.
Lift lid and remove screen. Wipe any
excess ink from screen and rinse screen
thoroughly with water. Do not allow ink
to dry on screen.
TIP: Ink can be reused by scraping
excess back into container.
TIP: When using the same screen design
for multiple objects, flood the design on
the screen with ink to prevent drying out
until next use on same project.
WARNING: Do not allow ink to dry
in screen. This may damage screen.
Remove dried ink from screen by using
HOT water and an abrasive scrubbing
pad. May take 3-5 minutes of aggressive
scrubbing to see results. Results may vary.
For multicolored designs, change
screens and repeat flooding and printing
steps for each color. Design must be
dry to the touch before printing next
layer. Do not remove article from platen
between printing different colors or you
will lose registration.
Allow ink to dry on article.
9. HEAT SET INK
For apparel items, heat set ink. Using
high setting on an iron, cover design
with paper or cloth and iron for 3 to 4
minutes on each side. DO NOT IRON
GARMENT WHILE ON PLATEN.
10 10
CREATE
TIP: To keep ink from drying in screen
while in use, lightly spritz with water.
Cleanup
Remove excess ink from the screen. Replace excess ink in bottle
if desired.
Rinse screen thoroughly with water. DO NOT ALLOW INK TO DRY
ON SCREEN or it may ruin your screen. DO NOT SUBMERGE
MACHINE.
Remove excess ink from squeegee and thoroughly rinse with water.
Wipe down machine with a soft, damp cloth. You can also remove
the lid and wash it in the sink, if necessary.
Replace protective sheet on platen (to protect from lint and dust)
or replace adhesive sheet if necessary.
Turn off and unplug machine when not in use.
Removing Emulsion from Screen
After removal of ink and tape, apply Yudu Emulsion Remover (sold
separately) to both sides of wet screen.
MAINTENANCE
Wait 30 seconds and rinse with water (a sink sprayer works best)
until all emulsion residue is gone. If needed, use a sponge for
easier removal.
Light TabLE
As lights become dim or begin to flicker, they will require replacement. We recommend that you replace all four bulbs at the same
time to ensure even and consistent exposure. This machine takes
four 18" 15 watt T8 bulbs.
REPLACING BULBS
Unplug machine and ensure it has
cooled down.
Remove the three screws from the front
plastic bar holding the glass in place.
Remove plastic bar.
11 11
Gently slide glass forward and carefully set aside.
Twist bulb to unlock it and lift from machine.
Place new bulb in machine and twist to lock into place.
Replace glass by sliding it under the plastic bar in the back.
Replace front plastic bar and the three screws that hold it in place.
TIP: If the bulbs don’t turn on, unplug the machine, open the
glass, and adjust the bulbs in the socket.
Adhesive sheet: a substance capable of holding materials
together by surface attachment. (Place adhesive sheet on flat
blank side of platen.)
Bead: a generous line of ink applied to a screen.
Blockout: a liquid masking material used to cover pinholes and
non-image areas of the screen mesh around the perimeter of the
stencil or design.
Emulsion: a light sensitive compound in a thin gelatin layer. When
dried, it forms a photographic type of film. Changes color when
exposed to light.
Emulsion remover: a specially formulated solution that removes
the emulsion and prepares the screen for recoating.
Flood coat: an even coating of ink which covers the image area of
the screen, but is not forced through the image area.
Flood stroke: a motion with the squeegee that deposits a layer of
ink on top of the screen mesh. Prevents the image from drying
out between pulls.
Heat set: a process of curing ink with high temperature.
Ink-jet transparency: a thin, transparent plastic sheet designed
specifically for use with ink-jet printers.
Platen: a removable fixture on the Yudu machine that supports
the item to be printed.
Pull: refers to pulling the squeegee across the silk screen.
Registration: a system of aligning two or more sheets accurately
by means of punched holes placed over pre-spaced posts located
outside the design area. Results in very accurate alignment of the
sheets.
Screen: a metal frame with screen mesh in the middle. One
screen is needed for each color to be printed.
Squeegee: a blade used to force ink through the openings of a
screen-printing design.
12 12
GLOSSARY
glossary
SUPPORT INFORMATION:
#066308
Monday – Friday
7:00 a.m. – 6:00 p.m. (MST)
E-mail: [email protected]
Phone: 1 (877) 9MY-YUDU
13 969-9838
1 (877)