1
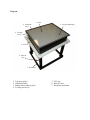
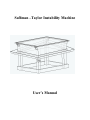
Saffman –Taylor Instability Machine
User’s Manual
Diagram
1. Glass
2. Aluminum
frame
3. Acrylic (underneath)
4. Leveling
screws
5. PVC tray
6. Shut-off
valve
7. Wood base
1.
2.
3.
4.
Top sheet (glass)
Aluminum frame
Bottom sheet (white acrylic)
Leveling screws (4)
5. PVC tray
6. Shut-off valve
7. Wood base and frame
Setting Up
1. Make sure that the shut-off valve (red) is closed before adding any solution.
2. First adjust the spacing between the acrylic and the glass by rotating the leveling screws
(#4) in each of the corners an equal number of turns.
3. Then remove the framed glass (#1) and place it next to the apparatus.
4. Place the viscous fluid on the white piece of acrylic (#3).
5. Place the piece of glass back on top of the acrylic, so that the aluminum frame (#2) is
sitting on top of all four screws.
6. Turn on the lights underneath the apparatus, and turn off the room lights.
7. Place the less viscous fluid inside of the syringe, and slowly compress the syringe to
inject the less viscous solution into the Hele-Shaw cell.
8. Watch carefully for the “fingers” to start forming.
9. You are now ready to take photos of the patterns forming. (NOTE: The fluids are
unstable so they are constantly moving, you may need to act quickly to take your photo).
10. Follow the clean up instructions below when you are finished with the apparatus.
Clean Up
1. Place a container underneath the valve and open it.
2. Carefully pull the glass off of the acrylic by holding on to the aluminum frame. Pull the
glass straight up to avoid liquid spilling everywhere.
3. Lay the piece of glass upside down on a table or on the ground.
4. Lift the sheet of acrylic up, tilting it down so that it hangs over the PVC tray (#5).
5. Use a squeegee to scrape all of the liquid off of the acrylic and into the tray.
6. Once you wipe all of the liquid off with a squeegee, take a wet cloth and wipe down the
acrylic to remove any excess liquid still on the sheet.
7. Pick up the sheet of glass by the aluminum frame and tilt it over the PVC tray. Repeat
steps 5 and 6 for the sheet of glass.
8. Wipe off the edge of the frame with a wet cloth.
9. Close the valve when the liquid has completely drained, and properly dispose of the
liquid.
10. When completely done with the apparatus, use some window cleaner to wipe down the
glass and acrylic so that it’s clean for the next person to use.