1
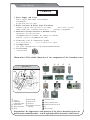
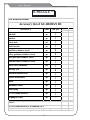
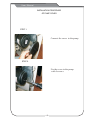
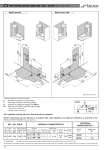
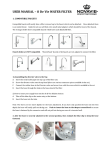
GUARDIAN II & III
Product manual
Walk - in safety bathtub
Important suggestions:
Read this manual before installing this product.
There is important product safety information in this manual, so
please be sure to keep it
User Manual
SAFETY GUIDELINES
WARNING:
- Do not use the product if you have high blood pressure, are suffering heart
disease or intoxicated.
MUST:
- Electric system should be properly grounded.
- The product should be installed by qualified professional personnel as per the
safety regulations regarding electricity and plumbing installation requirements
prescribed by the local laws and regulations.
- Electrical wiring should be done as per the safety regulations regarding
electrical code of the state or county where the unit is being installed.
- The temperature of hot water supplied should stay under 50oC (122oF).
- Adjust the setting to the desired water temperature before using any function.
During the process of temperature adjustment, test the water temperature with
your hand to verify that the temperature is suitable.
- Shut off the power supply and turn off the cold/hot water supply valve after using
the product.
- If any abnormal performance happens, contact your local sales agent or
service center in due time.
PROHIBITION:
- Non-professional personnel are not authorised to dismantle or overhaul the product.
- The product is for indoor and residential use only. It can never be used outdoors.
CAUTIONS:
For your benefit, keep these instructions manual together with the original invoice.
EXCLUSIONS:
The manufacturer of the product shall be in no case liable for any problem or accident
arising out of or in connection with the failure in following the above-mentioned
regulations or the requirements stipulated in the Instructions.
DECLARATION: The Company reserves the right to make changes to the product without prior notice.
User Manual
Table of Contents
I. Features............................................................................................1
1. Power Supply and Power....................................................................................................1
2. Water Pressure & water pipe Parameter..............................................................................1
3 .Dimension and Specification of water capacity.................................................................1
4. Protective sort & Protective grade.......................................................................................1
5. Configuration.......................................................................................................................1
II. Usage of bathtub ...................................................................1
1. Notice for using the bathtub.............................................................................................2
2. Adjusting water temperature, showering by hand-held shower head and filling water into
the tub....................................................................................................................................2
3. Operating the massage pump............................................................................................2
4. Operating thermostat.........................................................................................................2
5. Notice prior to leaving the bathtub...................................................................................2
6. Accessing the air and plumbing cleanser...........................................................................2
7. Using the shelf...................................................................................................................2
III. Maintenance.................................................................................3
IV. Schedule........................................................................................4
V. Attaching the installation instruction of thermostat water valve
User Manual
Features
1. Power Supply and Power
P o w e r s u p p l y:2 2 0 - 2 4 0 V A C 5 0 / 6 0 H z .
C o n s u m p t i o n:
Air jet:pump power:0.25Hp
2.Wa t e r P r e s s u r e & Wa t e r P i p e P a r a m e t e r
N o r m a l w o r k i n g w a t e r p r e s s u r e:0 . 2 - 0 . 5 M p a;
w a t e r f l o w:11 L / m i n .
d r a i n a g e p i p e :φ4 0 m m
Wa t e r c o n n e c t i o n : C o l d / H o t w a t e r p i p e ½ ";
3. D i m e n s i o n a n d S p e c i f i c a t i o n o f B a t h t u b C u b a g e
D i m e n s i o n a n d s p e c i f i c a t i o n:
G U A R D I A N I I I(W:1 4 4 0 m m, D:7 4 0 m m, H:7 5 0 m m)
B a t h t u b c a p a c i t y: G U A R D I A N I I I : 2 0 0 L
4. Protective sort & Protective grade
L e v e l o f s e c u r i t y:I;
L e v e l o f p r o t e c t i o n: I p 2 4
5. Configuration
T h e m a i n c o n f i g u r a t i o n s o f t h e G u a r d i a n Wa l k I n S o a k e r
5. Certification
ETL Certified
Illustration 1:This exhibit illustrates of the components of the Guardian series
①
②
③
④
⑤
Illustration 1
⑨
⑩
①
⑫
⑪
②
③
④
⑥
⑤
⑨
⑤
⑥
⑦
⑧
⑥ Door handle
⑦ Safety lock
temperature knob ⑧ Grab bar
③ Shower knob
⑨ Pneumatic switch for
④ Water inlet knob
air pump
⑤ Shelf
① Pillow
② Adjustable
⑦
13
10
11
12
13
14
10
⑧
11
12
14
Waterfall filler
Shower head holder
Hand - held shower head
Jet
Drain fitting
Explanation: the appearances and position of the above mentioned parts are
based on the standard models. Actual unit might differ from above illustration.
1
User Manual
MAINTENANCE
1 . Keep the bathtub clean and neat .
2 . DO NOT USE any abrasive cleaning products on the acrylic .
3 . To insure the lifetime usage of electrical parts of bathtub, please stop working
for 30 minutes every 3 hours of continuous usage.
4 . DO NOT USE strong acid or alkaline liquid to clean the bathtub or other
parts.
5. When cleaning the shell and floor of the bathtub, please use a soft and dry duster
cloth; If there is slight dirt, please use a soft cloth or sponge to clean with neutral
cleanser; Use ethanol to get rid of resistant stains.
6. ONLY USE detergent specially made for bathroom cleaning and strictly follow the
instruction specified on the container. The following substances are NOT TO BE
USED: acid or alkaline solution, medicine, acetone diluents and decontamination
powder. Otherwise the product may perform abnormally which may cause the user
harm.
7. DO NOT hit or strike the surface of acrylic, glass and/or metal parts to avoid
breaking; DO NOT USE corrosive liquid to clean the surface of acrylic, glass and metal
parts to avoid damaging the polish; DO NOT USE any coarse material to clean the
surface of acrylic, glass and metal parts to avoid scratching.
8. Frequently check power lines, switches, water supply pipes, drainage pipes and see if
they have been damaged.
9. For AIR SYSTEM only: After using the tub, it is recommended to turn on the air
pump for 5min. Once the tub is empty in order to push out any water in the air pipes
and keep the air jets dry and clean.
3
User Manual
1. Notice of entering the bathtub
Before entering the bathtub, please push the handle first to open the door, then close it and
lock the safety lock after entering.
Warning :
1) Before closing the door, please make sure that the crossbar is completely in the door.
Otherwise the crossbar will hit and scrape the bathtub.
2) The door handle is only for opening or closing door . Do not use as a support for the whole
body .
3 ). When the bathtub is filled with water, do not push the door handle and keep the safety lock in
the closed position. Otherwise water will pour away accidentally.
2. Temperature Adjustment & Handset Showerhead& Filling water into the bathtub
2 . 1 Turn the drain knob clockwise to close off the drain.
2 . 2 Turn the faucet anti-clockwise to open and fill tub with water as desired.
2 . 3 Turn the temperature valve until the desired water temperature is reached. Please note:
turning clockwise increases the water temperature, while turning anti-clockwise reduces the
water temperature.
2 . 4 When the tub is filled with water and the water level is near the bottom line of drain fitting,
turn the water valve clockwise to shut off the water.
2 . 5 Turn the shower head valve to turn on the hand-held shower.
The faucet of shower head and the waterfall faucet can be turned on simultaneously. The user can
fill the tub while showering.
Warning:
Before filling the water, please set the water to a low temperature to prevent scalding. Adjust
temperature as desired once water has begun filling the bath.
3 . Operating the Air pump
3 . 1 Press the air switch button of massage pump to operate the massage pump system for enjoying
your massage. Press it again to shut off the pump when you finish the massage.
4 . Notice of leaving the bathtub.
4 . 1 After your bath, please turn the drain knob anti-clockwise to drain the bath.
Wait until drainage is completed before opening the door .
5 . Using the shelf
5 . 1 Put the articles for bath use on the shelf. To service the tub, remove the screws located around
the shelf and pull the acrylic panel off the Guardian.
2
User Manual
SCHEDULE Jade Bathroom Products
Accessory list of GUARDIAN III
Accessory
Unit
air jet
tub shell
pc
1
tub-door
pc
1
safety lock
set
1
shelf (acrylic)
pc
1
shelf bar (stainless steel)
pc
2
safety grab bar (stainless steel)
pc
2
door grab bar (stainless steel)
pc
1
waterfall faucet (stainless steel)
pc
1
water valve (manifold)
set
1
massage jets
pc
8
hand-held shower head
pc
1
shower head holder
pc
1
pillow
pc
1
pneumatic switch
pc
1
drain fitting
pc
1
ELCB (circuit breaker)
pc
1
air pump(0.25HP)
pc
1
NOTE:
ELCB (circuit breaker) CE standard: 16A
4
User Manual
INSTALLATION PROCEDURE
OF PUMP COVER
STEP 1.
Connect the cover to the pump.
STEP 2.
Fix the cover to the pump
with 4 screws.
5
User Manual
Thermostatic valve maintenance
1)
2)
3)
4)
Unscrew top small screw of Thermostatic Valve
Remove Thermostatic Valve Cap
Check if the 2 red marks are aligned
Turn on the faucet and turn the Thermostatic valve without the cap to pass the 38
degree stop
5) If water temperature is higher, then you need to remove the Thermostatic
Graduation Ring and reposition it to enable a higher temperature
Note: as there is silicone under the Graduation Ring you need to slowly try to remove
it using a flat screw driver or use a small knife all around to free the silicone.
The graduation cap is just snap on top of the valve and not screwed on to it.
6
User Manual
Features Installations
7
GUARDIAN II
GUARDIAN III