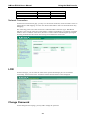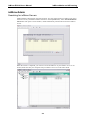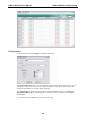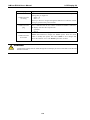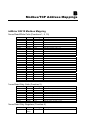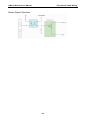
1
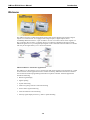
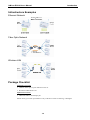
ioMirror E3210 User’s Manual www.moxa.com/product First Edition, May 2007 Moxa Technologies Co., Ltd. Tel: Fax: Web: +886-2-8910-1230 +886-2-8910-1231 www.moxa.com Moxa Technical Support Worldwide: [email protected] The Americas: [email protected] ioMirror E3210 User’s Manual The software described in this manual is furnished under a license agreement and may be used only in accordance with the terms of that agreement. Copyright Notice Copyright © 2007 Moxa Technologies Co., Ltd. All rights reserved. Reproduction without permission is prohibited. Trademarks Moxa is a registered trademark of the Moxa Group. All other trademarks or registered marks in this manual belong to their respective manufacturers. Disclaimer Information in this document is subject to change without notice and does not represent a commitment on the part of MOXA. MOXA provides this document “as is, ” without warranty of any kind, either expressed or implied, including, but not limited to, its particular purpose. MOXA reserves the right to make improvements and/or changes to this manual, or to the products and/or the programs described in this manual, at any time. Information provided in this manual is intended to be accurate and reliable. However, MOXA assumes no responsibility for its use, or for any infringements on the rights of third parties that may result from its use. This product might include unintentional technical or typographical errors. Changes are periodically made to the information herein to correct such errors, and these changes are incorporated into new editions of the publication. Table of Contents Chapter 1 Introduction ...............................................................................................1-1 Welcome............................................................................................................................... 1-2 Features ................................................................................................................................ 1-3 Infrastructure Examples........................................................................................................ 1-4 Ethernet Network .................................................................................................... 1-4 Fiber Optic Network ............................................................................................... 1-4 Wireless LAN ......................................................................................................... 1-4 Package Checklist................................................................................................................. 1-4 Specifications ....................................................................................................................... 1-5 LAN ........................................................................................................................ 1-5 Digital Input............................................................................................................ 1-5 Digital Output ......................................................................................................... 1-5 Alarm Port............................................................................................................... 1-5 Software .................................................................................................................. 1-5 Power ...................................................................................................................... 1-6 Environmental......................................................................................................... 1-6 Certifications........................................................................................................... 1-6 Accessories ............................................................................................................. 1-6 Physical Dimensions ............................................................................................................ 1-7 Hardware Overview.............................................................................................................. 1-8 Pin Assignments...................................................................................................... 1-8 LED Indicators........................................................................................................ 1-9 Chapter 2 Hardware Installation ................................................................................2-1 Connecting the Hardware ..................................................................................................... 2-2 Connecting the Power ............................................................................................. 2-2 Grounding the Unit ................................................................................................. 2-2 Connecting to the Network ..................................................................................... 2-2 Connecting the I/O Device...................................................................................... 2-2 Setting the IP Address........................................................................................................... 2-3 Static or Dynamic IP............................................................................................... 2-3 Factory Default Settings.......................................................................................... 2-3 Modifying IP Address............................................................................................. 2-4 Chapter 3 Using the Web Console ............................................................................3-1 Overview .............................................................................................................................. 3-2 Opening the Web Console ...................................................................................... 3-2 Navigation............................................................................................................... 3-2 Quick Reference...................................................................................................... 3-3 Basic Settings ....................................................................................................................... 3-3 Network Settings .................................................................................................................. 3-3 General Settings ...................................................................................................... 3-3 Ethernet Configurations .......................................................................................... 3-4 I/O Settings........................................................................................................................... 3-4 DI Channels Settings............................................................................................... 3-4 DO Channel Settings............................................................................................... 3-4 ioMirror Settings .................................................................................................................. 3-5 System Management ............................................................................................................ 3-6 Accessible IP Settings............................................................................................. 3-6 Network Connection ............................................................................................... 3-7 LCM ..................................................................................................................................... 3-7 Change Password ................................................................................................................. 3-7 Load Factory Default............................................................................................................ 3-8 Save/Restart.......................................................................................................................... 3-8 Chapter 4 ioMirrorAdmin and ioEventLog................................................................4-1 Overview .............................................................................................................................. 4-2 Installation ............................................................................................................................ 4-2 ioMirrorAdmin ..................................................................................................................... 4-3 Searching for ioMirror Servers ............................................................................... 4-3 Wiring Guide .......................................................................................................... 4-4 ioMirror Configuration ........................................................................................... 4-4 Firmware Update .................................................................................................... 4-5 Restart System ........................................................................................................ 4-5 Reset to Default....................................................................................................... 4-5 ioEventLog ........................................................................................................................... 4-5 Basic Functions....................................................................................................... 4-5 Configuration .......................................................................................................... 4-6 Opening Log Files................................................................................................... 4-7 Clearing the Log ..................................................................................................... 4-7 Appendix A LCD Display Kit ........................................................................................ A-1 Controls ................................................................................................................................A-1 Menu Options .......................................................................................................................A-1 Appendix B Modbus/TCP Address Mappings ............................................................ B-1 ioMirror E3210 Modbus Mapping .......................................................................................B-1 0xxxx Read/Write Coils (Functions 1, 5, 15)..........................................................B-1 1xxxx Read Only Coils (Function 2) ......................................................................B-1 3xxxx Read Only Registers (Function 4)................................................................B-1 4xxxx Read/Write Registers (Functions 3, 6, 16) ...................................................B-2 Function 8 ...............................................................................................................B-2 Appendix C Used Network Port Numbers....................................................................... 3 ioMirror E3210 Network Port Usage .......................................................................................3 Appendix D Factory Default Settings .......................................................................... D-1 Appendix E Pinouts and Cable Wiring........................................................................ E-1 Port Pinout Diagrams ........................................................................................................... E-2 Ethernet Port Pinouts .............................................................................................. E-2 Digital I/O Structure ............................................................................................................. E-2 Digital Input Structure ............................................................................................ E-2 Digital Output Structure.......................................................................................... E-2 Alarm Output Structure........................................................................................... E-3 1 Introduction Chapter 1 The ioMirror E3210 is a peer-to-peer Ethernet I/O server that acts as a cable replacement solution for connecting digital input sensors to PLC controller or DCS systems. Typical applications involve using a pair of ioMirror servers, one on each end of the connection. The following topics are covered in this chapter: Welcome Features Infrastructure Examples ¾ Ethernet Network ¾ Fiber Optic Network ¾ Wireless LAN Package Checklist Specifications ¾ LAN ¾ Digital Input ¾ Digital Output ¾ Software ¾ Power ¾ Environmental ¾ Certifications ¾ Accessories Physical Dimensions Hardware Overview ¾ Pin Assignments ¾ LED Indicators ioMirror E3210 User’s Manual Introduction Welcome The ioMirror E3210 is a cable-replacement solution that connects digital input signals to digital outputs over an IP network. It is equipped with 8 digital inputs, 8 digital outputs, and a 10/100Mbps Ethernet interface. A pair of ioMirror servers can connect remote sensor signals to a PLC controller, DCS systems, or a display device over Ethernet, eliminating the need to install additional signal wires. Up to 8 digital input signals can be connected from one ioMirror to another with only 20 ms signal latency over a local area network. Industrial Business Automation Applications The ioMirror is a fast and easy way to connect input and output signals over IP networks. It is ideal for non-mission critical applications such as remote monitoring. Maximum transmission distance can be achieved without programming and without a separate controller. Potential applications include the following: y Remote signal display y Signal splitting y System monitoring y Tank level, pump, and valve control/monitoring y Power station signal monitoring y Telecom machine room monitoring y Security signal display for factory, office or public building 1-2 ioMirror E3210 User’s Manual Introduction Features y High speed mirroring of digital I/O signals over Ethernet The ioMirror E3210 transmits digital I/O signals over Ethernet at very high speeds, with less than 20 ms latency in a local area 100Mbps network. The extremely low latency makes ioMirror E3210 an excellent choice for transmitting low and middle-speed signals, such as liquid level or optical sensor input. y Easiest setup for digital output signals driven by remote input The ioMirrorAdmin utility for Windows makes it easy to configure input-to-output mapping, both locally and remotely. Basic Configuration is provided for module -to-module mapping. Advanced Configuration is provided for more flexible channel-to-channel mapping, and allows one digital input signal to be mapped to multiple digital outputs. Remote configuration can also be completed using a web browser interface. y Designed to use existing Ethernet infrastructure, saving time and wiring cost With a high speed Ethernet infrastructure already in place, there is no longer any reason to go through the expense and effort of laying down additional I/O wiring. Modern Ethernet, fiber optic lines, or WLAN can provide high speed connectivity, with general input/output signals carried by a pair of ioMirror I/O servers. Wiring plans are now easier than ever. y No programming, and no separate PLC or PC controller A separate PLC or PC controller is not required for ioMirror operation. No ladder or C programming is required, either. All configuration can be done through ioMirrorAdmin or through the web console. y Local sensor signals duplicated to up to sixteen locations Each digital input signal can be mapped to two IP destinations. For example, you may monitor the eight tank level signals by up to sixteen display panels at the same time. y Easy and flexible installation The Windows utility for installation and configuration is easy to use. For basic module-tomodule configuration, you may simply assign the destination IP address for mapping. For advanced configuration, you can easily specify the mapping destination for each channel. y Easy troubleshooting tools ioMirror connections are easily monitored and managed. There are many tools and features that can alert you to a problem or show you the status of a connection: - Optional LCD display for local IP configuration - Instant error status with special built-in alarm port for 24 VDC alarm devices, such as buzzer or LED tower - Alarm and event log that records each connection and disconnection - Windows utility that displays channel mappings and status for every ioMirror server on the network - Automatic recovery within seconds when network is reconnected, without rebooting - Modbus/TCP support for SCADA systems 1-3 ioMirror E3210 User’s Manual Introduction Infrastructure Examples Ethernet Network Fiber Optic Network Wireless LAN Package Checklist Standard Accessories y ioMirror E3210 peer-to-peer Ethernet I/O server y Document and Software CD Optional Accessories y LDP1602 ioMirror LCD display kit NOTE: Notify your sales representative if any of the above items are missing, or damaged. 1-4 ioMirror E3210 User’s Manual Introduction Specifications LAN Interface 10/100BaseTx with MDI/MDIX, RJ45 Protocols DHCP, BootP, TCP, UDP, IP, ICMP, ARP, HTTP, SNTP, ioMirror Modbus/TCP up to 3 sockets Protection 1.5 KV magnetic isolation IP Address Fixed, dynamic (DHCP) Default 192.168.127.254 Digital Input Channels 8 points, source type, dry contact or wet contact I/O Mode Digital Input Dry Contact Logic 0: close to GND Logic 1: open Wet Contact Logic 0: 0 to 3 VDC Logic 1: 10 to 30 VDC (DI COM to DI) Isolation 3K VDC/2 KVrms Common Type 8 points/1 COM Digital Output Channels 8 points, sink type I/O Mode Digital Output On-state Voltage 24 VDC nominal Output Current Rating Max 200 mA per channel Optical Isolation 2K VDC/2 KVrms Common Type 8 points/1 COM Protection Over voltage protection: +50 VDC Over current limit: 600 mA (typical) Over temperature shutdown: 160°C min Alarm Port Channels 1 point, sink type On-state Voltage 24 VDC nominal Output Current Rating Max 200 mA Optical Isolation 3K VDC/2 KVrms Utilities ioMirrorAdmin for Windows Configuration Web browser, ioMirrorAdmin Software 1-5 ioMirror E3210 User’s Manual Introduction Power Power Input 24 VDC nominal, 12 (min) to 48 VDC (max) Power Consumption 3.26 W @ 24 VDC (typical) DO Power 24 VDC nominal, up to 48 VDC Wiring I/O cable max 14 AWG Environmental Operating Temperature -10 to 60°C Storage Temperature -40 to 85°C Certifications Shock, Free fall, Vibration CE Class A, Level 3, Criteria B FCC Part 15, CISPR (EN55022) class A UL508 EC61000-6-2, EC61000-6-4 Accessories LCD Display Kit Hot-pluggable attachment for IP display, DI/DO status 16 × 2 character display Backlit screen 5 buttons 1-6 ioMirror E3210 User’s Manual Introduction Physical Dimensions Units = mm 5.95 12.22 40.39 9.5 79 39.5 9.51 10.7 46.51 10.98 1-7 93.02 115 121.8 ioMirror E3210 User’s Manual Introduction 35.1 3.4 79 3.39 6.89 44.5 57.5 Hardware Overview Please note that the LCD display module is an optional accessory. Reset Button – The reset button is used to load factory defaults. Use a pointed object, such as a straightened paper clip or toothpick, to hold the reset button down for 5 seconds. The Ready LED will turn red as the factory defaults are loaded and will change to green when the operation is complete. Pin Assignments Ethernet (CN1) 1 8 Pin 1 2 3 6 Signal Tx+ TxRX+ Rx1-8 ioMirror E3210 User’s Manual Introduction Power (TB1) I/O (TB2) (Left to right) Pin Signal 1 DI COMM 2 DI0 3 DI1 4 DI2 5 DI3 6 DI4 7 DI5 8 DI6 9 DI7 10 DI GND 11 --- 12 --- Pin Signal 13 --- 14 Alarm 15 DO PWR 16 DO0 17 DO1 18 DO2 19 DO3 20 DO4 21 DO5 22 DO6 23 DO7 24 DO GND LED Indicators Ethernet LEDs Ethernet Orange Live 10Mbps Ethernet connection Green Live 100Mbps Ethernet connection Flashing Transmitting or receiving data System LEDs PWR Ready Red Power is on Off Power is off Red System error Green Off ioMirror is functioning normally Power error condition exists I/O LEDs DI (1 to 8) DO (1 to 8) Alarm DO PWR Green Status is “on” Off Status is “off” Red DI has lost connection with remote output module Flashing DO has lost connection with remote input module Red DO power in 1-9 2 Hardware Installation Chapter 2 This chapter explains how to install the ioMirror E3210 peer-to-peer Ethernet I/O server. The following topics are covered in this chapter: Connecting the Hardware ¾ Connecting the Power ¾ Grounding the Unit ¾ Connecting to the Network ¾ Connecting the I/O Device Setting the IP Address ¾ Static or Dynamic IP ¾ Factory Default Settings ¾ Modifying IP Address ioMirror E3210 User’s Manual Hardware Installation Connecting the Hardware Connecting the Power Connect your 12 to 30 VDC power supply to the ioMirror’s terminal block. If power is properly supplied, the “Power” LED will light up red until the system is ready. Grounding the Unit Connect your grounding line to the wall-mount sockets or DIN-rail. Connecting to the Network For initial installation, connect the ioMirror to the same LAN as your host computer, through an Ethernet switch or hub. Alternatively, you can use a straight-through Ethernet cable to connect the ioMirror directly to the host computer. Connecting the I/O Device DI Dry Contact DI Wet Contact 2-2 ioMirror E3210 User’s Manual Hardware Installation DO Alarm Output Setting the IP Address Static or Dynamic IP The ioMirror E3210 supports both static and dynamic IP addresses. You may need to consult with your network administrator to determine how IP addresses are assigned in your network environment: y For a static IP environment, you can enter a specific IP address using ioMirrorAdmin or the web console. y In a dynamic IP environment (BOOTP or DHCP), you can use ioMirrorAdmin or the web console to specify the DHCP, DHCP/BOOTP, or BOOTP server that will assign the ioMirror’s IP address. Factory Default Settings The factory default network settings are as follows: y IP address: 192.168.127.254 y Netmask: 255.255.255.0 y Gateway: None 2-3 ioMirror E3210 User’s Manual Hardware Installation Modifying IP Address There are several ways to modify the ioMirror’s IP address. ioMirrorAdmin is a Windows utility that can be used locally or on the network to configure the unit and upgrade the firmware. Please refer to Chapter 4 for instructions on using ioMirrorAdmin. The web console is a configuration tool that is opened using a standard web browser, through a localor network connection. Please refer to Chapter 3 for instructions on opening and using the web console. The LCD display kit is an optional accessory that can be used on-site for basic monitoring and configuration. Please refer to Appendix A for instructions on using the LCD display kit. 2-4 3 Using the Web Console Chapter 3 The ioMirror can be configured using a standard web browser over a direct or network connection. This chapter explains how to open and use the web console. The following topics are covered in this chapter: Overview ¾ Opening the Web Console ¾ Navigation ¾ Quick Reference Basic Settings Network Settings ¾ General Settings ¾ Ethernet Configurations I/O Settings ¾ DI Channels Settings ¾ DO Channel Settings ioMirror Settings System Management ¾ Accessible IP Settings ¾ Network Connection LCM Change Password Load Factory Default Save/Restart ioMirror E3210 User’s Manual Using the Web Console Overview Opening the Web Console Use a standard web browser, such as Microsoft Internet Explorer, to open the web console. Simply point the browser to your ioMirror’s IP address. For initial configuration, use the ioMirror default IP address of 192.168.127.254. The web console should appear as below: The main page of the web console displays detailed information about your ioMirror unit, including module name, serial number, firmware version, IP address, and MAC address. Navigation In the web console, the left panel is the navigation panel and contains an expandable menu tree for navigating among the various settings and categories. Click on an item in the navigation panel to jump to that page. For example, if you click on Basic Settings in the navigation panel, the main window will show a page of basic settings that you can configure. You can enter configuration changes directly on the page. Click on the Submit button at the bottom of the page after making configuration changes. The Submit button will be located at the bottom of every page that has configurable settings. If you navigate to another page without clicking the Submit button, your changes will not be retained. Submitted changes will not take effect until they are saved and the unit is restarted! You may save and restart the server in one step by clicking on the Save/Restart button after you submit a change. If you need to make several changes before restarting, you may save your changes without restarting by selecting Save/Restart in the navigation panel. If you restart the unit without saving your configuration, you will lose all configuration changes that have been submitted. 3-2 ioMirror E3210 User’s Manual Using the Web Console Quick Reference The following is a quick reference guide to the pages in the ioMirror’s web console. Details for each page are presented later in this chapter. Overview Basic Settings Network Settings General Settings Ethernet Configurations I/O Settings DI Channels DO Channels ioMirror Settings System Management Accessible IP Settings Network Connection LCM Change Password Load Factory Default Save/Restart → Show model name, serial number, etc. → Set time, time server → Set name, location, DNS → Set IP address, netmask, gateway → Configure digital input channels → Configure digital output channels → Configure channel/module mapping, alarm system → Filter access by IP address → Show TCP connections from different hosts → Show LCM status → Set password → Restore factory default settings → Save all changes and reboot Basic Settings On the Basic Settings page, you may set the system time or provide the IP address of a time server for time synchronization. Network Settings General Settings On the General Settings page, you may assign a server name and location to assist you in differentiating between different I/O servers. 3-3 ioMirror E3210 User’s Manual Using the Web Console Ethernet Configurations On the Ethernet Configurations page, you may assign the IP address, subnet mask, and gateway for your ioMirror server. You may also configure the IP address to be dynamically assigned by DHCP, DHCP/BOOTP, or BOOTP. I/O Settings DI Channels Settings On the DI Channel Settings page, you may view the status of each DI (digital input) channel. Click a channel to modify the digital input filter. The maximum digital input filter value is 65535. DO Channel Settings On the DO Channel Settings page, you may configure each DO (digital output) channel by clicking on the channel. 3-4 ioMirror E3210 User’s Manual Using the Web Console The Current Setting sets the channel’s current output status in order to test the DO connection. The Power On Setting sets the channel’s output status when the I/O server is first powered. The Alarm Status Setting sets the channel’s output status when the I/O server is in an alarm state. The alarm is configured on the ioMirror Settings page. After changing the DO channel settings, do not forget to Save/Restart your system. ioMirror Settings On the ioMirror Settings page, you may configure how I/O signals will be transmitted over Ethernet and how the alarm will operate. Under ioMirror Settings, Interval time determines how often I/O signals will be transmitted and accepts values between 20 and 600,000 ms. TCP Port no determines the network port that is used for I/O signal transmission. You can modify this setting as necessary to transmit signals through a firewall. Time out determines how long the ioMirror will wait for a network response before it will consider the connection broken. Alarm Settings The ioMirror can serve as the input module to several remote output modules simultaneously. At the same time, it can also serve as the output module to other remote input modules. The ioMirror’s alarm is designed to activate if any of these connections to other ioMirror units is broken. When the alarm is activated, several things happen: y all DO channels are reset to their Alarm status y the alarm LED flashes y any device connected to the alarm port will be activated y an error message is sent to the ioEventLog Under Alarm Settings, you can enable or disable the alarm. You can also specify where and how to send error messages with ioEventLog Server IP and TCP port no. 3-5 ioMirror E3210 User’s Manual Using the Web Console Module-to-Module and Channel-to-Channel modes Module-to-Module mode is used if you wish for all DI channels to be mapped to another ioMirror’s DO channels. Simply enter the destination IP address. Channel-to-Channel mode is used if you wish to individually map DI channels to separate or multiple ioMirror servers. For each DI channel, enter the mapping destination(s) using Remote Module IP Address and Remote DO Channel. If your ioMirror will also be receiving signals from another ioMirror server, enter the mapping source for each channel using Acceptable Remote Module IP Address. System Management Accessible IP Settings On the Accessible IP Settings page, you may control who has configuration access to the ioMirror by entering the permitted IP Address and Netmask. When the accessible IP list is enabled, only network hosts on the list may configure the ioMirror. Use the accessible IP list as follows: y To grant access to a specific IP address, use Netmask = 255.255.255.255. y To grant access to hosts on a specific subnet, use a non-trivial Netmask, such as 255.255.255.0. y To grant access to any network host, disable the accessible IP list. You may use the following sample entries for reference: Desired Hosts 192.168.1.120 192.168.1.1 to 192.168.1.254 IP Address 192.168.1.120 192.168.1.0 3-6 Netmask 255.255.255.255 255.255.255.0 ioMirror E3210 User’s Manual Desired Hosts 192.168.0.1 to 192.168.1.1 to 192.168.1.126 192.168.1.129 to Using the Web Console IP Address 192.168.0.0 192.168.1.0 192.168.1.1 Netmask 255.255.0.0 255.255.255.128 255.255.255.128 Network Connection On the Network Connection page, you may view each TCP connection, which can make it easier to manage devices and mappings. You also can check which ioMirror units are disconnected for easy debugging. The connecting protocol for each connection is indicated under Connection Type. Web/HTTP indicates a web console connection to the ioMirror. ioMirror/TCP indicates a connection to another ioMirror unit. For ioMirror connections, Direction is used to indicate whether digital input signals are being transmitted to the remote unit or being received from the remote unit. LCM On the LCM page, you can check the status of the optional LCD display kit. If it is installed successfully, the status will show “Attached” and the firmware details will be displayed. Change Password On the Change Password page, you may add or change the password. 3-7 ioMirror E3210 User’s Manual Using the Web Console Load Factory Default On the Load Factory Default page, you may reset the ioMirror back to its factory default settings. Save/Restart On the Save/Restart page, you may save all configuration changes and reboot the I/O server with the new configuration. 3-8 4 ioMirrorAdmin and ioEventLog Chapter 4 Two Windows utilities, ioMirrorAdmin and ioEventLog, are included to help you manage your ioMirror server over the network. The following topics are covered in this chapter: Overview Installation ioMirrorAdmin ¾ Searching for ioMirror Servers ¾ Wiring Guide ¾ ioMirror Configuration ¾ Firmware Update ¾ Restart System ¾ Reset to Default ioEventLog ¾ Basic Functions ¾ Configuration ¾ Opening Log Files ¾ Clearing the Log ioMirror E3210 User’s Manual ioMirrorAdmin and ioEventLog Overview Two Windows utilities are provided with the ioMirror E3210. y ioMirrorAdmin allows you to manage your unit over the network. You can configure the unit, upgrade the firmware, or refer to the unit’s wiring guide. y ioEventLog receives and stores error messages from ioMirror units on the network. Installation To install ioMirrorAdmin and ioEventLog, run SETUP.EXE from the Document and Software CD. The installation wizard will guide you through the installation process. When the installation process is complete, you can open either utility through the Windows Start menu. 4-2 ioMirror E3210 User’s Manual ioMirrorAdmin and ioEventLog ioMirrorAdmin Searching for ioMirror Servers ioMirrorAdmin is designed for network operation. You will need to find your ioMirror unit on the network to use any of ioMirrorAdmin’s functions. In the System menu, select Auto Scan Remote I/O Server. This opens a search window, which automatically searches the network for ioMirror servers. When the search is completed, you will see a list of all ioMirrors. If your ioMirror server is not located, make sure that your computer and your ioMirror server are in the same subnet. 4-3 ioMirror E3210 User’s Manual ioMirrorAdmin and ioEventLog Wiring Guide To view the ioMirror wiring guide, select Wiring Guide from the Help menu. ioMirror Configuration The ioMirror’s web console can be opened within ioMirrorAdmin. Select the desired unit in the left panel. The unit’s web console will appear in the right panel. Please refer to Chapter 3 for information on using the web console. 4-4 ioMirror E3210 User’s Manual ioMirrorAdmin and ioEventLog Firmware Update The ioMirror firmware can be updated through ioMirrorAdmin. Select the desired unit in the left panel. In the right panel, select the Firmware Update tab. You may obtain the latest firmware by visiting the MOXA website. Restart System You may restart any ioMirror server over the network. Right-click the desired unit in the left panel and select Restart System. Reset to Default You may load the factory default settings for any ioMirror server on the network. Right-click the desired unit in the left panel and select Reset to Default. ioEventLog Basic Functions ioEventLog is installed along with ioMirrorAdmin from the Document and Software CD. It is designed to help you keep a record of ioMirror status events over the network. The log is stored on the Windows PC, and you will need to set up your ioMirror server to send status events to your PC’s IP address. The following events are monitored: y cold start y warm start y off-line y on-line For each event, the following information is provided. The log can be sorted by any of these fields: y event type y event date and time y ioMirror source name y ioMirror source IP y ioMirror destination IP 4-5 ioMirror E3210 User’s Manual ioMirrorAdmin and ioEventLog Configuration In the System menu, select Settings to configure ioEventLog. The Alarm Listen Port is the TCP port number that will be monitored for status events. You can modify this setting as necessary to receive signals through a firewall. It will need to match the settings for the ioMirror server that is being monitored. The Log Directory is where the log files will be stored. The default directory is C:\Program Files\Moxa\ioMirror\log. A separate log file is created for each day, with file names assigned automatically. You can also select the Color for each event type in the log. 4-6 ioMirror E3210 User’s Manual ioMirrorAdmin and ioEventLog Opening Log Files You can view previously saved logs by selecting Open from the Log menu. You will be prompted for the date that you wish to view. The logs for the day that you select will be displayed in the Alarm Log Viewer window. Clearing the Log If you wish to clear the log, you can select Clear from the Log menu. This will clear all events for the current day. The cleared events will not be saved in that day’s logs. After the logs are cleared, new events will be displayed and recorded as usual. 4-7 A LCD Display Kit Appendix A The ioMirror supports an optional detachable LCD display kit, also known as the LCM, for easier field maintenance. The LCD display kit is hot-pluggable and can be used to configure the network settings or display other settings. Controls The up and down buttons navigate between the current options. The right and left buttons enter and exit the submenus. The center button is used when modifying settings or restarting the server. Button Up Down Left Right Center Function go to the previous item go to the next item exit the current submenu and return to the previous menu (go up one level) enter the selected submenu (go down one level) enter/exit editing mode An “e” in the upper right hand corner of the display indicates that the parameter can be modified. Press the center button to modify that parameter’s settings. Menu Options Display <ioMirror E3210> server <ioMirror E3210> network <ioMirror E3210> mirror Explanation / Actions This is the default screen. Enter this submenu to display information about the specific server you are viewing:: y serial number y name y location y e3210 f/w ver y lcm f/w ver y model name Enter this submenu to display information and settings for the network: y ethernet link y mac Address y ip mode: Static, DHCP, DHCP/Bootp, Bootp y ip Address: 192.168.127.254 y netmask: 255.255.255.0 y gateway: 0.0.0.0 y dns Server-1: 255.255.255.255 y dns Server-2: 255.255.255.255 Enter this submenu to view and set the IP address of the remote output module. This is only for ioMirrors that are operating in Module-toModule mode: MÅ_ÆM IP ioMirror E3210 User’s Manual Display <ioMirror E3210> i/o setting <ioMirror E3210> ping <ioMirror E3210> save/restart LCD Display Kit Explanation / Actions Enter this submenu to view I/O channel status. Here are examples of settings that you might see: y di-00 = on y di-07 = 0 Press up or down to navigate through the different I/O channels without having to go back to the previous menu. Select this option to enter an IP address to ping. If you get a “timeout” error, it indicates that the unit cannot reach that IP address. Otherwise, the display will show the response time. y ip address y ping ip Enter this submenu to display the restart now submenu. Enter the restart now submenu to display the restart option. Press the center button to modify this option, then select enable to save changes and reboot the ioMirror server. The disable option has no effect. ATTENTION Configuration changes that are made through the LCD display kit will not take effect until the unit has been restarted. A-2 B Modbus/TCP Address Mappings Appendix B ioMirror E3210 Modbus Mapping 0xxxx Read/Write Coils (Functions 1, 5, 15) Reference 00001 00002 00003 00004 00005 00006 00007 00008 00009 00010 00011 00012 00013 00014 00015 00016 00017 00018 00019 00020 00021 00022 00023 00024 Address 0x0000 0x0001 0x0002 0x0003 0x0004 0x0005 0x0006 0x0007 0x0008 0x0009 0x000A 0x000B 0x000C 0x000D 0x000E 0x000F 0x0010 0x0011 0x0012 0x0013 0x0014 0x0015 0x0016 0x0017 Data Type 1 bit 1 bit 1 bit 1 bit 1 bit 1 bit 1 bit 1 bit 1 bit 1 bit 1 bit 1 bit 1 bit 1 bit 1 bit 1 bit 1 bit 1 bit 1 bit 1 bit 1 bit 1 bit 1 bit 1 bit Description CH0 DO Value 0: Off 1: On CH1 DO Value 0: Off 1: On CH2 DO Value 0: Off 1: On CH3 DO Value 0: Off 1: On CH4 DO Value 0: Off 1: On CH5 DO Value 0: Off 1: On CH6 DO Value 0: Off 1: On CH7 DO Value 0: Off 1: On CH0 DO Power On Value 0: Off 1: On CH1 DO Power On Value 0: Off 1: On CH2 DO Power On Value 0: Off 1: On CH3 DO Power On Value 0: Off 1: On CH4 DO Power On Value 0: Off 1: On CH5 DO Power On Value 0: Off 1: On CH6 DO Power On Value 0: Off 1: On CH7 DO Power On Value 0: Off 1: On CH0 DO Safe Mode Value 0: Off 1: On CH1 DO Safe Mode Value 0: Off 1: On CH2 DO Safe Mode Value 0: Off 1: On CH3 DO Safe Mode Value 0: Off 1: On CH4 DO Safe Mode Value 0: Off 1: On CH5 DO Safe Mode Value 0: Off 1: On CH6 DO Safe Mode Value 0: Off 1: On CH7 DO Safe Mode Value 0: Off 1: On 1xxxx Read Only Coils (Function 2) Reference 10001 10002 10003 10004 10005 10006 10007 10008 Address 0x0000 0x0001 0x0002 0x0003 0x0004 0x0005 0x0006 0x0007 Data Type 1 bit 1 bit 1 bit 1 bit 1 bit 1 bit 1 bit 1 bit Description CH0 DI Value, 0=OFF, 1=ON CH1 DI Value, 0=OFF, 1=ON CH2 DI Value, 0=OFF, 1=ON CH3 DI Value, 0=OFF, 1=ON CH4 DI Value, 0=OFF, 1=ON CH5 DI Value, 0=OFF, 1=ON CH6 DI Value, 0=OFF, 1=ON CH7 DI Value, 0=OFF, 1=ON 3xxxx Read Only Registers (Function 4) Reference 34097 Address 0x1000 (4096) Data Type 1 word Description Vendor ID=0x1393 ioMirror E3210 User’s Manual Reference 34098 34099 38193 to 38264 38265 to 38312 38313 to 38384 38385 to 38432 38433 to 38504 38505 to 38553 Address 0x1001 (4097) 0x1002 (4098) 0x2000 (8192 to 8263) 0x2048 (8264 to 8311) 0x2078 (8312 to 8383) 0x20C0 (8384 to 8431) 0x20F0 (8432 to 8503) 0x2138 (8504 to 8552) Modbus/TCP Address Mappings Data Type 1 word Description Unit ID (Ethernet=1) 1 word Product Code=0x2210 72 word Get all DI channels CURRENT status 48 word Get all DO channels CURRENT status 72 word Get all DI channels POWER ON status 48 word Get all DO channels POWER ON status 72 word Get all DI channels SAFE MODE status 48 word Get all DO channels SAFE MODE status 4xxxx Read/Write Registers (Functions 3, 6, 16) Reference 40001 40002 Address 0x0000 0x0001 Data Type 1 word 1 word Description Alarm Enable(1: Enable0: Disable) ioMirror Alarm Timeout time Function 8 Address 0x7008 (28680) Function F/W R/W W Function Code 16 B-2 Length 1 word Description Reset existing setting C Used Network Port Numbers Appendix C ioMirror E3210 Network Port Usage Port 80 502 68 68 4045 4040 4800 Type TCP TCP UDP UDP TCP TCP UDP Usage Web Server Modbus Communication BOOTPC DHCP ioMirror ioEventLog Auto search D Factory Default Settings Appendix D The factory default configuration for the ioMirror E3210 is as follows: IP address Netmask Gateway Alarm system Time out DI mode Filter time DO mode DO alarm status Power on status Password Name Location 192.168.127.254 255.255.255.0 0.0.0.0 Disable 5 sec DI 0.5 ms DO Off Off NONE NONE NONE E Pinouts and Cable Wiring Appendix E The following topics are covered in this appendix: Port Pinout Diagrams ¾ Ethernet Port Pinouts Digital I/O Structure ¾ Digital Input Structure ¾ Digital Output Structure ¾ Alarm Output Structure ioMirror E3210 User’s Manual Pinouts and Cable Wiring Port Pinout Diagrams Ethernet Port Pinouts Pin 1 2 3 6 Signal Tx+ TxRx+ Rx- Digital I/O Structure Digital Input Structure Digital Output Structure E-2 ioMirror E3210 User’s Manual Pinouts and Cable Wiring Alarm Output Structure E-3