1
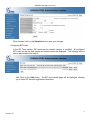
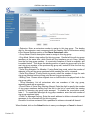
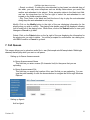
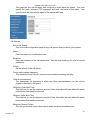
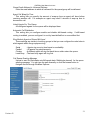
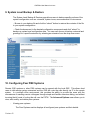
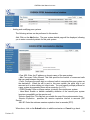
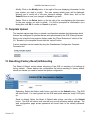
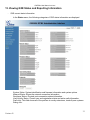
GXE502x User Manual 4/4/2008
GXE5024 Users Manual
1
Version .02
GXE502x User Manual 4/4/2008
Table of Contents
1. Introduction .....................................................................................................................................3
2. Administering Extensions on the GXE..........................................................................................3
3. Configuring Trunks on the GXE ....................................................................................................6
4. Configuring Conference Bridges.................................................................................................13
5. Configuring Hunt/Ring Groups....................................................................................................14
6. Configuring Auto-Attendants.......................................................................................................16
7. Call Queues ...................................................................................................................................19
8. System Configuration...................................................................................................................22
9. System Level Backup & Restore .................................................................................................30
10. Configuring Peer PBX Systems.................................................................................................30
11. Template Upload .........................................................................................................................32
12. Resetting (Factory Reset) & Rebooting ....................................................................................32
13. Viewing GXE Status and Reporting Information ......................................................................33
14. Reports ........................................................................................................................................34
15. Configuring Voicemail ................................................................................................................36
2
Version .02
GXE502x User Manual 4/4/2008
1. Introduction
Thank you for purchasing the Grandstream GXE502x IP-PBX, a SIP-based, affordable, high-quality
converged communications platform designed to enhance small to medium business enterprises.
The GXE502x is capable of providing the cutting-edge IP-based communications to businesses
demanding the latest of technologies, while leveraging existing infrastructure and providing a most
friendly transition into IP telephony for others. Supporting open-standard SIP, the GXE502x can
easily integrate into and interoperate with other components of your IP-based communications
network while providing a rich set of features to reduce costs and increase productivity. Built-in FXO
and FXS ports enable the GXE502x to interface with analog lines and devices while concurrently
registering to SIP trunks and SIP-based trunk gateways to maximize available communications
resources.
An auto-provisioning Express Setup wizard and an intuitive user interface allow the GXE502x to be
set up and installed quickly and confidently. Voicemail, voicemail-to-email, conference bridges, and
other enhanced features can be enabled and functioning with just minimal effort via user-friendly web
configuration pages. Its broad feature set, ease of operation, and quality and value makes it ideal for
any business communication environment.
- Equipment Packaging
The GXE502x IP-PBX package contains:
1) One GXE502x IP-PBX unit
2) One 12 Volt power adapter
3) One Ethernet cable
2. Administering Extensions on the GXE
Extensions for the internal users can be created from the Express Setup menu of a factory-default
GXE, or from the Phone Extensions menu at any time. This can be local users in the internal
network, or even remote users connecting over the open Internet. This flexibility allows users to have
their office extension with them virtually anywhere, keeping accessibility to personnel high without
incurring any PSTN toll charges for the worker at home or the road-warrior.
The Express Setup provides a quick wizard to complete initial setup of all extensions on a new
system, including auto-provisioning of the phones. The Phone Extensions menu allows you to add,
batch add, modify, reboot, delete and batch delete extensions.
-
Using the Express Setup wizard to create extensions and auto-provision phones.
3
Version .02
GXE502x User Manual 4/4/2008
The Express Setup wizard will allow you to set various system extensions on the GXE and
create your phone extensions. It will also auto-provision your phones with the extensions
you create. Please refer to the GXE Quick Start Guide for detailed instructions on setting
up your GXW with the Express Setup wizard.
Extension Length: all extensions must have the number of digits specified here.
Extension Digit Prefix: all extensions will begin with this digit.
Local IPPBX Number: a unique identifier number for this local GXE system.
-
Using the Phone Extensions menu to create, modify, view, and delete extensions.
In the General Settings section, the following settings can be set.
Extension Number for Internal Phone/FAX ports: Set the extension number for the TEL1
and TEL2 FXS ports on the back of the GXE here.
Extension Number for Paging: users may dial this number for group paging.
Extension Number for Auto-Attendant: set the extension to reach the auto-attendant
menu here.
Extension Number for Conference: set the extensions to reach both conference bridges.
Starting Extension for Express Provisioning: Set the starting extension for autoprovisioning during Express Setup.
Ending Extension for Express Provisioning: Set the ending extension for autoprovisioning during Express Setup.
4
Version .02
GXE502x User Manual 4/4/2008
When finished, click on the Submit button to save your changes or Cancel to discard.
The Extensions Directory section displays all SIP phone extensions configured on the GXE
including their details and registration status. The following actions can be performed in
this section.
Add an extension: Click on the Add One Extension button. The extension details page
will be displayed, allowing you to set all of the extension’s settings. When done, click on
the Submit button to add the extension or Cancel to go back.
Batch add extensions: Click on the Batch Add button. The next page allows you to
specify the range of extensions to add, as well as some general extension settings to
apply to them. You may go back to the extensions directory and modify the extensions
to set extension-specific settings. When done, click on the Submit button to add the
extensions or Cancel to go back.
Modify and/or reboot a SIP extension: Click on the Modify button to the right of the row
displaying information for the extension you wish to modify. The extension details page
will be displayed, allowing you to modify all of the extension’s settings. To reboot the
phone, set the Reboot Peer setting to “Yes”. When done, click on the Submit button to
modify and/or reboot the extension or Cancel to go back.
Delete: Click on the Delete button on the far right of the row displaying the information
for the extension you wish to delete. You will be prompted for confirmation via a dialog
box; click OK to confirm or Cancel to go back.
Batch delete: Delete multiple extensions in one step by checking each checkbox of all
extensions to be deleted, and clicking on the Delete button below the column of
checkboxes. To check all displayed extensions on the current page, check the
uppermost checkbox, labeled as “All”. Note that this only affects extensions on the
current page; extensions on other pages will not be deleted. You will be prompted for
confirmation via a dialog box; click OK to confirm or Cancel to go back.
5
Version .02
GXE502x User Manual 4/4/2008
-
Busy Lamp Field and Message Waiting Indication
Busy Lamp Field (BLF) support and Message Waiting Indication (MWI) support are enabled
on the GXE. New voicemail messages will automatically trigger an MWI light on phones
that support it to notify the user of new voicemail messages. To monitor the statuses of
other users on the GXE, configure BLF keys on an IP phone to the extension numbers of
the users to be monitored. The GXE will trigger the BLF keys to signal when the monitored
user is idle, has a call ringing, or is busy.
-
Auto Provisioning Extensions after Express Setup
You can Auto-Provision more extensions after completing the Express Setup process by
clicking “Auto Provision” under the Phone Extensions menu (Firmware version 1.0.0.50 &
greater). The starting and ending extensions for the phones that you are adding must be
specified before connecting the phones.
Click the “start” button to start the auto provisioning process. Once the Auto-Provision
page starts refreshing you may connect your phones into your switch/hub.
3. Configuring Trunks on the GXE
PSTN trunks via the FXO ports, SIP trunks, and SIP-based PSTN trunk gateways can be configured
on the GXE in the Trunk/Phone Lines menu. Also, the FXO and FXS port line electrical settings can
be configured here as well. This will allow users on the GXE to call destinations anywhere through
the trunks configured on the GXE.
-
Configuring internal PSTN trunks via FXO ports
In the Internal PSTN Trunk Line section, the FXO ports on the back of the GXE can be
configured to interface with and send/receive calls to/from the PSTN.
Compatibility with PSTN lines can be achieved by adjusting the following types of settings.
The default settings should function in most cases, depending on your regional PSTN line
characteristics.
6
Version .02
GXE502x User Manual 4/4/2008
FXO Termination: Specify line disconnect signaling and impedance.
Call Progress Tones: Configure tones to match regional settings.
Line Dialing Settings: Adjust line dialing properties to adhere to PSTN line requirements.
Caller ID Standard: Set caller ID handling to match PSTN settings.
The following Line Call Control settings allow you to specify how inbound and outbound
calls are to be handled.
7
Version .02
GXE502x User Manual 4/4/2008
Line: Specify a port or a range of ports to apply the same line call control rule to.
Dial Prefix: Configure the prefix digit on outbound calls to specify this trunk. When the
call is sent out via this trunk, the prefix digit is removed.
Inbound Call Answer: In the first drop-down box of each row, select the type of
destination for inbound calls on this trunk. Select the exact destination of that type in
the second drop-down box, if applicable.
Enable Password: Enabling this field lets you password protect the corresponding trunk.
Delete: Delete an existing line call control rule.
More: Allow another line call control rule to be set.
Allow Other IPPBX Use: Allow other peered IPPBXs to dial through the local GXEs
internal PSTN trunks.
When finished, click on the Submit button to save your changes or Cancel to discard.
-
Configuring internal phone/fax devices via FXS ports
In the Internal Phone/Fax Port section, the line electrical and DTMF signaling settings of
the FXS ports on the back of the GXE can be configured for compatibility with analog
phone/fax devices. The extension numbers for these ports are set in the Phone
Extensions menu, under the General Settings section.
8
Version .02
GXE502x User Manual 4/4/2008
When finished, click on the Submit button to save your changes.
-
Configuring SIP trunks
In the SIP Trunk section, SIP trunks can be viewed, created, or modified. All configured
SIP trunks as well as their details and current status are displayed. The following actions
can be performed in this section.
Add: Click on the Add button. The SIP trunk details page will be displayed, allowing
you to enter SIP account registration information.
9
Version .02
GXE502x User Manual 4/4/2008
Enable the trunk: Enter a descriptive name in the Trunk Name field, and set Trunk
Active to Enable.
Set SIP registration: Enter the SIP server and, if available, outbound proxy
information along with SIP account and password details. Set the registration
expiration time in the Registration Retry Interval setting, and set Heart Beat to Yes to
Enable or disable availability detection of the remote end (requires compatibility on
the remote end)..
Outbound call handling: Set the Max Concurrent Calls Allowed to prevent too many
concurrent attempts to send calls out this trunk.
Set the Dial Prefix digit to specify an outbound call to be dialed through this trunk.
When the call is sent out via this trunk, the dial prefix digit is removed.
10
Version .02
GXE502x User Manual 4/4/2008
The Prepend Prefix setting allows a prefix to be automatically added by the GXE to
the outbound dialed digits.
Inbound Call Answer: Set the destination to route incoming calls on this trunk to.
Session Keep Alive: This field lets you enable the use of the system session timer.
Session Expiration: This field specifies the session expiration interval in seconds
(SIP Server).
Min-SE: Enter the minimum session expiration time in seconds (RTP).
Use DNS SRV: If your SIP Trunk provider has redundant servers, set this field to
“Yes.”
DID Switch: This field lets you enter the P-Asserted-Identity (PAI) code from your
SIP trunk provider. You can enter your code by setting this field to “Yes” and clicking
the add button. This allows the GXE to authenticate with the SIP server. If your
trunk provider requires a PAI code and it is not entered, the calls will be dropped.
You also have to set the inbound call flow by selecting a choice from the “inbound
call answer” drop down menu if you are using this feature.
Unregister on reboot: Unregisters the GXE from the SIP server during reboots.
Register Active: If your SIP Trunk provider requires registration, set this field to
“Yes.”
Set Unregister on Reboot to Yes if the SIP server allows it.
When done, click on the Submit button to add the extension or Cancel to go back.
Modify: Click on the Modify button to the right of the row displaying information for the
SIP trunk you wish to modify. The SIP trunk details page will be displayed, allowing you
to modify all of the SIP trunk’s settings. When done, click on the Submit button to save
your changes or Cancel to go back.
Delete: Click on the Delete button on the far right of the row displaying the information
for the SIP trunk you wish to delete. You will be prompted for confirmation via a dialog
box; click OK to confirm or Cancel to go back.
-
Configuring external PSTN trunk gateways via SIP
In the External PSTN Trunk Line section, external PSTN trunk gateways can be viewed,
created, or modified. All configured external PSTN trunks as well as their details and
current status are displayed. The following actions can be performed in this section.
11
Version .02
GXE502x User Manual 4/4/2008
Add: Click on the Add button. The external PSTN trunk details page will be displayed,
allowing you to enter SIP peer connection information to connect with the external
PSTN trunk gateway.
Enable the trunk: Enter a descriptive name in the Trunk Name field, and set Trunk
Active to Enable.
Set SIP peer information: Enter the SIP gateway IP address or domain name in the
SIP Gateway URL field.
Set Heart Beat to Yes to Enable or disable availability detection of the remote side
(requires compatibility on the remote end)..
Outbound call handling: Set the Max Concurrent Calls Allowed to prevent too many
concurrent attempts to send calls out this trunk.
12
Version .02
GXE502x User Manual 4/4/2008
Set the Dial Prefix digit to specify an outbound call to be dialed through this trunk.
When the call is sent out via this trunk, the dial prefix digit is removed
Inbound Call Answer: Set the destination to route incoming calls on this trunk to.
Session Keep Alive: This field lets you enable the use of the system session timer.
Session Expiration: This field specifies the session expiration interval in seconds
(SIP Server).
Min-SE: Enter the minimum session expiration time in seconds (RTP).
Allow other IPPBX User: trunk with peer systems: If this trunk is to be available for
use by peer systems, set the Allow Other IPPBX Use setting to Yes.
When done, click on the Submit button to add the extension or Cancel to go back.
Modify: Click on the Modify button to the right of the row displaying information for the
external PSTN trunk you wish to modify. The external PSTN trunk details page will be
displayed, allowing you to modify all of the external PSTN trunk’s settings. When done,
click on the Submit button to save your changes or Cancel to go back.
Delete: Click on the Delete button on the far right of the row displaying the information
for the external PSTN trunk you wish to delete. You will be prompted for confirmation
via a dialog box; click OK to confirm or Cancel to go back.
4. Configuring Conference Bridges
-
View conference bridge statuses
The GXE supports up to two conference bridges, each one supporting up to ten
participants on the 5028 and 6 on the 5024. In the Conference Bridge menu, the status,
number of attendees, and the duration of an ongoing conference is displayed.
-
Assign extension numbers and passwords to conference bridges
13
Version .02
GXE502x User Manual 4/4/2008
To assign an extension number to a conference bridge, enter the extension number into the
Extension field of a conference bridge room. If you wish to require users to enter a
password before entering, enter a numeric password into the Password field. When done,
click on the Submit button to save your changes.
5. Configuring Hunt/Ring Groups
Ring groups can be configured on the GXE to allow multiple users to provide a higher level of
availability to incoming callers. Multiple ring methods are supported, and ring groups can have their
own voicemail boxes as well.
-
Viewing ring groups
The Hunt/Ring Group menu displays all configured ring groups and their details and
allows you to create, modify, or delete ring groups.
-
Adding and modifying ring groups
Add: Click on the Add button. The ring group details page will be displayed, allowing
you to configure the ring group settings:
14
Version .02
GXE502x User Manual 4/4/2008
- Extension: Enter an extension number to assign to this ring group. The leading
digit for this extension must correspond with the Leading Digit of Extensions setting
in the General Settings section of the Phone Extensions menu.
- Group Name: Enter a descriptive name to assign to this ring group.
- Ring Mode: Select a ring method for this ring group. Parallel will ring all ring group
members at the same time, while Serial will ring members one at a time, starting
from the first ring group member. A round-robin variation of Serial is available, and
is enabled below. This allows the starting position of each ring group call to be the
next ring group member of the previous ring group call, instead of from the first ring
group member in the list.
- Serial Ring Attempts Per Member: If using Serial ring mode, select the number of
attempts to ring all ring group members before sending the call to voicemail.
- Serial Ring Interval: If using Serial ring mode, select the number of rings for each
ring group member before moving onto the next ring group member.
- Waiting Tone: Choose either ringback tone or hold-music to be played back to the
ring group caller.
- Group Members: List all extensions who are members of this ring group,
separating each with a semicolon.
- Round Robin of Serial Ring Starting Attempt: Enter the digit to specify the number
of ring group members starting from the first in the list to round-robin the starting
position of incoming ring group calls amongst. To disable the round-robin mode,
enter 1. To round-robin amongst all ring group members, enter the total number of
ring group members listed.
- Email For Message Delivery: Enter the email address to deliver voicemail-to-email
messages to for voicemails left for this ring group.
Password to retrieve voicemail: Set a password to retrieve voicemails & faxmail.
When finished, click on the Submit button to save your changes or Cancel to discard.
15
Version .02
GXE502x User Manual 4/4/2008
Modify: Click on the Modify button to the right of the row displaying information for the
ring group you wish to modify. The ring group details page will be displayed, allowing
you to modify all of the ring group’s settings. When done, click on the Submit button to
save your changes or Cancel to go back.
Delete: Click on the Delete button on the far right of the row displaying the information
for the ring group you wish to delete. You will be prompted for confirmation via a dialog
box; click OK to confirm or Cancel to go back.
6. Configuring Auto-Attendants
Incoming calls can be directed to auto-attendants to provide immediate and professional service to
callers and automatically route calls to intended parties. You may schedule different auto-attendants
to play based on the date, time, and day of the week as well. The Auto-Attendant menu displays all
configured auto-attendants menus.
-
Configuring auto-attendant menus
The following actions can be performed in the Voice Menu section.
Add: Click on the Add button. The voice menu details page will be displayed, allowing
you to configure an auto-attendant:
16
Version .02
GXE502x User Manual 4/4/2008
- Voice Menu Name: Enter a name for this auto-attendant.
- Press x to trigger: Check the box next to the row for each keypad digit you would
like to provide as an option for callers to choose. Callers automatically have the
option to enter internal extension numbers from the auto-attendant, so no special
configuration needs to be enabled for that. In the first drop-down box of each row,
select the type of destination you would like this keypad digit to route the caller to.
Select the exact destination of that type in the second drop-down box, if applicable.
- No entry time out: Enter the time to wait for the caller to enter a menu option before
repeating the voice menu or exiting.
-Fax To: This field lets you automatically route all incoming faxes to a specific
location.
-Waiting Tone: This field lets you set the waiting tone to the system music or rinback.
- Play warning and repeat voice menu for up to: Select from the drop-down box the
number of times for this auto-attendant to repeat when the caller does not enter any
menu options, before exiting.
The Voice Prompt File upload field will allow uploading of the voice recording for the
new auto-attendant. Click on the Browse… button to search for files on your computer.
Click on the Upload button to upload this file to the GXE. After the file is successfully
uploaded, click on the Submit button to add this auto-attendant.
Modify: Click on the Modify button to the right of the row displaying information for the
auto-attendant you wish to modify. The voice menu details page will be displayed,
allowing you to re-configure the auto-attendant. When done, click on the Next button;
17
Version .02
GXE502x User Manual 4/4/2008
you may then upload a new voice recording for the auto-attendant if you wish. When
done, click on the Finish button to modify this auto-attendant.
Delete: Click on the Delete button on the far right of the row displaying the information
for the auto-attendant you wish to delete. You will be prompted for confirmation via a
dialog box; click OK to confirm or Cancel to go back.
-
Configuring time-based playing rules for auto-attendants
Playing rules may be created to dictate which auto-attendant is played to the incoming
caller, based on the times you set. The Playing Rules section displays all configured voice
menu playing rules, and allows the following actions to be performed.
Add: Click on the Add button. The playing rules details page will be displayed, allowing
you to configure the time conditions for playing an auto-attendant:
- Play Voice Menu: Using the drop-down box, select the auto-attendant you wish to
configure.
- Date: You may set the auto-attendant selected above to play either on a preset
date or range of dates, or to play on all selected days of the week. To specify by
date, select the radio button beside Date and enter the date or range of dates in the
text field to the right.
- Day of Week: To specify the auto-attendant to play on all selected days of the
week, select the radio button beside Day of Week and check each checkbox beside
each day of the week you would like the auto-attendant to play on.
18
Version .02
GXE502x User Manual 4/4/2008
- Except on date(s): If setting the auto-attendant to play based on selected days of
the week, you may enter exceptions such as holiday dates where you would like
another auto-attendant to be played. Enter exception dates in the blank text field,
and use the drop-down box on the far right to select the auto-attendant to use
instead on the listed exception dates.
- Play Time: Enter in the blank text field the time of day to play the auto-attendant
during days the auto-attendant is set to play.
Modify: Click on the Modify button to the right of the row displaying information for the
playing rules you wish to modify. The playing rules details page will be displayed, allowing
you to modify all of the playing rules. When done, click on the Submit button to save your
changes or Cancel to go back.
Delete: Click on the Delete button on the far right of the row displaying the information for
the playing rule you wish to delete. You will be prompted for confirmation via a dialog box;
click OK to confirm or Cancel to go back.
7. Call Queues
This screen allows you to upload an audio file in .wav (file/sample rate 8K/sample data 16bit/single
channel) that will play while you are in a call queue.
-
Setting up In-Queue Announcements
In-Queue Announcement Name
This field lets you enter a name (20 character limit) for the queue that you are
uploading.
In-Queue Announcement File
This field lets you specify the location of the .wav file that you are uploading. You can
type the path manually or click the browse button to navigate the file through Windows
Explorer.
-
Setting up Agents
Add an Agent
19
Version .02
GXE502x User Manual 4/4/2008
This page lets you add an agent and configure its rules within the queue. You must
specify the name, extension, SIP password, skill level, and email of the agent. Your
typical queue will start with the agent of the highest skill level.
-
Call Queues
Add a Call Queue
This is the main configuration page for any call queues that you add to your system.
Name
Enter the name of your call queue here.
Extension
Enter the extension of the call queue here. See the drop down box for a list of current
extensions.
Priority
Set the priority of the call queue.
Queue status update frequency
This determines how often the in-queue announcement message will play.
Other Announcements
This determines the frequency in which any other announcements you add will be
played to the caller in the queue.
Maximum Caller Wait Time
This field lets you set the maximum amount of time that callers will wait within the queue
before being forwarded to voicemail.
Minimum Caller Wait Time
This field lets you set the minimum amount of time that callers will wait within the queue
before being forwarded to voicemail.
Maximum Queued Callers
This lets you set how many callers can be within the queue simultaneously.
20
Version .02
GXE502x User Manual 4/4/2008
Group Email Address for Voicemail Delivery
Enter the email address in which all voicemail for the queue/group will be delivered.
Agent Call Wrap-Up Time
This setting lets you specify the amount of wrap-up time an agent will have before
receiving another call. For example an agent may need 5 minutes of wrap-up time to
document a call.
Listed Agents For This Queue
All configured agents for the queue will be displayed here.
Automatic Call Distribution
This setting lets you configure enable and disable skill-based routing. If skill-based
routing is enabled, you can configure it to rout by least-skilled first or more skilled first.
Ring Mode to Agents of Same Skill Level
These settings are similar to hunt/ring groups in that you can configure the order/rules in
which agents within the group/queue ring.
Serial
Parallel
Circular
Least Busy
- Agents ring one at a time based on availability.
- All agents ring simultaneously.
-A different agent will ring first each time a caller enters the queue.
-The least busy agent will ring first.
Call Queue Greeting Message
Upload a .wav file (file/sample rate 8K/sample data 16bit/single channel) for the queue
greeting message. You can type the path manually or click the browse button to
navigate the file through Windows Explorer.
21
Version .02
GXE502x User Manual 4/4/2008
8. System Configuration
System configuration and administration may be performed from the System Configuration menu.
The following sections detail the tasks which may be performed in this menu.
-
Configuring network settings
The Networking Setting section allows you to configure the LAN-side IP addressing and
DHCP server settings. For the WAN-side settings, IP addressing of the WAN port can be
set as well as Dynamic DNS and port-forwarding settings. The below actions and their
associated settings appear in order from top to bottom on the GXE web UI as well.
Setting the LAN-port IP address:
Set the LAN-port IP address by entering the IP address you wish to use in the LAN
Base IP setting. Enter the subnet mask in the LAN Subnet Mask setting. Please note
that this should be configured prior to auto-provisioning your phones through the
Express Setup menu, as they will be using an incorrect IP address for the SIP server
after the LAN-port IP address changes.
Configuring DHCP:
To use the GXE as the DHCP server on the LAN-side, set the DHCP Enable setting
to Enable (this is enabled by default). You may specify the starting and ending IP
addresses of the range of IP addresses offered by the DHCP server by setting the
Start of DHCP IP Pool and End of DHCP IP Pool settings. The DHCP IP Lease
22
Version .02
GXE502x User Manual 4/4/2008
Time allows you to specify the number of hours an IP address is leased to a device
before renewal.
Setting the WAN-port IP address:
The WAN-port can be configured to be dynamically assigned via DHCP, to use
PPPoE, or to be statically configured. Select the radio button beside the option you
wish to use. To use PPPoE, you will need to enter the PPPoE account and
password information and DNS server information in the provided fields. If statically
configuring the WAN-port IP address, please enter the IP addressing details in the
provided fields.
Enabling/disabling WAN-side HTTP access:
Security and accessibility for management are considerations for whether or not you
wish to enable or disable HTTP/Telnet access from the WAN-side of the GXE. If
you decide to use the default setting of enabled, set WAN Side Http/Telnet Access
to Yes; otherwise, disable it by setting it to No.
Using Dynamic DNS:
If the WAN-port IP of the GXE is dynamically assigned, you may use Dynamic DNS
to assign it a fixed domain name which is always synchronized with the IP address
of your GXE. Enable Dynamic DNS by setting the DDNS Active setting to Enable
and setting the DDNS ISP type, site name, and account and password information in
the provided fields. If not using Dynamic DNS, set the DDNS Active setting to
Disable.
23
Version .02
GXE502x User Manual 4/4/2008
Configuring port forwarding:
The GXE can be configured to perform port forwarding. In the Port Forwarding
settings, enter the port to forward from the WAN-side, the LAN-side device IP
address to forward to, the LAN-side device port to forward to, and the protocol (TCP,
UDP, or both) to forward in the respective fields.
When done, click on the Submit button to save your changes.
-
Configuring the Router Configuration
If you have routers (other than GXE integrated router) on your subnet that you can enter
the destination IP address, Mask and Gateway.
-
Configuring system settings
The System Setting section contains various important internal system settings and allows
configuration of several features and functions of the GXE. The below actions and their
associated settings appear in order from top to bottom on the GXE web UI as well.
Setting the web UI login password:
To change the password for accessing the GXE web configuration pages, enter a
new password in the Login Password field. Do not lose this password. For further
security, you may disable WAN-side web UI access in the Networking Setting
section.
24
Version .02
GXE502x User Manual 4/4/2008
Storing administrator contact and information:
Optional fields have been provided to store the administrator’s name, phone
numbers, and email address so that the administrator may be contacted for any
issues requiring attention. The system name may also be labeled in the System
Name setting to identify this GXE.
Setting SIP IP and port:
The SIP port for the GXE can be set to either the default of 5060 in the SIP Port
field, or another port number may be used. The Static Mapped WAN IP for SIP and
the Static Mapped WAN Port for SIP may also be changed in their respective fields.
Using STUN for NAT traversal:
If the GXE is behind a NAT router, it may be necessary to use STUN to allow the
GXE to reliably communicate via IP through the router. Enter a STUN server IP
address or domain name in the STUN Server field.
Enabling voicemail-to-email:
To have the GXE email users their received voicemail files, enter the SMTP server
and login name and password information, as well as the email address to send
from. This will allow the GXE to send voicemail emails to users and ring groups with
email addresses configured when they receive voicemail messages. If your email
server requires authentication, make sure you set “Require Authentication” to yes.
Setting the system time:
25
Version .02
GXE502x User Manual 4/4/2008
Select the correct time zone for the location of the GXE in the Time Zone drop-down
box. Conversely, you may enter a Self-Defined Time Zone, using the following
syntax: MTZ+6MDT+5,M4.1.0,M11.1.0
The syntax starts with “MTZ” followed by your time offset from Greenwich Mean
Time (GMT). To set Pacific Standard Time, you would use “MTZ-8”. This is
followed by “MDT” followed by your time offset from GMT during daylight savings
time. A comma then follows to begin definition of the daylight savings start date.
For the GXE to find the accurate time, an NTP server IP address or domain name
will need to be entered in the NTP Server field.
Selecting Music on Hold source:
Specify a Music on Hold (MOH) source by setting the System Music drop-down box
to either System Music Files for internally stored audio files or Audio-In to play audio
from an external audio source connected to the AUDIO IN jack on the back of the
GXE.
Setting mailbox storage quota:
Voicemail, videomail, and faxmail storage can be limited for the different types of
system users. The mailbox storage limits (in percentages of total system memory)
are specified in the drop-down boxes beside each user privilege level.
When done, click on the Submit button to save your changes.
-
Setting feature codes
Feature star codes allow GXE users to set features such as forwarding and Do Not Disturb
on their individual extensions, as well as reach destinations such as the voicemail system.
The Feature Codes section allows customization of the feature codes. The feature codes
may be viewed or modified in the text box beside each feature name.
26
Version .02
GXE502x User Manual 4/4/2008
Directory Assistance: Dial from a phone to have the GXE playback the phone’s extension number.
Prompt Voice Assistance: For listening to and recording voice prompts. Dial the feature code plus *
0 * [prompt number] * to listen to the voice prompt. Dial the feature code plus * 1 * [prompt number] *
to record the voice prompt.
Enable Call Forward Unconditional: Dial the feature code plus [forward-to number] to enable
unconditional call forwarding for the extension you are dialing with.
Cancel Call Forward Unconditional: Cancel unconditional call forward, calls will ring in.
Enable Call Forward Busy: Dial the feature code plus [forward-to number] to turn on busy call
forwarding for the extension you are dialing with.
Cancel Call Forward Busy: Cancel busy call forward; calls will ring when user is on the phone.
Enable Call Forward No-Answer: Dial the feature code plus [forward-to number] to turn on noanswer call forwarding for the extension you are dialing with.
Cancel Call Forward No-Answer: Cancel call forward on no answer, calls will go to voicemail.
Query Forward: Dial the feature code to have the GXE playback the call forwarding status and
forward-to number.
Enable Do-Not-Disturbed: Calls will go straight to voicemail, or return busy if no voicemail.
Cancel Do-Not-Disturbed: Cancel DND, calls will ring in normally.
Park: When in a call, an extension can transfer the other party to this feature code to park the call.
Pickup: Dial the feature code plus * [parking extension] to pickup a call parked by the parking
extension.
Voice Mail: Dial the appropriate feature code to access the voicemail system.
When done, click on the Submit button to save your changes.
27
Version .02
GXE502x User Manual 4/4/2008
-
Uploading voice prompts and configuration templates
Custom voice prompts may be uploaded in the Firmware Upgrade section, as well as
configuration templates for use when auto-provisioning phones. To upload these files,
browse to your firmware/prompt files in the Firmware Upgrade and System Prompt Image
fields and click the Submit button. You can upload zip files containing .wav files or a PV
files that have been generated by the Grandstream Wavtools.exe prompt generator.
-
Upgrading firmware
The Firmware Upgrade section allows you to upload firmware from your computer to the
GXE and upload custom voice prompts.
Prior to the firmware upgrade, please read the release notes to review the changes. In
addition, backup a copy of your GXE configuration, detailed in the next section. The GXE
will not overwrite your existing configuration, but it is good practice to keep a backup copy
in all cases.
Once you have downloaded new firmware from Grandstream, click on the Browse…
button to find the file on your computer. After the file has been selected, click on the
Submit button and wait for the file to finish uploading. When finished, reboot the GXE to
load the new firmware.
28
Version .02
GXE502x User Manual 4/4/2008
-
Backing up and restoring configuration files
Configuration files may be downloaded to or uploaded from your computer in the Backup &
Restore Configuration section. It is good practice to keep a backup copy of your
configuration file at all times.
Configuration backup: Select the Download Configuration radio button, and click on the
Submit button. You will be prompted to download the configuration file onto your
computer.
Configuration restore: Select the Upload Configuration radio button, and click on the
Browse… button to find the configuration file on your computer. After the file has been
selected, click on the Submit button and wait for the file to finish uploading. The GXE
will automatically reboot when finished, and load the configuration file.
-
Configuring Syslog logging
The GXE can be configured to send out several levels of Syslog messages; Info, Warning,
Error, and Debug. With a Syslog server setup to catch these messages, problems are
easier to find and diagnose. The Syslog Configuration section allows a Syslog server IP
address and the Syslog level to be set.
Enter the IP address of the Syslog server in the Syslog Server IP field, and use the Syslog
Level drop-down box to specify the level of logging. When done, click on the Submit
button to save your changes.
29
Version .02
GXE502x User Manual 4/4/2008
9. System Level Backup & Restore
The System Level Backup & Restore page allows users to backup specific portions of the
system configuration such as: voicemail, system tones, announcements & voice menus.
- Browse to your backup file and click the “submit” button to restore the contents of the file
to your system configuration.
- Check the boxes next to the desired configuration components and click “submit” to
backup up system level configuration data. You can even choose to backup voicemail and
greetings for a specific extension by selecting an extension from the drop down menu.
10. Configuring Peer PBX Systems
Remote GXE systems or other PBX systems can be peered with the local GXE. This allows local
users to dial remote system extensions and the GXE will route the calls directly via IP to the remote
system. In a multiple office environment, this provides the ability to provide the users with the
convenience of reaching remote colleagues through simple and familiar extension dialing, and without
incurring the toll costs of routing the call over the PSTN. The Advanced Options menu allows you to
view, add, modify, and delete peer systems.
-
Viewing peer systems
The Peer Systems section displays all configured peer systems and their details.
30
Version .02
GXE502x User Manual 4/4/2008
-
Adding and modifying peer systems
The following actions can be performed in this section.
Add: Click on the Add button. The peer system details page will be displayed, allowing
you to enter connectivity details for this peer system:
- Peer URL: Enter the IP address or domain name of the peer system.
- Max Concurrent Calls Allowed: This field specifies the number of concurrent calls
that can used between the peers.
- Prefix: Configure the prefix digit on outbound calls to recognize this peer system as
the destination. When the call is sent to this peer system, the prefix digit is not
removed as it is when dialing out other trunks. You may specify multiple prefixes for
a peer system by separating them with a semicolon (i.e. 6;7).
- IPPBX Number: Enter a unique number to identify the remote peer system.
- Heart Beat: Enable or disable availability detection of the remote peer system
(requires compatibility on the remote end).
-Session Keep Alive: This field lets you enable the use of the system session timer.
-Session Expiration: specifies the session expiration interval in seconds (SIP
Server).
-Min-SE: Enter the minimum session expiration time in seconds (RTP).
When done, click on the Submit button to add the extension or Cancel to go back.
31
Version .02
GXE502x User Manual 4/4/2008
Modify: Click on the Modify button to the right of the row displaying information for the
peer system you wish to modify. The peer system details page will be displayed,
allowing you to modify all of the peer system’s settings. When done, click on the
Submit button to save your changes or Cancel to go back.
Delete: Click on the Delete button on the far right of the row displaying the information
for the peer system you wish to delete. You will be prompted for confirmation via a
dialog box; click OK to confirm or Cancel to go back.
11. Template Upload
The template upload page lets you upload a configuration template that determines which
features are configured on phones that are auto-provisioned by the GXE (During Express
Setup or by using the Auto provision feature under the “Phone Extensions” section of the
UI). Browse to your template file and click the “upload” button.
Custom templates can be created by using the Grandstream Configuration Template
Generator tool.
12. Resetting (Factory Reset) & Rebooting
The Reset & Reboot section allows rebooting of the GXE or resetting of all settings to
factory default. Please backup the configuration file before resetting to factory default,
should you decide you need to restore the system configuration.
Rebooting: Select the Reboot radio button, and click on the Submit button. The GXE
will reboot itself. You can log back into the GXE web portal when the “ready” LED lights
up.
Reset to default: Select the Reset to Default radio button, and click on the Submit
button. The GXE will reboot itself, and will boot up with all factory default settings. The
web configuration page access password will revert back to the default password:
”admin.”
32
Version .02
GXE502x User Manual 4/4/2008
13. Viewing GXE Status and Reporting Information
-
GXE current status information
In the Status menu, the following categories of GXE status information are displayed.
System Status: System identification and firmware information and system uptime.
Network Status: Shows the network connection information.
Peripheral Status: Physical ports connection status information.
User Activity Status: Current user and registration status and active calls information.
Prefix Info: This field shows all of the prefixes in use by extensions, trunks & peer systems.
Debug Info:
33
Version .02
GXE502x User Manual 4/4/2008
14. Reports
In the Reports menu, useful system statistics and call statistics collected by the GXE are
reported.
Viewing system statistics
Under the System Statistics section, information regarding memory usage, faxes, and
voice and video messages is displayed.
Viewing call statistics
Under the Call Statistics section, information regarding inbound calls and outbound calls
is displayed. These statistics are reset upon reboot of the GXE.
34
Version .02
GXE502x User Manual 4/4/2008
Viewing Call Records
The Call Records section displays detailed information such as the Caller/Callee
extension # and the start and end time for each inbound/outbound call.
35
Version .02
GXE502x User Manual 4/4/2008
15. Configuring Voicemail
The GXE 502X allows users to manage voicemail via IVRs in their phones or through a personal web
portal. This section summarizes how to manage voicemail and other settings using both of these
features.
Configuring Voicemail through the IVR
The default feature code for voicemail access is *12345. After dialing this code, you will enter
a basic IVR menu with the option to listen to/forward messages and configure your voicemail
options. See the following flow chart for reference.
36
Version .02
GXE502x User Manual 4/4/2008
The Personal Web Portal
1. To log into the personal web portal for an extension. Log into the GXEs web GUI using the
extension # as the user name and password. If you have changed your voicemail
password from the default value, use your new password.
Once you have logged in the following page will display
2. To view current voice mails click on the “Voice Message” button on the left hand side of the
interface. Doing this will load the voice mail management page. Here you can save or
delete your messages.
37
Version .02
GXE502x User Manual 4/4/2008
3. To view your personal greeting, click the “Personal Greeting” button on the left hand side of
the GUI. This will load the personal greeting management page for your extension. You
can upload .wav files from a location of your choice and preview them here.
4. Click on the Fax Message button on the left hand menu to load the fax message
management page.
38
Version .02