1
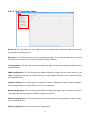
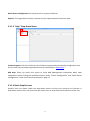
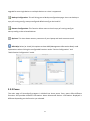
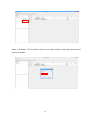
SmartConfig™ 1 CTC Union Technologies Co., Ltd. Far Eastern Vienna Technology Center (Neihu Technology Park) 8F, No. 60, Zhouzi St. Neihu, Taipei, 114 Taiwan Phone: +886-2-2659-1021 FAX: +886-2-2799-1355 User Manual Version 1.0 October 2015 This document is the current official release manual. Contents are subject to change without prior notice. Please check CTC Union's website for any updated manual or contact us by E-mail at [email protected]. Please address any comments for improving this manual or to point out omissions or errors to [email protected]. Thank you. 2015 CTC Union Technologies Co.,Ltd. All Rights Reserved The contents of this document are subject to change without any prior notice. 2 Table of Contents Chapter 1. Introduction ................................................................................................ 4 Chapter 2. Getting Started ........................................................................................... 5 2.1 Preparation ............................................................................................................................... 5 2.2 Launch SmartConfig™ ............................................................................................................ 5 2.3 SmartConfig™ Tool Overview ................................................................................................ 7 2.3.1 Drop-Down Menus & Icons.......................................................................................... 7 2.3.1.1 "File" Drop-down Menu .................................................................................... 7 2.3.1.2 "Tool" Drop-Down Menu .................................................................................. 8 2.3.1.3 "Help" Drop-Down Menu .................................................................................. 9 2.3.1.4 Quick Graphic Icons .......................................................................................... 9 2.3.2 Panes ........................................................................................................................... 11 2.3.2.1 Information and Function Pane ........................................................................ 12 2.3.2.2 Device Overview Pane ..................................................................................... 12 2.3.2.2.1 Device Grouping .................................................................................... 12 2.3.2.2.2 Device Functions ................................................................................... 19 2.3.2.3 Device Configuration Pane .............................................................................. 20 Chapter 3. Operation .................................................................................................. 21 3.1 Discover Devices ................................................................................................................... 21 3.1.1 Proprietary Broadcast Discovery ................................................................................ 21 3.1.1.1 Step-by-Step Explanations ............................................................................... 21 3.1.2 Standard SNMP Discovery ......................................................................................... 24 3.1.2.1 Step-by-Step Explanations ............................................................................... 25 3.2 Upgrade Firmware ................................................................................................................. 28 3.3 IP Configuration ..................................................................................................................... 31 3.4 Broadcast SNMP Configuration ............................................................................................ 35 3.5 Backup Device Configuration................................................................................................ 40 3.6 Restore Device Configuration................................................................................................ 43 3.7 Device Configuration ............................................................................................................. 45 3.8 Multi-Device Configuration................................................................................................... 47 Appendix A. Products Supported by SmartConfig™ ............................................. 52 3 Chapter 1. Introduction SmartConfig™ is a convenient and time-saving configuration tool for mass deployment of CTC Union's managed industrial switch products. This tool is designed for field engineers, to especially aid in mass deployments but can just as easily be used for initial configuration of a small group of switches or even a single device. SmartConfig™ is portable, so it can easily be included on a network tools pen drive and has been tested on and compatible with Windows operating system. The GUI of SmartConfig™ is both simple and intuitive. Different configurations can be saved and recalled for later use, saving valuable time in the field and minimizing downtime when expanding networks or doing field replacements. Features: Written in Java and includes its own runtime environment. Portable; no installation required. Proprietary (no initial IP setting required) Broadcast & Standard SNMP Device discovery. Provides mass configuration of IP addresses, SNMP configuration and device configuration cloning Configuration backup and restore Firmware upgrade, mass broadcasting of firmware upgrade. 4 Chapter 2. Getting Started This section describes the preparations and requirements that you need for running the SmartConfig™ configuration tool. Overview introduction of SmartConfig™ is also provided to help users familiarize with this configuration tool. 2.1 Preparation 1. Prepare a desktop PC or laptop that meets the following system requirements: CPU: 2 GHz or faster Dual core CPU RAM: 1 GB Hard Disk: 1 GB Operating System: Windows 7 or above 2. CTCU Industrial Ethernet switches 3. SmartConfig™ configuration tool: Use SNMP protocol (UDP 161) & HTTP protocol (TCP 80) for establishing connections with devices 2.2 Launch SmartConfig™ SmartConfig™ is a Windows based configuration tool program that requires no software installation. Simply click the SmartConfig folder placed in CD-ROM or save a copy of SmartConfig program to your PC. Find "sconfig" file and double-click the file to run "sconfig" program. Enter the password "0000" to enter the main menu of SmartConfig tool. 1. Double click SmartConfig folder. 2. Double click "sconfig" program. 5 3. Enter the default password "0000" when prompted with the password. 4. Then you will be directed to the main page of "sconfig" program. 6 2.3 SmartConfig™ Tool Overview When you key-in the legitimate password, you will be directed to the main menu of SmartConfig configuration tool. The main menu contains standard drop-down menus, icons and three separated panes. The following sub-sections provide detailed information about this tool. 2.3.1 Drop-Down Menus & Icons The upper part of the main menu is divided into two parts, drop-down menus and graphic icons. These two parts are introduced and described below. 2.3.1.1 "File" Drop-down Menu Import: Import the SmartConfig binary file from your local PC or laptop. Export: Export the devices information into binary format to your local PC or laptop. Login Password: By default, the login password is "0000". You can change the default password to the desired one here. Numbers, letters, and symbols are all supported. 7 2.3.1.2 "Tool" Drop-Down Menu Device List: This will show the main page of the SmartConfig tool and display information about discovered or imported devices. Discovery: This will bring you to Discovery configuration page. To use SmartConfig tool, you should first discover the devices on the same or different subnet network. IP Configuration: This will bring you to IP configuration page and users can change IP address for the selected devices. SNMP Configuration: This will bring you to SNMP configuration page. You can either refresh or get SNMP configurations from the selected devices or apply SNMP information set in SmartConfig to the selected devices. Upgrade Firmware: This will bring you to Upgrade Firmware configuration page. Firmware upgrade for one single device or multiple devices at a time is supported. Backup Configuration: This will bring you to Backup configuration page. Users can back up a copy of running-config, startup-config and default-config to the local PC. Restore Configuration: This function allows users to load a copy of running-config or startup-config to the selected devices. Device Configuration: Set up functions for a single device. 8 Multi-Device Configuration: Set up functions for a group of devices. Options: This page shows memory resources of your laptop and total resources used. 2.3.1.3 "Help" Drop-Down Menu Product Support: Click this will show a list of devices supported by SmartConfig configuration tool. You can also view the latest supported devices by SmartConfig in Appendix A. Mib Help: Select (or check) this option to show MIB (Management Information Base) node explanations when clicking the available functions under "Device Configuration" and "Multi-Device Configuration" mode. See illustrative example in page 11. 2.3.1.4 Quick Graphic Icons Graphic icons are shown under the drop-down menus and they are shortcuts to functions in drop-down menus. Users can also move the mouse over to view the brief introduction of the icon. 9 Move the mouse over the icon to view the brief function description Import: Import the SmartConfig binary file from your local PC or laptop. Export: Export the devices information into binary format to your local PC or laptop. Device List: This will show the main page of the SmartConfig tool and display information about discovered or imported devices. Device Configuration: Set up functions for a single device. Multi-Device Configuration: Set up functions for a group of devices. Discovery: This will bring you to Discovery configuration page. To use SmartConfig tool, you should first discover the devices on the same or different subnet network. IP Configuration: This will bring you to IP configuration page and users can change IP address for the selected devices. SNMP Configuration: This will bring you to SNMP configuration page. You can either refresh or get SNMP configurations from the selected devices or apply SNMP information set in SmartConfig to the selected devices. Upgrade Firmware: This will bring you to Upgrade Firmware configuration page. Firmware 10 upgrade for one single device or multiple devices at a time is supported. Backup Configuration: This will bring you to Backup configuration page. Users can backup a copy of running-config, startup-config and default-config to the local PC. Restore Configuration: This function allows users to load a copy of running-config or startup-config to the selected devices. Options: This icon shows memory resources of your laptop and total resources used. Mib Help: Select (or check) this option to show MIB (Management Information Base) node explanations when clicking the configurable functions under "Device Configuration" and "Multi-Device Configuration" mode. 2.3.2 Panes The main page of SmartConfig program is divided into three panes. Every pane offers different functions and provides different information about discovered devices. Information displayed is different depending on the function you selected. 11 2.3.2.2 Device Overview Pane 2.3.2.1 Information and Function Pane 2.3.2.3 Device Configuration Pane 2.3.2.1 Information and Function Pane This pane shows information of found devices that you discover, including IP address, MAC address, model name, FW version, self-defined name and location information or displays function configuration page of the discovered device when you select "Device Configuration" or "Multi-Device Configuration". 2.3.2.2 Device Overview Pane This pane shows the overview of devices discovered. Grouping options are available by right-clicking the mouse button. On each discovered item, users can also right-click the mouse button to view more functions. 2.3.2.2.1 Device Grouping SmartConfig allows users to categorize discovered based on model names or self-defined groups. Right-clicking the mouse button anywhere on this pane to show grouping options. Follow steps below to add a group, add an item into the new group, rename a group and delete a group. Step 1. Right click the mouse on this pane to pop-up "Device List" option. Then click the "Device List" option. 12 Step 2-1. By default, "All" list mode is used. You can select "Model" mode to group discovered devices by models. 13 Click "+" sign to expand discovered devices in this group. Step 2-2. By default, "All" list mode is used. You can select "Group" mode to add discovered devices into self-defined groups. 14 Right click the mouse and then select "Add Group" 15 Enter the Group name and click OK. Once the new group has been added, select one of the discovered devices and right click the mouse to view more options. Click "Change Group" button to change this device to the new group. 16 Select the group from the drop-down menu that this selected device belongs to. Move two devices to "Cabinet 2A" group. 17 Select the group and right click the mouse to view "Edit Group" and "Delete Group" option. NOTE: The default "Device" group cannot be deleted. 18 2.3.2.2.2 Device Functions Right-click the mouse button on each discovered device to show the following functions: Delete Device: Delete the selected device from the list. Device Password: While connecting with the device using proprietary Broadcast protocol, this password will be used for authentication. This password must be exactly the same as the user account "admin" password. SNMP Community: While connecting with the device using SNMP protocol, this community string will be used for authentication. This SNMP community string must be exactly the same as the SNMP community string provided in the device. Web: Open a Web browser for web management connection. Telnet: Open a telnet connection for Command Line Interface. Ping: Start a ping test for the selected device. Traceroute: Start a traceroute test for the selected device. 19 2.3.2.3 Device Configuration Pane This pane can display basic information about the selected device including the model name, IP address, VLAN ID, MAC address, SNMP information and so on. See the image provided below. The other function of this pane is to display a list of configurable functions available in SmartConfig when "Device Configuration" or "Multi-Device Configuration" is selected. Select the function displayed on this pane and then the configurable functions will be displayed in "Information and Function Pane". See the image below for example. For more information about "Device Configuration" or "Multi-Device Configuration", read section 3.7 and 3.8 for more details. 20 Chapter 3. Operation When you successfully login into the SmartConfig program, you will need to discover devices and then add them to the Device list. Once they are added to the list, you can modify IP settings of discovered devices, upgrade firmware (one device or multiple devices) and so on. 3.1 Discover Devices There are two ways to discover devices. One discovery method is via proprietary broadcast method. The other is via standard SNMP method. Two methods are used in different situations. Users can use the following guidelines to decide which method is adopted for discovering devices on the network. Discovery Selection Guidelines: Proprietary Broadcast Method 1. Support devices with firmware version above 1.100 2. Discover devices on the same subnet Standard SNMP Method 1. Support devices with firmware version below 1.100 2. Discover devices on the different subnet (networks are separated by a router) 3.1.1 Proprietary Broadcast Discovery Proprietary Broadcast discovery method can be used to discover devices with same or different IP addresses under the following two circumstances. If your devices cannot meet the following listed requirements, please try Standard SNMP discovery method to discover devices. Proprietary Broadcast Discovery method supports: Devices with firmware version above 1.100 Devices on the same subnet 3.1.1.1 Step-by-Step Explanations Step 1. Click the Discovery icon. 21 Step 2. Select "Broadcast" option. Then, click "Search" button. 22 Step 3. When searching process is completed, the discovered devices will be shown. Step 4. Select the discovered devices that you want to add to the list. Use "Shift" key + left click the mouse button to select items. Then click "Add to Devices" button. 23 Step 5. All selected devices are added to the list. Now, you can start to assign new IP address to each device or update new firmware image. 3.1.2 Standard SNMP Discovery Standard SNMP discovery method can be used to discover devices with different IP addresses under the following two circumstances. If your devices cannot meet the following listed requirements, please try Proprietary Broadcast discovery method to discover devices. Standard SNMP Discovery method supports: 1. Devices with firmware version below 1.100 2. Devices on the different subnet (networks are separated by a router) 24 3.1.2.1 Step-by-Step Explanations Step 1. Click the Discovery icon. Step 2. Select "SNMP" as your discovery method. Then make sure the Version and Community option are same as settings configured in your devices. 25 Step 3. Click IP Range "Add" button to set up IP address range. Devices that match to SNMP settings and belong to this IP address range will be discovered. Click "Search" button to start the discovery process. NOTE: To complete a successful discovery process, devices should not have the same IP address. Step 4. When searching process is completed, the discovered devices will be shown. 26 Step 5. Add the discovered devices to the Device List. Use "Shift" key + left click the mouse button to select items. Then click "Add to Devices" button. Step 6. All selected devices are added to the list. Now, you can start to assign new IP address to each device. 27 3.2 Upgrade Firmware For devices with firmware version below 1.100, it is recommended that newer firmware is upgraded first. Once firmware image is upgraded to 1.100 or above, you can change IP address or configure functions via SmartConfig. SmartConfig allows users to select one or more discovered devices for firmware upgrade process at a time. Before starting the firmware image upgrade process, you should have a list of discovered devices in your SmartConfig main page. Then follow the steps below to complete a successful firmware upgrade. Step 1. Make sure that you have a list of discovered devices. You can either use "Discovery" or "Import" to obtain a list of legitimate devices for SmartConfig configuration tool. 28 Step 2. Select a device or devices (Use "Shift" key + Left click the mouse button to select devices.) for firmware upgrade process. Then, click "Upgrade Device Firmware" icon. Step 3. Select the new firmware image for upgrade process. Then, click "Start" button to start the firmware upgrade process. Use "Up" or "Down" button to re-arrange the order of the list. Use "Add" and "Delete" button to include or exclude devices. Use "Import" button to load a list of devices for firmware upgrade. Use "Export" button to backup this list to your local PC. 29 Step 4. When firmware upgrade process is completed, devices will restart and the Status column will display "Success". If "Fail" is displayed, check the following: Make sure that devices that you select are with the same model name. Make sure that you select the right firmware image. 30 Step 5. Go back to "Device List" page. Firmware for IGS-803SM has been upgraded from 1.007 to 1.103. 3.3 IP Configuration IP Configuration function provides an efficient and quick way to assign new and individual IP address to devices on the network by Static or DHCP-based method. Please note that if your devices' firmware version is below 1.100, you cannot perform IP Configuration function. It is recommended to upgrade firmware to version 1.100 before performing this function. See section 3.2 for Firmware Upgrade. 31 Step 1. Select a device or devices that you want to assign new IP. (Use "Shift" key + Left click the mouse button to select multiple devices.) Then click "Broadcast IP Configuration" button. Step 2. Select IP address assignment method, "Static" or "DHCP" type. If you choose "Static" type, you need to further assign the starting IP address, the increment number, and subnet mask. 32 Step 3. Use "Up" and "Down" button to re-arrange IP address assignment order. Step 4. Click "Create" button to view new IP address assignment. (At this stage, you can also use "Up" and "Down" button to re-order the list.) 33 Step 5. Click "Apply" to start IP assignment process. When the process is successfully completed, the "Status" column will show "Success". Step 6. Click "Save" button to save IP assignment configuration. 34 Step 7. Go back to Device List page. 3.4 Broadcast SNMP Configuration This function is used to refresh or get SNMP configurations from the selected devices or apply SNMP information set in SmartConfig to the selected devices. Follow steps below to make changes of SNMP configurations. Step 1. Select the devices that apply to this change. (Use "Shift" key + Left click the mouse button to select devices) Here, the first two devices are selected as an example. 35 Step 2. Click "Broadcast SNMP Configuration" button to enter the configuration page. Step 3. When you successfully enter SNMP configuration page, you can enable/disable SNMP function, change version or change Read/Write Community string. Step 4-1. Click "Refresh" button to get the latest SNMP configurations from the devices. If the SNMP information of your devices has been changed, use "Refresh" button to get the latest SNMP configurations from the devices. For example, the SNMP version, the read and write community string have been changed to "v2c", 36 "publicabc" and "privateabc" respectively. Use "Refresh" button to update SNMP configurations in SmartConfig. Click "Save" button" to save changes. Check this change in main page. 37 Step 4-2. Change SNMP configurations in SmartConfig and click "Apply" button to apply changes to the selected devices. For example, the read and write community string have been changed to "publicdef" and "privatedef" respectively. Use "Apply" button to apply these changes to the selected devices. 38 39 3.5 Backup Device Configuration This function is able to save a copy of device configurations of one or multiple discovered devices to your local PC. Follow steps below to backup selected devices' configurations. Step 1. Select the devices for backup purposes. (Use "Shift" key + Left click the mouse button to select devices.) Here, the first two devices are selected as an example. 40 Step 2. Click "Backup Device Configuration" button to enter the configuration page. Step 3. When you successfully enter Backup configuration page, select the backup path to store your configuration file and select the configuration file type that you want to backup. 41 Step 4. You can also add or delete a device from the list using "Add" and "Delete" button. In this example, we add the third device into the list. Step 5. Click "Start" button to begin the backup process. Once the backup process has been completed, the "Status" column shows "Success". 42 3.6 Restore Device Configuration This function is able to load a copy of saved device configuration from your local PC back to one or multiple discovered devices. Follow steps below to restore a configuration file to a device or selected devices. Step 1. Select the devices for restore purposes. (Use "Shift" key + Left click the mouse button to select devices) Here, the first two devices are selected as an example. Step 2. Click "Restore Device Configuration" button to enter the configuration page. 43 Step 3. When you successfully enter Restore configuration page, select the file that you want to restore from your local PC. Then select the configuration file type that you want to replace or merge. Tick the checkbox if you want to replace the IP address. You can also add or delete a device from the list using "Add" and "Delete" button. Step 5. Click "Start" button to begin the restore process. Once the restore process has been completed, the "Status" column shows "Success". 44 3.7 Device Configuration Device Configuration allows users to configure the selected device's management functions. Before you start to configure management functions, make sure that your SmartConfig and selected devices have the same SNMP configurations. Otherwise, the connection will not be established successfully. See below for step-by-step setup: Step 1. Make sure that SNMP configurations are the same as the ones in SmartConfig. See section 3.3 for updating SNMP configurations via SmartConfig. Step 2. Discover devices and add them to the list. See section 3.1 for discovering devices. In this example, three devices are discovered. 45 Step 3. Select the device that you want to configure. In this example, the third device has been selected. Step 4. Click "Device Configuration" button to enter the configuration page. 46 Step 5. Select the function that you want to configure in "Device Configure Pane". Once the function is selected, the corresponding configurable fields will display on the right pane. NOTE: Device Configuration function in SmartConfig only supports basic management functions for setup. For complete functions, you should access the device via Web, Console or Telnet. For detailed descriptions, see "Management User Manual". 3.8 Multi-Device Configuration Multi-Device Configuration allows users to configure the selected devices' management functions. Before you start to configure management functions, make sure that SmartConfig and selected devices have the same SNMP configurations. Otherwise, the connection will not be established successfully. See below for step-by-step setup: Step 1. Make sure that SNMP configurations are the same as the ones in SmartConfig. See section 3.4 for updating SNMP configurations via SmartConfig. Step 2. Discover devices and add them to the list. See section 3.1 for discovering devices. In this example, three devices are discovered. 47 Step 3. Select the devices that you want to configure. In this example, two devices with the same model have been selected. Then, click "Multi-Device Configuration" button. 48 Step 4. Select the "Source Device" from the drop-down menu and the function that you want to configure in "Device Configure Pane". Once the function is selected, the corresponding configurable fields will display on the right pane. Step 5. Enter your setting and then click "Apply" button. Step 6. Select the devices that apply to this setting. If you want to apply this setting to your source device, check the "Include Source Device" checkbox. Then, click "Start" button. 49 Step 7. The "Status" column displays "Success" when the process is successfully completed. Step 8. Go back to the previous page and check the current setting. In this example, the new setting has been applied. 50 NOTE: Multi-Device Configuration function in SmartConfig only supports basic management functions for setup. For complete functions, you should access the device via Web, Console or Telnet. For detailed descriptions, see "Management User Manual". 51 Appendix A. Products Supported by SmartConfig™ SERIES IFS/IGS-402 IFS/IGS-404 IFS/IGS-803 IFS/IGS-812 IFS/IGS-1604 IPS-803 ICS-G24S4X ICS-G24S2X ITP-800 ITP-802 PRODUCT FIRMWARE IFS-402GSM IFS-402GSM-4PH24 IGS-402SM IGS-402SM-4PH24 IFS-404GSM IFS-404GSM-4PH24 IGS-404SM IGS-404SM-4PH24 IFS-803GSM IFS-803GSM-8PH24 IGS-803SM IGS-803SM-8PH24 IFS-812GSM IGS-812SM IFS-1604GSM IGS-1604SM IPS-803GSM-LL IPS-803GSM-HL IPS-G803SM-LL IPS-G803SM-HL ICS-G24S4X ICS-G24S2X ITP-G800M-8PH24 ITP-800M-8PH24 ITP-G800M ITP-800M ITP-G802SM-8PH24 ITP-802GSM-8PH24 ITP-802GTM-8PH24 ITP-G802SM ITP-802GSM ITP-802GTM V1.103 V1.103 V1.103 V1.103 V1.103 V1.040 V1.040 V1.103 V1.103 NOTE: This list is subject to change without any prior notice. Please check SmartConfig™ catalog regularly for the latest product support list. 52 This page is intentionally left blank. 53 54