1
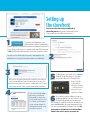
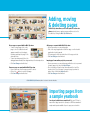
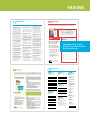
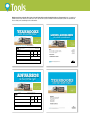
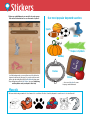
guidebook Yearbook Yearbook 4 14 GETTING STARTED YOUR YEARBOOK TOOLBOX STICKERS, LAYOUTS & COVERS NOW WHAT? 30 OH MY ! 24 Start here SO, YOU’RE IN CHARGE OF THE YEARBOOK. Whether you’re a newbie or a seasoned yearbook adviser, PYB is here for you every step of the way. Keep this guide within arm’s reach and your Yearbook Support Specialist (YSS) on speed dial! 1 BUILD YOUR TEAM Trust us, you don’t want to do this alone. Here are a some suggestions for putting together a winning team: • Take a minute to talk to your principal about his or her expectations. This will open the door to ask for future favors. • Ask parents to contribute photos, proofread text and prepare goodies for any after-school staff work time. • Seek out students with a variety of strengths: tech savvy, photography or writing skills and good ol’ elbow grease. 2 SAY HELLO Your Yearbook Support Specialist (YSS) will be checking on you throughout the year. Our YSS team has a combined experience of 67 years (seriously, we counted!) And is available by phone to answer all of your questions, provide technical support and offer ideas and suggestions on a range of topics. From staff motivation to yearbook design, your YSS is here to help. 3 REQUEST A MASTER LIST AND EVENT CALENDAR Ask your school’s office to provide you with a copy of the master list of students, faculty and staff, as well as an activity calendar. 4 COMPLETE A ROUGH LADDER DIAGRAM A ladder diagram is a page-by-page topical outline of what goes where in the yearbook. It is used by the adviser and staff to stay organized and is a great place to note who has been assigned to complete each page. The ladder will help you determine how many The master list will help you spell names correctly. pages you’ll use and Send a copy of the list to each teacher with a note will come in handy asking to make any edits (Does John go by Jack? once you start the Is Alexandria really Alexa?). Section Manager in our web app. The calendar will alert you to activities that may need to be photographed. Having this list will Remember, because we print yearbook pages allow you to make photo assignments ahead of in increments of two, your book must end on an time instead of rushing around the day of. (We even number. A PDF is available for download at know, we’ve been there.) picabooyearbooks.com/downloads. Finesse Your Finances 5 Your decision to use Picaboo Yearbooks will provide you many benefits, but the greatest may be to your budget. Our no minimum order policy allows you to have a low per book price without committing to more copies than you can sell. Once you’ve completed your ladder diagram, you can safely estimate the number of pages you’ll need. Use our online pricing calculator to determine the cost per book. To determine your yearbook sale price, consider the following: • Will you use our online storefront to sell your yearbooks? In school? Both? • Remember, bulk orders of 50 or more receive free shipping. If you are unsure if you will sell 50, add an additional $1-$2 per book to cover possible shipping costs. DOWNLOAD OUR MONEY MATTERS HANDOUT AT PICABOOYEARBOOKS.COM/ DOWNLOADSS • You can round up the price per book and receive a profit check at the conclusion of the school year. • If you are in a state or province that charges sales tax, take that into consideration when pricing your books both online and off. 6 CREATE SECTIONS Using our Section Manager, create sections for your book. Sections can consist of a single page or multiple pages. Typical sections in a yearbook are: Opening, Student Life, Sports, Portraits, Clubs and more. Keep in mind that you will upload photos by section, so plan accordingly. Create sections by clicking the blue NEW SECTION button at the top right of the app. You can rearrange pages and sections in the Bird’s Eye View. View our Section Manager video as well as other helpful tutorials at picabooyearbooks.com/tutorials. 7 UPLOAD PHOTOS There are two easy ways to upload photos to your project. After you’ve created sections in the Section Manager, click the section ribbon to enter into Edit Mode. Click on the blue Add Photos button at the bottom left of the page. Select photos you’d like to import from your computer (including any external devices attached to it), Facebook, Flickr or by linking to existing web content. Another way to access, move, rename and share photos with contributors is by clicking the Images tab at the top of your page. You can also use this area to request photos from anyone by email. Once a photo has been placed onto a page, you can edit, lighten, shrink, enlarge, rotate or add border artwork to it. 10 8 9 PROOFREAD You’ve probably looked at the yearbook hundreds (maybe thousands!) of times, but there are bound to be errors that you just won’t catch. Here are a few tips to prevent “Uh oh!” moments on distribution day: Give your eyes a rest. Set the yearbook aside for a few hours after you’ve finished and then proofread it with fresh eyes. Ask for help. Invite someone else to proofread everything. A new set of eyes may immediately spot errors that you’ve overlooked. Let your YSS know when your cover is finished so her or she can doublecheck resolution and safety zones for you. DESIGN YOUR COVER AND PAGES Create your layout designs from scratch or use one of our many customizable templates—or both! From sophisticated to fun, we have a variety of designs to complement your yearbook. Check out our gallery of pre-designed yearbook cover artwork options on page 24. Use backgrounds, stickers and photo corners to add flourish to your pages. Visit the Knowledge Base, view our online Tutorials or ask your YSS about your specific design questions. Learn more about page specs on page 10. PLACE YOUR ORDER If you haven’t already locked your sections, you will be required to do so before continuing the ordering process. Once you are ready to place your order, click on the shopping cart at the top right of your screen. Enter the quantities of hardcover, softcover and eYearbooks you’d like to purchase. Choose your shipping option. If you have offered online storefront ordering or student personalization, please see page 7 for more detailed ordering information. If you need to be invoiced, see page 11. Look for one type of problem at a time. Scan the page a first time for misspelled names, second for punctuation, third for grammatical errors, etc. Breaking up your editing into categories will help prevent your brain from slipping into auto-pilot. Review a hard copy. Proofreading your work on paper is much easier than doing so on the computer screen. Use spellcheck. The spellchecker can be a tremendous help, but remember that it’s not 100% goof proof. Watch for the low resolution symbol. Photos marked with this symbol will print poorly and should be made smaller (until the symbol disappears) or be replaced by a higher quality photo. Let it go. We know you’ve put your blood, sweat and tears into this year’s yearbook, but remember to allow three weeks for production and shipping and another week to organize for distribution. Û Okay, are you ready? Time to place your order! Tutorials http://picabooyearbooks.com/tutorials Find yourself stuck on how to do something? Check out our extensive library of quick and concise how-to videos at picabooyearbooks.com/tutorials. You can also find quick answers to your questions on our fully searchable Knowledge Base at picabooyearbooks.com/KB The Knowledge Base contains many helpful articles on topics such as: • Minimum computer requirements • Connection troubleshooting • Managing team members • Importing and moving pages • Uploading photos • Image editing • Managing portrait section data • An outline of our shipping options • Using QR Codes • Invoices and Purchase Orders • PYB’s Privacy Policy and Terms • And much, much more! The Knowledge Base is also available to parents and students who need help personalizing their order. Direct them to picabooyearbooks.com/KB for answers to many of their frequently asked questions or have them call dedicated Parent/Customer Support toll free at (855) 537-0050. Setting up the storefront The Storefront is where students and parents will be able to purchase their yearbooks. After you have completed the storefront set-up, you will have a custom URL to direct customers to. 1 To get started, click the Home button of the yearbook application, and then click Create Store in the upper right corner of the bookshelf. A pop-up screen will appear. Enter the name for the store, the zip code for your school or organization and a unique URL to refer buyers to. Note: Each URL must be different from any others that have already been created. You can then choose which book/books you wish to make available in that particular Store. Once your selections have been made, click on Create Store. 3 Next, you’ll see exactly what customers will see when they access your your school’s customized Picaboo Yearbook storefront website: the name of the storefront, the name of the book(s), a place to contribute photos and a "coming soon" message (as the book has not yet been made available for purchase). 4 You’ll see from the Book Settings page where you can make the book available for ordering, turn the Personalization option on or off, choose matte or gloss lamination for your cover and customize the ordering fields that will be seen by your yearbook customers. 2 5 6 To adjust the price of your yearbook, click on Open this Yearbook. The app will prompt you to log in again and you will be directed to the Pricing Calculator. Specify if you’d like to offer hardcover, softcover, an eYearbook — or all three. Once the pricing is set to your satisfaction, click Done. Once you have set your price (taking into account any possible page additions), you can set your store to accept Pre-Orders and begin promoting your yearbook sale. Once your pages are complete and locked, you can change the store status to Immediate Order to allow students and parents to order their copies on-demand and have it shipped to their homes. Visit picabooyearbooks.com/downloads to access the Money Matters handout for ideas on how to promote your yearbook sale. Tutorials PSPA disc portrait flow You can import student and staff portraits by using the PSPA disc provided by your school photographer. Our web app extracts the data from the disc and presents it in an easy to use interface. 4 Be sure you have downloaded the most recent version of Adobe Flash. Mac users should not use Chrome for this step as it does not support Java. Û 1 Click on the Images tab at the top left of the web app and then click on the Portraits option. Depending on your computer’s security settings, you may be asked to allow Java to access the portrait directory. If so, click OK. If you encounter any problems with this step, contact your YSS. 5 2 3 Select the source of your PSPA disc. Once you reach the folder that contains the file index.txt, click OK. Use the Export button inside the Images tab to create a PDF proof of the PSPA data. Use it to carefully check the imported data for the following: The portraits and data will appear on the screen. It may take a few minutes for the portrait photos to upload. Once the portraits have been imported successfully, you will see a confirmation message. Click OK to continue. • Duplicate or missing portraits. • Each portrait has a first name and a last name and the proper grade. • Names and portraits match. • Make sure each grade is accounted for and there are no miscellaneous categories. • Check names that begin with Mc (such as McDonald) and hyphenated names to make sure they are capitalized correctly. • All data will be as it was entered by your school portrait photographer. To edit, double-click on the desired entry. A pop-up window will appear and you may edit within that window. Note: changing any information in the drop-down menus will alter the imported data. Proceed with caution. You can add missing portraits on an individual basis. Click on the Add a New Portrait button to manually create a student portrait record. A pop-up window will appear. Click the Browse button to navigate to the location of the student portrait and enter the information. Click OK to create the record. Note: If you upload a non-portrait photo, it may be sized differently in the final layout. Crop it to the same general shape (portrait) to ensure the best results. 6 CREATING YOUR PORTRAIT SECTION Back in the main interface, click on the New Section button. A window will appear, where you can select either Freeform or Portrait. Select Portrait and click on Next to continue. When prompted, name the new Portrait Section. The next window will prompt you to enter the number of students and choose the number of portraits you want on each page. As you change the number of portraits per page, the page requirement number adjusts accordingly. Click on Finish to create the new portrait section. [ [ If you have more portraits than will fit in your designated portrait section, you will see a warning in the Sections workspace (see left). To add additional pages within a portrait section, follow the instructions for adding pages in the Bird’s Eye View on page 11. Adding photos & headlines to your portrait pages Add flare to your portrait pages with these tips & tricks. Once you have imported your photos from your PSPA disc, it's time to decide what else you want to include on your page. Choose from more than 100 pre-designed options in the Layouts tab. You may need to change layouts to accommodate the additional elements. Click on the text boxes to change the font, color or text justification of your portrait names. MOVING PORTRAITS To make room at the top of the page for a headline or a photo, you'll need to remove some of the portrait boxes. Click on the green arrow to delete the box and advance the portrait to the next available photo box. Once the row is removed, you may add a headline, candid photos, stickers, banners or more. ADDING GRAPHICS & PHOTOS Add images from other sections by choosing the section from the dropdown menu in the bottom left corner. Then drag and drop images onto the page. You may also upload photos and clipart into the Images > My Artwork > Stickers tab and clicking the blue Add Stickers button. ADDING A BLOCK OF COLOR To add blocks of color or a banner to your heading, go to the Backgrounds tab and add the desired design by clicking the i icon (see above) and then selecting the Add to Media Tray button. Once an image or background is in your media tray, you may drag and drop it onto your layout. ADDING A LARGER TEACHER PHOTO Similar to making room for a headline, remove enough portrait boxes to create room to accomodate a larger photo box. First make sure that it is not saved with the class portraits. Add it to another media tray (or keep in with faculty & staff). Select the appropriate media tray then drag and drop the teacher portrait onto the page, in the empty area. Tutorials Cover & page specifications In order to receive the highest quality yearbook possible, take a moment to review these FAQs regarding safety zones, recommended resolution and file formats. Can I create my yearbook pages in Photoshop or InDesign? Yes! You can create your pages in any program that will allow you to export your pages to high resolution images. What kind of photo file formats can I upload to the PYB app? There are two file types you can import into Picaboo: .JPG and .PNG files. JPG files are one of the most universal image file types saved. PNG files can be saved with a transparent background. This makes PNG files ideal when uploading Stickers to your project. Templates for Adobe InDesign and Photoshop are available for download at picabooyearbooks.com/downloads. Be sure to download the correct template size for both the pages and the cover. Is there a limit to the amount of photos I can upload? There is a size limit of 1.5 GB that you can import for each session you are logged into your project. This is a necessary step to accommodate a variety of computer and network systems. Once the images are uploaded (which may take a while depending on the size of each photo), completely exit the project by clicking the Home button in the upper left corner of the app. Re-open your project to start a new session. Once it opens again, you can import another 1.5 GB worth of photos and repeat as necessary. Pro Tip: Don’t upload every photo just because you can. Sort through them first and save time by only uploading the best ones. Export pages as PNG files at 300 dpi (see graphic to the left for exact settings). Import the exported images into the appropriate section of your project. Once they are imported, simply place them as the backgrounds of their respective pages within the application. If they were created with the correct pixel sizes listed above, they should fit perfectly. Wrap Zones, Crop Zones, Bleed Lines and Margins: What’s the difference? What is the yellow line? This area is called the Crop Zone. Similar to the Bleed Line, it shows what will likely be trimmed during the manufacturing process. Words and objects should stay clear of this area. What is the purple line? The purple line signifies the external page margin. To maintain a clean look and ensure all items placed on the page are well within the “live” area, we recommend staying inside this line. What is the red line? The red Bleed Line represents the outside of the page area that will be trimmed off during the manufacturing process. Words and objects must stay clear of this area unless they are intended to be trimmed as part of a specific design element. What is the dotted line inside my hardcover layout? The gray outline on the hard cover layout is the wrap zone. This represents the area that will be wrapped around the inside cover of the yearbook. Very little of this area will be visible (once the endsheet has been applied), so we highly recommend keeping text and important elements inside this area. Adding, moving & deleting pages The Bird’s Eye view allows you to see all yearbook sections at a glance and add, remove and move pages within a section. It is accessible by clicking the Bird’s Eye View button. Move a page or a spread while in Bird’s Eye view: • To move a single page, click on the page to select it (a blue border will appear around the selected page), then drag-and-drop the page to the desired position. • To move an entire spread, click on the dark gray bar underneath, then drag-and-drop to the desired position. • Click Save Changes when finished. Remove a page or a spread while in Bird’s Eye view: • Hover your mouse over the page you wish to delete. • Click on the - button to remove that page. • Click Save Changes when finished. Add a page or a spread while in Bird’s Eye view: • Hover your mouse over an existing page. • Click on the single page button to add one page or on the doublepage button to add a spread. • The new page(s) will be inserted in front of the page selected. • Click Save Changes when finished. Import pages from another project in your account: • Hover your mouse over an existing page within the section you want to import pages into, then click Import Pages. • Choose that project from the drop-down menu at the top of the layout selector. Select the page (or range of pages) you want to import, then click the blue Import button. • Click Save Changes when finished. Click Exit Bird’s Eye View at any time to return to the main interface. Importing pages from a sample yearbook See a layout you like from a sample book? Ask your YSS how to import those page layouts into your project. PYB has a number of ready made layouts available for you to pop your content into. Tutorials Creating & editing personalized pages PYB offers four free personalized pages for every student. If you choose to take advantage of this offer, a printable and emailable tutorial handout is available at picabooyearbooks.com/downloads. 2 1 Go to your school’s customized Picaboo Yearbook website. Click on the red ORDER button and follow the on-screen instructions. If you haven’t ordered a yearbook from Picaboo Yearbooks before, you will be prompted to set up an account with your email address and a password. If you have previously ordered from PYB, log in with your existing credentials. personalize THE FLIP SIDE 3 Your personalization includes a customized back cover. If you choose to skip this option, a plain white cover will be used instead. 5 [ [ You may return to the school’s custom yearbook order website to personalize your free pages until the school’s designated deadline. You may also access the link from your confirmation email. Click the red EDIT FLIP COVER & PAGES button to proceed to the Personalization Editor. 6 Enter the name and grade of each yearbook recipient. When you are finished adding recipients, click the red CONTINUE button. 4 Select the product and quantity you would like to order for each yearbook recipient. Click the teal CHECKOUT button and complete the ordering process. Once your order is complete, you will receive a confirmation email which we highly recommend you save. You can start personalizing now by clicking Click Here or you can come back later. At this point, you can upload photos, change backgrounds, layouts, and borders, and add text and stickers. Access a quick video tutorial at picabooyearbooks.com/tutorials to learn more. Personalization Editor To save your work so you can close the program and come back anytime to personalize your pages, click SAVE & EXIT in the top left corner. Once you have finished your personalized pages and are ready to submit them, click the blue FINALIZE YOUR BOOK button at the top right of the page. Finalizing your yearbook So, you’ve finished your yearbook. Congratulations! You’re almost ready to take a deep sigh of relief. Just make sure you take care of these final few housekeeping details. 1 2 Once you have completed and proofed your pages, you can set your pages to Ready for Review or Lock. After your editing team has had a chance to review everything, all sections should be locked. When you are ready to place your initial order, click on the blue order button on the top right of the window. 3 A pop-up will ask you to preview the yearbook and verify the spelling, crop zones, photo resolution, dark photos, and photo placement. Once you are satisfied, click on the Continue to Order button. Click Cancel to go back and make additional changes to the yearbook. 4 After your project has uploaded to our servers, the Select Products & Options screen will appear along with the specs you chose at the beginning, including the cover, lamination and other options selected in the Details tab. Click Add to Cart to continue. If this is the first order, you will be prompted to enter a shipping address. Next, you’ll select the shipping method by using the drop-down menu. If you have paid in advance via invoice, you will need to enter the provided code. Click on Go to Checkout to continue. 5 The final step in the order sequence is the Billing & Summary page. Select the payment method and verify that the shipping address and products are correct. If all information is correct, click on the Place Order Now button to finalize the order and obtain an order number. If you are not directed to a confirmation screen, your order has not been placed. 6 If you sold yearbooks via your online Storefront, you will likely have pre-orders waiting to be released and processed. 367 Log into your Storefront, click Manage and you will be taken to the screen with all your Storefront settings. There will be a yellow box with the number of Pre-Orders in waiting. Click the Order button to release the books. They will be shipped via the method you chose in the store. Paying by Invoice Need to be invoiced for your yearbook? Please review the invoice process carefully and submit your Invoicing Request Form at least two weeks prior to the order date. 1. Collect money for any in-school yearbook sales and track who has paid. 2. Fill out the Invoicing Request Form [link provided at picabooyearbooks.com/downloads]. 3. Picaboo will generate an invoice within two business days. 4. Mail payment for 100% of the invoice. 5. Once the check is received, Picaboo will send you a payment code for the value of the invoice. 6.Use the code to pay for books online upon check-out. Tools ACCOUNT MANAGER Your Picaboo Yearbooks sales representative. BIRD’S EYE VIEW In the PYB App, this blue button allows you to see all Sections of the yearbook at a glance and easily add, remove and move pages within a section. BLEED LINE A red line that represents the outside of the page area that will be trimmed off during the manufacturing process. Words and objects should stay clear of this area unless they are intended to be trimmed as part of a specific design element. BLEED PHOTO A photo that intentionally crosses the Bleed Line and extends off the page or across the gutter. BOOK SIZE The size of your book (in inches) after it has been trimmed. PYB offers 8½x11 and 9x12. Once you select your size and begin designing pages, it cannot be changed. BULK SHIPPING Refers to yearbooks that are shipped to one address. Bulk shipping is free for orders of 50 yearbooks or more. See also, Immediate Order. CANDIDS Non-posed photos. Subjects are generally looking away from the camera. CAPTION The who, what, where, when, how, and why of a photo. The first sentence is in the present tense and describes the action. Secondary sentences, in past tense, provide supporting information. Also called a cutline. CROP ZONE Similar to the Bleed Line, it is the yellow area on the outside of the page to show what will likely be trimmed during the manufacturing process. Words and objects should stay clear of this area as they will be trimmed off during the production process. COLOPHON An inscription in the back of the yearbook which states printing specifications such as price, number of copies printed, colors used, type, cover design, workshops staff attended, photography studios and awards won by the previous year’s book COLUMN DESIGN Dividing the double page spread into a number of equal divisions, such as four, five, six, etc. Pictures, headlines, copy, and captions are then designed to fit within the designated column design. COPY Text on the page—specifically the story. A story may also be referred to as body copy. COVERAGE Refers to the topics featured on individual pages or spreads and how those topics are highlighted. CROPPING Portions of a photo that are removed to improve its composition and make it proportional to layout space. DIVIDER/DIVISION PAGE A spread used to separate each of the sections of the yearbook. It is usually theme-related in design and the copy ties the main theme to the upcoming section. DOMINANT PHOTO The largest photo on the page. It is traditionally two to three times larger than any other element on the page. DPI Abbreviation for dots per inch which is a printing term for Image Resolution. The higher the DPI, the higher the resolution of the image. For viewing images on a computer screen, you only need 72 DPI. For offset printing, the image must be set to 300 DPI at the desired print size. Digital printing will allow for quality printing of images from 180 to 360 DPI at the desired print size. Also referred to as PPI (pixels per inch) when referring to computer monitor resolution. ENDSHEET A heavy paper that secures the pages of the yearbook to the hard cover. Soft cover books do not have endsheets. EXTERNAL MARGIN The white space around the outside of the spread which is typically the same on every spread. eYEARBOOK A digital yearbook that is compatible with PC, Mac and tablets such as the iPad and Kindle. PYB currently offers this option for free, but the adviser can choose to set a price for this option in the storefront set-up. EYELINE An imaginary horizontal line which runs across two facing pages (should fall near the center) that guides the reader’s eye. FILE FORMAT The way an image is saved to a digital camera’s memory. JPG, TIFF and RAW are the most common file formats. The PYB App will accept JPG and PNG. FOLIO The page numbers, traditionally placed at the bottom left and right of the spread. The folio sometimes includes the topic of a spread and a theme-related font or graphic. GLOSSY FINISH A shiny lamination used on the cover GRAPHIC ELEMENTS Refers to colors, white space, rule lines, shapes and special type treatments. GUTTER The center of the spread, highlighted in yellow, where the two pages meet. Words and important elements should stay clear of this area HARD COVER A glossy or matte laminated cover stretched over acid-free binder’s board. HEADBAND A band sewed or glued to the head or tail of the back of a hard cover book, or to both, often to protect and strengthen the binding but sometimes for decoration. HEADLINE A line of type used to pull the reader into the story. It introduces the topic and serves as the main visual point of interest on the spread. IMAGE RESOLUTION The amount of technical detail an image holds. In printing, it is measured by dots per inch (see DPI). Higher resolution means more image detail. Less resolution means less detail and will lead to fuzzy or pixelated images. In the PYB app, “low res” images result in a warning symbol (orange triangle) and should not be ignored. The image should either be made smaller on the page or replaced by a “hi res” photo of 300 DPI or more. IMMEDIATE ORDER Once the initial bulk order has been placed, the adviser has the option to change the Storefront to allow students and parents to order additional copies of the yearbook. These orders will be fulfilled immediately and mailed to the individual; shipping charges will apply. INFOGRAPHIC Facts, statistics and survey results presented in graphic form such as charts and graphs GLOSSARY INTERNAL MARGIN The spacing (traditionally a Pica) between each element on a spread. LADDER DIAGRAM A page by page topical outline of what goes where in the yearbook. It is used by the adviser and staff to stay organized and is a great place to note who has been assigned to complete each page. LAYOUT The design of a spread, placement of photos, etc. In the PYB App, the Layout Button is used to select a pre-designed template. MATTE FINISH A non-shiny lamination on the cover MEDIA TRAY The horizontal tray at the bottom of the PYB App. It displays either imported photos or the pages of the section you are working on. It also allows you to delete photos and re-arrange individual and two-page spreads. OPENING Two to four pages after the title page that traditionally introduce the theme. PAGE COUNT The total number of pages in a yearbook. PYB currently offers even numbered page counts between 20 and 400 pages. PAGE MARGIN A purple line in the PYB App that signifies the start of the external margin. PERFECT-BOUND A thermally-activated technology that binds the cover and pages together at the spine with a strong flexible glue. Paperback novels, larger magazines and all PYB Soft Cover yearbooks are bound this way. PERSONALIZATION If your school or organization has opted to use PYB’s unique personalization program, students or parents can personalize the last four pages and back cover of their book for free. Additional pages are 99¢. The personalized section will appear upside down on the back of the book until you flip and view it as if it were a new book. image compression format on the Internet and allows for photos or graphics with a transparent background. In the PYB App, Stickers without backgrounds are PNG files. PORTRAIT FLOW The process in which PYB automatically extracts the data and portraits from the PSPA Disc and flows the photos and student names onto the designated pages of the yearbook. PORTRAIT PAGES Refers to pages devoted to individual photos of students grouped alphabetically by grade level. Sometimes referred to as mugs or panel pages. PRE-ORDER Advisers can begin selling the yearbook in their designated Storefront while it is still in production. This helps the school plan ahead and know approximately how many books will be sold SPINE Area of the yearbook connecting the front and back covers. It traditionally includes the name of the school, year, volume number, etc. SPREAD Two facing pages in the yearbook. Also referred to as a double page spread or DPS. STICKERS Embellishments you can add to decorate a page. Also known as clip art. STOREFRONT A website dedicated to selling your specific school’s yearbook. SUB-HEADLINE A secondary headline which accompanies the main headline and provides specific, detailed information. It is generally two to three times smaller than the headline. TEMPLATE A master page that maintains consistency within a design or section. PSPA DISC A disc of portrait photos provided to the school by the school portrait photographer. The Professional School Photographers Association (PSPA) has established Digital Data & Image Format Guidelines for use by school photographers to make the portrait disc data format the same for every school and make it compatible with most yearbook company software. THEME A verbal statement and a visual look which tie all parts of the yearbook together and tell the story of the year. SAN SERIF Type without finishing strokes at the ends of letters. Translates to “without feet.” TOOL LINES Lines which are used for emphasis, such as around pictures or to separate captions from the story text. SECTION A traditional yearbook is typically broken up into six sections: student life, academics, people, clubs and organizations, sports, and ads. In the PYB App, Sections are used to upload and organize photos; therefore adding additional sections may be helpful TITLE PAGE Page one of the yearbook. Typically includes the name of the book, school address, phone number, web address, year, volume number, school population, etc. TRAPPED WHITE SPACE An area of white space separating two or more photographs or copy blocks and giving the appearance of disunity to the layout page. SECTION MANAGER The area in PYB App that allows the user to create yearbook sections. WHITE SPACE Empty area of a spread that is not covered by pictures/type. SERIF Type with finishing strokes at the ends of letters. Translates to “with feet. WRAP ZONE The gray outline on the hard cover layout which represents the area that will be wrapped around the inside covers of the yearbook cover. PICA The unit of measurement used in publication design. It is equal to 12 points or 1/6 of an inch. SIDEBAR A topic that is featured on the spread but stands out due a the change in background color and font. Also referred to as secondary coverage. PNG The abbreviation for Portable Network Graphics (pronounced “ping”). It is the most used lossless SOFT COVER A glossy or matte laminated 1.5 mm cover printed on a highly durable 10 pt. cover stock YEARBOOK SUPPORT SPECIALIST A YSS is your assigned in-house company representative who is available by phone or email for technical and production assistance. Tools PHOTOGRAPHY TIPS PYB EDUCATIONAL SERIES 1 ACTION! Get in the middle of the activity and start shooting. If nothing is happening in your dominant photo, how will it grab your reader’s attention? (Answer: It won’t.) 3 PHOTO BY ALASDAIR MIDDLETON FRAME IT Framing is a technique where by you draw attention to one element of an image by framing it with another element of the image. 2 GET PERSONAL A zoom lens is handy to have, but don’t expect to take great shots from the bleachers. If you can’t see the look on someone’s face, it’s probably not a great shot. 4 PHOTO BY MARTIN PETTITT LAUGH OR CRY Nothing makes a photo better than capturing raw emotion. From extreme joy to bitter pain, let your camera tell the real story. PHOTO BY WHITNEY LEONARD, CJE LEARN YOUR EQUIPMENT You don’t have to have a super expensive camera to take great photographs, but you do need to learn to use the equipment you have. Read the user manual (if you can’t find it, most are online these days) and learn what all the settings mean. Keeping your camera safely set on auto probably isn’t going to necessarily capture the best shot. There are a ton of online resources for learning more about digital photography. Take time to study websites like digitalcameraworld. com to educate yourself on lighting, composition and other technical aspects of digital photography. Step up your photo game with some post-production in Adobe Photoshop or Lightroom. Visit helpx.adobe.com for great lessons and video tutorials. PHOTO BY JASON COREY RULE OF THIRDS Pro Tip: Great yearbook photos are rarely taken at eye level. Stand on a chair, crouch on the floor or find an unexpected perspective to capture a unique shot. The “Rule of Thirds” one of the first things that budding digital photographers learn about in photography class as it is the basis for well balanced and interesting shots. THINGS TO AVOID IN YBK PHOTOGRAPHY • Avoid posed photos. Yes, sometimes they are a necessary evil, but don’t actively seek them. • Don’t skimp when it comes to buying extra memory cards. You can’t recreate the winning touchdown, so make sure you have plenty of space to capture it. • Don’t rely on post-production. You can’t make up for bad shooting with the magic of Photoshop. The idea is that an off-center composition is more pleasing to the eye and looks more natural than one where the subject is placed right in the middle of the frame. It also encourages you to make creative use of negative space, the empty areas around your subject. PHOTO BY SODANIE CHEA Top photo: The horizon and main subject in this photo have been positioned near lines or intersections for maximum impact. Bottom photo: The main subject has been placed at one of the intersections, and also along one a vertical line. The empty space at the bottom left provides balance and prevents the picture from feeling overcrowded. Visit picabooyearbooks.com for more yearbook tips and resources. PHOTO BY SODANIE CHEA WRITING: CAPTIONS PYB EDUCATIONAL SERIES 1 BRAINSTORM Make a list of words and phrases that come to mind when looking at the photograph. YEARBOOK DESIGN PYB EDUCATIONAL SERIES 2 THE FACTS List the Who, What, When & Where and use them to write an action sentence in present tense. 3 SUPPLEMENT Research the Why & How and use them to write a supporting sentence in past tense. Captions are placed to the outside of the layout and touch the corresponding photo. Internal Margin is consisent and separates photos from text. Drop Cap adds a design flourish that does not distract the reader. Headline Sub-headline Story GOING FOR THE GOLD Junior Varsity Track Runs all the Way to State exceped itiasin ctionecate molorrum id mos dolori berferspe saeste es mincidus antur seque sitius, es mincidus sunt molo officit ve ñWHO Identify everyone in photos of five or less. ñWHY Reveal facts not obvious from the photo. Our PYB Ed Series is designed to provide classroom teachers the tools to teach beginning students the basics of yearbook production. Visit picabooyearbooks.com/downloadss for these and other helpful resources. ñWHAT Describe the action in the photo. ñWHEN Be specific. “During class” is not specific. Select the best idea as your lead-in: Use the facts above to write a summary caption: quia idelique aut volorerunt escilla voluptam el maximin resci ditate prae volenda dest volorit vella quos venihic iatiorro eum est odis et elicae di cus. Di aut vellam non comnit, aut odia exerit quaestia ipit eum andusti netur sereptat. Odiorit atiore, que endam volest, quosti accae se volorem faceresci ducit quibus, si cus, odite con nimilita natentem dolor adignih ictiorion provit, con ex eos sanihillame rerfero bea doluptaturi oditas cus duci aut im quidenestias si dis re, 4 1 Eyeline gives the reader an imaginary site line to follow. “I hate carrots. Ew!” 2 “I want to be a teacher when I grow up.” “Dance is my favorite after school activity.” 3 exceped itiasin ctionecate id mos dolori berferspe saeste es mincidus antur ctionecate exceped itiasin ctionecate id mos dolori berferspe saeste es mincidus antur ctionecate 10 Varsity Track Sports 11 The Rail of Whitespace adds visual interest. CAPTION CHECKLIST q Is the first sentence written in present tense? arum iurita nonsequi sum simusanis autatem et et exceped itiasin ctionecate molorrum id mos dolori berferspe saeste es mincidus antur seque sitius, sunt molo officit veraest quam, que eos maiorerum labo. Itataquid eumque etureius dolo que nis ne comnihi lluptat eos del modis estis volor molupta tiorern atibus ma culluptibea sitione voluptassi tem volorro viditiscium nobita labo. Itataquid eumque etureius dolo que nis nedjf al;skdfj asdlkjf a;lksdjf comnihi lluptat eos del modis estis volor molupta tiorern atibus ma culluptibea sitione Three facts about Sophopmore ñHOW Reveal facts not obvious from the photo. Check your work against the criteria below. ñWHERE Be specific. “At school” is not specific. Q exceped itiasin ctionecate molorrum id mos dolori berferspe saeste es mincidus antur seque sitius, es mincidus sunt molo officit ve Sidebar provides secondary coverage in a graphic package. Folio Indicates the page number and content. Dominant Photo is two to three times larger than other elements. YEARBOOK DESIGN CHECK LIST q Do you have photos, captions, copy and a headline? q Are the second & third sentences in past tense? q Does the caption explain the action taking q Do all elements begin and end on a grid or column? q place in the photograph? q Do you have a dominant element? Do the captions indicate when and where the action takes place? q Have you varied the sizes and shapes of elements? Do the captions avoid editorializing? q Do captions touch the pictures they identify? q q The following words are avoided: many, several, a lot, some, a few, successful, dedicated, hopefully q Have you established an eyeline? q Is the headline a natural lead-in to the copy? Visit picabooyearbooks.com for more yearbook tips and resources. q Have you established consistent margins? PYB ED SERIES THEME DEVELOPMENT PYB EDUCATIONAL SERIES PYB YEARBOOK GLOSSARY PYB EDUCATIONAL SERIES ACCOUNT MANAGER Your Picaboo Yearbooks sales representative. COVERAGE Refers to the topics featured on individual pages or spreads and how those topics are highlighted. APP PYB’s web-based application used to create a yearbook. It performs best in Chrome or Firefox. CROPPING Portions of a photo that are removed to improve its composition and make it proportional to layout space. BIRD’S EYE VIEW In the PYB App, this blue button allows you to see all Sections of the yearbook at a glance and easily add, remove and move pages within a section. BLEED LINE A red line that represents the outside of the page area that will be trimmed off during the manufacturing process. Words and objects should stay clear of this area unless they are intended to be trimmed as part of a specific design element. BLEED PHOTO A photo that intentionally crosses the Bleed Line and extends off the page or across the gutter. BOOK SIZE The size of your book (in inches) after it has been trimmed. PYB offers 8½x11 and 9x12. Once you select your size and begin designing pages, it cannot be changed. BULK SHIPPING Refers to yearbooks that are shipped to one address. Bulk shipping is free for orders of 50 yearbooks or more. See also, Immediate Order. DIVIDER/DIVISION PAGE A spread used to separate each of the sections of the yearbook. It is usually theme-related in design and the copy ties the main theme to the upcoming section. DOMINANT PHOTO The largest photo on the page. It is traditionally two to three times larger than any other element on the page. DPI Abbreviation for dots per inch which is a printing term for Image Resolution. The higher the DPI, the higher the resolution of the resulting image. For viewing images on a computer screen, you only need 72 DPI. For offset printing the image must be set to 300 DPI at the desired print size. Digital printing will allow for quality printing of images from 180 to 360 DPI at the desired print size. Also referred to as PPI (pixels per inch) when referring to computer monitor resolution. CANDIDS Non-posed photos. Subjects are generally looking away from the camera. ENDSHEET A heavy paper that secures the pages of the yearbook to the hard cover. Soft cover books do not have endsheets. CAPTION The who, what, where, when, how, and why of a photo. The first sentence is in the present tense and describes the action. Secondary sentences, in past tense, provide supporting information. Also called a cutline. EXTERNAL MARGIN The white space around the outside of the spread which is typically the same on every spread. CROP ZONE Similar to the Bleed Line, it is the yellow area on the outside of the page to show what will likely be trimmed during the manufacturing process. Words and objects should stay clear of this area as they will be trimmed off during the production process. COLOPHON An inscription in the back of the yearbook which states printing specifications such as price, number of copies printed, colors used, type, cover design, workshops staff attended, photography studios and awards won by the previous year’s book. COLUMN DESIGN Dividing the double page spread into a number of equal divisions, such as four, five, six, etc. Pictures, headlines, copy, and captions are then designed to fit within the designated column design. COPY Text on the page—specifically the story. A story may also be referred to as body copy. eYEARBOOK A digital yearbook that is compatible with PC, Mac and tablets such as the iPad and Kindle. PYB currently offers this option for free, but the adviser can choose to set a price for this option in the storefront set-up. EYELINE An imaginary horizontal line which runs across two facing pages (should fall near the center) that guides the reader’s eye. FILE FORMAT The way an image is saved to a digital camera’s memory. JPG, TIFF and RAW are the most common file formats found in digital cameras. The PYB App will accept uploads are JPG and PNG. FOLIO The page numbers, traditionally placed at the bottom left and right of the spread. The folio sometimes includes the topic of a spread and a theme-related font or graphic. GLOSSY FINISH A shiny lamination used on the cover. GRAPHIC ELEMENTS Refers to colors, white space, rule lines, shapes and special type treatments. GUTTER The center of the spread, highlighted in yellow, where the two pages meet. Words and important elements should stay clear of this area. YEARBOOK THEME: While not the most important part of a yearbook, the theme helps tell the story of the year, unifies the book and gives it a plan. The theme should be unique to the specific school in that particular year. WHERE DOES THE THEME BELONG? HARD COVER A glossy or matte laminated 1.5 mm cover stretched over a 2.5mm acid-free binder’s board. HEADBAND A band sewed or glued to the head or tail of the back of a hard cover book, or to both, often to protect and strengthen the binding but sometimes for decoration. HEADLINE A line of type used to pull the reader into the story. It introduces the topic and serves as the main visual point of interest on the spread. IMAGE RESOLUTION The amount of technical detail an image holds. In printing, it is measured by dots per inch (see DPI). Higher resolution means more image detail. Less resolution means less detail and will lead to fuzzy or pixelated images. In the PYB app, “low res” images result in a warning symbol (orange triangle) and should not be ignored. The image should either be made smaller on the page or replaced by a “hi res” photo of 300 DPI or more. TYPES OF THEMES Cover Endsheets Title Page Opening Dividers Closing Folios Sidebars Mascot/School Colors Anniversary/Event School Name/Initials Conceptual Location Situational Play on Words Pro Tip: Keep a Book of Idioms handy as you brainstorm theme and section title ideas. Is your theme recognizable? Is your theme repeatable? Does your theme make sense? Does your theme have meaning? Does your theme have appeal? INFOGRAPHIC Facts, statistics and survey results presented in graphic form such as charts and graphs. INTERNAL MARGIN The spacing (traditionally a Pica) between each element on a spread. THINGS TO AVOID WHEN DEVELOPING A THEME LADDER DIAGRAM A page by page topical outline of what goes where in the yearbook. It is used by the adviser and staff to stay organized and is a great place to note who has been assigned to complete each page. In the PYB App, the ladder allows the user to designated sections. LAYOUT The design of a spread, placement of photos, etc. In the PYB App, the Layout Button is used to select a pre-designed template. WORK IT! THEME DEVELOPMENT CHECK LIST q q q q q IMMEDIATE ORDER Once the initial bulk order has been placed, the adviser has the option to change the Storefront to allow students and parents to order additional copies of the yearbook. These orders will be fulfilled immediately and mailed to the individual; shipping charges will apply. A Tiger’s Tale, Grin & Bear It, Seeing Red, Out of the Blue Pure Gold (50th Anniversary), AtTENtion Central Time, yOUr year, B All You Can B, Remember Wynne Blink, Spark, Imagine, Icon, Synergy Down the Road, It’s ON(tario), This Side of the Tracks Uniformly Different, East Meets West, Breaking Ground This Time, Subject to Change, Same Difference Use visual and verbal identifiers to tie your theme concept together THEME IDEA: _____________________________________________ Topics include: Yearbook Vocabulary, Photography, Design, Theme Development, Writing, Budgeting and more! Opening Headline: ________________________________________ Closing Headline: __________________________________________ SECTION TITLES Student Life: ____________________________________________ People: _______________________________________________ Academics: _____________________________________________ • Don’t copy a theme from the school down the road. • Don’t use slang, movie, magazine or television titles that might be outdated by publication time. • Avoid cliches. • Don’t use copyrighted materials. The legal concerns usually aren’t worth the trouble. • Don’t overdo it. Your theme does not belong on every page of the yearbook. Organizations: ___________________________________________ Sports: _______________________________________________ Visual Elements: _________________________________________ Color Scheme: ___________________________________________ MATTE FINISH A non-shiny lamination on the cover. Fonts: ________________________________________________ MEDIA TRAY The horizontal tray at the bottom of the PYB App. It displays either imported photos or the pages of the section you are working on. It also allows you to delete Visit picabooyearbooks.com for more yearbook tips and resources. WRITING: HEADLINES PYB EDUCATIONAL SERIES 1 BRAINSTORM Make a list of words and phrases that come to mind when you think of the topic of the spread or story. 3 MIX IT UP List a few things that made the story topic unique to this year. 6 DESIGN IN MIND Create a dynamic headline and sub-headline design treatment on the back of this page. SAMPLE HEADLINE STYLES SENTENCE STYLE Creative headline here UP STYLE Creative Headline Here SMALL CAPS 4 BE DESCRIPTIVE Use distinct facts about this year to create a thoughtful sub-headline. Creative Headline Here LOWERCASE creative headline here THICK/THIN creativeheadlinehere LIGHT/DARK creativeheadlinehere SAMPLE HEADLINE PACKAGES 2 primaryheadline the sub-headline looks nice here BE CLEVER Use wordplay and idioms to make your headline fun and attention-grabbing. a wicket is two or more lines of a sub-headline stacked above the primary headline Select the best idea as your sub-headline: a kicker is a one line subhead above the headline 5 HEADLINE CHECKLIST Check your work against the criteria below. q Do the headlines give the reader a sense of the story content? q Has an action verb been used? q Are the headlines specific to this school year? Select the best idea as your primary headline: primaryheadline Have unnecessary words been removed q (the, an, a & and?) PRIMARYHEADLINE is a sub-head PRIMARY aontripod the side of the headline primaryheadline a read-out is two lines of sub-head stacked below a primary headline [ PRIMARY HEADLINE a hammer headline features one or more lines of primary headline above one or more lines of a sub-headline REVERSE HEADLINE white text on a dark background is called reverse type Tools Whether you sell your yearbooks online, in school or both, Picaboo offers a variety of materials to help you sell your yearbook. Here is a sampling of available posters to help advertise your yearbook in school. Flyers and 11x17 posters are available for download at picabooyearbooks.com/downloads. Please contact your Account Manager for more information. YEARBOOKS are on sale now! LIVRES ANNUAIRES en rabais maintenant! It’s more than a yearbook. It’s YOURbook! Plus qu’un annuaire, c’est VOTRE annuaire. Reserve your copy today! The deadline is: Payment & Order 1. Fill out form and include check payable to: _____________________________________ 2. Please return form to ____________________________________ by the deadline above OPTIONS STUDENT NAME(S): HOMEROOM/GRADE(S): ADDITIONAL INFO: PRICE HARD COVER YEARBOOK $ _________ SOFT COVER YEARBOOK $ _________ QUANTITY PRIX: Livre Annuaire couverture rigide Livre Annuaire couverture souple Livre Annuaire digital DATE LIMITE: COMMANDER EN LIGNE: TOTAL AMOUNT ENCLOSED: IF YOU HAVE ANY QUESTIONS, PLEASE CONTACT: _______________________________________________________________ ANUARIOS ¡a la venta ya! Mucho más que tu libro del año, es el libro de ¡TU año! ¡Reserva tu copia hoy! La fecha límite es: Orden y Pago Por internet en ____________________ O Llena la siguiente planilla y regrésala a _________________ Incluye un cheque a nombre de _______________________________________ ¡Y recuerda la fecha límite! ESTUDIANTE(S): GRADO(S): INFORMACIÓN ADICIONAL: OPCIONES PRECIO ANUARIO DE TAPA DURA: $ _________ ANUARIO DE TAPA BLANDA: $ _________ PAGO TOTAL INCLUIDO: SI TIENES CUALQUIER PREGUNTA, COMUNÍCATE CON: CANTIDAD besoin d’aide? Visitez www.picabooyearbooks.com, ou envoyez un courriel à [email protected] merci de noter: Le montant prélevé sur votre carte de crédit sera soumis à des frais de échange, mais une remise a déjà été appliquée sur le prix d’achat pour compenser ce coût. MARKET YOUR YEARBOOK FLYERS, POSTERS, YARD SIGNS, T-SHIRTS, WEB BUTTONS & MORE! Tools TOPIC ASSIGNED TO q1 q2 q3 q4 q5 q6 q7 q8 q9 q 10 q 11 q 12 q 13 q 14 q 15 q 16 q 17 q 18 q 19 q 20 q 21 q 22 q 23 q 24 q 25 q 26 q 27 q 28 q 29 q 30 q 31 q 32 q 33 q 34 q 35 q 36 q 37 q 38 q 39 q 40 q 41 q 42 q 43 q 44 q 45 q 46 q 47 q 48 q 49 q 50 LEFT HAND PAGE RIGHT HAND PAGE YEARBOOK LADDER DIAGRAM Pro Tip: Download a copy of this ladder diagram or our eLadder at picabooyearbooks.com/downloadss. Have more than 200 pages? The PDF and eLadder version go up to 400 pages. TOPIC ASSIGNED TO q 51 q 52 q 53 q 54 q 55 q 56 q 57 q 58 q 59 q 60 q 61 q 62 q 63 q 64 q 65 q 66 q 67 q 68 q 69 q 70 q 71 q 72 q 73 q 74 q 75 q 76 q 77 q 78 q 79 q 80 q 81 q 82 q 83 q 84 q 85 q 86 q 87 q 88 q 89 q 90 q 91 q 92 q 93 q 94 q 95 q 96 q 97 q 98 q 99 q 100 LEFT HAND PAGE RIGHT HAND PAGE Tools TOPIC ASSIGNED TO q 101 q 102 q 103 q 104 q 105 q 106 q 107 q 108 q 109 q 110 q 110 q 112 q 113 q 114 q 115 q 116 q 117 q 118 q 119 q 120 q 121 q 122 q 123 q 124 q 125 q 126 q 127 q 128 q 129 q 130 q 131 q 132 q 133 q 134 q 135 q 136 q 137 q 138 q 139 q 140 q 141 q 142 q 143 q 144 q 145 q 146 q 147 q 148 q 149 q 150 LEFT HAND PAGE RIGHT HAND PAGE YEARBOOK LADDER DIAGRAM q 151 q 152 q 153 q 154 q 155 q 156 q 157 q 158 q 159 q 160 q 161 q 162 q 163 q 164 q 165 q 166 q 167 q 168 q 169 q 170 q 171 q 172 q 173 q 174 q 175 q 176 q 177 q 178 q 179 q 180 q 181 q 182 q 183 q 184 q 185 q 186 q 187 q 188 q 189 q 190 q 191 q 192 q 193 q 194 q 195 q 196 q 197 q 198 q 199 q 200 LEFT HAND PAGE RIGHT HAND PAGE Stickers Stickers are embellishments you can add to decorate a page. Click on the Stickers button to access thousands of options. Our most popular keyword searches Sports Office Shapes & Symbols Holiday Frames Just like backgrounds, you can either search for stickers by keyword or browse by category. You can also add your own stickers by uploading them into the My Artwork image area. They will appear under the My Stickers category. Simply drag and drop stickers onto your layout to dress it up. School ....also search borders for some fun page embellishments. Mascots We have added a large number of school mascots to our sticker collection. Search by keyword or search mascots to view them all. Layouts There are a number of single page and double page pre-designed layouts available for you to use. They can be used as is or altered to meet the needs of your individual yearbook design. Click on the design of your choice and it will appear in your layout window and will be ready for you to customize. If you select a single page design, a window will appear asking if you want the design applied to the left or the right. You can mix and match layouts to create double page spreads. There are also single page designs specially designed to accommodate title pages, portrait pages and advertising pages. If you decide to select a different layout, any previously placed photos or text may be moved or deleted. If you want to experiment with a new layout without committing to it, we recommend doing so on another page. You can always move the layout later if you decide to use it. Warning! Once you have replaced the placeholder boxes with your photo selections (by dragging and dropping them from the media tray beneath the layout), you can embellish your layouts with these fun effects: BORDER Check the border box to add a line around your photo box. You can change the size and color and then, if you choose, apply the selection to the page or entire project. SHADOW The shadow function allows you to add a 3D look to your photo box. SHAPES To change the shape of a photo box, select either the circle, heart or star icon. CORNERS Add decorative corners to your photo boxes by selecting one of the many options available. Use Apply to Page or Apply to All to make your selection uniform. Covers Picaboo[ ] Picaboo[PRO] offers you an assortment of pre-designed cover options and graphic elements to complement your yearbook design. Honeycomb To access these designs, click Picaboo[Pro] in the Backgrounds tab. You will see a large number of backgrounds that can be used alone or in conjunction with your text, photos and stickers. School Name Here See page 26 to learn more on how to use the entire Picaboo[PRO] design suite in your project. Grunge (3 color options) Talk (3 color options) Sphere Crayons Lines Year School Geo (4 color options) Artist Space School Name Here Starburst Chalkboard (4 color options) Pride Picaboo[PRO] Picaboo Yearbooks offers you the option of designing your own cover or choosing one of our professionally pre-designed covers. Many options are mix and match, but some are designed to work together. If you decide to use our Picaboo[PRO] options, we recommend you follow these steps. 1 Select your background. For the sake of this tutorial, let’s assume you’ve chosen the Geo cover. In the Backgrounds field, click Picaboo[PRO] and select the Geo background. The Geo series has four color options. Place the color of your choice into the cover layout. 2 Add graphics. Next, click on the Stickers tab. Similar to the backgrounds, search by keyword for Picaboo[PRO] Geo. You will see four nameplates that were designed to coordinate with the Geo series. Select the desired color option and drag and drop it onto the layout area. We suggest you place the nameplate slightly off center and to the right, similar to the sample cover shown on page 23. You may opt to increase or decrease the size of the nameplate with the Zoom Photo slider or apply a drop shadow. 3 Add your school name. Draw a text box and type your school name. Because the school name area is dark, we highly recommend you use white type for best results. 4 GO wildcats! CHENAL HEIGHTS HIGH SCHOOL Morgan Middle School Add your personal touch. By now, your cover should look similar to the graphic shown to the left. You may choose to use the cover as-is, or you may decide you want to get a little more creative. The back cover is a great place to add a mascot sticker, your school shield or logo, or a small series of photos. If you’ve chosen a theme for this year’s book, you may want to add some additional text to the cover. 5 If you need help at any point in the cover process, contact your YSS. When you are finished with your design, we highly recommend you let your YSS know so he or she can log in and make sure all of your elements are within all of the margins and that your graphics will print clearly. Fonts FONT SELECTIONS Our yearbook app offers more than 100 font options. From cover design to captions and headlines, we’ve got a number of options to meet your needs. Now what? Ever wonder what happens after you submit your yearbook? Below is a basic outline of PYB’s unique production process. Please note that this is just a summary. A lot of time and care is put into each yearbook we deliver to your door, including a quality control audit performed by trained auditors at each step of the way. 1 User (that’s you!) creates a project. 2 3 A yearbook order is placed. 4 PYB dispatches the print order to our manufacturing facility. The manufacturing facility acknowledges the order and pulls the digital materials. 6 5 Print orders are batched for the most efficient production based on order attributes; like size, hardcover vs. softcover, gloss vs. matte lamination, delivery date, etc. 9 Picaboo renders the images of the book. We take all the graphical elements on the pages that you’ve created in our app and render composed pages to be printed. 8 Pages are printed on HP Indigo digital printing presses, the most advanced digital print platform in the industry. 7 At the same time pages are being printed, covers are printed and laminated.* Books go through a final quality inspection. 10 Bar codes are scanned and shipping labels are automatically printed from the order info. Orders are packed and shipped. *MORE ON THE COVER PROCESS Hardcover artwork is printed, laminated and turned into cases by gluing and wrapping the printed and laminated cover sheets around thick, durable binder's board. Softcover artwork is printed and laminated. Covers are matched with their corresponding book blocks and bound using PUR glue which provides the strongest bind possible and enables a book to lay flat while open without cracking. Yearbook delivery day! Not sure what to do now that you’re finished? Try some of these ideas: • Organize your yearbook distribution. Select the distribution site, download and prepare distribution lists, plan a signing party, coordinate publicity, etc. • Create content for QR code links. Hopefully you’ve used QR codes to expand your coverage of events. Make online videos and slideshows to link to the codes you placed in your yearbook. • Recruit next year’s staff. Remember to include teacher recommendations, staff applications and interviews to select the cream of the crop. • Order a critique. Join organizations such as the National Scholastic Press Association and order a critique. Use the results to critique last year’s yearbook and make notes on how to improve next year’s book. Not quite ready to join? Download PYB’s critique form and do a self-critique. • Invite guest speakers. Have a local journalist, graphic designer or the photo editor of the local newspaper visit your class and talk about his or her work. This is a great way to inspire students to take yearbook more seriously and do their best work. • Write thank you notes. Remember to include administrators, teachers, advertisers, parents, students and others who assisted the staff with the production and completion of the book. Follow us! We would love it if you would follow us on social media. In addtion to helpful tips and tricks, you will have exclusive access to special contests and promotions. Take a few minutes to stop by and join the conversation. facebook.com/picabooyearbooks instagram.com/picabooyearbooks twitter.com/picabooyearbook pinterest.com/picabooybks Some fine print. According to the Terms of Service, the User has agreed not to upload and use any content that infringes or violates the intellectual property rights or proprietary rights, rights of publicity or privacy, or other rights of any third party; violates any law, statute, ordinance or regulation; is harmful, fraudulent, deceptive, threatening, abusive, harassing, tortious, defamatory, vulgar, obscene, libelous, or otherwise objectionable. You, not Picaboo Yearbooks, remain solely responsible for all content that you upload. Notes Colophon Yearbook Guidebook, Volume 1, Issue 2, was produced by the marketing department at Picaboo Yearbooks and was printed by a PYB facility on an HP Indigo Digital Press. The cover incorporates a full color design with a gloss lamination finish and was perfect bound using PUR adhesives. The book’s 30 pages are printed on 100# archival-quality, FSC Certified glossy text stock. The publication is set exclusively in two font families, Gotham and KG Eyes Wide Open. Layouts were produced using Adobe InDesign CC, were exported as 300 DPI PNG files and uploaded via Picaboo Yearbooks’ web app.