1
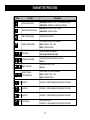
P8U-FM
FEATURES AND OPERATIONS
REMOTE STARTER
ANTI-START SYSTEM – SECURITY SYSTEM
TRANSMITTER OPERATIONS
Button
Function
Arm & Lock the Doors
Disarm & Unlock the Doors
AUX
Start and stop the remote starter.
Enable / Disable audible
Enable or disable the audible function. See note 1.
Enable : confirmation 1 chirp / 1 flash.
Disable : confirmation 2 flashes.
Temporary Valet Mode
Night Timer Mode
AUX
Audible enable : confirmation 1 chirp / 1 or 3 flashes (dome light delay).
Audible disable : confirmation 1 or 3 flashes (dome light delay).
Audible enable : confirmation 2 chirps / 2 flashes.
Audible disable : confirmation 2 flashes.
Start / Stop the Engine
Panic Mode
AUX
Description
Activation of panique mode. See note 2.
Note : the engine should not be running.
The system temporary ignore the passive arming mode.
See note 3.
The engine will start every 3 hours.
See note 4.
Enable / Disable
The Shock Sensor
Enable or disable the shock sensor. See note 5.
Enable : confirmation 1 chirp / 1 flash.
Disable : confirmation 2 flashes.
2 sec
Auxiliary 1
Confirmation 1 or 6 flashes depending the programmation of the installer.
2 sec
Auxiliary 2
Confirmation 1 or 5 flashes depending the programmation of the installer.
2 sec
Auxiliary 3
Confirmation 1 or 4 flashes depending the programmation of the installer.
2 sec
Trunk Opener
Allows to release the trunk.
Confirmation 1 or 3 flashes depending the programmation of the installer.
AUX
2
FEATURES AND OPERATIONS
Note 1 : Enable / Disable Audible
When the audible option is enabled, the system will chirp each time the system is armed or disarmed by the remote. To enable this option, the
following steps must be performed :
1. Disarm the system by pressing the unlock button
.
2. Turn the ignition key to ON position (engine is not running).
3. If disabled, press once on the auxiliary button AUX to enable this option (confirmation 1 chirp / 1 flash).
If enabled, press once again on the auxiliary button AUX to disable this option (confirmation 2 flashes).
Note 2 : Panic Mode
The panic mode allows you to activate the horn or siren for a period of 30 seconds to scare away anyone prowling around your vehicle. In some
instances, it may also be used as a car finder. To activate this option, the following steps must be performed :
1. The engine should not be running.
2. Press 2 times (quickly) on the lock button
. You will hear the horn or siren be triggered.
To deactivate the panic mode, press on any button (will deactivate the panic mode and execute the button function).
Note 3 : Temporary Valet Mode
When the temporary valet mode is activated, the system will ignore the passive arming mode (see the definition of passive arming at page 6). It
may be useful when you fill up some gaz or work on your vehicle and you don’t want the system arm by itself. To activate the temporary valet
mode, the following steps must be performed:
1. Disarm the system by pressing on the unlock button
.
2. Press 2 times (quickly) on the unlock button
. The parking lights will flash 5 times to confirm the entry to this mode.
By pressing on lock
or unlock
button, you will cancel this function.
3
FEATURES AND OPERATIONS
Note 4 : Night Timer Mode
This mode is practical when a very cold night is forecasted. The engine will start every 3 hours for a period of 3 minutes (4 times maximum). To
activate this mode, the following steps must be performed :
1. The engine should not be running and the system should not be in valet mode.
2. Press 2 times (quickly) on the start button
. The parking lights will flash 4 times to confirm the entry to this mode.
This mode is deactivated if the vehicle is started by the key or the remote.
Note 5 : Enable / Disable The Shock Sensor
Disabling the shock sensor could be useful when the sensor is defect or you’re in an area with a lot of vibration. This mode allows you to disable
the shock sensor to avoid the alarm to trigger for nothing. To enable or disable this mode, the following steps must be performed :
1. Disarm the system by pressing on the unlock button
.
2. Turn the ignition key to ON position (engine is not running).
3. If disabled, press 2 times (quickly) on the auxiliary button AUX to enable this option (confirmation 1 bip / 1 flash).
If enabled, press 2 times (quickly) again on the auxiliary button AUX to disable this option (confirmation 2 flashes).
4
FEATURES AND OPERATIONS
Remote starter with MANUAL transmission
For safety, you must perform an “Exit Sequence” to be able to start the engine by remote later. The following steps must be performed :
1. You are seated in the vehicle, the engine is running with the key in the ignition and the system is not in valet mode. Make sure all doors,
the hood and the windows are closed.
2. Place the gear shifter in NEUTRAL position.
3. Set the emergency brake (hand brake).
4. Release the brake pedal. If the option #14 (Automatic Sequence) is enable, go to step 6.
5. Press on start button
.
6. The parking lights will flash once and stay ON. Remove the key from the ignition. The engine should keep on running.
7. Open the door(s) and exit the vehicle.
8. The engine will automatically shut down 3 seconds after the last door is closed. The system is now ready to start by the remote.
(Exit Sequence Activated)
Note :
Opening any door or the hood after the “Exit Sequence” is activated, will cancel it. If you try to start the engine by the remote, the parking lights will
flash 8 times and the engine will not start. In that case, you must perform the “Exit Sequence” again.
5
FEATURES AND OPERATIONS
Remote Engine Starter:
To press on the start button
will activate the remote engine starter. Parking lights will turn ON for 2 seconds, the engine will start 6 seconds
later. Parking lights will stay ON as long as the engine is running 3, 6, 12 or 24 minutes (depending on setting). If the engine does not start, the
system will try a second time. If after the second try, the engine refuses to start, the system will shut down completely. You may be experiencing a
mechanical problem.
To turn the engine off while the engine is running, press on start
button again.
Arming and Lock the doors:
To arm the system will also enable the starter kill and lock the doors (if installed). If you try to arm the system and you’ll hear 4 (hood), 5 (doors) or
6 (trunk) chirps, one of the protected zones is opened. The system will ignore the defective zone and force the system to arm. Consult your installer
to verify your system.
Disarming and Unlock the doors:
To disarm the system will also disable the starter kill and unlock the doors (if installed). If you hear 5 chirps when you disarm the system, it means
that the alarm has been triggered while you were away.
Passive Arming:
If option #13 is set to “Passive Arming”, the system will arm automatically 30 seconds after the last door is closed.
6
FEATURES AND OPERATIONS
Keyless Running Mode
The keyless running mode allows to keep the engine running without the key in the ignition. To activate this mode, the following steps must be
performed :
Automatic Vehicle:
1. You are seated in the vehicle, the engine is running with the key in the ignition and the system is not in valet mode. Make sure the hood
is closed and do not press on the brake pedal.
2. Press on the start button
. The parking lights will flash once and stay ON to confirm this mode.
3. Remove the key from the ignition. The engine should keep on running.
4. Exit the vehicle, close and lock all doors. The engine should keep on running for 3, 6, 12 or 24 minutes (depending on setting).
Manual vehicle :
1. You are seated in the vehicle, the engine is running with the ignition key and the system is not in valet mode. Make sure all doors, hood
and windows are closed.
2. Place the gear shifter in NEUTRAL position.
3. Set the emergency brake (hand brake).
4. Release the brake pedal. If the option #14 (Automatic Sequence) is enable, go to step 6.
5. Press on the start button
.
6. The parking lights will flash once and stay ON. Remove the key from the ignition. The engine should keep on running.
7. Open the door(s) and exit the vehicle. During the door(s) is/are opened, press on the start button
.
8. Close and lock all doors. The engine should keep on running for 3, 6, 12 or 24 minutes (depending on setting).
7
FEATURES AND OPERATIONS
Deactivate the Starter Kill and Alarm (Permanently VALET Mode)
The valet mode allows you to deactivate alarm and starter kill and allows anyone to start and drive the vehicle with the key in the ignition. In valet mode, lock,
unlock and remote trunk release are still functional. Remote car starter and the alarm are not functional. This may be pratical in the following cases :
You have lost the remote.
The remote’s battery is empty.
You leave your vehicle to be serviced
You leave your vehicle to a valet service.
To enable the valet mode, there are 2 procedures:
Procedure A
1. Turn the ignition key to ON position (engine is not running). You have to perform the step #2 within 15 seconds. If 15 seconds is
expired, turn the ignition key OFF and redo this operation.
2. Depress 4 times the brake pedal, within 15 seconds after the ignition key is turned to ON. The LED lights on the antenna will stay ON confirming
that the system is in permanently valet mode. (2 chirps / 2 flashes)
Procedure B
1. Turn the ignition key to ON position (engine is not running). You have to perform the step #2 within 15 seconds. If 15 seconds is
expired, turn the ignition key OFF and redo this operation.
2. Press and hold the button found on the antenna for 3 seconds. The LED lights on the antenna will stay ON confirming that the
system is in permanently valet mode. (2 chirps / 2 flashes)
Note :
In the permanently valet mode, the starter kill function is deactivated . You cannot start your vehicle by remote. If you press on start button
, the parking lights
will flash 2 times and the engine will not start. To cancel the permanently valet mode, repeat steps 1 and 2. This time, the confirmation will be 1 chirp, 1
flash and the LED lights will turn off.
8
REMOTE ENGINE STARTER & ALARM DIAGNOSTIC
Diagnostic for Alarm :
Diagnostic for Remote Starter :
When the alarm is triggered, the system will keep in memory the last event.
This chart will help you find out which defective zone has triggered the
system.
First, the system must be disarmed by pressing the unlock button. Leave
the hood open then depress the brake pedal, count the number of flashes
from the parking lights to locate the issue. To repeat the flashes, depress
brake pedal again.
Each time you try to remote start and the vehicle doesn’t start, the parking lights
will flash to indicate the diagnostic of the system. Please refer to this chart and
locate the issues. You can also get the diagnostic code by opening the hood with
the system disarmed.
No false alarm
Brake pedal is depressed
0 Flash
2 Flashes
Valet mode is ON
1 Flash
3 Flashes
Hood is opened
2 Flashes
Shock sensor has been triggered
4 Flashes
System shut down via transmitter
3 Flashes
Hood has been opened
5 Flashes
Tach is not learned properly
4 Flashes
Panic mode has been triggered via transmitter
6 Flashes
Running time expired
5 Flashes
Trunk input has been triggered
1 Flash
7 Flashes
Starting time expired, but engine not running
8 Flashes
Exit sequence cancelled (manual transmission only)
9 Flashes
TACH wire disconnected
10 Flashes
Hand brake not pulled (manual transmission only)
11 Flashes
Door is opened (manual transmission only)
12 Flashes
Ignition is ON when remote start
9
Door has been opened
WARRANTY
The manufacturer guarantees to the purchaser of origin the remote starter and alarm to be free of defect material and labour. However, if it is proven that the product is
defective, inside the two year period as from the original date of purchase, the manufacturer will repair or replace, without expenses towards the purchaser, any part (excluding
any expenses incurred to deliver the product to the manufacturer) remote starter or alarm which the manufacturer considers defective. After the initial warranty period of 2
years, the manufacturer must repair or replace the defective products with a forwarding costs of 30.00$US. All the guarantees apply to the original purchaser and ONLY to the
vehicle in which it is initially installed. Repairs or replacement of the defective modules must remain at the discretion of the manufacturer. All the other parts, components,
accessories or optional equipment relating to the remote starter and alarm are not included in the guarantee of the manufacturer. This guarantee is nontransferable. The
original receipt must accompany a request for guarantee of service of any authorized retailer in factory. The fact of not conforming to these conditions can result in
cancellation of the guarantee.
This guarantee does not cover the following elements: expenses for labour of removal or reinstallation, transport charges, abuse, misuse or accidental damage of the remote
starter and the alarm or parts of the latter. This guarantee is cancelled in the event of amendments, repairs or deteriorations of any part of the product. The manufacturer
does not guarantee or does not insure against the loss of the vehicle or its contents. The models of alarm are used only as dissuasion against any possible loss. This alarm
can be considered for a reduction of the insurances; premiums please contact your insurance agent for more details. The manufacturer should not be held responsible for any
consequent damage connected to a violation of this or any other guarantee express or implicit. This guarantee gives you specific statutory duties. These rights vary according
to the area in which you reside.
CERTAIN DAMAGE IS EXCLUDED. The manufacturer declines any responsibility for additional damage caused by the product, including a financial loss, loss of use of the
product, hiring of vehicle or all other expenses connected to the maintenance and the guard of the product. The manufacturer declines any responsibility for any additional
damage caused by the product or resulting from his use, including the expenses of repair or replacement of other goods damaged or caused by his use, even if the product
functions correctly. This product is designed to dissuade from an unauthorized use of the vehicles in which it is installed. The manufacturer does not guarantee that the
product is proof against loss and vandalism and the human error or an inadequate use. The manufacturer does not accept any responsibility for any damage occurring any
kind that it is caused by a vehicle in which the product is installed or resulting from damage from its use. The manufacturer does not accept any responsibility for any damage
resulting from the loss of the vehicle or its contents, caused or claimed caused, directly or indirectly, by a failure of the product.
STARTER WITH MANUAL SHIFT – the installation of a remote starter MUST be carried out with an indicated manual transmission remote starter. It is the sole
responsibility of the operator of the vehicle to make sure that the vehicle is left with the transmission in neutral when the remote starter is used. The manual
transmission remote starter is designed as supplementary measure of safety ONLY! The manufacturer does not guarantee or does not insure against any
damage or loss of life, which can result from remote starting the remote starter when the vehicle is in gear. The models for manual transmission are only
designed to act as a preventive measure against starting in gear; it remains the sole responsibility of the operator or the owner of the vehicle to make sure the
transmission is in neutral.
10