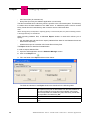
1
Legal notice:
T-Systems and the T-Systems logo are trademarks of T-Systems Business
Services GmbH. All other trademarks are the property of their respective
owners.
The information presented is subject to change without notice.
T-Systems assumes no responsibility for inaccuracies contained herein.
Copyright © 2014 T-Systems. All rights reserved.
The CE mark indicates that this product conforms to the following Council
Directives:
- 2004/108/EC (concerning electro-magnetic compatibility)
- 2006/95/EC (concerning electrical safety)
- 1999/5/EC (R&TTE)
Chapter 1
Overview
Presentation of the Statistics Application .................................... 1.1
What is the Statistics Application? ................................................................. 1.1
Presentation of the Interface ......................................................................... 1.1
Connecting and Disconnecting ......................................................... 1.1
Open the Statistics Application Using a Local Connection ............................ 1.2
Open the Statistics Application Using a Remote Connection ........................ 1.2
Open the Statistics Application Locally Without a Connection ...................... 1.2
Close the Statistics Application ..................................................................... 1.2
Chapter 2
Statistics Application Presentation
Accessing the Statistics Application .............................................. 2.1
Configuration of Statistics Period .................................................... 2.1
Configure the Statistics Period for Call Statistics .......................................... 2.1
Configure the Statistics Period for Line Statistics .......................................... 2.2
Configure the Period of Statistics for the ACD ........................... 2.2
Configure the Statistics Period for the ACD - Agent Statistics ...................... 2.2
Configure the Statistics Period for the ACD - Group Statistics ...................... 2.3
Graph Configurations ........................................................................... 2.3
! 0-1
"# $%&
Configure Graphs for Call Statistics .............................................................. 2.3
Configure Graphs for Line Statistics .............................................................. 2.3
Configure Graphs for the ACD ...................................................................... 2.4
Set Call Statistics Parameters ........................................................... 2.5
Set Parameters by Application ...................................................................... 2.5
Set parameters by Line ................................................................................. 2.5
Set Parameters for Automatic Printing .......................................... 2.5
Set Parameters for Automatic Printing of Agent Statistics ............................ 2.5
Set the Parameters for Automatic Printing of Group Statistics ...................... 2.6
Set Parameters for Automatic Printing Profiles ............................................. 2.6
Definition of Agents .............................................................................. 2.7
Define Agents to Be Analyzed ....................................................................... 2.7
Definition of Groups .............................................................................. 2.7
Define Groups to Be Analyzed ...................................................................... 2.7
Chapter 3
Looking Up Statistics
Graph Statistics ...................................................................................... 3.1
Look Up Statistics on Agents and Groups ..................................................... 3.1
Display Statistics as a Graph ......................................................................... 3.1
Statistics as Time Periods .................................................................. 3.1
Display Agent Statistics as Time Periods ...................................................... 3.1
Display Group Statistics as Time Periods ..................................................... 3.2
Absolute Value Statistics .................................................................... 3.2
Display Agent Statistics as an Absolute Value .............................................. 3.2
Display Group Statistics as an Absolute Value ............................................. 3.3
Display Statistics as an Absolute Value for Call Statistics ............................. 3.3
Statistics as Percentages .................................................................... 3.4
Display Group Statistics as a Percentage ..................................................... 3.4
Types .......................................................................................................... 3.4
Look Up Call Statistics as a Function of Call Types ...................................... 3.5
Look Up Time Statistics as a Function of Call Types .................................... 3.5
0-2
! "# $%&
Definition of Call Types for Group Statistics ............................... 3.5
Definition of Time Types for Group Statistics ............................. 3.6
Line Statistics .......................................................................................... 3.6
Look Up Statistics on Line Busy Rate ........................................................... 3.6
Look Up Statistics on Line Saturation Rate ................................................... 3.7
Look Up Line Saturation Periods ................................................................... 3.7
Exporting Statistics Files .................................................................... 3.7
Exporting Statistics Files ............................................................................... 3.7
CSV Statistics File Format ............................................................................. 3.9
Ticket Types .................................................................................................. 3.9
Lost Calls List ......................................................................................... 3.13
Consult the Lost Calls List ............................................................................3.13
! 0-3
"# $%&
0-4
! 1.1
Presentation of the Statistics Application
1.1.1
What is the Statistics Application?
The Statistics application is a software package which allows you to access daily statistics on
groups, agents, lines and calls. This information is presented in the form of tables and/or
graphs.
The principal purposes of this application are to:
1. Display statistics as:
• Graphs,
• Periods of time,
• Absolute values,
• Percentages.
2. Configure the frequency with which statistics are compiled.
3. Configure the appearance of graphs.
4. Set the parameters of statistics.
5. Set the parameters for automatic printing.
1.1.2
Presentation of the Interface
A typical page of the application contains three main areas:
-
The upper tabs area.
-
The body of the screen.
-
The lower tabs area.
The upper tabs area.
This area is used to change how the statistics are displayed and to set the parameters for
automatic printing.
The body of the screen.
This area is used to display the elements you want to obtain statistics on and to display
information related to the tabs selected.
The lower tabs area.
This area is used to access the different options for configuring statistics in the Statistics
application.
1.2
Connecting and Disconnecting
The Statistics application can be used to compile statistics using a local connection, remote
connection or locally without a connection.
! 1-1
Chapter
1.2.1
1
'
'(
Open the Statistics Application Using a Local Connection
To open the Statistics application using a local connection:
1. Select the Statistics Manager application in your program manager.
2. Enter the name or IP address of the Octopus Open Communication Server
3. If needed, select a different language
4. Enter the system administration password
The Statistics Manager window is displayed.
The functions available in this window are:
• Configuration: used to configure the Statistics Manager application.
• Call Statistics: used to access statistics on calls.
• Line Statistics: used to access information on call center internal resources.
• ACD: used to access group and agent statistics and configure automatic printing of
these statistics.
• Export: used to export statistics files in binary format or .CSV format.
5. Select the function you want to access. The window for this function is displayed.
1.2.2
Open the Statistics Application Using a Remote Connection
To open the Statistics application using a remote connection:
1. Open a OMC connection on the remote server.
2. Launch the Statistics application from OMC using the ACD statistics manager link under
Automatic Call Distribution.
1.2.3
Open the Statistics Application Locally Without a Connection
The Statistics application can be used to display statistics locally by using the ACD statistics
files available on the PC (hard disk or other medium).
1. Select the Statistics application in your program manager.
2. Remove the name or IP address of the PCX and click on OK.
3. Click on Configuration.
4. Select the Trace folder in which the statistics files are stored.
5. Select the function that you want to display.
1.2.4
Close the Statistics Application
To close the Statistics application, use the following procedure:
1. Close the current window. The Statistics Manager window is displayed.
2. Click on the
1-2
icon . The interface is closed.
! 2.1
Accessing the Statistics Application
Procedure
1. Access the Statistics Manager home page, see: Statistics Application - Overview Connecting and Disconnecting
2. Select the desired type of statistics by clicking the corresponding button
Note:
The Export option is not available in a local connection
2.2
Configuration of Statistics Period
2.2.1
Configure the Statistics Period for Call Statistics
Procedure
1. Access the Call Statistics window.
2. Click the Statistics tab. The parameter setting window appears. The period can be
configured on the basis of three criteria:
• Daily: used to select a full day or a time slot and to choose whether the statistics are
presented every half-hour or hour.
! 2-1
Chapter
2
•
•
)
+Period: used to configure the statistics period with a start date and an end date for
the period in question.
Monthly: used to configure the statistics period based on a specific calendar month.
3. Select the configuration parameters you require, then click Apply to confirm the data.
Note:
For all these choices, it is possible to select the time slot over 24 hours or over a value defined in the
drop-down menus of the option Between.
2.2.2
Configure the Statistics Period for Line Statistics
Procedure
1. Access the Line Statistics window.
2. Click the Statistics button. The parameter setting window appears. The period for which
statistics are compiled can be configured on the basis of three criteria:
• Daily: used to select a full day or a time slot and to choose whether the statistics are
presented every half-hour or hour.
• +Period: used to configure the statistics period with a start date and an end date for
the period in question.
• Monthly: used to configure the statistics period based on a specific calendar month.
3. Select the configuration parameters you require, then click Apply to confirm the data.
4. Click OK to close the window.
Note:
For all these choices, it is possible to select the time slot over 24 hours or over a value defined in the
drop-down menus of the option Between.
2.3
Configure the Period of Statistics for the ACD
2.3.1
Configure the Statistics Period for the ACD - Agent Statistics
Procedure
1. Access the ACD window.
2. Click the Agent Statistics icon.
3. Click the Statistics tab. The parameter setting window appears. The period for which
statistics are compiled can be configured on the basis of three criteria:
• Daily: used to select a full day or a time slot and to choose whether the statistics are
presented every half-hour or hour.
• +Period: used to configure the statistics period with a start date and an end date for
the period in question.
• Monthly: used to configure the statistics period based on a specific calendar month.
4. Select the configuration parameters you require, then click Apply to confirm the data.
Note:
For all these choices, it is possible to select the time slot over 24 hours or over a value defined in the
drop-down menus of the option Between.
2-2
! )
2.3.2
Configure the Statistics Period for the ACD - Group Statistics
Procedure
1. Access the ACD window.
2. Click the Group Statistics icon.
3. Click the Statistics tab. The parameter setting window appears. The period for which
statistics are compiled can be configured on the basis of three criteria:
• Daily: used to select a full day or a time slot and to choose whether the statistics are
presented every half-hour or hour.
• +Period: used to configure the statistics period with a start date and an end date for
the period in question.
• Monthly: used to configure the statistics period based on a specific calendar month.
4. Select the configuration parameters you require, then click Apply to confirm the data.
Note:
For all these choices, it is possible to select the time slot over 24 hours or over a value defined in the
drop-down menus of the option Between.
2.4
Graph Configurations
2.4.1
Configure Graphs for Call Statistics
Procedure
1. Access the Call Statistics window.
2. Click the Options tab. The parameter setting window appears. It contains four areas:
• Appearance: used to configure the color of graph curves.
• Gridlines: used to configure the type of gridlines used in graphs.
• Graph: used to select graph type.
• Option: used to select the type of call you want to display statistics on. This
information will be displayed in the Absolute Value tab.
3. Change parameters as required.
4. Click Apply to confirm the data.
2.4.2
Configure Graphs for Line Statistics
Procedure
1. Access Line Statistics window.
2. Click the Options button. The parameter setting window appears. It contains four areas:
• Appearance: used to configure the color of graph curves.
• Gridlines: used to configure the type of gridlines used in graphs.
• Graph: used to select graph type.
• Option: used to select the type of call you want to display statistics on. This
! 2-3
Chapter
2
)
information will be displayed in the Absolute Value tab.
3. Change parameters as required.
4. Click OK to confirm the data.
2.4.3
Configure Graphs for the ACD
2.4.3.1
Configure Graphs for the ACD - Group Statistics
Procedure
1. Access the ACD window.
2. Click the Group Statistics icon.
3. Click the Graph Options tab. The parameter setting window appears. It contains four
areas:
• Top area: used to select graph color.
• Central area: used to select graph type.
• Synthesis area: used to define what type of call is used for the statistics. The user can
choose between Incoming Calls (groups together calls answered, deterred, abandoned
and closed, for the day and the groups selected) and Answered Calls (groups together
direct ACD calls, calls waiting in line, in line longer than T1 and in line longer than T2
for the day and the groups selected).
• Number section: used to select how the graph is displayed through a choice of
Absolute Value or Time.
4. Change parameters as required.
5. Click Apply to confirm the data.
2.4.3.2
Configure the Graphs for the ACD - Agent Statistics
Procedure
1. Access the ACD window.
2. Click the Agent Statistics icon.
3. Click the Options tab. The parameter setting window appears. It contains four areas:
• Top area: used to select graph color.
• Central area: used to select graph type.
• Synthesis area: used to group together:
• Number of Calls: groups together ACD calls, incoming calls, outgoing calls, on
duty calls, off duty calls, no answer, temporary absence and clerical work.
• Total Time: groups together the totals of ACD conversations, ACD rings and other
conversations, for the day, the agent(s) and selected groups.
• Average Time: groups together ACD conversations, ACD rings and other
conversations, for the day, the agent(s) and selected groups.
• Detail area: used to define graphs related to specific statuses.
4. Change parameters as required.
5. Click Apply to confirm the data.
2-4
! )
2.5
Set Call Statistics Parameters
2.5.1
Set Parameters by Application
Statistics software can be used to select the application for which the statistics will be
compiled.
Procedure
1. Access the Call Statistics window.
2. Click the Parameters tab.
3. In the Parameters area, select By Application. The Applications List drop-down menu
is displayed.
4. Select the application whose statistics you want to display. The selection is displayed in
the Applications Selected area.
5. In the Threshold area, define (in seconds) the thresholds T1 and T2.
Note:
By default, T1 and T2 are set to 0. The value of these two parameters can be used to calculate and
update the fields Number of Calls <= T1 and Number of Calls> = T2.
6. Click Apply to validate.
2.5.2
Set parameters by Line
Statistics software can be used to select the lines for which statistics will be compiled.
Procedure
1. Access the Call Statistics window.
2. Click the Parameters tab.
3. In the Parameters area, select By Line. The Line Selection area is displayed to the right
of the window.
4. Check the boxes corresponding to the lines you want statistics on.
5. In the Threshold area, define (in seconds) the thresholds T1 and T2.
Note:
By default, T1 and T2 are set to 0. The value of these two parameters can be used to calculate and
update the fields Number of Calls <= T1 and Number of Calls> = T2.
6. Click Apply to confirm the data.
2.6
Set Parameters for Automatic Printing
2.6.1
Set Parameters for Automatic Printing of Agent Statistics
The Statistics application can be used to program automatic printing of daily statistics at
certain times of day. Up to 8 printing operations can be programed per day.
! 2-5
Chapter
2
)
Procedure
1. Access the ACD window.
2. Click Automatic Printing of Statistics - Agents. The window is displayed.
3. Click on the Print Parameters tab.
4. In the General Parameters area, define the type of printing required.
5. Select the time range and frequency of automatic printing.
6. In the right-hand area, define:
• the automatic printing time,
• the number(s) of the group(s) concerned,
• the print profile(s) relating to defined profiles 1, 2, 3, 4.
• the number of the agent (only when printing agent statistics).
Note 1:
To select all agents, enter 99 in the Agent column.
7. Click Apply to confirm the data.
8. Click OK.
Note 2:
Statistics can be printed manually from the Group Statistics screen by clicking on the Print tab.
2.6.2
Set the Parameters for Automatic Printing of Group Statistics
The Statistics application can be used to program automatic printing of daily statistics at
certain times of day. Up to 8 printing operations can be programmed per day.
Procedure
1. Access the ACD window.
2. Click Automatic Printing of Statistics - Groups. The window is displayed.
3. Click on the Print Parameters tab.
4. In the General Parameters area, define the type of printing required.
5. Select the time range and frequency of automatic printing.
6. In the right-hand area, define:
• the automatic printing time,
• the number(s) of the group(s) concerned by the printing operation,
• the print profile(s) relating to defined profiles 1, 2, 3, 4.
7. Click Apply to confirm the data.
8. Click OK.
Note:
Statistics can be printed manually from the Agent Statistics screen by clicking on the Print tab.
2.6.3
Set Parameters for Automatic Printing Profiles
The Statistics application can be used to print four types of print profile, depending on the
2-6
! )
analysis required.
Procedure
1. Access the ACD window.
2. Depending on which type of automatic printing parameters you want to set, click
Automatic Printing of Statistics - Agents or Automatic Printing of Statistics - Groups.
3. Click the Profile 1, 2, 3 or 4 tab.
4. For each profile, select the different statistics screens you want to print by checking the
corresponding boxes.
5. Click Apply to confirm the data.
6. Click OK.
2.7
Definition of Agents
2.7.1
Define Agents to Be Analyzed
Procedure
1. Access the ACD window.
2. Click Agent Statistics.
3. Click the Statistics tab.
4. From the drop-down menu in the Agent area, select the number of the agent to be
included in the statistics.
Note:
Select All to include all agents.
5. In the Group area, check the box of the group(s) to which the agent belongs.
6. Click Apply to confirm the data.
2.8
Definition of Groups
2.8.1
Define Groups to Be Analyzed
Procedure
1. Access the ACD window.
2. Click Group Statistics.
3. Click the Statistics tab.
4. In the Group area, check the boxes of the groups for which you want statistics.
5. Click Apply to validate.
! 2-7
Chapter
2-8
2
)
! 3.1
Graph Statistics
3.1.1
Look Up Statistics on Agents and Groups
1. Select the Statistics application in your program manager: the Statistic Manager window
is displayed.
2. Click the ACD button. The ACD window is displayed.
The functions available in this window are:
• Group Statistics: used to display group statistics as a graph, time period, absolute
value or percentage.
• Agent Statistics: used to display agent statistics as a graph, time period or absolute
value.
• Automatic Printing of Statistics - Groups: used to set the parameters for automatic
printing of statistics on groups.
• Automatic Printing of Statistics - Agents: used to set the parameters for automatic
printing of statistics on agents.
3.1.2
Display Statistics as a Graph
Procedure
1. Access the Statistics Manager home page.
2. Select the function you want statistics on. The window selected is displayed.
3. Click the Graph tab. The statistics are displayed as a graph.
3.2
Statistics as Time Periods
3.2.1
Display Agent Statistics as Time Periods
Procedure
1. Access the ACD window.
2. Click the Agent Statistics icon. The window is displayed.
3. Click the Times Table tab. The following statistics are available as time periods:
• Average ACD Com.: total ACD conversation time/number of ACD calls answered by
the agent.
• Average ACD Ring Time: total ring time of ACD calls arriving on the agent's set (ring
phase) / number of ACD calls answered by agent.
• Average Other Com: time during which the of the agent's line is busy (Incoming and
Outgoing) excluding calls originating from the ACD server/number of times this set is
busy, excluding ACD calls.
• Total Fully Busy: total ringing time of calls from the ACD server + time of ACD
conversations + time of Other calls (Incoming and Outgoing)
! 3-1
Chapter
3
•
•
•
•
•
3.2.2
*+, Total ACD Com: total conversation time of ACD calls processed by the agent.
Total Other Com: time during which the agent's line is busy (Incoming and
Outgoing) excluding calls of ACD origin.
Total Temporary Absences: total time the agent spends in Temporary status.
Total Clerical Work: total time the agent spends in Clerical Work status.
Total On Duty: total time the agent is connected (on duty).
Display Group Statistics as Time Periods
Procedure
1. Access the ACD window.
2. Click the Group Statistics icon. The window is displayed.
3. Click the Time tab. Statistics on the following elements are displayed:
• Average Busy Time: total time of answered calls (time measured between the
welcome announcement and the end of the call), divided by the number of calls
answered.
• Average Routing Time: total routing time of answered calls, divided by the number of
calls answered. The announcement time is counted in the routing time.
• Average Waiting Time: total time of calls waiting in line, divided by the number of
waiting calls answered.
• Average Ringing Time: total ringing time of calls answered, divided by the number of
calls answered.
• Average Conversation Time: total conversation time of calls answered, divided by the
number of calls answered.
• Average Abandoned Time: total time of calls waiting in line before the caller
abandons the call (the caller hangs up before being connected to an agent), divided by
the number of abandoned calls.
• Number of Abandoned Calls: total time of abandoned calls when a caller hung up
while they were in line, or while being transferred after leaving the line. These calls
have gone through the waiting line. They are a subset of the counter.
• Transfer Number Total: number of calls routed to the transfer number (programed in
OMC/Call Centre/ACD Service/General Parameters/General tab) following an
abnormal situation (group open with no agents assigned, or call waiting when the last
agent has gone off duty, for example). The first call is routed to the transfer number
and the following ones to the waiting line.
3.3
Absolute Value Statistics
3.3.1
Display Agent Statistics as an Absolute Value
Procedure
1. Access the ACD window.
2. Click the Agent Statistics icon. The window is displayed.
3. Click the Calls Table tab. Statistics on the following elements are displayed:
• ACD Calls: number of ACD calls answered by the agent.
3-2
! *+, •
•
Incoming Calls: number of non-ACD calls arriving on the agent's set (DDI external
calls or internal calls to the set).
Outgoing calls: number of non-ACD calls initiated by the agent (internal or external
calls to the set).
Caution:
This is only possible if the protocol allows the information to be obtained; otherwise all
Non-ACD or Other calls are placed in the Incoming Calls column.
•
No Answer: number of calls of ACD origin that the agent does not answer.
Note:
There may be several no answers for the same incoming call number.
•
•
•
•
3.3.2
Temporary Absence: number of times the agent switches to Temporary Absence
status.
Clerical Work: number of times the agent switches to Clerical Work status.
On Duty: number of times the agent comes On Duty.
Off Duty: number of times the agent goes Off Duty.
Display Group Statistics as an Absolute Value
Procedure
1. Access the ACD window.
2. Click the Group Statistics icon. The window is displayed.
3. Click the Absolute Value tab. Statistics on the following elements are displayed:
• Incoming Calls: total number of calls arriving in the call distribution chain.
• Answered Calls: number of ACD calls transferred to an agent and connected,
regardless of the group (called or through overflow).
• Calls Waiting: Calls in Line: number of calls placed in line before being answered
(connected to the customer):
• Calls in Line > S1: number of calls for which the wait period is longer than
threshold S1. This counter is a subset of the Calls in Line counter.
• Calls in Line > S2: number of calls for which the wait period is longer than
threshold S2. This counter is a subset of the Calls in Line > S1 counter.
• Calls Deterred: number of calls routed to the dissuasion announcement following
saturation of calls waiting in line or if no agent is defined for a given group.
• Calls Abandoned: number of calls which have left the ACD, the caller having hung up
before being connected to an agent, regardless of the call's routing phase.
• Service Closed Calls: number of calls while the group is closed.
• Overflow Calls: number of calls answered by an agent belonging to the group taking
the overflow from the group requested. This counter is a subset of the Answered Calls
counter.
Note:
S1 and S2 are two threshold values which can be defined in OMC/ACD Service/General
Parameters/General tab.
3.3.3
Display Statistics as an Absolute Value for Call Statistics
! 3-3
Chapter
3
*+, Procedure
1. Access the Call Statistics window.
2. Click the Absolute Value tab. Information related to lines is displayed as an absolute
value. Information is provided on the following:
• Total number of calls.
• Number of calls which are shorter than T1.
• Number of calls which are longer than T2.
• Total call time.
• Average call time = total call time/total number of calls.
• Maximum time of a call.
• Minimum time of a call.
3.4
Statistics as Percentages
3.4.1
Display Group Statistics as a Percentage
Procedure
1. Access the ACD window.
2. Click the Group Statistics icon. The window is displayed.
3. Click the Percentage tab. Statistics on the following elements are displayed:
• Incoming Calls: total number of calls arriving in the call distribution chain.
• Answered Calls: number of ACD calls transferred to an agent and connected,
regardless of the group (called or through overflow).
• Calls Waiting: Calls in Line: number of calls placed in line before being answered
(connected to the customer):
• Calls in Line > S1: number of calls for which the wait period is longer than
threshold S1. This counter is a subset of the Calls in Line counter.
• Calls in Line > S2: number of calls for which the wait period is longer than
threshold S2. This counter is a subset of the Calls in Line > S1 counter.
• Calls Deterred: number of calls routed to the dissuasion announcement following
saturation of calls waiting in line or if no agent is defined for a given group.
• Calls Abandoned: number of calls which have left the ACD, the caller having hung up
before being connected to an agent, regardless of the call's routing phase.
• Service Closed Calls: number of calls while the group is closed.
• Overflow Calls: number of calls answered by an agent belonging to the group taking
the overflow from the group requested. This counter is a subset of the Answered Calls
counter.
Note:
S1 and S2 are two threshold values which can be defined in OMC/ACD Service/General
Parameters/General tab.
3.5
3-4
Types
! *+, 3.5.1
Look Up Call Statistics as a Function of Call Types
A maximum of 10 type codes can be created in the ACD general parameters. When using the
Agent Assistant, the user can assign (or define) each call processed by selecting one of the
type codes.
Procedure
1. Access the ACD window.
2. Click the Agent Statistics icon.
3. Click the Calls Table tab. Call statistics are displayed as an absolute value in the form of a
table.
4. Click the Options button. The Calls Table area is displayed.
5. Select the Calls/Type box. The type status page is displayed.
Note:
The General box is checked by default. The General page can be used to display all calls.
6. Click OK.
3.5.2
Look Up Time Statistics as a Function of Call Types
Procedure
1. Access the ACD window.
2. Click the Agent Statistics icon.
3. Click the Calls Table tab.
4. Click the Options button. The Times Table area is displayed.
5. Select:
• Total Time/Type: to display the total time of calls on the basis of their type.
• Average Time/Type: to display the average call time based on their type.
6. Click OK.
Note:
The General box is checked by default. The General page can be used to display the time of all calls.
3.6
Definition of Call Types for Group Statistics
Statistics can be produced on the following elements:
-
Incoming Calls: total number of calls arriving in the call distribution chain.
-
Answered Calls: number of ACD calls transferred to an agent and connected, regardless
of the group (called or through overflow).
-
Calls Waiting: Calls in Line: number of calls placed in line before being answered
(connected to the customer), with:
• Calls in Line > S1: number of calls for which the wait period is longer than threshold
S1. This counter is a subset of the Calls in Line counter.
• Calls in Line > S2: number of calls for which the wait period is longer than threshold
! 3-5
Chapter
3
*+, S2. This counter is a subset of the Calls in Line > S1 counter.
-
Calls Deterred: number of calls routed to the dissuasion announcement following
saturation of calls waiting in line or if no agent is defined for a given group.
-
Calls Abandoned: number of calls which have left the ACD, the caller having hung up
before being connected to an agent, regardless of the call's routing phase.
-
Service Closed Calls: number of calls while the group is closed.
-
Overflow Calls: number of calls answered by an agent belonging to the group taking the
overflow from the group requested. This counter is a subset of the Answered Calls counter.
Note:
S1 and S2 are two threshold values which can be defined in OMC/ACD Service/General
Parameters/General tab.
3.7
Definition of Time Types for Group Statistics
The following statistics are available as time periods:
-
Average Busy Time: total time of answered calls (time measured between the welcome
announcement and the end of the call), divided by the number of calls answered.
-
Average Routing Time: total routing time of answered calls, divided by the number of
calls answered. The announcement time is counted in the routing time.
-
Average Waiting Time: total time of calls waiting in line, divided by the number of waiting
calls answered.
-
Average Ringing Time: total ringing time of calls answered, divided by the number of calls
answered.
-
Average Conversation Time: total conversation time of calls answered, divided by the
number of calls answered.
-
Average Abandoned Time: total time of calls waiting in line before the caller abandons
the call (the caller hangs up before being connected to an agent), divided by the number of
abandoned calls.
-
Number of Abandoned Calls: total time of abandoned calls (following a caller hanging
up) when they were in line, or while being transferred after leaving the line. These calls
have gone through the waiting line. They are a subset of the counter.
-
Voluntary Exits: number of calls which have voluntarily left the line (by pressing the * key)
without hanging up, to leave a message in the group mailbox.
-
Transfer Number Total: number of calls routed to the transfer number (programed in
OMC/Call Centre/ACD Service/General Parameters/General tab) following an abnormal
situation (group open with no agents assigned, or call waiting when the last agent has
gone off duty from the service, for example).
The first call is routed to the transfer number and the following ones to the waiting line.
3.8
Line Statistics
3.8.1
Look Up Statistics on Line Busy Rate
The line busy rate is the time when a line(s) is (are) busy compared to the maximum busy time
3-6
! *+, possible. Line information shows how the call center internal resources are being used.
The busy rate can be calculated for a given line using the following criteria:
-
Daily: the busy rate is calculated for half-hour or hour slots with statistics produced over 24
hours or over a given time slot.
-
+Period: the busy rate is calculated for a 24-hour time period over several consecutive
days.
-
Monthly: the busy rate is calculated for a 24-hour time period.
-
Lines: the busy rate is calculated on a line by line basis or for several lines.
Procedure
1. Access Line Statistics window.
2. In the Line Statistics window, click the Busy tab. The graphical representation of the line
busy rate is displayed.
3.8.2
Look Up Statistics on Line Saturation Rate
The line saturation rate is a busy rate of 100%. These are times when the line or lines cannot
handle other calls.
Procedure
1. Access the Line Statistics window.
2. In the Line Statistics window, click the Saturation tab. The graphical representation of
the line saturation rate is displayed as a percentage.
Note:
The saturation rate is calculated for a given day. Only the Daily statistics mode can be selected. The
statistics modes Period and Monthly cannot be used to display the saturation rate.
3.8.3
Look Up Line Saturation Periods
The Line Saturation Period screen shows all periods during which the lines are saturated.
Procedure
1. Access Line Statistics window.
2. In the Line Statistics window, click the Line Saturation Period tab. The saturation
periods are displayed as a list.
3.9
Exporting Statistics Files
3.9.1
Exporting Statistics Files
You can export the statistics files corresponding to a specified time period (there is one file per
day), in a specified file format.
As soon as it is connected to a system, the statistics application automatically converts files to
binary format, but you can manually request the export of statistics files in one of two file
formats:
! 3-7
Chapter
3
*+, -
CSV format files (for external use)
-
binary files (for use by the statistics application in local mode)
The files are transferred to a directory which is specific to the connected system. This directory
is created from the MAC address of the PBX server. A subdirectory bin is used to receive
binary format files and a subdirectory csv is used to receive CSV format files.
Note:
When viewing (binary format) files or exporting (binary or CSV format) files, only files not already present
in the target directory are transferred.
When exporting statistics files, a dedicated Export window is used which allows you to
specify:
-
the start date and end date for the export (statistics files dated on and between these two
dates will be exported),
-
whether the export is to transfer CSV format files or binary files.
The Export window is described in detail below.
In order to export statistics files:
1. Open the ACD application from the Statistics Manager screen.
2. Click on the Export icon:
3. Fill in the fields of the Export window shown below.
The fields and buttons of the Export window are described in the following table.
3-8
Target directory
Contains the path of the directory to which the statistics files will
be exported. This path is determined from the MAC address of
the remote PBX server and cannot be modified. CSV format
files are exported to a subdirectory csv, and binary format files
are exported to a subdirectory bin.
Start date
Date of the earliest statistics file to be included in the export.
End date
Date of the most recent statistics file to be included in the export.
! *+, 3.9.2
Export .csv files
If this radio button is selected, the statistics files exported will be
in CSV format. These files can be subsequently reprocessed by
the user. Details of this file format are provided in the section
Format of CSV Statistics Files.
Export binary files
If this radio button is selected, the statistics files exported will be
in binary format. These files can be subsequently used by the
statistics application in local mode.
Available period
Indicates the range of dates for which statistics files are available for export.
Export
Used to execute the export process.
Close
Used to cancel the export request and to return to the statistics
application main screen.
CSV Statistics File Format
Statistics files in the CSV format contain information concerning agent actions, ACD calls, and
calls received on the VTM (Virtual and Media Terminal).
This information is presented in the file as a series of entries, referred to as tickets. The
different types of ticket are as follows:
-
Agent Activity tickets; see Agent Activity Ticket
-
Group Status tickets; see Group Status Ticket
-
ACD Call tickets; see ACD Call Ticket
3.9.3
Ticket Types
3.9.3.1
Agent Activity Ticket
Once a statistics file has been created, these tickets are generated for all logged agents at
each change of an agent's status.
Examples
2004/01/30;10:10:08;F;01;101;S;1;2;3;4; ; ; ; ;
2004/01/30;10:10:08;F;02;102;S;1;2;3;4; ; ; ; ;
2004/01/30;10:10:08;F;03;103;S;1; ; ; ; ; ; ; ;
2004/01/30;10:10:08;F;04;104;S;1;2; ; ; ; ; ; ;
2004/01/30;10:10:08;F;08;108;H;1;2; ; ; ; ; ; ;
2004/01/30;10:10:08;F;09;101;H; ; ; ;4;5;6;7; ;
2004/01/30;10:10:08;F;10;110;H; ; ; ;4;5;6;7; ;
2004/01/30;10:10:08;F;11;111;T;1; ; ; ; ; ; ; ;
2004/01/30;10:10:08;F;12;112;A; ;2; ; ; ; ; ; ;
Explanation of Elements
! 3-9
Chapter
3.9.3.2
3
*+, Element
Format
Description
Element 1
yyyy/mm/dd
Date of ticket
Element 2
hh:mm:ss
Time of ticket
Element 3
F
Letter indicating ticket format
Element 4
xx
Physical number of agent (from 01 to
32)
Element 5
qmcdu
Agent's telephone number
Element 6
x
Code indicating operation performed:
S – Put into service
H – Withdrawn from service
T – Other task
A – Temporary absence
G – Change of group
Element 7
x
1 if the agent belongs to group 1
Element 8
x
2 if the agent belongs to group 2
Element 9
x
3 if the agent belongs to group 3
Element 10
x
4 if the agent belongs to group 4
Element 11
x
5 if the agent belongs to group 5
Element 12
x
6 if the agent belongs to group 6
Element 13
x
7 if the agent belongs to group 7
Element 14
x
8 if the agent belongs to group 8
Agent Telephone Ticket Status
These tickets are generated for all logged agents at each change of an agent’s telephone
status.
Examples
2004/01/30;10:10:08;P;01;101;P;
2004/01/30;10:10:08;P;02;102;N;
2004/01/30;10:10:08;P;01;101;D;
Explanation of Elements
3-10
Element
Format
Description
Element 1
yyyy/mm/dd
Date of ticket
Element 2
hh:mm:ss
Time of ticket
Element 3
P
Letter indicating ticket format
Element 4
xx
Physical number of agent (from 01 to
32)
Element 5
qmcdu
Agent's telephone number
! *+, Element 6
3.9.3.3
x
Code indicating type of event:
O – Line is now occupied
P – Line is no longer occupied
D – Line is available again
N – No answer (ACD call)
B – Double call
F – Call to non-existent number
X – Anomaly (telephone not connected)
Group Ticket Status
These tickets are generated at each change an ACD group status.
Examples
2004/01/30;10:10:08;G;01;a;
2004/01/30;10:10:08;G;02;b;
Explanation of Elements
3.9.3.4
Element
Format
Description
Element 1
yyyy/mm/dd
Date of ticket
Element 2
hh:mm:ss
Time of ticket
Element 3
G
Letter indicating ticket format
Element 4
xx
Physical number of group (from 01 to
08)
Element 5
x
Code indicating type of event:
a – Group manually opened
b – Automatic group opening/closing
selected*
c – Group manually closed
* According to specified opening/closing times
ACD Call Ticket
These tickets are generated after every ACD call.
Examples
2004/04/30;10:15:23;A;3;1;1;01;101;262;32;0;22;230;S;3;0323456789;9876;
2004/04/30;10:15:23;A;3;1;1;01;101;32;0;28;22;0;N; 0;0323456789;9876;
2004/04/30;10:15:23;A; 3; 1; 1; ; ;12;0;0;0;0;D;0;0323456789;9876;
2004/04/30;10:15:23;A; 3; ; ; ; ;0;0;0;0;0;P;0;0323456789;9876;
Explanation of Elements
! 3-11
Chapter
3-12
3
*+, Element
Format
Description
Element 1
yyyy/mm/dd
Date of ticket
Element 2
hh:mm:ss
Time of ticket
Element 3
A
Letter indicating ticket format
Element 4
T
Indicates that the timeout /Max Delivery Time/ expired and the call has
been redistributed from the queue to
deterrence
Element 5
xx
Physical number of route that processed the call (from 01 to 14)
Element 6
xx
Number of requested ACD group
(from 01 to 08)
Element 7
xx
Number of allocated ACD group (from
01 to 08)
Element 8
xx
Physical number of last agent called
(from 01 to 32)
Element 9
qmcdu
Telephone number of last agent called
Element 10
xxxx
Time period ACD function was occupied (from call arrival until call termination by agent or caller).
Element 11
xxx
Time period for call routing (from call
arrival until communication with agent
began).
Element 12
xxx
Time period for call waiting (time
spent in line).
Element 13
xxx
Time period telephone was ringing.
Element 14
xxxx
Time period for conversation (from call
answered by agent until call terminated by agent or caller).
! *+, Element 15
x
Letter indicating call outcome:
S – Call successfully handled
D – Call deterred
A – Call abandoned
F – Call received for closed group
(outside group opening hours)
f – Call received for closed group
(manually closed)
R – Call redirected to fowarding number
Q – Caller voluntarily left queue (key
*)
P – Call lost (saturation of incoming
call capacity)
X – Anomaly (ACD engine not synchronized with PBX, and CSTA event
sent)
Element 16
xx
Qualification code for the call (from 00
to 10) pro-vided by the application
agent
Element 17
n
Caller’s number
Element 18
n
Number called
3.10
Lost Calls List
3.10.1
Consult the Lost Calls List
Lost calls are calls which do not reach the ACD when all the lines are saturated.
Procedure
1. Access the Call Statistics window.
2. Click the Lost Calls List tab. A window is displayed and provides the following information
on lost calls:
• Date.
• Time.
• Line.
• Application.
• Caller number.
• Caller number.
• IUU (user-to-user information).
! 3-13
Chapter
3-14
3
*+, !