1
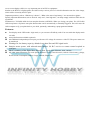
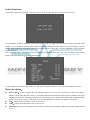
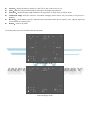
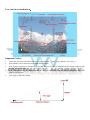
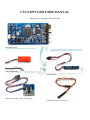
CYCLOPS OSD USER MANUAL
Thank you for choosing CYCLOPS OSD
OSD Main board
5HZ GPS Module
Setting board
Voltage and current sensor(50V/100A)
Temperature sensor (-10~100Co)
An on-screen display (OSD) is a very important part of an FPV'ers equipment.
Similar to the HUD in a fighter-plane, the OSD overlays various pieces of critical information onto the video image,
which will be viewed by the FPV pilot.
Important questions, such as “Which way is home?”, “What is the state of my battery?” are answered at a glance.
Equally important information, such as 'how far away am I', 'how high am I', can help comply with local FPV rules &
regulations.
Furthermore, CYCLOPS OSD also has autopilot function (OPTION). When you losing your plane. The CYCLOPS
OSD incorporates a fly-home auto-pilot function that can be automatically or manually triggered. This will cause the
OSD computer to fly your plane back to you while, optionally, maintaining a preprogrammed altitude.
Features:
z
z
Two display mode: HUD mode / digit mode, or you can turn off OSD by radio. You can switch the display mode
via radio.
Auto-pilot function available (optional).
z
One additional independent power input, provide non-12V voltage for camera or video TX. The power status can
be monitored.
z
z
Warnings for low battery capacity, altitude lower than 50m and GPS signal weak.
Intuitive menu system, with onboard menu buttons. No R/C receiver or remote control required to
configure.
Show a summary of the flight: Max. altitude, max. speed, max. distance, max. current.
z
z
All OSD general function you need: Speed, Distance to base, hone direction, OSD & Video battery voltage,
Power current Consumption, Battery Usage, Altitude, Flight-time.....
Connection diagram
Sockets description:
1.
External power in for Video transmitter or Camera: The sockets can provide a non-12V power for video
transmitter or camera.
2. Jumper 1:select display the voltage status of the camera (Jump in right) or video transmitter on the screen (Jump
in left).
3. Jumper 2:select the video transmitter power from the OSD board (Jump in right) or external power (Jump in
left).
4. Jumper 3:select the video camera power from the OSD board (Jump in right) or external power(Jump in left).
5. Video out:connect to the video transmitter
6. Video in:connect to the video camera
7. Jumper 4:select to power the OSD board by main power battery only if the main power battery is 12V (Jump in
right is selected to use main power battery to power the OSD board)
8. To current sensor
9. To temperature sensor
10. Control channel:connect to receiver, you can switch the display mode by radio.
11. Extension functions:
Remark:
Current sensor connection diagram. The T-type connecter is not included in package.
Switch Functions:
Connect the component according to the above, power it on, and the OSD gives such texts on the screen.
As GPS module starting to search for satellites, the number at the top right shows how many satellites are found. If the
number is 0, no satellite is tracked. If the number is not 0 but flashing, the GPS signal is not good enough to provide
reliable GPS positioning information (the satellite tracking process may take 1-4 mins depended on how good the
satellite signal is.)
The CYCLOPS OSD is configured using three simple push-buttons. Press “up” and “down” buttons on the setting
board to enter the preferences menu as shown below:
Go up and down in the menu by pressing “up” and “down” buttons and press “reset” key in the middle to confirm.
Menu description:
z
z
z
z
AUTO MAX:select to display the max flight parameters or not. In case of selecting Y, then if the plane’s
altitude is lower than 20m and velocity is 0, then the OSD will automatically display the max altitude, max speed,
max distance from the launching point and max current of the power battery that experienced during this flight.
In case of selecting N, and you still want to see the max parameters, hold the “up” button on the board.
Trip:display the travel distance on the screen or not.
Temp:display the temperature on the screen or not.
Main Bat:display the information of power battery on the screen(including voltage, current and consumed mAh)
or not.
z
z
z
z
z
z
Aux Bat:display the battery voltage for video TX or cam on the screen or not.
Units:Metric or imperial measurement selection for all displayed parameters.
Num Eric:whether display flight information in digit mode. (Y=digit mode, N=HUD mode)
Calibration Amp:Reset the current to zero(unless changing current sensor, only one return to zero process is
needed.)
Bat Scale:set the battery capacity (when the mAh consumed reaches the set capacity value, capacity digits and
icon will flash to warn the pilot).
Return:return to fly mode
10 seconds after power on, the OSD will enter fly mode:
Graphic display mode
Numeral display mode
User interface introduction:
Important Notice:
1.
2.
3.
4.
5.
In case the data are deviated from reality (ex. speed, altitude…), press “reset” button to reset all data.
If the altitude is lower than 50m, the altitude data will flash.
If the signal of satellites are less than 3, or the GPS signal is unstable or unlikelihood, the satellite number on the
top right corner will flash.
If the consumption of power battery reaches the set value, the battery icon and power consumption digits will
flash to warn the pilot.
View angle is detected as below:
6.
7.
The return-to-home icon example:
, for the example, turn 23 degrees to the left, 23m away from
the launching point.
Fly direction and current position: Taking the north as 0 degree, turn 360 degrees clockwise. If the fly direction is
west, then the OSD displays “270”. The current position of plane is displayed by taking the north as 0 degree,
and the launching point as point of the origin, turn 360 degrees clockwise. For example, if the plane is at the
southeast of the launching point, then OSD will display 135.
Specifications:
z
z
z
z
z
z
z
OSD Main board: 80mm x 45mm, 23.4g (without heat shrink)
GPS Module: 35mm x 15mm, 9.5g (with heat shrink, wire and connecter)
Voltage and current sensor: 32mm x 32mm, 12.9g (with wire and connecter)
Setting board: 55mm x 10mm, 6g (with wire and connecter)
Temperature sensor: 170mm, 2.4g
Receiver link: 330mm, 4g
PAL video system compatible only.