1
2011
Cerberus, LLC
Grant Averett
[CERBERUS FTP SERVER 4.0 ]
User manual for Cerberus FTP Server 4.0. It contains detailed steps and help on configuring Cerberus
FTP Server.
Contents
Introduction ................................................................................................................................................. 5
Description.............................................................................................................................................. 5
Guide ...................................................................................................................................................... 5
Minimum System Requirements ................................................................................................................. 6
Hardware Requirements ......................................................................................................................... 6
Operating Systems ................................................................................................................................. 6
Version 2.5 and higher ....................................................................................................................... 6
Installation ................................................................................................................................................... 7
Getting Started - Initial Setup Wizard ........................................................................................................ 13
The Wizard ........................................................................................................................................... 13
Step 1 - Licensing............................................................................................................................. 13
Step 2 - Initial User Creation ............................................................................................................ 15
Step 3 - Network Setup .................................................................................................................... 16
Step 4 - Security ............................................................................................................................... 18
Getting Started - Network Setup ............................................................................................................... 19
Basic Setup so users can connect from the Internet............................................................................. 19
Step 1 - Control Connection ............................................................................................................. 19
Step 2 - Passive Mode ..................................................................................................................... 19
Step 3 - Firewall ............................................................................................................................... 19
Configuring the Server .............................................................................................................................. 20
Allowing External Access to your Server .............................................................................................. 20
Common Network Configurations ......................................................................................................... 21
Configuration 1: Your computer is connected directly to the Internet ............................................... 21
Configuration 2: Your computer is connected to a router, and the router is connected to the Internet
......................................................................................................................................................... 21
The User Manager .................................................................................................................................... 22
About Cerberus FTP Server Authentication .......................................................................................... 22
Adding a new user ................................................................................................................................ 22
The Virtual Directory System ................................................................................................................ 24
Simple Virtual Directory mode .......................................................................................................... 24
Standard Virtual Directory mode ...................................................................................................... 24
Adding a virtual directory to a user account .......................................................................................... 25
Virtual Directory Permissions ................................................................................................................ 25
Cerberus Group Accounts......................................................................................................................... 27
About Groups ....................................................................................................................................... 27
Overriding Group settings for a User ................................................................................................ 27
Adding a new group .............................................................................................................................. 27
General Settings ....................................................................................................................................... 29
Configuring General Settings ................................................................................................................ 29
General............................................................................................................................................. 29
Network ............................................................................................................................................ 30
Notification........................................................................................................................................ 30
Configuring Logging Support .................................................................................................................... 31
Configuring Logging Support ................................................................................................................ 31
Screen Logging Settings....................................................................................................................... 33
Configuring Interfaces ............................................................................................................................... 34
Interfaces .............................................................................................................................................. 34
Types of Listeners ................................................................................................................................ 34
Adding a New Interface ........................................................................................................................ 35
Interface Settings .................................................................................................................................. 35
The "Default" interfaces ........................................................................................................................ 35
Security Settings ....................................................................................................................................... 37
Configuring Security Settings ............................................................................................................... 37
Digital Certificate Support ..................................................................................................................... 37
About Certificate Authorities ............................................................................................................. 37
TLS/SSL Security ................................................................................................................................. 38
Security Options ............................................................................................................................... 38
Client Certificate Verification ............................................................................................................ 39
Additional Client Certificate Verification Options .............................................................................. 39
TLS/SSL Cipher Selection .................................................................................................................... 40
DSA Certificates and Ephemeral Diffie-Hellman Keys .......................................................................... 40
Elliptical Curve Certificates ................................................................................................................... 40
Remote Settings ....................................................................................................................................... 41
Configuring Remote Settings ................................................................................................................ 41
Remote Access..................................................................................................................................... 42
Web Administration............................................................................................................................... 42
Miscellaneous Settings ............................................................................................................................. 43
Directory Listing Time Format .......................................................................................................... 43
MDTM Time Format ......................................................................................................................... 44
Other ................................................................................................................................................ 44
Advanced Settings .................................................................................................................................... 45
Configuring Advanced Settings ............................................................................................................ 45
Send and Receive Buffers ................................................................................................................ 45
PASV Port Range ............................................................................................................................. 46
Windows NT ..................................................................................................................................... 46
Operating System ............................................................................................................................. 46
The IP Manager ........................................................................................................................................ 47
The "General" page .............................................................................................................................. 47
Adding a single IP address to the IP manager policy ....................................................................... 48
Adding a range of IP addresses to the IP manager policy ................................................................ 48
Deleting a IP addresses from the current policy ............................................................................... 48
Searching for an IP Address............................................................................................................. 48
The "Auto-Blocking" page ..................................................................................................................... 48
Differences in Auto-blocking between Blacklist mode and Whitelist mode ....................................... 50
LDAP Authentication ................................................................................................................................. 51
What do I need to use LDAP Authentication? ....................................................................................... 51
Other LDAP Dialog Options .................................................................................................................. 52
Setting up Active Directory Authentication ............................................................................................ 52
LDAP User Mapping ............................................................................................................................. 54
Creating an LDAP User to Cerberus Group Mapping ........................................................................... 54
Removing an LDAP mapping ............................................................................................................... 54
Active Directory Authentication ................................................................................................................. 55
About Active Directory Integration ........................................................................................................ 55
Active Directory FTP Security Group ................................................................................................ 56
Understanding Windows Authentication ............................................................................................... 56
The "Guest" Account ........................................................................................................................ 56
Entering a license for Cerberus FTP Server ............................................................................................. 57
The Registration dialog box .................................................................................................................. 57
Web Services control ................................................................................................................................ 59
Available Features ................................................................................................................................ 59
Access URL .......................................................................................................................................... 59
Security Considerations ........................................................................................................................ 59
gSOAP Copyright and Disclaimer ......................................................................................................... 60
Command Support .................................................................................................................................... 61
FTP Commands Supported .................................................................................................................. 61
File Transfer Protocol ................................................................................................................................ 63
Active mode .......................................................................................................................................... 63
Passive mode ....................................................................................................................................... 63
Introduction
Description
Cerberus FTP Server provides a secure and reliable file transfer solution for the demanding IT
professional or the casual file sharer. Supporting SFTP, FTPS and FTPES, Cerberus is able to
authenticate against Active Directory and LDAP, run as a Windows service, has native x64 support,
includes a robust set of integrity and security features and offers an easy-to-use manager for controlling
user access to files and file operations.
Guide
For additional help and troubleshooting information, take a look at the Cerberus FTP Server FAQ.
You can also access the most recent help documentation online.
Minimum System Requirements
Hardware Requirements
Pentium class processor (200 MHz or better recommended)
32 MB RAM
256-color or higher display adapter
10 MB free hard disk drive space
Operating Systems
Version 2.5 and higher
Windows 2000 Professional and Server SP4
Windows XP SP3
Windows 2003 Server
Windows Vista
Windows 2008 Server
Windows 7
Installation
Close all other programs (recommended) before installing Cerberus FTP Server and make sure that
you install it logged in as Administrator or a member of the Administrators group if you are installing it
on a Windows NT or higher system.
1. Download the latest version of Cerberus FTP Server from
http://www.cerberusftp.com/files/CerberusInstall.exe
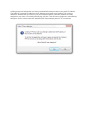
2. Double click or run the CerberusInstall.exe self-extracting installer. You may be prompted "Do
you want to allow the following program to make changes to this computer" click Yes (or Allow).
Clicking Yes will give the Cerberus FTP Server Installer Administrator privileges to install
(required on most operating systems).
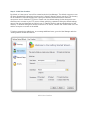
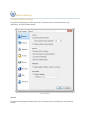
3. You will see the "Welcome to the Cerberus FTP Server Setup" screen. Click Next.
4. Agree to the licensing agreement to continue. Select the "I accept the terms in the License
Agreement" button and click Next.
5. Select an installation folder. Or keep the default path. Click Next.
6. Confirm your settings and click Install to complete the install.
7. Click Finish.
Getting Started - Initial Setup Wizard
The Wizard
Step 1 - Licensing
The Getting Started Wizard will appear when Cerberus starts up for the first time. The initial screen
will allow the user to select the licensing option most appropriate for their intended use of Cerberus.
Selecting the "Personal use" option immediately causes Cerberus to function as the Personal edition.
This means that the message "For personal use only" and "UNREGISTERED" will appear in the
welcome message that Cerberus sends every time a client connects. In all other respects, Cerberus
FTP Server Personal edition is functionally equivalent to the registered version.
Licensing
Selecting As a Company, Government entity, or Educational institution enables a 30 day trial
period of the Professional version of Cerberus FTP Server. No “UNREGISTERED” message is added
to the welcome greeting and all of the Professional edition features are enabled. Cerberus reverts to the
Personal edition after the evaluation period expires and a message indicating that the server is
unregistered will be added to the server welcome message for each connection. At anytime, including
after the trial period has expired or if "For personal use" was selected at startup, Cerberus may be
turned into the full commercial Personal, Standard, or Professional edition by entering a valid
registration code into the License Manager.
Step 2 - Initial User Creation
By default, an "anonymous" user will be created under the User Manager. The default anonymous user
will have download and upload-only access to the "c:\ftproot" directory as their root drive. This directory
will be created if it does not already exist. Leaving the defaults checked creates the standard
anonymous user for Cerberus FTP Server. Please note, the default settings for the anonymous user
allow anyone to connect to your FTP server, without specifying a password. Using the default settings,
anyone can view and download any file from your "C:\ftproot" directory and any subdirectories of that
directory. To disallow anonymous access to Cerberus FTP Server, uncheck the "Create Initial user" box
and the anonymous user will not be added.
To further customize the added user, or to manage additional users, go to the User Manager after the
"Getting Started" wizard has finished.
Initial User Creation
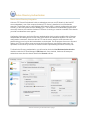
Step 3 - Network Setup
The Network Setup screen detects basic network settings and tries to provide advice on any settings
changes that need to be made because of the computer's network configuration.
Network Setup Checklist
A dialog prompt will ask whether you want to automatically attempt to detect your public IP address.
The public IP or external IP address is the IP address you present to the Internet. This is often a
different IP address than you have on your local computer and the external IP address is usually
assigned to your router. You should normally say yes here. This will instruct Cerberus to automatically
attempt to use the correct external IP address when clients attempt passive FTP connections.
Public IP Auto-detection
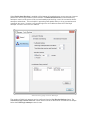
Step 4 - Security
Cerberus FTP Server fully supports TLSv1/SSLv3 encryption over FTP (FTPS) and SSH SFTP. To
enable SFTP and SSH SFTP support, a certificate must be generated for the server. The Self-Signed
Certificate creation process will provide a certificate that Cerberus can use to allow secure connections
and file transfers.
Make sure the Enable TLS/SSL check box is checked and the Self Signed Certificate information is
filled out, and then press the finish button. A dialog box will popup indicating that a certificate was
successfully created. Cerberus can now accept secure SSL connections from compatible FTP clients.
SSL Certificate Creation
Getting Started - Network Setup
Basic Setup so users can connect from the Internet
FTP connections within your local network usually work without any problems. However, when you want
the FTP server to be available outside of your local network, additional steps are often necessary to
make the server visible to the outside world. The following steps are usually required to allow Cerberus
FTP Server to be accessed from the Internet:
Step 1 - Control Connection
The control connection port Cerberus FTP Server is listening on needs to be forwarded from your router
to the machine hosting Cerberus. The default port that Cerberus listens on is port 21. Consult your
router documentation for instructions on how to setup port forwarding. Finishing this step will allow
Internet users to establish a connection with your server. The next step is making sure passive mode
is configured so that directory listings and file transfers work.
Step 2 - Passive Mode
To allow passive mode to work properly, you must forward the passive range of ports from your router
to the machine running Cerberus. See "My IP address begins with 192.168.xxx.xxx. Is there anything
special I have to do for people to see my FTP Server on the Internet?" for detailed instructions on how
to make sure passive mode is setup properly. If you don't perform this step, users may be able to login
but directory listings may hang and timeout.
Step 3 - Firewall
Make sure any firewalls you are running are allowing connections on port 21. Cerberus will
automatically attempt to add itself to the Windows Firewall Exception list (you will be prompted to allow
this). However, you may still have to manually add an exception to allow port 21 connections into your
computer.
Configuring the Server
Allowing External Access to your Server
Depending upon your connection to the Internet, you may need to configure your router or firewall
before users outside of your local network can see your FTP server. Communication with an FTP server
is done through two connections, a control connection, and a data connection. Ensuring these
connections can be established are the two areas where special attention is usually needed.
The control connection
The control connection is always the first connection established with an FTP server. The control
connection's purpose is to allow clients to connect and to send commands to the server (and receive
server responses). Port 21 is considered the default control connection port, and this is the default port
that Cerberus FTP Server will configure your IP interfaces to listen on for new connections. Using the
default port is not mandatory - the administrator is free to change the interface to use any free port on
the system as the listening port. However, if the administrator is running a software-based firewall, the
administrator must be certain that [incoming] connections are not blocked on the port chosen for the
control connection. If the port that Cerberus is listening on is blocked, no one will be able to see or
connect to the FTP server.
The data connection
The second type of connection is called the data connection. This is the connection that an FTP server
uses to exchange file listings and transfer files on. When an FTP client uses the control connection to
instruct Cerberus FTP Server to send a file listing or transfer a file, the actual data exchange takes
place on the data connection. The data connection is usually where most of the confusion and problems
arise for FTP server administrators.
There are two different ways a data connection can be established between an FTP client and an FTP
server. The first is commonly called active FTP. In this mode, an FTP client sends the IP address and
port that the client is currently listening for data connections on to the FTP server. The client
accomplishes this by sending the server a PORT command over the control connection. Using the
address and port from the PORT command, the FTP Server then connects to the client and sends the
file or file listing. When using active FTP, the administrator has to make sure that port 20 on the
machine that Cerberus FTP Server is running on is open for outgoing connections. The reason for this
is because when using active FTP, the server always establishes connections from port 20. Most
firewalls allow outgoing connections automatically, so manually opening up port 20 for outgoing
connections is usually not necessary.
The other way to establish a data connection between client and server is to use passive FTP. Passive
mode was introduced to get around common problems with client firewalls. Instead of the FTP server
connecting to the FTP client, the client connects to the FTP server using a port previously
communicated using the PASV command. When a client issues the PASV command, the FTP server
responds with a port that the server is currently listening on for data communication. Problems occur
with passive FTP when the firewall that Cerberus FTP Server is running on is blocking the selected
ports. To get around this problem, the administrator is required to open up the range of ports that
Cerberus has reserved for passive FTP connections. You can configure what range of ports Cerberus
FTP Sever uses for passive FTP mode by looking under the 'Advanced' tab of the Server manager.
Failures during LIST, NLST, MLST, RETR, or STOR operations can usually be attributed to problems
with the data connection.
Common Network Configurations
A PC running Cerberus FTP Server with access to the Internet often fits into one of two configurations:
Configuration 1: Your computer is connected directly to the Internet
This is the simplest network configuration you can have and usually requires little or no configuration to
Cerberus FTP Server to allow full access. This configuration is most common with dial-up, DSL, cable
modem, and other broadband users. However, machines connected to the Internet directly often employ
a software firewall to provide some protection against unwanted intrusion attempts. While some firewall
software can automatically detect an FTP server and properly configure itself, the administrator usually
has to manually configure the firewall. See the explanation above about the control and data connection
for common ports that have to be allowed through a firewall.
Configuration 2: Your computer is connected to a router, and the router is connected to the
Internet
Routers usually act as firewalls, so the same problems that can occur in Configuration 1 can occur here.
Follow the advice in Configuration 1 to resolve firewall problems.
In addition to the firewall problems that can occur in this network configuration, there is now the problem
that the IP address you are using on your machine is not the IP address that the Internet sees for your
machine. Other users on the Internet usually see your router's IP address instead of your PC's private
address. Routers are devices on your network, just like your PC, and they have their own IP address,
and that is the IP address the router tells other computers is your address when you go out on the
Internet. When a user attempts to connect to the FTP server, they need to use the Internet-facing IP
address of the router (the router is where the connection is really happening), not the private address of
the computer Cerberus FTP Server is running on. When the router receives the connection attempt it is
then able to forwarded the connection to your computer.
The first thing to check in this configuration is that your router is sending all of the FTP traffic to the
computer Cerberus FTP Server is running on. Most routers have a web-based configuration utility that
you can use to configure Port Forwarding. Specifically, you will want to make sure you forward the
control and possible data connection ports to the computer running Cerberus FTP Server.
There is one more problem that crops up in this network configuration. To properly allow passive
transfer mode, the administrator will have to make sure Cerberus is giving out the router address in
response to PASV requests. You can automatically enable this by making sure "WAN IP Auto detection"
is enabled in the 'General' tab of the Server Manager. Alternately, you can enter the IP address of the
router manually for each interface in the "Use different IP for PASV mode" IP box under the Server
manager's 'Interfaces' tab.
While more complicated network configurations are possible, most users will fall into one of the above
configurations.
The User Manager
About Cerberus FTP Server Authentication
Cerberus FTP Server can manage user accounts from three different sources. The first is the default
Cerberus FTP Server user database. The Cerberus default user database is displayed in the User List
box on the General page of the User Manager. The accounts within the default database are users
created just for Cerberus FTP Server. The directions on this page are for adding a user to this default
database.
You may also use Cerberus FTP Server to authenticate Active Directory users when the machine
hosting Cerberus is part of a domain (or the local NT account database), even if the computer Cerberus
FTP Server is installed on is not the domain controller. See the page Active Directory Authentication for
more information on how to configure Cerberus to allow authentication of Active Directory domain
users.
Finally, users can also be authenticated against an LDAP service. See the section on configuring
Cerberus for LDAP authentication.
NOTE: Active Directory and LDAP authentication are only available in the Professional version of
Cerberus FTP Server.
Adding a new user
Users can be added and modified in the Cerberus FTP Server user database by opening up the User
Manager and selecting the Users tab. To add a user, select "New" from the button to the right of
the Cerberus User Accounts group box. A new user will appear under the user list box. The newly
created user will already be in rename mode, so simply type in the new name of the user. All user
names must be unique and are case insensitive. Once you have entered the new user name,
press enter to commit the change. The user can then be configured by clicking on the user's name in
the user list box:
The Cerberus FTP Server User Manager- Users page
Group: A Cerberus FTP Server Group that this user belongs to.
Is Anonymous: If checked, the user password is ignored and the user can be logged in using any
password.
Password: The password for the user. Note, The Password always displays as 7 (*) characters,
regardless of the length of the actual password.
Simultaneous Logins: The maximum number of connections this user can make to the server at
the same time.
Simple Directories: See below for an explanation of this setting
Account is Disabled: Determines whether the account can login or not. A disabled account cannot
login into the server.
Require Secure Control: If enabled, this user can only login to the server using a secure
connection (TLS/SSL encrypted session).
Require Secure Data: If enabled, file transfers will only be allowed if the connection is secure.
Disable After Date: If a date is set here then the account will become disabled after that date.
SSH Authentication: Determines the authentication requirements for logging into an SFTP
interface. Valid options are:
o Password Only: Require only a password for authentication.
o Public Key Only: Require only a valid public key for authentication
o
Public Key and Password: Require both a valid public key and a valid password for
authenticating a user
The SSH Authentication Method dialog under the User Manager
The Virtual Directory System
The virtual directory (VD) system allows the administrator to attach any directory or drive to the root.
When a client requests the root directory from the server, the VDs you specify are sent to the client. The
client can also navigate to any of the VD directories' subdirectories. The VD system takes care of all path
translation.
Security settings can be specified for each virtual directory. All subdirectories under the VD inherit the
security settings of the VD.
There are 2 modes that a user account can operate in with respect to the virtual file system. The two
modes are simple and standard mode.
Simple Virtual Directory mode
When a user account uses simple directory mode, the administrator can only assign one directory to
represent the virtual directory for that user. Instead of that directory being seen as a subdirectory off of
the root, the virtual directory selected will be the directory the user is placed in when they first log into
the server. In other words, the directory selected as the virtual root directory will be the root directory.
Standard Virtual Directory mode
In standard mode (the Simple Directories option is un-checked), the administrator may add as many
directories as virtual directories to a user account as desired. The directories selected will appear as
subdirectories off of the root when the designated user logs into the server.
Adding a virtual directory to a user account
Each user can be assigned different virtual directories. A virtual directory is added to a user account by
using the User Manager, pictured above. To add a virtual directory to a user, first:
1. Select the user in the "User List."
2. Next, click on the button labeled "...". This button is located below the "User List" list box, in the
"Virtual Directory" group. Once you have clicked on the "..." button, a "Browse for Folder" dialog
will appear.
3. Navigate to the directory you wish to add and press the "OK" button on the dialog box. The
directory you selected should appear in the edit box to the right of the "..." button.
4. Finally, select the "Add to Root" (this button will be labeled "Assign as Root" in simple mode)
button located to the right of the "..." button.
The directory should appear in the "Virtual Root directory" list box. To configure the newly added
directory, click on the directory name in the list box. The directory's permission options should
appear in the list box to the right of the directory list. Place a check beside any permission that
you would like to grant to the virtual directory and all of that directory’s subdirectories.
Virtual Directory Permissions
Each virtual directory that you add for a user can have a separate and distinct set of access
permissions. The settings applied to a top level virtual directory filter down to all of that root directory's
subdirectories.
Permissions can only be assigned at the top, root level.
Cerberus Group Accounts
About Groups
Cerberus FTP Server 3.0 added group support. This simplifies administration by letting you assign
permissions once to the group instead of multiple times to each individual user. You can add Virtual
Directories and basic user settings to a group and have users inherit those permissions. By default,
when a user is assigned a group that group's settings override the default user settings. You will see
the user settings grayed out and the actual value displayed for each grayed setting is the value of the
group that user belongs to.
The exception is the virtual directory list. The user's virtual directories are a union of the group's virtual
directories and any virtual directories you add to the user.
Overriding Group settings for a User
You can always over-ride the group settings by right-clicking on a user in the User Manager and select
the "Override Group" to assign a value different from the group value. From that point on that user
setting will be "disconnected" from the group setting. You can revert back to the group setting by rightclicking on the user and selecting "Default to Group".
Adding a new group
A single group can be added and modified in the Cerberus FTP Server database by opening up the
User Manager and selecting the Groups tab. To add a group, select "New" from the button to the right
of the "Cerberus Group Accounts" group box. A new group will appear under the group list box. The
newly created group will already be in rename mode, so simply type in the new name of the group. All
group names must be unique and are case insensitive. Once you have entered the new group name,
press "enter" to commit the change. The group can then be configured by clicking on the group name in
the group list box. A list of configurable properties for that group will appear in the list box to the right of
the group.
Those properties are:
Is Anonymous: If checked, the user's password is ignored and the user can be logged in using
any password.
Simultaneous Logins: The maximum number of connections a user of this group can make to the
server at the same time.
Simple Directories: See the section on Virtual Directories for an explanation of this setting
Group is Disabled: Determines whether the account can login or not. A disabled account cannot
login into the server.
Require Secure Control: If enabled, users that are a member of this group can only login to the
server using a secure connection (TLS/SSL encrypted session).
Requrie Secure Data: If enabled, file transfers will only be allowed for users that are a member of
this group if the connection is secure.
The Cerberus FTP Server User Manager- Groups page
General Settings
Configuring General Settings
The general settings page contains options for connection timeout, network detection, login
notifications, and auto-update settings.
General page
General
The general settings page contains options for connection timeout and hiding the main Cerberus
window.
Use idle connection timeout - Controls whether idle connections should be terminated after a
period of inactivity.
o Idle Connection Timeout (seconds) - How long a connection can remain idle without
being terminated.
Minimize window to tray on startup - If selected, Cerberus FTP Server will start hidden when
windows starts up. Only the tray icon will appear. You can restore the graphical interface by
double-clicking on the Cerberus tray icon, or right-clicking on the tray icon and selecting
"Show/Hide Server"
Network
Controls general network settings.
Detect WAN IP at Startup - If enabled, Cerberus will attempt to detect the external address that
Internet computers see for connecting to the network this machine is located on. This is usually
the external router address. Enabling this option is important for ensuring passive connections
work correctly.
Add to Windows Firewall Exception List - If selected, Cerberus FTP Server will attempt to add
itself to the Windows Firewall Exception list. This setting is disabled on operating systems that do
not support the Windows Firewall (Windows 2000 and below).
Detect IPv6 Addresses - If selected, Cerberus FTP Server will attempt to detect any IPv6
addresses that the system has initialized. You can leave this setting disabled if you are not using
IPv6.
Minimize window to tray on startup - Selecting this option will make Cerberus bind to localhost
address (127.0.0.1).
Notification
Controls user login notification settings.
Display taskbar notification window on user login - If enabled, Cerberus will display a small
notification window on the bottom-right corner of the desktop whenever a user attempts to login to
the server.
Configuring Logging Support
Configuring Logging Support
Cerberus FTP Server logging is implemented through the Apache Log4cxx framework, a robust logging
package modeled after log4j. The default logging logs up to 5000KB of data to a single file and then
rolls over to a new log file. The 5 past log files are kept by default but log file size, naming, and history
are all completely configurable through the log4j.xml file.
The log is under:
C:\ProgramData\Cerberus LLC\Cerberus FTP Server\log on Windows Vista and above
and
C:\Documents and Settings\Application Data\Cerberus LLC\Cerberus FTP Server\log on
Windows XP
The log4j.xml configuration file is one level above in the "Cerberus FTP Server" folder. An example
log4j.xml file is below:
<?xml version="1.0" encoding="UTF-8" ?>
<log4j:configuration xmlns:log4j='http://logging.apache.org/'
debug="false">
<appender name="FILE"
class="org.apache.log4j.rolling.RollingFileAppender">
<rollingPolicy
class="org.apache.log4j.rolling.FixedWindowRollingPolicy" >
<param name="activeFileName"
value="log/server.log" />
<param name="fileNamePattern"
value="log/server.%i.log" />
<param name="minIndex" value="1" />
<param name="maxIndex" value="5" />
</rollingPolicy>
<triggeringPolicy
class="org.apache.log4j.rolling.SizeBasedTriggeringPolicy">
<param name="maxFileSize" value="5000KB" />
</triggeringPolicy>
<layout class="org.apache.log4j.PatternLayout">
<param name="ConversionPattern"
value="[%d{yyyy-MM-dd HH:mm:ss}]:%7.7p
[%6.6x] - %m%n" />
</layout>
</appender>
<appender name="ERROR_FILE"
class="org.apache.log4j.rolling.RollingFileAppender">
<rollingPolicy
class="org.apache.log4j.rolling.FixedWindowRollingPolicy">
<param name="activeFileName"
value="log/server_error.log"/>
<param name="fileNamePattern"
value="log/server_error.%i.log"/>
</rollingPolicy>
<triggeringPolicy
class="org.apache.log4j.rolling.SizeBasedTriggeringPolicy">
<param name="maxFileSize" value="5000KB"/>
</triggeringPolicy>
<layout class="org.apache.log4j.PatternLayout">
<param name="ConversionPattern"
value="[%d{yyyy-MM-dd HH:mm:ss}]:%7.7p [%6.6x]
- %m%n"/>
</layout>
<filter
class="org.apache.log4j.varia.LevelRangeFilter">
<param name="LevelMin" value="ERROR" />
</filter>
</appender>
<root>
<level value="INFO"
class="org.apache.log4j.xml.XLevel" />
<appender-ref ref="FILE"/>
<appender-ref ref="ERROR_FILE"/>
</root>
</log4j:configuration>
Possible values for the <level value="level" class="org.apache.log4j.xml.XLevel" /> tag's level
parameter are:
TRACE
DEBUG
INFO
WARN
ERROR
Screen Logging Settings
Logging settings page
In addition to the file-based log, Cerberus also displays the current log output to the graphical user
interface while the server is running. Options for the screen-based logging can be controlled through
the Logging settings tab of the Server Manager.
Log messages to screen - Enable logging messages to the screen
Onscreen log length - The number of lines of on-screen logging that should be saved
Configuring Interfaces
Interfaces
An interface is simply an IP address that the FTP Server is listening on. It can be an IPv4 or IPv6
address. The "Default" interface represents the settings that will be applied for newly detected
interfaces. There are several different parameters that each interface can have:
Interfaces page of the Server Manager
Types of Listeners
There are three types of listeners that you can add to an IP address. FTP listeners, FTPS listeners and
SSH2 File Transfer Protocol (SFTP) listeners. The first two allow regular FTP as well as different forms
of secure FTP while the SSH2 SFTP listener is for establishing connections over the SFTP protocol (a
completely different protocol from FTP, despite the similar name).
There are two types of secure FTP connections possible, FTPS and FTPES. FTPS is usually referred
to as implicit FTP with TLS/SSL security. Its closest analog is HTTPS. It is basically the FTP protocol
over a TLS/SSL secured connection. This form of secure FTP is deprecated but widely supported and
still in use. This is what a Cerberus FTP Server FTPS listener is for and this type of listener typically
listens on port 990. Note, the settings "Require Secure Control" and "Require Secure Data" are
meaningless for this type of listener. Connections established to an FTPS listener can only be
established securely.
FTPES, which is often referred to as explicit FTP with TLS/SSL security, is a modification of the FTP
protocol that starts out over an insecure, normal FTP connection and is then upgraded to a secure
connection through FTP command extensions during login. This is the preferred method of secure FTP
because it allows SPI firewalls to know that there is FTP traffic occurring on the connection. You
establish FTPES sessions using a normal Cerberus FTP Server FTP listener, typically over port 21.
Both unencrypted FTP and explicit TLS/SSL connections can be established to this type of listener.
You cannot establish an implicit FTPS connection over this type of listener.
Adding a New Interface
Cerberus FTP Server 4.0 and higher supports adding multiple listening interfaces for a given IP
address. The only requirement is that the listener be on a unique IP/port combination. You can add an
FTP, FTPS (for implicit secure FTP only), or an SSH2 SFTP listener.
Select the "plus" icon next to the interface list box to add a new interface. A new dialog box will appear
to ask for the interface details (interface IP, type, and port combination). Selecting the "X" icon will
prompt you to delete the selected interface listener.
Interface Settings
Listen Port - The port that this interface will listen on for the control connection
Max Connections - The maximum number of simultaneous connections that can connect to this
interface
Require Secure Control - If enabled, only secure control connection will be allowed. This is
required to protect passwords from compromise on unsecured networks.
Require Secure Data - If enabled, only secure data connections will be allowed. All directory
listings and file transfers will be required to be encrypted.
Don't Use External IP for Passive connections
Passive Options
o Auto Detect - If WAN IP auto detection is enabled then use the WAN IP for the PASV
command, otherwise use the interface's IP.
o Specify PASV IP - Allows the administrator to specify what IP address is returned in
response to a PASV command
o Use a DNS service - Allows use of DNS names like www.cerberusftp.com. The address
specified will be examined at regular intervals and the IP address that represents that
DNS name will be used in PASV commands.
The "Default" interfaces
There is a Default interface for each type of listener (FTP, implicit FTPS or SFTP). When a new
interface (IP address) is detected, that interface will receive an FTP, FTPS and SFTP listener and each
of those listeners will be assigned the values of the appropriate "Default" interface at the time of
detection. For example, If the "Default FTP" interface was defined to be on port 21, then when a new
interface is detected for the first time it will receive an FTP listener on port 21 with the values of the
Default FTP interface. Those settings then become the settings for the newly detected interface. Note
that the new interface's settings are not linked to the "Default" interface in any way. The "Default"
interface simply represents the values that newly detected interfaces will be initialized with. Changing
the values of the "Default" interface wouldn't change any values on existing or previously detected
interfaces.
For example, when you first install Cerberus FTP Server, the "Default FTP" interface is set to port 21
(the default FTP listening port) and all interfaces detected during that first start will receive FTP
listeners with that port value. If you later change the "Default FTP" interface settings then that change
will have no effect on existing interfaces.
It is also worth noting that Cerberus remembers the settings for interfaces that were previously detected
but might have changed. For servers that have dynamic addresses that constantly change or cycle
between a range of addresses, Cerberus will "remember" the old values and apply those instead of the
"Default" settings if that interface address is later detected again.
Un-checking the box next to each Default interface will disable automatic listener activation for that
interface type when a new interface is detected.
Security Settings
Configuring Security Settings
The security settings page allows the administrator to configure all aspects of Cerberus FTP Server
SSL/TLS security. To enable TLS/SSL connections between FTP clients and the server, you need a
server certificate and a private key.
Digital Certificate Support
Cerberus FTP Server 4.0 and higher supports RSA, DSA and Elliptical Curve (EC) keys. Support for
elliptical curve ciphers with FTPS requires a special Elliptical Curve Cryptography (ECC) build of
Cerberus FTP Server.
There are generally two options for obtaining a digital certificate (with private key).
1. You can generate your own self-signed certificate using the Cerberus Create Cert button.
2. You can obtain a certificate from a recognized Certificate Authority
Which is more appropriate really depends upon your goals. If you just want to make sure that client and
server connections are securely encrypted then a self-signed certificate is all you need. It has the
benefit of being easily created through Cerberus and completely free. Just click the Create Cert button,
fill in the certificate details in the dialog that appears, press the Ok button and that should be all you
have to do. A self-signed certificate will be created and Cerberus will be automatically configured to use
it.
If your goal is to make sure that your clients can verify that the server they are connecting to is
legitimate and to ensure they don't see any warning messages about being "unable to verify the server"
then using a certificate signed by a trusted certificate authority is required. You will have to contact one
of the recognized Certificate Authorities such as Comodo, Thawte, Verisign or one of the many other
recognized Certificate Authorities and request a server certificate (for a price).
A note about secure connections: Cerberus supports FTPS, FTPES, and SFTP encryption. To
establish a secure connection you must connect to the server with a client that supports one of those
secure methods. This will require a dedicated FTP client, not a web browser. No web browsers natively
support any type of secure FTP.
About Certificate Authorities
You only need to worry about setting up and validating against a certificate authority if you (the server)
want to authenticate the certificates coming from your FTPS clients. If you aren't concerned with
verifying your FTPS clients using certificates then you can safely ignore all of the certificate authority
configuration information. Just select the "No verification" setting (the default). Note: Client certificate
verification is completely separate from SSH SFTP public key authentication. SSH SFTP public key
authentication is configured on a per user basis.
Security settings page of the Server Manager
TLS/SSL Security
Cerberus uses the settings here for all secure connections.
Security Options
These are basic TLS/SSL settings applicable to secure client FTP and SSH connections and encrypted
HTTPS SOAP messages.
Enable Explicit TLS/SSL - This must be enabled to allow secure access to the server. NOTE: A
certificate and private key must be available before TLS/SSL encryption will be available.
Enable FIPS 140-2 Mode - Engaged the FIPS 140-2 certified encryption module for Cerberus
FTP Server. Selecting this option enables encryption using only FIPS 140-2 certified algorithms.
Only available in the Professional edition.
Ignore SSH Window Size - Some SFTP clients do not correctly request an increase in the SSH
channel window size. Enabling this option will allow those connections to continue even after
exceeding the available channel window space..
Require Encryption on SFTP - Although most clients won't request an unencrypted connection,
the SSH protocol does allow it. Check this option to disallow unencrypted SSH connections.
Public Certificate - The full path to your public certificate. The public certificate is exchanged
with the client during TLS/SSL encryption and is examined by the client to verify the server.
Private Key - This is the server's private key. The private key is used to encrypt messages to the
client. The client can use the server's public key to decrypt messages encrypted with the server'
private key. The private key is not sent to the client. If your public and private key are in the same
file then set this path to be the same as the
NOTE: The public and private key can be in the same file. If your public and private key are in the
same file then set this path to the same path as your Public Certificate path. Cerberus
understands both DER and PEM encoded certificate formats.
Needs Key Password - Check this option if the digital certificate is encrypted.
Password - The key password used to decrypt your digital certificate.
Create Cert – Cerberus will generate a Self-Signed Certificate that will allow encrypted
connections.
Verify – Cerberus will attempt to verify that the certificate at the Public and Private key path is
recognized and readable with the given password.
Client Certificate Verification
Cerberus FTP Server is able to require clients to verify themselves using digital certificates. When
given a Certificate Authority certificate list, Cerberus will verify that the client certificate is signed and
valid for the given Certificate Authorities. This feature is only available in Cerberus FTP Server
Professional edition and currently only applies to FTPS connections.
No Verification - This is the default option. Cerberus will not require nor will it verify digital
certificates
Verify Certificate - Cerberus will attempt to verify that the certificate presented by the client is
signed and valid. It will compare the certificate against the certificate authorities present in the CA
Certificates File. Any FTPS connection attempts without a valid certificate will be denied when
this option is selected.
CA File - A file containing a PEM-encoded list of Certificate Authorities with which to verify client
certificates against.
Additional Client Certificate Verification Options
Cerberus can be configured to provide additional post-verification client certificate checking. Specifically,
you can require the certificate common name to match the FTP username. This option is currently only
exposed via the config file and can be controlled through the following security tag
<verifyClientCommonName>true</verifyClientCommonName>
Set this option to true to enable certificate common name to FTP username checking.
TLS/SSL Cipher Selection
The ciphers that Cerberus uses during secure connection negotiation can be controlled through a text
string in the Cerberus FTP Server settings.xml configuration file. The
<cipherListString>ALL:!LOW:@STRENGTH</cipherListString>
element follows the same cipher string format as the OpenSSL ciphers string.
DSA Certificates and Ephemeral Diffie-Hellman Keys
Cerberus FTP Server 4.0.3 and higher includes support for DSA certificates. Unlike RSA certificates,
DSA certificates cannot be used for key exchange and require additional Diffie-Hellman (DH) parameters
during key exchange.
DH parameters are computationally very expensive to generate and it isn’t feasible (or necessary) to
generate those parameters in real-time. Cerberus FTP Server includes DH parameters for 512, 1024,
2048, and 4096 bit keys. The parameters were pre-generated using strong sources of pseudo-random
entropy and are used during DH key exchange to generate new, temporary keys for each SSL session.
Cerberus looks for the DH parameter files in the C:\ProgramData\Cerberus LLC\Cerberus FTP
Server\certificates directory. You can freely replace the included parameter files with your own, pregenerated versions if you desire. If the existing files are deleted, Cerberus will attempt to re-create the
missing files during startup by generating new ones. This can take a very long time and Cerberus will
appear to hang during startup while the files are generated. Deleting the existing DH parameter files is
not recommended.
Elliptical Curve Certificates
Cerberus FTP Server 4.0.3 and higher includes support for elliptical curve (EC) certificates. Cerberus
FTP Server 4.0.9 and higher support Elliptic Curve Diffie-Hellman (ECDH) key agreement, Elliptic Curve
Digital Signature Algorithm (ECDSA), and elliptic curve public keys for SSH SFTP as specified in RFC
5656. Only the required NIST curves at 256, 384, and 521 bits with uncompressed points are currently
supported. Please see this page for more information on elliptical curve cryptography support
Remote Settings
Configuring Remote Settings
The remote settings page allows the administrator to configure web administration access and remote
Application Programming Interface (API) access to Cerberus FTP Server. Cerberus allows remote
access to the server administrator via a web browser-based interface and via the normal Cerberus FTP
Server Graphical User Interface (GUI) when running in Windows Service mode.
For software developers, Cerberus exposes several APIs for controlling all aspects of the server using
the SOAP web services.
Remote settings page of the Server Manager
Remote Access
The remote access settings control HTTP and HTTPS web and SOAP access to Cerberus FTP Server.
When Cerberus is running as a Windows Service, the GUI connects to and communicates with the
Cerberus service through a remote access API called SOAP. The Cerberus service listens for SOAP
connections on the Port specified under the Remote Settings page. That port must be available for
Cerberus to listen on or the GUI will be unable to connect to the service.
Allow SOAP Access - Enable SOAP-based access. SOAP is an API for connecting
programmatically to the server.
o NOTE: This must be enabled to be able to access the server user interface when running
as a Windows Service.
Secure HTTP (HTTPS) - Select this option to allow only secure HTTPS connections for the web
administration and SOAP access
Port - The port that the SOAP service and web admin pages will be served from.
Username - The username used to access the web administration page.
Password - The password used to access the web administration page.
o NOTE: This is also the username and password used when accessing Cerberus as a
Windows Service from the Cerberus GUI.
Web Administration
The web admin capability does not have the full feature set of the local Windows user interface but
does provide a large subset. We will be adding more features with every minor release until it mirrors
the local graphical user interface.
Enable Web Access - Allow a server administrator to connect and configure Cerberus FTP
Server using the built-in web-based interface.
The Standard and Professional edition include a web administration feature and can be enabled by:
1.
2.
3.
4.
5.
Select the Remote tab of the Server Manager
Check Allow SOAP Access
If you would like to enable secure web access, check Secure HTTP (HTTPS)
Check Enable Web Access
Enter the Username and Set New Password for the remote admin account. This is the
username and password you will use to login to the web administration console
6. Shutdown and Restart Cerberus FTP Server
7. Open your web browser on the machine running Cerberus FTP Server and go to
http://localhost:10000/ or https://localhost:10000/ if you selected Secure HTTP (HTTPS)
Miscellaneous Settings
Configuring Miscellaneous Settings
The miscellaneous settings page contains options that don't fit well into any other category.
Miscellaneous Settings Page of the Server Manager
Directory Listing Time Format
This setting determines the time zone format for the file list returned in response to the LIST and NLST
commands. Most clients expect dates and times to be UTC format.
Universal Time (UTC) - The default, send file date/time in UTC format.
Local Time - Send file date/time in local time.
MDTM Time Format
The FTP command, MODIFICATION TIME (MDTM), can be used to determine when a file in the server
file system was last modified. This command has existed in many FTP servers for many years, as an
adjunct to the REST command for STREAM mode. As a result, this command is widely available.
This command is also frequently used in a non-standard fashion to set file modification times. Cerberus
supports both the standard MDTM command for retrieving file times and the non-standard use for
setting the date/time on a file.
NOTE: Settings dates and times required FTP client support. There is often a setting that has to be
enabled in many FTP clients before an uploaded or downloaded file will have its date/time set. Consult
your FTP client documentation on how to enable this setting. Cerberus automatically supports setting a
file date/time without any additional configuration.
Universal Time (UTC) - Most FTP clients expect the MDTM command to process date/time
values in UTC format and this is the default. Selecting this option will cause Cerberus to
interpret and send dates in UTC format.
Local Time - Interpret and send dates in local time (not RFC compliant).
Set Modification Time - When clients attempt to use the non-standard MDTM extension to set
a date/time for a file, this setting determines whether the file modification time will be set
Set Access Time - When clients attempt to use the non-standard MDTM extension to set a
date/time for a file, this setting determines whether the file access time will be set
Other
These are settings that don't fit anywhere else.
Suppress Startup Notification Bubble - If checked, the tooltip bubble that is displayed with
the Cerberus GUI will not be displayed when the GUI is first started.
Retrieve Owner/Group information for file listings - Includes the owner and group of each
file in responses to the LIST and NLST command. NOTE: This will slow down file listings.
Advanced Settings
Configuring Advanced Settings
The advanced settings page contains options for passive mode, running as a Windows Service,
network buffers, and power management.
Advanced page
Send and Receive Buffers
These settings control the size of the buffers used for data transfers. Cerberus will read and write
packets of this size for send and receive operations.
Send - Number of bytes to send at once.
Receive - Number of bytes to receive at once.
PASV Port Range
Controls passive FTP settings.
Start - First port in the port range to use for passive connections.
End - Last port to use for passive connections before wrapping back around to the Start port.
Deny FXP Transfers - File eXchange Protocol (FXP) is a method of data transfer which uses the
FTP protocol to transfer data from one remote server to another (inter-server) without routing this
data through the client's connection. Conventional FTP involves a single server and a single
client; all data transmission is done between these two. In the FXP session, a client maintains a
standard FTP connection to two servers, and can direct either server to connect to the other to
initiate a data transfer.
Deny Reserved Ports - Don't allow passive or active port requests below port 1024.
Windows NT
Settings only available on Windows NT and higher.
Install as a Windows Service - If enabled, installs Cerberus FTP Server as a Windows Service.
After selecting this option and pressing "Ok" to close the Server Manager the user may be
prompted for an account with permissions to add a service to the system.
o IMPORTANT: Remote access using SOAP must be enabled for the administrator to be
able to access the GUI when running as a Windows Service. If you haven't already
enabled Remote access then selecting Install as Windows Service will automatically
enable it and prompt you for a remote access password.
Use optimized file sending - Uses the built-in Windows API for fast file sending.
Operating System
Controls how the server responds to certain operating system events..
Respond to power management events - If enabled, Cerberus will attempt to gracefully
shutdown and startup in response to power suspend and resume events. May allow more
graceful recovery from suspending and resuming the system.
Shutdown Server when Windows is shutting down - Detects operating system shutdown or
restarts and tries to gracefully terminate all connections and ensure all server settings are saved.
The IP Manager
The "General" page
The Cerberus FTP Server IP Manager allows an administrator to selectively allow or deny access to the
FTP server based upon IP address. The IP manager functions in one of two policy modes, either
denying any IP addresses listed from logging into Cerberus FTP Server, or only allowing IP addresses
listed to log in. The policy mode is controlled by a radio button at the bottom of the tab page titled
"General."
General page of the IP Manager
The IP list shows the IP address or IP address range and how long that address or address range is
blocked for. Possible options for block time are "Forever" (Blacklist mode), "Never" (Whitelist mode), or
a date/time value. If a date/time value is present, the IP address or IP address range is blocked from
connecting until that date/time has elapsed (Blacklist or Whitelist mode). You can change how long an
IP address entry is blocked for by right-clicking on that IP entry and selecting "Change Time" from the
menu that appears.
Adding a single IP address to the IP manager policy
IP addresses can be managed individually, or whole ranges of addresses can be affected by the
current policy. To add a single address to the current policy, make sure the "Assign a range of
addresses" check box is unselected. Then, enter the IP address you wish to add to the first IP address
box. Finally, click the "Add" button immediately below the IP address box.
Adding a range of IP addresses to the IP manager policy
To add a range of addresses, first ensure the "Assign a range of addresses" check box is selected.
Then, enter the beginning IP address in the "IP From" box and the ending IP address in the "IP To"
box. The range will be interpreted as a contiguous range of addresses to block or allow. Finally, click
the Add button immediately below the IP address box.
CIDR Support
You can also enter a range of IP addresses in CIDR notation using the CIDR edit box. You can enter
one CIDR range or multiple CIDR ranges. To enter multiple CIDR ranges, separate each CIDR range
with a space or comma. The CIDR address will be converted to a contiguous range and added to the IP
Manager list.
Deleting a IP addresses from the current policy
To delete either an IP address or range of IP addresses from the current policy, select the item from the
"IP Addresses" list view box. Once selected, press the Delete button. You can also select and delete
multiple items at once from the IP manager by ctrl or shift-clicking multiple items in the list box. NOTE:
You can also delete an IP address or a range of IP addresses by right-clicking on the selected IP and
selecting "Delete" from the menu that appears.
Searching for an IP Address
You can use the "Find" button at the top of the IP list box to search for an IP address in the list box. The
"Find" button will select the first IP address or range of IP addresses containing the IP address you are
searching for.
The "Auto-Blocking" page
The other use for the IP manager is the ability to configure an auto-blocking policy for the FTP server.
Administrators can use the auto-blocking policy to help prevent DoS (Denial of Service) and brute force
password guessing. If the auto-blocking policy is enabled, a user that continually fails to log into the
server will be blocked from trying after a certain number of failed attempts. The number of failed
attempts and the length of time the IP address will be blocked from attempting to log in can be
configured from the "Auto-Blocking" page.
When Enable Auto-Blocking is enabled a failed attempt is logged whenever a user enters an incorrect
password or tries to login with an invalid username. If Enable DoS Protection is selected then any
attempt to connect to the server will be counted towards auto-blocking, even if the connection doesn't
attempt to authenticate. This can helpful in preventing DoS attacks that try to tie up connections and
overwhelm the server. However, a successful login from an IP address resets the "Failed login
attempts" counter to zero for the IP address.
Auto-blocking page of the IP Manager
The number of failed login attempts can be configured from the Pre-Blocked Settings frame. The
Time before login counter reset edit control can be used to set the amount of time that must elapse
before the Failed login attempt counter is reset.
The length of time an address is blocked can be configured using the Auto-Block Timeout setting.
Select the Forever radio button to block a flagged IP address indefinitely, or select the "Block for X
minutes" radio button to set the length of time the address is blocked. Once an address is blocked, the
timeout period must elapse before the address is allowed to log in again.
IP addresses that have recently failed logins, but have not yet exceeded the Failed login attempt
threshold, are displayed in the IP Addresses being "watched" list view. You can freely delete an
address from the list view. Deleting the address has the effect of resetting the Failed Login attempt
counter for that address to zero.
Differences in Auto-blocking between Blacklist mode and Whitelist mode
How auto-blocking works differs depending upon whether the IP manager is functioning in Blacklist or
Whitelist mode. If the IP manager is functioning as a Blacklist (denying addresses listed in the IP
manager), then whenever a connection exceeds the failed login attempt threshold, that connection's IP
address is added to the deny list.
Auto-blocking works differently for Whitelist mode (allowing only addresses listed to login to the server).
In Whitelist mode, whenever a failed login attempt exceeds the failed login threshold, the IP address is
either removed from the IP manager's list of allowed IP addresses (if auto-blocking is set to block failed
logins forever) or blocked for the Auto-Block Timeout period. The exception is if the IP address is part
of a range of IP addresses. If an IP address is part of a range of allowed IP addresses, that range is not
deleted.
LDAP Authentication
Cerberus FTP Server Professional is able to authenticate users against LDAP directory services. The
Lightweight Directory Access Protocol, or LDAP, is an application protocol for querying and
modifying directory services running over TCP/IP.
Administrators can easily integrate Cerberus and LDAP or LDAPS (Secure LDAP). All you need are a
few parameters describing the LDAP service.
What do I need to use LDAP Authentication?
An LDAP service and some information about the server hosting the LDAP service:
Server is the FQDN or IP address of the LDAP server to search.
Port is the network port of the LDAP server.
Base DN is the distinguished name to use as the search base.
User DN is the FDN of an account with read privileges to the LDAP server
User DN attribute is the name of the uid attribute for a user in the directory.
Configuration page for LDAP Authentication
Other LDAP Dialog Options
The LDAP Accounts list box that enumerates LDAP accounts is only meant as an aid in determining if
your LDAP connection is configured correctly. If you can get a successful listing of user accounts then
those accounts should be accessible to Cerberus during authentication. Some additional display options
are detailed below:
Show FQDN: Display the fully qualified domain name of each enumerated object. Note: This
setting has no effect on actual LDAP authentication.
Show All Users: If this option is checked, every account will be retrieved and enumerated in the
LDAP Accounts list box. This can take a very long time if there are a large number of users. Note:
This setting has no effect on actual LDAP authentication.
Setting up Active Directory Authentication
The following steps detail the procedure for enabling LDAP Authentication to verify credentials against
Active Directory. The steps are similar for connecting to other LDAP servers, such as OpenLDAP or
ApacheDS.
1. Change the LDAP Server and Port attribute in the User Manager, LDAP Users tab to the
host name and port number of the Active Directory:
o e.g., Server: hostname.domain.com or 192.168.0.100
o Port: 389
2. Change the Base DN to the proper base for the Active Directory.
Simply specifying the base suffix will not work in this attribute. For Active Directory, it
would usually be the cn=Users plus suffixes e.g.: for domain corp.cerberusllc.com
CN=Users,DC=corp,DC=cerberusllc,DC=com
or
CN=Users,DC=corp,DC=cerberusllc,DC=local
3. Change the DN for the User DN bind attribute to a user with the right to read the Active
Directory.
Anonymous access to the Active Directory is not allowed, so a bind account is needed. It is
simply an account for Active Directory that has read ability on the attribute to which the
user will authenticate. An example might be
cn=administrator,CN=Users,DC=corp,DC=cerberusllc,DC=local. Enter the password
for the user account.
4. Change the User Naming Attribute.
This attribute is the one that the LDAP module will search for in Active Directory and
attempt to match against the supplied FTP username. It is often the UID attribute on many
LDAP servers. For example, if users login using their Common Name, the value of this
attribute would be cn. For Active Directory, the login name is usually mapped to
sAMAccountName, as it is the attribute in Active Directory most like UID. For Active
Directory, it is usually best to specify sAMAccountName, as it is the attribute in Active
Directory most like UID.
5. Change the User Entry Search Filter.
This string is an LDAP search string used to locate and filter the account in Active
Directory. It should correspond to the attribute with which people use to log in.
e.g., (objectClass=User)
The above filter will include on search entities that have the object class User. Do not
attempt to add the uid search attribute here. Cerberus will automatically append an
attribute filter to select the correct account based on the User Naming Attribute.
I.e., if the User Naming Attribute is sAMAccountName, Cerberus will automatically create a
string like
(&(objectClass=User)(sAMAccountName=ftpUser)
where ftpUser is the name of the user that attempted login.
6. Set the search scope.
This setting controls how deep into the directory to search for users. This setting combined
with the Base DN and Search Filter determines which users are matched for
authentication.
One Level is usually the best setting for typical Active Directory configurations.
7. Verify that the settings are correct by clicking the "Test Connection" button. You should see
the user DNs from Active Directory that are able to log in to Cerberus FTP Server.
8. Select a Cerberus FTP Group to represent the virtual directories and permissions for LDAP
users. Note that the "isAnonymous" and "isDisabled" setting on the group are ignored.
Cerberus FTP Server is now configured for authentication against an LDAP server (Active Directory, in
this case).
LDAP User Mapping
If you wish to customize the directory and permission mappings for individual LDAP users then you can
do so through the LDAP Directory Mapping tab. You can select individual LDAP accounts and map them
to Cerberus group accounts. This mapping will override the default Cerberus Group and directory
mapping specified for all LDAP users on the LDAP server page.
Configuration page for LDAP User to Cerberus Group Mapping
Creating an LDAP User to Cerberus Group Mapping
Mappings between an LDAP User and a Cerberus Group can be achieved by selecting an LDAP user (or
simply typing the name of the LDAP user in the edit box) and then selecting a Cerberus Group. Select the
Assign button and a mapping entry will be placed in the mapping list box to indicate the LDAP user will
now have the same constraints and virtual directory mappings as the selected Cerberus Group.
Removing an LDAP mapping
To remove a mapping, simply select the mapped entry and press the Remove button.
Active Directory Authentication
About Active Directory Integration
Cerberus FTP Server Professional is able to authenticate users on an NT domain (or the local NT
account database), even if the computer Cerberus FTP Server is installed on is not the domain
controller. The domain may be a pre-Windows 2000 domain (NT4), a domain configured to use Active
Directory, or the local system account database (use "."as the domain for authenticating against local
accounts). However, the machine Cerberus FTP Server is running on must be a member of the domain
you wish to authenticate users against.
Configuring Cerberus to use Active Directory authentication simply requires enabling Active Directory
authentication and telling the server the name of the domain to authenticate against. The rest of the
configuration is automatic. Users are able to FTP into the server using the same username and
password they use to log into their workstations on the domain. For the purpose of access to files and
folders, the FTP user has the same access as the Active Directory user with the same name. All
operations on the server by the user are carried out while impersonating the Active Directory user.
To allow Active Directory authentication, you will need to check the Use Windows Authentication
checkbox under the NT User Manager's AD Users tab. Once checked, Cerberus will attempt to
authenticate users from the domain listed in the Domain edit box.
Active Directory Authentication page
NT accounts are always configured for simple directory mode (See Adding users for more information
about simple mode) if any mode other than "Cerberus Group" is selected for the NT User Directory
Mapping mode.
The NT User Directory Mapping modes work as follows:
Global Home: Every NT account will use the directory specified under the "Global Home" edit
box as the FTP root, the user's home directory, or a subdirectory off of a common root directory
that is the same as the user's name.
Global Home\%username%: Every NT account will use a subdirectory off of the "Global Home"
directory that is the same as the account's name.
User Home Directory: Every NT account will use that account's home directory as the FTP root.
Cerberus Group: The specified Cerberus Group will be used to determine what directories and
what settings to apply to the Active Directory user when they login, including any security
requirements associated with the group.
Active Directory FTP Security Group
Optionally, you can also configure a Security Group for FTP users. This will cause Cerberus FTP
Server to check that the Active Directory user is a member of the listed Active Directory Global security
group before allowing login. If selected, only members of the security group will be allowed to login.
Understanding Windows Authentication
NT user authentication is intended for experienced system administrators that understand the NT
security model. Novice users, or users wishing to avoid the details of Windows security, should leave
Windows Authentication disabled and stick with native Cerberus FTP Server users.
Note: The Cerberus FTP Server account database is always checked for a user before the NT account
database is checked. If there is user with the same name in both databases, the Cerberus FTP Server
user will be the only one authenticated against. To ensure that the NT user is checked, delete the
Cerberus user.
The "Guest" Account
In NT, the Guest account lets people log on to an NT computer when they don't have a personal
account defined on the computer, in the computer's domain, or in any of the domains that the
computer's domain trusts. Like the Administrator account, the Guest account is a built-in account with a
fixed SID; although you can rename the account, it can't--by default--be deleted. Unlike the
Administrator account, the Guest account doesn't require a password for logon, which is why it's
disabled by default. A Guest account re-enabled by mistake would pose a significant security hole
To help guards against this potential security hole, an administrator cannot enable Cerberus FTP
Server's Windows authentication integration if the Guest account is enabled.
Entering a license for Cerberus FTP Server
The Registration dialog box
Using Cerberus FTP Server for commercial use past the 25 day evaluation period requires a license
key. Once you have purchased and received a license key, you need to enter the license key details in
the registration dialog box.
Please note that a Cerberus FTP Server 2.0 license key will not work. Contact Cerberus, LLC about
getting a free version 3.0 license key if you purchased Cerberus FTP Server within one year of version
3.0's release date. A 3.0 license key will work correctly with 4.0 provided you are still within your free
upgrade period.
To open the registration dialog box, go to the Help menu and select the Enter license data menu item.
A box similar to the one below will prompt you to enter your registration code. Open your license email
and copy everything starting at and including -----BEGIN REGISTRATION----- all the way until and
including -----END REGISTRATION-----. Paste the copied text into the large edit box.
License registration dialog box
Press the Ok button. Another dialog box will appear, after you press enter, to inform you of correct or
incorrect registration information.
Once you have successfully registered Cerberus FTP Server, the "About" dialog box will display the
registration contact name, company name, purchase date, and for how long the license entitles the
user to free upgrades.
Web Services control
Available Features
Programmers can now access most of Cerberus FTP Server's common functions through a new Web
Services interface. These services use SOAP 1.2 over HTTP or HTTPS and do not require a separate
HTTP server. Cerberus FTP Server's implementation of Web Services includes a built-in, lightweight
HTTP stack.
The following functionality is available through the Web Services API:
Listing the current Cerberus FTP Server user and group accounts
Adding new users or groups and modifying existing users and groups
Deleting users or groups
Retrieving user or group information
Adding new virtual directories or modifying existing directories for a given user or group
Deleting a virtual directory for a given user or group
Getting the server's current started or stopped status
Stopping or Starting the server
Retrieving server statistics
Retrieving and modifying interface details
List, terminating, and blocking active connections
Retrieving and saving configuration information
Refer to the included Ceberus.wsdl file for specifics on the Web Services interface to these functions.
You can view an example Cerberus.wsdl online here. Always refer to the actual WSDL included with
the Cerberus distribution you are using for the latest definitions.
There is an example .NET project available here: NetSoapClient.zip
Access URL
Make sure you enable SOAP access from the Remote settings page on the Server Manager. You can
access the SOAP service WSDL on your local machine at the URL
http://localhost:10000/wsdl/Cerberus.wsdl.
Make sure you have "Enable Web Administration" selected to view the actual WSDL. If Web
Administration is not enabled you will still be able to use the WSDL to develop SOAP services but you
won't be able to use the built-in web server to view the WSDL using the URL link. The WSDL is located
in the installation directory where Cerberus is installed.
Security Considerations
By default, Cerberus FTP Server's Web Services access is turned off. Before allowing Web Services
access to Cerberus FTP Server, you should be well aware of the security implication that this entails.
While it is the user's responsibility to be knowledgeable of Web Services and the risks associated with
using them, here are some reminders:
Make sure the port you are running the Web service on is properly locked down. If you are only
using Web Services to communicate between programs on the same machine, the port Cerberus
is running the Web Services on shouldn't be accessable from outside of the local machine.
When using Web Services, remember that anyone with access to the port that the Web Services
is running on can send service requests to Cerberus FTP Server. This can represent a serious
security risk.
HTTP, the backbone of Cerberus FTP Server's Web Services, transmits information as
unencrypted text. Anything you send over HTTP has the potential to be intercepted and read.
Cerberus also has the option of using SSL/TLS support for Web Services over HTTPS. Using
HTTPS instead of HTTP significantly increased the security of any data transmitted.
Cerberus FTP Server uses the gSOAP toolkit to implement Web Services. You can find out more about
gSOAP at the gSOAP home page.
gSOAP Copyright and Disclaimer
"Part of the software embedded in this product is gSOAP software.
Portions created by gSOAP are Copyright (C) 2001-2008 Robert A. van Engelen, Genivia inc. All
Rights Reserved.
THE SOFTWARE IN THIS PRODUCT WAS IN PART PROVIDED BY GENIVIA INC AND ANY
EXPRESS OR IMPLIED WARRANTIES, INCLUDING, BUT NOT LIMITED TO,zTHE IMPLIED
WARRANTIES OF MERCHANTABILITY AND FITNESS FOR A PARTICULAR PURPOSE ARE
DISCLAIMED. IN NO EVENT SHALL THE AUTHOR BE LIABLE FOR ANY DIRECT, INDIRECT,
INCIDENTAL, SPECIAL, EXEMPLARY, OR CONSEQUENTIAL DAMAGES (INCLUDING, BUT NOT
LIMITED TO, PROCUREMENT OF SUBSTITUTE GOODS OR SERVICES; LOSS OF USE, DATA, OR
PROFITS; OR BUSINESS INTERRUPTION) HOWEVER CAUSED AND ON ANY THEORY OF
LIABILITY, WHETHER IN CONTRACT, STRICT LIABILITY, OR TORT (INCLUDING NEGLIGENCE
OR OTHERWISE) ARISING IN ANY WAY OUT OF THE USE OF THIS SOFTWARE, EVEN IF
ADVISED OF THE POSSIBILITY OF SUCH DAMAGE."
Command Support
FTP Commands Supported
The following FTP commands are supported by Cerberus FTP Server:
ABOR
DELE
CWD
CDUP
MODE
NOOP
PASV
QUIT
PORT
SYST
RMD
MKD
PWD
STRU
TYPE
APPE
LIST
NLST
REIN
RETR
STOR
STOU
MLSD
XPWD
XMD5
XSHA1
XSHA256
XSHA512
XCRC
LANG
P@SV
EPSV
EPRT
AUTH
PROT
OPTS
REST
FEAT
CCC
PBSZ
XCUP
XMKD
RMDA
XRMD
MFMT
MFCT
MDTM
ALLO
File Transfer Protocol
FTP stands for File Transfer Protocol, and is one of standard Internet protocols, along with SMTP,
POP3, IMAP, IRC and so on. It is described in the RFC 959. FTP allows users of the Internet to
connect to the server computer, browse its directories, and transfer files between the client and server.
Active mode
Active FTP use to be the traditional default used by FTP client programs. Active FTP uses a "reverse
data channel" that can cause problems when operating behind some older firewalls and NAT routers,
though some modern products have become "FTP aware". By comparison, passive FTP (see next
section) has become the favored method of establishing a data connection as it is more firewall and
NAT router friendly.
FTP sessions are initiated by an FTP client's connection to port 21 of an FTP server. This establishes
the command channel that FTP clients use to issue commands to the server. In active FTP, an FTP
client next opens a listening port on its machine, informs the remote FTP server of this port number,
and requests the remote FTP server to connect from its port 20 back to the client on the port it has
specified. This establishes the "reverse data channel" for transporting file data and directory listings.
Since many firewalls and NAT routers automatically block incoming connections to their protected client
machines, the need to establish this second "reverse data channel" can cause problems. Although
passive FTP was created to overcome these problems, some modern firewalls and NAT routers have
become "FTP aware". They monitor the outgoing control channel, interpret the client's request to the
remote server, and open an incoming port back through the router to the client machine. This allows
some active FTP clients to operate behind FTP aware firewalls and NAT routers without problems.
Passive mode
Passive FTP protocol was created to overcome the firewall and router problems associated with active
FTP's need to establish a reverse data channel back from the server to the client. Passive FTP
operates just like active FTP except that both the initial control channel (to the server's default port 21)
and the data channel (to a port specified by the server in response to a client PASV command) are
initiated by the client and received and accepted by the server. Because passive FTP does not use a
"reverse data channel" approach, it is often more friendly to firewalls and NAT routers.