1
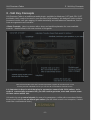
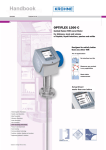
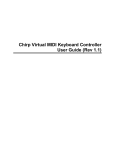
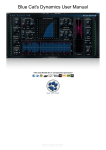
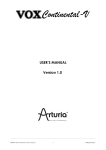
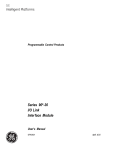
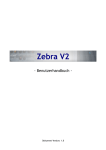
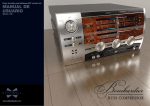
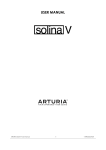
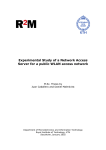
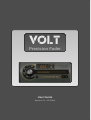
Volt
Precision Fader
User Guide
Version 1.0.1 – 12.3.2011
Index
1 -What Is Volt?.............................................................................................................................. 2
2 -Why Use Volt?............................................................................................................................ 3
3 -Volt Key Concepts...................................................................................................................... 4
4 -System requirements................................................................................................................. 6
5 -How to install.............................................................................................................................. 6
6 -Controls...................................................................................................................................... 7
6.1 -Shuttle Control Knob ..........................................................................................................7
6.2 -Transition Speed Knob........................................................................................................7
6.3 -dB Value Fader................................................................................................................... 8
6.4 -Undo/Redo Switch.............................................................................................................. 8
6.5 -Unity/Mute Switch............................................................................................................... 8
6.6 -Half and Double Switches ..................................................................................................9
6.7 -Persistent Memory Bank Switches (A,B,C) ..................................................................... 9
6.8 -Virtual Voltage Digits........................................................................................................... 9
6.9 -Auto-mute..........................................................................................................................10
6.10 -Door Switch.....................................................................................................................10
7 -Automating Volt........................................................................................................................ 10
8 -MIDI Control..............................................................................................................................11
9 -Other Features......................................................................................................................... 13
10 -Frequently Asked Questions.................................................................................................. 13
11 -Credits.................................................................................................................................... 14
1 - What Is Volt?
Volt Precision Fader is a high quality software plugin for fine control of gain. Volt was designed
to produce smoother fades and more precise gain staging than is possible with conventional
DAW faders.
Volt's massively enhanced precision and ergonomic user interface are intended to help
recording musicians and engineers achieve unprecedented analogue-like results within the
DAW environment. Artifacts which are common to DAW faders such as "zipper-noise", audible
stepping, and signal data truncation are minimized or eliminated.
Volt is suitable for a wide range of audio production applications from tracking to mastering to
live sound.
Volt Precision Fader
1 -What Is Volt?
2 - Why Use Volt?
The Idea:
We originally built volt to help us with mastering; specifically to perform the same role as a
conventional fader would, but with greater accuracy (fewer mathematical errors) than we could
achieve using a conventional DAW console fader.
The Surprise:
Some of our mastering clients asked to try Volt; we didn't think they would hear any difference
because many people think that the difference between Volt and an ordinary fader should be
inaudible. We were somewhat surprised when people who actually tried Volt were saying things
like "wow! that is the smoothest fade i've ever heard".
We were surprised because we hadn't mentioned that anyone should use Volt for making fades
since the workflow when automating Volt is more complex than for an ordinary fader. So instead
we only said that Volt features 64-bit precision, and that there are several ways to access it.
The Development Process:
Almost everyone who tried Volt during its initial development phase was not a mastering
engineer themselves. Mix engineers and recording musicians all commented about Volt's ability
to make smooth fades. They convinced us that we had made a tool that they were finding could
improve their results in a wide range of audio engineering and music production tasks. They
encouraged us to develop Volt as our first software product to be publicly released, and in many
cases they contributed their time, knowledge, and experience to this project. ( see "9 - Credits")
The Result:
The team which worked with us on Volt helped us to craft a feature set for it that we expect will
make Volt useful in any circumstance where a gain change is indicated. For example, Volt can
emulate the behavior of a conventional DAW fader, but since Volt uses a 64bit internal
smoothing algorithm for every gain change; it tends to produce less distortion and less zipper
noise than a typical DAW fader, even when it is acting like one.
We think that Volt should be useful to anyone who is involved with music and audio production.
It isn't going to make your next recording a hit, but we think it's been proven in the analog world
that better faders can make a difference. Ceberus Audio is proud to introduce Volt, the first
precision fader for DAW-based music and audio production.
-3-
Volt Precision Fader
3 -Volt Key Concepts
3 - Volt Key Concepts
Volt Precision Fader is a multiformat audio plugin, available for Windows (VST) and OSX (VST
and Audio Unit), ready to be used in your favourite DAW software. We designed Volt to provide
increased control over gain staging, to make remarkably smooth fades and transitions, and to
have an ergonomic user interface.
• Basic Controls: Here is a picture with a short and useful explanation for most available
controls - details follow in the next sections of this guide.
* MIDI Controllable (see “6 – MIDI Control”).
Note that the Shuttle Knob and Transition Speed don't appear at the same time in Volt;
but they are both identified here so you can see all of Volt's Basic Controls at once.
It is important to bear in mind that plug-in parameters cannot hold 64 bit values; so in
order to successfully automate Volt, you will need to generate, store and retrieve some
of these values within Volt.
Volt works by using control signals for most of its parameters, unlike with conventional faders,
these control signals are not actual gain values (the dB Value control is an exception, it works
much like a conventional fader).
The dB Value Control.
-4-
Volt Precision Fader
3 -Volt Key Concepts
• Absolute and Relative Controls: The basic controls on Volt's interface are generally one or
the other of the following types:
Relative controls:
Relative controls calculate new gain values in real-time by performing a
multiplication operation based on the present gain value. The result of
triggering a relative control will depend on the starting value.
The Relative controls are : the Shuttle Knob, and the Half/Double switches.
Absolute controls:
Absolute controls initiate a fade to a specific target gain value. The target
value is stored inside of Volt, not in the control signal itself. For example, the
Unity/Mute switch has two possible target values, and each of the memory
switches has a single user-settable target value.
• Transition Speed: For some of Volt's switches, the rate at which Volt fades from a starting
value to a target gain value is determined by the value of the Transition Speed control.
Controls that have adjustable fade speed appear brighter when the
Transition Speed control is pressed.
• Absolute control events must be used as Anchor Events when Automating Volt:
Generally, fades made with Volt will use whatever value Volt is set to when the event is initiated
as a starting point. It is therefore essential when automating Volt to create separate “Anchor
Point” events which tell Volt the starting point for each fade.
Whenever you automate Volt (either with a DAW's “track envelopes” or with MIDI data) you
must precede with a read event for an absolute control, which Volt can use as an Anchor Point
for the fade. By doing so, Volt will set itself to the proper value when the automation sequence is
played back. Otherwise, Volt will use the last value entered as a starting point, which may not
be what is intended. (see “5 – Automating Volt)
-5-
Volt Precision Fader
3 -Volt Key Concepts
• Shuttle Mode vs. Transition Mode: Volt provides two different ways to control the shapes
of your fades. Volt defaults to opening in Shuttle Mode, meaning the Shuttle Knob is visible.
The Shuttle Knob is a free-form relative control for shaping fades. It should be used when the
precise destination value is not known, a fade made with the shuttle knob will end with whatever
value Volt has attained when the knob is released.
Opening the “Volt” door activates Transition Mode: The Shuttle knob is replaced with a
Transition Speed knob. Transition Speed may be used in conjunction with Volt's switches to
modulate the shape of a fade . This method should be used when the precise destination value
for a fade has been pre-determined (e.g. a Memory switch).
One may use Shuttle Mode and Transition Mode in sequence, but not simultaneously.
• Special Interrupt: In many cases Volt's controls will lock each other out while they are being
operated in order to avert conflicts. The Unity/Mute switch and the Memory switches however,
have special interrupt features.
For example, theUnity/Mute switch could be used to dip the output gain toward mute and then
return to unity before reaching the mute state. Similarly, the Memory switches may interrupt
each other so that they may be played like a musical instrument. This can be useful to help
create patterns of gain changes, or to make compound fades.
• MIDI Control: DAW track automation tends to “lock” controls which are automated. In the
case of the dB Value control, it will cause Volt to lock to an absolute value, so it cannot be
easily automated together with other controls. MIDI control does not present this issue, and
in terms of timing and precision, is as good or better for Volt's control signals as track
automation, so we recommend MIDI control for all Volt users. (see “6- MIDI Control”)
• OnScreen Help: Click on the “cerberus audio” text to view Volt's OnScreen Help. (see “7Other Features”)
<new image>
• Version Number: To view the About Screen, where the version number is displayed:
Remove the faceplate by right-clicking the cerberus audio logo. (see “7- Other Features”)
<new image>
4 - System requirements
OSX: G4 or newer, 10.4 or newer, VST or AU compatible host
Windows: Processor Pentium4 or newer, XP or newer, VST 2.x compatible host
5 - How to install
OSX: Run the installer.
Windows: just drag the DLL version into your VST plugins folder and (re)start your DAW
software (forcing VST plugin rescan if needed)
-6-
Volt Precision Fader
6 -Controls
6 - Controls
The heart of the plugin, its high resolution fading engine, is at your disposal through its smart
and rationally laid out user interface.
Here follows a detailed explanation of all controls with mention of relevant user interface actions
and gestures.
The Modifier Keys
"shift", "control", "command", or "option" may be used in combination with a left-click in most
cases in place of "right-click", (e.g. in the case of a one-button mouse).
6.1 - Shuttle Control Knob
Fine Tuning
Pressing and holding either the "shift" or "opt/alt" keys on your computer keyboard while
adjusting the Shuttle Control Knob will lower the gearing ratio of the knob to afford fine tuning.
This function may be used on the fly; the knob will revert to it's default gearing ratio when the
"shift" or "opt/alt" key is released.
Double-Click (Quick Set) to Unity
Double-Click on the Shuttle Control Knob to set Volt's gain to Unity (1.0v or 0.0dB). This quickset function is not affected by the Transition Speed setting.
MIDI Control
“Pitch Bend” For your musical convenience, Volt's Shuttle Control Knob can be controlled by a
hardware MIDI controller's pitch-bender.To use this feature, simply send MIDI data to Volt.
Generally, it is similar to routing MIDI to a virtual instrument; consult your host's documentation
for further details.
6.2 - Transition Speed Knob
Transition Speed is an alternative method to the Shuttle Control for controlling fade shape. It
affects the rate of change when certain button switches are triggered; so it determines the
shape and the duration of fades made using these controls. One could achieve similar results
by using the Shuttle Knob, but the Transition Speed method may be more suitable when the
target destination of a fade is known in advance.; choose the method which suits your workflow.
Transition Mode
iClick on the door switch to toggle between Shuttle Mode and Transition Mode. When Volt is in
Transition Mode the Shuttle knob is replaced by a Transition Speed knob Transition Speed is
always active, even when Volt is in Shuttle Mode, but the Transition Speed controls will be
hidden on Volt's interface.
Controls That are Affected
Transition Speed affects the following button controls: Half, Double, A, B, and C memory banks,
and Unity/Mute. These switches will illuminate whenever the Transition Speed Knob or
-7-
Volt Precision Fader
6 -Controls
Transition Speed displays are clicked.
Double-Click (Quick Set) to Unity
Double-Click on the Transition Speed Knob to set Volt's gain to Unity (1.0v or 0.0dB).
This quick-set function is not affected by the Transition Speed Setting.
Direct Text Entry
Right-click on the Transition Speed digit display to open a text box and enter a value.
MIDI Control
“Modwheel (cc 1)”
6.3 - dB Value Fader
The Db Value display is also a control that works like a conventional DAW fader. Drag up or
down on the dB value to adjust the gain as one would with an ordinary DAW console fader.
Fine Tuning
Press and hold either the "shift" or "opt/alt" keys on your computer keyboard while adjusting the
dB Fader to allow fine tuning of this control. The control will return to regular operation when the
"shift" or "opt/alt" key is released.
Direct Text Entry
Right-click or double-click on the dB Value display to open a text box and enter a gain value in
decibels.
MIDI Control
“cc7” Note that automating the dB Value Fader using track envelope data will cause this
control to hold a value for as long as the automation track is active, which will lock out most of
the other controls in Volt; therefore we recommend MIDI Control for the dB Value Fader.
6.4 - Undo/Redo Switch
Volt's Undo/Redo Switch is designed specifically to help you to make easy A/B comparisons. It
toggles between an undo (current) and redo (prior) state. Undo/Redo is not affected by
transition speed.
MIDI Control
“B”
6.5 - Unity/Mute Switch
Unity: Left-click the Unity/Mute switch to set Volt's gain to "Unity gain" (1.0v or - 0.0dB).
Mute: Right-click the Unity/Mute switch to mute Volt's output (0.0v or -∞dB).
MIDI Control
“D#” (Unity), “C#” (Mute)
-8-
Volt Precision Fader
6 -Controls
6.6 - Half and Double Switches
Use these switches to halve or double the current gain setting. If the calculated value's bit depth
is greater than Volt's 64bit floating point range, it will be rounded up or down to the 14th digit.
MIDI Control
“G” (Half), “A” (Double)
6.7 - Persistent Memory Bank Switches (A,B,C)
Volt features three persistent memory banks, they are accessed via the "A", "B", and "C"
buttons. Volt's Memory Banks will restore their settings per-instance when the DAW project file
is saved and re-opened.
Default Memory Bank Settings
If any of the Memory Banks in an instance of Volt were not yet set, the Memory Bank will
contain Volt's initial gain setting (from when the host/daw project file was loaded).
Once a memory bank is set manually, that setting will be recalled whenever the DAW project file
is reopened. Each instance of Volt in a DAW project can have it's own unique memory settings.
Setting a Memory Bank
Right-click on the individual Memory Bank buttons to set that Memory Bank to Volt's current
gain setting. This setting can then be recalled at any time. A newly stored setting will overwrite
any previously stored setting.
Recalling a Memory Bank
Click on a Memory Bank to change Volt's gain setting to the Memory Bank's setting.
The speed of the transition can be adjusted using the Transition Speed Knob.
Memory bank Store and Recall actions can be automated (see “Automating Volt”).
MIDI Control
“C” (Set A memory), “D” (Set B memory), “E” (Set C memory)
“F#” (Recall A memory), “G#” (Recall B memory), “A#” (Recall C memory)
6.8 - Virtual Voltage Digits
The Virtual Voltage Digits provide rapid means to set Volt's output to a specific gain value.
What is Virtual Voltage?
We measure sound pressure on the decibel scale, which is logarithmic and non-linear. But
using the dB scale can complicate even simple mathematical operations. Thus in digital
devices, we measure internal signals on a linear scale that is analogous to the voltage scale
used by electrical engineers.
Volt makes its linear "virtual voltage" accessable for entering values with extreme precision.
Volt also has a traditional decibel-based fader control. (see “5.3 - dB Value Fader”)
Adjust each digit value individually
Click on the main digit display to illuminate the digits and enable direct access to the digits. the
Virtual Voltage Digits can be dragged up or down. Exit this editing mode by clicking on the dB
Value control or on the upper right hand corner logo.
-9-
Volt Precision Fader
6 -Controls
Direct Text Entry
Right-click on the main digit display when the digits are in their darkened state to open a text
box and enter a precise virtual voltage value.
6.9 - Auto-mute
Since Volt has an immense range and is capable of spanning it within a short time period, we
have included Auto-mute: a safety feature which is designed to protect against pilot error,
Enabling and Activating Auto-mute
When auto-mute is enabled and active, it will mute Volt's output if any audio sample exceeds a
threshold of +2dB. Auto-mute is enabled by default, but it is only active for each instance of Volt
when that instance's plug-in window is open*. Auto-mute may be disabled by turning off the
"auto-mute" switch.
*In Audio Units format: Auto-mute is always active if it is enabled, even if the plug-in instance's
window is not open.
6.10 - Door Switch
The Door Switch switches between Volt between Shuttle Mode and Transition Mode.
The only difference between these modes is whether the Shuttle Knob or the Transition Speed
appears on the front panel. (see “2 - Volt Key Concepts”)
MIDI Control
“F”
7 - Automating Volt
Automation Anchor Events
You must precede an automaton sequence with an Anchor Event (see “2 - Volt Key Concepts)
in order to guarantee that Volt starts from the correct value before making a fade.
An Anchor Event is an Absolute control event which establishes the starting value for an
automation sequence. The choices for Anchor Events are:
1. Recalling a stored Memory setting (See " - Storing a Memory Setting").
2. Setting Volt to Unity or Mute using the Unity/Mute switch.
3. dB Value fader (MIDI only! Automating this control using track automation will lock
out other controls)
Initial States
Some host DAWs may only record changes to controls and not their initial states, therefore with
track automation (but not with MIDI automation) one may need to draw an initial automation
point by hand.
- 10 -
Volt Precision Fader
8 -MIDI Control
8 - MIDI Control
Volt parameters and controls can be driven using MIDI messages; Volt receives MIDI signals
the same way a virtual interment would. One may send MIDI to Volt in real time, or record and
route file-based MIDI to Volt.
Automation Anchor Events
Anchor Events are needed for MIDI as well as track automation. Please read the previous
section "6 - Automating Volt" for details about Anchor Events.
Flexibility of MIDI Automation
MIDI does not affect controls before or after a control event. In this regard, MIDI control works
much like mouse clicks/drags. By contrast: track automation is active for the entire track once it
is active: even when the control is not being changed it is still being governed by the automation
track. We recommend MIDI automation for Volt since MIDI affords more flexibility than standard
track automation.
This is the standard binding of MIDI messages to Volt controls:
- 11 -
Volt Precision Fader
8 -MIDI Control
Automating Volt with MIDI in Apple Logic
This section applies to Apple Logic only:
1. Create the Audio, Instrument, or Aux track
that you want to manipulate with Volt.
2. Create a new Software Instrument track.
3. Instantiate Volt on this new Instrument track.
(Volt will be available under "AU MIDI-Controlled Effects" from the
Input effect menu.)
4. In the upper right corner of the plug-in window (in Logic's plug-in UI container),
choose the audio path you want to apply Volt to from the "Side Chain" menu.
5. Select or record-enable the Instrument track in order to record incoming MIDI.
- 12 -
Volt Precision Fader
9 -Other Features
9 - Other Features
On-Screen Help
To view the on-screen help : click on the "Cerberus Audio" text toward the upper right of the
faceplate. Click anywhere to dismiss the on-screen help.
"About" Screen
To remove the faceplate and reveal the "About Screen": right-click on the Cerberus Audio logo
in the upper right corner of the faceplate. Both Transition Speed and the Virtual Voltage Digits
are accessible from the About screen. The version number is also located on the About Screen.
“Clip” Lights
It is very difficult to clip a floating point audio signal, but sometimes it is important to know if a
signal would clip were it reduced to fixed-point. Volt has indicators to show when a signal has
exceeded -0dB. The indicators will reset whenever Volt's output gain value is changed, and can
also be reset manually by clicking on the output meters.
10 - Frequently Asked Questions
–
Should I control Volt using MIDI or with track automation envelopes?
We think that MIDI can work better and in many cases it can be easier to work with when
automating multiple controls, but you are free to try both methods.
–
Settings were not recalled when I re-opened my DAW project file.
The demo version does not recall it's settings.
The unlimited full version can be purchased here:
http://cerberusaudio.com/Software/Buy/Buy_Volt
Where do I find updates for this product?
http://cerberusaudio.com/Software/UserArea/Updates/
–
I've lost my login or password
Please use our Support form to request a new password
- 13 -
Volt Precision Fader
11 -Credits
11 - Credits
UI Design
Anders Hedström
http://flavoursoflime.blogspot.com
Programming
Jeff Dinces
http://cerberusaudio.com
Thanks to
Cockos, Inc.
Rob Loyst
Stillwell Audio
tooshka.com
Arto Vaarala
Xenakios
http://www.cockos.com
http://robrokkenaudio.com
http://stillwellaudio.com
http://tooshka.com
http://artovaarala.com
http://xenakios.wordpress.com
Testing and Consulting
airon
bbb
http://beatbybit.com
Oli Larkin
http://www.olilarkin.co.uk
Greg Lostracco
http://www.the-summit.ca
Alex Martinez
http://facebook.com/sunkingz
Theo Niessink
http://www.taletn.com
pipelineaudio
http://pipelineaudio.net
Psalm_97
Robomusic
Mike Roe
Dave Smith
http://groove-quantize.com
Ronen Shloosh
http://www.waves.com
Rob Warmowski
Jack Winter
White Tie
http://houseofwhitetie.com
User Manual (layout and content arrangement)
Mario Bianchi (aka Mabian)
http://www.errepici.it
- 14 -