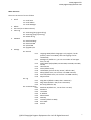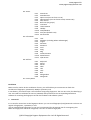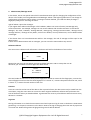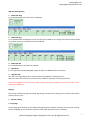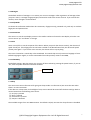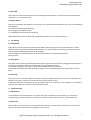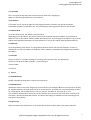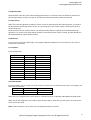
1
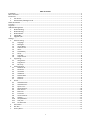
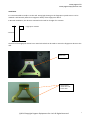
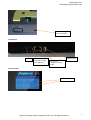
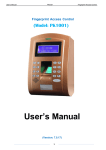
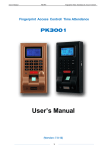
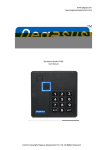
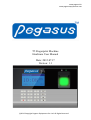
www.pegasus.hk
www.pegasusequipments.com
T5 Fingerprint Machine
Hardware User Manual
Date: 2012.07.17
Version: 1.1
(c)2012 Copyright Pegasus Equipments Pvt. Ltd. All Rights Reserved.
Thank you for purchasing our fingerprint reader Model T5.
We believe that it would provide you with trouble free performance.
As an esteemed customer of
best of our abilities.
we welcome you and we look forward to serving you with the
If there are any suggestions for improvement of our products, please feel free to write to us at
[email protected] or [email protected] .
Thanks & Regards
Chairman & The Entire Staff
Pegasus Equipments
www.pegasus.hk
www.pegasusequipments.com
Table of Content
Installation ................................................................................................................................................................... 1
Menu Structure............................................................................................................................................................ 3
Enrollment ................................................................................................................................................................... 4
1.
user Enroll ...................................................................................................................................................... 4
2.
Administrator/Manager Enroll ....................................................................................................................... 5
Delete Enrollment........................................................................................................................................................ 5
Time Set....................................................................................................................................................................... 5
Log View ...................................................................................................................................................................... 5
USB Disk Management ................................................................................................................................................ 6
1.
Download Glog............................................................................................................................................... 6
2.
Download Slog ............................................................................................................................................... 6
3.
Download DB.................................................................................................................................................. 6
4.
Upload DB ...................................................................................................................................................... 6
5.
Upgrade F/W .................................................................................................................................................. 6
Settings ........................................................................................................................................................................ 6
1.
General setting............................................................................................................................................... 6
1.1
Language ............................................................................................................................................... 6
1.2
Managers .............................................................................................................................................. 7
1.3
Verify Mode........................................................................................................................................... 7
1.4
LCD Contrast.......................................................................................................................................... 7
1.5
Voice...................................................................................................................................................... 7
1.6
LockPowKey .......................................................................................................................................... 7
1.7
Sleep...................................................................................................................................................... 7
1.8
Auto Off................................................................................................................................................. 8
1.9
Adjust Sensor ........................................................................................................................................ 8
2.
Log Setting...................................................................................................................................................... 8
2.1
GLog Alarm............................................................................................................................................ 8
2.2
SLog Alarm ............................................................................................................................................ 8
2.3
Re-verify ................................................................................................................................................ 8
3.
Communication.............................................................................................................................................. 8
3.1
Machine ID............................................................................................................................................ 8
3.2
Password ............................................................................................................................................... 8
3.3
Use DHCP .............................................................................................................................................. 9
3.4
IP Address.............................................................................................................................................. 9
3.5
Subnet Mask ......................................................................................................................................... 9
3.6
Gateway ................................................................................................................................................ 9
3.7
TCP Port................................................................................................................................................. 9
4.
Access............................................................................................................................................................. 9
4.1
Attendance.Set...................................................................................................................................... 9
4.2
AttendanceTZ ........................................................................................................................................ 9
4.3
Open Time ............................................................................................................................................ 9
4.4
OpenTimeOut ..................................................................................................................................... 10
4.5
Door Sensor ........................................................................................................................................ 10
4.6
Bell Time ............................................................................................................................................. 10
4.7
Timezone ............................................................................................................................................ 10
4.8
UserTimeZone..................................................................................................................................... 10
4.9
Holiday ................................................................................................................................................ 11
4.10
VerifyModeTZ...................................................................................................................................... 11
4.11
Anti-pass ............................................................................................................................................. 11
4.12
Set DuressFP........................................................................................................................................ 11
5.
Information .................................................................................................................................................. 11
6.
Self Test ........................................................................................................................................................ 11
7.
Factory Reset................................................................................................................................................ 11
I
www.pegasus.hk
www.pegasusequipments.com
Installation
It is recommended to install T5 on the wall. Strong light shining on the fingerprint optical sensor is to be
avoided. It will seriously affect the recognition ability of the fingerprint device.
In Normal installation, the device is mounted on the wall at a height of 1.4 meters.
Fingerprint machine
1.4 meters
The back of the fingerprint device has a metal rack which can be used to mount the fingerprint device to the
wall.
Metal rack
Use screw to
mount the rack
to the wall
(c)2012 Copyright Pegasus Equipments Pvt. Ltd. All Rights Reserved.
1
www.pegasus.hk
www.pegasusequipments.com
Screw for fixing the
rack to the device
Connections
.
Power
Connect to
computer through
mini USB cable
USB pen drive
Connect to
computer through
TCPIP
Startup Screen
Date and Time
(c)2012 Copyright Pegasus Equipments Pvt. Ltd. All Rights Reserved.
2
www.pegasus.hk
www.pegasusequipments.com
Menu Structure
The menu structure of T5 is as follows
1. Enroll
1.1 Enroll User
1.2 Enroll Admin
1.3 Enroll Manager
2. Delete
3. Set Time (to set date and time)
4. View Log
4.1 View GLog (GLog=general log)
4.2 View Slog (SLog=system log)
4.3 Delete All Log
5. USB Disk
5.1 Download GLog
5.2 Download Slog
5.3 Download DB
5.4 Upload DB
5.5 Upgrade F/W
6. Settings
6.1 General
6.1.1 Language ENG (default language is only english, if order
quantity come to our MOQ, then the language can be
customized)
6.1.2 Managers 5 (default is 5, you can set number of managers
from 1 to 10)
6.1.3 Verify Mode (FP/CD/PWD, FP+CD+PWD, CD+PWD, FP+PWD,
FP+CD)
6.1.4 LCD Contrast
6.1.5 Voice (default is Yes)
6.1.6 LockPowKey (to lock the key ‘Power’, default is No)
6.1.7 Sleep (default is No, can set from 1 to 9999 miniutes)
6.1.8 Auto Off (default is No, can set from 1 to 9999 minutes)
6.1.9 Adjust Sensor
6.2 Log
6.2.1 Glog Alarm (default is 1000, that is maximum)
6.2.2 Slog Alarm (default is 100, that is maximum)
6.2.3 Re-verify (default is No)
6.3 Communication
6.3.1 Machine ID (default is 1, can set from 1 to 255)
6.3.2 Passward
6.3.3 Use DHCP
6.3.4 IP Address
6.3.5 Subnet Mask
6.3.6 Gateway
6.3.7 TCP Port (default is 5005)
6.3.8 PC IP Addr
6.3.9 PC Port
(c)2012 Copyright Pegasus Equipments Pvt. Ltd. All Rights Reserved.
3
www.pegasus.hk
www.pegasusequipments.com
6.4 Access
6.4.1
6.4.2
6.4.3
6.4.4
6.4.5
6.4.6
6.4.7
6.4.8
6.4.9
6.4.10
6.4.11
6.4.12
Attend. Set
AttendanceTZ
Open Time (can set from 1 to 10)
OpenTimeout (can set from 0 to 255, 0 means No)
Door Sensor
Bell Time (12 groups)
Timezone
UserTimeZone
Holiday
VerifyModeTZ
Anti-pass (default is No)
Set DuressFP
6.5.1
6.5.2
6.5.3
6.5.4
6.5.5
6.5.6
6.5.7
6.5.8
6.5.9
6.5.10
6.5.11
User
Manager (including Admin and Manager)
Finger
DuressFP
Password
Card
GLog
Slog
Communication
Manufacturer
F/W Version
6.6.1
6.6.2
6.6.3
6.6.4
6.6.5
6.6.6
6.6.7
6.6.8
6.6.9
Keyboard
Sound
Sensor
Flash
LCD
Lock
Bell
WiegandOut
WiegandIn
6.5 Information
6.6 Self Test
6.7 Factory Reset
Enrollment
Menu enroll is used to do the enrollment of users, you will find that just one minute can finish the
enrollment of fingerprint, password (1~9999) or proximity card.
In enrollment, you need to input a user id before recognizing fingerprint. The user ID is a key for identifying a
user. You need to mark down the user ID (1~65535) and input back to the corresponding attendance
software for matching the fingerprint in both the hardware and software system.
1. user Enroll
It is to enroll a normal user to the fingerprint device. you can enroll fingerprint/card/password. each user can
register 3 fingerprints, 1 password, 1 card.
you can enroll backup fingerprints or one card, one password for the existing user for contingency plan.
When one fingerprint cannot be recognized, it can turn to another fingerprint.
(c)2012 Copyright Pegasus Equipments Pvt. Ltd. All Rights Reserved.
4
www.pegasus.hk
www.pegasusequipments.com
2. Administrator/Manager Enroll
In the device, we can set special users which have administration right for changing the configuration of the
device. In this model, we have grade Admin and Manager. Admin is the highest graded user. It can change all
configuration of the device. When admin or manager has been defined, you need this admin/manager’s
fingerprint/card/pin for accessing the menu.
right of Admin is prior than manager.
if you register both admin and manager in the hardware, Admin can access all menu, but Manager only
access some menu. For example, manager can not access submenu like ‘Enroll-Enroll Amin’ ‘Enroll-Enroll
Manager’, ‘Set Time’, ‘USB Disk’, ‘Settings-General’, ‘Settings-Log’, ‘Settings-Communication’, ‘Settings-Access’,
‘Settings-Self Test’, ‘Settings-Factory Reset’, and in menu ‘Delete’, can only delete users, can not delete Admin
or Manager.
If the device does not have administrator while it has manager, the role of manager will be equal to the
administrator.
if there are no administrators and no managers, you can access the menu without any control.
Delete Enrollment
This menu item is delete enroll information. The device will ask for the deletion of user ID first.
Delete
ID
00001
ESC
OK
Change the user ID to the one which you want to delete and press <OK> to accept the user ID.
After that, you are asked to confirm again the delete action.
Delete
ID 00001-0
Sure Delete ?
ESC
OK
The zero beside the user ID is to show you the fingerprint number. 0 means the first fingerprint, 1 means the
second fingerprint and 2 means the third fingerprint. If it shows “P”, it means the password of the user, and if
it shows “C”, it means the card number of the user.
Time Set
Time set is used to set the time of the device. after a period of time, the device time may be varied from the
actual time, using this menu item can correct the time. Pegasus Attendance software will synchronize the
time of the device when you download data. It guarantees the accuracy of each device when there are many
devices in a network.
Log View
The log information is to check the transaction record and supervisor log of action in the device. GLOG means
general log. It is the punch transaction in the device. SLOG is the log of changing the menu item by supervisor
or normal user. Delete all log means all glog and slog records will be deleted.
(c)2012 Copyright Pegasus Equipments Pvt. Ltd. All Rights Reserved.
5
www.pegasus.hk
www.pegasusequipments.com
USB Disk Management
1. Download Glog
It is to download the transaction data to USB disk.
2. Download Slog
It is to download the management setup record into the USB disk. any change of the device setting will be
recorded in the device and download to the USB disk.
3. Download DB
It is to download the user data into USB disk.
4. Upload DB
It is the opposite of downloading DB. It gets the file from USB disk back to the device.
5. Upgrade F/W
This item is for upgrading of the machine firmware by USB disk or backend system.
We will do the action when we have new function added or debug of the existing firmware.
Please don’t upgrade our firmware by the file you get from other companies in case of corruption, as the
machines are different
Settings
The setting is divided into general setting, log setting, communication setting, access setting, information,
self test, factory reset.
1. General setting
1.1 Language
set the language of the device. The default language allowed is English. Customer can request for making
another language such as Thailand or Spanish if the order quantity comes to our MOQ.
(c)2012 Copyright Pegasus Equipments Pvt. Ltd. All Rights Reserved.
6
www.pegasus.hk
www.pegasusequipments.com
1.2 Managers
The default number of manager is 5. It means you can set 5 managers. after registration of manager, when
you press ‘menu’, a manager fingerprint/pin/card need to confirm the access of menu. If you increase the
number, more managers can be allowed.
1.3 Verify Mode
to choose the verification mode when do transactions, fingerprint only, password only, card only or combine
fingerprint and password etc.
1.4 LCD Contrast
This menu is to set the LCD display contrast. The smaller number will cause the LCD display to be dim. You
can use arrow “up” and “down” to change.
1.5 Voice
Voice out on/off is to set the response of the device. When you punch the device correctly, the device will
speak ‘thank you’. If the fingerprint has not been enrolled or the identification fails, the device will speak
‘please press again!’. If you off the voice out item, the device will not say anything.
The voice is located in a sound chip in the mainboard. The sound chip can only store one language of voice.
Default language is English, it can be customized if the order quantity comes to our MOQ.
1.6 LockPowKey
The default setting is No, that means you can turn off the machine by pressing the power button, if you set
‘Yes’, then the power off button would be disabled.
Power key
1.7 Sleep
This menu item sets an idle interval for going into sleep mode. For idle interval, we mean the time when
there is no user interaction.
If the device is in sleep state, the backlight of LCD, sensor LED will be turned off. The device will go back to
normal state when the following event occurs
(1) any key is pressed
(2) door is opened
(3) exit button is pressed
(4) tamper is detected
The available range is from 0 to 9999 minutes. the default is 0 (No). 0 means the sleep function is disabled.
(c)2012 Copyright Pegasus Equipments Pvt. Ltd. All Rights Reserved.
7
www.pegasus.hk
www.pegasusequipments.com
1.8 Auto Off
This menu item sets an idle interval for auto switching off the machine. For idle interval, we mean the time
when there is no user interaction.
1.9 Adjust Sensor
This menu item adjust the brightness of the sensor. You need to do the adjustment when one of the following
case happens
(1) after manufacturing of the device
(2) changing of the optical sensor
(3) upgrading of the firmware in the device
While adjustment, you must keep dark environment of the sensor and clean the sensor.
2. Log Setting
2.1 GLog Alarm
Glog Alarm means the general log warning threshold. General Log means the punch transaction. Each IN
represents one record and each OUT represents also one record. When the remaining space can store less
than this figure, the display will show error message.
You are supposed to download the transaction immediately or you will loss the previous
punch records.
2.2 SLog Alarm
Slog Alarm means Super Log warning threshold. Super Log means the record for changing the menu items. It
is to set the number of record space remaining for giving warning message.
The default threshold is 100. That is, when the remaining space can only stores
100 records, the display will show warning message for you to download the super log records or to clear
them.
2.3 Re-verify
This menu item is to set the number of seconds to prevent duplicate punch of the same user identifier. The
default is zero (No). It means you can punch many times without control.
It will waste the space of the device in storing useless records. So customer can set this figure to a number of
seconds. The maximum number of minutes allowed is 255.
3. Communication
3.1 Machine ID
to set the device ID of the machine. If you have more than one device in your network, you need to set
unique device ID. If three devices in a network, we need to set those device ID to 1, 2 and 3 differently.
3.2 Password
a password for communication. It is to prevent other person to use the similar software to connect to the
device. The default communication password is one zero (0).
(c)2012 Copyright Pegasus Equipments Pvt. Ltd. All Rights Reserved.
8
www.pegasus.hk
www.pegasusequipments.com
3.3 Use DHCP
This is to on/off the Dynamic Host Control Protocol. DHCP is for assigning IP
address to the device by DHCP host in the network.
3.4 IP Address
In this item, we can set the IP address of the fingerprint device related to the TCP/IP connection.
The default IP address is 192.168.1.224. This is the identity of the fingerprint device in the network.
3.5 Subnet Mask
to set the subnet mask. The default is 255.255.255.0.
Depending on the IP address, the subnet mask must be matched with the IP address. as the default IP
address is class C, the subnet mask has treble 255 and one zero. If you change the IP address to class B, the
subnet mask should be 255.255.0.0. If the IP address is in class A, the subnet mask should be 255.0.0.0.
3.6 Gateway
to set the gateway of the device. It is the gateway between device and external computer or switch. It
should have 1 in the last number. For example, if the IP address is 192.168.1.224, the gateway should be
192.168.1.1.
3.7 TCP Port
The port number is a number listening to incoming communication calls. The default port
number in the device is 5005. generally, no need change it.
3.8 PC IP Addr
3.9 PC Port
4. Access
4.1 Attendance.Set
Enable or disable the attendance TZ (time zones) function
4.2 AttendanceTZ
Attendance status is the status assigned to a period of time. For example, 08:00 to 11:00 can be set as duty
on. Another example, 19:00 to 21:00 can be set to overtime on. T5 allows you to set the attendance status
for a time period. The available status is duty on, duty off, overtime on, overtime off, in, out.
You can define 10 attendance status time zones and each zone consists of start time (hour, minute), end
time (hour, minute) and attendance status. The device will change its attendance status according to the
time zones automatically.
4.3 Open Time
Open time means lock release time, is to set the time for door to open when a user pass verification.
(c)2012 Copyright Pegasus Equipments Pvt. Ltd. All Rights Reserved.
9
www.pegasus.hk
www.pegasusequipments.com
4.4 OpenTimeOut
OpenTimeOut is the time for the door keeping opened.This is to prevent some one follows an authorized
person to get inside. So when one gets in, the door must be closed within certain time interval.
4.5 Door Sensor
When you connect fingerprint machine to a door sensor for detecting the door opening status, you need to
tell the machine which type of door sensor you are using. There are 3 types, None, normal open type and
normal close type.
None means we do not use door sensor. normal open means if door is opened, lock should also be kept
opened. If it is not the case, alarm will be invoked. normal close means if door is closed, the lock should also
be locked.Otherwise, alarm will be invoked.
4.6 Bell Time
It is set time to turn on the bell loudly. For example, 09:00 and 18:00.You can set minimum 1 time zone or
maximum 12 time zones.
4.7 Timezone
Time zone (50 sets)
Time zone
1
Day of week
Sun
Mon
Tue
Wed
Thu
Fri
Sat
Holiday
Sun
Mon
2
Time range
00:00-23:59
00:00-23:59
00:00-23:59
00:00-23:59
00:00-23:59
00:00-23:59
00:00-23:59
00:00-23:59
…
…
….
4.8 UserTimeZone
In UserTimeZone, we can assign time zone to each user. Each user can have two time zones. For example, we
have time zone 1 and 2.
Time zone
Day of Week
Time Range
1
Mon
9:00-18:00
2
Mon
19:00-23:00
When user 11 is assigned these 2 time zones, it is allowed to get in on Monday 9:00-18:00 and 19:00-23:00.
When you do the assignment, you need to input the User ID first. After that, you can input 1 to 50 time zone
to the 2 user time zone.
Note: if the timezone is 0, that means you can identify whenever you want.
(c)2012 Copyright Pegasus Equipments Pvt. Ltd. All Rights Reserved.
10
www.pegasus.hk
www.pegasusequipments.com
4.9 Holiday
to set the holiday date.
4.10 VerifyModeTZ
to set different verification mode to different time period, total you can set 10 time zones.
4.11 Anti-pass
to allow anti-pass back or not.
4.12 Set DuressFP
to set the duress fingerprint.
when someone is forced to get in, he can use a predefined duress fingerprint for triggering the alarm. If user
wants to use that function, they need to enroll at least 2 fingerprints. One is normal and the other is set to
duress fingerprint.
5. Information
Information of number of users, manager, finger,DuressFP, password, card registered,and number of Glog,
Slog existed, and information of communication way, manufacturer, firmware version.
6. Self Test
System checking includes: Keyboard, Sound, Sensor, Flash, LCD, Lock, Bell, WiegandOut and Weigandin.
7. Factory Reset
The device returns to original setting.
*** The End ***
(c)2012 Copyright Pegasus Equipments Pvt. Ltd. All Rights Reserved.
11