1
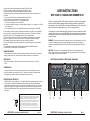
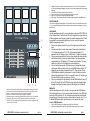
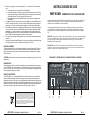
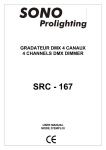
Equipson, S.A.
www.equipson.es
[email protected]
WDP 8 DMX
User Manual / Instrucciones de Uso
WDP 8 DMX
DIMMER PACK
ENGLISH
PAGE 1
CASTELLANO PAGINA 5
Use este modo si desea utilizar la unidad como dimmer DMX. Esta función
le permite encender y controlar la intensidad de los canales DMX con el
uso de un controlador. Encender, apagar y dimmerizar pueden ser usadas
mediante este pack. Puede configurar su unidad para hacerla funcionar como dimmer pack de 1, 2
o 4 canales.
1. Conecte un controlador DMX a la entrada de señal Dmx de la unidad.
2. Conecte la carga en cualquiera de las 8 tomas del panel frontal
3. Elija el número de canales a usar 1, 2 o 4 de la siguiente forma:
A. Controle las 4 salidas con un único canal DMX.
B. Controle las salidas en dos grupos, el primero abarca las cargas 1 y 2 y el segundo 3 y 4. El valor
DMX a marcar es 2.
C. La configuración por defecto es 4 canales DMX, cada canal es controlado por 1 canal DMX.
4. Para cambiar el modo de función de canal asegúrese de estar en modo DMX. Use la tecla MENU
para seleccionar “CH” seguido de 2 dígitos. Entonces use las teclas UP y DOWN para cambiar la
configuración entre 01, 02 o 04. Inicialmente el dimmer está en modo54 canales.
5. El dimmer marca dirección de inicio DMX 1, para cambiarlo, use MENU hasta que en pantalla
aparezca “A” seguido de 3 números, use las teclas UP y DOWN para seleccionar la dirección
DMX deseada. Recuerde que este canal es el primero de control de la consola.
6. Una vez ha configurado la dirección, asegúrese que el controlador dispone de ese mismo canal
para iniciar.
7. Su unidad operará ahora como dimmer DMX, puede controlar la intensidad mediante el
controlador DMX. 0 no habrá salida y 100 intensidad total.
CAMBIO DE FUSIBLE
Para sustituir el fusible, utilice un destornillador plano para desenroscar la cubierta, retire el fusible
antiguo y sustitúyalo por otro. Tenga presente usar fusibles del mismo valor y dimensiones.
PRECAUCION:
USER INSTRUCTIONS
WDP 8 DMX 4 CHANNEL DMX DIMMER PACK
Thank you for purchasing the WDP 8DMX 4 channel dimmer pack. To optimize the performance of
this product, please read these operating instructions carefully and familiarize yourself with the
basic operations of this unit. WDP 8DMX is a four channel, DMX dimmer pack. This unit has been
tested at the factory before being shipped to you . There is no assembly required.
This unit allow you to control special effect lighting, that normally could not be controlled, by a DMX
controller. With this revision to our popular WDP 8 DMX, we have eliminated confusing dip switches
and replace them with an easy to use digital switching device that incorporates the use of an easy
to read LCD display.
WARNING: To prevent or reduce the risk of electrical shock or fire, do not expose this unit to rain
or moisture. Clearing memory often may cause damage to the memory chip, be careful not to
reinitialize your unit frequency often to avoid this risk. Only use the recommended AC/DC power
adaptor.
CAUTION: There are no user serviceable parts inside this unit. Do not attempt any repairs
yourself, doing so will void your manufactures warranty. In the unlikely event your unit may require
service, please contact your nearest our dealer.
FUNCTIONS AND CONTROLS FRONT PANEL, REAR PANEL
Desconecte la alimentación de la unidad antes de realizar cualquier reparación o cambio de
fusible.
ALIMENTACION
Antes de encender la unidad, compruebe que la red de la zona es la requerida por su dimmer
pack. Esta unidad es capaz de operar a 230 V AC. Teniendo en cuenta que la red puede variar
entre lugares de instalación, compruebe la alimentación antes de conectar.
DESCRIPCION DEL PRODUCTO
El WDP 8 DMX es un dimmer pack de 1, 2 o 4 canales DMX. Este pack puede usarse como chaser
o dimmer DMX. La unidad está diseñada con circuiteria de paso por cero para protegerla ante
cargas inductivas al usar efectos de luces que incluyen transformador como focos, etc. Cada canal
dispone de 2 clavijas DIN de carga para un total de 8 y tomas XLR macho/hembra para conexión
DMX. Cada canal está equipado con fusible individual para unar carga máxima de 10 A por canal,
20 A totales.
Este símbolo en su equipo o embalaje, indica que el presente producto
no puede ser tratado como residuos domésticos normales, sino que deben
entregarse en el correspondiente punto de recogida de equipos electrónicos
y eléctricos. Asegurándose de que este producto es desechado
correctamente, Ud. está ayudando a prevenir las consecuencias negativas
para el medio ambiente y la salud humana que podrían derivarse de la
incorrecta manipulación de este producto. EL reciclaje de materiales
ayuda a conservar las reservas naturales. Para recibir más información,
sobre el reciclaje de este producto, contacte con su ayuntamiento, su
punto de recogida más cercano o el distribuidor donde adquirió el producto.
WDP 8 DMX
USER MANUAL / MANUAL DE USO
PAG. 8
8
9
WDP 8 DMX
10
USER MANUAL / MANUAL DE USO
11
12
PAG. 1
8. Fusibles de Canal: Cada uno de los cuatro canales, está protegido por un fusible de
10 A. Estos fusibles previenen daños por sobrecarga en su equipo. Asegúrese de
sustituir el fusible por otro de igual tamaño y valor.
9. Interruptor de red: Este interruptor controla la alimentación de la unidad
10. Cable de red: Conecte el cable en una toma de red
11. Entrada DMX: Este conector acepta señal de entrada DMX
12. Salida DMX: Este conector envía la señal DMX al siguiente dispositivo
MODO DE FUNCIONAMIENTO
La unidad dispone de 2 modos diferentes de funcionamiento. Puede ser usada como un chaser de
4 canales o como dimmer pack de 1, 2 o 4 canales DMX. Sigua las instrucciones para operar
la unidad a su conveniencia.
MODO CHASE
5
6
7
Use este modo de funcionamiento si desea hacer funcionar la unidad como
chaser de 4 canales. Este dispositivo dispone de 16 programas incorporados
puede seleccionar cualquiera de esos programas o configurar una serie de
chases de manera aleatoria de los 16 programas. Puede controlar la velocidad
la ejecución y que programa funcionará.
1. Conecte la carga en cualquiera de los 8 conectores de salida del pack
2. Use la tecla mode para seleccionar el modo chase: Chase mode está
indicado por “PA” seguido de un número 01-16. Si aparece “A” en la
pantalla, significa que está en modo DMX.
3. Configure el patrón deseado: El patrón se representa en pantall con “P”
seguido de 2 números. Puede seleccionar cualquiera de los 16 programas
4. Configure la velocidad deseada: En este punto puede cambiar la
velocidad de chase del programa. En modo chase, pulse MENU hasta que
en pantalla aparezca “SP” seguido de 2 números. Entonces use las
teclas UP y DOWN para ajustar la velocidad ( 1/10 de segundo). Un valor
de 01 será la velocidad más lenta ( una vez cada 30 segundos)
5. Ahora puede cambiar la intensidad de luz: Use la tecla MENU para
seleccionar “d”. Use las teclas UP y DOWN para cambiar la intensidad. 00
es la salida más baja y 99 intensidad completa.
MODO DMX
1 2
1.
2.
3.
4.
5.
6.
7.
3
4
Mode Button: This button will change the operate mode between DMX and chaser.
Menu Button: This button will activate the different functions in DMX and chase modes.
Up Button: This button will increase the displayed value in the LCD display.
Down Button: This button will decrease the displayed value in the LCD display.
Power Output: 3-prong grounded Edison output sockets. 8total output sockets.
Green L.E.D. Indicators: These LEDs will indicate their relevant channel activity.
LCD Display: This multifunction display will detail all chase and program that pertains to the
current operating mode of the pack.
WDP 8 DMX
USER MANUAL / MANUAL DE USO
PAG. 2
Use este modo si desea utilizar la unidad como dimmer DMX. Esta función
le permite encender y controlar la intensidad de los canales DMX con el
uso de un controlador. Encender, apagar y dimmerizar pueden ser usadas
mediante este pack. Puede configurar su unidad para hacerla funcionar como
dimmer pack de 1, 2 o 4 canales.
1. Conecte un controlador DMX a la entrada de señal DMX de la unidad.
2. Conecte la carga en cualquiera de las 8 tomas del panel frontal
WDP 8 DMX
USER MANUAL / MANUAL DE USO
PAG. 7
Channel Fuses: Each of the four channels is protected by a 10A fuse. These fuses prevent
you from overloading and damaging your pack. Be sure to always replace with the exact same
type fuse.
9. Power Switch: This switch controls the units main power.
10. Power Cord: Plug this cord into a matching power supply for your area.
11. DMX Input: This connector a ccepts your DMX input signal.
12. DMX Output: This connector sends your DMX input signal through to the next DMX device.
8.
OPERATION MODE
The unit has two different operating modes. This unit can be used as a four channel chaser or as a
1, 2, or 4 channel DMX dimmer pack. Please follow the instructions blow to operate the unit in your
desired mode.
CHASE MODE
5
6
7
1 2
3
4
1. Botón Mode: Este botón cambia el modo de funcionamiento entre chaser y DMX.
2. Botón Menú: Este botón activa las diferentes funciones en modos DMX y chase.
3. Botón UP: Esta tecla incremente el valor mostrado en la pantalla
4. Botón Down: Esta tecla reduce el valor mostrado en la pantalla
5. Salida de potencia: 8 conectores de salida DIN hembra de 3 polos y toma de tierra.
6. Indicadores LED verdes: Estos LED indican la actividad del canal marcado.
7. Pantalla LCD: Esta pantalla multifunción detalla todos los chases y programas que
funcionan en ese momento.
Use this operating mode only if you are planning on using your WDP 8 DMX as
a four channel chaser. This device has 16 built in programs, you may select any
of these programs or set the pack to chase in a random sequence of all 16 built
in programs for a more dramatic light show. You may control the speed at
which the programs will chase.
1. Connect your lighting effects to the any of the eight power sockets on the
pack
2. Use the mode button to select chase mode: Chase mode is indicated by
“PA” followed by numbers 01-16. “PA” is Programmed Applied. If “A”
appears in the LCD display you are in DMX mode, “A” stands for address.
3. Set you desired chase pattern: Once you have selected the chase function
use the Menu button to select your desired chase. The chase pattern is
represented in the LCD display by “P” followed by two numbers. You may
select any of the built in 16 programs to run at a single time.
4. Set you desired chase speed: At this point you may change the program
chase speed. While in chase mode, tap on the MENU button until the “SP”
followed by two numbers is displayed in the LCD. Then use the UP and
DOWN buttons to adjust the chase speed. A value of 99 will give you the
fastest chase speed (about 1/10th of a second). A value of 01 will give y ou
the slowest chase speed (one step every 30 sec.).
5. You may now change the light intensity: Use the MENU button to select “d”
in the LCD. Use the UP and DOWN arrow keys to change the light output
intensity. 00 will give the lowest output and 99 will give you full intensity.
DMX MODE
Use this operating mode only if you plan to use your pack as a DMX dimmer.
This function will allow you to turn on and control the intensity of non-DMX with
the use of a DMX controller. On, off, and dimming functions can be performed
through this pack. You may also set your dimmer pack to function as a 1, 2, or
4 channel DMX dimmer pack, which means you can combine the output
functions. DMX Operation:
1.
2.
WDP 8 DMX
USER MANUAL / MANUAL DE USO
PAG. 6
Plug in a DMX controller to your dimmer pack via the 3-pin XLR cables.
Connect your lighting effect to any of the eight power sockets on the front of the pack.
WDP 8 DMX
USER MANUAL / MANUAL DE USO
PAG. 3
3.
4.
5.
6.
7.
Decide if you are going to use your dimmer pack as 1, 2, or 4 channels. This function allows
you to:
a. Control the output to all four outlets with one DMX channel.
b. Group outlet channels one and two and group outlets channels three and four. The first
group will be controlled by one DMX channel and the second group will be controlled by
another DMX channel. This gives the pack a DMX value of two.
c. The default setting is a four channel DMX switcher, each channel is controlled by one
DMX channel.
To c hange the channel function mode be sure you are in DMX mode. Use the MENU button to
select “CH” followed by two digits. Then use the UP and DOWN arrow buttons to change the
setting from 01, 02, or 04. Your dimmer pack is initially set as a four channel DMX switcher.
The dimmer pack is initially set to be activated by DMX address one. To change this setting be
sure you are in DMX mode. Use the MENU button to select the address settings, this will be
indicated by an “A” in the first character of the LCD followed by three numbers. Use the UP
and DOWN arrow buttons to select your desired DMX address. Remember the DMX address
tells your DMX controller what channel to activate the pack’s functions.
Once you have set the pack’s DMX address be sure your controller’s address matches that of
the pack’s.
Your pack will now operate as DMX dimmer, y ou may control the light output intensity through
your DMX controller. 0 will give no output and 100 will give you full output.
FUSE REPLACEMENT
To replace the protective fuse, use a flat head screwdriver to unscrew the fuse holder. Pull out the
old fuse and replace it with a new one. Insert the fuse back into slot and tighten. Always replace
with the exact same type fuse remove unless otherwise specified by an authorized our company
service technician.
CAUTION:Always disconnect the units main power before performing any type of service or fuse
replacement!
INSTRUCCIONES DE USO
WDP 8 DMX
DIMMER PACK DE 4 CANALES DMX
Gracias por la adquisición de WDP 8 DMX, un dimmer pack de 4 canales DMX. Para optimizar el
funcionamiento de este producto, lea las instrucciones de funcionamiento cuidadosamente. La
unidad ha sido comprobada antes de ser embarcada.
La unidad permite controlar efectos de luces que normalmente no pueden ser controlados por
una consola DMX. En el diseño de esta unidad, se han eliminado los dip switches y sustituido
por un dispositivo de conmutación digital de fácil uso que incorpora la utilización de una pantalla
LCD.
ATENCION. Para prevenir o reducir el riesgo de descargas eléctricas y fuego, no exponga la unidad
a la lluvia o la humedad. La limpieza de memoria muy frecuente puede dañar el chip interno, por lo
que no reinicialice la unidad de manera continuada para evitar el riesgo. Utilice únicamente
adaptadores AC/DC recomendados.
PRECAUCION . En el interior no hay elementos de manipulación para el usuario. No trate de
repararlo por usted mismo, hacerlo invalidaría la garantía. En el caso de que la unidad precisara
reparación, contacte con su distribuidor más cercano.
FUNCIONES Y CONTROLES DE LOS PANELES FRONTAL Y TRASERO
POWER SUPPLY
Before plugging your unit in be sure the source voltage in your area matches the required voltage
for your WDP 8DMX. The unit is available in a 120V and 240V version. Because line voltage may
vary from venue to venue, you should be sure to plug your power supply into a matching wall outle t
before attempting to operate you controller.
PRODUCT DESCRIPTION
The WDP 8 DMX is 1, 2, or 4 channel DMX Dimmer Pack. This pack can serve as a stand alone
chaser or a DMX dimmer pack. This pack is designed for zero-crossing circuitry which protects
against inductive loads, so it is safe for use with all lighting effects that include transformers such as
pin spots. Each channel comes with two 3-prong Edison sockets inputs for a total of eight. This u nit
features XLR female and male connection for DMX compatibility. Each channel is equipped with a
fuse for each channel, and a maximum output load of 10A per channel or 20A total.
This symbol on the product or on its packaging indicates that this product
shall not be trated as household waste. Instead it shall be handed over to
the applicable collection point for the recycling of electrical an electronic
equipment. By ensuring this product is disposed of correctly, you will help
prevent potential negative consequences for the environment and human
health, which could otherwise be caused by inappropriate waste handling
of this product. The recycling of amterials will help to conserve natural
resources. For more detailed information sabout recycling of this product,
please contact your local city office, your household waste disposal service
or the shop where you purchased the product.
WDP 8 DMX
USER MANUAL / MANUAL DE USO
8
PAG. 4
9
WDP 8 DMX
10
USER MANUAL / MANUAL DE USO
11
12
PAG. 5