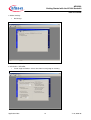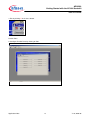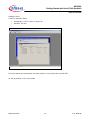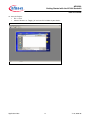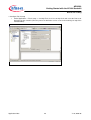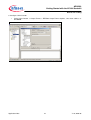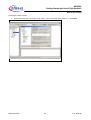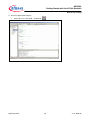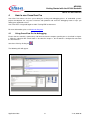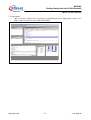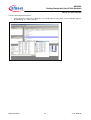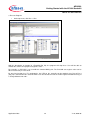
1
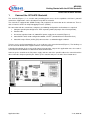
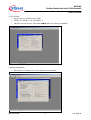
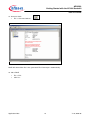
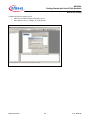
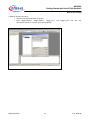
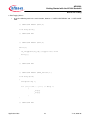
Application Note, V1.0, June 2006
AP16093
G e t t i n g s t a r t e d w i t h XC 1 6 4 C S
s t a r te r ki t u s i n g D A v E , T a s ki n g
EDE & CrossView Pro
Debugger
Microcontrollers
Edition 2006-06-13
Published by
Infineon Technologies AG
81726 München, Germany
© Infineon Technologies AG 2006.
All Rights Reserved.
LEGAL DISCLAIMER
THE INFORMATION GIVEN IN THIS APPLICATION NOTE IS GIVEN AS A HINT FOR THE
IMPLEMENTATION OF THE INFINEON TECHNOLOGIES COMPONENT ONLY AND SHALL NOT BE
REGARDED AS ANY DESCRIPTION OR WARRANTY OF A CERTAIN FUNCTIONALITY, CONDITION OR
QUALITY OF THE INFINEON TECHNOLOGIES COMPONENT. THE RECIPIENT OF THIS APPLICATION
NOTE MUST VERIFY ANY FUNCTION DESCRIBED HEREIN IN THE REAL APPLICATION. INFINEON
TECHNOLOGIES HEREBY DISCLAIMS ANY AND ALL WARRANTIES AND LIABILITIES OF ANY KIND
(INCLUDING WITHOUT LIMITATION WARRANTIES OF NON-INFRINGEMENT OF INTELLECTUAL
PROPERTY RIGHTS OF ANY THIRD PARTY) WITH RESPECT TO ANY AND ALL INFORMATION GIVEN
IN THIS APPLICATION NOTE.
Information
For further information on technology, delivery terms and conditions and prices please contact your nearest
Infineon Technologies Office (www.infineon.com).
Warnings
Due to technical requirements components may contain dangerous substances. For information on the types
in question please contact your nearest Infineon Technologies Office.
Infineon Technologies Components may only be used in life-support devices or systems with the express
written approval of Infineon Technologies, if a failure of such components can reasonably be expected to
cause the failure of that life-support device or system, or to affect the safety or effectiveness of that device or
system. Life support devices or systems are intended to be implanted in the human body, or to support
and/or maintain and sustain and/or protect human life. If they fail, it is reasonable to assume that the health
of the user or other persons may be endangered.
AP16093
Getting Started with the XC164 Starterkit
AP16093
Revision History:
2006-06
Previous Version:
none
Page
V1.0
Subjects (major changes since last revision)
We Listen to Your Comments
Any information within this document that you feel is wrong, unclear or missing at all?
Your feedback will help us to continuously improve the quality of this document.
Please send your proposal (including a reference to this document) to:
[email protected]
Application Note
3
V1.0, 2006-06
AP16093
Getting Started with the XC164 Starterkit
Table of Contents
Page
Introduction....................................................................................................................................................... 5
1
Connect the XC164CS Starterkit ................................................................................................. 6
2
2.1
How to use DAvE .......................................................................................................................... 8
Using DAvE to configure XC164CS................................................................................................ 9
3
3.1
How to use Tasking .................................................................................................................... 19
Using Tasking to generate code ................................................................................................... 19
4
4.1
How to use CrossView Pro ........................................................................................................ 31
Using CrossView Pro for debugging............................................................................................. 31
5
Conclusion .................................................................................................................................. 36
Application Note
4
V1.0, 2006-06
AP16093
Getting Started with the XC164 Starterkit
Introduction
Introduction
This application note introduces the Infineon Technologies XC164CS 16bit microcontroller. It aimed to guide
users to a quick start to the XC164CS starterkit using DAvE and Tasking EDE.
All the information contained in this application note is retrieved from the XC164CS official documentation
(System Units and Peripheral Units) and the XC16xBoard User Manual. References should always be made
to these documents.
In this application note, we will be using the following abbreviation:
•
“Tasking” for the Altium Tasking Tools for C166-ST10 v8.5r2 (C Compiler, Assembler & Linker).
•
“CrossView” for the Altium Tasking CrossView Pro Debugger v8.5r2.
•
“EDE” for the Altium Tasking Embedded Development Environment.
•
“DAvE” for the Infineon Technologies Digital Application virtual Engineer.
•
“Starterkit” for the Infineon Technologies XC164CS Starterkit Board.
The application note will start by
1. How to easily connect the XC164CS starterkit to a computer to start evaluation,
2. How to use DAvE to program the Infineon microcontroller you want to use in your project, by offering
intelligent wizards, that help you configure the chip to work the way you need it and automatically
generate C-level templates with appropriate driver functions for all of the on-chip peripherals and
interrupt controls,
3. Use Tasking for program building, editing and code generation,
4. Finally, use CrossView for simple debugging such as setting of breakpoints & viewing of
core/peripherals registers. (Detailed information for Tasking and CrossView at www.tasking.com)
Application Note
5
V1.0, 2006-06
AP16093
Getting Started with the XC164 Starterkit
Connect the XC164CS Starterkit
1
Connect the XC164CS Starterkit
The starterkit (Figure 1) is a versatile tool, providing quick access to the capabilities of XC16x’s powerful
architecture. Applications can be developed easily with the starterkit.
The starterkit is equipped with SRAM memory and peripherals for connection to the environment. There is
also an interface for the On Chip Debugging Features (OCDS1).
For connection with the starterkit to a computer, the following configuration and hardware are required:
1. Computer parallel port configured as “EPP” operating mode (for proper CrossView operation),
2. Parallel cable,
3. An external regulated 9 to 12V, 500mA DC power supply for the starterkit (Figure 2),
4. Starterkit DIP switch S106 configured to ‘0000”, all ‘OFF’ (Standard Internal Start from flash),
5. Starterkit Jumper JP501 (OCDS_EN) connected to 1-2, onboard wriggler enabled.
To have access to all microcontroller pins, user need to use the extension board (Figure 3). The labeling set
for the extension board comes together with the starterkit package.
A detailed description of the usage of this board is beyond the scope of this application note, the reader is
referred to the XC16xBoard User Manual for detailed information.
Connect up the starterkit to the DC power supply and one end of the parallel cable to the starterkit and the
other end to the computer parallel port. Power up the starterkit and press the blue ‘Reset’ button once.
Figure 1
XC164CS starterkit
Application Note
6
V1.0, 2006-06
AP16093
Getting Started with the XC164 Starterkit
Connect the XC164CS Starterkit
Figure 2
DC Power Supply
Figure 3
Starterkit with Extension Board
Application Note
7
V1.0, 2006-06
AP16093
Getting Started with the XC164 Starterkit
How to use DAvE
2
How to use DAvE
DAvE stands for Digital Application virtual Engineer and is Infineon Technologies’ code generator for their
range of 8, 16 and 32 Bit Microcontrollers. It provides initialization, configuration and driver code to ease
programming for beginners as well as experts.
To install DAvE, user needs to follow the following steps (Figure 4):
1. Download and install the DAvE Mothersystem from http://www.infineon.com/dave (The starterkit
package contains a CD for the installation of DAvE),
2. Download the required DIP file for the particular microcontroller you are using (i.e. XC164CS),
3. Install the DIP file.
Users can refer to the application note for DAvE if they encountered any problem.
Figure 4
How to install DavE
Application Note
8
V1.0, 2006-06
AP16093
Getting Started with the XC164 Starterkit
How to use DAvE
2.1
Using DAvE to configure XC164CS
We will be using DAvE to configure the XC164CS to toggle a particular port pin. The first step will be to start
the program generator DAvE and to create a new project to select the XC164CS microcontroller.
1. File -> New -> 16-Bit Microcontroller -> XC164CS -> Create
Application Note
9
V1.0, 2006-06
AP16093
Getting Started with the XC164 Starterkit
How to use DAvE
Project settings
2. General
•
Main Source File: Rename Main.c to Toggle_ Main.c
•
Main Header File: Rename Main.h to Toggle_Main.h
•
Compiler Settings: Select Tasking
Application Note
10
V1.0, 2006-06
AP16093
Getting Started with the XC164 Starterkit
How to use DAvE
3. System Clock
•
Input Frequency: Oscillator Clock: 8MHz
•
PLLIDIV = 2, PLLMUL = 30 & PLLODIV = 3
•
Clock Prescaler for System: CPU Clock: 40MHz (Max. CPU Clock up to 40MHz)
4. Startup Configuration
•
External Access Control: Select Fetch code from internal ROM
Application Note
11
V1.0, 2006-06
AP16093
Getting Started with the XC164 Starterkit
How to use DAvE
5. Global Settings
•
No Change
6. CPUCON1 / VECSEG
•
Vector Segment Pointer: Select Start from internal program memory
Application Note
12
V1.0, 2006-06
AP16093
Getting Started with the XC164 Starterkit
How to use DAvE
7. Exit by clicking X in the close button.
Parallel Ports
8. Configure Parallel Ports by clicking on Port
Application Note
13
V1.0, 2006-06
AP16093
Getting Started with the XC164 Starterkit
How to use DAvE
Configure Port 9
9. Click on Configure Port 9
•
Functionality : Tick Use P9.4 as general IO
•
Direction: Tick Out
P9.4 corresponds to microcontroller Port 9 Pin 4 which is connected to the starterkit LED.
10. Exit by clicking X in the close button.
Application Note
14
V1.0, 2006-06
AP16093
Getting Started with the XC164 Starterkit
How to use DAvE
11. Functions
•
Initialization Function: Tick IO_vInit
•
Function Library: Tick IO_vTogglePin
•
Source File: Rename IO.C to Toggle_IO.C
Application Note
15
V1.0, 2006-06
AP16093
Getting Started with the XC164 Starterkit
How to use DAvE
12. Parameters
•
Header File: Rename IO.H to Toggle_IO.H
13. Exit by clicking X in the close button.
Application Note
16
V1.0, 2006-06
AP16093
Getting Started with the XC164 Starterkit
How to use DAvE
14. Save the Project
•
File -> Save
•
Choose filename as ‘Toggle_IO’ and save file in folder of your choice.
Application Note
17
V1.0, 2006-06
AP16093
Getting Started with the XC164 Starterkit
How to use DAvE
15. Generate Code
•
File -> Generate Code or
DAvE will show all the files it has generated. File Viewer opens automatically.
16. Close DAvE
•
File -> Exit
•
Click Yes
Application Note
18
V1.0, 2006-06
AP16093
Getting Started with the XC164 Starterkit
How to use Tasking
3
How to use Tasking
The C166 software development toolset from Altium is a complete programming package for the
XC166/C166 family, and includes a C/C++ compiler, assembler/linker and debugger (simulator, ROM
monitor and OCDS-L1).
The starterkit package contains a CD for the installation of a demo version for Tasking EDE.
To install Tasking:
1. Run the ‘Setup’ file inside Tasking CD.
For detailed information on Tasking, please visit www.tasking.com.
3.1
Using Tasking to generate code
First start the program Tasking EDE for C166-ST10. If you see an open project, close it by File -> Close
Project Space.
1. Create a new project space
•
File -> New Project Space
•
Click on Browse to select a folder which you want to save your project. (Choose folder which you
have saved DAvE generated files previously)
•
Choose project name as ‘XC164CS’ and click Open -> OK
Application Note
19
V1.0, 2006-06
AP16093
Getting Started with the XC164 Starterkit
How to use Tasking
2. Add new project to project space
•
Click on icon Add new project to project space
•
Enter project name as ‘Toggle_IO’ and click OK.
Application Note
20
V1.0, 2006-06
AP16093
Getting Started with the XC164 Starterkit
How to use Tasking
3. Add existing files to project
•
Click on icon Add existing files to project
•
Add ‘Toggle_Main.C’, ‘Toggle_Main.H’, Toggle_IO.C’ and Toggle_IO.H’ and click OK.
(Remember that these are files generated by DAvE)
Application Note
21
V1.0, 2006-06
AP16093
Getting Started with the XC164 Starterkit
How to use Tasking
4. Load Files
•
At the top menu, click Project -> Load Files -> Invert -> OK
Application Note
22
V1.0, 2006-06
AP16093
Getting Started with the XC164 Starterkit
How to use Tasking
5. Edit Toggle_Main.C
•
Insert the following code in the main function, between ‘// USER CODE BEGIN’ and ‘// USER CODE
END’
// USER CODE BEGIN (Main,2)
void delay(void);
// USER CODE END
// USER CODE BEGIN (Main,4)
while(1)
{
IO_vTogglePin(P9_P4); //toggle Port9 Pin4
delay();
}
// USER CODE END
// USER CODE BEGIN (MAIN_General,10)
void delay(void)
{
unsigned long i;
for (i=0;i<0x200000;i++) /* delay */
{
_nop();
_nop();
}
}
// USER CODE END
Application Note
23
V1.0, 2006-06
AP16093
Getting Started with the XC164 Starterkit
How to use Tasking
Note:
DAvE doesn’t change code which is inserted between ‘// USER CODE BEGIN’ and ‘// USER CODE END’.
Therefore, whenever adding code to DAvE’s generated code, write it between ‘// USER CODE BEGIN’ and
‘// USER CODE END’.
Application Note
24
V1.0, 2006-06
AP16093
Getting Started with the XC164 Starterkit
How to use Tasking
6. Configure application
•
At the top menu, click Project -> Project Options
•
Under Application -> Processor, change Manufacturer to Infineon and Processor to XC164CS
Application Note
25
V1.0, 2006-06
AP16093
Getting Started with the XC164 Starterkit
How to use Tasking
7. Configure Flash Setup
•
Under Application -> Flash Setup -> On-Chip Flash, tick Use on-chip flash and select the Processor
derivative for the starterkit. (Hint: the processor derivative can be seen on the markings on top of the
microcontroller)
Application Note
26
V1.0, 2006-06
AP16093
Getting Started with the XC164 Starterkit
How to use Tasking
8. Configure Linker/Locator
•
Under Linker/Locator -> Output Format -> IEEE695 Output Format Options, enter Start address as
‘0xC00000’
Application Note
27
V1.0, 2006-06
AP16093
Getting Started with the XC164 Starterkit
How to use Tasking
9. Configure Linker/Locator
•
Under Linker/Locator -> Interrupt Vector Table, enter Vector table base address as ‘0xC00000’
Application Note
28
V1.0, 2006-06
AP16093
Getting Started with the XC164 Starterkit
How to use Tasking
10. Configure CrossView Pro
•
Under CrossView Pro -> Execution Environment, remove tick in Use simulator. Change Board
manufacturer to Infineon and Board configuration to Infineon XC164CS with OCDS (Single Chip).
Application Note
29
V1.0, 2006-06
AP16093
Getting Started with the XC164 Starterkit
How to use Tasking
11. Generate Application Program
•
At the top menu, click Build -> Rebuild or
Application Note
30
V1.0, 2006-06
AP16093
Getting Started with the XC164 Starterkit
How to use CrossView Pro
4
How to use CrossView Pro
CrossView Pro reduces the time spent during the testing and debugging phases of embedded systems
project development. An easy-to-use interface with powerful and extensive debugging features helps you
debug your applications faster.
CrossView Pro is integrated together within Tasking EDE environment.
For more information, please visit www.tasking.com.
4.1
Using CrossView Pro for debugging
Ensure that the starterkit is powered up and connected to the computer parallel port as described in chapter
1. With the setting for DIP switch S106 as described in chapter 1, the XC164CS is configured to start from
the internal flash.
Start CrossView by clicking on
The following GUI will appear.
Application Note
31
V1.0, 2006-06
AP16093
Getting Started with the XC164 Starterkit
How to use CrossView Pro
1. Set Breakpoint
•
Click on the green LED beside the function IO_vTogglePin(P9_P4) in Toggle_Main.C which is the
code we have inserted. The green LED will turn RED.
Application Note
32
V1.0, 2006-06
AP16093
Getting Started with the XC164 Starterkit
How to use CrossView Pro
2. View Core/Peripheral Registers
•
At the top menu, click View -> Register. User will be able to select from a list of available registers
for monitoring. (i.e. CPU & PORT)
Application Note
33
V1.0, 2006-06
AP16093
Getting Started with the XC164 Starterkit
How to use CrossView Pro
3. Execute Program
•
At the top menu, click Run -> Run
With the breakpoint at function IO_vTogglePin(P9_P4), the program will stop there. User will be able to
monitor the current core/peripheral registers status.
For example, as PLLCON is set as 0x7D12 in function MAIN_vInit. The PLLCON core register value can be
observed correctly in CrossView.
By pressing function key ‘F5’ continuously, the LED on the starterkit can be toggled since Port 9 Pin 4
(P9_P4) is connected to the starterkit LED. It can also be observed in the PORT register window that P9_P4
is changed between 0 and 1.
Application Note
34
V1.0, 2006-06
AP16093
Getting Started with the XC164 Starterkit
How to use CrossView Pro
4. Remove Breakpoint
•
Click on the red LED beside the function IO_vTogglePin(P9_P4) in Toggle_Main.C which is the code
we have inserted. The red LED will turn GREEN.
By pressing the function key ‘F5’ once, the program will run and the LED on the starterkit can be observed to
be toggling periodically.
Application Note
35
V1.0, 2006-06
AP16093
Getting Started with the XC164 Starterkit
Conclusion
5
Conclusion
This application note showed users how to quickly started evaluating Infineon Technologies 16bit XC164CS
microcontroller. Users can easily download additional DAvE DIP files to generate code for other 16bit
derivatives for evaluation purpose. The steps described in tasking are generic so users can easily generate
application code by making minimum changes to the project options. Some debugging techniques are also
introduced when using CrossView such as setting of breakpoints and viewing of core/peripherals registers
status.
Please note that all the code examples given this application note are aimed at demonstration purpose only.
Code is neither optimized nor is its reliability guaranteed.
If you need more information, please contact your nearest Infineon sale’s office. Contact information is
available on Infineon web site: www.infineon.com.
We wish you a lot of success with the XC164CS!
Application Note
36
V1.0, 2006-06
http://www. inf ineon.com
Published by Infineon Technologies AG