1
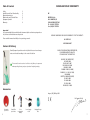
Warranty
The unit is guaranteed for 12 months both for materials and construction.
This unit has been constructed and manufactured under consideration of all safety regulations. Should the unit show any manufacturing errors or irregularities during the
guarantee period, the manufacturer according to our standards will fix them. For any
guarantee claim, the invoice or delivery note must be provided as proof. The guarantee
is limited to the replacement of the part or parts which show the manufacturing error
or irregularity.
CLED PLUS
LED CURING LIGHT
Excluded from guarantee are: personnel costs, expenses of the technical staff, transport
costs, packaging, etc. Furthermore, errors or other problems that the manufacturer cannot be blamed for or parts that are subject to normal wear may not be claimed under
guarantee.
Direct or indirect damage claims towards any persons or things may not be derived from
this guarantee, even if the reason for the damage could be traced back to the unit. This
guarantee will automatically be terminated, if the unit is repaired, changed or opened
by force by the user/buyer or any unauthorized third party.
Should any problem occur during the guarantee period, the user/buyer have only to contact the manufacturer or an authorized service center named by the manufacturer.
The right to exchange the complete unit for a new one is excluded. Any parts replaced
during the guarantee period must be returned to Micerium S.p.A., who will supply a
new part. Should the replaced part not be returned, it will be billed to the user/buyer
®
Manufacturer:
Micerium S.p.A.
Via G. Marconi 83 - 16036 Avegno (GE) Italy
Tel: (+39) 0185 7887880 • Fax: (+39) 0185 7887970
E-mail: [email protected] • www.micerium.com
File: Manuale CLED PLUS ENG v1_1-06-2012
HOW TO CONTACT OUR CUSTOMER CARE MICERIUM S.P.A:
Please contact Micerium S.p.A. at the followings:
- Phone number: (+39) 0185 7887 880 (our sales offices are open all weekdays);
- Fax: (+39) 0185 78 87 970;
- E-mail: [email protected]
User’s Manual
®
Table of Content
CE DECLARATION OF CONFORMITY
Safety
Installation and Panel Functionality
Operating Instruction
Maintenance and Technical Data
Equipment Symbols
Warranty
3
4
5
6
7
8
WE
MICERIUM S.p.A.
VIA G. MARCONI, 83
16036 AVEGNO (GE) ITALY
Tel.: (+39) 0185 7887870
Fax: (+39) 0185 7997970
Important!
It is recommendable that reusable dental instruments (such as air/water syringe and scalers) be heat sterilized between each patient.
DECLARE UNDER OUR EXCLUSIVE RESPONSIBILITY THAT THE PRODUCT :
Please read this manual carefully before operating your unit.
Ref. CLED PLUS
LED CURING LIGHT
Content of Delivery
Carefully unpack your device and verify that all accessories and components are included according to the content lists below:
i
WHICH THIS DECLARATION IS REFERRED TO,
IS IN COMPLIANCE WITH WHAT IS
ESTABLISHED BY THE DIRECTIVES:
93/42/EEC- MS (2007/47/ECC)
ISO 13485:2003
EN ISO 14971:2007
EN ISO 10993-1:2003
EN 60601-1:2006
EN 60601-2:2001 (A1:2006)
EN 60601-1 - 4: 1996 (A1:1999)
EN 980:2008
DIRETTIVA 2002/96/EC (WEEE)
EN 1041 :2008
EN 1640 :2004
EN 1639 :2004
EN ISO 3630-1 :2008
This content list can be used as a check list to verify delivery of components
when unpacking. Contact your place of purchase if anything is missing.
CLED PLUS
Accessories
Avegno (GE), 02 May 2012
Dr. Eugenio Miceli
Protective
Eye Shield
2
11mm Fiber
Optic Probe
Li-ion
rechargeable
Battery
Power Supply
+ Cord
Charging/Storage
Base
7
Maintenance
Safety
1. Check periodically for cracks, chips or any damage to the light guide. If damage is
observed, replace light guide.
2. Remove any debris from the light guide. Clean with a soft or cotton ball.
3. The light guide should be autoclaved (Steam Autoclave Only) after each patient. The
light guide can be autoclaved at 135°C and 2.2 Bar for 20 minutes.
4. Do not autoclave the curing light handpiece, oval protection shield or mini shield (if
applicable). Follow the clinic’s disinfection procedures for these items or use disposable
plastic covers during procedures.
5. The Li-ion battery should be discarded according to national laws.
6. Remove the battery to save energy during prolong periods of nonuse.
Intended Use
This device is designed for dental purpose only. The curing light is designed for the acceleration of bonding and composite materials used for dental restoration. Do not use
where it is not intended. If you are unsure about your application, please contact your
local dealer or place of purchase.
** If you observe severe damage or your light is not functioning properly, please stop using the light and contact
your purchase dealer for repair or replacement information.
Contraindications
This device is not to be used by or on any persons that suffers, or has suffered in the past
from photo biological reactions.
Technical Specification
Switching Power Adator
Input
Output
AC 100-240V,
50/60Hz, 0.3A
DC 5V, 2A
Light Source
Model Type
Wavelength
Battery
LED Blu 5 W
456 nm
Type
Li-ion
Voltage
DC 3.7V
Capacity
2350 mA
Dimension
18D X 65L mm
General requirements
Maintenance and repair of this device is only to be made by DBI America and its authorized service personnel with proper tools and equipments. This device should only be
operated by a trained and licensed professional.
General Precaution
• To avoid eye injury, never look directly into the blue light.
• Wear protective glasses and place the oval protective shield on the Mega Light Plus
before operating.
• Only turn the light on after the light guide is inside the patient’s mouth, to prevent
injuring the patient’s eyes.
• Condensation inside an electrical appliance can be dangerous. If the device is transported
from one place to another with vast temperature differences, allow light to acclimate
to the new ambient temperature.
• Do not use the device near flammable anesthetic liquid, oxygen, nitrous oxide or near
any heat source. Use of solvent or flammable products on device could cause damage.
• Keep light guide 3,2 cm from resin to prevent over-exposure to material or injury to
patients.
Device Disposal
Information to Users
This product is covered by the European Directives 2002/95/EC, 2002/96/EC and 2003/108/EC, for the reduction of the use of hazardous
substances in electrical and electronic equipment, and disposal of waste.
The symbol of bin crossed reported on your equipment or its packaging indicates that the product at the end of its useful life must
be disposed separately from other waste.
A separate collection of this equipment arrived at the end of its life is organized and managed by the manufacturer. If you want to
get rid of this equipment, please contact the manufacturer and follow the system that he has chosen to allow separate collection of
the apparatus arrived at the end of its life.
A proper separate collection for the next launch of the disused equipment to recycling, treatment and environmentally compatible
disposal helps to avoid possible negative effects on the environment and on health and promotes reuse and / or recycling of materials
composing the equipment. The illegal disposal of the product by the holder includes the application of administrative sanctions provided for by law.
6
WARNING
Warning indicates a potential dangerous situation nonobservance may lead
to death or injury.
CAUTION
Caution indicates a potential harmful situation. Non observance may damage
equipment.
i
NOTE
Note indicates a situation where special notice should be observed.
3
Installation
Operating Instruction
Charging Li-ion Battery:
1. Install the Li-ion battery by removing the battery cover located underneath the curing
light.
2. Connect the battery’s two pin connector to the curing light female connector found
inside the curing light handpiece.
3. After connecting the battery, tuck wires and battery in to the battery holding chamber.
4. Close the battery cover and make sure not to pinch the battery wires.
5. Connect the power adapter to the charging base.
6. Place the curing light handpiece in the charger and plug the power adapter to a power
outlet.
7. After approximately 1 - 2 minutes the display will flash “CH” indicating that the battery
is charging.
Selecting Program – Press the Mode button in sequence to select programs. The LED
indictor light under each corresponding letter will turn on with each specific program
selected.
(1) – F: Fast = 5 watts (full power)
(2) – R: Ramp = Gradually increases strength
(3) – P: Pulse = Short pulses
i
NOTE: A new battery requires to be charged for 8 hours prior to initial use. If battery is in sleep
mode press the MODE button to activate the unit. The battery will not charge if it is in sleep
mode.
8. Light Guide – Directly insert the stainless steel chuck into the front of the curing light
handpiece. Make sure that the chuck is pushed all the way inside the handpiece.
Remove the black plastic protection cap from the tip of the light guide.
9. Oval Protective Shield – Insert the oval shield through the front of the curing light
handpiece until it is firmly in place.
Selecting Time – Press the Time button to select desired curing times in intervals of 5,
10, 20, 30, 40 and 50 seconds.
Warning: Due to the high output power of this product, the tip portion of the
light guide near the tooth can become very hot. We strongly recommend using a
maximum of 10 seconds per each cure.
Start Curing – Press the On/Off curing button to activate light. A beep will be heard in
10 second intervals. To interrupt curing time, simply press the On/Off button. During the
process of curing the digital display will show the remaining time.
Warning: Keep light guide 3,2 cm from resin to prevent over-exposure to material
or injury to patient.
Deactivating Sleep Mode – To conserve energy the Mega Light Plus will go into sleep
mode of the light has not been utilized for 60 seconds. To deactivate sleep mode, press
the Mode button.
Low Power Operation – When “CH” flashes on the display panel the light must be charged. If this happens in the middle of a procedure, press the Mode button to bypass the
system lock.
Note: the battery must be charged immediately after the procedure. If you are unable
to charge the battery before your next procedure, directly connect the power cord
from the charging base to the curing handpiece and continue working.
i
CLED Plus
Panel
Curing Light Legend
C. MODE
Indicator
P – Indicates connection with the power adaptor.
CH – Indicates the battery is charging or the battery is low.
A. MODE/WAKE
Button
D. Display
FC – Indicates the battery is fully charged.
•
•
B. ON/OFF
Button
4
E. TIME SELECTOR
Button
The last curing time or “FC” will flash on the display panel when the light is on the
charging base. This indicates that the battery is full and/or operational.
The unit is equipped with a battery protection program. If the battery is removed
and replaced, connect it to the power adap-tor or charging base to release the
protection.
5