1
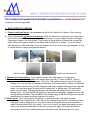
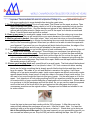
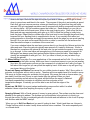
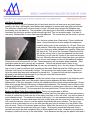
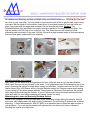
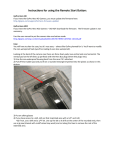
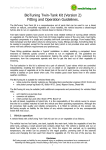
9/2012
REPAIR OF GELCOAT AND OTHER SECRETS OF
MAINTAINING YOUR BOATS FINISH
FOUND ON WWW.OPTISTUFF.COM
We are here to help you. Please call us if you need further instructions: 800 784 6478
HELPFUL TOOLS
1. Gelcoat: from manufacturer of boat for perfect color match. Refrigerate or freeze for longer life.
2. MEKP: catalyst. Treat this as you would acid. If it gets in your eyes it could blind you.
3. Dremel tool with ball end cutter, nail, razor blade, knife or another method to clean out the repair.
4. Mixing Container: Waxed paper cup is the best. Wax dissolves & seals repair so it fully hardens.
5. Newspaper to keep everything clean.
6. Stir sticks: tongue depressors, Popsicle sticks, something small to stir with.
7. Paper towels or rag.
8. Acetone for cleanup.
9. Latex gloves to keeps your hands clean.
10. Plastic Tape: I prefer 1" green or yellow 3M fine line tape from an automotive store.
11. Nail, screw or other pointed tool for application.
12. Sanding block: hard, flat and sized to fit your repair.
13. 320, 400, and 600 grit wet / dry sand paper.
Optional:
Buffer and buffing compound such as 3M super duty or rubbing compound.
Preval sprayer. A $10 compressed air sprayer found at hardware and auto body supply stores.
B: BASIC GELCOAT REPAIRS
1. A CHIP: Found along the rail, chine’s and corners of the boat, leading and trailing edges of foils.
2. SCRATCH: Usually found on the bottom of the boat. If very shallow they can be wet sanded out
and blended into the surrounding area. Deeper ones, especially with glass showing, should be
repaired by filling with gelcoat.
3. SHATTER CRACKS: Many times shatter cracks are best left alone. A boat hitting a pilling very
hard may have a chip. But if you look closely there maybe fine cracks going out in all
directions. Shatter cracks usually go out much further than you originally suspect. 20 to 30
inch is not uncommon. These cracks usually go through to the fiberglass and require that the
gelcoat be removed down to the glass. The repair can require spraying to make the boat look
like new.
4. A HOLE: This requires a structural repair, removal and replacement of fiberglass then spraying the
area with gelcoat.
Both the shatter crack and the hole are best done by a professional who has the experience and
equipment to do this type repair.
C: BASIC STEPS TO A REPAIR
1. Protect unaffected areas. Use newspaper on the floor of the boat for instance. Why mess up
what is already perfect?
2. Using a Dremel tool get out the bad gelcoat. While the Dremel tool works best any device like a
nail or knife will work. There may be large pieces that are no longer adhered to the sub-straight.
These can be seen if you look closely. They usually go flying when the Dremel tool touches the
defect. Bevel the edges to slope into the repair area so there are no ledges. If you see cracks
take the gelcoat in that area down to the sub-straight. If you don’t the crack may reappear. A chip
or scratch does not require total gelcoat removal.
Hair line crack
Scratch you can sand out
3. Remove dust and moisture. If you suspect moisture dry with acetone or a hair dryer.
4. Mix about ¼ to ½ inch of gelcoat in the waxed paper cup with 3-7 drops of MEKP. Stirring
mixes in the MEKP and dissolves wax off the cup. The paraffin rises to the top of the repair
sealing it off. You can also use candle wax shavings for the same effect. Gelcoat is formulated
so the surface remains tacky until the fiberglass and resin is applied when the boat is originally
made. You may have heard of additives like “sanding aid” or putting tape, PVA and waxed
paper over the repair. With the waxed paper cup the repair will harden without the surface
staying sticky. Too much MEKP will prevent the gelcoat from hardening, change the color, and
can generate air bubbles. Too little MEKP will just take longer to harden. With gelcoat from the
manufacturer the repair should be a perfect color match.
6. Fill the repair: Use a nail, dipped in the gelcoat, to scratch around in the repair assuring
good adhesion and filling all the voids. Sort of like a dentist filling a tooth. He doesn’t just drop
a big glob in place. Make sure you over fill the repair and that the gelcoat goes outside the
edges. Gelcoat shrinks 25% by volume. If you do not over fill the repair area when you sand
down to the original surface there will be low spots and the edge of the repair will show in
some places. Look for air bubbles and pop them with the nail. Getting the air out is very
important. The air bubbles will sand out as pinholes. Putting on too much gelcoat will require a
little more sanding but is more desirable than doing the repair twice.
7. Repair of Metal Flake Gelcoat This is a 2-part repair. First Dremel out the repair as above. Then
apply the background gelcoat being careful to not fill in the repair completely but just give the
repair the background color. Once the background gelcoat is fairly hardened, add the clear
gelcoat with the glitter mixed in. Make sure you over fill the repair as it shrinks as mentioned
above. From this point sand and buff as normal.
8. Clean up any mess you made with a paper towel and acetone. Save the mixing cup to see how
well it hardens. The cup will harden before your repair because of the volume of material.
9. Wait for gelcoat to harden. Over night is best. Heat, such as a hair dryer on low will accelerate
the hardening. Over heating to shorten the hardening time can cause discoloration and shorten
the life of the surrounding gelcoat. When hard you should not be able to indent the repair with
your fingernail. If you sand too soon the gelcoat will shrink below the surface, the edges of the
boundary area will show and dirt can get imbedded in the repair surface.
10. If the surface is still sticky on top but the gelcoat is hard underneath, as shown by the finger nail
test, wipe off the tackiness with acetone. This will keep your sand paper from gumming up.
11. Tape off the area around the repair. The purpose of the tape is to protect the area around the
repair from the sand paper. A professional works without tape but for novices the repair will
come out better with it. It will also help keep you from sanding too deep and going through the
gelcoat in the surrounding area. Stay close to the repair. Make sure the tape extends outside
the sanding area or it will curl up.
12. Choose your sanding block well, a small block for a small repair. The block should be hard and
smooth. A small block of wood or hard plastic is best. 3 X 5 inch commercial rubber sanding
blocks are for fairing something that is already smooth like the boat bottom and they are too
large for repairs. The rubber is too soft and flexible to recreate a flat surface. It will cause
dishing out or low spots around the repair. Inside corner repairs are difficult and usually require
special shaped blocks, dowel, pencil or hard thin rubber in the case of large inside curves. You
will need to put more thought and time into this type of repair. Cut the sand paper so it fits the
repair. Your objective is to limit putting anything but 600 grit scratches outside the repair area.
An oversize block or large uncontrolled piece of sand paper will not achieve this. Shown below
is a good way to fold the sandpaper and hold the block. As you go over the repair the exposed
wood on the ends of the block will hit the good gelcoat so the sand paper does not put
unnecessary scratches on the original surface. The paper can be folded and refolded to use
its entire surface.
Leave the tape in place and start sanding with the 320-grit paper. A little dish soap in the
water will help cleanse the sand paper as you work. Use lots of water. Note: You want the
sanding to end up at the original surface, not above or below it. Watch what you’re doing as
this is the critical part of the repair. Dry the area frequently as you approach the tape so you
can see and feel where you are. Stop the 320 just before reaching the tape. Use 400 to get
down to the tape. Remove the tape and expand your area of sanding with 600 grit to come
down to ground zero and blend in the repair. The purpose of the grits in wet sanding is speed.
Each finer grit must remove previous coarser grit scratches to the point that they are totally
removed. 600 grit-sand paper scratches can be removed with buffing compound bring the area
to a shining luster. 400 grit scratches cannot be buffed out. Sand randomly or you can cut
grooves and dish out the repair area. White is the most forgiving color. Dark colors like blue,
black and red may require sanding with grits up to 1200 to allow the buffing to totally bring
back the gloss. Edges like the outside edge of the boat tend to sand through the gelcoat easily
because half your sanding block is unsupported in the air. If you mentally think about not
putting pressure on this edge and apply more pressure above the edge you can avoid sanding
through. On a two side corner repair like the bow or chine’s, sand the two flat surfaces first
than recreate the shape or roundness of the corner last.
If you see a shadow below the sand area you are about to go through the Gelcoat and into the
glass and resin. Since the gelcoat originally was sprayed on it varies in thickness. 18 mils is
standard but sometimes the gelcoat is thin and once you get outside the repair it is very easy
to go through. In this case leave well enough alone or the area may need to be sprayed. At
McLaughlin we always spray black gelcoat behind lighter colors like white. Black helps us
visually see entrapped air and get it out. So if you come to black you are just about to go
through the gelcoat.
13. When buffing it may take 3 or more applications of the compound and buff offs. Do not burn the
gelcoat, keep the buffer moving. Make sure there is compound present or you are just wasting
your time. On small repairs you can put the compound on a towel and rub it with your finger. It
will take a little longer but you can polish the repair by hand. A little wax on top will go a long
way toward bring out the luster.
Do not use Epoxy and Marine Tex. except for non-visible structural repairs. Why? Epoxy sticks to
polyester, but polyester will not stick to epoxy. Therefore all future repairs have to be made in epoxy.
The epoxy is not the same color and does not look good. Why mess the boat up forever when you
can make it look like new? Epoxy is much harder than the gelcoat. When you sand
the epoxy the existing surface around the repair will dish before the epoxy is flattened.
Last epoxy expands and contracts at a different rate than polyester as the
temperature changes. Eventually you will be able to see and feel the edges of the
repair.
Do not use 3M 5200. It is a good sealant and bedding compound but while it is called
adhesive it does not perform anything like epoxy or gelcoat.
Spraying Gelcoat: With a Preval sprayer it is easy to spray gelcoat. The surface must be clean and
sanded for the gelcoat to adhere. The problem you will encounter is the gelcoat is to thick to go
through the nozzle. Put the un-catalyzed gelcoat in the bottle and add acetone to thin it until it sprays
well and then add the MEKP catalyst.
When you go to Sell Your Boat and you want it looking its best. Wash it and then use Johnson’s
Pledge furniture polish to make it really shine and hide minor scratches. This works especially well
on colored decks.
Hull Deck Separation
A crack can form in the joint between the hull and deck when the rail receives a very hard impact,
usually in the bow. McLaughlin uses Methacrylate adhesive in the bow and other high stress areas.
The adhesive is flexible and will never break or crack. Still with a hard impact the fiberglass may
break away from the adhesive. The remainder of the deck joint is filled with an adhesive specially
formulated for decking to produce a high strength rigid hull. This is a structural repair. You want to
use epoxy, Methacrylate or some other structural adhesive. The runnier they are the better to get into
the joint.
Turn the boat upside down (See below). Protect unaffected
areas. Using screw drivers or thin wedges like sharpened
Popsicle sticks open up the crack about a 1/8 inch. Clean out
lose material. Particularly any particles that might prevent the
gap from closing up when clamped back together. Make sure
the area is dry. Find a tool like a sharpen Popsicle stick that
will act like a putty knife to force the adhesive into the crack.
The better you can coat the 2 sides of the crack the stronger
the joint. Normally the crack will close tight when you remove
the wedges. If the joint will not go together on its own use clamps to hold until the adhesive hardens.
Cleanup as much of the area as you can. The excess epoxy will not release when hardened. After
completion sand the rail to remove any roughness. Now do the gelcoat repair if there is any.
To add even more strength to the bow you can use overlapping, short, two-inch strips of fiberglass
tape or mat to glass the hull and deck together on the inside. Sand the area first. While you can use
polyester resin, epoxy is structurally stronger. This procedure can really cause a mess. Be sure to
cover the inside bow area with newspaper to prevent this. To glass the hull and deck together you
will need to get the boat high enough so you can get under the boat and work.
Midship Frame to deck connection
IODA made a poor design in this area. Initially the builders were not supposed to join these two parts.
Then IODA changed their mind. McLaughlin used polyester adhesive and later switched to
Methacrylate. If this joint separates it can be left unattached without doing structural damage. Fixing it
takes a very strong adhesive like epoxy or Methacrylate adhesive. The material must be thick to stay
in place and fill the gap. If you cannot find a thick adhesive try adding micro balloons or baby powder
to it. 3M 5200 will not work. Do the repair with the boat upside down. Protect the deck from spillage.
Broken out Mast Collar See pictures below. This is not complicated or difficult.
Usually this repair just requires replacement of the collar itself but if the glass and foam are broken or
the hole is opened up to much use one of the epoxy clay bars to fill in the voids. You will find these at
most hardware stores. The catalyst is internal to the epoxy. You just squeeze and blend it with your
fingers to activate. In a sever case where the hole is really wide you can use a new collar inserted up
from under the deck as a form to hold the perfect shape while the epoxy hardens. The epoxy clay
does not stick to the plastic but be on the safe side take any type oil and wipe it on the plastic. Even
olive oil works. Clean out the broken glass and foam. Make sure the area is dry. Push the epoxy into
the voids and even the screw holes with your fingers. Wrap epoxy around the collar and shove it
upward from under the deck completely filling in all the spaces and voids. Scrape the top surface so
the epoxy is flush with the top of the mast thwart. Once hardened carefully tap the plastic collar and it
will release from the epoxy and drop out below leaving a perfectly sized hole. The collar you just used
as a form is your new collar. You may need to hand sand the hole a little to get the new collar to drop
into place. But the tighter it fits the better. Use a block of wood and hammer to force the collar into
place. Also make sure the upper deck surface is flat so the collar sits flush. Caution: The
Optiparts/Optimax logo imprinted in the plastic should be parallel to the centerline of the boat. You
may not realize it but this hole is not round but oval. This allows fore and aft movement while
eliminating side movement of the mast. Drill the 4-holes at a slight outward angle so that the washers
and nuts have space underneath to be attached.
Hull discoloration and cleaning
Many times you will return from a Regatta and find your white hull with an ivory tan discoloration.
What cause this are oils and minerals in the water. From experience Lake Pontchartrain is one of the
worst. Restoring the gelcoat to bright white is easy and effortless. Products such as On & Off, West
Marine Heavy Duty Hull Cleaner and my favorite Starbrite Instant Hull Cleaner require simply wiping
on and rinsing off. No elbow grease required! They contain an Oxalic acid that removes the rust and
other stains without harming the Gelcoat. A coat of Teflon polish before the event will keep the hull
clean and retain its color while increasing hull speed. (Never use wax!)
Maintaining the Luster and Restoring Oxidized Gelcoat
Oxidation on fiberglass occurs over time due to salt, water and sunlight hitting the surface. Using a
boat cover also helps prevent this and is a good investment. The technology to prevent this is forever
improving. A West Marine advisor, 800 621 6885, is an excellent place to learn the latest solution to
your problems. If you can wet the surface with spit and the color returns you have a chance of
restoring the original color and luster.
Here is one of many solutions. Compound the surface with a polisher with a speed of 1000 to 3000
RPM. Faster speeds or staying in one spot too long will burn the gelcoat. The preferred tool used in
the industry is a Makita. It may cost you $200 or more. Use a compound such as 3M – 06044. It may
take several applications. With compounding you are actually sanding off the surface oxidation
without creating scratches. Next finish the buffing with a product like Finesse-it II 3M-09048 to really
shine it up. Use a buffing pad such as 3M 05705 Super buff. This pad has 2 sides. Use one side to
compound the other to finish. You can wash the pad in a washing machine but let it air dry. You will
need an adapter mandrel for this type pad. Now wax with any automotive or marine wax. 3M-09030
Marine Ultra Performance wax is excellent. See below. The 3M products can be found a body shop
supply store Wax the surface about twice a season to keep the shine and avoid repeating the
process. If you start waxing early in the life of your boat you will help prevent oxidation dulling of the
colors. If you are a racer do not wax the hull bottom. Wax creates surface tension and beads
water, which creates drag. Teflon polish does not cause beading. Only wax the deck and the upper
portion of the sides that see sunlight.
Hull Speed -To Wet Sand or Not?
From experience straight-line wet sanding the bottom of a hull with 800 to 1200 grit wet-dry paper is
fast but not recommended. In a very short time the pores that open up from wet sanding will facilitate
adhesion of algae, dirt and promote oxidation. It requires that you keep the hull super clean and wet
sand several times a season. If you do not the hull will actually slow down. A much better solution is
to use a chemical coating made for speed. In recent years several companies have brought out
polishes with a Teflon additive. I am not positive these Teflon polishes make you faster. What I do
know is the hull stays cleaner, nothing sticks to it and that is fast. But Watch Out when you capsize
the boat (Not Fast!) you will have trouble climbing up on the centerboard, as it is very slick. Also the
boat will slide off a trailer in a heartbeat. I have seen many MC Scows, including mine; end up on the
ground as we were driving to the launch ramp. The polish is much easier to apply then normal car
wax. Starbrite, West Marine and Harken/McLub are brands we are aware of.
Server, Forms, Gelcoat repair course instructions