1
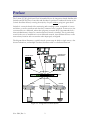
Latitude NVMS Quick Install Guide Preface The Latitude NVMS Quick Install Guide is intended for use by integrators already familiar with Latitude and DVTel’s line of encoders and decoders. It presents a condensed version of the Latitude Installation Manual, covering the majority of topics without going into great detail. Latitude is a network-based video monitoring and recording system, comprised of servers and clients, as well as encoders and decoders, connected over a network. In most cases, the system resides on a dedicated, rather than corporate, network. DVTel recommends that a network administrator always be consulted before Latitude is installed. This is particularly crucial in the case of installation in a non-dedicated network, since different devices on the network may interfere with one another when improperly configured. The diagram below illustrates a typical Latitude system setup in which a single server, a few client workstations, and multiple encoders/decoders reside on a dedicated network. Latitude Client Workstations Latitude Server Ethernet Cables HS1 HS2 OK1 OK2 PS 1 2 3 4 5 6 7 8 9101112 COLACTSTA- CONSOLE Switch Ethernet Cables Decoder Encoder ... BNC Cable BNC Cable Figure 1-1 - A single Server Latitude System Nov 2004, Rev. A 2 Encoder BNC Cable Latitude NVMS Installation Preliminaries Before beginning installation, make sure that: ¾ You have all the hardware and software required to install Latitude, including server and client computers, encoders/decoders, external storage devices (if any), a network switch (or multiple switches), CAT5 network cables, and the Latitude NVMS CD. ¾ All client, server and external hard drives should be formatted to NTFS. ¾ All client and server operating systems have been updated with the appropriate Windows and Internet Explorer service packs and the latest version of DirectX. ¾ Windows Internet Information Services (IIS) is installed on the Directory server, if web access to Latitude is required. Encoder/Decoder Installation Perform the following steps: ¾ Copy Device Configurator from the Latitude NVMS CD onto the desktop of the PC you will be using to configure your encoders/decoders, and launch the application. Enter the password dvtel when prompted. ¾ Setup Device Configurator’s Program Options for your computer and network. Make sure to specify the VSIP port you would like to give the encoders/decoders. ¾ Connect an encoder or decoder to the computer using a serial cable, a crossed network cable, or a switch and two regular network cables. Discover the unit and assign network addresses to it (using the Configure button). Label the unit with its IP address. ¾ Repeat the previous step for each of your encoders and decoders. ¾ Reconnect the encoders/decoders to the network, and connect them, with BNC cables, to cameras and analog monitors. Latitude NVMS Installation The installation of Latitude NVMS requires installing server and client applications. Server Installation Perform the following steps: ¾ Insert the Latitude NVMS CD into the CD-ROM drive of your server computer (if your system is to have more than one server, choose the machine in which you would like the Directory to run). If the installer is not launched automatically, explore the CD and double-click the setup file. Choose Install Latitude Server. ¾ Use the InstallShield to install the components applicable to your system. In most cases, a Typical Installation is the most appropriate. If performing an upgrade from NVRS 2.5, do not uninstall MSDE. Nov 2004, Rev. A 3 ¾ When the Resource Administration Tool (RAT) is launched, make a note of the validation key. Using the system ID and password provided with your Latitude CD, log into the license tool at DVTel’s website (http://www.dvtel.com) and enter the validation key and your e-mail address to have the license key sent to you. ¾ Import the license key into the RAT. Click Archiver in the Resources tree. Under the Archiving tab, checkmark the hard drives to which you would like to archive. Make sure to leave at least 1 GB of free disk space per drive. ¾ If you purchased additional Media Archivers, repeat the above process on each machine on which you would like to install an Archiver. Do not install more than one Latitude NVMS Directory. Client Installation Perform the following steps: ¾ Insert the Latitude NVMS CD into the CD-ROM drive of your client computer. If the installer is not launched automatically, explore the CD and double-click the setup file. Choose Install Latitude Client. ¾ Use the InstallShield to install the components applicable to your system. In most cases, a Typical installation is the most appropriate. ¾ Repeat the above process on each machine on which you would like to install Latitude NVMS client applications. Synchronizing Time Across Latitude DVTel strongly recommends that you synchronize time across all computers running Latitude applications. Please refer to Appendix A for detailed instructions on how to do so. Note that in certain networks, particularly ones that have domain controllers, time synchronization may be done automatically. In that case, no settings changes are required. Nov 2004, Rev. A 4 Latitude NVMS Configuration With the exception of ControlCenter layouts, which are configured with ControlCenter, all Latitude NVMS settings are configured using AdminCenter. To create an entity in AdminCenter, right click in the System View Pane (the left pane) and choose Create > [Entity Type]. Cameras, Analog Monitors and Sites ¾ When configuring cameras, make sure to: Give each camera a meaningful name (instead of the default name based on the encoder’s IP address). Enter the number of days you would like each camera’s video kept in the archives. This parameter can be changed in the Recording tab of the Configuration Pane. Configure recording and viewing qualities (under the second and third tabs). In most cases, DVTel recommends setting the Input filter mode to Medium and applying bit rate control. Set the Analog format field to the appropriate option for each camera (under the Attributes tab). ¾ When configuring analog monitors make sure to: Give each monitor a meaningful name (instead of the default name based on the decoder’s IP address). Set the Analog format field to the appropriate option for each monitor (using the Attributes tab). ¾ Create sites and drag and drop each camera and monitor into one of them. Note that only administrative users can view video from cameras, or with analog monitors, which are left in the root directory. Coverages and Archiving Schedules ¾ Create coverages prior to creating schedules. Latitude NVMS supports three types of coverages: One-shot, Weekly, and Daily. The Stop and Start parameters can be modified either with the GUI timeline or with their input boxes. ¾ For each schedule you create, make sure to: Choose a Coverage, an Archiving mode (Continuous, On motion, etc.), and a Recording quality. Checkmark the cameras you would like to associate with each schedule (under the Encoders tab). Note that a camera can be associated with multiple schedules. In case of conflict, the choice of schedule depends on its coverage’s priority. See the Latitude User Manual for more details. Nov 2004, Rev. A 5 Camera Sequences ¾ When creating sequences: Use the + button at the bottom of the Camera Sequence Configuration Pane to add additional cameras to the sequence. Click the Live video button to preview your sequence. ¾ Drag and drop each sequence you create into a site (in the System View Pane). ControlCenter Layouts ¾ Launch ControlCenter to create Layouts. ControlCenter can be launched directly from AdminCenter by clicking the eye button in the toolbar. Click the pencil button in the bottom right of ControlCenter’s Viewing Pane to enter the layout editing mode. ¾ To create and configure layouts: Use the Change pattern button to change the tile pattern, the ABC button to name a layout and the + button to create an additional layout. Click and drag cameras from the camera tree to any of the tiles to add them to the layout. If applicable, arm tiles for alarms by clicking their number buttons in the bottom left corner of the tiles. ¾ Save all layouts in sites. Layouts cannot be saved in the root directory. Users and User Groups ¾ When creating users, make sure to: Give each user a non-trivial password. If the Directory server is set up for e-mail, you may want to enter e-mail addresses for the users as well. Specify, in the User logon section, any periods in which users should not be able to access to Latitude NVMS, using coverages. Define each user’s Permissions (for sites) and Privileges (for applications). Use the ControlCenter tab to specify the default layouts available to users when they first launch ControlCenter. ¾ When creating user groups, make sure to: Define each user groups Permissions (for sites) and Privileges (for applications). Note that the inheritance of permissions is “positive” (permissions assigned to a group will automatically be inherited by its members), whereas the inheritance of privileges is “negative” (a member may not have privileges denied to its group). PTZ Cameras To configure PTZ cameras with Latitude NVMS, you will need to first configure the serial port of the encoder/decoder connected to the camera, then create a PTZ motor entity. Nov 2004, Rev. A 6 ¾ To configure a serial port: In the Physical view of the System View Pane, browse for the camera you would like to configure. Instead of selecting it, however, click the RS232 or RS422/485 port associated with it (both the serial ports and the camera appear under the unit in the tree hierarchy). Choose the serial port to which the camera is connected. From the Data bits, Parity, Stop bits, Baud rate and Mode (RS422/485) dropdown menus, choose the appropriate options for the PTZ camera you are configuring (see your cameras user documentation for additional details). ¾ To create and configure a PTZ motor: Right click anywhere in the System View Pane and choose Create > PTZ... In the Create PTZ dialogue box, choose the camera’s protocol from the Protocol drop-down menu, browse for the camera in the Select video encoder window, and choose the serial port to which the camera is connected in the Serial port(s) on the same unit field. Click the Properties tab in the Configuration View Pane and enter your camera’s PTZ number (if you are unsure what this number is, look it up using the camera’s menu). ¾ To test your PTZ configuration: Click the Test tab (of the PTZ motor Configuration Pane) and the Live video button. Use the green on-screen controls to test that the camera is responding to PTZ commands. Verifying Latitude NVMS is Archiving Video To verify that your system is recording video, launch MediaCenter and search for video (if none of the archiving schedules have taken effect yet, try recording a few seconds of video manually in ControlCenter first). Nov 2004, Rev. A 7 Appendix A – Time Synchronization To synchronize time across your Latitude system, follow the procedures described below. You will need to choose one computer to act as a time server. This machine need not run any Latitude application. Configuring Time-Client Computers 1. Open up a command prompt by going to Start > Run, typing cmd in the Open field and clicking OK. 2. In the command prompt, type in net stop w32time to stop the computer’s time synchronization service. Press Enter. 3. Type in the command net time /setsntp:TimeServerName, where TimeServerName is the name of the computer that will be used as the time-server. Press Enter. 4. Restart Windows’ time synchronization service by typing in net start w32time and pressing Enter. 5. Repeat steps 1-4 for each computer you would like to synchronize with the time server. Configuring a Time-Server Computer 1. Open up a command prompt by going to Start > Run, typing cmd in the Open field and clicking OK. 2. In the command prompt, type in net stop w32time to stop the computer’s time synchronization service. Press Enter. 3. Go to Start > Programs > Accessories > Notepad. Enter the following text into a blank Notepad document: Windows Registry Editor Version 5.00 [HKEY_LOCAL_MACHINE\SYSTEM\CurrentControlSet\Services\W32Time\Parameters] 'LocalNTP'=dword:00000001 'ReliableTimeSource'=dword:00000001 4. Save the document as C:\TimeServer.reg. The file must reside directly in the “C” drive. 5. Back in the command prompt, type in regedit /s TimeServer.reg and press Enter. 6. Restart Windows’ time synchronization service by typing in net start w32time and pressing Enter. Nov 2004, Rev. A 8