1
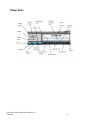
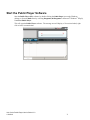
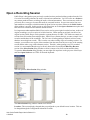
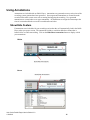
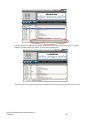
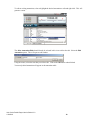
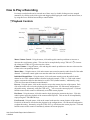
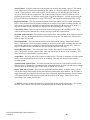
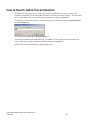
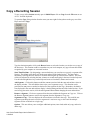
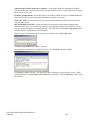
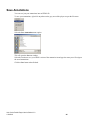
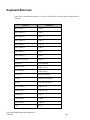
User’s Guide Public Player (PP) Version 4.1.0 Veri-Core LLC 2700 Business Center Blvd. Melbourne, FL 32940 [email protected] 888-883-4007 or 321-574-4777 Table of Contents Table of Contents Introduction to Public Player ........................................................................................................................................ 3 Understanding the Player and Annotator .................................................................................................................... 4 Player Zone .................................................................................................................................................................... 5 Annotator Zone .............................................................................................................................................................. 6 Start the Public Player Software ................................................................................................................................... 7 Configure the Public Player Software .......................................................................................................................... 8 Edit Default Browse Location ....................................................................................................................................... 8 Set Always on Top Option ............................................................................................................................................ 8 Refresh Content from a Live Recording ........................................................................................................................ 9 Live Media Refresh Rate ............................................................................................................................................... 9 Hide Video Window. ................................................................................................................................................... 10 Advance Duration ........................................................................................................................................................ 10 Rewind Duration.......................................................................................................................................................... 11 Installing the USB Foot Pedal...................................................................................................................................... 12 Open a Recording Session ............................................................................................................................................ 13 Using Annotations......................................................................................................................................................... 15 Show/Hide Feature ...................................................................................................................................................... 15 Playback from Annotations ......................................................................................................................................... 16 Edit Annotations .......................................................................................................................................................... 16 How to Play a Recording.............................................................................................................................................. 19 Playback Controls ........................................................................................................................................................ 19 How to Search within Current Session ....................................................................................................................... 21 Copy a Recording Session ............................................................................................................................................ 22 Save Annotations .......................................................................................................................................................... 24 Printing Annotations .................................................................................................................................................... 25 Keyboard Shortcuts...................................................................................................................................................... 26 Veri-Core’s Public Player User’s Guide V1.2 1/18/2013 ii Introduction to Public Player Public Player (PP) is an advanced digital audio/video player designed to be used to play any content recorded with any of Veri-Core’s digital recording products. Included in public player is a free annotations reader. Public Player allows the user to: Play multiple channels of digitally recorded audio created from any of the Veri-core recording products. Play corresponding recorded video with the multiple channels of digital audio. Interface a standard USB foot pedal for hands free control. Isolate individual channels of audio during playback of any Veri-core recorded content. Display annotations associated with the recorded content. Fully utilize the association of the annotation’s timestamps against the recorded audio and video. Edit existing annotations and add new annotations. Veri-Core’s Public Player User’s Guide V1.2 1/18/2013 3 Understanding the Player and Annotator Public Player is a single user interface bundled package, consisting of a Player and Annotator: Player – allows users to play back any combination of channels, or all digital audio channels, that were recorded along with the optional video stream. The user interface provides a metered visual indication of the channels being played back. Easily and quickly jump to desired times using the player’s slider control, double clicking on the corresponding annotation, or using the reverse and forward controls. Player provides a visual indicator to quickly determine when audio was recorded during any session time. The Player is compatible with transcription hardware (for example, a foot pedal). The player provides volume controls at the master level as well as individual channel levels. Included is a control to increase or decrease the speed with which the content is playing while maintaining pitch. Annotator – displays the annotation table associated to the recorded audio and video. It is a read only application in Public Player by default when opened. The ability to toggle to an edit mode exists allowing a user to edit existing annotations and add new annotations. You can easily double click on an existing annotation to jump to that point in the recorded audio. Veri-Core’s Public Player User’s Guide V1.2 1/18/2013 4 Player Zone Veri-Core’s Public Player User’s Guide V1.2 1/18/2013 5 Annotator Zone Veri-Core’s Public Player User’s Guide V1.2 1/18/2013 6 Start the Public Player Software Start the Public Player (PP) software by double-clicking the Pubic Player icon on the Windows desktop, or from the Start menu by selecting Programs (All Programs in Microsoft® Windows® XPsp2), Veri-Core/Public Player. This will open the Public Player software. The message area will display a “No session loaded, right click to load” communication. Veri-Core’s Public Player User’s Guide V1.2 1/18/2013 7 Configure the Public Player Software The Configuration option in the file menu allows you to configure several features of the Public Player; default search locations, always on top option, live media refresh rate, option to refresh content from a live recording, show/hide the video window, advance button rate and the reverse button rate. To open the Configuration menu, right click anywhere in the grey area of the Player section. This will open the file menu options. Select Configuration. Edit Default Browse Location To minimize the need to browse to file locations when opening a recorded Veri-core session Public Player allows you to pre select a default browse location. This location will be the default location that the Select Session window will open to. This is merely a matter of convenience for users who frequently open sessions from the same location such as a network archive. By default this location is your local c:\ drive. To configure this default browse location, open the Advanced configuration window by right clicking anywhere on the grey area of the Player and select Configuration/Advanced. This will open the Configuration window. Browse to the location that you most frequently keep your Veri-Core files. This could be your local drive as in the illustration, a removable media device or a shared network location. This will be the location that you will most frequently store your content files; not the actual content files. For example, it could be a master archive location. The Public Player program will return a list of recording sessions from within a master folder displaying the available sessions by recorder name and the date of the recording Click the OK button when finished. Set Always on Top Option For transcription purposes a user may wish to have the Public Player software always reside over the top of any other open window(s). To configure the Always on Top option, right click anywhere on the grey area of the Player. This will open the file menu options. Veri-Core’s Public Player User’s Guide V1.2 1/18/2013 8 Select the Configuration/Advanced option. This will open the Configuration window. Select the check box for Always on Top. Click the OK button when finished. Refresh Content from a Live Recording Public Player is used to open Veri-Core recorded content. This content could be an audio only recording or it could be a recording where video was also recorded. This content will always in include annotations; system generated and user defined if included. If the recorded session that you are open is still a part of an active recording, the user may define an option to continue refreshing the content. This option will continue to update the available content for viewing in the Public Player’s player section. To configure Refresh Content from a Live Recording, right click anywhere on the grey area of the Player. This will open the file menu options. Select the Configuration/Advanced option. This will open the Configuration window. This will open the Configuration window. Select the check box for Refresh content from a live recording. Click the OK button when finished. Live Media Refresh Rate When the Refresh Content from a Live Recording option is configured we must determine at what rate the Player’s content will be refreshed. We do this by right clicking anywhere on the grey area of the Player. This will open the file menu options. Veri-Core’s Public Player User’s Guide V1.2 1/18/2013 9 Select the Configuration/Advanced option. This will open the Configuration window. Locate the Live Media Refresh Rate configuration option. This option is represented in Milliseconds. Note: there are 1000 milliseconds in a second. Click the OK button when finished. Hide Video Window. The Veri-Core Public Player can display optional video that may have been recorded at the time the audio was recorded. You have the option to open the video display window or close it by selecting a simple configuration option. To configure the Hide Video Window, right click anywhere on the grey area of the Player. This will open the file menu options. Select the Configuration/Hide Video Window option. This will check or uncheck the option to hide the video window. Advance Duration The Public Player software allows the user to custom configure the amount of time that the Advance (fast forward) button will move through the player content. To Configure the Advance Duration option, right click anywhere on the grey area of the Player and select Configuration/Advance Duration. Veri-Core’s Public Player User’s Guide V1.2 1/18/2013 10 This will expand the Advance Duration menu to display 1 second, 5 seconds, 15 seconds, 30 seconds, 1 minute or 5 minute options. This will be the duration of time that the player advances for each request. Simply select the option that you want. Rewind Duration The Public Player software allows the user to custom configure the amount of time that the Rewind button will move through the player content. To Configure the Rewind Duration option, right click anywhere on the grey area of the Player and select the Configuration/Rewind Duration. This will expand the Rewind Duration menu to display 1 second, 5 seconds, 15 seconds, 30 seconds, 1 minute or 5 minute options. This will be the duration of time that the player advances for each request. Simply select the option that you want. Veri-Core’s Public Player User’s Guide V1.2 1/18/2013 11 Installing the USB Foot Pedal The USB Foot pedal is used to control playback functions during transcription. The USB Foot Pedal is a plug and play device and requires no configuration. By default the functions are set as: Play/Pause – depressing the center pedal control will beginning playing the cued recorded content in the player. When the content begins to play it will first rewind 2 seconds and then begin playing. This is to provide confidence that you have not missed playing any of the recorded content. Every tap of the center play control will rewind the content another 2 seconds before playing; 3 taps rewinds it 6 seconds. Reverse – depressing the right pedal control will rewind the currently cued up time for playback. You can configure how much time each tap of the pedal will rewind the content in our Configuration file menu. Press and hold this control for continuous rewind. Fast Forward – depressing the left pedal control will advance the currently cued up time for playback. You can configure how much time each tap of the pedal will advance the content in our Configuration file menu. Press and hold this control for continuous advancement. Veri-Core’s Public Player User’s Guide V1.2 1/18/2013 12 Open a Recording Session Public Player is designed to open previously recorded sessions produced with any product from the VeriCore suite of recording solutions; the audio, video and user annotations. Veri-Core refers to a Session as any content produced from a recording; the audio, video and annotations. These sessions may reside on your local drive, some type of removable media or a network location. In a previous section you were instructed how to configure a default location for Open Session to point to whenever the Select Session dialog window is opened. In this section we will discuss how to use the Open a Session menu option and how to browse to locations other than the default location. It is important to understand that Public Player can be used to open original recorded sessions, archives of original recordings, as well as copies of recorded sessions. When opening an original or archive of an original session, Public Player can be pointed to a parent directory or folder. This folder can contain all sessions from all recorders from multiple dates. Public Player contains the logic to return a simple list of recorders and the dates of the recordings. The Veri-core recording packages and their archivers ensure that there are no duplicate records. This is not the case when creating copies of recording sessions. For example, you could have two copies of the same date from the same recorder; one a copy of the morning session and the other a copy of the afternoon session. Therefore, when opening a copy of a recorded session it is recommended that the copy be directly browsed to from within the Directory Browser section of the Select Session dialog window to ensure it returns a list of all sessions and their dates. To open the Select Session dialog window you must right click anywhere on the grey area of the Player and select Open Session or use CTRL-F6 from the keyboard. This will open the Select Session dialog window. The Select Session dialog window contains four sections: Location - This section displays the path that you configured as your default browse location. This can be changed through the Configuration/Advanced file menu. Veri-Core’s Public Player User’s Guide V1.2 1/18/2013 13 Directory Browser - This displays the list of locations that you can browse to from your computer. From here you can browse to different locations where sessions may be stored. If you are opening a copy of an original Veri-core recording you will want to browse directly to the copy folder. The folders located in the red circle below illustration an example of a copy of an original recording. Select Recorder - This displays a list of available recording sessions from the location chosen in the Directory Browser section listing them by the recorder name. Browsing to different locations in the Directory Browser can return options for different recorders. Selecting a recorder name in this display window will generate a list of available dates in the Select Date section. If you are opening a session from an original recording location or an archived location you will see multiple available dates for each recorder name. Select Date - This section displays a list of available dates from a recorder. There can be many dates associated with a recorder. Highlight the session date you want to open and click the OK button when finished. This will load the audio, video if available, and the annotations associated with a recording session. Veri-Core’s Public Player User’s Guide V1.2 1/18/2013 14 Using Annotations Annotations are included with our Public Player. Annotations are generated two ways at the time of the recording; system generated and user generated. System generated annotations are created from the recorder when certain events occur such as starting and stopping the recording. User generated annotations are created when a user types annotations. All annotations are assigned a timestamp at the time of creation that link the text to the recorded audio and video. Show/Hide Feature If annotations were included with your recording session then they will automatically load in the Public Player when you open a session. The annotations include a convenient hide/show feature that is beneficial for use while transcribing. Click on the Hide/Show Annotations button to display or hide your annotations. Hidden Shown Veri-Core’s Public Player User’s Guide V1.2 1/18/2013 15 Playback from Annotations The annotations included with the recorded content have a direct connection to the audio and video. Each annotation has a timestamp associated with the annotation linking it to the content. Double clicking on an annotation from the annotation table will initiate the playback of the audio/video content. Edit Annotations If the session that you have opened in Public Player is not a read only file, you can unlock the annotations and allow edits. This will allow the user to edit existing annotation as well as add additional annotations. To toggle from the read only mode to an edit mode in annotations, right click anywhere within the annotation table. This will generate a menu. Select the Allow Annotation Edits menu option. The edit blocks in the annotation table will turn from grey to white when in the edit mode. Veri-Core’s Public Player User’s Guide V1.2 1/18/2013 16 Use the edit blocks to add new annotations in the speaker field, the Event field or both. Cue up the content by clicking on the play button. Type the desired annotations. The timestamp will be generated against the current play time of the content upon the first key stroke. Veri-Core’s Public Player User’s Guide V1.2 1/18/2013 17 To edit an existing annotation, select to highlight the desired annotation to edit and right click. This will generate a menu. The Allow Annotation Edits should already be selected in this view to allow the edit. Select the Edit Annotation option. This will open an edit window. Using the mouse, select the text that you wish to edit. Click on the OK button when finished. Your newly edited annotation will appear in the annotation table. Veri-Core’s Public Player User’s Guide V1.2 1/18/2013 18 How to Play a Recording Previously recorded audio can be accessed one of three ways: by double clicking on a time stamped annotation, by clicking on the slider region and dragging and dropping the control to the desired time, or by using the reverse and fast forward Player control buttons. Playback Controls Master Volume Control - Using the mouse, click and drag this control up and down to increase or decrease the overall master volume. This can also be accomplished by using CTRL-ALT- to increase the volume and CTRL-ALT- to decrease the volume. Channel Volume - Using the mouse, click and drag this control up and down to increase or decrease the volume to the corresponding channel. Master Mute – Using the mouse, click on the master mute control to mute the audio from all of the audio channels. Click on the control again to un-mute the audio from all of the audio channels. Individual Channel Mute - Using the mouse, click on the mute control to mute the audio from the channel or use CTRL-(channel number) from the keyboard (example: CTRL-1). Click on the control again to un-mute the audio for that channel or use the CTRL-(channel number). Additionally, using CTRL-0 will un-mute all channels muted channels. Reverse - Using the mouse, click on this control to reverse the current play time of the content. Each click of the mouse will reverse the playtime by the configured time. See Advanced Configuration to adjust this setting. Alternately, using the CTRL-ALT- will reverse the current play time. Click and hold the mouse on this control to continuously reverse the current playtime. Play/Pause - Using the mouse, click this control to begin playing the content in the player. Click this control again to pause the playback of the content on the keyboard. This can also be accomplished by simply using the CTRL-BREAK keys. Fast Forward - Using the mouse, click on the control to advance the current playtime of the content. Each click of the mouse will advance the playtime by the configured time. See Advanced Configuration to adjust this setting. Alternately, using the CTRL-ALT- will advance the current play time. Click and hold the mouse on this control to continuously advance the current playtime. Veri-Core’s Public Player User’s Guide V1.2 1/18/2013 19 Speed Control – Using this control you can adjust the rate at which the content is played. The content can be played at an increased speed speeding up the content, or a decreased speed slowing down the content. Using the mouse, click on the control. Use the mouse to click and drag the slide control to increase or decrease the rate of playback. The number displayed in the control will show the rate of playback speed selected. To return to normal speed, click on the 1X option. You can also increase the speed with which the content plays by using CTRL-ALT- and reduce the speed using CTRL-ALT- . Begin Session Time – This represents the beginning time of the content you have loaded in the Public Player. If the session is from an original recording or an archive of an original recording, then this will represent the first time the recording was started on the date displayed in the message area. If this is a copy of a recorded session, then this time will represent the beginning time of the copy. Current Play Time – This time represents the currently cued up time of the recording session. This could be the time of the content that is currently playing or cued up in a paused state. Recorded Audio Indicator – This timeline represents the entire audio available in the loaded session for playback. The grey shading indicates times when audio was recorded. The white areas indicates time when no audio was recorded. End Session Time – This represents the end time of the total content you have loaded in the Public Player. If the session is from an original recording or an archive of an original recording, then this will represent the last time the recording was started on the date displayed in the message area. If this is a copy of a recorded session, then this time will represent the end time of the copy. Session Recorder Name – This is the name of the recorder that originally recorded the session. This name is assigned to all of the content (audio, video and annotations) at the time of the recording. This name will always remain with the recorded content. Session Date – This is the date of the original recorded session. This date is assigned to all of the content (audio, video and annotations) at the time of the recording. This date will always remain with the recorded content. Total Recorded Content Time – This time represents the total run time of the actual recorded session. This total time is calculated by calculating the time contained between all of the start and stop recordings. This time does not include any lapse of time when no content was recorded. Player Time Select Control – This control is manipulated with the mouse. Using the mouse you can click on the triangle shaped image to drag the control up and down the player timeline. As the control is dragged along the player timeline the associated time is displayed. Releasing the image from the mouse will begin the playback of the time associated with the position of the image. This will now also be represented in the current playtime time. ***NOTE*** Some computer keyboards are equipped with media controls to play/pause, reverse and advance. These controls will also work in conjunction with the controls on Public Player. Veri-Core’s Public Player User’s Guide V1.2 1/18/2013 20 How to Search within Current Session Bookmarks are timestamps that are created against the recorded audio every time you add a new annotation. Bookmarks are used to rapidly search for key points in an audio recording. You can search for key words from within a current set of open annotations or across all annotations. To search for a keyword from within a currently opened set of Annotations, click on Current Session from the Search menu. This will open the Search For a Keyword dialog box. Type the keyword that you want to search for. Click OK to close the dialog box and commence the search. When the keyword is found the annotation will appear highlighted. Double Click on the Annotation to begin playing the audio. Veri-Core’s Public Player User’s Guide V1.2 1/18/2013 21 Copy a Recording Session To save a copy of the Session currently open in Public Player click on Copy from the File menu or use ALT-C from the keyboard. To open the Copy dialog window from the menu you must right click anywhere on the grey area of the Player and select Copy. This will open the Copy dialog window. Type the destination path or click on the Browse button to select the location you wish to save a copy of the Session to. This location could be somewhere on your local computer, any type of removable media recognized by your computer or a network location. Start Time/End time – By designating a start and end time you can select to copy only a segment of the Session. The default value shown will be the start and end of the loaded session. This time can be adjusted by selecting the hour, minutes or seconds and using the up or down arrow controls. This time can also be adjusted by selecting the hour, minutes or seconds and typing in the time from the keyboard. Use the left and right arrow keys on the keyboard to move from hours, minutes and seconds. Add Segment – Click on this button to add the content associated with the start and end time values in the display window. This will add the times to the cue of segments to copy. This function can be performed as many times as needed to obtain all of the segments for the copy. Remember, the default time displayed in the start and end time display is the beginning and the end of the loaded session. If you need to copy the entire session, click the add segment button without changing the start and end time. Remove a Segment – Click on a segment of time that was added to the Segments to Copy cue. Click on the Remove Segment button to remove this segment from the Segments to Copy cue. Segments to Copy – This area displays the selected times to include in the copy. This could be one segment representing the entire session or segment of a session to copy, or this could be multiple segments of time to include in a single copy. Options – This area allows you to configure additional options; Auto-load, audio only copy and a mixdown copy. Veri-Core’s Public Player User’s Guide V1.2 1/18/2013 22 Auto-load copied session after copy is complete – selecting this option will automatically load the copied content into the Public Player after the copy has completed. This is a good option to use to check the end result of your copy. Exclude User Annotations – Select this option if you want to exclude all of the user added annotations. This will leave only the system generated annotations to include in your copy. Only Copy Audio – Select this option if your session includes audio and video and you wish to only copy the audio portion. Mix All Channels to One File – Select this option if your original session contains multiple audio channels and the desire is to create a copy that mixes all of the audio channels to one MP3 file. Please note, this option only applies to an audio only copy. You must first select the Only Copy Audio option to unlock the Mix All Channels to One File option. When you have completed making all of your copy selections, click on the Copy button. The Enter Copy Name dialog window will open. You must type a unique name to assign to the copy. Click the OK button when finished. The Progress window will open. This progress window will display a log of the copy process. When completed the log will display Done and the OK button will unlock. Click the OK button to close out of this window. Veri-Core’s Public Player User’s Guide V1.2 1/18/2013 23 Save Annotations You can save just your annotations into an HTML file. To save your annotations, right click anywhere on the grey area of the player to open the file menu. Select the Save Annotation menu option. This will open the Save As window. Select the location to save your HTML version of the annotation in and type the name you will assign to the saved annotations. Click the Save button when finished. Veri-Core’s Public Player User’s Guide V1.2 1/18/2013 24 Printing Annotations To print your annotations click on Print Annotations from the File menu. This will open your windows Print window. Select your printer and click on the Print button. Veri-Core’s Public Player User’s Guide V1.2 1/18/2013 25 Keyboard Shortcuts Some of the command and controls in Veri-Core’s Public Player can be performed using keyboard shortcuts. Function Command Mute channel 1 CTRL-1 Mute channel 2 CTRL-2 Mute channel 3 CTRL-3 Mute channel 4 CTRL-4 Mute channel 5 CTRL-5 Mute channel 6 CTRL-6 Mute channel 7 CTRL-7 Mute channel 8 CTRL-8 Unmute all channels CTRL-0 Play/Pause CTRL-BREAK Advance media CTRL-ALT- Rewind media CTRL-ALT- Play/Pause Media play button Advance Media advance button Rewind Media rewind button Speed Control +1 CTRL-ALT- Speed Control -1 CTRL-ALT- Volume up CTRL- Volume down CTRL- Open Session CTRL-F6 Copy ALT-C Veri-Core’s Public Player User’s Guide V1.2 1/18/2013 26