1
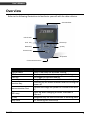
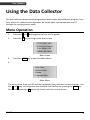
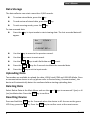
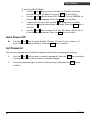
Mini Pocket Sized Data Collector Z-1160 User’s Manual ( Version 1.00 ) ZEBEX INDUSTRIES INC. WWW.ZEBEX.COM ZEBEX INDUSTRIES INC. Revision History Changes to the original manual are listed below: Version Date Description of Version 1.0 April. 28, 2011 Initial release Data Collector Series User’s Manual Version 1.0 04/28/2011 Important Notice No warranty of any kind is made in regard to this material, including, but not limited to, implied warranties of merchantability or fitness for a particular purpose. We are not liable for any errors contained herein or incidental or consequential damages in connection with furnishing, performance or use of this material. No part of this document may be reproduced, transmitted, stored in a retrieval system, transcribed, or translated into any language or computer language in any form or by any means electronic, mechanical, magnetic, optical, chemical, manual or otherwise, without express written consent and authorization. We reserve the right to make changes in product design without reservation and without notification. The material in this guide is for information only and is subject to change without notice. All trademarks mentioned herein, registered or otherwise, are the properties of their various respective owners. Copyright © 2011. All rights reserved. Guidance for Printing This manual is in A5 size. Please double check your printer setting before printing it. i Z-1160 Table of Contents IMPORTANT NOTICE ..................................................................................................... I INTRODUCTION........................................................................................................... 1 Features........................................................................................................................1 PC SYSTEM REQUIREMENT .....................................................................................................1 PACKAGE CONTENTS ..............................................................................................................1 OVERVIEW ...........................................................................................................................2 GETTING STARTED ....................................................................................................... 3 ATTACHING NECK STRAP .........................................................................................................3 CHARGING THE DEVICE ..........................................................................................................3 POWER ON/OFF THE DEVICE .................................................................................................3 CONNECTING TO PC ..............................................................................................................4 Connecting via RS-232..................................................................................................4 Connecting via USB ......................................................................................................4 Running the Device on PC ............................................................................................4 Setting the Device on PC ..............................................................................................5 USING THE DATA COLLECTOR ....................................................................................... 6 MENU OPERATION ................................................................................................................6 Menu tree list ...............................................................................................................7 Scanning the Barcode Data..........................................................................................7 DATA MANAGEMENT .............................................................................................................8 Data Entry ....................................................................................................................8 Data Storage ................................................................................................................9 Uploading Data ............................................................................................................9 Deleting Data ...............................................................................................................9 Resetting Device ...........................................................................................................9 DEVICE SETUP ....................................................................................................................10 LCD Contrast...............................................................................................................10 Beep Volume ..............................................................................................................10 System Clock...............................................................................................................10 Barcode Setup ............................................................................................................10 Communication ..........................................................................................................10 Auto Power Off ...........................................................................................................11 Set Password ..............................................................................................................11 SPECIFICATIONS ........................................................................................................ 12 Z-1160 ii USER’S MANUAL Introduction Congratulations on your purchase of the super compact Mini Pocket Sized Data Collector. Along with superior portability and visually safe scanning LED, the data collector features a real-time clock, a buzzer, a dual-color status LED, and a UART port for direct connection to external equipment. The on-board 64K EEPROM provides a robust, stable, programmable memory space. Some of this non-volatile memory is dedicated to storing scanned data. The PDC can retain more than 6000 records. The Mini Personal Data Collector comes already programmed with a basic data collection program, called Free Task, which can scan and store barcodes, and do simple edits on the stored data. Data can be uploaded to a PC through the USB or RS-232 link cable. Features Ultra small, ultra portable form factor. Battery life up to 6,000 scans. Superior scanning performance. PC System Requirement Windows XP Service Pack 2 or above. Microsoft Internet Explorer 5.01 or later. Microsoft Framework 2.0. Disk Space Requirements: 280 MB (x86), 610 MB (x64). Package Contents Items contain in the package may vary depending on the model of the data collector. Data Collector 1 USB Cable RS-232 Cable (Optional; required for firmware update) Neck Strap Z-1160 USER’S MANUAL Overview Refer to the following illustrations to familiarize yourself with the data collector. Scan Window LCD Screen Scan Key LED Lamp Down Key Up Key Function Key Strap Hole Communication Port Description Scan Window LCD Screen Scan Key Down Key Function Key Communication Port LED Lamp Up Key Strap Hole Z-1160 Function Emits a red beam for barcode reading Display various data when a program is being run The trigger of barcode reading Navigation key for menu selections or entering data Function key for menu selection and for turning the power off Connect to charge the power or communicate with PC Lights up when charging or when a barcode is scanned Navigation key for menu selection or entering data For attaching the neck strap 2 USER’S MANUAL Getting Started Refer to the following illustrations to learn the basics of the data collector in this section. Attaching Neck Strap The included neck strap may prevent potential damage to the device if dropped. 1. Insert the small thin cord of the strap to the strap hole of the device. 2. Loop the thick cord of the strap through the thin loop. 3. Pull the strap tight. Charging the Device The Z-1160 runs on a build-in rechargeable battery and can scan more than 6,000 barcodes between charges and data downloads to a host device. 1. Connect the USB cable to device. 2. Connect the other end of the USB cable to your PC. The LED should light up red indicating the charge had started. 3. Charge the batteries until the LED indicator turns off. Power ON/OFF the Device Press the v and ^ keys together to turn on the device. To turn off the device, press and hold FN at the boot screen. Power ON 3 Z-1160 USER’S MANUAL Connecting to PC To use the software supplied with the data collector, it must be connected to a PC. Connecting via RS-232 RS-232 connection is required when updating the firmware. To connect the data collector to a PC via RS-232 port: 1. Connect the mini USB end of the RS-232 cable to the communication port of the data collector. 2. Connect the other end of the cable to a RS-232 serial port on the computer. 3. Make sure the unit is turned on after the cable is connected. Connecting via USB To connect the data collector to a PC using the USB cable: 1. Connect the mini USB end of the USB cable to the communication port of the data collector. 2. Connect the other end of the USB cable to the USB port on the computer. 3. Make sure the unit is turned on after the cable is connected. Running WinTaskGen 1. 2. 3. Install and run WinTaskGen on your PC. For USB connections, please install and run the virtual COM port driver. Check “Define comport long parameters” checkbox on top if necessary. Extra options appear as shown below when you check this option. 4. Select the options from the dropdown menu. When you define communication protocols, you must set the same value with the device. Z-1160 COM options: Select the COM port the device is connected to. (Look for the Virtual COM port connection in the Device Manager on your PC) 4 USER’S MANUAL 5. Baudrate options: 4800,9600,19200,38400,57600,115200. Parity options: Even, Mark, None, Odd, Space. DataBits options: 8,7. StopBits options: None, One, OnePointFive, Two. After the parameters are set, the device is automatically detected. Setting the Device on PC 1. Follow the previous instructions to connect the data collector. 2. Select the “Remote Settings” tab on the Main Menu. Click the “Device Settings“ to obtain the device status. Select the options from the dropdown menus in “Device Settings.” Set beep volume options: Quiet, Low, Medium, Loud. Set auto power off options: Disable, 10mins, 15mins, 20mins, 30 mins. Set power up scan options: OFF/ON. Set date format options: MM/DD/YY, DD/MM/YY, MM/DD/YYYY, DD/MM/YYYY. Set back light options: OFF/ON. Follow PC Time: Check this option to obtain time from your PC or adjust the time manually using the up and down arrow. Get Device Time: Obtain device now date and time. Set Device Time: Set up device date and time. Note: For other settings or usage please see the WinTaskGen User’s Manual for more details. Z-1160 5 USER’S MANUAL Using the Data Collector The data collector comes already programmed with a basic data collection program, Free Task, which can read and store barcodes, do simple edits, and upload data to a PC through the communication cable.. Menu Operation 1. Press the v and ^ keys together to turn on the power. 2. Press the FN key to bring up the boot screen. Z-1160 VER. 1.00 SCAN key to Menu Free Mem: 64K 11/05/03 05:04PM Boot screen 3. Press the SCAN key to open the Main Menu. 4. 1.Run Task 2.Delete Data 3.Setup 4. Upload Data Main Menu The menu items show on LCD and the highlighted item indicates current selection. Use the v and ^ keys to change the item selection and confirm by pressing the SCAN key. You can also press the FN key at any time to exit the current screen. Z-1160 6 USER’S MANUAL Menu tree list Menu Run Task Delete Data Description Select this option to start recording data. You can scan barcodes or enter the data manually. Select this option to delete recorded data. Select this option for: 1. LCD Contrast 2. Beep Volume Setup 3. System Clock 4. Barcode Set 5. Communication 6. Auto Power Off Upload Select this option to upload recorded data. Select the Run Task under Main Menu. The LCD shows <Rec>, for record number, and is ready to scan and collect data. Rec 1 Field 1 Fn:Exit Dn:View Free Task (Input) screen Scanning the Barcode Data Follow the steps below to scan a barcode. 1. Press the v and ^ keys together to turn on the power. 2. At the Free Task screen, press the SCAN key and sweep the red light vertically across the barcode. You will hear a short beep on a successful scan and LED will flash green. correct 7 incorrect Z-1160 USER’S MANUAL Data Management Data Entry When requiring to key in data manually, there are two modes of data entry. Mode One: 1. At the Free Task screen press the ^ key once to start the entry. Rec 1 Field 1 Fn:Exit Dn:View 2. Each time you press the ^ key the number will go up by 1. The number will restart when it reaches 9. Continue to press the ^ key until the number you want is reached. 3. Press the v key to move to the next digit and press the ^ key again to select your number. Continue this process until the numeric data you want to enter is completed. Rec 12345 1 Field 1 Fn:Exit Dn:View 4. Press the Scan key to input the data or the FN key to disregard the data. Mode Two: 1. At the Free Task screen press and hold the ^ key to start the entry. The number will advance rapidly until the ^ key is released. 2. Press the v and ^ keys to adjust the number. ^ will increase the number by 1 and v key will decrease the number by 1. 3. Press the Scan key to confirm the inputted data or press the FN key to go to mode one to edit the data. Z-1160 8 USER’S MANUAL Data Storage The data collector can retain more than 2,000 records. To review stored data, press the ^ key. To end review of stored data, press the FN key. To exit scanning mode, press the FN key. To view scanned data: Press the v key in input mode to start viewing data. The last recorded data will appear. Rec 6 Field 1 1234567 <CURRENT REC.>← Use the ^ key to move to the previous record. Use the v keys move to next record. Use the Scan + ^ keys to edit field data and FN to exit. Press the Scan + v keys for 2 seconds to delete the recorded data. Press the FN key to exit to input mode. Uploading Data Two modes are available to upload the data: USB Virtual COM and USB HID Mode. Once a communication device is set up (please refer to Device Setup, Communication), the device will automatically detect its readiness before starting uploading data. Deleting Data Select Delete Data at the Main Menu and use the v and ^ keys to commend Y (yes) or N (no) to delete data. Press the Scan key to confirm. Resetting Device Press and hold the Scan key for 2 seconds when the device is off. As soon as the green LED lit-up, press the FN key. Press the Scan key to confirm reset at the reset screen. 9 Z-1160 USER’S MANUAL Device Setup Select Setup at the Main Menu and select the following options to setup the device: LCD Contrast Use the v and ^ keys to adjust LCD contrast from 1 to 20. Press the Scan key to confirm. Beep Volume Use the v and ^ keys to select volume from Low, Medium, Loud and Quiet. Press the Scan key to confirm. System Clock 1. Use the ^ key to adjust the number and use the v key to move to the next digit. Continue the process until you finish entering the month, date, and year in MMDDYY format. Press the Scan key to confirm. 2. Use the ^ key to adjust the number and use the v key to move to the next digit. Continue the process until you finish entering the hour, minute, and second in HHMMSS format. Press the Scan key to confirm. Barcode Setup Use the v and ^ keys to select On or Off for different types of barcodes and press the Scan key to confirm: EAN/UPC, Code 39, F ASCII Code 39, Codabar, ITF 25, Code 128, Code 11, Code 93, MSI Code, RSS14 Standard, RSS14 Limited, and RSS14 Expanded. Communication Z-1160 Use the v and ^ keys to select USB Virtual Com or USB HID Mode. USB Virtual COM simulates the USB connection as a wired RS232 interface. Use the v and ^ keys to select Enable or “Disable” at Online Send Record and Yes or No at Protocol Setting and press the Scan key to confirm. USB HID Mode acts the same as USB keyboard and can easily adapt to any host computer like a standard keyboard. 10 USER’S MANUAL To set the USB HID Mode: 1. Use the v and ^ keys to select “Enable” or “Disable” at Online Send Record and ALT Mode. Press the Scan key to confirm. 2. Use the v and ^ keys to select USA, German, French, SPANISH, or Japanese at HID Language. Press the Scan key to confirm. 3. To adjust the Delay Setup, use the ^ key to adjust the number and use the v key to move to the next digit. Press the Scan key to confirm. 4. Use the v and ^ keys to select LF, H Tab, EOT, None, CR/LF, CR, or LF as the Data Terminator. Press the Scan key to confirm. Auto Power Off Use the v and ^ keys to select Disable, 30 mins, 10 mins, 5 mins, 3 mins, or 1 mins as the auto power off time. Press the Scan key to confirm. Set Password You can set a password to the Setup to prevent others from changing the settings. 1. Use the v and ^ keys to enter a numeric password. Press the Scan key to confirm. The system prompts you to enter the password again. 2. Enter the password again at the Re-Confirm screen and press the Scan key to confirm. 11 Z-1160 USER’S MANUAL Specifications SYSTEM CPU EEPROM Display Keypads & Buttons Indicators (LED) Beeper Operation Interface Software & Development POWER Main Battery Battery Life INPUT DEVICE Light Source Optical System Scan Rate Print Contrast Depth of Field PHYSICAL Dimensions Weight ENVIRONMENTAL Operating Temperature Storage Temperature Operating Humidity Storage Humidity REGULATORY EMC Z-1160 32-bit C-MOS microprocessor 64KB non-volatile memory FSTN, 96 x 32 dots graphic LCD (4 x 16 characters) “SCAN”, up, down, and “FN” keys Two-color LED (green & red) Programmable tone & beep time USB interface (a) Support the TaskGen software (application generator) (b) SDK to support IAR/GNU C (freeware) Compiler 3.7 V, 150 mAH, Li-Poly rechargeable battery Up to 6,000 scans (by battery spec.) 617 nm visible LED Linear CCD array 330 scans per second 30% @ UPC/EAN 100% 20-300 mm (L)69.8 x (W)44.4 x (H)23.3 mm 43.5 g (including battery) 0°C ~ 50°C (32°F ~ 122°F) -10°C ~ 60°C (14°F ~ 140°F) 10% ~ 70% RH, non-condensing 5% ~ 70% RH, non-condensing CE & FCC Part 15B 12


![User`s Manual [(LDSP_LCD_99_2)] Label Data](http://vs1.manualzilla.com/store/data/005846764_1-de86383eb41f3d06a08b51e5958ead91-150x150.png)