1
CREW 1.10 Release Notes
This document contains information about the CREW 1.10 software release, how to install / upgrade the
software, the changes from version 1.05, and documentation for the new / changed features. Please read
this document thoroughly before installing the software.
For items not covered in these Release Notes, please consult the CREW Users Manual, which is
included in PDF format on the CREW software CD and available on our web site at:
www.siennaimaging.com/downloads/software/CREW System/
Important Notes for Timestone Software Users
CREW 1.10 installs a version of the “HASP” hardware key driver that is incompatible with the Timestone
Software “HardLock” driver. If you intend to use CREW and Timestone on the same computer, you must
either manually install a compatible version of the HASP driver after completing the CREW installation, or
use the Beta version of CREW 1.11 that includes this by default. Instructions for both these options can be
found on our web site at:
http://www.siennaimaging.com/CREW_beta
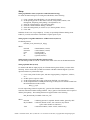
Installing the software
The latest CREW software installation files can always be obtained from the Gretag web site (see “Digital
Printers” link from www.gretag.com/products). These files can also be directly downloaded from
www.siennaimaging.com/downloads/software/CREW System/
All CREW modules in your system must be upgraded at the same time. CREW 1.10 modules will not
inter-operate with older versions of CREW. When upgrading, please ensure to upgrade all copies of
CREW Task Server, CREW Task Generator, and CREW Hotfolder Client.
1)
Obtain the current CREW Software installation files, either on CD-ROM or by downloading and
unzipping the files from one of the locations noted above to a convenient location on your hard drive.
2) If installing from CD-ROM insert the CD into your computer, which should “autorun” the installer
program. Otherwise, double-click on the “CREW.exe” program located in the root folder where the
installation files are located (CD-ROM drive, or the location you unzipped the downloaded files to).
This will start the main CREW installation program.
3) Choose the first application that you wish to install from the main screen of the CREW installation
program, and click “Install”. This will start the installer for the application that you have chosen.
CREW 1.10 Release Notes, June 19, 2002. Rev 1.0. Document #13307-003, Copyright 2002 Gretag Imaging Inc.
4) If you are upgrading from a previous version of CREW, you must choose the “Repair” option in
the installation program for each application, rather than the default “Modify” option.
5) Use the standard wizard interface to install the software on your computer, and follow any on-screen
directions that are given to you. The standard default options are best for most installations.
6) Once the installation is complete, the application installer will finish and the CREW installation
program will reappear, allowing you to install additional programs if you desire. Repeat steps 3 and 4
for each application you wish to install on this computer.
7) If the installer prompts you to reboot your system, please do so before running the CREW software.
Common problems when updating/installing CREW 1.10
•
•
Application complains of “HASP” errors, or “HASP not detected”
• Verify that the correct HASP “hardware key” for that application is placed on the parallel/printer
port of your computer
• Re-install the application, and choose the “Repair” option this time (problem caused by using the
default “Modify” option when upgrading from a previous version of CREW, rather than the
Repair option as noted above)
CREW and/or another application lock up when used on the same computer
• If the other application also uses a hardware protection key on the parallel port of your computer,
there may be a driver conflict between the CREW HASP driver and the other application. This is
a known problem when using Timestone software and CREW on the same computer (see
above).
• Manually upgrade the CREW HASP driver to a compatible version, or install the 1.11 Beta
version of CREW (see note for Timestone Software users at the beginning of this document for
details)
Changes since CREW 1.05 / 1.06
CREW Task Server Changes
• Added feature to use memory-mapping of image files to improve memory efficiency and speed
• Improved connection with printer core, better handling of online/offline and reconnection
• Faster handling of printer “write gating”
• Fixed small bugs from CREW 1.05 and earlier
• Server port number was not saved properly
• Error reporting in XML files not always handled correctly
• Corrected back-printing issues
CREW Task Generator Changes
• Improved user interface, with new “Print Properties” page for easier and faster use
• Added support for Windows XP Professional
• Improved network connection to Task Server
• Fixed small bugs from CREW 1.05 and earlier
• fixed socket connect/disconnect bug
• fixed printer information timeout bug
CREW Hotfolder Client Changes
• Preset Folders now directly support Kodak DP2 System and Gretag DRS-200/Cyra Reorder systems
(through new “Filename Parsing” feature)
• Improved user interface, with new “Print Properties” page for easier and faster use
• Added support for Windows XP Professional
CREW 1.10 Release Notes, June 19, 2002. Rev 1.0. Document #13307-003, Copyright 2002 Gretag Imaging Inc.
•
•
Improved hotfolder functionality and resource sharing (processes maximum of 100 items from each
folder before checking other enabled folders)
Improved responsiveness of user exit commands
Changes to the User Manual for New and Changed Features
The following information adds to or supercedes the noted sections in the CREW 1.05 User Manual. Until
such time as a new 1.10 version of the user manual is available, please refer to this document before using
the 1.05 manual. Unless noted here, all other features are the same as noted in the 1.05 version of the user
manual.
Section 3.1 – 3.5: Task Server Properties Page
“Always Create Printer File” check box:
CREW 1.10 has the ability to buffer image data in memory where possible instead of always writing the
data to disk. In some circumstances, this will result in much higher efficiency in transferring data to the
printer. When the memory is needed for other uses, CREW will automatically write the data to the hard
drive and free up the used memory.
Leaving this checkbox unselected (the default setting) will enable this feature. If you experience repeated
“Fault XXX” errors on your printer, you may wish to try turning this feature off (by checking the selection
box and restarting Task Server).
Sections 3.8 – 3.24 (HFC) and 3.7 – 3.23 (TaskGen): Print Properties
The Print Properties dialogs of both Task Generator and Hotfolder Client have changed significantly since
CREW 1.05. These changes have been made to make the dialogs more effective, intuitive, and quicker to
use. The following descriptions replace the respective sections of the CREW 1.05 user manual.
CREW 1.10 Release Notes, June 19, 2002. Rev 1.0. Document #13307-003, Copyright 2002 Gretag Imaging Inc.
Print Properties Dialog
The print properties dialog is used to specify how you wish your image files to be formatted, prepared and
printed on your output device (i.e. Netprinter or Miléca). Print Properties allows the user to specify the
print quantity, image sizing and sizing method, paper size, image placement, image rotation, sharpening or
smoothing, color management, color adjustment, and back-printing that they wish to apply to their images.
Depending on which menu you select the print properties dialog from, the settings you select will be
applied to all image files, only the images currently selected, or only a single image at a time, as detailed
below.
CREW Task Generator “Properties” / “Default Properties” menu: Changes made while in this dialog
become the starting selections for all image files opened after this point. Changes do not affect any images
that are currently loaded in Task Generator, or any that have already been “sent” to Task Server or the
printer. This dialog is normally used to set the most common printing format that you intend to use, so that
you do not have to manually make the same selections for every image you intend to print.
CREW Task Generator “Image” / “Print Properties” menu: changes made through this dialog affect
only the currently selected image file. If multiple image files were selected, “Next” and “Previous” buttons
will appear in the lower left corner of the Print Properties dialog, allowing you to change each selected
image in turn. Changes only affect the image that is currently “active”, as shown in the title bar of the
dialog, and the preview on the “Image” tab. After making changes to each image, click “Apply”, then
“Next” (or “Previous”) to move on to the next image file. If you do not click “Apply” before clicking
“Next” or “Previous”, the program will ask you if you would like to apply the changes or not before
proceeding. You also have the option of automatically applying these changes, which can be selected from
the confirmation pop-up or through the “Properties” menu of Task Generator (“Assume Apply on
Next/Previous”). This option is only available when one or more images are selected in the left-hand pane
of Task Generator.
CREW Task Generator “Right-click” / “Print Properties” menu (or double-click on an image file in
the left-hand pane): when right-clicking on an image filename listed on the left side of the Task Generator
window, and selecting “Print Properties”, the resulting changes affect only the selected image. This same
dialog is accessed by double clicking on a filename in the left-hand pane of Task Generator. This dialog is
commonly used to change the formatting of a single image that has already been opened in Task Generator.
CREW Task Generator “Image” / “Group Properties”: changes made in the “Group Properties” dialog
will be applied to all images that are currently selected in the left pane of Task Generator. The starting set
of options presented is based on the “Default Properties” that are currently set (see above). This dialog is
commonly used to format a group of image files to use the same printing options after they have been
opened in Task Generator.
CREW Hotfolder Client Preset Folders Print Properties: print properties set for a particular Preset
Folder apply to all images processed from that folder (when it is Enabled). If “Filename Parsing” is
enabled for this folder and the image filename format is valid, the print quantity set in this dialog will be
over-ridden by the print quantity information contained in the image filename.
CREW 1.10 Release Notes, June 19, 2002. Rev 1.0. Document #13307-003, Copyright 2002 Gretag Imaging Inc.
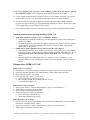
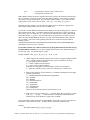
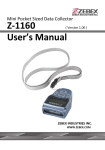
“Print” tab
The “Print” tab of the Properties page. Hotfolder Client shown left, TaskGen show right.
The “Print” tab is used to set the sizing and positioning options to be used for your image. This page will
show a preview of the page (the actual piece of paper that the image will be printed on, shown by a solid
white background area), and the size and position of the image on that page (shown by a blue cross-hatched
area). The preview is not available in the “Default Properties” version of this dialog or the “Group
Properties” version because those screens apply to multiple image files that can be of varying sizes and
aspect ratios.
Copies: sets the number of prints to be made for this image
Color Manage: if checked, this informs CREW Task Server to apply ICC profile color correction to the
image during printing, as set on the “Paper Profiles” tab of Task Server.
Print DPI: this selector sets the printing resolution of the image file, and is based on the valid range of DPI
settings for the current printer mode (or for all printer modes in the Default Properties dialog). Normally,
the default settings are used, however changing these settings is sometimes useful if you regularly use
lower-resolution files from an upstream application and do not wish to resample the image files before
printing.
Top / Left / Bottom margins: these settings change the positioning of the image in relation to the page
when printed. Note: there is no setting for “Right” margin, as the width of the page is determined by the
width of the currently installed paper magazine. Depending on the page size settings currently selected, not
all of the margin entry boxes may be enabled.
Units: this selector changes the units used elsewhere on this page between Inches, Centimeters, and Pixels.
Page Sizing Options: these options determine how the page size (the actual piece of paper the image will
be printed on) is determined, independent of the sizing of the image itself.
Specify Margins: using this option, the page size will be the same as the size of the image file
being printed, plus the margin sizes set by the user here. The user can set the Top, Left, and
Bottom margin sizes manually, and the Right Margin will depend on the paper width and image
size.
CREW 1.10 Release Notes, June 19, 2002. Rev 1.0. Document #13307-003, Copyright 2002 Gretag Imaging Inc.
Follow Image Length: the length of the page will be the same as the length of the image. The
user can set the Top and Left margins manually, the Bottom margin will always be zero, and the
Right margin will depend on the paper width and image size.
Fixed Page Length: the page will be a specific size (as set here), no matter what the size of the
image. This may result in areas of unexposed paper, or cropping of the image, depending on the
relationship between the page size and image size. The user may set the Top and Left margins
manually.
Rotate Clockwise: the image may be rotated in a clockwise direction in 90-degree increments by using this
selector.
Image Sizing Options: these options determine the size and aspect ratio of the printed image, independent
of the sizing of the page it is printed on.
No Changes: the image file is printed without re-sampling the pixels. The final image size is
determined by dividing the number of pixels in the image by the Print DPI setting (above). This
option is commonly used when the images have been pre-sized by another application up-stream,
and no further sizing changes are necessary.
Maintain Aspect Ratio: this sizing option allows the user to specify the maximum size to print an
image, while maintaining the aspect ratio (relationship of width to length) of the image. There are
two options under the Maintain Aspect Ratio selection:
Set the Size: (not available in Default Properties or Group Properties dialogs) the user
sets either the width or length, and CREW calculates the other dimension automatically
based on the real aspect ratio of the image.
Set the Bounding Box: the user sets the maximum width and maximum length for the
image to be printed, and CREW automatically sizes the image to the largest size possible
which fits into that “bounding box” while maintaining the real aspect ratio of the image.
The resulting image will always be equal to or smaller than the size set by the user (at
least one axis will always be exactly the size set by the user)
Fit to Size: the image will be printed exactly the size specified by the user here. There are two
options under Fit the Size:
Center Crop: if the image is not naturally the same aspect ratio as the size specified by
the user, either the top/bottom or left/right of the image will be cropped off, and the
image resized so that it is exactly the size specified here. The image will not be
“distorted”, but portions of the top/bottom or left/right may be removed from the image.
Skew to Size: if the image is not naturally the same aspect ratio as the size specified by
the user, the image is “distorted” to fit the size set. None of the image will be removed,
however the image may be stretched in one axis, distorting the image. This option may
be useful for non-photographic images that must fit a certain size and cannot be cropped
without losing important information but do not currently have the correct aspect ratio for
that size.
Full Bleed: the image will be sized so that the width is equal to the width of the currently installed
paper plus 0.1 inches. The length will be set so that the aspect ratio of the image is maintained
based on the width set above. The image will be positioned so that it “bleeds over” the edge of the
paper, ensuring that image covers the full width of the paper. This option is critical in applications
where border-less prints are required.
CREW 1.10 Release Notes, June 19, 2002. Rev 1.0. Document #13307-003, Copyright 2002 Gretag Imaging Inc.
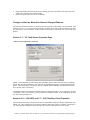
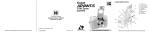
“Image” tab (Task Generator only, not available in “Default Properties” dialog)
The Image tab provides the user with a preview of how the image will be printed, as well as the ability to
change the sizing and rotation of the image (the sizing controls are a duplicate of the controls described
above on the “Page” tab).
The preview shown will display an approximation of the cropping and orientation of the image as it will
appear on the final print. However, if the image size plus margin sizes are larger than the page size
selected on the “Page” tab, portions of the image may not be printed as shown.
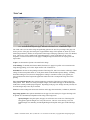
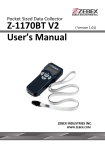
“Backprint” tab
CREW 1.10 Release Notes, June 19, 2002. Rev 1.0. Document #13307-003, Copyright 2002 Gretag Imaging Inc.
This tab is used to specify the information that will be printed on the back of the page, if your printer
supports back-printing (Netprinter only). The items you select will be printed in the sequence you select
them, as shown by the “BackPrint will show” preview area. If you wish to back-print any information that
is not shown in this list, simply type it in the “Define User String” section, click “Add”, then select that
information from the list below.
The “BackPrint will show” preview area will show in GREEN the maximum number of characters that are
supported by your printers back-printing unit, with additional characters shown in RED (meaning that they
will most likely not be printed).
Please note that if you are using a back-print string defined on the printer itself, that string will appear at the
beginning of the back-print. The length of the data entered in CREW may be reduced by this same number
of characters (meaning that not all the text shown in GREEN may be printed).
<SHORT FILENAME> will be replaced with the filename of the image file, without any path
information (e.g. "MyImage.tif”)
<LONG FILENAME> will be replaced with the path and filename of the image file (e.g.
“c:\temp\test\MyImage.tif”)
<FILE CREATION DATE/TIME> will be replaced with the date and time stamp that Windows
reports for that image file (e.g. “06/21/72 12:43:16”)
“Color Adjustment” tab
The functionality of the Color Adjustment tab has not changed since CREW 1.05, please refer to the
CREW 1.05 users manual for a description of how these functions work.
CREW 1.10 Release Notes, June 19, 2002. Rev 1.0. Document #13307-003, Copyright 2002 Gretag Imaging Inc.
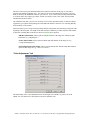
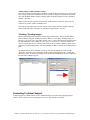
“Filename Parser” tab (Hotfolder Client only, new to CREW 1.10)
The Filename Parser feature of CREW 1.10 is a powerful interface to various front-end systems such as the
Gretag CYRA Reorder Station, Gretag DRS-200 Station, and Kodak’s Digital Print Production (DP2)
System. The following section details how to configure Hotfolder Client and these three front-end systems
for using the Filename Parser feature.
Overview
“Filename Parser” (FP) is a feature of Hotfolder Client Preset folders that allows HFC to extract
information about an image from the filename used to save it. This information is used to
determine how the images will be printed, in what order, and how many copies of each image to
print.
Currently, HFC supports two different naming structures for use with two different types of frontend systems.
1) Gretag DRS Formatting: this is the filename format used by the Gretag DRS-200 Reprint
Station, as well as the Gretag CYRA Reorder Station.
2) Kodak DP2 Interface Format: this is a filename format that can be output from Kodak’s
“Digital Print Production” software (DP2).
Other front-end systems can also use this interface if they can support one of the two above
formats. Other formats may be supported the future.
The information that is retrieved from the filename includes the following (DRS format, (DP2
format)):
§
§
§
§
“Batch Number” (or “Order ID”)
“Order Number” (or “Order Item”)
“Frame Number” (or “Page Number”)
Print Quantity (“Print Quantity”)
CREW 1.10 Release Notes, June 19, 2002. Rev 1.0. Document #13307-003, Copyright 2002 Gretag Imaging Inc.
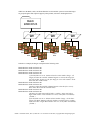
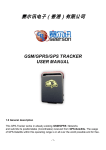
CREW uses the Batch, Order, and Frame Numbers in a hierarchical system to ensure that images
are grouped together and sequenced properly when printed, as shown in the diagram below:
Batch
#ABCD123
Order
#001
Order
#002
Frame
#001
Frame
#001
Frame
#002
Frame
#002
Order
#003
Frame
#001
Frame
#002
Frame
#003
Frame
#003
Frame
#004
In the above example, the images would print in the following order:
Batch ABCD123 Order 001 Frame 001
Batch ABCD123 Order 001 Frame 002
Batch ABCD123 Order 001 Frame 003
Batch ABCD123 Order 001 Frame 004
Batch ABCD123 Order 002 Frame 001
(if the FP folder was set to “Submit on batch or order number change”, all
images for Order 001 would be submitted together as soon as this image file
was seen by HFC, because it is the first image for a new order number. Order
002 Frame 001 would be held)
Batch ABCD123 Order 002 Frame 002
Batch ABCD123 Order 003 Frame 001
(As above, Order 002 would be submitted together when this file is seen by
HFC, Order 003 Frame 001 would be held)
Batch ABCD123 Order 003 Frame 002
Batch ABCD123 Order 003 Frame 003
(All images for Order 003 would be held in “pending” status until either a
higher order number or batch number were seen, or the folder was manually
“flushed”)
(If the FP folder was set to “Submit on batch number change”, all the above
images from Batch ABCD123 (all order numbers) would be held in “pending”
status until either a higher Batch Number was seen, or the folder was manually
“flushed”)
CREW 1.10 Release Notes, June 19, 2002. Rev 1.0. Document #13307-003, Copyright 2002 Gretag Imaging Inc.
Setup
Setting up Hotfolder Client (required to enable Filename Parsing)
To enable Filename Parsing for an existing Preset Hotfolder, do the following.
1) Create a normal “Preset Hotfolder” (see user manual for details)
2) Set the printing options for this folder as desired (sizing method, rotation, color
management, sharpening, back-printing, color adjustment, etc.)
3) Select the “Filename Parser” tab on the setup dialog
4) Check the “Enable Filename Parsing” check box
5) Select the Parsing Mode you wish to use (see “Parsing Modes” below)
6) Click “OK”
Hotfolder Client is now set up completely. You may set up multiple Filename Parsing Preset
Folders if you wish, and each one will maintain a separate queue of jobs.
Setting up the Gretag DRS-200 Station / CYRA Print Scan (if used)
File Naming Format:
B123456_N123_ID123456_FF_P4.jpg
Where:
B123456
ID123456
N123
P4
FF
= Batch Number (123456)
= Order Number (123456)
= Frame Number
= Print Quantity (4)
= ignored (obsolete)
Setting up the Gretag CYRA Reorder Station (if used)
The file-naming format used for the CYRA Reorder Station is the same as the DRS-200 Station.
Setting up Kodak DP2 (if used)
To enable Kodak DP2 to output properly to a Filename Parsing Preset Folder, you must do the
following. Please consult with your DP2 user manual or Kodak Technical Support if you have
questions with how to perform these steps.
1) Create a new printer for this queue, and name it appropriately (“Netprinter”, “Miléca”,
etc.)
2) Set this queue to output to “Disk”
3) Set the output path to the location of the Preset Hotfolder you created above
4) Set the output filename to exactly the following (or build your own filename format from
the information later in this section):
DP2_[-]_[#].tif
For each output image, DP2 will replace the [-] portion of the filename with the Batch number,
Order ID, Order Item Number and Page Number. The [#] portion of the filename will be replaced
with the print quantity. The resulting filename will appear similar to the following:
DP2_B123456 My Test Batch 7890 1234_5.tif
Where:
B123456
My Test Batch
7890
= randomly generated / sequential “Batch” number, ignored by HFC
= Order ID (“Batch” in HFC, text or numeric, may include
spaces and/or underscore characters)
= Order Item Number (“Order” in HFC, numeric only)
CREW 1.10 Release Notes, June 19, 2002. Rev 1.0. Document #13307-003, Copyright 2002 Gretag Imaging Inc.
1234
5
= Page Number (“Frame” in HFC, numeric only)
= Print Quantity (numeric only)
Note: CREW normally ignores the sequential “B123456” portion of the filename generated above,
but it is possible to use it as part of the “Order ID” (Batch in CREW), so that when you print the
same group of images multiple times, they is treated as separate batches. If you wish to do this,
simply insert an extra “token” between “DP2_” and “[-]” (i.e. use “DP2_X_[-]_[#].tif”).
Normally TIF image format is used for output from DP2, however CREW also supports most
other common image formats (such as JPG, TGA, BMP, etc.).
If you need to include additional information in the filename for back-printing purposes, it must be
placed in-between the “DP2_” tag and the remainder of the filename above, and be separated on
either side by spaces or underscores (i.e. “DP2_Put Extra Information Here Then Continue With
The Normal Format_[-]_[#].tif”). The extra information (except the first word before a space or
underscore) plus the DP2 Batch ID will show up as part of the Batch Number in HFC while the
job is “pending”. This will not affect printing order (the above format would result in Batch
Numbers such as
“ExtraInformationHereThenContinueWithTheNormalFormatB123456YourRealBatchNumber”
(note that the first word (“Put”) is omitted).
If your DP2 workflow uses a different method of specifying Batch/Order/Frame than Gretag
has implemented as default, you can easily configure DP2 to use the exact information that you
need for your setup. Use the following as a guide:
Example filename: DP2_A_B_C_D_E_F_G_H_…W_X_Y_Z.tif
1) CREW interprets the filename output by DP2 as follows, using the example filename
above, with the filename being split into parts at spaces and underscore marks:
Z = print quantity (must be numeric)
Y = “Frame” number (must be numeric)
X = “Order” number (must be numeric)
B through W = put together to form the “Batch” number (text or numeric)
A = ignored by CREW (as long as it does not contain spaces or underscores)
2) DP2 uses the following “special characters” to substitute information into the output
filename automatically.
[-] = BatchID OrderID OrderItemNumber PageNumber
[O] = OrderID
[B] = BatchID
[S] = OrderItemSequence
[I] = OrderItemID
[G] = PageNumber
[U] = OrderSequence
[#] = PrintQuantity
plain text can be inserted anywhere in the filename as well
3) If there are no spaces or underscores (“_”) between fields, they are treated as a single
field. E.g.: “…_[O][S]_…” would result in the OrderID and OrderItemSequence
numbers being concatenated into a single value in CREW.
You can manually construct a filename for DP2/CREW to use that fits your needs using the above
information. It must start with “DP2_”, and the last three fields must be numeric only.
Example:
DP2_BarneysStudio_[B]_[U]_[I]_[G]_[#].jpg
CREW 1.10 Release Notes, June 19, 2002. Rev 1.0. Document #13307-003, Copyright 2002 Gretag Imaging Inc.
BarneysStudio = ignored (because it is the first segment after “DP2_”)
DP2’s BatchID and OrderSequence together = HFC “Batch” number
DP2’s OrderItemID = HFC “Order” number
DP2’s PageNumber = HFC “Frame” number
DP2’s Print Quantity = HFC Print Quantity
Notes on using Filename Parsing with Kodak DP2:
1) HFC uses the Gretag nomenclature when referring to Filename Parsing in the software as
well as this manual. When using DP2, please translate “Batch”, “Order”, and “Frame” as
follows:
o “Batch” = Kodak DP2 “Order ID”
o “Order” = Kodak DP2 “Order Item Number”
o “Frame” = Kodak DP2 “Page Number” or “Sequence Number”
2) The “Batch Number” (in DP2 terminology) created by DP2 is an ascending sequence
created each time a job is printed, intended to ensure that the output filename is unique
every time it is created (so that you can print the same job/image multiple times without
problems). Using the “standard” naming convention above, this portion of the filename
is ignored by HFC, and the DP2 Order ID is used as the HFC Batch Number. If you wish
to use this number as part of the Batch Number, please refer to the instructions above for
creating a custom filename format for use in DP2.
Parsing Modes
Filename Parsing has three operational modes that determine when a group of images is sent to the
printer for output, as follows.
“Submit Images Immediately”
When the FP Preset Folder is set to “Submit images immediately” files are printed individually as
soon as they are parsed by HFC. The Print Quantity information is extracted from the filename,
however the printing order cannot be guaranteed (they are printed in the order provided by the
Windows operating system).
This mode is useful when you want images to print immediately and you are not concerned with
exact printing order, or the possibility of “gaps” in-between images (on roll-to-roll printers like the
Miléca).
“Submit Images on Batch or Order Number Change”
This mode is commonly used to ensure that a complete order is submitted and printed at once,
ensuring the correct print sequencing and minimizing the potential for “gapping” between prints
(on roll-to-roll printers like the Miléca).
When this mode is enabled, images will be held in a “Pending” status until the Order Number or
Batch Number changes. When either of these numbers change, HFC assumes that the current
print job is complete and submits that group of images as a single batch to the printer.
If you wish to print “Pending” images immediately, select the appropriate Preset Folder on the
“Properties” page of HFC, and press the “Flush” button. HFC will immediately submit any
pending images in that folder. Note that the “Flush” button is only enabled if there are pending
images for that folder (shown by a “Pending” job on the Jobs tab of HFC).
CREW 1.10 Release Notes, June 19, 2002. Rev 1.0. Document #13307-003, Copyright 2002 Gretag Imaging Inc.
“Submit Images on Batch Number Change”
This mode is similar to Submit Images on Batch or Order Number Change, however it allows the
user to group several orders together before they are printed. Images are submitted to the printer
only when the Batch Number changes (multiple orders are printed together so long as the Batch
Number is the same).
Images will be correctly sequenced in ascending “Order” number, and Orders will be correctly
sequenced by “Frame” number within the order.
This mode is used mostly when one HFC client is used to queue jobs from multiple rendering
stations at the same time, and images are submitted in large batches at one time.
“Flushing” Pending Images
When using printing modes other than “Submit images immediately”, images are held until an
Order or Batch is complete, and the next Order or Batch is seen by HFC. Pending images are
shown by a job on the “Jobs” tab of HFC named “{FP-x}”, along with a status message that shows
the “Batch Number” of the pending job (Note, spaces or underscores in the Batch Number are
removed when displayed here). Because HFC waits for the next Order or Batch to appear before
printing the current pending images, you must manually tell HFC to “Flush” the last batch that you
print.
All pending images can be flushed at any time by selecting the appropriate folder from the
“Properties” tab of HFC, then clicking the “Flush” button on the right hand side. Clicking this
button causes HFC to submit any pending images in that folder immediately instead of waiting for
the next Order or Batch to appear.
Contacting Technical Support
Technical support for CREW software can be obtained through your regular Gretag Imaging support
channel. Please contact our Service Department if you have any problems or questions.
CREW 1.10 Release Notes, June 19, 2002. Rev 1.0. Document #13307-003, Copyright 2002 Gretag Imaging Inc.