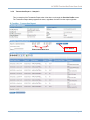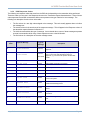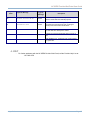
1
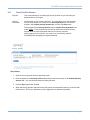
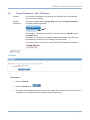
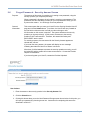
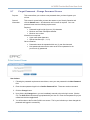
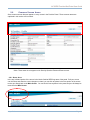
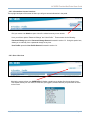
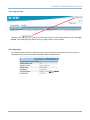
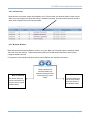
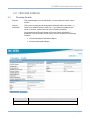
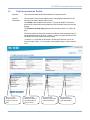
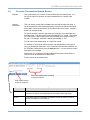
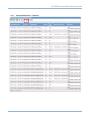
North Carolina Subsidized Early Education for Kids (SEEK) PROVIDER WEB PORTAL User Guide July 25, 2011 NC SEEK Provider Web Portal User Guide TableofContents 1.0 INTRODUCTION....................................................................................................................2 1.1 About This Guide.................................................................................................................2 1.2 About the North Carolina SEEK Provider Web Portal.........................................................2 2.0 PROVIDER PORTAL BASICS..............................................................................................3 2.1 Accessing the Provider Portal .............................................................................................3 2.2 Login Screen .......................................................................................................................4 2.3 Change Password Screen...................................................................................................5 2.4 User Profile Screen .............................................................................................................7 2.5 Forgot Password - User ID Screen .....................................................................................8 2.6 Forgot Password - Security Answer Screen........................................................................9 2.7 Forgot Password - Change Password Screen ..................................................................10 2.8 Common Screen Areas .....................................................................................................11 2.8.1 Home Area ...................................................................................................................11 2.8.2 Information Access Sections........................................................................................12 2.8.3 User Info Area ..............................................................................................................12 2.8.4 Log-out Area.................................................................................................................13 2.8.5 Hyperlinks.....................................................................................................................13 2.9 Navigation and Option Buttons.........................................................................................14 2.9.1 Pagination Features .....................................................................................................14 2.9.2 Display Records ...........................................................................................................14 2.9.3 Export Options..............................................................................................................15 2.9.4 Other Results Options ..................................................................................................15 2.9.5 Column Sort .................................................................................................................16 2.9.6 Browser Buttons ...........................................................................................................16 3.0 PROVIDER SCREENS ........................................................................................................17 3.1 Provider Profile ..................................................................................................................17 3.2 Provider Authorization Report ...........................................................................................18 3.3 Child Authorization Profile .................................................................................................20 3.4 Provider Transaction Search Screen ................................................................................22 3.5 Provider Transaction Report .............................................................................................23 3.5.1 Transaction Report – Sample 1 ...................................................................................24 3.5.2 Transaction Report – Sample 2 ...................................................................................25 3.5.3 POS Response Codes .................................................................................................26 4. July - 2011 HELP ......................................................................................................................................27 Page 1 NC SEEK Provider Web Portal User Guide 1.0 INTRODUCTION This user guide provides information about the features and functionality of the North Carolina SEEK Provider Web Portal, commonly referred to as “the Provider Portal or “the portal”. The Provider Portal is an internet based application used by child care providers to research information regarding children on the SEEK program. The portal can be accessed from any location where you have an internet connection and know your user ID and password. The Provider Portal provides information regarding you, as a provider, authorization information regarding the child, and responsible adult cardholder information. When logged into the Provider Portal application, the user has rights to view only the provider related information associated with their User ID. No other provider’s information is accessible. 1.1 About This Guide Purpose This document describes the processes for accessing the Provider Web Portal, for viewing provider profile, authorization and transaction information specific to the provider logged into the application. This user guide is intended as a resource manual when using the application. Use of this Guide The user guide does not provide step-by-step instructions for site navigation; however, it does provide detailed screen information and instructions for conducting inquiries. For additional assistance with the application, please contact the Provider Helpline at 1-877-606-2776. Graphics The graphic illustrations in this guide are screen captures that show whole or partial North Carolina Provider Portal screens. The entries seen in the illustrations in this guide are not actual provider data. It is possible that the data or screens you see in the live application may vary slightly from the screen captures in this manual. Some updates may have been completed after the time of printing of this manual. For questions on items of this nature, please also contact the Provider Helpline at 1-877-606-2776. 1.2 About the North Carolina SEEK Provider Web Portal The North Carolina Provider Web Portal is primarily a “see” system, which means you will be viewing data within the application as opposed to “doing” any type of data entry. You will view specific child care data and help manage attendance through the SEEK program. All Portal screens use drop-down menus and point-and-click techniques to provide you with an easy-to-use method to access and view child care transaction data. You can retrieve and view data associated with: Your provider profile The list of children for which you have been authorized to provide care July - 2011 Page 2 NC SEEK Provider Web Portal User Guide 2.0 PROVIDER PORTAL BASICS This section describes basic information on accessing the North Carolina Provider Portal, logging in to the website, and other common screen information. 2.1 Accessing the Provider Portal To access the Provider Portal, your computer must be connected to the internet. Follow the steps below: Open your internet or web browser (i.e., Internet Explorer, AOL, Firefox, Safari, etc.) Type the North Carolina Provider Portal address into the address box at the top of the screen: www.ncseek.nc.gov . (It is recommended to set this website address as a ‘Favorite” in your browser.) Press the Enter key The website opens at the Login Screen, which requires a valid login (User ID) and password. The User ID is your 9-digit provider license number. If you are a non-licensed facility, the User ID is your Facility ID number instead. Your initial password is the 5-digit zip code of your facility. For security reasons, you are forced to change your password at your initial login. You will also set up a security question in case you forget your password. July - 2011 Page 3 NC SEEK Provider Web Portal User Guide 2.2 Login Screen Purpose: This screen allows you to log into the North Carolina Provider Web Portal. General Information: You are required to have a valid User ID and password in order to access the application and you must login every time you use the portal. The User ID is your 9-digit provider license number. If you are a non-licensed facility, the User ID is your Facility ID number instead. Your initial password is the 5-digit zip code of your facility. The first time you login to the portal, you are automatically directed to the Password Change screen. Follow the instructions in section 2.3 for password change. User Actions: 1. Enter your User ID. This is your 9-digit license number. If you are a non-licensed facility, the User ID is your Facility ID number instead. 2. Enter your password. For initial login, this is the 5-digit zip code of your facility. 3. Click the blue Login button. July - 2011 Page 4 NC SEEK Provider Web Portal User Guide 2.3 Change Password Screen Purpose: This screen allows you to change your password on initial login or reset your password if you forget it. General Information: You will be automatically directed to this screen the first time you access the Portal. After that, you can get to it any time by clicking Forgot Password on the Login Screen and then entering the answer to the security question you set up when you first visited the Portal. The following are requirements when selecting a password. Required: Password length is eight (8) to ten (10) characters Minimum one lower case alpha character Minimum one number Allowed but not required: Upper case alpha characters Special characters (Ex. *, &, %) Other constraints Passwords cannot be repeated within one (1) year after last used New passwords cannot be the same as the current password or the previous six (6) passwords For security reasons, if a password is entered incorrectly three (3) times in a row, the system disables the user account and you will be locked out. If lockout occurs, click on the Forgot Password link underneath the blue Login button and follow the instructions in section 2.5. If you remain locked out, your password will automatically reset after midnight or you may contact the Provider Helpdesk to have your password reset. You will be prompted to change your password at the time of your initial login, and then again every 90 days. July - 2011 Page 5 NC SEEK Provider Web Portal User Guide User Actions 1. Enter your current password in the “Old Password” field. (Since this is your initial login, the “Old Password” is still the 5-digit zip code of the facility.) 2. After considering the password requirements, create a new password and enter it in the “New Password” field. Enter that same password again in the “Confirm Password” field and click on the Change button. 3. Upon pressing the Change button, you will be directed to the Security Question set up screen. Follow the instructions in section 2.4 to set up your security question. July - 2011 Page 6 NC SEEK Provider Web Portal User Guide 2.4 User Profile Screen Purpose: This screen assists you in setting up a security question so you can reset your password later if you forget it. General Information: All information on this screen is required. You must select one of the questions from the drop down menu, answer it in the Security Answer box, confirm the answer in the Confirm Security Answer box, and click the Save button. The text typed for the Security Answer and the Confirm Security Answer must match exactly. The text entered for the Security Answer and Confirm Security Answer show as colored dots rather than text for security purposes. When logging in for the first time, you must set up your security question immediately after changing your original password. User Actions: 1. Select a security question from the drop down menu. 2. Enter the answer in the Security Answer field and enter that same answer in the Confirm Security Answer field. You must enter the answers exactly the same. 3. Click the Save button when finished. 4. When the security question has been saved, the system will automatically take you to the Provider Profile screen. This is your indication you have logged into the website successfully. July - 2011 Page 7 NC SEEK Provider Web Portal User Guide 2.5 Forgot Password - User ID Screen Purpose: If you forget your password, you can enter your User ID to set a new password with your security question. General Information: This screen is opened from the Login Page by clicking the Forgot Password? link under the blue Login button. All information on this screen is required. You must enter your User ID and click the Submit button. Remember: The User ID is your 9-digit provider license number. If you are a nonlicensed facility, the User ID is your Facility ID number instead. If you have forgotten your User ID, contact the Provider Helpdesk for assistance. User Actions 1. Enter your User ID. 2. Click the Submit button. 3. The system will automatically take you to the security answer screen discussed in the next section. It will prompt you to complete the security question you chose previously. July - 2011 Page 8 NC SEEK Provider Web Portal User Guide 2.6 Forgot Password - Security Answer Screen Purpose: The purpose of this screen is to assist you in setting a new password, using the security question you completed previously. When a password is forgotten, the only option is to select a new password. The portal does not have the ability to email you your old password or notify you of it by some other means. You will simply set a new password. General Information: This screen opens after you enter your User ID on the Security Question User ID page and click the Submit button. From there, the User ID will carry forward as the first field on this screen but is a field you cannot change or edit. All information on this screen is required. The system defaults to the security question you chose previously. In this screen, the answer to the security question is NOT case-sensitive. Therefore, the answer McCloskey and MCCLOSKEY are the same. For security purposes, the text entered for the Security Answer appears as colored dots, not text. If you enter the wrong answer, the system will display an error message indicating that either the User ID or answer is incorrect. After three (3) failed attempts to answer the security questions correctly, you will be locked out and the system will not start a new session. Contact the Provider Helpline for assistance If you have forgotten your User ID, contact the Provider Helpdesk. User Actions 1. Enter the answer to the security question in the Security Answer field. 2. Click the Submit button. 3. Clicking this button takes you to the User Password Change screen shown below. At this point, you will reset your password by choosing a new one. Instructions for completing this screen are described in section 2.7 July - 2011 Page 9 NC SEEK Provider Web Portal User Guide 2.7 Forgot Password - Change Password Screen Purpose: This screen allows you to select a new password when you have forgotten your old one. General Information: This screen is opened after you enter the answer to your Security Question and click the Submit button. All information on this screen is required. Your new password must meet the following requirements: Required: Password length is eight (8) to ten (10) characters Minimum one lower case alpha character Minimum one number Allowed but not required: Upper case alpha characters Special characters (Ex. *, &, %) Other constraints Passwords cannot be repeated within one (1) year after last used New passwords cannot be the same as the current password or the previous six (6) passwords User Actions 1. Following the password requirements noted above, enter your new password in the New Password field. 2. Enter the same password again in the Confirm Password field. These two entries must match. 3. Click the Change button. 4. Upon clicking the Change button, you are immediately returned to the main login screen. (Section 2.2) The User ID field will already by populated with your User ID. Enter the new password you just created and click the Login button. 5. You will be taken to the Provider Profile home screen. This is your indication you have changed the password and logged in successfully. July - 2011 Page 10 NC SEEK Provider Web Portal User Guide 2.8 Common Screen Areas Some common screen features appear on every screen in the Provider Portal. These common areas are explained in this section of this manual. **Note: These areas do not appear on the Security Question Password Reset screens. 2.8.1 Home Area In the top, left-hand portion of the screen is the North Carolina SEEK logo area of the portal. Roll your mouse over this area, and when the cursor changes to a hand, you can click anywhere in the blue portion of the screen to take you directly back to the Main Screen. You can do this from anywhere in the portal and you will always be returned to the Main Screen. July - 2011 Page 11 NC SEEK Provider Web Portal User Guide 2.8.2 Information Access Sections The top right hand part of the screen is where you will go to access information in the portal. Roll your mouse over Admin to open a list of the related screens you can access. Here you will see options “Password Change” and “User Profile” These screens do the following: Password Change opens the Password Change Screen discussed in section 2.3. Using this option here, allows you to manually force a password change at any time. User Profile opens the User Profile Screen discussed in section 2.4. 2.8.3 User Info Area Moving the mouse pointer over USER INFO will display a small pop up window like the one shown here. This window shows your user name, the last time you logged in, and the last time you performed an action on the Portal. July - 2011 Page 12 NC SEEK Provider Web Portal User Guide 2.8.4 Log-out Area link on any screen will log you out of the Portal and return you to the Login Clicking on the Screen. After clicking this, you will have to log in again in order to use the Portal. 2.8.5 Hyperlinks Any Portal information shown on the screen in blue type is a hyperlink or link that you can click to go to a new page that gives you more detailed information about the selected item. July - 2011 Page 13 NC SEEK Provider Web Portal User Guide 2.9 Navigation and Option Buttons Several navigation and option buttons will appear on the search result screens in the top left side of the screen. Below is an explanation of these features. 2.9.1 Pagination Features First page of search results Moves user to first record in search results Previous page Next page Moves user back to previous page of search results Moves user to the next page of search results Last page of search results Moves user to last record in search results 2.9.2 Display Records This option allows the user to select how many records to display per page of search results. The options are 10, 20, 50, or 100 records per page. The default is 20 records. To change the default, select an option from the drop down. The user may change this option at any time. July - 2011 Page 14 NC SEEK Provider Web Portal User Guide 2.9.3 Export Options CSV Export This option allows the user to export the search results to a standard .csv file. CSV is ‘comma separated value’, meaning the data is put in a simple text file with each data element separated by a comma. This file can then be imported into many different computer applications, including Microsoft Excel, but also many spreadsheet type programs. CSV is more of a universal file type. XLS Export This option allows the user to export the search results to a standard .xls file. Exporting to .xls transports the data directly to a Microsoft Excel spreadsheet. Doing this type of export, allows you to manipulate the search results in a Microsoft Excel application. . Doing this type of export allows you to filter and manipulate the search results for other types of reports or spreadsheets you may be doing. 2.9.4 Other Results Options Filter Results This option allows the user to filter the results based on specific criteria. July - 2011 Clear Results This option clears any previous search filters. Page 15 NC SEEK Provider Web Portal User Guide 2.9.5 Column Sort Most columns in the search results are available to sort. Roll the cursor over the blue header of each column and if the cursor changes to a hand, that column is available for sorting. Once the column has been sorted, a white arrow will appear next to the column header. 2.9.6 Browser Buttons Most internet browsers (Internet Explorer, Firefox, etc.) have “Back” and “Forward” buttons; sometimes called, “Next” and “Previous” buttons. These functions work within the Provider Web Portal also to allow for easy navigation between screens. For purposes of this manual, the buttons used in Internet Explorer are featured in this section. Back or Previous This button allows the user to move back to a previous screen in their browser history. July - 2011 These buttons record movement within your browser and keep a history of the screens you have visited. Forward or Next This button allows the user to move forward to the next screen in their browser history. Page 16 NC SEEK Provider Web Portal User Guide 3.0 PROVIDER SCREENS 3.1 Provider Profile Purpose: This screen displays your provider profile. It is often referred to as the “Home Screen.” General Information: This screen contains general demographic information about your facility. I.e. facility name, address, phone number, etc. If you believe something on this screen is incorrect, contact your local LPA or licensing consultant. Once logged into the Provider Portal, the Provider Profile information is displayed. From the Provider Profile screen, the user can perform the following functions: Action Buttons AUTHORIZATIONS July - 2011 View the Attendance Transactions Report View the Authorizations Report Function This button opens the Provider Authorizations Report. Page 17 NC SEEK Provider Web Portal User Guide Action Buttons Function TRANSACTION This button opens the Provider Transaction Search Screen. Browser [Back] or [Forward] button These buttons allow you to move to the Next Screen or Previous Screen in your browser history. (Refer to section 2.9.6) 3.2 Provider Authorization Report Purpose: This screen displays a list of children authorized at your facility. General Information: Ordering of results is as follows: 1. By Case ID 2. By Child Number (#) The Case ID and Authorization ID are system generated numbers that occur when the information comes into the SEEK program from the state’s eligibility system. The Child Number is a system assigned number. At the time of conversion to SEEK, existing children on the case are assigned a number beginning at 01, 02, 03 and so on – from youngest to oldest child on the case. New children added to the case after that, will be assigned the next number in numerical order for the case, regardless of their age within the family at that time. The Child Name field links to the Child Authorization Profile screen. Roll your cursor over the child’s name. When the underline appears, click on the link and you will be taken to the Authorization Profile for that child. Refer to section 3.3 for more instructions. The Last Activity field displays the date and time there was activity associated with the authorization. This could include an information update to the authorization, or an actual swipe of the SEEK card. The Transaction Type field shows the most recent SEEK card transaction at your provider facility for each authorization. Some possible entries are: July - 2011 IN or OUT – Standard Check In or Check Out SAF IN/OUT - Check In or Check Out captured in the Store and Forward or SAF mode. Refer to your Provider User Manual for further detail on the SAF feature. P/IN or P/OUT - Previous Check In or Previous Check Out Page 18 NC SEEK Provider Web Portal User Guide Action Buttons Function Child Name Clicking on the Child’s Name opens the Child Authorization Profile Screen. DETAILS This button opens the Provider Profile Home Screen. TRANSACTION This button opens your Provider Transaction Search Screen. July - 2011 Page 19 NC SEEK Provider Web Portal User Guide 3.3 Child Authorization Profile Purpose: This screen shows the authorization details for a particular child. General Information: The top portion of the screen displays known demographic information for the child, such as; name, address, date of birth. The Child # is also located on this screen. This may be helpful if you have a parent at the counter who has forgotten their child’s number at the time they are swiping. The Protective Custody Flag appears on this screen as either a Y (Yes) or N (No). The bottom portion of the screen contains blue banner rows showing all open or closed authorizations for the child. Use the ‘+’ button to expand the banner and see details of the authorization as shown below. ** Note the blue hyperlink on this screen. Clicking here will return you to the Provider Profile screen. For a reminder of the hyperlink feature, refer to section 2.8.5. This + or – sign allows the user to expand or close the entry July - 2011 The banner will display the status of the authorization as open or closed. The banner will display the begin date of the authorization. The banner will display the end date of the authorization. Page 20 NC SEEK Provider Web Portal User Guide Action Buttons Function DETAILS This button opens the Provider Profile Home Screen. TRANSACTION This button opens the Provider Transaction Search Screen. When the user clicks the Transaction button located at the bottom of the Child Authorization Profile screen, you will receive the screen below. The same information appears in the top two sections of the screen, but a new search section has been added to the bottom. See the red lined box below. This is called the Provider Transaction Search screen. July - 2011 Page 21 NC SEEK Provider Web Portal User Guide 3.4 Provider Transaction Search Screen Purpose: This screen allows you to search for transactions within the last 90 days. You can run the report for all cases, or request transactions for a specific case number. General Information: This is an inquiry screen that is available from other places within the portal. It can be accessed from the Child Authorization Profile screen that was discussed above and it can be accessed from the Provider Profile home screen. Sample 2 below is an example of this. To execute a search, enter the date range you would like in the Start Date and End Date fields. The date must be entered in MM/DD/YYYY format. This means you must have a 2 digit number for the month and day and a 4 digit number for the year. For example: 05/02/2011 would represent May 2, 2011. You can enter either a date range, or a case ID#, or both. For example, if you’d like to retrieve a report of all transactions in the month of June, you would enter 06/01/2011 in the “Start Date” field and then 06/30/2011 in the “End Date” field and then press the Search button. You can leave the Case # field blank in this example. Alternatively, you could leave the date fields blank and enter a Case # only to retrieve a list of all transactions on that Case #. Further actions are described below. Enter search dates here according to the format above Enter Case # here to search for a specific Action Buttons Function SEARCH Click the Search button when you are ready to begin the search. This executes the search and brings back the records you have requested. RESET This button clears all information entered and resets the search screen to accept new dates or a new case #. CANCEL This button cancels the search. July - 2011 Page 22 NC SEEK Provider Web Portal User Guide 3.5 Provider Transaction Report Purpose: This report shows all transactions that have occurred at your facility. General Information: Order of the results is as follows: Date/Time of transaction Case ID# Child Name Child # Any of these columns can be sorted and reordered on by clicking in the blue header area of the column as explained in Section 2.9.5 The Trans Type field shows the type of activity on the card at the facility. Some possible entries are: IN/OUT (Check In/ Check Out) P/IN or P/OUT (Previous Check In or Previous Check Out) SAF OUT (Check Out the occurred while the device was in Store and Forward mode) If a swipe was done as a “Previous” transaction, the date and time the Previous In/Out swipe actually occurred in shown in the Entry Date/Time field The Response column notes the response received from the POS machine. See section 3.5.3 for a list of POS Response codes. As a reminder, the results of this report can be exported to a .csv file or a .xls file as explained in section 2.9.3. The buttons are noted below in the red circle. July - 2011 Page 23 NC SEEK Provider Web Portal User Guide 3.5.1 July - 2011 Transaction Report – Sample 1 Page 24 NC SEEK Provider Web Portal User Guide 3.5.2 Transaction Report – Sample 2 This is a sample of the Transaction Report when it has been run through the Provider Profile screen. The Transaction Report always appears the same, regardless of where from the report originates. Enter search dates here July - 2011 Click Search Page 25 NC SEEK Provider Web Portal User Guide 3.5.3 POS Response Codes The following are response codes that come from the POS device depending on the transaction being performed. These are codes you may see in the Response column on the Transaction reports discussed above. Some of these codes represent success with a transaction while most represent some type of denied or error message. The following is a description of each column in the table: The first column is a two digit code assigned to the message. This code usually appears above or before the message text. The second column is the actual text of the response message. This will appear in the Response column of the transaction reports discussed in Section 3.5. The third column describes the type of message. As mentioned above, some of these messages represent success in a transaction while many of them represent an error or denied function. The final column is a description of what the message means. Response Code 00 Response Message SUCCESS/APPROVED Type of Message Success Success 01 SUCCESS/DENIAL With denial Description Transaction passed all business rules and is approved. Overall request was processed properly by the host. One or more of the sub-transactions was not approved, e.g. one of the two person numbers was invalid. 55 INVALID PIN Denied Invalid PIN or PIN not selected 56 CARD NOT FOUND Denied Card number not found in the system. 75 PIN TRIES EXCEEDED Denied Bad PIN try count is over a predefined threshold. A0 AUTH NOT FOUND Denied Child authorization not found. A4 CARD NOT ACTIVE Denied Card is not active AB TRXN NOT FOUND Denied The entered transaction that is to be voided cannot be found in the system. BB BACKSWIPE ERROR Denied The attendance date of the previous check in/out is outside the backswipe period. BE VOID PERIOD ERROR Denied Can't void transactions that are outside the void period. D0 INVALID PROVIDER Denied The provider is not authorized for the entered transaction. D1 UNKNOWN POS DEVICE Denied The POS sending the request is not identifiable by the host. DC PROVIDER INACTIVE Denied The provider is not authorized to accept attendance. July - 2011 Page 26 NC SEEK Provider Web Portal User Guide Response Code Response Message Type of Message Description DD CHECKOUT MISSING MM/DD Denied This is caused by a check-in attempt where an open check-in exists within the backswipe period. DE OVERLAPPING CARE Denied A previous check-in/out is being attempted between an existing check-in/check-out span, creating an overlap in the service dates and/or times. E1 ALREADY VOIDED Denied All paired attendance transactions with check-ins for the void date have already been voided. ED CHECK-IN NOT FOUND Denied A check-out cannot be performed without a check-in first. 95 SYSTEM ERROR-RETRY Error Host database error. Transaction was not processed. Try again later. 4. HELP – July - 2011 For further assistance with the NC SEEK Provider Web Portal, call the Provider Help Line at: 1-877-606-2776 Page 27