1
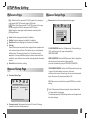
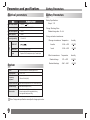
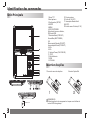
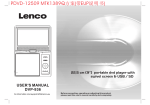
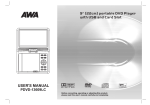
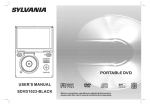
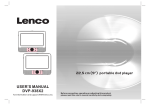
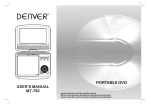
PORTABLE DVD
USER'S MANUAL
SDVD9000
Before connecting, operating or adjusting this product,
please read this user's manual carefully and completely.
Table of Contents
Contents
Table of Contents
P1
SETUP Menu Setting
General Setup Page
Safety Precautions
Identification of Controls
Main Unit
Remote control unit
P2
P3-P5
P6
Audio Setup Page
P6-P7
Video Setup Page
P7
Preference Page
P7-P8
Password Setup Page
P8
Battery Parameters
P9
Parameters and specifications
P9
P3
P4-P5
Troubleshooting tips
1
P6-P8
P9-P10
P10
Safety Precautions
WARNING
RISK OF ELECTRIC SHOCK
DO NOT OPEN
N Notes on Copyrights:
Warning:To reduce the risk of electric shock,do not remove
the cover or back of this product.There are no user-serviceable
parts inside. Refer servicing to qualified service personnel.
It is forbidden by law to copy, broadcast, show,broadcast via
cable, play in public, or rent copyrighted material without
permission.
Warning: To reduce the risk of fire or electric shock, do not
expose this product to dripping or splashing water,rain, or
moisture. Do not place objects filled with water such as vases,
on the Product.
This product features the copy protection function developed by
Macrovision.Copy protection signals are recorded on some discs.
When recording and playing the pictures of these discs picture
noise will appear.This product incorporates copyright protection
technology that is protected by method claims of certain U.S.
Patents and other intellectual property rights owned by Macrovision
Corporation and other rights owners.Use of this copyright protection
technology must be authorized by Macrovision Corporation, and is
intended for home and other limited viewing uses only unless
otherwise authorized by macrovision Corporation. Reverse
engineering or disassembly is prohibited.
Warning: This digital video disc player employs a laser system.
Use of controls,adjustments, or the performance of procedures
other than those specified herein may result in hazardous
radiation Exposure.
Warning: To prevent direct exposure to laser beam,do not open
the enclosure.Visible laser radiation when open.
Warning: Never stare directly into the laser beam.
Caution: Do not install this product in a confined space such
as a book case or similar unit.
Warning: when the unit using by child, parents must make sure
to let the child understand all contents in Instruction book how
battery using to guarantee using battery correctly all the time.
SERIAL NUMBER:
You can find the serial number on the back of the unit.This number
is unique to this unit and not available to others.You should record
requested information here and retain this guide as a permanent
record of your purchase.
Model No. ______________________________
Serial No. ______________________________
Date of Purchase_________________________
Warning: when find battery overheat, swell or dour, please
stop using battery and contact service centre for getting
replacement.
charg e
Warning: do not charging battery on the place of insufficient
ventilation such as: mattress, sofa, cushion , soft mat......
stro ng
im pact
over
heat
40 C
Warning: we will not take any responsibility if user incorrectly
use battery, not following our warning instruction label on the
battery case.
2
Identification of Controls
Main Unit
1
1.TFT screen
8.VOL+
2.Speakers
3.SETUP
9.VOL-
4.MODE
10. PLAY/PAUSE
5.MENU
11. STOP
6.DVD/SD/USB
12.SD/MMC/MS
Select input source,DVD/Card/USB
13.USB
7.UP/DOWN/LEFT/RIGHT
2
14.COAXIAL
when playing CD,VCD,DVD,If available
15.Headphone out jacks
UP:previous track
3
4
5
6
Down:Next track
16.AV OUT
Left:Fast reverse
17.Power ON/OFF switch
Right:Fast forward
7
8
9
10
select an item in the menu.
18.DC IN 9-12V
Insert the battery
11
1.Open the battery door.
12
13
14 15 16 17 18
1
SD/MS/MMC Card
3
2.Insert two AAA size batteries.
N
2
NOTES:
Remove battery during storage or when you are not using the DVD
player for a long time.
Identification of Controls
Remote control unit
11
26
OSD
GOTO
DVD
SD/USB
MUTE
27
4.Forward Skip
Go to next chapter/ track.
9
12
17
18
10
13
19
5
8
VOL-
VOL+
SLOW
21
20
24
16
1
2
25
MENU
6
7
15
14
4
3
23
22
1.PLAY/PAUSE
Press PLAY/PAUSE once to pause playback, pressing PLAY/
PAUSE second time will resume the playback.
2.STOP
When this buttom is pressed once, the unit records the stopped
point,from where playback will resume if ENTER is pressed after
wards. But if STOP button is pressd again instead of ENTER
button, there will be no resume function.
3.Reverse Skip
Go to previous chapter/ track to the beginning.
5.ZOOM
DVD VCD : Use ZOOM to enlarge or shrink the video image.
1.Press ZOOM during playback or still playback to activate the
Zoom function. The square frame appears briefly in the right bottom
of the picture.
2. Each press of the ZOOM button changes the TV screen in the
following sequence:
JPEG : Use ZOOM to enlarge or shrink the picture.
1.Press 'ZOOM' .
2,Used "
" to enlarge,or "
" to shorten the picture.
Use the
button to move through the zoomed picture.
6.REPEAT
Press REPEAT during playback to select a desired repeat mode.
DVD : you can play a chapter/title/all on a disc.
VCD
CD : you can play a track/all on a disc.
Mp3 WMA : you can select shuffle/ random/ single/ Repeat one/
Repeat folder/ folder play mode on a disc.
7.A B
To repeat a segment: press AB once to set the starting point for
repeat segment, press it again to set an end point, and the player
will repeat the segment from the start to the end point.
8.PROGRAM
DVD VCD CD :The program function enables you to store your
favourite tracks from the disc. Press PROGRAM button ,then
PROGRAM MENU will appear on screen, now you can use the
number key to direct input the titles,chapters or tracks number and
select START option. TO resume normal playback, press PROGRAM
and select STOP option on the program menu.
4
Identification of Controls
Remote control unit
JPEG :You can press PROGRAM repeatly to select the slide show
mode, the are 16 types slide show.
19.SETUP
Accesses or removes setup menu.
9. MUTE
Disable Audio output.
20.10+ BUTTON
In order to select a track 10 or greater, first press 10+, For example;
select track 12, first press 10+, and then press number 2 button.
10.TITLE
Return to DVD title menu.
11.OSD
Switches the OSD language.
12.0-9 NUMBER BUTTON
Selects numbered items in a menu.
13.ENTER
Confirms menu selection.
14. MENU
Accesses menu on a DVD disc.
15.DISPLAY
To display the playtime and status information.
16.AUDIO
DVD Press AUDIO repeatedly during playback to hear a different
audio language or audio track, if avilable.
CD VCD Press AUDIO repeatedly during playback to hear a different
audio channel (Stereo, Left, or Right).
17.SUBTITLE
Press SUBTITLE repeatedly during playback to hear a different
subtitle languages.
21.STEP
Press STEP once to pause playback, Form this station, press STEP
to advance one video frame.
22.
BUTTON
Press
BUTTON allow skipping back at 5-level speed(X2->X4->
X8->X16->X32), press ENTER button return to normal playback.
23.
BUTTON
Press
BUTTON allow skipping ahead at 5-level speed(X2->X4->
X8->X16->X32), press ENTER button return to normal playback.
24. PBC
PBC on/off switch. Only for VCD, For other discs, the function
is invaild.
25.SLOW
Press Slow button repeatedly to enter slow playback, and cycle
between different speeds. The speeds are 1/2,1/4,1/8,1/16,and
normal.
26.GOTO
Goto time point , title or chapter you want in DVD Mode.
27.DVD/SD/USB
DVD/CARD/USB.
18.ANGLE
Press ANGLE will change the view angle, on DVDs that support this
feature.
5
Turn off the power and keep AC cord pulled out from the outlet when connecting the systerm.
SETUP Menu Setting
General Setup Page
Press SETUP button to get the setup menu. Use direction buttons
to select the preferred item. After finishing settings, press
SETUP again to normal display.
The following menu items can be changed:
GENERAL: selects the GENERAL PAGE menu.
AUDIO: selects the AUDIO PAGE menu.
VIDEO: selects the VIDEO PAGE menu.
PREFERENCE : selects the PREFERENCE PAGE menu.
PASSWORD: selects the PASSWORD PAGE menu.
Angle Mark
Displays current angle setting information on the right hand corner
of the TFT screen if available on the disc.
OSD Language
You can select your own preferred language seetings.
Closed Captions
Closed captions are data that are hidden in the video signal of some
discs.Before you select this function,please ensure that the disc
contains closed captions information and your TV set also has this
function.
General Setup Page
Screen Saver
This function is used to turn the screen saver On or Off.
Audio Setup Page
- - GENERALSETUP PAGE - TV DISPLAY
ANGLE MARK
OSD LANGUAGE
CLOSED CAPTIONS
SCREEN SAVER
WIDE
ON
ENG
ON
ON
ON
OFF
ON
OFF
ON
OFF
ENGLISH
FRENCH
GERMAN
ITALIAN
SPANISH
PORTUGUESE
4:3 PANSCAN
4:3 LETTERBOX
16:9
WIDE SQUEEZE
GOTO GENERAL SETUP PAGE
Audio Setup Page
---- AUDIO SETUP PAGE --DOWNMINX
DIGITAL OUTPUT
DOLBY DIGITAL
STR
RAW
DUAL MONO STR
DYNAMIC
TV DISPLAY: selects the aspect ratio of the playback picture.
-- --- --- ------ -
4:3 PANSCAN: if you have a normal TV and want both sides of the
picture to be trimmed or formatted to fit your TV screen.
4:3 LETTERBOX: if you have a normal TV. In this case, a wide picture
with black bands on the upper and lower portions of the TV screen will
be displayed.
16:9:wide screen display.
FULL
STR
L-MONO
R-MONO
MIX-MONO
SPDIF/OFF
SPDIF/RAW
SPDIF/PCM
LT/RT
STEREO
OFF
GO TO AUDIO SETUP PAGE
Wide Squeeze: Set screen mode to 4:3.
6
SETUP Menu Setting
Audio Setup Page
Downmix
This options allows you to set the stereo analog output of your
DVD Player.
Video Setup Page
Video Setup Page
- - VIDEO SETUP PAGE - -
LT/RT :Select this option if your DVD Player is connected to a
Dolby Pro Logic decoder.
Stereo :Select this option when output delivers sound from only
the two front speakers.
Digital Output
The function is used to select the SPDIF Output:SPDIF Off,SPDIF
/RAW,SPDIF/PCM.
SPDIF Off: Turns off the SPDIF output.
SPDIF/RAW: If you have connected your DIGITAL AUDIO OUT
to a multi-channel decoder/receiver.
SPDIF/PCM: Only if your receiver is not capable of decoding
multi-channel audio.
SHARPNESS
BRIGHTNESS
CONTRAST
HUE
SATURATION
VIDEO INVERSE
MID
00
00
00
00
OFF
HIGH
MEDIUM
LOW
GOTO VIDEO SETUP PAGE
Sharpness,Brightness,Contrast,Hue,Saturation:setting the video
quality.
Video Inverse:setting TFT screen display inverse on or off.
Preference Page
Preference Page
Dolby digital
The options included in Dolby Digital Setup are: 'Dual Mono ' and
'Dynamic '.
Dual Mono
Stereo:Left mono sound will send output signals to Left speaker
and Right mono sound will send output signals to Right speaker.
L-Mono:Left mono sound will send output signals to Left speaker
and Right speaker.
R-Mono:Right mono sound will send output signals to Left speaker
and Right speaker.
Mix-Mono:Left and Right mixed mono sound will send output
signals to Left and Right speakers.
Dynamic
Dynamic range compression.
7
- - PREFERENCE SETUP PAGE - -
TV TYPE
AUDIO
SUBTITLE
DISC MENU
PARENTAL
DEFAULT
PAL
ENG
ENG
ENG
RESET
1 KID SAF
2G
3 PG
4 PG13
5 PGR
6R
7 NC17
8 ADULT
PAL
ENGLISH
AUTO
ENGLISH
NTSC
FRENCH
ENGLISH
FRENCH
GERMAN
FRENCH
GERMAN
ITALIAN
GERMAN
ITALIAN
SPANISH
ITALIAN
SPANISH
PORTUGUESE
SPANISH
PORTUGUESE OTHERS
PORTUGUESE OTHERS
OTHERS
GOTO PREFERENCE PAGE
TV Type
Selecting the colour system that corresponds to your TV when AV
outputs.This DVD Player is compatible with both NTSC and PAL.
SETUP Menu Setting
Password Setup Page
Preference Page
Password: select the menu password change page.
PAL - Select this if the connected TV is PAL system.It will change the
video signal of a NTSC disc and output in PAL format.
NTSC-Select this if the connected TV is NTSC system.It will change
the video signal of a PAL disc and output in NTSC format.
Auto:Chang the video signal output automatic according to the
playing disk format.
OLD PASSWORD
NEW PASSWORD
CONFIRM PWD
Audio:Selects a language for audio (if available).
Subtitle:Selects a language for subtitle (if available).
Disc Menu:Selects a language for disc menu (if available).
Parental
Some DVDs may have a parental level assigned to the complete disc
or to certain scenes on the disc.This feature lets you set a playback
limitation level.The rating levels are from 1 to 8 and are country
dependent. You can prohibit the playing of certain discs that are not
suitable for your children or have certain discs played with alternative
scenes.
Default:Back to the factory setting.
OK
OLD PASSWORD: Enter the OLD password, (Factory setting is
1369), and the cursor will jump automatically to
NEW PASSWORD
.
NEW PASSWORD: Enter the NEW password. Enter 4 digits from
the remote control unit numeric buttons, and the
cursor will automatically jump to CONFIRM PASSWORD.
Password Setup Page
CONFIRM PASSWORD: Confirm the NEW password by entering
it again. If the confirmation is incorrect, the cursor
will stay in this column. After entering, the correct new password
again, the cursor will jump automatically to OK.
Password Setup Page
OK: When cursor is on this button, press ENTER key to confirm
setting.
- - PASSWORD SETUP PAGE - PASSWORD MODE
PASSWORD
ON
ON
OFF
N
Note: If the password has been changed, the parentaland disc
lock code will also be changed.
The default password(1369)is always active even the password
has been changed.
GOTO PASSWORD SETUP PAGE
Password mode: Set password mode on/off. If set to off, change
parental level will not check password.
8
Parameters and specifications
Battery Parameters
Electrical parameters
Battery Parameters
Standard requirement
Item
Power requirements
: DC 9.5V
Dimensions (Approx.)
: 260(L)X182(W)X37.5(H)MM
Power consumption
: <10W
Weight (Approx.)
: 0.9KG
Operating humidity
: 5 % to 90 %
1.5A
Battery Specifications:
Output:7.4V
Charge / Discharge Time:
Standard charge time:3h ~ 4h
Storage and work circumstances:
Output
VIDEO OUT
AUDIO OUT
:1.4 Vrms (1 KHz, 0 dB)
Audio
:Speaker:1WX2,Headphones output, Coaxial output
Laser
:Semiconductor laser, wavelength 650 nm
Signal system
: NTSC / PAL
Frequency
response
: 20Hz to 20 kHz(1dB)
Signal-to-noise ratio
:More than 80 dB (ANALOG OUT connectors only)
Dynamic range
:More than 85 dB (DVD/CD)
Accessories
:Video/Audio cable,Remote control,
Stereo headphone,Rechargeable battery,
Car cigarette Adapter,car Bag
9
Note: Design and specifications are subject to change prior notice.
Humidity
6 months
-20 C ~ +45 C
65+20%
1 week
-20 C ~ +65 C
65+20%
2.Work circumstances
System
N
1. Storage circumstances Temperature
Temperature
Humidity
Standard charge
0 C ~ +45 C
65+20%
Standard discharge
-20 C ~ +65 C
65+20%
SETUP Menu Setting
Troubleshooting tips(Common)
Troubleshooting tips(DVD)
Before calling for service, you can check the following items on
symptoms and solutions
Play does not commence even when title is selected:
Confirm the "Rating" settings.
No sound or distorted sound:
Ensure that the equipment is connected properly.
Ensure that the input settings for the TV and stereo system are proper.
No picture:
Ensure that the equipment is connected properly.
Ensure that the input setting for the TV is "video".
Ensure that the LCD is on.
No play:
Condensation has formed : wait about 1 to 2 hours to allow the
player to dry out.
This player can't play discs other than DVDs, MP3s and CDs.
The disc may be dirty and require cleaning .
Ensure that the disc is installed with the label side up.
No remote control:
Check the batteries are installed with the correct polarities(+&-).
The batteries are depleted: replace them with new ones.
Point the remote control unit at the remote control sensor and
operate.
Remove the obstacles between the remote control unit and the
remote control sensor.
Operate the remote control unit at a distance of not more than 8
meters from the remote control sensor.
Audio soundtrack and/or subtitle language is not the one selected
at the initial settings:
If the audio soundtrack and/or subtitle language does not exist on
the disc, the language selected at the initial setting will not be seen/
heard.
No subtitles:
Subtitles appear only with discs which contain them.
Alternative audio soundtrack(or subtitle) language fail to be
selected:
An alternative language is not selected with discs which do not contain
more than one language.
In the case of some discs, the alternative language cannot be selected by
operating the AUDIO or SUBTITLE button. Try selecting it from the DVD
menu if one is available.
Angle cannot be changed:
This function is dependent on software availability. Even if a disc has a
number of angles recorded, these angles may be recorded for specific
scenes only.
No key operation(by the unit and/or the remote control) is effective:
Turn the unit off and then back to on. Alternatively, turn off the unit,
disconnect the AC power cord and the re-connect it.(The player may
not be operating properly due to lightning, static electricity or some
other external factor.)
Battery does not work
check whether the battery is out of power or in proper connection.
10
DU LECTEUR DVD PORTABLE
DVD PORTABLE
GUIDE DE L'UTILISATEUR
SDVD9000
Avant de brancher, faire fonctionner, et régler cet appareil, veuillez lire attentivement et entièrement
ce guide de l'utilisateur.
Table des matières Contenu
Table des matières
Table des matières
P1
Paramétrage du Menu CONFIGURATIONP
Page de Configuration générale
Précautions de sécurité
Identification des commandes
P2
P3-P5
Unité principale
P3
Télécommande
P4-P5
1
P6-P8
P6
Page de configuration Audio
P6-P7
Page de Configuration Vidéo
P7
Page de Préférences
P7-P8
Page de Configuration du mot de passe
P8
Paramètres de batterie
P9
Paramètres et caractéristiques
P9
Précautions de sécurité
AVERTISSEMENT
RISQUE D'ELECTROCHOC
NE PAS OUVRIR
Avertissement:Pour réduire le risque d'électrochoc, ne retirez
pas le couvercle ou l'arrière de ce produit. Il n' y a pas de pièce
à l'intérieur réparable par l'utilisateur. Référez-vous à un
personnel de maintenance qualifié.
Avertissement: Pour réduire les risques d'incendie et
d'électrochoc, n'exposez pas ce produit à des éclaboussures
d'eau de pluie, ou à l'humidité. Ne placez aucun objet rempli
d'eau tel qu'un vase au dessus du produit.
Avertissement: Ce lecteur de disque vidéo numérique utilise un
système à laser. L'utilisation des commandes, réglages ou la
réalisation de procédures autres que celles spécifiées ici, peut
entraîner une exposition dangereuse aux radiations.
Avertissement: Pour empêcher l'exposition directe au rayon
laser, n'ouvrez pas le boîtier. Le rayon laser est visible lors de
l'ouverture.
Avertissement: Ne fixez jamais le rayon laser.
Attention: N'installez pas de produit dans un espace confiné tel
qu'une bibliothèque ou un meuble similaire.
Avertissement: Lorsque l'appareil est utilise par un enfant, les
parents doivent faire comprendre à l'enfant tout le contenu du
guide d'instructions et comment garantir l'usage des piles pour
qu'elles fonctionnent correctement tout le temps.
N Notes sur le Copyright:
Il est interdit de copier, diffuser, montrer, diffuser via câble, lire en
public, ou louer un produit sous copyright sans permission.
Ce produit comporte la fonction de protection contre les copies
développée par Macrovision. Des signaux de protection contre les
copies sont enregistrés sur certains disques. Lors de
l'enregistrement ou lecture des images de ces disque une
interférence apparaîtra. Ce produit comporte une technologie de
protection de copyright qui est protégé par les déclarations de
méthode de certains brevets américains et des droits de propriétés
intellectuelles de Macrovision Corporation et d'autres détenteurs de
droits. L'utilisation de cette technologie d e protection de copyright
doit être autorisée par Macrovision Corporation, et est prévue pour
la maison et d'autres visionnages limités autorisés par Macrovision
Corporation. Une étude du circuit et le démontage est interdit.
NUMÉRO DE SÉRIE:
Vous trouverez le numéro de série à l'arrière de l'unité. Ce numéro
est unique à cet appareil et n'est pas valable pour d'autres. Vous
devriez enregistrer les informations demandées ici et conserver ce
guide comme enregistrement permanent de votre achat.
N° de Modèle. ______________________________
N° de série. ______________________________
Date d'achat_________________________
Avertissement: lorsque la batterie chauffe, gonfle ou est en
mauvais état,veuillez arrêter de l'utiliser et contacter le centre
de maintenance pour obtenir son remplacement.
Avertissement: ne chargez pas la batterie dans un endroit pas
assez ventilé tel que: matelas, sofa, coussin , tapis......
charg e
Avertissement: nous ne serons pas responsable si l'utilisateur
utilise incorrectement la batterie, et s'il ne suit pas notre étiquette
d'avertissement sur le boîtier de la batterie.
fo rt
im pact
Surchauffe 40°C
lIl est interdit d'utiliser une rallonge ESB supérieure à 250mm pour usage avec le port ESB.
2
Identification des commandes
Unité Principale
1.Ecran TFT
15.Prise écouteurs
16.Sortie AV (AV OUT)
2.Haut-parleurs
17.Interrupteur Marche/Arrêt
3.Configuration (SETUP)
(ON/OFF)
4. MODE
18.Entrée courant Continu (9-12V)
5.MENU
6. DVD/CARTE/ESB
Sélection de la source d'entrée,
DVD/carte,ESB.
7.Précédent/Haut (PREV/UP)
Suivant/Bas (NEXT/DOWN)
OK
Retour rapide/Gauche (FR/LEFT)
Avance rapide/Droite (FF/RIGHT)
8.VOL+
9.VOL10. Lecture/Pause (PLAY/PAUSE)
11. STOP
12.Carte Mémoire
13.ESB
14.COAXIAL
Insertion des piles
1.Ouvrez le couvercle des piles.
SD/MMC/MS
USB
COAXIAL
DC IN 9-12V
1
SD/MS/MMC Card
3
2.Insérez 2 piles AAA
N
2
REMARQUES:
Retirez les piles lors du rangement ou lorsque vous n'utilisez le
lecteur DVD de longtemps.
Identification des commandes
Télécommande
11
26
OSD
GOTO
DVD
SD/USB
MUTE
27
4.Saut avant (forward Skip)
Va au chapitre/piste suivant.
9
12
17
18
10
13
19
5
8
VOL-
VOL+
SLOW
21
20
24
16
1
2
25
MENU
6
7
15
14
4
3
23
22
1. Lecure/Pause (PLAY/PAUSE)
Appuyez sur PLAY/PAUSE une fois pour mettre en pause, appuyez
sur PLAY/PAUSE une seconde fois pour reprendre la lecture.
2.STOP
Lors de la pression une fois sur ce bouton, l'appareil enregistre le
point d'arrêt et la lecture va reprendre à cet endroit en appuyant sur
le bouton ENTER. Mais si le bouton STOP est pressé de nouveau à
la place du bouton ENTER, la lecture ne pourra pas reprendre.
3.Saut arrière
Va au chapitre/piste précédent.
5.ZOOM
DVD VCD : Utilisez le ZOOM pour agrandir ou rétrécir l'image vidéo.
1.Appuyez sur ZOOM durant la lecture ou continuer la lecture pour
activer la fonction Zoom. Un carré apparaît brièvement dans le bas
droit de l'image.
2.Chaque pression sur le bouton ZOOM va changer l'écran TV
selon la séquence
PHOTO Utilisez ZOOM pour agrandir ou rétrécir l'image
1.Appuyez sur 'ZOOM'
2. Utilisez "
" pour agrandir ou "
" pour rétrécir l'image.
Utilisez les boutons
pour vous déplacer dans l'image zoomée.
6.RÉPÉTITION (REPEAT)
Appuyez sur REPEAT durant la lecture pour sélectionner le mode
de répétition voulu.
DVD : vous pouvez lire un chapitre/titre/tout sur un disque.
VCD
CD : vous pouvez lire une piste/Toutes sur un disque.
AUDIO : Vous pouvez sélectionner le mode de lecture d'un disque à
shuffle/ aléatoire/ un seul/ Répéter Un/ Répéter dossier/ dossier.
7. A B
Pour répéter un segment: appuyez une fois sur AB pour définir le
point de départ du segment à répéter, appuyez de nouveau dessus
pour définir le point de fin, et le lecteur lira le segment du point de
départ au point de fin.
8.PROGRAMME (PROGRAM)
DVD VCD CD :La fonction programme vous permet de stocker vos
pistes favorites à partir du disque. Appuyez sur PROGRAM , puis le
MENU PROGRAMME Apparaîtra, à présent vous pouvez utiliser
les touches numériques pour entrer directement les numéros de
titres, chapitres ou pistes et sélectionnez l'option START (démarrer).
Pour reprendre la lecture normale, appuyez sur PROGRAM et
sélectionnez l'option STOP sur le menu programme.
4
Identification des commandes
Télécommande
PHOTO : Vous pouvez appuyer répétitivement sur PROGRAM pour
sélectionner le mode diaporama, Il y a 16 types de diaporama.
19.CONFIGURATION (SETUP)
Accède ou sort du menu de configuration.
9. SOURDINE (MUTE)
Coupe la sortie audio.
20.BOUTON 10+
Dans le but de sélectionner la piste 10 ou supérieure, appuyez d'abord
sur 10+, Par exemple: pour sélectionner la piste 12, appuyez d'abord
sur 10+, et puis appuyez sur le bouton numérique 2.
10.TITRE (TITLE)
Revient au menu titre du DVD.
11.OSD
Permet de sélectionner la langue du menu de l’appareil.
12.0-9 BOUTONS NUMÉRIQUES
Sélection des éléments numérotés dans un menu.
13.ENTRE (ENTER)
Confirme la sélection du menu.
14. MENU
Accède au menu sur un disque DVD.
15.AFFICHAGE (DISPLAY)
Affiche le temps de lecture et les informations d'état.
16.AUDIO
DVD Appuyez répétitivement sur AUDIO Durant la lecture pour
entendre une langue audio différente ou une piste audio, si disponible.
CD VCD Appuyez répétitivement sur AUDIO Durant la lecture pour
entendre un canal audio différent (Stéréo, gauche, ou droite).
17.SOUS TITRE (SUBTITLE)
Appuyez répétitivement sur SUBTITLE Durant la lecture pour
entendre des langues de sous titrage différentes.
18.ANGLE
Appuyez sur ANGLE pour changer l'angle de vue, sur un DVD qui
prend en charge cette fonctionnalité.
5
21.PAS (STEP)
Appuyez une fois sur STEP pour mettre en pause, à partir de cet état,
appuyez sur STEP pour avancer image par image d'une vidéo.
22. BOUTON
Appuyez sur le bouton
pour sauter en arrière à une vitesse de
niveau 5 (X2->X4->X8->X16->X32), appuyez sur ENTER pour revenir
à la lecture normale.
23. BOUTON
Appuyez sur le bouton
pour sauter en avant à une vitesse de niveau
5(X2->X4->X8->X16->X32), appuyez sur ENTER pour revenir à la
lecture normale.
24. PBC
Interrupteur Marche/Arrêt de PBC. Uniquement pour VCD, Pour les
autres disques, la fonction est inactive.
25.RALENTI (SLOW)
Appuyez sur le bouton Slow répétitivement pour faire une lecture au
ralenti, et sélectionner les différentes vitesses. Les vitesses sont
1/2,1/4,1/8,1/16,et normale.
26.RECHERCHE (SEARCH)
Va à moment, titre, ou chapitre que vous souhaitez en mode DVD.
27.DVD/CARTE/ESB
DVD/CARTE/ESB.
DIV109 peut lire des clés ESB avec une capacité de stockage jusqu'à
4GB. L'utilisation de clé ESB avec une capacité supérieure peut
endommager l'appareil. DIV109 peut lire des cartes mémoires
avec une capacité de stockage jusqu'à 4GB. L'utilisation de carte
mémoire avec une capacité supérieure peut endommager l'appareil.
Paramétrage du Menu CONFIGURATION
Page de Configuration Générale
Appuyez sur le bouton CONFIGURATION (SETUP) pour le menu.
Utilisez Les boutons de direction
pour sélectionner le champ
souhaité. Après avoir terminé les paramétrages, appuyez de nouveau
sur le bouton CONFIGURATION (SETUP) pour revenir à l'affichage
normal.
Les champs du menu suivants peuvent être changés:
GÉENÉRAL: sélectionne le menu PAGE GÉNÉRALE.
AUDIO: sélectionne le menu PAGE AUDIO.
VIDEO: sélectionne le menu PAGE VIDÉO.
PREFERENCE : sélectionne le menu PAGE PRÉFÉRENCE.
MOT DE PASSE: sélectionne le menu PAGE DU MOT DE PASSE.
Page de configuration Générale
Page de Configuration Audio
- - GENERALSETUP PAGE - TV DISPLAY
ANGLE MARK
OSD LANGUAGE
CLOSED CAPTIONS
SCREEN SAVER
WIDE
ON
ENG
ON
ON
Marque d'angle
Affiche les informations de paramétrage de l'angle actuel dans
le coin droit de l'écran TFT si disponible sur le disque.
Langue de l'affichage à l'écran (OSD)
Vous pouvez sélectionner votre langue préférée.
Sous titrage pour malentendants
Ce sont des données qui sont cachées dans le signal vidéo de
certains disques. Avant de sélectionner cette fonction, veuillez
vous assurer que le disque contient des informations de sous
titrage pour malentendants et que votre TV supporte également
cette fonction.
Économiseur d'écran
Cette fonction est utilisée pour activer ou désactiver
l'économiseur d'écran.
ON
OFF
ON
OFF
ON
OFF
ENGLISH
FRENCH
GERMAN
ITALIAN
SPANISH
PORTUGUESE
4:3 PANSCAN
4:3 LETTERBOX
16:9
WIDE SQUEEZE
GOTO GENERAL SETUP PAGE
AFFICHAGE TV: sélectionne le ratio d'aspect de l'image lue.
4:3 RECADRAGE: si vous avez une TV normale et que vous voulez
que les 2 côtés de l'image soient coupés ou formatés pour qu'elle
s'ajuste à votre TV .
4:3 LETTERBOX: Si vous avez une TV normale. Dans ce cas, une
image large avec des bandes noires en haut et en bas de l'écran de
TV s'afficheront.
16:10: Affichage en large sur l'écran.
Ecran large: définit le mode de l'écran en 4:3
ALLEZ DANS LA PAGE DE CONFIGURATION AUDIO
---- AUDIO SETUP PAGE --DOWNMINX
DIGITAL OUTPUT
DOLBY DIGITAL
STR
RAW
DUAL MONO STR
DYNAMIC
-- --- --- ------ -
FULL
STR
L-MONO
R-MONO
MIX-MONO
SPDIF/OFF
SPDIF/RAW
SPDIF/PCM
LT/RT
STEREO
OFF
GO TO AUDIO SETUP PAGE
6
Paramétrage du Menu Configuration
Page de Configuration Audio
Downmixage
Cette option vous permet de définir la sortie analogique stéréo
de votre lecteur DVD.
LT/RT :Sélectionnez cette option si votre lecteur DVD est
connecté à un décodeur Dolby Pro Logic.
Stéréo :Sélectionnez cette option lorsque la sortie émet un son
à partir d'uniquement deux haut-parleurs frontaux.
Sortie numérique
La fonction est utilisée pour sélectionner la sortie SPDIF:SPDIF Off,
SPDIF/RAW,SPDIF/PCM.
SPDIF Off: Désactive la sortie SPDIF.
SPDIF/RAW: Si vous avez connecté votre Sortie Audio
Numérique à un décodeur/récepteur multi-canaux.
SPDIF/PCM: Uniquement si votre récepteur n'est pas capable
de décoder l'audio multi-canaux.
Digital Système
Les options incluses dans la configuration Digital sont: 'Dual Mono '
et ' Dynamique '.
Dual Mono
Stéréo: Le son mono de gauche sera envoyé aux signaux de sortir
pour le haut parleur de gauche et mono de droite pour le haut-parleur
de droite.
G-Mono:Le son mono de gauche sera envoyé aux signaux de sortie
pour les haut- parleurs gauche et droit.
D-Mono: le son mono de droite sera envoyé aux signaux de sortie
pour les hauts parleurs Gauche et Droit .
Mix-Mono: le son mono mélangé de gauche et droite sera envoyé
aux signaux de sortie pour les haut-parleurs gauche et droit
Dynamique
Compression de gamme dynamique
Page de Configuration Vidéo
Page de Configuration Vidéo
- - VIDEO SETUP PAGE - SHARPNESS
BRIGHTNESS
CONTRAST
HUE
SATURATION
VIDEO INVERSE
MID
00
00
00
00
OFF
HIGH
MEDIUM
LOW
GOTO VIDEO SETUP PAGE
La finesse, Luminosité,Contraste,teinte,Saturation: configurent la
qualité vidéo.
Vidéo Inverse: configure l'affichage de l'écran TFT en inverse ou non.
Page des Préférences
Page des Préférences
- - PREFERENCE SETUP PAGE - -
TV TYPE
AUDIO
SUBTITLE
DISC MENU
PARENTAL
DEFAULT
PAL
ENG
ENG
ENG
RESET
1 KID SAF
2G
3 PG
4 PG13
5 PGR
6R
7 NC17
8 ADULT
PAL
ENGLISH
AUTO
ENGLISH
NTSC
FRENCH
ENGLISH
FRENCH
GERMAN
FRENCH
GERMAN
ITALIAN
GERMAN
ITALIAN
SPANISH
ITALIAN
SPANISH
PORTUGUESE
SPANISH
PORTUGUESE OTHERS
PORTUGUESE OTHERS
OTHERS
GOTO PREFERENCE PAGE
TV Type
Sélection du système de couleurs qui correspond à votre TV lorsque
les sorties AV. Ce lecteur est compatible à la fois NTSC et PAL.
7
Paramétrage du Menu Configuration
Page de Configuration du mot de passe
Page de préférences
PAL – Sélectionnez ceci si la TV est connectée au système PAL. Cela
changera le signal vidéo d'un disque NTSC et sortira au format PAL.
NTSC- Sélectionnez ceci si la TV est connectée au système NTSC.
Cela changera le signal vidéo d'un disque PAL et sortira au format
NTSC.
Auto:Change automatiquement la sortie du signal vidéo selon le
format du disque.
Audio:Sélectionne une langue pour l'audio (si disponible).
* Sous-titrage:Sélectionne une langue de sous-titrage (si disponible).
* Menu du disque:Sélectionne une langue pour le menu du disque
(si disponible).
* Contrôle parental
* Certains DVD peuvent avoir un niveau de contrôle parental assigné
au disque complet ou à certaines scènes du disque. Cette
fonctionnalité vous permet de définir une limitation de lecture. Le
classement va de 1 à 8 et dépend des pays. Vous pouvez interdire la
lecture de certains disques qui ne conviennent pas à vos enfants ou
avoir certains disques lisibles pour certaines scènes.
Mot de passe: sélectionnez le menu pour changer le mot de passe.
OLD PASSWORD
NEW PASSWORD
CONFIRM PWD
OK
ANCIEN MOT DE PASSE: Entrez l'ancien mot de passe, (Défini
par défaut en usine à1369), et le curseur va passer directement à
NOUVEAU MOT DE PASSE.
NOUVEAU MOT DE PASSE: Entrez le NOUVEAU mot de passe.
Entrez 4 chiffres à partir de la télécommande, et le curseur va
automatiquement passer à CONFIRMEZ MOT DE PASSE.
Défaut:revient aux paramètres d'usine.
CONFIRMEZ MOT DE PASSE: Confirmez le NOUVEAU mot de
passe en l'entrant de nouveau. Si la confirmation est incorrecte,
le curseur va rester dans cette colonne. Après avoir entré le bon
mot de passe, le curseur va passer automatiquement sur OK.
Page de Configuration du Mot de passe
Page de Configuration du Mot de passe
OK: Lorsque le curseur est sur ce bouton, appuyez sur la touche
ENTRER pour confirmer le réglage.
- - PASSWORD SETUP PAGE - PASSWORD MODE
PASSWORD
ON
ON
OFF
N
Remarque: Si le mot de passe a été changé, le code de verrouillage
parental du disque sera également changé.
Le mot de passe par défaut (1369) est toujours actif même quand
le mot de passe a été changé.
GOTO PASSWORD SETUP PAGE
Mode Mot de passe: Active/Désactive le mode mot de passe.
Si désactivé, changer le niveau parental ne fera pas de vérification
de mot de passe.
8
Paramètres et caractéristiques
Paramètres batterie
Paramètres électroniques
Caractéristiques de batterie
Element
Besoin standard
Alimentation
: DC 9.5V
Dimensions (approx.)
: 260(L)X182(W)X37.5(H)MM
: <10W
Poids (approx.)
: 1.3 KG
Humidite de
fonctionnement
: 5 % to 90 %
SORTIE (output)
Consommation
Caractéristiques de batterie
Sortie º7.4V
1.5A
Temps de Charge / Décharge
Temps de charge Standard 3h ~ 4h
Stockage et circonstances de fonctionnement
1. Circonstances de stockage
6
Sortie VIDEO
Audio Sortie
:1.4 Vrms (1 KHz, 0 dB)
Audio
Haut-parleur:1WX2,Sortie écouteurs, Sortie Coaxiale
65+20%
1 semaine
-20 C ~ +65 C
65+20%
2.Circonstances de fonctionnement
Charge Standard
Laser
: Laser Semiconducteur, longueur d'onde 650 nm
Système du Signal
: NTSC / PAL
Réponse en fréquence
: 20Hz à 20 kHz(1dB)
Rapport Signal/bruit :Plus de 80 dB (Connecteurs Sortie Analogique uniquement)
gamme dynamique
Accessoires
N
9
:Plus de 85 dB (DVD/CD)
:télécommande,batterie Rechargeable, Sac et
adaptateur allume-cigare
Remarque: Le design et les caractéristiques sont sujets à
changement sans avertissement.
Humidité
-20 C ~ +45 C
Décharge Standard
Système
Température
mois
Température
Humidité
0 C ~ +45 C
65+20%
-20 C ~ +65 C
65+20%