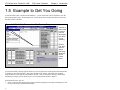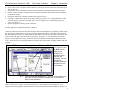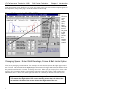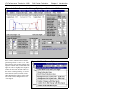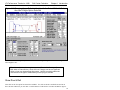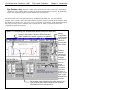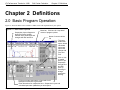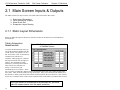
1
Roll Center
Calculator
for Windows
User’s Manual
Performance Trends, Inc.
2
Performance Trends, Inc. PO 530164, Livonia, MI 48153
Tech Help for Registered Owners (248) 473-9230 Fax: 248-442-7750
Email: [email protected]
Website (tips, correspond with other users, download demos, update schedule, etc.)
www.performancetrends.com
Copyright Notice
Copyright (C) 1998 Performance Trends, Inc.
All Rights Reserved
These software programs and user's manual are reserved by Performance Trends, Inc. and are intended
for the use of the original owner only. Copying or duplicating these products except for the personal use
of the original owner is a violation of U. S. Copyright Law and is hereby expressly forbidden.
Portions Copyright (C) Microsoft Corp. 1993
All Rights Reserved
International Business Machines Corp. makes no warranties, either expressed or implied, regarding the
enclosed computer package, its merchantability or its fitness for any particular purpose.
IBM PC, XT, and AT are registered trademarks of International Business Machines Corp.
DISCLAIMER OF WARRANTIES:
THE SOFTWARE PROVIDED HEREUNDER IS LICENSED "AS IS" WITHOUT ANY
WARRANTIES, EXPRESS OR IMPLIED, INCLUDING BUT NOT LIMITED TO, ANY
WARRANTIES FOR MERCHANTABILITY OR FITNESS FOR A PARTICULAR PURPOSE. NO
ORAL OR WRITTEN STATEMENTS, REPRESENTATIONS OR OTHER AFFIRMATION OF
FACT, INCLUDING BUT NOT LIMITED TO STATEMENTS REGARDING CAPABILITY,
CAPACITY, SUITABILITY FOR USE OR PERFORMANCE OF SOFTWARE SHALL BE RELIED
UPON BY USER OR BE DEEMED TO BE A WARRANTY OR REPRESENTATION BY
PERFORMANCE TRENDS, INC. FOR ANY PURPOSE, OR GIVE RISE TO ANY LIABILITY OF
OBLIGATION OF PERFORMANCE TRENDS, INC. WHATSOEVER. USER ACCEPTS ALL
RESPONSIBILITY FOR SELECTING THE SOFTWARE TO MEET USER NEEDS OR SPECIFIC
PURPOSES. PERFORMANCE TRENDS INC. IS UNDER NO OBLIGATION TO FURNISH USER
UPDATES OR ENHANCEMENTS EVEN IF FURNISHED TO OTHER USERS.
Continued on next page.
3
LIMITATION Of LIABILITY:
If at the time of delivery to the original User only there are any defects in the media on which the
Software is provided, User's sole and exclusive remedy shall be the replacement of any media returned to
Performance Trends, Inc. within 90 days of the receipt of the Software by User, or at Performance
Trends Inc.'s sole option, a refund of the License fees paid to Performance Trends, Inc. by User.
IN NO EVENT SHALL PERFORMANCE TRENDS, INC. OR THIRD PARTIES WHO HAVE
RIGHTS IN THE SOFTWARE BE LIABLE TO USER FOR LOSS OF PROFITS, INDIRECT,
SPECIAL, INCIDENTAL OR CONSEQUENTIAL DAMAGES EVEN IF PERFORMANCE TRENDS,
INC. IS AWARE OF THE POSSIBILITY OF SUCH DAMAGES.
IN THE EVENT ANY REMEDY HEREUNDER FAILS OF ITS ESSENTIAL PURPOSE, OR IN ANY
OTHER EVENT, PERFORMANCE TRENDS INC.'S LIABILITY HEREUNDER SHALL NOT
EXCEED ANY AMOUNTS PAID BY USER TO PERFORMANCE TRENDS, INC. UNDER THIS
AGREEMENT.
Some states do not allow the limitation or exclusion of liability for incidental or consequential damages
and some states do not allow the exclusion of implied warranties, so the above limitations or exclusions
may not apply to you.
No action, regardless of form, arising out of any claimed breach of this agreement or performance under
this agreement may be brought by either party more than one year after the affected party learns of the
cause of action.
Refer to diskette envelope for full license agreement.
********************************** W A R N I N G ***********************************
The Roll Center Calculator makes calculations based on equations and data found in various published
and heretofore reliable documents. The program is designed for use by skilled professionals experienced
with vehicles and suspensions. The following processes are hazardous, particularly if done by an
unskilled or inexperienced user:
-
Obtaining data to input to the program
Interpreting the program's results
Before making measurements of or modifications to any suspension, engine or driving situation, DO
NOT FAIL TO:
4
Regard the safety consequences
Consult with a skilled and cautious professional
Read the entire user's manual
Obey all federal, state & local laws
Respect the rights and safety of others
Table of Contents
Chapter 1 Introduction
1
1.1 Overview of Features
1
1.2 Before You Start
2
1.3 A Word of Caution
3
1.4 Getting Started (Installation)
4
1.5 Example to Get You Going
5
Chapter 2 Definitions
13
2.0 Basic Program Operation
13
2.1 Main Screen Inputs & Outputs
15
2.1.1 Static Layout Dimensions
15
2.1.2 Other Dimensions & Specs
21
2.1.2 Show Dive & Roll
23
2.1.3 Suspension Layout Drawing
25
2.2 Main Screen Options
27
2.3 Camber Table & Graph
33
Appendix 1 "Rules of Thumb" for Desired Roll Center,
Camber and Camber Gain
39
Index
41
5
(C) Performance Trends Inc 1998
Roll Center Calculator
Chapter 1 Introduction
Chapter 1 Introduction
1.1 Overview of Features
The Roll Center Calculator program by Performance Trends, Inc. is software to let circle track racers,
road racers, engineers, and performance enthusiasts understand, tune and even design front suspensions.
Its many features include:
Features:
•
•
•
•
•
•
•
•
•
•
•
1
Mouse driven user interface compatible with Windows and Window 95 for easy operation and better
print capability.
Automatically updates the drawing, Roll Center, Camber and Camber Gain as you change inputs, or
select various amounts of Dive and Roll. You actually watch the car Dive and Roll just like an
animation.
Displays Spring Compression so you know what the springs are doing during Dive and Roll.
For Double A Arm suspensions, you can shim the upper arms in or out and watch the effect on
Camber.
For McPherson Strut suspensions, you can move the top of the strut in or out and watch the effect
on Camber.
Several of example front suspensions preloaded for you to pick from.
Different ways for you to enter some measurements, either X and Y coordinates or length and angle
of arms.
The Draw Big option to see the suspension components in greater detail.
Option to draw in imaginary Extension Lines to show how the Instant Centers and Roll Center are
determined.
Displays a table of Camber for various increments of Dive and Roll, increments which you can
change. You can also include a Baseline condition (suspension setup) for comparison.
You can graph the Camber Table.
(C) Performance Trends Inc 1998
Roll Center Calculator
Chapter 1 Introduction
1.2 Before You Start
What you will need:
•
•
•
•
•
IBM 386, 486, or Pentium (or 100% compatible).
4 Meg of RAM.
Approximately 5 Megabyte of disk space.
Windows v3.1 or Windows 95.
Windows Compatible Printer (optional).
Many terms used by the Roll Center Calculator and this user's manual are similar to terms used by other
publications, like Camber Gain, Instant Center, etc. However, these terms may have different
definitions. Therefore, read Chapter 2 to see what these terms mean to the Roll Center Calculator.
Occasionally it will be necessary to identify "typos" in the manual, known "bugs" and their "fixes", etc.
which were not known at the time of publication. These will be identified in a file called
README.DOC in the Roll Center Calculator directory or folder.
To read this file in Windows 3.1, double click on Notepad in the Accessories program group.
Then click on File, then Open and select All Files for the file type. Find the Roll Center
Calculator directory, usually RC under PERFTRNS.PTI, and click on README.DOC.
Notepad will display the contents.
To read this file in Windows 95, use Windows Explorer to find the Roll Center Calculator
directory, usually RC under PERFTRNS.PTI. Then double click on README.DOC. Wordpad
will display the contents.
Every effort has been made by Performance Trends, Inc to provide you with an accurate, cost saving,
high quality tool at a very reasonable price. We do not copy protect our software, to allow our customers
full freedom to make back-up copies for their own personal use. Please respect the programmer's
copyright and do NOT give out copies to your friends.
2
(C) Performance Trends Inc 1998
Roll Center Calculator
Chapter 1 Introduction
1.3 A Word of Caution
The Roll Center Calculator is a comprehensive software package which estimates a suspension's motion
based on limited user input. These estimates can be used for suspension analysis and tuning. However,
a suspension is a very complex system, which makes exact calculations of all details impossible.
Therefore, several simplifying assumptions are made to reduce the calculations to a manageable level.
The user must recognize:
The software can not predict the safety of a suspension modification or driving situation. Done
correctly, with the proper quality parts and safety precautions, extreme racing conditions can be
safe. Done by inexperienced racers with standard or low quality parts, a race car can be a "disaster
waiting to happen". Please read and follow any "Safety Notes" as highlighted in this manual.
The software, like any computer model, can NOT make exact predictions because:
• Much of the input data to the software is estimated.
• Even if the input data were exactly correct, the simplifying assumptions within the program
will limit the accuracy. These assumptions include that there is no flex in the suspension arms
or bushings.
• Tire characteristics, driver performance, track conditions, etc. are rarely constant and
repeatable.
The software should be used as a guide to:
• Help you understand how a suspension works; what parameters are important, how parameters
interact, what are the tradeoffs, etc.
• Point you in the correct, general direction for making modifications. This direction should be
verified by other sources like known authorities, race results, books, etc. Never trust one
"single source" if it does not make sense to you.
• Make you think, not think for you. If unexpected results are obtained, take a minute to:
• Double check all your data input.
• Refer back to this manual.
• Ask someone else skilled and experienced in the particular area.
• Give the retailer or Performance Trends Inc's. Tech Help Line a call for an
explanation. (Computer programs are written by normal people who can make
mistakes. It's always possible there may be an error in the calculations. Your phone
call may help us correct it.)
Please also read the Warranty and Warning at the beginning of this manual and on the diskette
envelope. Also see Appendix 1 for general tips on “optimum” suspension settings and how there is
little agreement on what is actually “optimum”.
3
(C) Performance Trends Inc 1998
Roll Center Calculator
Chapter 1 Introduction
1.4 Getting Started (Installation)
You must install the Roll Center Calculator from the distribution CD to a hard drive before it will run.
To do this in Windows 95, 98, Me, NT, 2000:
• Start your computer.
• Insert the distribution CD into the CD drive. The Installation Wizard should AutoStart where
you can select to install the Roll Center Calculator or any other of our programs in demo mode.
•
•
•
If the Installation Wizard does not Auto Start, then click on Start, then Run, then Browse.
Browse until you find your CD rom drive, then the Setup.exe file on the CD.
Double Click on Setup.exe and then click on OK back at the Run screen to run Setup.exe.
Follow the instructions of the SETUP program. For most users, just click on OK for each question
asked to accept the default answers suggested by the Setup program. Once you have installed the Roll
Center Calculator, there should be a Perf. Trends icon or program group for you to click on. Otherwise,
use Explorer to find the RC folder under the PERFTRNS.PTI folder and click on the RC-32.EXE
program. Also see section 1.5, next page.
Entering Registered Owner's Name:
During your first setup, the Roll Center Calculator will ask you to enter your name as the Registered
Owner. During this first session, you can modify it until you are satisfied. Once you accept the name,
the computer will generate a code # based on the name. To be eligible for Tech Help, you will need both
your registered name and code #, and to have sent in your registration card. The name you enter should
be very similar to the name you enter on the registration card.
Click on About in the Main Menu to review your name and code # .
4
(C) Performance Trends Inc 1998
Roll Center Calculator
Chapter 1 Introduction
1.5 Example to Get You Going
To start the Roll Center Calculator from Windows 3.1, click on the Roll Center Calculator icon in the
Perf.Trnds program group. From Windows 95, click on Start, then Programs, then Perf. Trends, and
then Roll Center Calculator.
Figure 1.1 Blank Main Screen when First Opening Program
‘Untitled’ is
name used
for specs
until you
save specs
to a name
of your
choosing
Click on
File, then
Open to
open a
previously
saved set
of Roll
Center
specs.
You will notice that a message appears which says you can Open some saved suspension measurements
by clicking on File and then Open. This opens the Suspension Library, which has some example
suspensions stored in it right from Performance Trends. Click on OK for this message and the other
introductory messages you are shown to get to a screen which looks similar to Figure 1.
From this main menu, you can:
• Enter or edit any of the measurements and specifications displayed, and watch calculated specs and
the layout drawing be updated automatically.
5
(C) Performance Trends Inc 1998
•
•
•
•
•
•
Roll Center Calculator
Chapter 1 Introduction
Open or Save a file of complete measurements by clicking on the File menu item, then either Open,
Save or Save As.
Add, edit or review comments to describe the measurements currently displayed in the program.
Produce various amounts of suspension Dive and Roll and watch Camber, Roll Center and Spring
Compression change
Change the Options to somewhat customize the program for you.
Get Help to explain these options by clicking on Help or pressing <F1>. Help definitions are also
available anytime you click on an input spec’s name or input box or a calculated spec name or
value. See Figure 1.3
Quit the program by clicking on File, then Exit.
All these options are explained in detail in Chapter 2.
At the top of the main menu, the blue title bar shows the current Suspension is [ untitled ], which means
the current specs displayed have not been saved to the Suspension Library. This makes sense since all
the measurements are blank. So lets do what the introductory message said, and open a Suspension file.
Click on File in the upper left corner, then select Open. See Figure 1. You will obtain a screen like
Figure 2 of the Suspension Library, which lists all files of suspension measurements which have been
saved. These have been saved by Performance Trends for your convenience at getting familiar with the
program.
Figure 1.2 Suspension Library (standard Windows File Screen)
For beginner users,
do NOT click on
these boxes.
However, for
advanced users
familiar with
Windows, you can
change the
directory (folder) or
disk drive to look
for files here.
Files are arranged alphabetically. Click on a file to Open here,
then click on the OK button (or double click on file name to
Open in one operation).
Click on “dbl-aarm” to Open a set of measurements for a typical double A-arm suspension. The
Suspension Library disappears and the Main Screen returns with measurements loaded for all specs. If
6
(C) Performance Trends Inc 1998
Roll Center Calculator
Chapter 1 Introduction
some measurement is not familiar to you, click on its name or the spec and a brief description appears in
the Help frame, along with a page # from this manual for more help.
Figure 1.3 Specs for the File DBL-AARM
Click on
most
any
specs
for a
brief
description to
be given
in the
Help
box at
the
bottom
of this
screen.
Changing Specs: Enter X&Ht Readings, Frame & Ball Joints Option
First, lets try changing a measurement. For example, lets raise the ball joint on the right upper control
arm 1/2 inch. This would mean the Right(Height) measurement for Upper Ball Joint (the distance from
the ground) would increase .5 inches. So change 20 to 20.5. When you get ready to press <enter> after
typing in 20.5, watch the drawing, especially the right side suspension at point A and Camber Gain.
(Remember, this is a front view, so the right side of the car is actually on the left side of the screen.)
Important: Always remember you are looking at a Front view of the car.
This means the Right side of the screen actually shows the Left side of the
car and the Left side of the screen shows the Right side of the car.
7
(C) Performance Trends Inc 1998
Roll Center Calculator
Chapter 1 Introduction
Figure 1.4 Main Screen after Raising Right Upper Ball Joint to 20.5 inches
Press <enter> and notice how Camber
gain changed from -1.20 to -1.32. This
minor change will produce slightly more
negative Camber Gain, which means the
right tire will see slightly more negative
camber for the same amount of Dive in
the corner or during braking. You will
notice that Stc (static) Camber (in the
Other Dimensions & Specs at the right
side of the screen) changed from -3 to
-2.89 degrees.
Figure 1.5 Main Screen Options
8
(C) Performance Trends Inc 1998
You will also notice that the Length and
Angle of the Upper Arm (printed in
light gray in the lower left corner
changed from 11.88 inches to 12.02 and
14.62 degrees to 16.93. You might be
thinking that the only way for the length
of the arm to change is by installing a
different arm, which is correct. What
we simulated was raising the Upper Ball
Joint and adjusting the length and angle
of the upper arm so the Frame Pivot
would stay in the same spot.
Roll Center Calculator
Chapter 1 Introduction
Figure 1.6 Notice when Changing Options
If you click on Options at the top of the
Main Screen you will see that the first
option (Enter X&Ht Readings, Frame &
Ball Joints) is checked. This means you
enter the X and Height readings of both ends of the arms, and the length is calculated from those
readings. If you select its alternate option (Enter X&Ht at 1 End, Arm Len & Angle), then you could
change the Height at the Upper Ball Joint and the mount at the frame would change as necessary to hold
the length of the arm and its angle constant. You could then change the Angle of the arm to produce
most any X or Height at the Frame Mount.
Changing Specs: Enter X&Ht at 1 End, Arm Len & Angle Option
Lets try this. Click somewhere outside the menu choices of Figure 1.5 to close these choices without
changing them. Then click on the 20.5 and type in 20 and press <enter> to return it to its original
value. Camber Gain should go back to -1.20 and Stc (static) Camber should go back to -3.
Now click on Options and then on the Enter X&Ht at 1 End, Arm Len & Angle option. You will be
given the notice shown in Figure 1.6 and see that the Upper and Lower Arm Dim. (“Dim.” is an
abbreviation for “dimensions”) are now enabled so you can enter them directly. The Upper Frame
Mount and Lower Ball Joint inputs are disabled (printed in light gray), meaning these values will be
calculated from the other inputs. You may notice that the Height of the Upper Frame Mount and Lower
Ball Joint change slightly, from 17 to 17.01 and 4 to 3.99 which is due to slightly rounding differences
in the math. This hundredth inch difference will not produce any significant error in the results. See
Figure 1.7.
Now change the Upper Ball Joint Height from 20 to 20.5 and press <enter>. Notice how the Length of
the arm stays at 11.88 inches and the Angle stays at 14.62 degrees. Frame Pivot X and Height have
changed as they would in order to keep the length and angle constant. Stc Camber changes just as it did
before to -2.89 because the Ball Joint has moved the same as before. However the Camber Gain now is
9
(C) Performance Trends Inc 1998
Roll Center Calculator
Chapter 1 Introduction
Figure 1.7 Changing Upper Ball Joint Height with the Enter X&Ht at 1 End,
Arm Len & Angle Option Selected
-1.16 because the arm angle stayed at 14.62 where the arm angle changed to 16.93 after raising the Ball
Joint Height to 20.5.
The choice of which of these options you use (Enter X&Ht Readings, Frame &
Ball Joints or Enter X&Ht at 1 End, Arm Len & Angle) can have a significant
effect on how your inputs affect other specs. Use the one which makes the
most sense for the type of modification you are trying to simulate.
Show Dive & Roll
Now click on the Yes option for Show Dive and Roll. You will see the Dive and Roll text and arrow
boxes become enabled so you can enter a certain amount of vehicle Dive in inches and Roll in degrees.
10
(C) Performance Trends Inc 1998
Roll Center Calculator
Chapter 1 Introduction
The arrow boxes let you increment Dive and Roll up and down by clicking on the appropriate arrow.
You will also see the suspension drawing move just as it would in the real vehicle. The suspension in
the static position is drawn in light gray for comparison (or dark gray if you have chosen that Option).
The static Instant Centers and Roll Center are also drawn in light gray so you can see how much they
have moved due to Dive and Roll.
To the right of the drawing, you will see Spring Compressn and Dyn Camber also change as you go
through various amounts of Dive and Roll. Both of these numbers are very useful:
Spring Compressn: Positive spring compression means the spring is compressed from its
static (standing still before any Dive or Roll) position, or the car is diving. Negative spring
compression means the spring is elongated or the car is rising. By making spring compression
match the motion shown by your shock travel indicators, you ensure you are moving the suspension
through somewhat the same motion which your car sees on the track.
11
(C) Performance Trends Inc 1998
Roll Center Calculator
Chapter 1 Introduction
Dyn Camber, deg: Dynamic Camber is the camber the tire will see due to Dive and/or Roll.
Camber has a large impact on the tire patch on the track, and therefore tire traction. By optimizing
camber you can produce higher traction and therefore faster lap times.
Play around with some of the option buttons or commands in the Menu bar. You can’t hurt the
program. Once you feel a little comfortable with the program, read the rest of this short manual to learn
the definitions of all the specs, how to save a set of suspension specifications, recall information which
has been previously saved, or what the various options can do. Then you will know all the basic
commands to operate the program.
Figure 1.8 Analyzing the Suspension Motion with Dive and Roll
Dynamic suspension is shown in Black, Blue and
Static suspension is shown in gray for comparison.
Spring
Compressio
n shows how
spring (and
shock) is
moving with
Dive & Roll.
Dynamic
Camber
shows how
tire camber
changes
with Dive &
Click on
arrow
buttons to
increment
Dive and
Roll up or
down, or just
type in your
desired Dive
and Roll.
Car is shown rising (negative Dive) and rolling to the
right (positive Roll), which is what the car would do
accelerating out of a left hand turn.
12
(C) Performance Trends Inc 1998
Roll Center Calculator
Chapter 2 Definitions
Chapter 2 Definitions
2.0 Basic Program Operation:
Figure 2.1 shows the Roll Center Calculator’s Main Screen with explanations of your options.
Figure 2.1 Main Menu Options
Suspension Layout diagram to
show Roll Center location,
Camber Gain, dimensions and
changes with Roll and Dive.
Menu bar. Click here for “drop down”
menus of program options.
Name of current vehicle
file
This area
holds other
specs, shows
calculated
specs and
specs that
change with
Dive and
Roll.
Click on Yes
to enable
specs to put
suspension
through Dive
and Roll.
Click on
Draw Big to
enlarge
suspension
drawing.
Click on most any spec name or input and a brief
description of the item is given here
Enter dimensions for suspension here. Suspension Layout and
calculated specs are updated as you enter specs.
13
(C) Performance Trends Inc 1998
Roll Center Calculator
Chapter 2 Definitions
The Roll Center Calculator lets you determine a vehicle's front suspension Roll Center and Camber
Gain. For a quick background, Roll Center is an imaginary point about which the chassis tends to roll in
cornering maneuvers. In general, the lower the Roll Center, the more the car rolls in the corners. The
farther right the Roll Center the less the right side moves up or down during cornering. Camber Gain
is the amount of camber change (tilt of the tires when viewed from the front) you get from a certain
amount of body motion, typically 1 inch of dive from braking. Most race cars want Camber Gain in the
range of -1 to -2 degrees for an inch of dive. For circle track cars (always turning left), you may want
positive camber gain on the left side. Both of these have a large impact on a car’s handling and
maximum cornering capability. See Appendix 1.
Basic procedure for using the program:
1.
You enter measurements from your car (or open an example file of measurements provided with the
program by clicking on File and then Open).
2.
The program draws your suspension on the screen, including calculated dimensions like King Pin
Angle, Instant Centers and the Roll Center in the Suspension Layout drawing.
3.
Once all measurements are entered, you can force the suspension into various amounts of Dive and
Roll by selecting the Yes option in the Show Dive & Roll section. As the suspension is redrawn
with various amounts of Dive and Roll, the new Roll Center, Camber and Spring Compression are
displayed.
4.
Watching Spring Compression (in the Other Dimensions & Specs section to the right of the layout
drawing) is useful for matching the actual vehicle motion you see on the track. Adjust Dive & Roll
so the springs go through the range of motion indicated by your shock travel indicators. This
assumes the shocks and springs have approximately the same motion ratio.
14
(C) Performance Trends Inc 1998
Roll Center Calculator
Chapter 2 Definitions
2.1 Main Screen Inputs & Outputs
The Main Screen has 4 major sections, each which will be discussed in this section:
1.
2.
3.
4.
Static Layout Dimensions
Other Dimensions & Specs
Show Dive & Roll
Suspension Layout Drawing
2.1.1 Static Layout Dimensions
Before we define the inputs in this section, lets take a minute to describe how you will make these
measurements.
Taking Suspension
Measurements
Figure 2.2 Static Layout Dimensions Section
of theMain Screen
You enter the measurements from your
car's front suspension members into the
Layout Screen. First, park the car on a
flat, level surface. First we must decide
on what we will call the car’s
centerline. Many people use a distance
half way between the left and right tire
patches. The disadvantage of this
method is if you change rim widths or
wheel offsets your centerline can
change. This means all your
measurements are now off also. Therefore, we usually recommend a distance half way between the frame rails, or the frame mounts on the
lower arms. These locations usually will stay in one place. Once you’ve decided on the method, use a
tape measure to mark a point on the floor which is halfway between the your references. This will now
be your car’s centerline and is 0 in the X (horizontal) direction in the Static Layout Dimensions section.
Once you decide on a centerline for a particular car, you must
make all measurements from this same centerline.
15
(C) Performance Trends Inc 1998
Roll Center Calculator
Chapter 2 Definitions
Figure 2.3, Finding Car Centerline and Measuring Front Suspension Points
(typical X and Height measurement shown for Lower Frame Pivot)
Car Centerline
X
Height
Half the distance between
the lower arm mounts
can be used as centerline
Alternate Car Centerline
Half the Track Width
(the distance between
the center of the tire
patches) can also be
used as the centerline.
Track Width
In symmetric cars where the left and right side are identical, the centerline can also be the center of the
engine and can be marked by dropping a plumb bob (pointed weight on a string) down from the center
of the crank pulley. Then with the plumb bob, place the string on the center of a new suspension point
to be measured and drop the bob until it just touches the floor. Measure the distance from the car's
16
(C) Performance Trends Inc 1998
Roll Center Calculator
Chapter 2 Definitions
centerline to where the plumb bob points on the floor. This is the "X" distance for that particular
suspension point.
You can print a blank worksheet for recording your measurements by clicking on File at the upper left of
the Main Screen (in the Menu Bar), then clicking on Print Blank Worksheet. Be sure you have first
selected the correct Suspension Type (Double A Arm or MacPherson Strut) by clicking on Suspension
Type in the Menu Bar to obtain the correct worksheet for your car.
For entering dimensions, 2 other options can be important:
Enter X & Ht Readings, Frame & Ball Jnts
Enter X & Ht at 1 End, Arm Len & Angle
If it is easier to measure the lengths or the A Arms and the angle of the A Arms, choose the
Arm Len & Angle option. You still have to measure the X and Height of one end of the arm,
but not both. For the Upper Arm, you will enter the Ball Joint X and Height, and the Length
and the Angle. For the Lower Arm, you will enter the Frame Mount X and Height, and the
Length and the Angle. Changing this option will Enable and Disable the appropriate
dimension specs so you know which values to enter. This option is not available for
MacPherson Strut suspensions.
Camber Changes with New Inputs
Camber Does Not Change with New Inputs
For entering a new suspension, it may be better to select the “Camber Does Not Change with
New Inputs” option. This
Figure 2.4 Important Options for Entering
prevents Camber from
continually being changed
Measurements
(possibly to very unusual
values) as you enter new
measurements. Once you
have a new suspension
entered, choosing the
“Camber Changes with New
Inputs” option works well to
see how suspension
adjustments or modifications
will change camber.
Enter all the X and Height
measurements into the screen. The
screen's drawing and calculated
values are updated after each entry.
This lets you immediately see if a value you entered looks wrong.
17
(C) Performance Trends Inc 1998
Roll Center Calculator
Chapter 2 Definitions
The Roll Center location and Left and Right Instant Centers are also drawn in as large dots. Instant
Centers are the imaginary points about which each side of the suspension tends to rotate and usually
appear on the opposite side of the suspension. For example, Right side’s Instant Center will usually
appear on the left side of the Suspension Layout drawing. The Roll Center is black on most computers,
and the Instant Centers match the colors of the Left or Right suspension drawing. If these locations are
off the screen, they are drawn at the correct height with an arrow pointing to their "off screen" location.
Upper Ball Joint
Location
Figure 2.5 Measuring Ball Joint Locations
X is the distance from the car
centerline to the center of the ball
joint on the upper arm on either
the right side or left side, in
inches. Height is the distance
from the ground to this same
location. See page 15-16 for a
definition of possible centerlines.
Measure to what you
visualize to be the center
of the ball inside the joint.
Upper Frame Pivot Location
X is the distance from the car centerline to the center of the pivot on the frame mount on the upper arm
on either the right side or left side, in inches. Height is the distance from the ground to this same
location. See page 15-16 for a definition of possible centerlines.
Lower Ball Joint Location
X is the distance from the car centerline to the center of the ball joint on the lower arm on either the
right side or left side, in inches. Height is the distance from the ground to this same location. See page
15-16 for a definition of possible centerlines.
Lower Frame Pivot Location
X is the distance from the car centerline to the center of the pivot on the frame mount on the lower arm
on either the right side or left side, in inches. Height is the distance from the ground to this same
location. See page 15-16 for a definition of possible centerlines.
18
(C) Performance Trends Inc 1998
Roll Center Calculator
Chapter 2 Definitions
Upper Spring Pad Location
X is the distance from the car centerline to the center of the upper mounting pad for the spring, in
inches. Height is the distance from the ground to this same location. See page 15-16 for a definition of
possible centerlines. (These inputs are not required for Instant Center calculations.)
Tip: If you are more interested in shock travel than spring travel, enter the top shock mount location.
However, the Wheel Rate calculated from the Spring Rate you enter in the Other Dimensions & Specs
section will not be exactly correct.
Lower Spring Pad Location
X is the distance from the car centerline to the center of the mounting pad for the spring on lower right
arm, in inches. Height is the distance from the ground to this same location. See page 15-16 for a
definition of possible centerlines. (These inputs are not required for Instant Center calculations.)
Tip: If you are more interested in shock travel than spring travel, enter the lower shock mount location.
However, the Wheel Rate calculated from the Spring Rate you enter in the Other Dimensions & Specs
section will not be exactly correct.
Upper Arm Length
Figure 2.6 Measuring A Arm Length
Top View of A Arm Showing How to Measure Length of A Arm
Draw a line to the
other ball joint.
Length of arm is
w here this line
intersects the
axis of the arm.
A xis of the arm
is a line joining
front and back
mounting points.
19
Correct
Incorrect
(C) Performance Trends Inc 1998
Roll Center Calculator
Chapter 2 Definitions
Length of upper right arm from Pivot Center to Ball Joint center as viewed from the front, in inches.
This can be shorter than actual length measured along the arm if arm is swept forward or back. See
Figure 2.6. This spec is only enabled if you have chosen the ‘Enter X & Ht at 1 End, Arm Len &
Angle’ option.
Upper Arm Angle
Angle of the upper left arm as viewed from the front, in degrees. A positive angle means the arm
angles up as the arm goes away from the car centerline, which is typical.
Lower Arm Length
Lower Arm Angle
See Upper Arm Length and Upper Arm Angle explanations above.
2.1.2 Other Dimensions &
Specs
Figure 2.7 Other Dimensions &
Specs Section of
Main Screen
Spring Length
Installed or Static length of the spring measured along
spring centerline before any Dive or Roll. You can not
enter this value directly. This length is calculated from
the X and Height for the Upper and Lower Spring Pad
Locations. This value is useful to check that your X and
Height measurements are entered correctly, as it should
closely match your installed spring length.
Spring Angle
Installed angle of spring measured between spring
centerline and vertical, in degrees. You can not enter
this value directly. This angle is calculated from the X
and Height for the Upper and Lower Spring Pad
20
(C) Performance Trends Inc 1998
Roll Center Calculator
Chapter 2 Definitions
Locations. This value is useful to check that your X and Height measurements are entered correctly, as
it should closely match your installed spring angle.
Spring Deflection
The change in the length of the spring due to Dive or Roll. Negative (-) means spring compression from
diving, positive (+) means elongation from rising. Since shocks generally are mounted close to the
spring locations, shock travel is very similar to Spring Deflection.
Spring Rate
Is the force required to compress the uninstalled spring 1 inch, in pounds. The spring is assumed to be
linear, that is if 500 lbs compresses the spring 1", 1000 lbs will compress the spring 2". This is an input
which you enter and effects the Wheel Rate described below.
Wheel Rate
The force required to move wheel
center 1 inch up while the chassis does
not move, in pounds. This is a
calculated spec (can not be entered
directly) and depends on the Spring
Rate and suspension geometry.
Figure 2.8 Illustration of Camber, King Pin
Axis and Scrub Radius
Camber Angle
(negative angle shown here)
Scrub Radius
The distance from where the king pin
axis hits the ground and the center of
the tire patch. See Figure 2.8 for King
Pin Axis. This is a calculated spec (can
not be entered directly).
Camber
The degrees of tilt of the wheel with
respect to the ground as viewed from
21
King Pin Axis
Scrub Radius
(C) Performance Trends Inc 1998
Roll Center Calculator
Chapter 2 Definitions
the front, in degrees. Negative camber means the top of the wheel tilts in towards the car, which is
typical of most race cars. This is an input which you enter. See Figure 2.8.
Dynamic Camber
The new, Dynamic camber of the wheel caused by Dive and Roll. See Camber above.
Hub Distance
The distance from the center of the lower ball joint to the mounting surface of the wheel hub. See
Figure 2.9.
Wheel Rim Width
Width of the wheel rim from inside bead to bead, in inches. This measurement is usually about 1” less
than measuring from outside edge to outside edge.
Figure 2.9 Illustration of Hub Distance
Wheel Rim Offset
The distance from the inside of the
wheel rim to the wheel's mounting
surface, sometimes called backspacing.
This is usually measured by laying the
wheel face up on the floor and
measuring from the floor to the
mounting surface.
Wheel Mounting
Face of Hub
Center of
Ball Joint
King Pin Angle
King pin axis is the line intersecting the
upper and lower ball joints. The angle
is the angle between this axis and a
vertical line. See Figure 2.8. This is a
calculated spec (can not be entered
directly).
Hub Distance
22
(C) Performance Trends Inc 1998
Roll Center Calculator
Chapter 2 Definitions
2.1.3 Show Dive & Roll
Figure 2.10 Show Dive & Roll Section of Main Screen
Click on Yes to enable these inputs and options
Click on up or down buttons to increment Dive
or Roll up or down
Click on Draw Big button to
redraw screen with much
larger Layout drawing. See
Figure 2.11.
You can also just type in most any amount of Dive or Roll
in these text entry boxes, and press <enter>.
As shown in Figure 2.10, you must first select the Yes option in this section before any of these inputs or
command buttons become enabled.
Dive
The amount the car's front end drops compared to its static (standing still) height. To simulate the front
end rising, enter a negative (-) number.
Roll
The amount the car's front end rolls (leans) due to cornering forces, compared to its static (standing still)
angle. A positive (+) angle means the car is leaning to the Right, typical of Left turns. Use a negative (-)
number to lean Left (Right turns).
23
(C) Performance Trends Inc 1998
Roll Center Calculator
Chapter 2 Definitions
Draw ‘Big’
This command button lets you select a screen mode shown in Figure 2.11 where the Suspension Layout
is drawn about twice its normal size. In this mode you can see things in more detail.
Figure 2.11 Draw ‘Big’ Mode Shown with the Draw Extension Lines Option
Selected ‘Other Dimensions & Specs’ which change with Dive and/or
Roll or which are a good reference to these specs which change.
Click on these arrow buttons to increments Dive or Roll
or just type in your desired Dive and Roll in the text box.
Click here to return to the normal screen with all dimensions displayed
24
(C) Performance Trends Inc 1998
Roll Center Calculator
Chapter 2 Definitions
2.1.4 Suspension Layout
The features of the Suspension Layout drawing are discussed in Figure 2.12 below.
Figure 2.12 Major Features of the Suspension Layout Screen
Camber Gain and the motion on which it is based is given in this line.
Right Instant Center drawn in blue just like the right side suspension.
The arrow drawn in this Figure (not on the computer screen) shows how
it has moved from its static location (gray dot with blue outline).
Left Instant Center drawn in red just like the left side suspension. The
arrow drawn in this Figure (not on the computer screen) shows how it
has moved from its static location (gray dot with red outline). The red
arrow pointing off the screen shows its actual location is off the screen.
Roll Center drawn in black. The arrow drawn in this Figure
(not on the computer screen) shows how it has moved from
its static location (gray dot with black outline).
Dynamic Roll Center
location (due to Dive and
Roll)is shown in black.
Static Roll Center location is shown in black, unless the
car is in Dive and/or Roll. Then it is shown in gray (as
shown here) for comparison to the Dynamic Roll Center.
Letters A-L relate to dimensions listed in Static Layout Dimensions section. See page 15.
25
(C) Performance Trends Inc 1998
Roll Center Calculator
Chapter 2 Definitions
26
(C) Performance Trends Inc 1998
Roll Center Calculator
Chapter 2 Definitions
2.2 Main Screen Options
In the Menu Bar at the top of the Main Screen, there are 8 main menu commands:
1. File
2. Options
3. Suspension Type
4. Shim
5. Table & Graph
6. Comments
7. Help
8. About
These are discussed in this section.
Figure 2.13 Menu Bar of Main Screen showing Options Available
File
Click on File to present several standard Windows File
options:
Figure 2.14 File Options
New blanks out all the current spec inputs, calculated values,
comments and changes the current file name to Untitled.
Open presents a standard Windows File Open dialog box,
where you can open a Roll Center file which was previously
saved. You can select different directories or disk drives for
files. You can choose most any file, but if the program senses
the file is not a Roll Center file, you will be given notice and
the file will not be opened.
Save saves the current specs to the current file name. This is
a shortcut to update the current file with the current specs and measurements.
27
(C) Performance Trends Inc 1998
Roll Center Calculator
Chapter 2 Definitions
Save As also presents a standard Windows File Open dialog box, where you save a Roll Center file to
a name of your choosing. Certain names are not acceptable, including:
• Names with more than 3 characters to the right or 8 characters to the left of a period (.) .
• Names over 11 characters long (12 characters if one is a period).
• Names which include the characters:
/ \ [ ] : | < > + = ; , * ? or spaces
You can also select different directories or disk drives for saving files.
Tip to Advance Users: The default directory for opening and saving files is RCFILES. The program
will not allow you to delete files or create different directories. However though File Manager
(Windows 3.1) or Windows Explorer (Windows 95) you can do this. This will allow you to create a
directory (folder) structure for organizing your files.
Print prints the Main Screen.
Print Blank Worksheet prints
Figure 2.15 Main Screen Options Menu
the main screen with blank boxes for
all inputs.
Windows Print Setup opens the
standard Windows menu for selecting
the printer, page orientation, etc.
Options
Click on Options for the list shown in
Figure 2.15.
Enter X & Ht Readings, Frame & Ball Jnts
Enter X & Ht at 1 End, Arm Len & Angle
If it is easier to measure the lengths or the A Arms and the angle of the A Arms, choose the Arm Len &
Angle option. You still have to measure the X and Height of one end of the arm, but not both. For the
Upper Arm, you will enter the Ball Joint X and Height, and the Length and the Angle. For the Lower
Arm, you will enter the Frame Mount X and Height, and the Length and the Angle. Changing this
option will Enable and Disable the appropriate dimension specs so you know which values to enter.
This ‘Len & Angle’ option is not available for MacPherson Strut suspensions. For more details, see the
Example in Section 1.5.
28
(C) Performance Trends Inc 1998
Roll Center Calculator
Chapter 2 Definitions
Draw Extension Lines
Don’t Draw Extension Lines
Lets you choose if imaginary extension lines should be drawn in the Suspension Layout. These
extension lines help show how the Instant Centers and Roll Center are arrived at. Figure 2.11 shows
extension lines, Figure 2.17 does not.
Background Car Layout Color - Light Gray
Background Car Layout Color - Light Gray
Lets you select the color for the background car and suspension drawing in the Layout screen. The
Background Car shows the static position of the suspension and car before any Dive and/or Roll.
Camber Changes with New Inputs
Camber Does Not Change with New Inputs
For entering a new suspension, it may be better to select the “Camber Does Not Change with New
Inputs” option. This prevents Camber from continually being changed (possibly to very unusual values)
as you enter new measurements. Once you have a new suspension entered, choosing the “Camber
Changes with New Inputs” option works
Figure 2.16 Camber Gain Specs Menu
well to see how suspension adjustments
or modifications will change tire
camber.
Camber Gain Definition Specs
Click on this option and you get the
menu of Figure 2.16. This menu lets
you change the amount of body
movement the program uses to
determine Camber Gain.
First you select the Type of Calc, which
means either to use the program's
standard definition of 1" of Dive with No
roll, or to Use Specs Below (in this
menu).
29
(C) Performance Trends Inc 1998
Roll Center Calculator
Chapter 2 Definitions
If you select to Use Specs Below, the Body Dive, inches and Body Roll, degrees specs become enabled so
you can enter or change them. If you click on the OK/Exit button while Use Specs Below is selected, the
Camber Gain at the Main Screen will now be based on these custom specs. This definition is always
displayed in the Suspension Layout screen as shown in Figure 2.17.
Click on Cancel to close this menu and return to the original specs used for calculating Camber Gain.
Suspension Type
Click on Suspension Type to choose Double A Arm, as pictured in Figures 2.1 or 2.11, or MacPherson
Strut type shown in Figure 2.17. The Shim option for inputting the Length and Angle of the Strut are
not available for this suspension type. Also realize that if you switch Suspension Types with a current
set of suspension dimensions, the drawing will look very unusual.
Figure 2.17 MacPherson Strut Suspension Type
Camber Gain Definition is
always shown here
Struts replace the arms
drawn for the Double A
Arm suspension type.
Strut dimensions replace
the Upper Arm
dimensions here also.
The Shim option or
inputing the Length and
Angle of the Strut are not
available for this
suspension type.
30
(C) Performance Trends Inc 1998
Roll Center Calculator
Chapter 2 Definitions
Figure 2.18 Shimming Menu for Right Side
Shim
Click on Shim when this option is
enabled, and then select from the choices
of shimming the left or right arm You are
then presented with the menu shown in
Figure 2.18.
This menu lets you move the Frame Pivot
point of the upper A arm in or out, as is
usually done by adding or removing
shims. The software keeps the length of
the arm constant and calculates where the
Ball Joint end will be after the adjustment.
First, select whether you want to Add or
Remove shims from the first Combo box.
Then select whether you want to use
standard sixteenth (1/16) and eighth (1/8)
inch shims, or to enter some other
'Custom' shim adjustment. After your
selection, the lower inputs will become
enabled as appropriate. Selecting 'No
Shims' disables the lower inputs.
An estimate of the new Camber is given at
the top for the shim adjustment currently
entered, with the Current Camber also
given for comparison. (If you have Not
selected the option at the Main Screen that Camber should be adjusted with changing dimensions, you
will be asked if you want Camber to be adjusted before it is.)
The entries and suspension layout on the Main Screen are not updated until you click on 'Use Calc
Value'.
Important: This menu assumes that Adding shims moves the Frame Pivot
farther out from the car (reducing negative camber or increasing positive camber).
Some chassis (for example: the left side on some Lefthander Chassis) work the
opposite, adding shims moves the pivot inward. If your chassis is like this, select
'Remove Shims' if you are actually adding shims or 'Add Shims' if you are actually
removing shims.
31
(C) Performance Trends Inc 1998
Roll Center Calculator
Chapter 2 Definitions
Table & Graph
Click on Table & Graph for a more detailed analysis of how Camber changes for several combinations
of Dive and Roll. This option is fairly extensive and is covered in a separate section, Section 2.3 on the
next page.
Figure 2.19 Comments Editing Screen
Comments
Click on
Comments for the
Comment Editing
screen shown in
Figure 2.19.
Comments are
printed with your
other specs when
you request a
print (at least the
first 300
characters or so), and are saved with a Roll Center file. Comments are a good way to keep track of what
each saved Roll Center file is.
Help
Click on help for information on your options for the Main Screen of this program.
About
Click on About for information on the program, Performance Trends, and your registered name and
code #.
32
(C) Performance Trends Inc 1998
Roll Center Calculator
Chapter 2 Definitions
2.3 Camber Table & Graph
If you click on Table & Graph at the Main Screen, you will obtain a screen similar to Figure 2.20. This
screen shows you 2 tables of Camber values for a set on Dive and Roll combinations. The top table is
for the Right side and the bottom is for the Left side.
Figure 2.20 Typical Camber Table (hiding the baseline data)
Right side camber
table. Click and
drag the mouse to
select (highlight)
rows you want to
graph. Corresponding Left rows are
also graphed. This
particular table is not
showing a baseline
condition for
comparison.
Left side camber
table. Note you can
not select (highlight)
rows here.
You can also select to have a Baseline condition displayed in the Table (Show Baseline Data). This is
useful to compare 2 different suspension layouts. A Baseline is some previous condition which was
shown in the Table. You can select to have the Baseline always be updated to whatever condition was
previously in the Table (Previous Table is Baseline Data), or to save some specific Baseline condition of
interest (Baseline is Saved Data). See Figure 2.21.
33
(C) Performance Trends Inc 1998
Roll Center Calculator
To save the current Table as a Baseline, click on
'Baseline', then 'Save This Data as Baseline'. The
program will ask you for a Comment to describe the
Baseline condition. This Comment will be printed
with the Table when you print it if you are Showing the
Baseline condition. This comment can also be edited
by clicking on 'Baseline' and then 'Baseline Comment'.
Chapter 2 Definitions
Figure 2.21 Baseline Commands
After saving a baseline Table, you could close the
Table by clicking on Back in the Menu Bar, make a
change in the suspension and create the table again by
clicking on Table & Graph. You would produce a
Camber Table like Figure 2.22.
Figure 2.22 Camber Table Showing Baseline Condition
3 rows for each
condition: new
suspension camber, baseline
camber and the
difference in
degrees.
User selected
only rows with
Dive = 2 inches. If
you now select
the Graph
command, only 2
inches of Dive for
new & baseline,
Left and Right will
be graphed (4
graphs total)
Click on Print to print the Table.
34
(C) Performance Trends Inc 1998
Click on the Options menu item and
select 'Specs for Table Rows &
Columns' to change the Dive and
Roll increments, and which is used
for rows and which is used for
columns. You will obtain the menu
shown in Figure 2.23.
Roll Center Calculator
Chapter 2 Definitions
Figure 2.23 Menu for Changing Camber Table
Specs
As you change the specs in this
menu, the Preview at the bottom
changes to show what the Roll and
Dive increments, and the general
layout of the Camber Table will look
like. The program allows only up to
10 rows and 11 columns. Your
inputs may be changed if a
combination produces more than
these limits.
When you are satisfied with the
Preview, click on OK/Exit. Click on
Cancel to close this menu and return
to the original Table layout.
Note: If you change the Camber
Table specs, any previously saved
baseline conditions will be lost
because that baseline has different
increments for columns and rows,
which would not match up to the new
increments you have selected.
Click on the Graph menu item and you can Graph the selected data from the Table. To select data,
you highlight various rows by clicking and dragging the mouse in the top Table for the Right Side.
These selected (highlighted) rows, AND the corresponding rows in the bottom table for the Left side,
will be graphed. If you have selected more data than the Graph can hold, you will be told and the top
and bottom rows only of what you’ve selected will be graphed.
35
(C) Performance Trends Inc 1998
Roll Center Calculator
Chapter 2 Definitions
Figure 2.24 Graph of Camber Data Selected in Figure 2.23
This screen graphs of Camber in degrees on the vertical Y axis versus either Roll or Dive on the
horizontal X axis. The data graph here is based on what was highlighted in the Camber table when you
clicked on the Graph menu item. Data is always graphed for the Left side as well as the Right side for
whatever conditions you have selected (highlighted).
Read the labels in the "legend" at the right side of the graph to see which lines are which colors. The
graph is always "autoscaled" which means the program picks the scales for drawing it to display all data
with good detail. Print the graph on your printer using your Windows default printer by clicking on the
"Print" menu command. You can change settings, labels and Windows printer setup by clicking on the
"Options" menu command. See Figure 2.25. You can return to the Camber Table screen by clicking on
the Back menu command.
36
(C) Performance Trends Inc 1998
Roll Center Calculator
Chapter 2 Definitions
Figure 2.25 Graph Options Menu
The Graph Options screen is divided into 4 sections.
The first section is called "Graph Labels": Click on "Use Standard Labels" for standard labels
to be printed on the graph. Click on "Use Labels Given Here" and the program will use the
labels which you can enter or change. Click on any of the 3 text boxes and type in your chosen
titles or labels.
The second section of the Graph Options is called "Print": Click on "Black and White" or
"Color" to tell the program how to print the graph. Unless you have a color printer, you should
choose "Black and White". The program always graphs in color on the computer screen. Click
on the "Print Now" button to print the current plot on the printer, the same as selecting the
"Print" menu command. Click on the "Windows Printer Setup" button to see the current
printer selection or select a different printer for printing the graph.
The third section lets you pick the line thickness for the "Plot Lines", either thick or thin.
The fourth section lets you pick the color for the "Background Color" of the graph, either black
or white.
Click on OK to return to the Graph Screen with your changes in effect.
37
38
Appendix 1 "Rules of Thumb" for
Desired Roll Center, Camber and
Camber Gain
Roll Center is an imaginary point about which the chassis tends to roll in cornering maneuvers. In
general the lower the Roll Center the more the car rolls in the corners, and the farther right the Roll
Center the less the right side moves up or down during cornering. Camber Gain is the amount of
camber change (tilt of the tires when viewed from the front) you get from a certain amount of body
motion, typically 1 inch of dive from braking. Most race cars want Camber Gain in the range of -1 to 2 degrees for an inch of dive. This is expecially true for the outside tire in a turn. For circle track cars
(always turning left), the desired camber gain on the left side may be less or even a posifive number,
depending on track banking and other factors. Both of these have a large impact on a car’s handling and
maximum cornering capability.
Note from Performance Trends: It is difficult to get any
agreement from “experts” on optimum Roll Center location,
Camber Gain, static Camber setting, etc. This is true for most
any suspension setting. The reason appears to be that these
settings are so combination dependent. Traction capability of the
track and tires; tire construction; roughness of track;
temperatures; compliance of the chassis, suspension members
and bushings, shock settings, etc. However, the component with
the biggest effect on optimum settings is the driver. Driver
preference for how a car handles and “feels” has a huge
effect on their confidence, aggressiveness on the track and
lap times.
The following statements are ones we have found in various references which appear to be consistent
between these references.
39
Roll Center:
Several authorities agree that the static Roll Center (before any Dive or Roll) should be from 2.5" to 4.5"
above the ground. For road race cars (turning both left and right) you want to keep the Roll Center near
the car's centerline (left or right).
The farther the Roll Center is to the Left, the quicker the car will react (more it will Roll) when going
into a Left turn. For this reason, many asphalt circle track (left turning) cars locate the Roll Center to
the right of center (less Roll) and dirt cars locate the Roll Center to the Left of center (more Roll and
hopefully better "bite" at the right front). However, the car is more predictable "all around" if the Roll
Center is kept close to the car's centerline.
Higher banking (20 degrees or more) usually requires a lower Roll Center, in the 2-3 inch range.
The more mass in the front of the car (heavier engine or engine more forward), the higher the Roll
Center should be.
Some authorities believe a lower Roll Center works better on dirt because the higher body roll produces
more "side bite" from the tires.
Lower Roll Centers require stiffer springs to control Roll. However, stiff springs hurt traction on bumpy
tracks.
The less the Roll Center moves during Dive and Roll, the more predictable the car's handling.
Most authorities agree that holding the Roll Center position as constant as practical during Dive and
Roll is optimum.
Camber/Camber Gain:
For Circle Track cars (turning left), reasonable Static Camber values (before any Dive or Roll) are: Left
Side + 1 degree, Right Side -2 to -3 degrees.
Wider and/or stiffer sidewall tires require less Static Camber.
Camber Gain should be in the range of -1.75 for a flat track, -1.25 for a medium banked track (10-15
degrees) and down to -1 for highly banked tracks (over 25 degrees) on the outside tire (right tire in a left
turn). For circle track cars (always turning left), the desired camber gain on the left side may be less or
even a posifive number, depending on track banking and other factors. These Camber Gains are based
on the program's standard definition as the amount of Camber Change from 1" of Dive.
40
Index
Angle, 9, 10, 14, 17, 20, 22, 28, 30
Arm Len & Angle, 9, 10, 17, 28
Assumptions, 3
Library, 12
Lower Arm Length, 20
Lower Ball Joint, 9, 18
Lower Frame Pivot, 16, 18
Lower Spring Pad, 19, 20, 21
Baseline, 1, 33, 34
MacPherson, 17, 28, 30
Camber, 5, 1, 2, 6, 7, 8, 9, 11, 12, 14, 17, 21,
22, 29, 30, 31, 32, 33, 34, 35, 36, 39, 40
Camber Changes with New Inputs, 17, 29
Camber Gain, 5, 1, 8, 9, 14, 39, 40
Centerline, 15, 16, 18, 19, 20, 39, 40
Comments, 6
Directory, 2, 4
Dive, 5, 1, 6, 8, 10, 11, 12, 14, 15, 20, 21, 22,
23, 29, 30, 32, 33, 35, 36, 39, 40
Double A Arm, 1, 17, 30
Draw Big, 1
Dyn Camber, 11, 12
Dynamic Camber, 12, 22
Extension Lines, 1, 24, 29
File, 2, 4, 5, 6, 7, 14, 17, 27, 28
Graph, 5, 27, 32, 33, 34, 35, 36, 37
Help, 3, 4, 6, 7, 27, 32
Hub Distance, 21, 22
Install, 4
Installation, 5, 4
Instant Center, 2, 18
Instant Centers, 1, 11, 14, 18, 29
King Pin, 14, 21, 22
Layout, 5, 14, 15, 18, 24, 25, 29, 30
Length, 9, 17, 19, 20, 28, 30
41
Open, 2, 5, 6, 14, 27, 28
PERFTRNS.PTI, 2, 4
Print, 1, 2, 27, 34
Registered Owner, 3, 4
Roll, 1, 4, 5, 1, 2, 3, 4, 5, 6, 10, 11, 12, 13, 14,
15, 18, 20, 21, 22, 23, 27, 28, 29, 30, 32, 33,
35, 36, 39, 40
Roll Center, 1, 4, 5, 1, 2, 3, 4, 5, 6, 11, 13, 14,
18, 27, 28, 29, 32, 39, 40
Safety, 4, 3
Save, 6, 28, 34
Scrub Radius, 21
Setup, 4
Shim, 27, 30, 31
Shocks, 11, 14, 19, 21, 39
Spring, 1, 6, 11, 14, 19, 20, 21
Spring Compressn, 11
Suspension Library, 5, 6
Table, 5, 1, 27, 32, 33, 34, 35, 36
Tech Help, first page after cover page, 3, 4
Upper Arm Angle, 20
Upper Arm Length, 19
Upper Ball Joint, 7, 8, 9, 10, 18
Upper Frame Pivot, 18
Upper Spring Pad, 19
Wheel Rate, 19, 21
Wheel Rim Offset, 22
Wheel Rim Width, 22
Windows, 1, 2, 4, 5
Worksheet, 17, 27
X&Ht Readings, 7, 9, 10
42