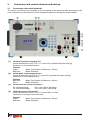
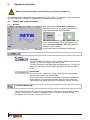
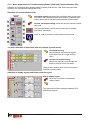
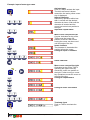
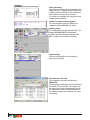
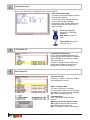
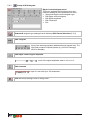
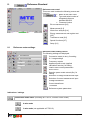
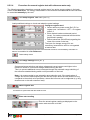
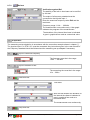
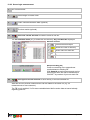
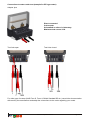
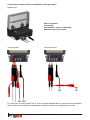
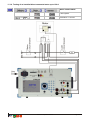
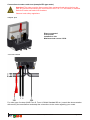
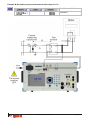
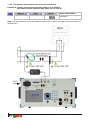
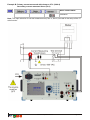
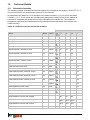
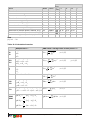
1
PTS 3.1 C Portable Test System Operation Manual PTS 3.1 C Operation Manual Edition 08.2009 Copyright MTE Meter Test Equipment AG All rights reserved. The contents of this manual are subject to change without notice. All efforts have been made to ensure the accuracy of this publication but MTE Meter Test Equipment AG can assume no responsibility for any errors or their consequences Customs tariff number: 9030.3100 PTS 3.1 C Operation Manual Page 2/202 Table of Contents 1. 2. 3. Safety ....................................................................................................................................... 5 General .................................................................................................................................... 7 Connectors and control elements and start-up .................................................................... 8 3.1 Connectors and control elements........................................................................................... 8 3.2 Installation of test circuitry and start-up ................................................................................ 12 3.2.1 Paths of Current ............................................................................................................ 13 3.2.2 Paths of Voltage ............................................................................................................ 13 3.2.3 Special Circuits .............................................................................................................. 13 3.2.4 Connecting a PC ........................................................................................................... 13 4. Operation principles ............................................................................................................. 14 4.1 Display and control elements ............................................................................................... 14 4.1.1 Display .......................................................................................................................... 14 4.1.2 Turnable Handling Button (THB).................................................................................... 17 4.1.3 Keypad .......................................................................................................................... 17 4.1.4 Functional Buttons (FB) ................................................................................................. 18 4.1.5 Basic applications of Turnable Handling Button (THB) and Functional Buttons (FB)...... 19 4.1.6 External keyboard (option)............................................................................................. 21 4.2 Status indications ................................................................................................................. 21 4.3 Input of data ......................................................................................................................... 24 4.3.1 Numerical inputs ............................................................................................................ 24 4.3.2 Alphanumerical line input............................................................................................... 25 4.3.3 Alphanumerical field input.............................................................................................. 27 4.4 Load / save settings ..................................................................................................... 29 5. Basic settings of the instrument .................................................................................. 31 5.1 Printer and save parameter settings ............................................................................ 34 5.2 Language Selection ..................................................................................................... 37 6.1 Test results and administrative data ........................................................ 38 Data Base functions ............................................................................................................. 39 6.2 6.3 View of saved test results and measurement information............................................. 46 Data Base structure ............................................................................................................. 48 6.4 Administrative data ...................................................................................................... 50 6. 6.4.1 Admin dataset (ADS) ............................................................................................. 51 6.4.2 Customer dataset .................................................................................................. 52 6.4.3 General Info dataset .............................................................................................. 52 6.4.4 Other results dataset ............................................................................................. 54 6.5 6.5.1 Meter data ................................................................................................................... 56 Meter type dataset ................................................................................................. 56 6.5.2 Meter dataset ........................................................................................................ 64 6.6 Transformer data ................................................................................................................. 66 6.6.1 Current transformer CT type dataset ..................................................................... 67 6.6.2 Current transformer CT dataset ............................................................................. 67 6.6.3 Potential transformer PT type dataset ................................................................... 68 6.6.4 Potential transformer PT dataset ........................................................................... 68 PTS 3.1 C Operation Manual Page 1/202 6.7 Load point data ............................................................................................................ 69 6.7.1 Load point dataset ................................................................................................. 69 6.7.2 Harmonics dataset ................................................................................................ 69 6.7.3 Ripple control RCS telegram type dataset ............................................................. 69 6.7.4 Ripple control RC Sequence dataset ..................................................................... 69 7. Operation of the Source .............................................................................. 70 7.1 Load point definition..................................................................................................... 71 7.1.1 Setup of Umax and Imax and nominal values Un and In ....................................... 71 7.1.2 Edit load point........................................................................................................ 73 7.2 Harmonics ................................................................................................................... 75 7.2.1 7.3 Setup of Harmonics ............................................................................................... 75 RCS Ripple Control Signals ......................................................................................... 77 7.3.1 Setup of RCS telegram .......................................................................................... 78 7.3.2 Setup of RCS telegram type .................................................................................. 79 7.4 7.4.1 7.4.2 7.4.3 7.4.4 Execute load point ....................................................................................................... 80 Functional button (FB) Start/Stop power source ............................................................ 80 Indication Status of power source .................................................................................. 81 Vector diagram and waveforms ..................................................................................... 81 Switch ON/OFF sequence ............................................................................................. 82 7.4.5 Change settings of load point ................................................................................ 84 7.4.6 Load point adjustment with regulators ................................................................... 86 7.4.7 Switch Harmonics ON / OFF ................................................................................. 88 7.4.8 Switch RCS telegram ON / OFF ............................................................................ 89 7.5 Setup ........................................................................................................................... 90 7.5.1 8. 8.1 Parameters ............................................................................................................ 91 Reference Standard.................................................................................... 92 Reference meter settings ..................................................................................................... 92 8.1.1 Selection of voltage and current ranges................................................................. 94 8.1.2 Definition of frequency output ................................................................................ 96 8.1.3 Selection of voltage measurement inputs .............................................................. 98 8.1.4 Selection of current measurement inputs ............................................................... 98 8.1.5 Voltage measuring transformer PT settings ........................................................... 99 8.1.6 8.1.7 Current measuring transformer CT settings ........................................................... 99 Reference system parameters ..................................................................................... 100 8.2 8.2.1 Error measurement .................................................................................................... 101 Measuring setup .......................................................................................................... 103 8.2.2 Setup of error measurement ................................................................................ 104 8.3 Measurement............................................................................................................. 106 8.3.1 UIPQS values ...................................................................................................... 106 8.3.2 Vector diagram .................................................................................................... 106 8.4 Wave form analysis ................................................................................................... 107 8.4.1 Wave form display............................................................................................... 107 8.4.2 Harmonic analysis............................................................................................... 109 PTS 3.1 C Operation Manual Page 2/202 8.5 Energy measurement and register test ...................................................................... 111 8.5.1 Energy measurement .......................................................................................... 111 8.5.2 Register test ........................................................................................................ 114 8.6 Instrument Transformer Testing ................................................................................. 127 8.6.1 Potential Transformer (PT) burden measurement................................................ 127 8.6.2 Current Transformer (CT) burden measurement ................................................. 130 8.6.3 Current Transformer (CT) ratio measurement ..................................................... 134 8.7 Special functions........................................................................................................ 136 8.7.1 Measurement of impulse constant ....................................................................... 136 8.7.2 fRef test ............................................................................................................... 137 9. Automatic test run with portable test system ........................................ 139 9.1 9.1.1 9.1.2 Create / edit test sequence ........................................................................................ 139 Editor functions............................................................................................................ 140 Test step definition ...................................................................................................... 144 9.1.3 Load point setup .................................................................................................. 146 9.1.4 Error measurement setup .................................................................................... 146 9.1.5 Energy measurement setup ................................................................................. 147 9.1.6 Mark positioning setup......................................................................................... 148 9.2 Run automatic or step by step test ............................................................................. 149 9.2.1 Test sequence and meters setup................................................................................. 153 9.2.2 View test step results ................................................................................................... 155 9.3 Preparation of test run ....................................................................................................... 156 9.3.1 Work with Administrative Data Sets (ADS) .................................................................. 156 9.3.2 Work with individual meters and test sequences of data base ..................................... 157 9.3.3 Work with direct entries for meter and test sequence .................................................. 157 9.4 Test run examples ............................................................................................................. 158 9.4.1 Automatic test run........................................................................................................ 158 9.4.2 Step by step test run.................................................................................................... 160 9.4.3 Test run with test steps of type energy ........................................................................ 161 9.4.4 Functions to change / interrupt / restart the test run ..................................................... 162 9.5 Useful functions available during test run ........................................................................... 162 9.6 Error handling .................................................................................................................... 163 10. 10.1 Storage and printout of test results ........................................................................... 164 Preview of results ........................................................................................................... 166 10.2 10.2.1 10.2.2 10.2.3 Save results............................................................................................................ 166 Save mode configuration .......................................................................................... 166 Save single measurement ........................................................................................ 167 Save continuous measurements .............................................................................. 168 10.3 10.3.1 10.3.2 10.3.3 10.3.4 Print data ................................................................................................................ 169 Printer requirements ................................................................................................. 169 Printer configuration ................................................................................................. 169 Call of printout .......................................................................................................... 169 Layout of printout...................................................................................................... 170 PTS 3.1 C Operation Manual Page 3/202 10.4 Data transfer to PC ......................................................................................................... 176 10.4.1 Software for data readout (option) ............................................................................ 176 10.4.2 Data transfer with compact flash (CF) card............................................................... 176 10.4.3 Data transfer by serial interface ................................................................................ 176 11. Connection examples using test mode ............................................................................. 177 11.1 Connection examples using test mode ........................................................................... 177 11.1.1 Testing of a direct connected meter up to 10 A ........................................................ 177 11.1.2 Testing of a direct connected meter up to 120 A ...................................................... 179 11.1.3 Testing of an installed transformer connected meter up to 10 A ............................... 181 11.1.4 Testing of an installed direct connected meter up to 120 A....................................... 183 11.2 Connection examples using reference standard only ...................................................... 185 11.2.1 Testing of an installed transformer connected meter ................................................ 185 11.2.2 Testing of an installed direct connected meter with clamp-on CT (100 A) ................. 187 11.2.3 Burden measurement of voltage transformer............................................................ 189 11.2.4 Burden measurement of current transformer ............................................................ 191 11.2.5 Transformer ratio measurement of current transformer ............................................ 193 12. Technical Details ................................................................................................................. 195 12.1 Calculation formulae ....................................................................................................... 195 12.2 Technical data ................................................................................................................ 199 PTS 3.1 C Operation Manual Page 4/202 1. Safety The following symbol appears on the product and in the operation manual with the meaning: Caution! Please consult the operation manual before using the instrument. Failure to follow or carry out instructions preceded by this symbol may result in personal injury or damage of the device and the installation. General precautions for use To prevent electric shock: This product has to be only used by qualified personnel practicing applicable safety precautions. Use caution during installation and use of this product; high voltages and currents may be present in circuit under test. Local safety regulations must be observed. PTS 3.1 C Operation Manual Page 5/202 Precautions for use of PTS 3.1 C in measurement mode It is not recommended to use the PTS 3.1 C direct current inputs to measure in unprotected installations (on secondary side of nonintrinsically safe current transformers, in installations without protection fuses). Use the 1A/10A current connectors only, if the current path can be opened during the measurements without danger for the operator, the equipment under test and the instrument itself. Warning! The voltage across the 1A/10A current connectors must not exceed 440 VAC in the case of a failure! The correct operation of the built-in relays and the protection fuses (1.6AFF / 16AFF) is not guaranteed at fault voltages >440VAC. PTS 3.1 C Operation Manual Page 6/202 2. General The PTS 3.1 C portable test system consists of an integrated single-phase current and voltage source and a single-phase electronic reference standard of accuracy class 0.1 %. Characteristic features of the PTS 3.1 C are its wide measuring range, high accuracy and high tolerance to unwanted external influences. The PTS 3.1 C allows the monitoring of meter installations as well as analysis of the local mains conditions. Advantages Easy verification of meters under precise load conditions, using the built-in, compact, current and voltage source Automatic operation with predefined load points without the need for an external PC Exchangeable Compact Flash (CF) memory card for measurement results and customer data Display of vector diagram for analysis of the supply conditions User-friendly system for data input and operation of combined source and reference meter The system may be used either as a stand-alone reference standard meter, or together with the integrated power source Functions Independent generation of single-phase loading conditions for verification of meters Active, reactive and apparent energy measurement for single phase 2-wire systems with integrated error calculator and pulse output Vector diagram, harmonics spectrum and wave form display for analysis of the mains conditions Burden measurement of Current Transformer (CT) and Potential Transformer (PT) Application On site meter measurements Verification of energy registration Verification of the circuit load conditions Options Software CALSOFT Error compensated clip-on CT’s up to100 A For any further information concerning the use of this instrument, or in the event of any questions, you are invited to contact EMH / MTE directly at: MTE Meter Test Equipment AG Dammstrasse 16 CH-6304 Zug Switzerland Phone: +41-41-724 24 48 Fax: +41-41-724 24 25 EMH Energie-Messtechnik GmbH Vor dem Hassel 2 D-21438 Brackel Germany Phone: +49-4185-5857-0 Fax: +49-4185-5857-68 PTS 3.1 C Operation Manual Page 7/202 3. 3.1 Connectors and control elements and start-up Connectors and control elements The various connections are accessible on the front panel of the instrument after opening the outer cover. Operation may be carried out via the integrated keyboard or through the serial interface. [1] [2] [3] [4] 1A/10A red current connectors for I Current flow direction out of PTS 3.1 C, Imax=12A, protected with fuses (see [4]) Connection: 4 mm insulated socket Function Output: Mode: Test System or Reference + Source Back wire: Mode: Reference 1A/10A black current connector for I Current flow direction into PTS 3.1 C, Imax=12A, protected with fuses (see [4]) Connection: 4 mm insulated socket Function Back wire: Mode: Test System or Reference + Source Input: Mode: Reference 1A/10A fuses for current connection I For 1A internal range: Fuse 1.6A / 500 V, fast acting For 10A internal range: Fuse 16A / 500 V, fast acting 120A red current connector for I Current flow direction out of PTS 3.1 C, Imax=120A, no fuses Connection: 6 mm high current connector Function Output: Mode: Test System or Reference + Source Back wire: Mode: Reference PTS 3.1 C Operation Manual Page 8/202 [5] 120A black current connector for I Current flow direction into PTS 3.1 C, Imax=120A, no fuses Connection: 6 mm high current connector Function Back wire: Mode: Test System or Reference + Source Input: Mode: Reference Attention! The voltage between current terminals ([2], [3], 300V CAT III [5], [6]) and case or protecting earth shall not exceed 0A … 120A 300 V, if the instrument is applied in measurement category CAT III environment. 120A NOT FUSED Attention! The 120A current connectors [5], [6] are not protected with fuses. Never connect line voltage to the connectors [5] and [6] of the same phase. Warning! When testing meters with closed voltage links, the current paths are connected with the voltage paths. Dangerous line voltages are present on the current paths in this case! [6] [7] [8] [9] Red voltage output phase connector for U Umax = 480VAC Connection: 4 mm insulated sockets Black voltage output neutral connector U Internally connected with [11] Connection: 4 mm insulated sockets Fuses for voltage output connection for U Fuses: 2 x 400mA / 500 V, fast acting Attention! U1 is output only, used in Mode Test System or Reference + Source. Do not connect to line voltage. [10] Red voltage input phase connector for L Umax=480VAC Connection: 4 mm insulated sockets Black voltage input neutral connector N Internally connected with [8] Connection: 4 mm insulated socket Attention! The connectors L, N are INPUTS INPUTS ONLY ONLY. [11] Attention! The voltage between voltage terminals ([7], [8], [10], 11]) and case or 300V CAT III/600V CAT II protecting earth shall not exceed 300 V, if the 0 … 480V instrument is applied in measurement category CAT III environment, and not exceed 600 V, if applied in CAT II environment. Supply voltage connection, mains switch, fuses 1 Supply voltage connection: 88min … 264max VAC, 47 … 63 Hz 2 Mains switch 3 Fuses 2 x 4A / 250 V slow blow (below the cover) PTS 3.1 C Operation Manual Page 9/202 [12] [13] Compact flash card Removable compact flash (CF) memory card for storage of measurement data, administrative data and instrument settings. Push on button to eject the CF card and then pull out the card. When reinserting the card, regard the correct orientation. The side near the eject button has a thin guideway, the opposite side a thick guideway. Warning! Do not remove the CF card, if the card is actually accessed, indicated with a red background of the CF status indication on the display. Not following this procedure may lead to corrupted files and loss of data. The most safe procedure is to switch off the PTS 3.1 C before removing or inserting the CF card. Connection for 100A electronically compensated clamp-on current transformer Connection: 14 pole Redel socket, suitable exclusively for an electronically compensated MTE clamp-on current transformer PTS 3.1 C Operation Manual Page 10/202 [14] Connection for flexible LEMflex 30A/300A/3000A current transformer Connection: Redel socket, 6 pole, suitable exclusively for an electronically adjusted LEMflex current transformer [15] Connection for 1000A clamp-on current transformer, electronically adjusted Connection: Redel socket, 6 pole, suitable exclusively for an electronically adjusted MTE clamp-on current transformer [16] Impulse input The impulse input can each be used for a scanning head (e.g. the SH 2003) and can also be used to connect to a retransmitting contact of the device being tested. Type: Lemo socket, 5 pole Pin 1 +11 ... 13V (I<60mA) (supply of scanning head) Pin 2 fin max. 100 Hz (slow input, anti-bounce) Pin 3 fin max. 200 kHz (fast input) Pin 4 GND Pin 5 screen Impulse output The default setting for the mean frequencies of the impulse output is: Proportional to total active power P [17] [18] [19] [20] [21] [22] The reference power and the meter constant can be reconfigured. Type: Lemo socket, 5 pole Pin 1 +11 ... 13 V (I<60mA) Pin 2 not used Pin 3 fout max. 60kHz (1:1) Pin 4 GND Pin 5 screen Serial Line Interface RS232 Connection: 9 pole SUB-D connector Pin 2 TxD Pin 3 RxD Pin 5 GND Pin 7 CTS Pin 8 RTS Alphanumerical keypad and cursor keys Turnable Handling Button (THB) Connector for external keyboard (PS2) Color LCD display PTS 3.1 C Operation Manual Page 11/202 3.2 Installation of test circuitry and start-up Attention! Disconnect or switch off dangerous voltages in the measuring set-up during connecting or disconnecting the PTS 3.1 C whenever possible. Regard local safety regulations for connection of measuring instruments to the installation. Steps to connect and disconnect the PTS 3.1 C Connect the PTS 3.1 C 1. Connect clamp-on CT at PTS 3.1 C first, if used 2. Connect scanning head SH 2003 or hand switch at PTS 3.1 C , if used. 3. Connect the supply cable to the PTS 3.1 C and switch-on the instrument 4. Connect voltage cables first at PTS 3.1 C and then at measuring set-up. 5. Connect the measuring currents: a) Connect current cables first at PTS 3.1 C and then at measuring set-up, if direct current inputs are used. b) Fix clamp-on CT on wire of measuring set-up, if clamp-on CT is used. Disconnect the PTS 3.1 C 1. Disconnect the measuring currents: a) Disconnect current cables first at measuring setup and then at PTS 3.1 C, if direct inputs are used. b) Remove clamp-on CT from wire of measuring set-up, if clamp-on CT is used. 2. Disconnect voltage cables first at measuring set-up and then at PTS 3.1 C 3. Switch-off the PTS 3.1 C and disconnect the supply cable. 4. Disconnect scanning head SH 2003 or hand switch at PTS 3.1 C, if used. 5. Disconnect clamp-on CT at PTS 3.1 C. Attention! Connect the clamp-on current transformer always first to the PTS 3.1 C and then to the cable of the test circuitry. Never unplug the clamp-on CT connector at the PTS 3.1 C during operation. This is to avoid open circuiting of the clamp-on CT secondary winding. Connection examples using the PTS 3.1 C for measurements on various types of devices under test, and for different connection modes, are given in Chapter [11] PTS 3.1 C Operation Manual Page 12/202 3.2.1 Paths of Current There are two possible connections for each phase. For currents up to 10A the two 4mm safety sockets are used. For higher currents up to 120A the two high current connectors are used. Attention! Only one connection (1A/10A or 120A) for each phase may be connected at a time and the connection used must be the same as the selected 10A or 120A in the installation menu. Starting from the red socket, the current path of a phase is routed through the device under test back to the black socket. The current outputs are isolated from the voltage outputs and the supply voltage. Two fuses are used to protect each phase: 1.6A for the 1A range and16A for the 10A range (both fuses are fast acting types). Attention! If the clamp-on current transformers are used, connect them first to the PTS 3.1 C and then to the cables of the test circuitry to avoid open circuiting of the clamp-on CT’s secondary windings. 3.2.2 Paths of Voltage The voltage paths for voltage output (U) and measurement, voltage inputs (L1, N) are separately realized. The voltage output U is used for the direct connection of device under test to the PTS 3.1 C in the Test and Source modes. The voltage output is potential free and protected against accidental short circuit. The output is protected by two 400mA fast acting fuses. the voltage input L1, N is used for the direct connection of device under test to the PTS 3.1 C in the Measurement mode. The neutral connector is connected to the neutral connector of the voltage output (black socket U). 3.2.3 Special Circuits For connecting devices under test, where current and voltage path are not separable (e.g. electricity meters without voltage links) the corresponding current and voltage sockets of the PTS 3.1 C can be connected together. Warning! In this case the current paths are at the voltage potentials. Dangerous high voltages are present on the current paths. 3.2.4 Connecting a PC The PTS 3.1 C Portable Test System has an RS232 PC communication interface for remote control. In this manner testing processes can, to a large extent, be run automatically. The required interface of the PTS 3.1 C is selected and configured via the menu Data Base Basic settings. The interface connector of the PTS 3.1 C should be connected to the PC serial interface. The commands available are described in a separate document. PTS 3.1 C Operation Manual Page 13/202 4. Operation principles Before operating carefully read the safety precautions in chapter [1]. The following section deals with manual operation of the PTS 3.1 C. Operation of the instrument via serial interface commands is explained in a separate operation manual. 4.1 Display and control elements 4.1.1 Display After start-up the Source Menu Card (MC) is displayed in the form of a register card with the Logo cycling between MTE and EMH. The various selectable functions of the menu are shown at the left hand side of the display in the form of Functional Buttons (FB) with graphical indication of the function. At the bottom status information is displayed. Menu Card (MC) MC status Active MC Type of instrument (PTS3.1C) serial number (#38800) and firmware version (V1.15) are indicated in the menu card. The MC’s Reference and Data Base are always active. The MC’s of Source and Sequence are activated depending on selected basic mode. Inactive MC The menu card is ‘grayed out’. Type of instrument, serial number and firmware version are not indicated. FB’s and sub menus can still be selected, if selection is activated in basic settings, but cannot be executed. Only the FB’s, which are supported by the actual instrument configuration, can be executed. Functional Button (FB) The functional buttons are used to call sub menus or functions or to enter data or select settings. The function is indicated in graphical from on the button directly. Further description can be found in section [4.1.4/ 4.1.5]. PTS 3.1 C Operation Manual Page 14/202 Menu Cards (MC) and Functional Buttons (FB) of main menu A detailed description of the listed functions and sub menus can be found in the chapters indicated in brackets []. Portable Reference Standard Error measurement [8.2] Measurement [8.3] Wave form analysis [8.4] Energy measurement and register test [8.5] Transformer tests [8.6] Special functions [8.7] Reference meter settings [8.1] Portable Power Source Load point and network definition, execution [7.1] Harmonics [7.2] RCS Ripple Control Signals [7.3] System parameters [7.5] Automatic test run with Portable Test System Automatic or step by step test run [9.2] Edit automatic test sequence [9.1] PTS 3.1 C Operation Manual Page 15/202 Data Base Administrative data [6.4] Meter data [6.5] Transformer data [6.6] Load point data [6.7] View of results [6.2] Basic settings of the instrument [5] The look of the main menus is changing as soon as a sub menu is called. The last selected sub menu is shown with a second column of FB’s. and the sub menu displayed in the window on right side of the two FB columns. Type and firmware version In the main menu at the bottom above the status indications type and version information is displayed. PTS3.1C V1.15 B0031 22.06.2009 SN38800 LP02 Type of unit Firmware version Build code of the firmware Date of the firmware Serial number of the unit Hardware Version This information may be required during contact with MTE in the event of a problem. Status information / Tool-tip Status information Most of the time. Status information of the system controlled by the PTS 3.1 C is displayed The display depends on the system configuration. For a detailed description see [4.2]. Tool-tip Each time a new FB is selected a help text is displayed in a so called tool-tip window. The time the window is shown is configurable between OFF, 0.5 .. 10s. For configuration and display of tool-tips in other languages see [5]. PTS 3.1 C Operation Manual Page 16/202 4.1.2 Turnable Handling Button (THB) The Turnable Handling Button, further in the manual abbreviated with THB, is the most used operating element of the PTS 3.1 C and allows following basic operations: Left / right turning Move red selection frame step by step to select soft keys or display regions Select out of selection list during inputs Change numerical values during inputs Move the cursor sign during alphanumerical inputs Pushing on button Activate sub menu, function or input Terminate sub menu, function or input Activate / deactivate selected area Change left / right between menu cards (MC) These two keys are exclusively reserved for this function. 4.1.3 Keypad Alphanumeric keys for input of numerical values and text within the menus. Repeated key presses allow the text characters shown in the lower part of the key to be selected. In this way both characters and numbers can be selected. The last selected character or number will be inserted into the input field. The sign below the zero symbolizes a space. It is used to insert space or to delete characters or numbers by overwriting them with a space. Cursor keys PTS 3.1 C Operation Manual Page 17/202 4.1.4 Functional Buttons (FB) The rectangular fields shown in the display are simulating keys with different functions and settings. They can be selected and executed with the THB. Because the function of the keys is variable, and the function is indicated on the key itself depending on the menu selected, they are called Functional Buttons, further in the manual abbreviated with FB. These keys together with the graphical symbols displayed on them, allow fast and easy operation of the instrument. Different types of functional buttons Call of sub menu The pressed FB in the first column indicates that the measurement sub menu is active. The FB’s in the second column are changing. They belong to the activated sub menu The pressed FB in the second column indicates that the PQS display is active. The FB’s of the sub menu can directly be selected by moving the red frame to the desired FB by turning the THB. Pressed functional button A key shown as depressed indicates that the function is in active state, e.g. input of time base. Selection with cyclic mode and status indication in the FB Consecutive key presses cycle between the possible states. The actual state is indicated in the FB itself. E.g. the connection mode FB has two states. Each key press changes between these two states. A cyclic change between two states is also called toggle mode. Disabled key If a key is disabled, it is shown ‘grayed out’. The function is blocked. The corresponding FB is not selectable and executable. Blank key A blank key can be selected by the THB, but has no function. Blank keys are a reserve for future applications. Exit of sub menu The next higher menu or the calling menu is displayed. PTS 3.1 C Operation Manual Page 18/202 4.1.5 Basic applications of Turnable Handling Button (THB) and Functional Buttons (FB) Selection of functional button, display region or display field with the THB. Numerical input and selection out of predefined settings with THB. Selection of Functional Button (FB) Clockwise turning moves the thin red frame step by step from left column first functional button at the bottom up and the right column down until to the last functional button at the bottom. Counter clockwise turning moves the thin red frame the same way back. The functional button, where the thin red frame is actually positioned, is selected. Push on THB to activate or deactivate the selected FB. Top down selection of input fields with two variants (cyclical mode) Clockwise turning Moves the thin red frame through all input fields from left to right and top down. Counter clockwise turning Moves the red frame only through the fields in the first column top down. The selection restarts at the top if the bottom is reached (cyclical mode). Selection of display regions and fields inside the region Select display region Move thin red frame to the desired display region. The red selection frame changes between FB’s and display regions. PTS 3.1 C Operation Manual Page 19/202 Enable / disable region Push on THB button at selected display region. The red frame becomes thick and selection of fields inside the region is enabled. As soon as the THB is turned on any side the frame becomes thin again. To disable the region the frame must be selected to be thick again. Then the push button must be pressed to disable the region Select fields up / down inside the region Clockwise turning The available fields are selected in direction top to bottom and left to right. Counter clockwise turning The fields are selected the same way back. The next step after the first field selects the region, indicated with a thick region frame. Select outside the region Turning the selection frame outside a selected region will select a second region or an FB outside the region. The selection and activation of a second region is used to copy from region to region. Numerical data input with keypad or THB Data input with keypad or THB The first key press on the THB activates the data input related to the FB. The activation is indicated by the pressed FB, a red frame, a grey cursor sign and the THB symbol. In this example a numerical input can be made directly with the keypad or by turning the THB. The second key press on the THB terminates the data input. The input is accepted. The cursor sign, the THB symbol and the red frame disappear. The red selection frame is shown around the soft key. Another soft key can be selected by turning the THB. PTS 3.1 C Operation Manual Page 20/202 Selection out of predefined settings with cursor keys or THB E.g. set printer baud rate The first key press on the THB activates the selection related to the FB. The activation is indicated by the pressed FB, a red frame and up / down cursor symbols. One of the following settings can be selected by turning the THB or using the up / down cursor keys (cyclical mode): 4800 / 9600 / 19200 / 38400 / 57600 / 115200 Baud The second key press on the THB terminates the selection. The last selected setting is overtaken. The up / down cursors and the red frame disappear. The red selection frame is shown around the FB. Another FB can be selected by turning the THB. 4.1.6 External keyboard (option) An external keyboard can be connected to the PTS 2.3 C and be used to operate the instrument and to make alphanumerical inputs. Note: The definition of the keys is based on a German keyboard layout. Special key functions Keys Function Ctrl + or Change between register cards (same function as left / right keys at the THB) , , , Move selection frame (same function as turning the THB) Enter Activate, terminate sub menu, function or input (same function as THB push button) 4.2 Status indications At the bottom of the display different status indications of the system are visible. The status indications are varying depending on the system configuration. The status indication of the missing modules are replaced with grey fields. Connection mode and reactive mode Connection mode 4-wire mode 3-wire mode (not available at PTS3.1C) Reactive mode Natural (n) mode (90° phase shifters used) Artificial or cross-connected (x) (phase - phase voltages with 90° phase shift used) (not available at PTS3.1C). PTS 3.1 C Operation Manual Page 21/202 Voltage and current measurement inputs Voltage input type Direct voltage inputs Current input type Direct current inputs 120A Direct current inputs 12A Current clamps 100A Current clamps 1000A LEM clamps 30A LEM clamps 300A LEM clamps 3000A Transformer factors Status of activation of transformer factors for voltage inputs (upper symbol) and current inputs (lower symbol). Transformer factors disabled The ratio is 1. All values are indicated as measured. Transformer factors enabled The displayed load values and energies and the ranges indicated in the status section are multiplied with the ratios defined at reference meter settings [8.1]. Selection and indication of voltage and current ranges Type Automatic range selection Manual range selection Range indication Normal display The actual selected end of range value is indicated for voltage (U1) and current (I1). Range overflow The range indication of inputs, which are overloaded is blinking between red and normal and a repeating beep can be heard. The overload indications disappear as soon as normal conditions are reached again. Transformer factors activated The internal selected end of range values 120V and 12A are multiplied with the defined transformer factors (e.g. voltage 1kV:100V = 10, current 100A:5A = 20). PTS 3.1 C Operation Manual Page 22/202 Time base Internal time base interval The set time base is indicated. The bar graph shows the actual elapsed time of the running interval. External control of time base interval The time base interval is defined by impulses at impulse input 1. The time in brackets indicates the time between the last two impulses at input 1. The Indicated bar graph of the next period is based on this value. Source ON / OFF status Source OFF indicated with red OFF button and white flash symbol Source switch on / switch off active indicated with sandglass and yellow flash symbol. The set values are ramped up or down. Source On indicated with green ON button and yellow flash Actual set voltage and current values of the source Indication of the actual set values for voltage output and current output of the source. The values indicated here are switched on, when the start button is operated. Compact flash card status Compact flash card inserted and recognized The available storage size, e.g. 63 mega bytes of the inserted 64 MB compact flash card is indicated. A bar graph shows the used storage in percentage of the available storage. The background is displayed red during read or write operations on the flash card. Warning! Do not remove the CF card, if the card is actually accessed. Not following this procedure may lead to corrupted files and loss of data. The most safe procedure is to switch-off the instrument before removing or inserting the CF card. No compact flash card inserted Cyclical data saving active Time and date hh:mm:ss Actual time with h: hour, m: minutes, s: seconds DD.MM.YYYY Actual date with D: day, M: month, Y: year PTS 3.1 C Operation Manual Page 23/202 4.3 Input of data The input of data is achieved using the alphanumeric keypad and the cursor keys or by using an external keyboard (option). 4.3.1 Numerical inputs E.g. meter constant of device under test. Input of numbers Display of actual meter constant Pressing the THB button at the selected input field activates the input. The old value is displayed in a thick red frame followed by a grey cursor sign. Enter the desired value with the keypad. The first entered digit replaces the previous value. Incorrectly entered inputs can be cleared with the left cursor key, digit for digit. The input is completed by pressing the THB button. The red frame becomes thin, the grey cursor sign disappears and the new value is saved. If an input should be activated by mistake, the input function can be aborted by operating the THB button once again. In this case the original value is retained. PTS 3.1 C Operation Manual Page 24/202 Input of numbers with exponent Decimal point: If at start of input, or immediately after a number has been entered, the point key is depressed, a decimal point is inserted Positive exponent: If the point key is operated a second time immediately after a decimal point has been entered, an E+ is inserted for a positive exponent. Negative exponent: If the point key is pressed again after the E+ is displayed, an E- is inserted for a negative exponent. The input is completed by pressing the THB button. The red frame becomes thin, the grey cursor sign disappears and the new value is saved. Input of minus sign E.g. input of phase angle settings. Minus sign with point key: If at start of input the decimal point key is depressed twice a minus sign is inserted. If the point key is operated a third time a normal decimal point is inserted. Input, change sign with +/- key: Operating the +/- key inserts a minus sign or changes the sign of an already entered number (cyclical mode). 4.3.2 Alphanumerical line input With the keypad the numbers and characters shown on the upper and lower half of the keys and with the point key some additional application dependent special characters can be entered. Input can also be made with an external keyboard (option) connected to the PTS 3.1 C. Select input format Repeated key operation changes between (cyclical mode): Capital letters Lower case letters Numbers PTS 3.1 C Operation Manual Page 25/202 Example: Input of meter type name Activate input Push on THB to activate the input The thick red frame is shown around the line and a yellow cursor sign is displayed. Input of character Repeat key operation within less than 1 second until the desired character is shown. Wait until the character is inserted and the cursor has moved one position to the right. Input with capital letters Move cursor one position left Counter clockwise turning of the THB moves the cursor one position to the left. With further turning the cursor can be moved until the begin of the line. Insert character The character is inserted at the position before the cursor. Change to input of numbers Delete character Move cursor one position right Clockwise turning of the THB or operating the right cursor key moves the cursor one position to the right. Further turning or cursor key operations moves the cursor to the end of the line. Change to capital letters or Change to lower case letters Terminate input Push on THB to terminate the input. PTS 3.1 C Operation Manual Page 26/202 Input of special characters The listed seven special characters can be selected by repeated key operation of the point key (cyclical mode). Special characters at standard line input Special characters at file name line input 4.3.3 Alphanumerical field input With the keypad the numbers and characters shown on the upper and lower half of the keys and with the point key some special characters can be entered. Input can also be made with an external keyboard (option) connected to the PTS 3.1 C. Select input format Repeated key operation changes between (cyclical mode): Capital letters Lower case letters Numbers Example: Input of comment Activate input Push on THB to activate the input A grey cursor, a red frame and an input line at the bottom are displayed. New text is always inserted at the actual position of the grey cursor. The old character or number will be overwritten. Input of character With repeated key operation within one second, the characters and numbers listed in the bottom line can be selected in cyclic mode. Input of capital letters If no further key pressure follows within one second, then the last inverse displayed character or number is inserted in the text. The grey cursor moves one position to the right. Move cursor one position left Counter clockwise turning of the THB moves the cursor one position to the left. With further turning the cursor can be moved until the begin of the line. Insert character The character is inserted at the position before the cursor. Move cursor one position right Clockwise turning of the THB or operating the right cursor key moves the cursor one position to the right. Input of space The special sign below the 0 indicates a space character. or PTS 3.1 C Operation Manual Page 27/202 Change to input of numbers Delete character Change line Operating the down cursor two times moves the cursor to lines down. Move to begin of line Turn the THB counter clockwise until the cursor is at the begin of the line. Change to capital letters Change to lower case letters Enter special character Operate the point key six times to select the underline character. Enter number in text mode Terminate input Push on THB to terminate the input. PTS 3.1 C Operation Manual Page 28/202 4.4 Load / save settings Load / save settings menu The function can be called from different menus to load or save parameters (e.g. error measurement parameters). The data base file selection menu is called and parameters can be loaded from a file or saved to a file on the compact flash card. The FB’s of data base menu, which are not used, are displayed “grayed out” and not accessible. The file defaults is loaded at power on. Desired default settings can be saved under this name. Note: The files are only available and the default parameters are only loaded, if a compact flash card is inserted at the PTS 3.1 C. Indications / settings Indications File name The file name is shown beside the blue file symbol. Date and time Date and time when file was saved is shown. Depending from length of file name either in big letters or with flash and small letters. File size The file size is shown in byte. Load settings Activate load from data base with THB Select / load settings Move yellow line to desired file with THB and push THB to load the new settings. The calling menu is displayed again. Cancel load settings Move yellow line to EXIT with THB and push THB to cancel the load function. The actual settings remain unchanged. The calling menu is displayed again. Save settings PTS 3.1 C Operation Manual Page 29/202 Activate save to data base with THB Select / save as new settings Move yellow line to desired file with THB and push THB to activate input of new name Define name A name is proposed. Change name if desired, see [4.3.2]. Terminate saving with push on THB. Reenter file name The proposed file name already exist. OK: Entry field for define name appears again. NO: Cancel save function. Select / save as defaults Move yellow line to Defaults with THB and push THB. Confirm overwriting Overwrite: Overwrite Defaults with new settings. At next power on this settings will be loaded as default. Abort: Cancel save function. The actual defaults settings remain unchanged. Cancel save settings Move yellow line to EXIT with THB and push THB to cancel the save function. Exit, back to calling menu Delete file / rename file / create folder / browse folder Description of these functions see [6.1] PTS 3.1 C Operation Manual Page 30/202 5. Basic settings of the instrument Basic settings of the instrument menu The following settings are displayed: Time 16:00:06 Date 02.07.2009 Baud rate 115200 Bd for the serial interface RS232A Baud rate 19200 Bd for the serial interface RS232B (not available at PTS 3.1 C) Tool-Tip timeout 2.0s Language is English Settings displayed on cyclical FB: Menutab selection mode Basic Control Mode Indications / settings [4] Time The clock will be stopped and the time displayed. Set the RTC time in the format hh:mm:ss. The separator (:) will be generated automatically. h: hour, m: minute, s: second The clock will start with the new time. Date Set the RTC date in the format dd.mm.yyyy. The separator (.) will be generated automatically. d: day, m: month, y: year Baud rate of serial interface RS232A The serial interface RS232A can be used for the communication to a PC or can be used for connecting a serial printer. The printer settings are made separately in the menu printer and save parameters settings [5.1] Set panel baud rate: The following settings can be selected: 4800 / 9600 / 19200 / 38400 / 57600 / 115200 Baud. Baud rate of serial interface RS232B (not available at PTS 3.1 C) PTS 3.1 C Operation Manual Page 31/202 Tool-Tip timeout The Tool-Tip timeout can be selected from 0.5s to 10s. The ToolTip text will be displayed in the status line for the defined time. The Tool-Tip description will not appear in the status line. The Tool-Tip will be displayed during the defined time in the status line of the screen and explains the function of the FB. Call Language selection menu [5.2]. Load different languages for tool tips, menu and units from the directory Languages Call General system parameters menu Call printer and save parameters settings menu [5.1]. Setup beeper The beep function is active when the FB is shown depressed. Push the THB to change the status (cyclical mode). Beep for each keystroke on internal keyboard Beep for each keystroke on external keyboard Beep each time the time base starts. Beep each time a new error value will be displayed Exit and accept settings, back to calling menu. PTS 3.1 C Operation Manual Page 32/202 Menutab selection mode Toggle mode between. Change between activ and inactiv menu cards (MC) with help of change left/right THB. Change between activ menu cards (MC) with help of change left/right THB Basic Control Mode Cyclical mode selection between: Test System Reference standard (Ref), source (Src) and automatic test sequence function (Seq) are active. The source settings (connection mode, current connectors used, range selection) are coupled with the reference standard settings. The source controls these reference standard settings. Reference + Source Reference standard (Ref) and source (Src) are operated independently. The settings (connection mode, current connectors used, range selection) must be made separately for both units. Reference The Reference standard (Ref) is enabled only. The source (Src) is disabled. In this mode the PTS 3.1 C can be used like a standalone reference standard. Save and exit the menu PTS 3.1 C Operation Manual Page 33/202 5.1 Printer and save parameter settings Printer and save parameter settings menu The following settings are displayed: printer type Baud rate for printer interface 9600Bd time for line delay 200ms time for save interval not selected Selection of printer type The mentioned printer types CITIZEN PD-04 and DATAMEGA DPN-2335-40-V.24 are tested. Other printer types have to be tested before use. The printer should be connected to the serial interface. Selection for the thermo printer CITIZEN PD-04 Selection for the dot matrix printer DATAMEGA DPN2335-40-V.24 Selection without any printer. Set printer baudrate The printer baudrate is set separately. So as soon as the printer is used this settings will be active independent from the settings of the RS232 interface in data base installation submenu. The following settings can be selected: 4800 / 9600 / 19200 / 38400 / 57600 / 115200 Baud. Set Printer line delay The line delay time can be selected: 200ms / 500ms / 1000ms / 2000ms or OFF. PTS 3.1 C Operation Manual Page 34/202 Set save mode Toggle mode between the two save modes. The results will be saved one time. The FB interval with the according input field is ‘grayed out’ The results will be saved at the defined interval time. This mode will be used for load analysis. Input of number between 1 and 99999 Select s, min or hr h: hour, m: minute, s: second Indication of active periodical save mode The camera key is shown depressed <-> The CF card status indication is periodically changing between diskette symbol and size indication. The background becomes temporary red, when data is saved to the CF card. To stop the periodical saving the camera key must be pressed once again. Set image save mode If activated, an image of the display at time of pressing the camera FB can be saved together with the actual result data set. Toggle mode between. Save display image The whole display content is saved Save results image The result window of the display is saved No image The image save function is disabled. The images are saved in the same directory as the result file in the format: <4 char name><4 digit number>.BMP <4 char name> First 4 characters of the result file name <4 digit number> Automatically incremented number starting at 0000 .BMP Windows BMP Bitmap File Format PTS 3.1 C Operation Manual Page 35/202 Example Result directory Result files and image files are stored in the same directory. The grey shown image files *.BMP cannot be viewed on the instrument itself with the result preview function. If a result file is deleted, then also all linked image files are deleted. Header of results at print preview The link between result file (E002) and image file (E0020000.BMP) is shown. Display image The full display is saved (size 302 kB). The image E0020000.BMP was captured together with the results (same time and date in status as in header of results). Result image Only the result section of the display is saved (size 182 kB). Directories on CF card The images are stored in the directory RESULTS. The images can directly be accessed by the PC with a CF card reader. The images can be copied or moved to any directory on the PC and can be used for documentation of the measurements (e.g. inserted in a word document). PTS 3.1 C Operation Manual Page 36/202 5.2 Language Selection Language selection menu The available languages for tool tips and menu texts are displayed in this menu There are two possibilities to load new language files to the instrument: Download of a new language file <language>.txt from a PC with the download tool. Copy the new language file <language>.LNG on a PC directly to the compact flash card directory LANGUAGE.DB. For use of standard FB for data base handling see [6]. Select language file One of the shown languages can be selected. The selected language will be activated immediately. The selected language is indicated in the menu Parameter. Reset to default language The language file <English> will be loaded. The language English is indicated in the menu Parameter. Delete file Select the file. By answering the security question with OK the marked file will be deleted. New language selection Exit and accept settings, back to calling menu. PTS 3.1 C Operation Manual Page 37/202 6. Test results and administrative data Data Base menu card The data base menu gives access to all administrative data sets (ADS) and test results dataset (TDS), which are saved on the compact flash card. Parts of the data base can either be entered or modified manually with the keypad or external keyboard or can be loaded into the unit with the software CALSOFT. Data transfer from PC to the compact flash card can be done via the serial interface or directly with an adapter for the compact flash card connected to the PC. Access to parts of the data base is possible from different menu cards and sub menus. Indications / settings Call Administrative data menu [6.4] Call Meter data menu [6.5] Call Transformer data menu [6.6] Call Load point data menu [6.7] Call View test results menu [6.2] Basic settings of the instrument see chapter [5] PTS 3.1 C Operation Manual Page 38/202 6.1 Data Base functions Data base file selection menu The window on the right side shows a directory (e.g. Meter Type Selections) with subfolders and object files. There exists several object file types for the different parts of the data base. The two FB columns at the left side show all the available data base functions, which can be applied on the object files. The object file selection menu can be called from different MCs and different locations. If some FB’s are not used at a call of the object file selection menu, they are shown “grayed out” and are not accessible in this case. Indications / settings Basic file handling functions Common functions for the listed FB’s (example shown for load object file) Activate function Select and activate FB with push on THB. The FB is shown depressed. A red frame surrounds the file window and a yellow selection line is shown. Move the yellow selection line up / down by turning the THB right / left. Activate subfolder Move yellow line by turning the THB to desired folder name and push THB to change to selected folder. The path with root directory (Meter Type Selections:) and subfolders (LG\ZMD) is shown in the two header lines. Higher folder levels can also be selected with --- UP --- or --- ROOT ---, see description under browse. Note: Direct selection of folders is not working for delete and rename. Here the browse function must be used. Select file Move yellow line by turning the THB to the desired file (e.g. ZMD120AM for load or ---NEW--- for save). PTS 3.1 C Operation Manual Page 39/202 Cancel function Move the yellow line to EXIT and push THB to cancel the function. Edit actual object The editor menu of the object file type indicated in the root directory (e.g. Meter Type Selections) is displayed. Actual meter type dataset The actual content of the object can be viewed and changed directly. The content of the entry fields depends on the forgoing actions. If an object was loaded before, the content of this object file is shown. If reset object to defaults or create / edit new object was called before, the fields are empty. Some fields can directly be changed (e.g. manufacturer: SIEMENS), other fields contain links to sub menus (e.g meter counter setup: 1 (P)) or show object file names of linked object files. Exit, back to file selection menu. Note: To keep the changes, they must be saved, after leaving the menu, otherwise they will be lost at next power off. PTS 3.1 C Operation Manual Page 40/202 View actual object The content of the actual object dataset of the file type indicated in the root directory (e.g. Meter Type Selections) is displayed in the printout format. View actual meter type The data of the actual object is shown in the printout format. This function gives a good overview over the actual object dataset, because all data, also the data of the linked submenus and object files, is shown at once. Scroll up / down by turning the THB at big datasets Exit menu by push on THB Print results by push on zero key [10.3] Load object file Load selected object file Push THB at selected object file (e.g. meter type file ZMD120AM in subfolder path: LG\ZMD of root directory: Meter Type Selections). The file is loaded and the editor of the actual object dataset is shown (see description for edit actual object). Save object file Save as new file Select line ---NEW--- and push THB to save dataset as new file. Enter / change name The input of a name is required. In some cases a name is automatically generated. The name can be changed with THB and keypad [4.3.2]. Terminate save Push THB to terminate the save function. Warning file exists, reenter name? OK: Reenter different file name and push THB again to terminate. NO: The rename function is canceled. PTS 3.1 C Operation Manual Page 41/202 Save as defaults Select file named Defaults in root directory (e.g. Meter Type Selections) and push THB. A confirmation is required, because an existing file will be overwritten. Confirm overwriting Overwrite: Overwrite Defaults with new settings. At next power on this settings will be loaded as default. The save function is terminated. Abort: Cancel save function. The actual defaults settings remain unchanged. Save to existing result file With this function several measurement data sets can be saved in the same result file. Confirm overwriting / append Overwrite: The old measurement data set will be overwritten with the new data set. Append: The new measurement data set will be appended to the existing file. This option is only available at measurement result files. Abort: Cancel save function. Create / edit new object The empty editor menu of the object file type indicated in the root directory (e.g. Meter Type Selections) is displayed. Actual meter type dataset - empty The input fields are empty or reset to default values. Enter new dataset as desired. See description of different actual object datasets for the meaning of the listed entry fields. Exit, back to file selection menu. Save the values entered at the actual object dataset to a file in the data base (optional) Note: If the entries are not saved, they will be lost at power off. Reset actual object to defaults The actual object dataset is cleared. All entry fields and links to submenus and other object files are empty. PTS 3.1 C Operation Manual Page 42/202 Delete object file or folder Delete object file Push THB at selected file. A confirmation is requested. Confirm delete file NO: The delete function is canceled. OK: The file is deleted and the delete function is terminated. Delete folder Push THB at selected folder. A confirmation is requested. Confirm delete folder NO: The delete function is canceled. OK: The folder and all its content (files and subfolders) are deleted. The function is terminated. Rename object file or folder Activate rename Push THB at selected file or folder. Change name Change name with THB and keypad [4.3.2]. PTS 3.1 C Operation Manual Page 43/202 Terminate rename Push THB to terminate input and rename function. If the name was not changed a warning appears. Warning file exists, reenter name? OK: Reenter different file name and push THB again to terminate. NO: The rename function is canceled. Create subfolder Select / activate new Select line ---NEW--- in the root directory or subfolder, where the new subfolder shall be created, and push THB to start input of name. Enter subfolder name Enter name of subfolder (MM) with THB and keypad [4.3.2] Terminate function Push THB to terminate input and create new folder (MM). The function is terminated. Browse subfolders Select subfolder Select folder (MM) in actual path (LG) with yellow line and push THB to activate the folder. Change to subfolder The subfolder content is shown. The second header line shows the new path (LG\MM). Change to upper folder Select --- UP --- and push THB to change to next higher level. Change to root directory Select --- ROOT --- and push THB to change to the root directory (e.g. Meter Type Selections) Terminate browse Pushing the THB at any line with a file name or --- NEW --- or --- EXIT --terminates the browse function. PTS 3.1 C Operation Manual Page 44/202 Change sorting order Push on THB to cyclically change between the 7 different sorting orders: Sort directories followed by files ascending according names. Sort files followed by directories descending according names. Sort files and directories ascending according creation dates Sort files and directories descending according creation dates Sort files ascending according file size Sort files descending according file size No sorting Exit, back to calling menu PTS 3.1 C Operation Manual Page 45/202 6.2 View of saved test results and measurement information View results menu Call Any Test Results directory Call URef Test Results (not available) Call FRef Test Results directory Following some examples of viewing the results saved in the Any Test Results directory are shown. The results of the other directories URef Test Results and FRef Test Results can be viewed in the same way. Any Test Results directory All standard result files saved on the compact flash card are listed in this directory. The result files contain the combined results data with test results data (TDS) and administrative data (ADS). Select / load a result file The view results menu is called View results menu The results are shown in the printout format. This allows a compact fast overview of the ADS and TDS data saved in a result file The first line shows the result file name. The second line shows date and time of saving. Scroll up / down by turning the THB at big datasets Exit menu by push on THB Print results by push on zero key [10.3] PTS 3.1 C Operation Manual Page 46/202 Result file with several data sets In a result file with several data sets saved in continuous mode or with the append function the actual shown result dataset 1 of total 3 (1/3) is indicated as third header line. For the look of the different results see printout examples in chapter [10]. PTS 3.1 C Operation Manual Page 47/202 6.3 Data Base structure Stored measuring data [Result] contains two major parts: Administrative Dataset (ADS) [Result (Administration)] Test Results Dataset (TDS) [Result (Measurement)] The ADS contains the main parts: General Info dataset [Test General] Customer dataset [Customer] Meter dataset [Meter #1 to #3] Other checks dataset [Other Checks] The TDS contains the parts: Results of the different measuring functions [Error] to [DCREF / fREF] Sequence results [Sequence Results] Database structure Result Result (Admininstration) Installation No. Name Adress Tel. No. (Off.) Tel. No. (Mob.) Email Contract. Pow. Energy Supplier Net Operator Test Equipment Reference Meter Type Ser. No. Warm-Up Time Traceability Power Source ... Other Device #1 ... Other Device #2 ... Customer Meter No. Name Adress Tel. No. (Off.) Te. No. (Mob.) Email Meter Name Owner No. Serial No. Manuf. Year Approv. Date Comment #2 Coun. Content Meter Type Test Serv. Buy. No. Name Adress Tel. No. (Off.) Tel. No. (Mob.) Email #1 #3 Other Checks Error Installation OK Meter No. OK Wiring OK Sealing OK Phase Rot. OK ... ... (incl. U,I,, ...) Counter #1 Meas. System #1 Counter #1 Energy Test (incl. U,I,, ...) Harmonics (incl. U,I,, ...) #2 #3 #4 Waveforms (incl. U,I,, ...) #2 #3 #4 Burden U (incl. U,I,, ...) #2 #3 #4 Burden I (incl. U,I,, ...) CT CT Type PT PT Type Ratio U (incl. U,I,, ...) Ratio I (incl. U,I,, ...) Transducer (incl. U,I,, ...) DCREF / fREF Minimum content is the data that can be displayed on CALSOFT RESULT level! Test General Date Time Test No. Ambient Temp. Tester Name Pos. No. Result (Measurement) (incl. U,I,, ...) Sequence Results (incl. U,I,, ...) PTS 3.1 C Operation Manual Page 48/202 Detail structure Meter Sequence results Sequence Results Coun. Content Counter #1 #2 #3 Test Point #1 #4 Source Parameters Value Tariff #1 Value Tariff #2 Value Tariff #3 Value Tariff #4 Test Parameters Error (incl. U,I,, ...) OR Energy Test Meas. System #1 Meter Type Name Manufacturer Ub, Ib, Imax, f Principle Approval No. Norm CT CT Type Name Owner No. Serial No. Manuf. Year Comment Name Manufacturer Accuracy Class I1, I2, Ratio SN Norm Counter #2 #3 #1 #4 Energy Type +P, -P +Q, -Q QI, QII, QIII, QIV S, I2h, U2h (one off can be selected) Accuracy Class Const. (opt.) Value Unit Energy Type +P, -P +Q, -Q QI, QII, QIII, QIV S, I2h, U2h (one off can be selected) #._ | _.# Unit tm(min) (only in case of Max, Pmax) Const. (elec.) PT Name Owner No. Serial No. Manuf. Year Comment U Drop (Total) U Drop (Fuse) PT Type Name Manufacturer Accuracy Class U1, U2, Ratio SN Norm Value Unit #2 #3 (incl. U,I,, ...) #4 Counter Type E, Esum Max, Cum nCum, LP Nos. Tariff 1, 2, 3, 4 Test Point #n Source Parameters Test Parameters Error (incl. U,I,, ...) OR Energy Test (incl. U,I,, ...) PTS 3.1 C Operation Manual Page 49/202 6.4 Administrative data Administrative data menu Administrative dataset (ADS) The ADS is at the top of the hierarchy of the data base objects. It contains the objects: Customer dataset General info dataset Meter dataset Other checks dataset An ADS object can be linked to a test result data set (TDS) and be saved together with the results as a result file. Indications / settings Load / edit object files The file selection menu [6.1] is called and an object file directory is displayed: FB Directory Description Select Admin Dataset [6.4.1] Select Customer Dataset [6.4.2] Select General Info Dataset [6.4.3] Meter selections [6.5.2] Select Other Results Dataset [6.4.4] Three ways to load / edit object files Load object file from directory The actual object menu shows the content of the loaded object file, which can be modified. Edit actual object The actual object menu shows the already existing object file, which can be modified. Operating the edit actual object FB through several levels allows to completely enter new object data with the keypad or an external keyboard or to modify a previously loaded object. PTS 3.1 C Operation Manual Page 50/202 Create new object The actual object menu is empty. A completely new object can be entered. Save object file Save modified actual object to new file or overwrite existing file. 6.4.1 Admin dataset (ADS) Call edit actual object or load object file or create new object at the file selection menu [6.1] to call the actual object menu. Actual admin dataset (ADS) The file names of the actual loaded data base elements are shown at: Customer dataset General info dataset Meter dataset for inputs 1 to 3 Other checks dataset Enter or modify directly with THB and keypad or external keyboard: Comment to ADS dataset Indications / settings Load / edit object files The file selection menu [6.1] is called and an object file directory is displayed: FB Directory Description Select Customer Dataset [6.4.2] Select General Info Dataset [6.4.3] Meter selections [6.5.2] Meter selections [6.5.2] Meter selections [6.5.2] Select Other Results Dataset [6.4.4] Exit, back to calling menu PTS 3.1 C Operation Manual Page 51/202 6.4.2 Customer dataset Call edit actual object or load object file or create new object at the file selection menu [6.1] to call the actual object menu. Actual customer dataset Enter or modify directly with THB and keypad or external keyboard: Customer address Phone number Mobile phone number E-mail address Comment to customer dataset How to make alphanumerical inputs see [4.3]. Exit, back to file selection menu. 6.4.3 General Info dataset Call edit actual object or load object file or create new object at the file selection menu [6.1] to call the actual object menu. Actual general info dataset Enter or modify directly with THB and keypad or external keyboard: Date / time Number Temperature Contract power / energy supplier Network operator Name / position / reference of tester The file names of the actual loaded data base elements are shown at: Installation setup Test service buyer setup Indications / settings Load / edit object files The file selection menu [6.1] is called with the object file directory: Select customer Dataset For description of actual customer dataset object see [6.4.2] Call equipment info setup menu [6.4.3.1] PTS 3.1 C Operation Manual Page 52/202 6.4.3.1 Equipment info setup Equipment info setup menu The file names of the actual loaded data base elements are shown at: Reference meter Power source Other equipment #1 Other equipment #2 Indications / settings Load / edit object files The file selection menu [6.1] is called with the object file directory: Select Equipment Info Dataset For description of actual equipment info dataset object see [6.4.3.2] Exit, back to calling menu 6.4.3.2 Equipment info dataset Call edit actual object or load object file or create new object at the file selection menu [6.1] to call the actual object menu. Actual equipment info dataset Enter or modify directly with THB and keypad or external keyboard: Equipment type Equipment number Traceability Warm-up time Comment to equipment How to make alphanumerical inputs see [4.3]. PTS 3.1 C Operation Manual Page 53/202 Indications / settings Traceability Traceability available Traceability not available Exit, back to calling menu 6.4.4 Other results dataset Call edit actual object or load object file or create new object at the file selection menu [6.1] to call the actual object menu. Actual other results dataset A set of predefined (01 .. 15) and user defined checks (16 .. 25) is shown with marking: Good Bad No check The marking and user defined checks can be modified with: Change check boxes Define user result Enter or modify directly with THB and keypad or external keyboard: Comment to other results dataset PTS 3.1 C Operation Manual Page 54/202 Indications / settings Change check boxes Change checkboxes active A red frame and a yellow selection row is displayed. Move the yellow row with the THB on the position to change. Push on the THB to change the state of the test (cyclical mode): Good Bad No check Terminate entries by moving the yellow row over the end positions 1 or 25. Define user result Definition of user results The names of the checks at positions 16 .. 25 can be defined by the user. Move yellow row with THB to position to change. Activate input of test name with push on THB. Enter test name (e.g. Meter cabinet OK). Terminate input with push on THB. Leave definition of user results by moving the yellow row over the end positions 1 or 25. Exit, back to calling menu PTS 3.1 C Operation Manual Page 55/202 6.5 Meter data Meter data menu Meter type dataset Meter dataset Indications / settings Load / edit object files The file selection menu [6.1] is called and an object file directory is displayed: FB 6.5.1 Directory Description Meter Type Selections [6.5.1] Meter Selections [6.5.2] Meter type dataset Call edit actual object or load object file or create new object at the file selection menu [6.1] to call the actual object menu. Actual meter type dataset Enter or modify directly with THB and keypad or external keyboard: Meter principle Manufacturer / type Nominal voltage / nominal frequency Basic current / maximum current Approval Number / meter norm Meter connection type Measure system setup Meter counters setup PTS 3.1 C Operation Manual Page 56/202 Indications / settings Meter principle Electronic meter Ferraris meter Manufacturer / type Manufacturer The first line is reserved for name or abbreviation of meter manufacturer Type The second line is reserved for name of meter type. Nominal voltage / nominal frequency Nominal voltage Enter nominal voltage as indicated on the meter or the specification. U (phase - neutral) or U(phase - phase) must be entered depending on meter connection type. Nominal frequency Enter nominal frequency as indicated on the meter or the specification. Basic current / maximum current Basic current Enter basic current Ib at direct connected meters or nominal current In at transformer connected meters, as indicated on the meter or specification. Maximum current Enter maximum current as indicated on the meter or the specification. Approval number / meter norm Approval number Any alphanumerical approval identification, defined by customer, country of manufacturer, based on accepted type tests Meter norm Customer specific, national or international norm (e.g international meter norm IEC 60687 for electronic meters of class 0.5s, 0.2s). PTS 3.1 C Operation Manual Page 57/202 Meter connection type Network type selection menu Move red selection frame with THB to desired network type. Push THB to activate network type. The selected network is shown pressed. Push THB on exit door to leave the selection menu. Call Measure systems setup menu [6.5.1.1] Call Meter counters setup menu [6.5.1.3] Exit, back to calling menu 6.5.1.1 Measure systems setup Measure systems setup menu Up to four measure systems can be defined for one meter type. The names of the actual loaded data base object files are shown at: .. PTS 3.1 C Operation Manual Measure system 1 .. 4 Page 58/202 Indications / settings .. Load / edit object files The file selection menu [6.1] is called with the object file directory: Measure System Selection For description of actual measure system dataset see [6.5.1.2] Exit, save actual settings, back to calling menu 6.5.1.2 Measure system dataset Call edit actual object or load object file or create new object at the file selection menu [6.1] to call the actual object menu. Actual measure system dataset Enter or modify directly with THB and keypad or external keyboard: Measuring system type Accuracy class Meter constant of disc mark / LED Meter constant of electrical output PTS 3.1 C Operation Manual Page 59/202 Indications / settings Energy type Select energy type with THB (cyclical mode): P Active energy import / export Q Reactive energy import / export S Apparent energy import / export P+ Active energy import P- Active energy export Q+ Reactive energy import Q- Reactive energy export Q1 Reactive energy in power quadrant I (P+Q+) Q2 Reactive energy in power quadrant II (P-Q+) Q3 Reactive energy in power quadrant III (P-Q-) Q4 Reactive energy in power quadrant IV (P+Q-) I 2 U2 I2-hours (used at transformer loss meters, copper and leakage loss) U2-hours (used at transformer loss meters, iron and core loss) Accuracy class Enter accuracy class of measuring system in percentage (%) as indicated on meter or specifications. Meter constant of disc mark /LED impulse output Meter constant of electrical impulse output Constant value Enter constant value for disc mark (1 revolution (r) = 1 impulse (i) ) or LED impulse output or electrical impulse output as indicated on the meter or specifications. Unit Available units depending on selected energy type U2 I2 P.. Q.. S.. i/k..h i/kWh i/kvarh i/kVAh i/kWh i/kWh i/..h i/Wh i/varh i/VAh i/Wh i/Wh i/..s i/Ws i/vars i/VAs i/Ws i/Ws k..h/i KWh/i kvarh/i kVAh/i KWh/i KWh/i ..h/i Wh/i varh/i VAh/i Wh/i Wh/i ..s/i Ws/i vars/i VAs/i Ws/i Ws/i Exit, save actual settings, back to calling menu PTS 3.1 C Operation Manual Page 60/202 6.5.1.3 Meter counters setup Meter counters setup menu Up to four counters can be defined for one meter type. The names of the actual loaded data base object files are shown at: Counters 1 .. 4 .. Indications / settings .. Load / edit object files The file selection menu [6.1] is called with the object file directory: Meter Counter Selections For description of actual meter counter dataset see [6.5.1.4] Exit, save actual settings, back to calling menu 6.5.1.4 Meter counter dataset Call edit actual object or load object file or create new object at the file selection menu [6.1] to call the actual object menu. Actual meter counter dataset Energy counter Enter or modify directly with THB and keypad or external keyboard: Energy type Counter type Register format Number of tariffs PTS 3.1 C Operation Manual Page 61/202 Maximum counter Additional to the energy counter settings define: Maximum period Indications / settings Energy type Select energy type with THB (cyclical mode): P, Q, S, P+, P-, Q+, Q-, Q1, Q2, Q3, Q4, U2, I2 Description of energy types see measure systems dataset [6.5.1.2] Counter type Select counter type with THB (cyclical mode): E Energy E Total energy Max Maximum Cum Cumulative maximum nCum Maximum period LP Load profile Maximum period The FB is only active at counter type Max. Enter period for maximum register in minutes. PTS 3.1 C Operation Manual Page 62/202 Counter format Format X. Digits before decimal point (1 .. 9) .X Digits after decimal point (0 .. 9) Unit Available units depending on counter and energy type counter types energy types units E, E P.., U2, I2 Wh, kWh, MWh, GWh Q.. varh, kvarh, Mvarh, Gvarh S VAh, kVAh, MVAh, GVAh P.., U2, I2 W, kW, MW, GW Q.. var, kvar, Mvar, Gvar S VA, kVA, MVA, GVA Max, Cum, nCum, LP XXXXXX.X kWh Indication of actual selected register format and unit Number of tariffs Number of tariffs: 1, 2, 3, 4 Exit, back to calling menu PTS 3.1 C Operation Manual Page 63/202 6.5.2 Meter dataset Call edit actual object or load object file or create new object at the file selection menu [6.1] to call the actual object menu. Actual meter dataset Object files for meter type and transformers (optional) and metering code (optional) can be loaded. The file names of the actual loaded object files are shown at: Meter type Current transformers CT1 .. CT3 Voltage transformers PT1 .. PT3 The loaded metering code is shown at: Metering code Enter or modify directly with THB and keypad or external keyboard: Owner number / serial number Production year / certification date Comment to meter dataset Counter readings Indications / settings Load / edit object file The file selection menu [6.1] is called with the object file directory: Meter Type Selections For description of actual meter type dataset see [6.5.1] Load / edit object files Up to three current and / or voltage transformers can be linked to the phases 1 to 3 of a meter. In this way a whole substation setup can be defined. Example for loading of CT Move red frame with THB to field of phase 1 (CT1). The file selection menu [6.1] is called and an object file directory is displayed. Select / load file from directory. The object file loaded at phase 1 is automatically copied to phases 2 and 3. Select fields of phases 2 or 3 with THB to individually load other settings for this phases. Move red selection frame to FB and push on THB to terminate function. PTS 3.1 C Operation Manual Page 64/202 The number of active input fields is depending on the connection mode defined in the loaded meter type. E.g. at 3-wire mode only 2 input fields are active. FB Directory Description CT Selections [6.6.2] PT Selections [6.6.4] Enter counter readings Actual counter readings dataset The readings of up to 4 tariffs (T1 .. T4) for up to 4 counters can be entered here. Enter or modify counter reading directly with THB and keypad or external keyboard for: Counter 1 tariff T1 Counter 2 tariff T1 Counter 3 tariff T1, T2 Only tariffs defined in the loaded meter type are shown. Exit, back to calling menu Load / enter metering code The file selection menu [6.1] is called with the object file directory: Metering code Selections Call Load object file to load a saved metering code. The meter data set menu is displayed again and the loaded metering code is displayed. Call edit actual object or create new object to call the actual meter code dataset menu. Actual meter code dataset Enter or modify directly with THB and keypad or external keyboard: Country code Network operator code ZIP code Metering code Exit, back to calling menu Exit file selection menu, back to meter dataset menu. The entered metering code is displayed. Exit, save actual settings, back to calling menu PTS 3.1 C Operation Manual Page 65/202 6.6 Transformer data Transformer data menu Object files for current CT and potential PT types and CT / PT transformers can be loaded. The file names of the actual loaded object files are shown at: Current transformer CT type dataset Current transformer CT dataset Potential transformer PT type dataset Potential transformer PT dataset Load / edit object file The file selection menu [6.1] is called with the object file directory: CT Type Selections For description of actual current transformer CT type see [6.6.1] Load / edit object file The file selection menu [6.1] is called with the object file directory: CT Selections For description of actual current transformer CT dataset see [6.6.2] Load / edit object file The file selection menu [6.1] is called with the object file directory: PT Type Selections For description of actual potential transformer PT type dataset see [6.6.3] Load / edit object file The file selection menu [6.1] is called with the object file directory: PT Selections For description of actual potential transformer PT dataset see [6.6.4] PTS 3.1 C Operation Manual Page 66/202 6.6.1 Current transformer CT type dataset Call edit actual object or load object file or create new object at the file selection menu [6.1] to call the actual object menu. Actual CT type dataset menu Enter or modify directly with THB and keypad or external keyboard for: Manufacturer Current transformer CT type Accuracy class Primary current Secondary current Nominal burden Exit, back to calling menu 6.6.2 Current transformer CT dataset Call edit actual object or load object file or create new object at the file selection menu [6.1] to call the actual object menu. Actual CT dataset Object files for current transformer CT’s and current transformer CT types can be loaded. The file names of the actual loaded object files are shown at: Current transformer CT type Enter or modify directly with THB and keypad or external keyboard for: Owner number Serial number Production year / certification date Comment to CT dataset Exit, back to calling menu Indications / settings Load / edit object file The file selection menu [6.1] is called with the object file directory: CT Type Selections For description of actual current CT type dataset see [6.6.1] PTS 3.1 C Operation Manual Page 67/202 6.6.3 Potential transformer PT type dataset Call edit actual object or load object file or create new object at the file selection menu [6.1] to call the actual object menu. Actual PT type dataset Enter or modify directly with THB and keypad or external keyboard for: Manufacturer Potential transformer PT type dataset Accuracy class Primary voltage Secondary voltage Nominal burden Exit, back to calling menu 6.6.4 Potential transformer PT dataset Call edit actual object or load object file or create new object at the file selection menu [6.1] to call the actual object menu. Actual PT dataset Object files for potential transformer PT’s and potential transformer PT types can be loaded. The file names of the actual loaded object files are shown at: Potential transformer PT type Enter or modify directly with THB and keypad or external keyboard for: Owner number Serial number Production year / certification date Voltage drop fuse / voltage drop total Comment to CT dataset Exit, back to calling menu Indications / settings Load / edit object file The file selection menu [6.1] is called with the object file directory: PT Type Selections For description of actual potential PT type dataset see [6.6.3] PTS 3.1 C Operation Manual Page 68/202 6.7 Load point data Load point data menu Object files for load point data can be loaded. The file names of the actual loaded object files are shown at: Load point dataset Harmonics RCS Ripple Control telegram type dataset RCS Ripple Control Sequence dataset 6.7.1 Load point dataset Indications / settings Load / edit object file The file selection menu [6.1] is called with the object file directory: Load point Selections For description of Load point dataset see [7.1.2] 6.7.2 Harmonics dataset Load / edit object file The file selection menu [6.1] is called with the object file directory: Harmonics Selections For description of Harmonics dataset see [7.2.1] 6.7.3 Ripple control RCS telegram type dataset Load / edit object file The file selection menu [6.1] is called with the object file directory: RSC Param Selections For description of RCS Ripple Control parameter type dataset see [7.3.2] 6.7.4 Ripple control RC Sequence dataset Load / edit object file The file selection menu [6.1] is called with the object file directory: RCS Telegram Selections For description of RC Sequence Telegrams dataset see [7.3.1] PTS 3.1 C Operation Manual Page 69/202 7. Operation of the Source Source menu card This menu card contains the following menus and functions: Name of menu card Type and serial number of PTS 3.1 C Firmware version Load Points menu Harmonics menu Ripple Control menu Power Source Setup menu Status line Warning! There might be dangerous voltages and currents at the terminals of the power source after switching it ON. Regard the local safety precautions before working with the device. Call Load Point menu [7.1] The menu allows the handling and definition of the load points with the setting of all possible parameters. Call Harmonics menu [7.2] The menu allows the handling and definition of harmonics with the setting of all possible parameters. Call Ripple Control menu [7.3] The menu allows the handling and definition of ripple control telegrams with the setting of all possible parameters. Call Power Source Setup menu [7.5] The parameters menu is reserved to MTE service staff. The display of the parameters will be useful for the user to give detailed information to the service staff. Warning! The power source will also work without compact flash card. The database is saved on the compact flash card and therefore will be no access to the database without compact flash card. The initial settings UIφf will be 0. At least UIφf must be set and the settings Umax Imax must be checked before operation. PTS 3.1 C Operation Manual Page 70/202 7.1 Load point definition Load point menu This menu contains the following menus and functions additional to the power source menu: Start/Stop load point Fast Stop load point UIφf menu UmaxImax menu Display of network selection Load/save menu Display of UmaxImax settings Display of UIφf settings Vector diagram monitor Waveform monitor Start/Stop power source and Fast Stop power source [7.4] Call Edit Load point UIφf menu [7.1.2] Call Slider Screen [7.4.6] The Slider Screen can be chosen for manual setting of voltage, current and angle with the help of sliders. The function can be selected after the start of a load point. Call set/edit Umax Imax menu [7.1.1] Load/save settings from/to directory Load Point Selections 7.1.1 Setup of Umax and Imax and nominal values Un and In Umax Imax menu This menu contains the following menus and functions: Edit UmaxLN Edit UmaxLL (not available at PTS3.1C) Edit Imax Edit Un Edit In Call meter types menu Load/save Umax Imax settings menu PTS 3.1 C Operation Manual Page 71/202 Maximum voltage Umax The amplitude of the output voltage will be limited to the setting UmaxLN. It can prevent damages of reference meter and meter under test. The phase to neutral maximum voltage UmaxLN can be set in the range 0V...480V. Maximum current Imax The amplitude of the output current will be limited to the setting Imax. It can prevent damages of reference meter and meter under test. The maximum phase current Imax can be set in the range 0A...120A. Nominal voltage Un Nominal phase -neutral voltage (LN) can be set here in the range: Un (LN): 0 V … UmaxLN Nominal current In The nominal current In can be set in the range 0A...120A. Therefore the basis current Ib or nominal current In of the defined meter will be taken. The nominal current will be limited to <Imax>. Load Meter Type settings from directory Meter Type Selections [6.5.1] The parameter Un, In, Imax will be loaded from selected meter type. Load/save settings from/to directory Source Limits [4.4] The settings UmaxLN, Imax, Un and In can be loaded or saved. Exit and accept settings, back to calling menu. PTS 3.1 C Operation Manual Page 72/202 7.1.2 Edit load point Edit load point menu This menu contains the following submenus and functions: Edit voltage U Edit current I Edit phase angle current to voltage φ Edit start phase angle in relation to synchronization signal SYNC Edit frequency and frequency mode (SYNC: Frequency synchronous to supply voltage) Network selection (not available at PTS3.1C) Edit phase to neutral voltage U The value for the phase to neutral voltage can be set between 0V...480V. The voltage will be limited to <UmaxLN>. The value for the phase to neutral voltage can be set in % of voltage Un. The phase to neutral voltage will be limited to <UmaxLN>. Edit phase current I The value for the current can be set between 0A ... 12A or 0A ... 120A. The current will be limited to <Imax>. The value for the current can be set in % of current In. The value for the current can be set between 0%...100% Imax. Edit phase angle between I and U The value of the angle between current and voltage can be set in degree, cosLA, cosLE, sinLA or sinLE. The unit can be selected with the up/down cursor keys. The values can be set with the help of the keypad or the THB. Unit Calculation of angle φ Input range Input steps with THB -360°...+360° 1° -1...+1 -1, -0.866, -0.5, .0.25, 0, +0.25, +0.5, +0.866, +1 φ = acos (x) -1...+1 -1, -0.866, -0.5, .0.25, 0, +0.25, +0.5, +0.866, +1 φ = - acos (x) -1...+1 -1, -0.866, -0.5, .0.25, 0, +0.25, +0.5, +0.866, +1 φ = asin (x) -1...+1 -1, -0.866, -0.5, .0.25, 0, +0.25, +0.5, +0.866, +1 φ = 180° - asin (x) Edit start phase angle of voltage The start phase angle φb1 of the voltage in relation to the synchronization signal (supply voltage) can be set in the range 0°...+360°. PTS 3.1 C Operation Manual Page 73/202 Edit frequency NUM (numerical mode) The frequency of the fundamental wave can be set independently of the line frequency in the range 45Hz...400Hz. NUM is indicated behind the frequency value in the source main menu. SYNC (synchronization mode) The frequency is synchronized to the supply line frequency. Exit and accept settings, back to calling menu. PTS 3.1 C Operation Manual Page 74/202 7.2 Harmonics Harmonics menu This menu contains the following menus and functions additional to the power source menu: Display of voltage harmonics settings L1 Display of current harmonics settings L1 Edit Harmonics menu Load/save harmonic settings menu Start/Stop power source and Fast Stop power source Start/Stop harmonics Call Edit Harmonics menu Load/save settings from/to directory Harmonics Selections 7.2.1 Setup of Harmonics Edit harmonics menu This menu contains the following functions: Edit function for setting of voltage harmonics Edit function for setting of current harmonics Reset all harmonics PTS 3.1 C Operation Manual Page 75/202 Edit harmonics Edit harmonics Up to 15 harmonics can be defined The sum of all harmonics is limited to 40%, from 2nd...6th the maximum amplitude is 40% and from 7th...31st 10% The maximum amplitude is limited for each harmonic separately The phase angle of each harmonic can be varied Selection of 2nd...31st harmonic Reset all harmonics function Exit Range 1%...40%, these values can be set in steps of 1% with THB or individual with keypad. Angle range -360°...+360°, values can be set in steps of 10° with THB or individual with keypad.. Exit and accept settings, back to calling menu. Reset Harmonics All harmonics will be set to 0%. Before erasing the harmonic settings the security question will appear. Choosing OK will erase the current settings. Exit and accept settings, back to calling menu. PTS 3.1 C Operation Manual Page 76/202 7.3 RCS Ripple Control Signals Ripple Control menu This menu contains the following menus and functions additional to the power source menu: Display of ripple control status Display of ripple control telegram Ripple control setup menu Start/Stop ripple control Load/save ripple control settings menu Start/Stop and Fast Stop [7.4] Start/Stop RCS signal [7.4.8] Edit RCS telegram [7.3.1] Load/save settings from/to directory RCS Telegram Selections The RCS telegram settings will be loaded or saved. PTS 3.1 C Operation Manual Page 77/202 7.3.1 Setup of RCS telegram Ripple Control telegram menu This menu contains the following menus and functions additional to the power source menu: Select/edit Ripple control telegram type Edit Ripple control telegram Edit Signal amplitude Edit Comments Exit Select/edit telegram type settings from/to directory RCS Param Selections [7.3.2] Edit Telegram Input of the steering impulses (address bits and impulse bits). The input field contains N impulse places.(e.g. N=50 for Semagyr, N=10 for Decabit) Edit Ripple control signal amplitude Input of the signal amplitude either in %U or in V. Edit Comment Input of a text with up to 128 characters. Exit and accept settings, back to calling menu. PTS 3.1 C Operation Manual Page 78/202 7.3.2 Setup of RCS telegram type Edit RCS telegram type menu This menu contains the following functions: Edit telegram structure with the parameter t00, t01, tN0, tN1 Edit ripple control steering impulse places N. Edit of ripple control frequency f. Edit comments t01 t00 tn1 tn0 Time of start impulse Pause time between start and first steering impulse n1 Time of steering impulse Pause time between steering impulses Edit start impulse Input of the start impulse time in ms. Edit start impulse pause Input of start impulse pause time in ms. Edit steering impulse Input of the steering impulse time in ms. Edit steering impulse pause Input of steering impulse pause time in ms. Edit number of steering impulses Input of the number of steering impulses according the defined telegram type in the range of 0...256. Edit ripple control frequency Input of the ripple control frequency in Hz. PTS 3.1 C Operation Manual Page 79/202 Edit comments Input of text with up to 64 characters. Exit and accept settings, back to calling menu. 7.4 Execute load point Warning! Check all connections in the test circuit. Check the settings UmaxImax. Check the settings UIφf. Fast Stop The output signals of the power source will be stopped immediately by pushing the FB Fast Stop. 7.4.1 Status of FB Functional button (FB) Start/Stop power source Status of power source Description The FB Start/Stop is light gray and marked with a black blizzard. The power source is switched off. The power source can be started pushing the FB Start/Stop. The output signals will be raised in a ramp to the set value. The FB Start/Stop is dark gray and marked with a red and yellow blinking blizzard. The settings UIφf or Umax Imax have been changed. The power source is running and will change the output signals in a ramp to the set value after pushing the FB Start/Stop. The power source is switched on. The key is dark gray and marked with a yellow blizzard. The power source can be stopped pushing the FB Start/Stop. The output signals will be decreased in a ramp. PTS 3.1 C Operation Manual Page 80/202 7.4.2 Indication Status of power source Status of Indication power source OFF Description The symbol with red button and white blizzard is shown. The power source is switched off. ramp up/down The symbol with gray sandglass and yellow blinking blizzard is shown. The power source is on. The power source ramp up or down voltage and current or the power source is switching off (Fast Stop). ON The symbol with green button with yellow blizzard is shown. The power source is on. Output voltage and current are stable. 7.4.3 Vector diagram and waveforms The vector diagram shows the actual voltage vectors and current vectors. The waveform monitor shows the actual voltage wave form and current waveform. The scale will automatically be set according the amplitude of the signals. One period of the signal will be displayed. PTS 3.1 C Operation Manual Page 81/202 7.4.4 1 Switch ON/OFF sequence Check measuring setup and settings Warning! Check all connections in the test circuit. Check the settings UmaxImax. Check the settings UIφf. Status indication when the power source is switched OFF The power source is switched off The settings are all grayed out. Vector diagram monitor is dark Wave form monitor is dark Power source indication is OFF 2 Switch ON power source Status indication during ramping up voltage and current to the set value. Status indication when the power source is switched ON The power source is switched on. Voltage and current are stable. The measured values will be displayed instead of settings. Vector diagram monitor is ON. Waveform monitor is ON. Power source indication is ON. 3 Run test PTS 3.1 C Operation Manual Page 82/202 4a Switch off the power source Status indication when ramping down voltage and current. The power source is switched off The settings are all grayed out. Vector diagram monitor is dark Wave form monitor is dark Power source indication is OFF Status indication when the power source is switched OFF 4b Fast switch off the power source The power source will be stopped immediately without ramping down the output signals. The status indications will be identically as described in the switch off procedure with FB Start/Stop in step 4a. PTS 3.1 C Operation Manual Page 83/202 7.4.5 1 Change settings of load point Check measuring setup and settings Warning! Check all connections in the test circuit. Check the settings UmaxImax. Check the settings UIφf. 2 Switch ON power source Status indication during ramping up voltage and current to the set value. Status indication when the power source is switched ON The measured values of voltage, current, phase angle, start phase angle and frequency are shown. 3 4 Call the UIφf menu Change settings One or several values can be changed. In this example U has been changed from 230V to 253V. PTS 3.1 C Operation Manual Page 84/202 5 Exit and accept settings, back to calling menu. Power source is still switched ON. The blizzard is flashing red/yellow The changed settings are grayed out. 6 Switch on new settings Status indication during ramping up or down voltage and current to the new set value. The power source is running with the new settings. The actual measured load point values are displayed. PTS 3.1 C Operation Manual Page 85/202 7.4.6 1 Load point adjustment with regulators Select load point menu The load menu is switched ON 2 Check measuring setup and settings Warning! Check all connections in the test circuit. Check the settings UmaxImax. Check the settings UIφf. 3 Switch on the power source first Status indication during ramping up voltage and current to the set value. Status indication when the power source is switched ON 4 Select the slider menu In the case UFS or IFS is smaller than the actual voltage U or current I, the output of the source will be limited to UFS and IFS. Changes will affect to the output immediately. The actual measured values will be displayed. 5 Set full scale voltage UFS The full scale voltage can be set in the range 0V...Umax. 6 Set full scale current IFS The full scale current can be set in the range 0...Imax. PTS 3.1 C Operation Manual Page 86/202 7 Set voltage U, current I and phase angle φ The slide for phase angle show the settings absolute in degrees. Additional to changes with the THB a single digit (blue marked) can be selected with the left/right cursor keys and can be individually changed with the up/down cursor keys. This allows changes in defined steps (10 / 1 / 0.1 / 0.01). 8 Exit and save settings The settings are already active and the measured values are displayed. PTS 3.1 C Operation Manual Page 87/202 7.4.7 Switch Harmonics ON / OFF 1 Switch on power source first Status indication during ramping up voltage and current to the set value. Status indication when the power source is switched ON 2 Select harmonics menu 3 Harmonics menu on Display the harmonic monitor Define or select the harmonics 4 Switch on the selected harmonics Indication harmonics on 5 6 Run test Switch off harmonics Indication harmonics switched off PTS 3.1 C Operation Manual Page 88/202 7.4.8 1 Switch RCS telegram ON / OFF Switch on the power source first Status indication during ramping up voltage and current to the set value. Status indication when the power source is switched ON 2 3 4 Select the ripple control menu Ripple control menu on Display with ripple control monitor Define or select the ripple control signal Switch on the selected ripple control signal Indication that the ripple control telegram is switched on and is in execution. The ripple control telegram is in execution. The total run time for the selected telegram can vary from several seconds up to several minutes. 5 Switch off ripple control signal (if necessary during execution) Indication ripple control signal switched off 6 Switch off the power source Indication power source switched off PTS 3.1 C Operation Manual Page 89/202 7.5 Setup Power source setup menu This menu contains the following menus and functions: Current output selection Power source system parameters menu Load/save source selections menu Select Current output Selection of current outputs for currents 0 A … 10 A (toggle mode): 1A/10A current outputs used The current connections must be changed for currents > 10 A. 120A outputs used The same current connections can be used for the full range 0 A … 120 A. For the currents >10 A … 120A always the high current outputs are used. Note: Independent of the current output selection, the current input selection at the reference standard (Reference / setup menu) must always be: Direct current inputs 1A/10A for the range 0 A ... 10 A and Direct current inputs 100A for the range >10 A … 120 A. This selection is made automatically in the basic control mode Test System, but must be made manually in the mode Reference + Source. Call Power source system parameters menu Load/save settings from/to directory Source Selections Exit and accept settings, back to calling menu. PTS 3.1 C Operation Manual Page 90/202 7.5.1 Parameters Power source system parameters menu The parameter menu shows the power source parameters. This menu contains the following functions: Display with all power source parameters, select/edit parameters Password enter screen Exit Select/Edit parameters The screen shows 17 rows of power source parameters from the parameter list containing up to 1000 parameters. Scroll pages with THB. Password Only for MTE service staff. Enter password. Exit and accept settings, back to calling menu. PTS 3.1 C Operation Manual Page 91/202 8. Reference Standard Reference menu card This menu card contains the following menus and functions: Name of the menu card Type and serial number of integrated reference standard SWS2.3 Firmware Version Error measurement [8.2] Measurement [8.3] Wave form analysis [8.4] Energy measurement and register test [8.5] Transformer tests [8.6] Special functions [8.7] Setup [8.1] 8.1 Reference meter settings Reference meter settings menu The following settings are displayed: Connection mode (4-wire), fix setting U / I range settings Frequency outputs Apparent power mode (applied calculation formula), fix setting Load or save current parameters Exit of menu Reactive power mode natural (Qn), fix setting Selection of voltage measurement input Selection of current measurement input Voltage transformer Current transformer Time base Reference system parameters Indications / settings Connection mode 4-wire (fix setting at PTS3.1C, includes 2-wire mode) 4-wire mode 3-wire mode (not applicable at PTS3.1C) PTS 3.1 C Operation Manual Page 92/202 Call Range settings menu [8.1.1] Call Definition of frequency outputs menu [8.1.2] Apparent power mode (fix setting at PTS3.1C, S = U*I) Selection of the formula used for the calculation of total apparent power S. Total apparent power calculation is based on total active power and total S P2 Q2 reactive power values. (not used at PTS3.1C) Total apparent power calculation is based on the effective values of voltages and currents. S U I 4-wire: U U1 U2 U3 ; I I1 I2 I3 3-wire: U U12 U32 ; I I1 I3 2 2 2 2 2 2 2 2 2 2 Call Load / save reference meter settings menu [4.4] Exit, back to calling menu Reactive power mode natural (fix setting at PTS3.1C). Natural (n) 90° phase shifters in voltage path are used to calculate the reactive power Artificial or cross-connected (x) The phase to phase voltage between other phases, (which already has a 90° phase shift) is used instead of the phase to neutral voltage. This mode is applicable only to a symmetrical voltage system. Call Selection of voltage measurement inputs menu [8.1.3] Call Selection of current measurement inputs menu [8.1.4] Call Voltage measuring transformer PT settings menu [8.1.5] Call Current measuring transformer CT settings menu [8.1.6] PTS 3.1 C Operation Manual Page 93/202 Time base The time base defines the periodic timing interval for the measure and display of all calculated results. These include such values as U,I,P,Q,S, etc. It is also used in conjunction with harmonics analysis and vector diagram displays. The interval for the update of the results on the display is defined in seconds (s). Time base manually set The time base interval can be set manually by the user. Input of time base interval in seconds (s). Range: 0.1 … 999.9 s Status indication of time base The time base interval in seconds is displayed together with a bar graph, indicating the elapsed time of the active running measurement. External time base In the case of entering zero, the time base switches to external time base. By means of this function, an external pulse via pulse input socket 1 can be used to trigger the display of new results. This allows the display of the results to be synchronised with external instruments. Status indication of external time base The time base interval defined by the last two external impulses in seconds is displayed together with a bar graph, indicating the elapsed time of the active running measurement in relation to the previous time interval. Call Reference system parameters menu [8.1.7] 8.1.1 Selection of voltage and current ranges Voltage and current range settings menu The following settings of the PTS 3.1 C are displayed: Auto or manual range selection manual selection of voltage ranges manual selection of current ranges The wide input dynamic range of voltage and current (several decades) is internally reduced to a smaller dynamic range in order to achieve the required accuracy. This is done by using multiple internal voltage and current sub-ranges. PTS 3.1 C Operation Manual Page 94/202 The range selection can be made either automatically or manually Auto or manual range selection 8.1.1.1 Auto range selection Automatic range selection (default condition on start-up) The soft key and the Symbol in the status line indicate that automatic range selection is active. The keys for manual range selection are disabled. Two tables showing the range maximum values of all internal voltage and current ranges are displayed. The actual selected ranges are marked Status indication for automatic range selection The Symbol indicates that automatic range selection is active. The actual selected ranges of voltage and current are shown. 8.1.1.2 Manual range selection Manual range selection The soft key and the Symbol in the status line indicate that manual range selection is active. Two tables with the range maximum values for all internal voltage and current ranges are displayed. The actual selected ranges are marked. Status indication for manual range selection The Symbol indicates that manual range selection is active. The actual selected ranges of voltage and current are listed. Status indication for manual range overflow The Symbol indicates that manual range selection is active. If any of the selected voltage or current ranges, shown in the status line, is too low, the manually selected range is flashing red and a beep is hearable. The internal voltage and current ranges are changing at 110% of the step, to the higher or lower range PTS 3.1 C Operation Manual Page 95/202 The main application of the manual range selection is to fix a maximum range, to prevent automatic range changes during a measurement. In the case of varying currents or voltages or a current or voltage near the upper limit of an internal range, it is better to fix the next higher range manually, to be sure that no range changes occur during the measurement. Any range change occurring during an error measurement will invalidate that measurement. Manual selection of voltage range The pressed range soft key indicates that voltage range selection is active. Selection active A red frame is displayed. -- U1-- and the actual selected range are yellow highlighted. The last highlighted range is selected. The red frame and the yellow highlighting disappear. Manual selection of current range The pressed range soft key indicates that current range selection is active. Selection active A red frame is displayed. -- I1 -- and the actual selected range are yellow highlighted. The last highlighted range is selected. The red frame and the yellow highlighting disappear. Exit, back to calling menu 8.1.2 Definition of frequency output Frequency output The PTS 3.1 C has one individually configurable impulse output. The impulse outputs 2 and 3 are not available at this instrument (FBs are shown greyed out). Active (P1), reactive (Q1) or apparent power (S1) values can be assigned to the impulse output for positive and negative (+/-) direction or restricted to one direction, positive (+) or negative (-) only. The mean frequency of the output is proportional to the chosen quantity. Default setting: Active power (P1) PTS 3.1 C Operation Manual Page 96/202 Selection of reference value for the frequency output Reference value Active power Reactive power Apparent power Direction Positive and negative (all quadrants) Positive only (consumption) Negative only (back feeding) Selection of the meter constant C / R for the frequency output. Auto The internal PTS 3.1 C range dependent constant is active. Constant Free selectable range independent meter constant It should be noted that the constant must be selected in such a way that the maximum frequency of 20kHz is not exceeded in the desired operational ranges. Unit Selection of the unit of the desired output. CPZ1 Shows the actual constant at the impulse output. Fout1 Shows the actual frequency output at the impulse. Exit, back to calling menu PTS 3.1 C Operation Manual Page 97/202 8.1.3 Selection of voltage measurement inputs This function serves to select the voltage input used, direct connected voltage or hotstick connected for high voltage measuring up to 40kV. Direct voltage measuring input Hotstick U up to 40kV (not available) Back to the main setup screen Indication on the main setup screen After pressing the status indication shows the corresponding voltage input. Status symbol indication for direct voltage measuring input. 8.1.4 Selection of current measurement inputs This function serves to select the current input used, direct connection, different kinds of current clamps or hotstick connected for measuring up to 2000A. One of the following inputs for current measurement can be selected. Direct inputs 120A Direct inputs 12A Current clamps 100A Current clamps 1000A LEM clamps 30A LEM clamps 300A LEM clamps 3000A Hotstick I up to 2000A (not available) Exit Indication on the main setup screen Depending on what current input is chosen, after pressing , on the main setup screen it shows the corresponding current input and the belonging status symbol. Current input selection indication Status symbol indication PTS 3.1 C Operation Manual Page 98/202 8.1.5 Voltage measuring transformer PT settings Database functions Edit actual object Load object file from Reset actual object to defaults Call edit actual object or load object file or create new object at the file selection menu [6.1] to call the actual object menu. Actual PT type dataset menu Manufacturer Potential transformer PT type Accuracy class Primary voltage Secondary voltage Nominal burden Exit, back to calling menu 8.1.6 Current measuring transformer CT settings Database functions Edit actual object Load object file from Reset actual object to defaults Call edit actual object or load object file or create new object at the file selection menu [6.1] to call the actual object menu. Actual CT type dataset menu Manufacturer Current transformer CT type Accuracy class Primary current Secondary current Nominal burden PTS 3.1 C Operation Manual Page 99/202 Exit, back to calling menu 8.1.7 Reference system parameters Parameter settings This function enables the user to ascertain, in the case of a malfunction, whether the internal parameters of the instrument are set properly. All particular entries as stored in the non-volatile memory are listed here (range end values, correction values, configurations, etc.). The modification of the parameters is secured by a password and reserved exclusively for the manufacturer and authorized service personal. These indications can be useful in the case of need to call or for repair work, allowing a clear identification of the instrument. Password enter Exit, back to calling menu Set password Password A password is necessary for access to these functions. Exit, back to calling menu PTS 3.1 C Operation Manual Page 100/202 8.2 Error measurement There is one impulse input, which can be used for error measurements in accordance with the impulse comparison method for active reactive and apparent energy. The impulse input can be used with scanning head, e.g. the SH 2003, with push button, or with impulse cable which is directly connected to the device under test. Error measurement menu The results and basic settings of the error calculation unit 1 for the impulse input 1 are shown. The calculation units 2 and 3 are not active at PTS 3.1 C. The settings for reference mode, meter constant, measuring period in impulses (imp) or seconds(s) and number of results used for statistical calculations must be defined in the setup of error measurement menu [8.2.2]. Error display mode (percentage, per mill, absolute) Relative error in percentage The displayed values are related to 0. No error = 0%. Relative error in per mill The displayed values are related to 0. No error = 0 % ° 1 % = 10 % ° Absolute error The displayed values are related to 100. No error = 100% The following description is based on the relative error display mode in percentage Reference power / energy mode Actual mode P1 is active power / energy. The settings can be changed in the setup menu [8.2.2] Linked definitions The actual connection mode (e.g. 4-wire) and actual reactive mode (e.g. natural) can be seen in the status indication at the left lower corner of the display. These settings are fix at the PTS3.1C. The connection mode single phase 2wire is included in the 4-wire mode. PTS 3.1 C Operation Manual Page 101/202 Constant of meter under test The value must previously be defined in the setup menu [8.2.2]. Actual power The power of the selected reference mode is indicated. The value is updated in the interval of the time base. Energy of one impulse (constant of impulse input) The measured constant of the impulse input is indicated in the form Ws/imp or Wh/imp. If the test period is n = 1, this is equal to the energy measured between two impulses. For n > 1 the energy of one test period divided by n is indicated. Error of energy measurement of input 1 The result will be updated in the interval defined by n, as soon as n impulses are counted at the input 1. The first measurement will require n+1 impulses, as the first impulse is used to start the measurement process. Indications during first measurement Waiting for first impulse to start Running the first time Overflow indications Indication of positive errors > +999.9999% Indication of negative errors > -100% Mean value Em(x) and standard deviation Es(x) of the error E1 The calculation is performed over the displayed number of results x in brackets Em(x). After restart of the measurement the value x will be counted up until N, the number of results defined in the setup menu, is reached. Successive calculations are performed over the last N results of E1. With the setting N = 0 or 1 the value Em(1) = E1 and Es(1) = 0.000 is displayed. The statistic function is disabled and the error value displayed at Em(1) is equal to E1. Graphical error indication with tolerance band The arrow indicates the error in graphical form in relation to a selectable tolerance band (e.g. Emin = - 2 %, Emax = + 2 %). The tolerance band can be changed in the setup menu [8.2.2]. PTS 3.1 C Operation Manual Page 102/202 Bar graph display of measuring period A bar graph indicates either the counted impulses with resting estimated measurement time in brackets or the elapsed time in s of the active measurement. At the right side the end value of t/n is displayed within the bar graph, either as impulses or seconds. Start / Stop error measurement The error measurement is activated, if the button is pressed. The 1st impulse will start the error measurement. The measurement is continuously running until the button is pressed again to stop. Note: To change settings in the setup menu the error measurement must be stopped before. Restart of measurement Each key press causes a restart. All error results and statistical calculations for mean value and standard deviation are reset. The evaluation system waits for the first impulse to start a new measurement. The function is only available, if the start / stop soft key is pressed. Call setup of error measurement menu [8.2.2]. Call storage and printout of test results menu [10]. 8.2.1 Measuring setup Examples for measuring setups in different connection modes are described in chapter 11. Special care must be taken with regards to the grounding of the measuring setup. We recommend that only one connection of the measuring voltage neutral connector N is made to the protecting earth in the whole measuring setup. Normally this is done at the reference meter. However, if the output of the source used is already grounded, then this should be the only ground in the system. Loops caused by multiple ground connections must be avoided. PTS 3.1 C Operation Manual Page 103/202 8.2.2 Setup of error measurement Here the data for the device under test are entered, and the basic settings for the error measurement are defined. Setup of error measurement menu In this menu the following basic settings for the error measurement can be made for input 1 (inputs 2 and 3 are not available at PTS 3.1 C): Reference energy mode (Ref) and energy direction(+/-) Meter constant of device under test (C/R) Measuring period (t/n) Number of test results used for mean value and standard deviation calculations(N) Tolerance band (Emin / Emax) Reference mode and energy direction This should be the same reference mode as at the device under test. Reference mode Active power Reactive power Apparent power Input switched OFF, no measurement Energy direction Positive and negative (all quadrants) Positive only (consumption) Negative only (back feeding) Constant of meter under test Numerical Input of the constant of the device under test. An input is also possible in exponential form for large values, e.g. during checking of reference standard meters. The value of the constant is always linked to the unit value, which is defined in the adjacent field(for numerical input see chapter 4.3.1). Unit Depending on the measurement mode following units can be selected: In the most cases can be entered in the way familiar to the operator without conversion and just as it is printed on the nameplate of the meter. In this case, ’Imp’ stands for impulse. An impulse means the same as a disk rotation or the passing mark on a Ferraris meter, where ‘Imp’ is often replaced by ‘r’ for revolution. P Q S Imp/k..h Imp/kWh Imp/kvarh Imp/kVAh Imp/..h Imp/Wh Imp/varh Imp/VAh Imp/..s Imp/Ws Imp/vars Imp/VAs k..h/Imp KWh/Imp kvarh/Imp kVAh/Imp ..h/Imp Wh/Imp varh/Imp VAh/Imp ..s/Imp Ws/Imp vars/Imp VAs/Imp PTS 3.1 C Operation Manual Page 104/202 Measuring period Definition of the test time by number of impulses imp or seconds sec. (for numerical input see chapter 4.3.1). Number of impulses of device under test. The effective counted number is one more, because an additional start impulse is needed. Test time in seconds. Based on the actual load and the constant of the meter under test (C/R) the system calculates itself the number of impulses to test. The resultant test time will only be approximate, because the test can only be carried out over an integer number of pulses. Number of results for statistics Input of the number of results N used for the calculation of mean value Em(N) and standard deviation Es(N) (for numerical input see chapter 4.3.1). Em(N): Es(N): New measurement: The calculation is made over the last N measurements. N = 1: The statistic function is disabled. The mean value Em(1) is equal to the displayed error Ex, x = 1, 2, 3, and the standard deviation Ex(1) is always zero. If a new measurement is started, the calculation is made over the already available results, indicated with Es(n), where n = number of results since start of measurement (range: 1 .. N). Error tolerance band Emin / Emax Input of the lower and upper Error tolerance. The tolerance range of the error bar graph can be changed, in sequential manner: 100, 50, 20, 10, 5, 2, 1, 0.5, 0.2, 0.1, 0.05, 0, individual for Emin, Emax by turning the THB or any value can be entered by the keypad directly. Copy parameters from input x (1,2,3) to input y (1,2,3) Not active, because inputs 2,3 are not available at PTS 3.1 C. Call Load / save reference meter settings [4.4] Exit, back to calling menu PTS 3.1 C Operation Manual Page 105/202 8.3 Measurement With the measurement function, load values and power values as well as vector diagrams can be measured and displayed. 8.3.1 UIPQS values 4-wire mode 8.3.2 UIPQS values The display shows all relevant load values of the 2wire network at the same time. Phase to neutral voltage (U1) Phase current (I1) Phase angle current to voltage (1) Active power (P1) Reactive power (Q1) Apparent power (S1) Power factor (PF) Frequency (f) Vector diagram 4-wire mode Vector diagram The vector diagram of a 2-wire network with a phase shift of 30° between current and voltage is shown. The reference value for the vector diagram is U, displayed at 12 o’clock. . The display is updated at the time base interval. In the background of the U, I vectors the power quadrants with the axes P+, P-, Q+, Q- are indicated. A green arrow indicates the active power quadrant (e.g. P+Q+). Reference for vector diagram The reference phase voltage U or current I is defined here. All phase angles are displayed in relation to the reference value, which can have the direction 12 o’ clock or 3 o’ clock. Repeated key pressure changes between (cyclic mode): U-> 12h / I -> 12h / U -> 3h / I -> 3h PTS 3.1 C Operation Manual Page 106/202 8.4 Wave form analysis Waveform display menu [8.4.1] Harmonic analysis menu [8.4.2] 8.4.1 Wave form display Oscilloscope The oscilloscope can display one or a combination or all of the signals: The display shows always one period of the signal, scaled in relation to the actual maximum range values. At the bottom of the diagram the actual voltage step U and current step I of the vertical axis and the period of the signal t are displayed. The step height depends on the selected ranges and the zoom level. Phase 3 with 5th harmonic (10% U, 40% I) Without zoom the step height is half the end of range value. The vertical axis is divided into three positive and three negative steps, with the actual values for voltage and current indicated beside the horizontal separation lines. At the bottom the effective values of all signals and the measured frequency are displayed. The numerical values are updated at the time base interval. The signals U3, I3 with 5th harmonics displayed here correspond to the results of the analysis in chapter [8.4.2]. Phase selection Enable / disable display of voltage U1 or current I1. Toggle between the display (cyclic mode). PTS 3.1 C Operation Manual Page 107/202 Zoom in /out The signal can be zoomed in / out over eight levels: x 2 / x 4 / x 8 / x 20 / x 40 / x 80 / x 200 / x 400. The step height beside the vertical axis is changed depending on the zoom level. With the + /- zoom keys any one of these eight levels can be selected. Small signal without zoom Zoom level 3 (x 8) The status of the selection is indicated at the top of the diagram (e.g. U1, I1 activated). Call storage and printout of test results menu [10]. Exit, back to calling menu PTS 3.1 C Operation Manual Page 108/202 8.4.2 Harmonic analysis Harmonics Harmonic analysis can be performed for: Phase to neutral voltage (U) Phase current (I) Active power (P) Reactive power (Q) Apparent power (S) Harmonics of order number h1 (fundamental, always displayed as 100%) up to h31 are displayed using a logarithmic scale (0.01 / 0.1 / 1 / 10 / 100%). Harmonic mode ( U, I, P ;Q, S) Selection of mode for harmonic analysis Consecutive key presses on the FB will select phase voltage active power , reactive power or apparent power , phase current , . Analyze individual harmonic A single harmonic hx (x = 1 … 31) can be selected with the THB. The percentage value of the harmonic in relation to the fundamental waveform and the absolute value with the corresponding units (V, A, W, var, VA) as well as the selected harmonic frequency are displayed at the bottom. The selected harmonic is highlighted in the graphical diagram. At the bottom are also displayed the effective value (U1) the fundamental frequency (f) and the total harmonic distortion (kU1) of the analyzed signal, updated at the time base interval. E.g. Harmonics of current The signal consists of a fundamental of 5A and a 5th harmonic with 40% of the fundamental (2 A). The effective value (I1) is the square root of the sum of all harmonics squared. Because the 5th harmonic is much bigger than the rest, the other harmonics can be neglected. The effective value is approximately: I3 = (h12 + h52) = (52 + 22) I3 = 5.385 A PTS 3.1 C Operation Manual Page 109/202 E.g. Harmonics of active power The active power value is based on a voltage signal 230V with 10% of 5th harmonic and a current signal 5A with 40% of 5th harmonic. These are typical signals used for type tests. The phase shift from current to voltage of the fundamental wave forms is approximately +30°. The resulting 5th harmonic of power is -3.9 %. The absolute value of h5 is negative, because the phase shift between the 5th harmonic of current and voltage is approximately 150°. Call storage and printout of test results menu [10]. Exit, back to calling menu PTS 3.1 C Operation Manual Page 110/202 8.5 Energy measurement and register test Energy measurement Register test 8.5.1 Energy measurement This function serves to do simple energy measurements in one of the available power modes with manual start and stop. Start energy measurement Reset and restart energy measurement Setup energy measurement menu [8.5.1.1] Voltage and current range settings menu [8.1.1] Call Setup energy measurement menu [8.5.1.1] Call Range settings menu [8.1.1] Display of values Display for one energy measurement Actual power The actual power of the selected energy mode is displayed. Actual energy The actual energy of the selected mode is displayed. The energy is counted up, starting at zero, displayed with the selected unit. PTS 3.1 C Operation Manual Page 111/202 Actual power per measure period Actual power of the selected mode is displayed. The value shows the energy counted since start of period (WP1/t) divided by the maximum period (t). Maximum value When the first measuring period is finished, power value is shown. At the end of the next measuring period, the new power value is displayed. The value, however, only varies if the new power value is larger than all preceding ones. Time bar graph for measuring period A time bar graph shows the progression of the measuring period. The next measuring period starts automatically. Start Energy measurement Start the energy measurement after definitions are made in Setup Energy measurement. menu [8.5.1.1] Restart Energy measurement With the FB the counting registers are reset to zero. Counting restarts automatically. Call storage and printout of test results menu [10]. Exit, back to calling menu PTS 3.1 C Operation Manual Page 112/202 8.5.1.1 Setup Energy measurement Copy parameters from field x (1,2,3) to field y (1,2,3) Load/save settings from/to directory[4.4] Selection of the source power for the energy measurement. Enter of time period for maximum registration Selection of the reference power for energy measurement Active power Reactive power Apparent power Input switched OFF, no measurement Time period For the maximum measurement, the user is asked for a measuring period. Time base in minutes for maximum registration. Copy parameters from field x (1,2,3) to field y (1,2,3) Load/save settings from/to directory Load [4.4] Exit, back to calling menu PTS 3.1 C Operation Manual Page 113/202 8.5.2 Register test The register or counter test function is used to test the correct indication of the registers on mechanical or electronic meters. Switch power source on/off (I, U or U+I) Start or stop automatic register test Start or stop energy measurement Enter start reading of register Enter end reading of register Reset register test Setup Register Test menu [8.5.2.1] Range settings menu [8.1.1] Call Setup Register Test menu [8.5.2.1] Call Range settings menu [8.1.1] Indications / Entries Indications for one energy register Tolerance band Predefined upper and lower tolerances with graphical indicated error. Predefined energy for register test The grey marked field shows the predefined energy, as defined in the Setup register test menu [8.5.2.1]. After starting the register test, the energy is counting down to zero. Actual power The actual power of the selected energy mode is displayed. Actual power per measuring period Actual power of the selected mode is displayed. The value shows the energy counted since start of period (WP1(t)) divided by the maximum period (t). PTS 3.1 C Operation Manual Page 114/202 Maximum value When the first measuring period is finished, power values are also shown in the field P1Mmax. The next measuring period starts automatically. At the end of the next measuring period, the new power values are displayed. The value, however, only varies if the new power value is larger than all preceding ones. Actual energy Actual passed energy. The energy is counting up until the register test is stopped. The number of digits after decimal point is defined by the entry of the start reading. Start reading of register Any start value can be defined for the register. The way the value is entered (number of digits after decimal point) is used as register format for the actual energy indication and the input of the end reading and defines the resolution of the error calculation. End reading of register Entering of the end reading, when the register test has finished or during the test to enter the expexted end reading before the register test has finished. Register Error The register error is calculated based on the measured energy (WP1) and the entered start (1:) and end (2:) readings. Note: The digits entered after decimal point at the start reading define the resolution for the error calculation. E.g. the format 0.001 kWh at a dosage energy of 1 kWh gives a resolution of the error of 0.1%. The real measured energy WP1 is relevant for the error calculation, not the predefined value WP1D. WP1 normally is a little bitter higher than the predefined value WP1D, because energy is also measured during the source is switched off with a ramp. Time bar graph for maximum measuring period A time bar graph shows the progression of the measuring period. The next measuring period starts automatically. This time is only used for Maximum demand test. Test setup Before start of the test, the meter under test (MUT) must be connected. Examples for measuring setups in different connection and operating modes can be found in menu [11]. Configuration Check / change basic settings and configurations for register test in setup menu [8.5.2.1] Step by step instruction See test procedures for automatic register test [8.5.2.2] or manual register test [8.5.2.3], [8.5.2.4]. PTS 3.1 C Operation Manual Page 115/202 8.5.2.1 Setup Register test Define the load point for the automatic register test Source action during register test Define the load point for the automatic dosage Define the load point in the same way as in the source setup menu or load previously defined saved load point settings. Note: To speed up the register test it is recommended to operate the meter at maximum power (e.g. Imax and power factor PF1). Source action during register test Select the desired status of the voltage and current source, during the register test run. Only current is switched ON/OFF during the test. The voltage is always on. The current is switched on/off for the dosage of the desired energy. This is the most used mode for electronic meters. For reading out the register end values of electronic meters, voltage has to be switched on. Only voltage is switched ON/OFF during the test. The current is always on. The voltage is switched on/off for the dosage of the desired energy. Both, voltage and current are switched ON/OFF during the test. The source is completely off. Voltage and current are switched on/off for the dosage of the desired energy. This mode can e.g. be used with electromechanical meters. Note: Current and voltage are automatically switched on again in modes Test and Reference + Source after entering the end reading and calculation of the error. This is done to have the possibility to document the load values together with the results with the camera key. Settings for register test 1 The following settings for Ref., tmax and Emin / Emax can be defined independently for each of the three register tests 1, 2, 3. PTS 3.1 C Operation Manual Page 116/202 Reference power mode for energy measurement and energy dosage Active power Reactive power Apparent power Register test switched OFF, the corresponding field is blank in the register test main menu. Maximum demand period Time period for maximum demand test in minutes (e.g. typical value: 15 min). This interval must be manually synchronized with the maximum demand period of the meter under test by starting the test with the interval start at the meter. Hint: The maximum demand test is always running and cannot be switched off. If this is disturbing, a period of 60 min can be entered. In this case WP1(t)/t will indicate the energy counted up since start in Wh during 1h. Error tolerance band Entry of an upper and lower tolerance between ±0.0000... ±100 %. Enter the amount of energy (W) for dosage The unit depends on the chosen reference mode. These setting and input can be defined on input 1 only, valid for all three register tests. In case x?x. is chosen, the unit is shown Copy parameters from field x (1,2,3) to field y (1,2,3) The copy function is enabled, if the regions of two fields are selected at the same time. E.g. copy settings of field 1 to field 2 Activate field 1 The red frame is displayed around the region of field 1. Activate region of field 2 and activate copy function The red frame is displayed around the region of field 2. The frame around region of field 1 becomes blue. The copy key is enabled. By pressing the copy key all settings are copied from the field with the blue frame to the field with the red frame. The copy function can be repeated, by selecting the region of field 3 or field 1. The last input region selected always becomes the copy destination. The field region selected previously is the copy source PTS 3.1 C Operation Manual Page 117/202 Load/save settings from/to directory menu [4.4] Exit, back to calling menu 8.5.2.2 Procedure for automatic register test The following procedure describes an automatic register test of one active energy register in the basic control mode Test or Reference + Source. The source is switched automatically on and off as required by the settings. 1 1.1 1.2 Call Setup Register Test menu [8.5.2.1] Load predefined settings or check and adapt the actual settings Configure register test 1 Select reference power mode (Ref.) P1 for register test 1 and select -- OFF -- for register tests 2,3. Enter desired maximum demand period (tmax), if a maximum demand test should be performed in parallel. Define tolerances (Emin/Emax) regarding the class of the meter under test. Enter dosage energy (W), e.g. 1 kWh Define the load point for the automatic register test (e.g. 230V, 100A, 0°). Attention! During the test these settings are activated, not the actual settings in the source menu. Check that the load point settings are defined and suitable for your meter under test (e.g. I ≤ Imax). 1.3 Select source action mode current switched on/off. 1.4 Leave setup menu 2 Reset register test The result of a previous test are reset to zero. 3 Start automatic register test The FBs for source action and energy measurement are blocked and the voltage is switched on to power up the meter under test. PTS 3.1 C Operation Manual Page 118/202 4 Enter register start reading The input of the start reading is automatically activated. Enter the actual register reading as displayed on the meter under test with unit kWh. 5 Start of energy dosage By pressing the THB to accept the input of the start reading the current is switched on and the dosage runs automatically as defined. The dosage value WP1D is counting down from initial value to zero. The reference energy WP1 is counting up with the resolution of the entered start reading. If the programmed dosage value is reached, the current is switched off. 6 Enter register end reading The input of the end reading is automatically activated. Enter the actual register reading as displayed on the meter under test with unit kWh. 7 Calculation and indication of the register error By pressing the THB to accept the input of the end reading the register test is finished. The error (E1) of the register test is calculated and indicated based on the measured reference energy (WP1) and the entered start (1:) and end (2:) readings. The current is automatically switched on again for documentation of the load values together with the results with the camera FB. Note: If this is not desired, the current can be switched off manually by operating this button with the THB. 8 Call storage and printout of test results menu [10]. The test result together with the actual load values are frozen at the moment the camera key is pressed and can be saved on the CF card for later analysis and reporting with the software CALSOFT. Notes In the same way the test can also be performed for reactive energy or apparent energy only. To repeat the same test restart with step 2. Attention! The source remains in the last state, if you leave the register test menu. Voltage and/or current can still be switched on depending on the actual source action settings. PTS 3.1 C Operation Manual Page 119/202 Check the actual state in the source menu card and switch off the source manually, if this is required. Variations in the automatic procedure 1a, 4a, 6a 1a Test of 2 or 3 registers at the same time The 2 or 3 required register tests must be defined in the setup (1a). Note: The dosage energy is only defined at register test 1 and is valid for all three register tests. The test will stop for all three register tests, if the energy defined at register test 1 is reached. If active and reactive energy registers are tested at the same time, a suitable load point must be defined (PF ≠ 1) to get active and reactive energy dosage at the same time. 4a,6a During entry of start and end readings the input for all active registers is required one by one, before the next step is running. Change of start and end readings 4b, 6b Before the start of the test, as soon as the test is running and also if the test is finished the start and end readings can be changed. This can be used to: - Correct wrong entries - Enter an expected end reading - Test several registers of different meters one by one by entering the corresponding register readings. 5a Stop automatic test A running automatic test can be stopped any time with following sequence: Press the automatic test button to stop the automatic procedure. The buttons for source control and energy measurement are unblocked. Press the source action button to stop the energy dosage. Press the energy measurement button to stop the energy measurement of the reference standard. After stopping the energy measurement, the entry of the end reading is automatically activated and the steps (6) and (7) run as normal. The error is calculated with the energy (WP1) counted since start of the test. 3c, 5c, 6c 3c 5c Automatic test with reference standard only In the basic control mode Reference the register test is a guided energy measurement. There is no automatic dosage performed. The switch on/off of the load must be done manually by the user (e.g. by operating a load circuit breaker or by connecting and disconnecting a load or by manual operation of an external source). The source action button is blocked all the time, because no source control is available. Energy measurement of the reference standard is automatically started The load status before the test, e.g. voltage on, must be manually controlled by the user. Dosage is not starting automatically. The user must activate the load, e.g. operate a circuit breaker or switch on a current with an external source manually. As soon as a load is there, the predefined energy is counting down. PTS 3.1 C Operation Manual Page 120/202 6c The energy measurement is stopped, when the predefined energy is reached and the input of the end reading is activated. The user must stop the load manually at the same time, when the input of the end reading is activated to assure, that the reference standard and the meter under test are counting the same amount of energy. 8.5.2.3 Procedure for manual register test The following procedure describes a manual register test of one active energy register in the basic control mode Test or Reference + Source. The source and the energy measurement are controlled manually by the user. 1 1.1 1.2 Call Setup Register Test menu [8.5.2.1] Load predefined settings or check and adapt the actual settings Configure register test 1 Select reference power mode (Ref.) P1 for register test 1 and select -- OFF -- for register tests 2,3. Enter desired maximum demand period (tmax), if a maximum demand test should be performed in parallel. Define tolerances (Emin/Emax) regarding the class of the meter under test. The input of a dosage energy W is not necessary, because this value is not regarded at manual test. Define the load point for the register test (e.g. 230V, 100A, 0°). Attention! If the source action button is pressed, these settings are activated, not the actual settings in the source menu. Check that the load point settings are defined and suitable for your meter under test (e.g. I ≤ Imax). 1.3 Select source action mode current switched on/off. 1.4 Leave setup menu 2 Reset register test The result of a previous test are reset to zero. 3 Enter start reading Enter the actual register reading as displayed on the meter under test with unit kWh. PTS 3.1 C Operation Manual Page 121/202 4 Start energy measurement The energy measurement of the reference meter is enabled and the energy will be counted and shown at WP1 as soon as a load is present. 5 Switch power source on The current is switched on and the energy dosage is running until it is stopped manually. The reference energy WP1 is counting up with the resolution of the entered start reading. The dosage value WP1D is shown grey and remains unchanged, because this value is not regarded in the manual mode. 6 Switch power source off The current is switched off. Wait with the next step until the source is completely switched off. 7 Stop energy measurement The energy measurement of the reference is stopped. 8 Enter register end reading The input of the end reading is automatically activated. Enter the actual register reading as displayed on the meter under test with unit kWh. 9 Calculation and indication of the register error By pressing the THB to accept the input of the end reading the register test is finished. The error (E1) of the register test is calculated and indicated based on the measured reference energy (WP1) and the entered start (1:) and end (2:) readings. PTS 3.1 C Operation Manual Page 122/202 Call storage and printout of test results menu [10]. 8 The test result together with the actual load values are frozen at the moment the camera key is pressed and can be saved on the CF card for later analysis and reporting with the software CALSOFT. Notes In the same way the test can also be performed for reactive energy or apparent energy only. To repeat the same test restart with step 2. Attention! The source remains in the last state, if you leave the register test menu. Voltage and/or current can still be switched on depending on the actual source action settings. Check the actual state in the source menu card and switch off the source manually, if this is required. Variations in the manual procedure 1a, 3a, 8a 1a Test of 2 or 3 registers at the same time The 2 or 3 required register tests must be defined in the setup (1a). Note: If active and reactive energy registers are tested at the same time, a suitable load point must be defined (PF ≠ 1) to get active and reactive energy dosage at the same time. 3a,8a During entry of start and end readings the input for all active registers is required one by one, before the next step is running. 3b, 8b Change of start and end readings Before the start of the test, as soon as the test is running and also if the test is finished the start and end readings can be changed. This can be used to: - Correct wrong entries - Enter an expected end reading - Test several registers of different meters one by one by entering the corresponding register readings. PTS 3.1 C Operation Manual Page 123/202 8.5.2.4 Procedure for manual register test with reference meter only The following procedure describes a manual register test of one active energy register in the basic control mode Reference. The energy measurement of the reference standard and the test load must be controlled manually by the user. 1 Call Setup Register Test menu [8.5.2.1] Load predefined settings or check and adapt the actual settings Configure register test 1 Select reference power mode (Ref.) P1 for register test 1 and select -- OFF -- for register tests 2,3. Enter desired maximum demand period (tmax), if a maximum demand test should be performed in parallel. Define tolerances (Emin/Emax) regarding the class of the meter under test. The input of a dosage energy W is not necessary, because this value is not regarded at manual test. The definition of the load point and the source action mode is not necessary, because no source is controlled in mode Reference. Leave setup menu 2 Call Range settings menu [8.1.1] Set manual range selection and select voltage and current ranges next higher to the maximum values of current and voltage reached during the test. This is to prevent additional errors introduced through the automatic range switching of the reference standard during switch on/off procedure of the load. Note: It is recommended to use automatic range selection only, if the peak values of voltage and current reached during the test are not known and if the test duration is long compared to the switch on/off procedure, where this influence can be neglected (e.g. long duration test on site with customer load). 3 Reset register test The result of a previous test are reset to zero. 4 Enter start reading Enter the actual register reading as displayed on the meter under test with unit kWh. PTS 3.1 C Operation Manual Page 124/202 5 Start energy measurement The energy measurement of the reference meter is enabled and the energy will be counted and shown at WP1 as soon as a load is present. 6 Switch on the load Manually switch on an external source or switch on a circuit breaker or connect a load to dose some energy. The reference energy WP1 is counting up with the resolution of the entered start reading. The dosage value WP1D is shown grey and remains unchanged, because this value is not regarded in the manual mode. 7 Switch off the load Manually switch off an external source or switch off a circuit breaker or disconnect a load to stop the energy flow. 8 Stop energy measurement The energy measurement of the reference is stopped. 9 Enter register end reading The input of the end reading is automatically activated. Enter the actual register reading as displayed on the meter under test with unit kWh. 10 Calculation and indication of the register error By pressing the THB to accept the input of the end reading the register test is finished. The error (E1) of the register test is calculated and indicated based on the measured reference energy (WP1) and the entered start (1:) and end (2:) readings. Notes In the same way the test can also be performed for reactive energy or apparent energy only. To repeat the same test restart with step 3. PTS 3.1 C Operation Manual Page 125/202 Variations in the manual procedure 1a, 3a, 8a 1a Test of 2 or 3 registers at the same time The 2 or 3 required register tests must be defined in the setup (1a). Note: If active and reactive energy registers are tested at the same time, a suitable load must be available (PF ≠ 1) to get active and reactive energy dosage at the same time. 4a,9a During entry of start and end readings the input for all active registers is required one by one, before the next step is running. 4b, 9b Change of start and end readings Before the start of the test, as soon as the test is running and also if the test is finished the start and end readings can be changed. This can be used to: - Correct wrong entries - Enter an expected start and end reading E.g. if the load cannot be controlled, a start reading a little bit higher than the actual reading of the meter register can be entered, and the register test can be started by starting the energy measurement, if this reading is reached at the meter under test. Then an end reading can be entered and the test can be stopped by stopping the energy measurement, if the end reading is reached at the meter under test. In this way no load control is necessary. This method could be applied for on site tests with customer load, which cannot be influenced. - Test several registers of different meters one by one by entering the corresponding register readings. PTS 3.1 C Operation Manual Page 126/202 8.6 Instrument Transformer Testing PT burden measurement CT burden measurement PT ratio measurement (not available) CT ratio measurement 8.6.1 Potential Transformer (PT) burden measurement The rated secondary voltage (Un) and rated burden (SN) of the potential instrument transformer (PT) must be entered. These values can normally be found on the nameplate of the transformer. Optionally the influence of the wires between secondary side of the transformer and the measuring point can be regarded by entering resistance of fuse and junctions (RF), length (l) and cross section (A) of the wire. The PTS 3.1 C measures the burden current (I), the actual secondary voltage (U) and the burden factor (cos). As main result the ratio (Sb) of total rated operating burden (Sn) to rated burden (SN) is calculated and indicated in %. Regarding the international standard IEC 60044-2 the Sb value should be in the range: 25 % SN Sb 100 % SN After the exchange of a mechanical meter with an electronic meter in a substation the burden of the voltage measurement transformer is often too low and measures must be taken to raise the burden to be in the admissible range again. For the necessary connections between transformer and instrument see the connection example in chapter [11]. PT burden measurement menu The measurement starts immediately and is continuously running with the actual parameter settings shown in the upper part of the display. The measured and calculated results are updated in the interval of the time base. Assign results to phase L1, L2 or L3 (can be used for test of a 3 phase meter phase by phase) Settings for PT burden measurement Call storage and printout of test results menu [10]. Exit, back to calling menu PTS 3.1 C Operation Manual Page 127/202 Indications / settings Parameter settings Voltage transformer parameters Rated secondary voltage (UN) and rated burden (SN) of voltage transformer Influence parameters (optional) Parameters to regard the influence of the length (l) and cross section (A) of the wire and of junctions and fuses (RF) between test point and transformer secondary side on the total burden. Results Secondary voltage The actual measured secondary voltage of the voltage transformer Burden current The actual measured current into the burden of the voltage transformer Measured burden The real burden with actual load condition. This value cannot be directly compared to the rated nominal burden (SN). Therefore this value has not high importance. Measured burden S1 U1 I1 Operating burden ratio The ratio between calculated total rated operating burden to the entered rated burden is indicated in %. The value should be in the range: 25 % SN Sb 100 % SN If the value is not in the admissible range measures can be taken on site to adjust the burden and the effect can immediately be checked. Operating burden ratio in % Sb Sn 100% SN Burden factor Ratio of real part (G) to admittance (Y).The value is calculated based on the measured values U and I. Burden factor Phase angle of burden cos G Y G B cos1 tan1 Y G Rated operating burden Burden related to the rated voltage, calculated with the measured admittance (Y) and the entered rated voltage (UN). This value can directly be compared with the rated burden specified by the manufacturer (SN). Because the calculation of SN is based on the admittance (Y), the PTS 3.1 C Operation Manual Page 128/202 measurement is independent of the actual secondary voltage (U). The secondary voltage (U) can be different from the rated value (UN). The result remains the same. Rated operating burden Sn UN2 Y UN2 I U Total rated operating burden Resistance of wire, fuse and junctions Burden related to the rated voltage with regard of voltage drops between secondary connections of the voltage transformer and the measuring point of the secondary voltage (U). The voltage drop is calculated with the optional entries for length (l) of wire from measuring point to transformer and back and cross section (A) of the wire. Additional the entered value RF for fuse and junctions will be regarded. Total rated burden Resistance of wire, fuse and junctions 1 Sn UN2 Y Rl Rl l RF A If RF, A and l are zero: Sn = Sn Conductance (real part of Y) Susceptance (imaginary part of Y) Admittance Y The admittance (Y) and its real part (G) and imaginary part (jB) are calculated based on the measured values U and I. Admittance Y Complex Admittance I G2 B 2 U Y I G jB U Assign results to phase L1, L2, L3 Select L1, L2, L3 to assign the measured results (U1, I1) to the corresponding phase (cyclical mode). The calculated results are indicated with the index of the selected phase. This function can be used to test and save the results of a 3 phase meter phase by phase. PTS 3.1 C Operation Manual Page 129/202 Parameter settings for PT burden measurement To perform the measurement, the nominal values of the potential transformer (PT) must be entered: Rated secondary voltage in V Rated burden in VA This information can be found on the name plate or the calibration certificate of the transformer. Load/save settings Exit, back to calling menu If the voltage cannot be measured directly at the secondary side of the voltage transformer, the influence of the wires between measuring point and transformer and the influence of fuses and junctions to the total burden can be regarded by entering values at l, A and RF. The entries are regarded for the calculation of Rl and Sn. The entries l, A and RF are optional and should be set to zero, if not used. Resistance of fuses and junctions between measuring point and transformer in . Total length of conductor from measuring point to voltage transformer and back to measuring point in m. Cross section of conductor between measuring point and voltage transformer in mm2. Resistivity of copper () m mm2 17.857 m 8.6.2 Resistance Rl Rl l RF A Current Transformer (CT) burden measurement The rated secondary current (IN) and rated burden (SN) of the current instrument transformer must be entered. Optionally the influence of the wires between secondary side of the transformer and the measuring point can be regarded by entering length (l) and cross section (A) of the wire. The PTS 3.1 C measures the actual secondary current (I), the burden voltage (U) and the burden factor (cos). As main result the ratio (Sb) of total rated operating burden (Sn) to rated burden (SN) is calculated and indicated in %. Regarding the international standard IEC 60044-1 the Sb value should be in the range: 25 % SN Sb 100 % SN After the exchange of a mechanical meter with an electronic meter in a substation the burden of the current measurement transformer is often too low and measures must be taken to raise the burden to be in the admissible range again. For the necessary connections between transformer and instrument see the connection example in chapter [11]. PTS 3.1 C Operation Manual Page 130/202 CT burden measurement The measurement starts immediately and is continuously running with the actual parameter settings shown in the upper part of the display. The measured and calculated results are updated in the interval of the time base. Assign results to phase L1, L2 or L3 (can be used for test of a 3 phase meter phase by phase) Settings for CT burden measurement Call storage and printout of test results menu [10]. Exit, back to calling menu Indications / settings Parameter settings Current transformer parameters Rated secondary current (IN) and rated burden (SN) of current transformer Influence parameters (optional) Parameters to regard the influence of the length (l) and cross section (A) of the wire between test point and transformer secondary side on the total burden. Results Burden voltage The actual measured burden voltage of the current transformer. Secondary current The actual measured secondary current of the current transformer. Measured burden The real burden with actual load condition. This value cannot be directly compared to the rated nominal burden (SN). Therefore this value has not high importance. Measured burden S1 U1 I1 Operating burden ratio The ratio between calculated total rated operating burden to the entered rated burden is indicated in %. The value should be in the range: 25 % SN Sb 100 % SN If the value is not in the admissible range measures can be taken on site to adjust the burden and the effect can immediately be checked. Operating burden ratio in % Sb Sn 100% SN PTS 3.1 C Operation Manual Page 131/202 Burden factor Ratio of real part (R) to impedance (Z).The value is calculated based on the measured values U and I. Burden factor Phase angle of burden cos R X cos1 tan1 Z R R Z Rated operating burden Burden related to the rated current, calculated with the measured impedance (Z) and the entered rated current (IN). This value can directly be compared with the rated burden specified by the manufacturer (SN). Because the calculation of SN is based on the impedance (Z), the measurement is independent of the actual secondary current (I). The secondary current (I) can be different from the rated value (IN). The result remains the same. Rated operating burden Sn IN2 Z IN2 U I Total rated operating burden Resistance of wire and junctions Burden related to the rated current with regard of voltage drops between secondary connections of the current transformer and the measuring point of the burden voltage (U). The voltage drop is calculated with the optional entries for length (l) of wire from measuring point to transformer and back and cross section (A) of the wire. Total rated operating burden Resistance of wire Sn IN2 Z Rl Rl l A If A and l are zero: Sn = Sn Resistance (real part of Z) Reactance (imaginary part of Z) Impedance Z The impedance (Z) and its real part (R) and imaginary part (jX) are calculated based on the measured values U and I. Impedance Z Complex Impedance U R 2 X2 I Z PTS 3.1 C Operation Manual U R jX I Page 132/202 Assign results to phase L1, L2, L3 Select L1, L2, L3 to assign the measured results (U1, I1) to the corresponding phase (cyclical mode). The calculated results are indicated with the index of the selected phase. This function can be used to test and save the results of a 3 phase meter phase by phase. Parameter settings for burden measurement I To perform the measurement, the nominal values of the current transformer (CT) must be entered: Rated secondary current in A Rated burden in VA This information can be found on the name plate or the calibration certificate of the transformer. Load/save settings Exit, back to calling menu If the burden voltage cannot be measured directly at the secondary side of the current transformer, the influence of the wires between measuring point and transformer and the influence of junctions to the total burden can be regarded by entering values at l, A. The entries are regarded for the calculation of Rl and Sn. The entries l, A are optional and should be set to zero, if not used. Total length of conductor from measuring point to current transformer and back to measuring point in m. Cross section of conductor between measuring point and current transformer in mm2. Resistivity of copper () m mm2 17.857 m Resistance Rl Rl PTS 3.1 C Operation Manual l A Page 133/202 8.6.3 Current Transformer (CT) ratio measurement This function is used to measure the transformer ratio of current transformers. The kind of current measurement, direct or with clamp-on current transformers, can be selected for primary and secondary input. Current transformer ratio Reference for current ratio calculation Definition of the reference Display of measured primary and secondary values φ Phase angle in ° Error Ex of the measured ratio / nominal ratio in % Display of results Measured primary current IP and secondary current IS. Calculated nominal value NP or NS based on ratio IPrim/ISec, depending on the value that is defined as reference. φ Phase angle in ° Error E of the measured ratio / nominal ratio in % The results are updated in the interval of the time base T (e.g. 1s). Nominal ratio rn = NPn/NSn Measured ratio r = IP/IS = NP/NS Ratio error E = [r/rn –1]*100 [%] Input of nominal ratio To calculate the ratio error E the specified ratio of the transformers must be defined. This is done by input of primary nominal value NP and secondary nominal value NS or nominal ratio at NP with NS = 1. The fields of the reference are grey marked and will be the base value for the calculation of NP or NS in the results display section. Reference for current ratio calculation Select / Edit current transformer data Settings for primary and secondary current inputs PTS 3.1 C Operation Manual Page 134/202 Current Transformer selection Database current transformer Type Taking an existing dataset from the directory CT Type. Editing a CT type data set. Primary current measurement input The definition must be different for primary and secondary input, otherwise the measurement is not started. Definition of primary current input First the kind of measurement, direct or with clamps, must be defined for the primary current Ip, primary input. Secondary current measurement input Definition of secondary current input First the kind of measurement, direct or with clamps, must be defined for the secondary current Is, secondary input of the current transformers. Load/save settings from/to directory Exit, back to calling menu Call storage and printout of test results menu [10]. Exit, back to calling menu PTS 3.1 C Operation Manual Page 135/202 8.7 Special functions Special functions menu AC/DC transducer test (not available) Measurement of impulse constant [8.7.1] Self test (not available) URef test (not available) fRef test [8.7.2] 8.7.1 Measurement of impulse constant A predefined number of impulses (1 up to n) of a scanning head, hand switch or other impulse source is counted at the impulse input and compared with the energy measured by the internal reference standard from start impulse to impulse n. This reference energy is divided by the tested number of impulses to calculate the approximate impulse constant of the impulse source. This function helps to find the correct meter constant for the error measurement, if the constant is not clearly indicated on the device under test (e.g. when testing transformer operated meters, where only the primary constant is indicated, but no CT and/or PT ratio or additional factors must be regarded or when testing reference standards, where the specification for the impulse output is missing). Measurement of impulse constant The function works in the same way as the error measurement (see also [8.2]). Start / Stop measurement Change unit of constant (i/kxh, i/xh, i/xs, kxh/i, xh/i xs/i with x = W, var, VA) Call parameter setup menu Call storage and printout menu [10] Exit, back to calling menu Parameters for measurement of impulse constant Reference power (Ref.) and number of impulses or time to test (t/n) can be defined in the same manner as at error measurement (see also [8.2.2]) Load/save settings from/to directory Exit, back to calling menu PTS 3.1 C Operation Manual Page 136/202 8.7.2 fRef test Verification against fRef The stability of the built in time base can be verified by this test. The output of a frequency standard must be connected to the impulse input 1. Enter the exact test frequency value fRef and the test time t. Frequency range: 1 kHz … 200 kHz The measurement runs continuously. A bar graph indicates the progress of the measurement. The deviation of the internal time base is indicated in ppm in graphical form and as a numerical value. 1 Preparation The measuring set-up should be in accordance with the connection example shown in chapter [ ]. The impulse input 1 on PTS 2.3 C must be connected. Any instructions given in the user manual of the Frequency standard should be followed and the measuring set-up adapted if necessary. 2 Input of reference frequency The frequency must be in the range: 1 kHz … 200 kHz 3 Input of duration of test The measuring time must be in the range: 10 s ... 999 s 4 Start fRef test Test starts After the test duration the deviation of the internal time base is indicated in ppm in graphical form and as a numerical value. The measurement runs continuously. 5 Stop fRef test PTS 3.1 C Operation Manual Page 137/202 6 Save test results 7 Exit, back to calling menu PTS 3.1 C Operation Manual Page 138/202 9. Automatic test run with portable test system Sequence menu card The sequence menu allows to define test sequences for the two functions: Error measurement and Energy measurement (register test) and to run them automatic or step by step on a portable test system. Note: The test sequence function can only be used for Portable Test Systems with both Reference Standard and Power Source integrated and active. Indications / settings Run automatic or step by step test [9.2] Create / edit test sequence [9.1] 9.1 Create / edit test sequence Basic menu The three white display areas show top down: File name of actual test sequence Comment Steps of actual test sequence At the first call all fields are empty. Following functions can be executed in this menu: Reset and edit test sequence Edit actual test sequence Load / save test sequence Exit, back to calling menu Indications / settings Call test sequence editor menu [9.1.1] Load / save test sequence from / to directory Check Sequence Selections [4.4, 6] PTS 3.1 C Operation Manual Page 139/202 Test step list The test steps are numbered in the sequence they are executed. Type E Error measurement # Energy measurement (register test) Test step name The automatically generated name indicates the active current phases and the load point settings of the test step. Voltage, current and phase angle settings Test step with fix settings for UI (empty step) Percentage settings in relation to nominal values Un, In of meter type, phase angle defined with power factor Activated current phases L--No phase active (empty step) L123 All phases 1, 2, 3 active L-2Only phase 2 active 9.1.1 Editor functions Test sequence editor menu The right side of the display looks like the basic menu [9.1], only the FB’s on the left side are changed and the following functions are available: Enter comment Insert new step Edit step Copy step Move step Delete step Exit, back to basic menu PTS 3.1 C Operation Manual Page 140/202 Indications / settings Enter comment Comment menu The comment display changes from reduced two to full four line display. Any comment related to the test sequence can be entered. The following FB’s are available: Enter comment Exit, back to editor menu Basic editor functions Common functions for the listed FB’s (example shown for insert new step): Activate function Select and activate FB with THB. The FB is shown depressed. A red frame surrounds the test step window and a yellow selection line is shown on position 1. Select position Move yellow line with THB to desired position. Cancel function Move yellow line with THB up at the first or down at the last step to cancel the function. The FB is shown normal again. PTS 3.1 C Operation Manual Page 141/202 Insert new step Activate insert Push on THB at selected position to call the Test step definition menu [9.1.2] Select and define: 1 Type error or Type energy 2 Load point setup [9.1.3] 3 Error setup [9.1.4] or Energy setup [9.1.5] 4 Copy from meter (optional) 5 Exit, back to editor menu New step inserted The new test step is inserted at the selected position (08). The old step at this position and all following steps are shifted +1. Edit step Activate edit Push on THB at selected position to call the Test step definition menu [9.1.2] Change settings and name as desired. Exit, back to editor menu and terminate edit function. PTS 3.1 C Operation Manual Page 142/202 Copy step Activate copy Push TBH at selected position. Step copied The selected step (07) is copied to position +1 (08). The old step at this position and all following steps are shifted +1. Move step Mark source position Push THB at selected position. The test step is marked red. Select target position Move yellow line with THB to desired position target position. Move position Push THB at target position to move the marked test step and insert the step behind the step shown at target position. Delete step Delete step Push TBH at the selected position. Step deleted The following positions are shifted -1. PTS 3.1 C Operation Manual Page 143/202 9.1.2 Test step definition Test step definition menu - new step The test step name, the load point settings, the error measurement parameters and the status of the copy from meter check boxes are shown. Functions independent of test step type: Test step name Load point setup Set copy form meter flag Exit, back to basic menu Test step definition menu - Type Error Functions and indications related to type error: Test step type - Error Error measurement setup Type Error In the lower part of the display the error measurement parameters are shown Load Point The load point parameters shown are defined with fix settings for voltage and current with units V, A and the phase information as power factor (cosLA). Applicable for all types. Test step definition menu - Type Energy Functions and indications related to type energy: Test step type - Energy Energy measurement setup Type Energy In the lower part of the display the energy measurement parameters are shown. Load Point The load point parameters shown are defined in the form percentage of meter nominal and maximum values (%Un, %Imax) and the phase information as power factor (cosLA). In this form the test step can be used for different meter types with varying Un, Imax values. Applicable for all types. Test step definition menu - Type Mark Positioning Functions and indications related to type mark positioning: Test step type – Mark positioning Mark positioning setup Type Mark Positioning In the lower part of the display the mark positioning parameter is shown. Load Point The load point parameters shown are defined with fix settings for voltage, current and phase angle with units V, A,°. Applicable for all types. PTS 3.1 C Operation Manual Page 144/202 Indications / settings Test step name The system automatically generates a test step name based on the load point setup. The given name can be changed or any other name can be defined. Load point setup The file selection menu is called [6.1]. Load settings Select and load object file with predefined settings from directory Load Points Selection. Edit settings The load point setup menu is called [9.1.3] Settings can be entered completely new or loaded settings can be modified. Test step type Type Error Error measurement with 1 input (e.g. LED kWh, LED kvarh or impulse output Wh/i). Type Energy Energy measurement (register test) with 1, 2 or 3 counter registers. Type Mark Positioning Positioning of the disc mark of mechanical meters in percentage of a full turn (e.g. 85%). Call error measurement setup menu [9.1.4] Call energy measurement setup menu [9.1.5] Call mark positioning setup menu [] Set copy from meter flag Change settings Activate function Push THB to activate function. The FB is shown depressed and a red selection frame is shown. Change status Select check box of input 1 to 3 with red frame by turning the THB. Push on THB to change the status of the check box (cyclical mode). PTS 3.1 C Operation Manual Page 145/202 Terminate function Move red frame back to FB and push the THB to stop the function. Status of check box Copy from meter active The settings in the type error or type energy frame related to the input, where the checkbox is crossed, are copied from the meter, which is defined for this input during the test run. Note: The test duration (t/n) for type error (imp, s) or type energy (kWh, s) is not copied from the meter. The value must be defined in the test step (initial values: 1 imp, 0 s). Copy from meter inactive The settings for type error or type energy as defined in the test step and shown in the frame are used. 9.1.3 Load point setup Load point setup menu Network selection (not available at PTS3.1C) Settings for voltage (U) current (I1), phase angle (), start phase angle in relation to SYNC (b1) and frequency (f) or synchronization to line frequency (SYNC) can be selected, modified or entered here. The settings can be made absolute with unit A, ° or relative as %Un, %In, %Imax. The phase angle can be entered in ° or as power factor in the form cosLA, cosLE, sinLA, sinLE. Exit back to calling menu For a detailed description of load point settings see chapter [7.1.2]. 9.1.4 Error measurement setup Error measurement setup menu Settings for reference power/energy mode (Ref.) with sign (+/-), meter constant (C/R), test duration (t/n) in impulses (imp) or seconds(s), number of test repetitions (N) and error tolerance band (Emin/Emax) can be modified or entered here for input 1. Load /save settings from / to object file in directory Exit, back to calling menu For a detailed description of error measurement settings see chapter [8.2.2]. PTS 3.1 C Operation Manual Page 146/202 9.1.5 Energy measurement setup Energy measurement setup menu Settings for energy type (Energy), test interval in form of energy or time (Interval) and accuracy class in % (Class) can be modified or entered here for inputs 1 to 3. Load /save settings from / to object file in directory Counter Test Point Selections Copy settings form input x to input y Exit, back to calling menu Indications / settings Energy type Select energy type with THB or up / down cursors (cyclical mode): P Active energy import / export Q Reactive energy import / export S Apparent energy import / export P+ Active energy import P- Active energy export Q+ Reactive energy import Q- Reactive energy export Q1 Reactive energy in power quadrant I (P+Q+) Q2 Reactive energy in power quadrant II (P-Q+) Q3 Reactive energy in power quadrant III (P-Q-) Q4 Reactive energy in power quadrant IV (P+Q-) I 2 U2 I2-hours (used at transformer loss meters, copper and leakage loss) U2-hours (used at transformer loss meters, iron and core loss) Interval Value Enter desired dosage interval for energy or time dosage with keypad or THB. Unit / mode Select the appropriate unit with up down cursors (cyclical mode): Unit s, min, hr Ws, Wh, kWh Mode Time dosage Energy dosage Class Select with THB or up / down cursor or enter directly with keypad the accuracy class of measuring system in percentage (%) as indicated on meter or specifications. This value will be used for good / bad evaluation during the test run. PTS 3.1 C Operation Manual Page 147/202 9.1.6 Mark positioning setup Mark positioning setup menu Definition of stop position of disk mark in percentage of a full revolution. Select value with up / down cursor or enter directly with keypad in percentage. Exit, back to calling menu PTS 3.1 C Operation Manual Page 148/202 9.2 Run automatic or step by step test Test run menu - test prepared FB’s for preparation of test run: Select start or next test step Test mode automatic or step by step Test sequence and meters setup Following display fields show the actual meter and sequence definition: Test sequence file name (ZMD S01) Meter type (ZMD120AM) and meter (ZMD120AM No:72 318 9) file name for inputs 1 to 3, where meters are defined. Comment to test setup (abbreviated form) Window with test sequence steps Test run menu - automatic test running FB’s for execution of test run: Start / Stop test run Select error Indication for input 1, 2 or 3 View test step results Storage of test results Following display fields and indications are active during test run: Error tolerance band above test step window Actual running step (red) with status indication for inputs 1 to 3 in test step window Two bar graphs for each input, showing the status of actual measurement and repetitions Load point status with vector diagram and table for voltage (U), current (I) and power (P) for phases L1, L2, L3 on the right side PTS 3.1 C Operation Manual Page 149/202 Indications / settings Graphical error indication with tolerance band Selection of input Change between indication for input 1, 2, 3 (cyclical mode) The result of the last finished test run of the selected input is shown. The error is indicated numerical and graphically with a bar graph starting at the blue zero line, indicated in relation to the white tolerance band. Lower and upper limits are indicated in percentage. Different error indications No bar graph, new step, no result yet Green bar graph, error within tolerance Red bar graph, error out of tolerance The Indication is inactive, when the test run is stopped (Start / Stop FB is out). Indications in Test Sequence window Actual test step Test step position and step name are red marked Test step type Type Error Type Energy (register test) Test step status for measuring places 1, 2, 3 Not yet executed, no result or input not defined Step running Step finished, error within tolerance Step finished, error out of tolerance Status of actual running test step For each measuring input there is an individual status indication for the actual running test step. Status of actual measurement The actual counted impulses (38 imp.) of the running measurement and a green bar graph in relation to the programmed test duration t (50 imp.) are indicated. The test duration can also be indicated in seconds (s). At test steps of type energy no numerical values are indicated. PTS 3.1 C Operation Manual Page 150/202 Status of repetitions The actual status of the executed repetitions of the measurement (2) and a blue bar graph in relation to the programmed number of repetitions (5) are indicated. Start / Stop test run Start of a test run is only possible, if a test sequence with at least one test step is defined and if at least one meter is defined. Test stopped Source status Voltages and currents are switched off Status of functions in both test modes Test sequence and meters setup can be changed Start or next test step can be defined Test running Source status Voltages or voltages and currents are switched on Currents are switched off / on between test steps Note: The voltages are always on as long as the start / stop FB is depressed. Status of functions in test mode automatic Test sequence and meters setup is not accessible Start or next step is not accessible as long as test run is active Status of functions in test mode step by step Test sequence and meters setup is not accessible Start or next step is not accessible as long as test step is active Start or next step is active between steps PTS 3.1 C Operation Manual Page 151/202 Select start or next test step The function is used to select the start test step in both test modes. In test mode step by step the function is also used to define the next step. Activate function A red frame surrounds the test step window and a yellow selection line is shown on position 1 Select new position Move yellow line with THB to desired start or next step position. Terminate selection Push on THB at selected position. The selected position is marked red. Start step The function is terminated Next step The selected test step is automatically started and the function is locked as long as the test step is running. Test mode Automatic test run The test runs full automatic for error measurement test steps from selected start test step until the last test step in the sequence and then stops. If there are energy measurement test steps within the sequence, the sequence stops and waits for user input of start or end readings. When the input is finished the sequence runs automatic again. Step by step test run The selected test step runs. When the step is finished the current is switched off, but the voltage remains on. The next step is selected. The user must manually select and activate the next step with the select start or next step function. Call test sequence and meters setup menu [9.2.1] Call view test step results menu [9.2.2] Call storage of test results menu [10] PTS 3.1 C Operation Manual Page 152/202 9.2.1 Test sequence and meters setup Test sequence and meters setup menu The file names of the actual loaded data base elements are shown at: Test sequence Meter and meter type of input 1 Meter and meter type of input 2 Meter and meter type of input 3 To setup meters and comment at once call: Load ADS of customer Make individual definitions by calling the FB’s: Load / edit test sequence and meters individual Enter or modify directly with THB and keypad or external keyboard: Comment to setup Exit, back to calling menu Indications / settings Load / edit meters for measuring inputs 1, 2, 3 The three measuring inputs can be assigned to three impulse outputs, defined with a meter constant, and be assigned to three counters. The file selection menu [6.1] is called with the object file directory: Meter Selections There are two possibilities to assign the meters to the inputs: Load meter file from data base Three different meters or the same meter one, two or three times can be loaded with different impulse outputs, measuring systems and counters selected. Restriction: The meters must have the same Imax and network type. If this is not the case the entries are shown red and the exit is blocked. See also error handling [9.6]. Edit actual meter dataset Select sub menus and activate edit actual object until the meter menu is displayed. Enter directly the data for meter and meter type. It is not necessary to fill out all the fields. See also descriptions of edit and dataset in chapter [6]. PTS 3.1 C Operation Manual Page 153/202 Load / edit test sequence The file selection menu [6.1] is called with the object file directory: Check Sequence Selections There are two possibilities to define the actual test sequence: Load test sequence file from data base Test sequences previously defined by the test sequence editor and stored in the data base can be loaded. Edit actual test sequence Select sub menus and activate edit actual object until the sequence editor is displayed [9.1.1]. Define test steps directly. Load administrative dataset (ADS) The file selection menu [6.1] is called with the object file directory: Select Admin Dataset If the ADS contains meters, they are automatically loaded at positions 1 to 3. By loading predefined ADS of customers the measurement setup can be done in a fast and comfortable way. The link to the needed test sequence and the settings for impulse output and meter selection can be made in the ADS comment, which is also loaded. Select impulse output to test Select one of the up to 8 meter constants, based on the two constant types and up to four measuring systems (x = 1,2,3,4), defined in the meter type linked to the loaded meter. This selection is necessary if the copy form meter function is activated in the test sequence. In this case the meter constant for the measurement is taken from the meter type of the loaded meter regarding the selection. ---- No constant defined The field can not be selected. This is the case if no constant or even no meter type is defined in a reduced setup. C1 Optical constant (Co) of measuring system 1 defined. R1 Electrical constant (Ce) of measuring system 1 defined. Select counter to test Select one of the up to 4 counters, defined in the meter type linked to the loaded meter. This selection is necessary if the copy form meter function is activated in the test sequence. In this case the counter (register) type and format is taken from the meter type of the loaded meter regarding the selection. ---- 1 No counter defined The field can not be selected. This is the case if no counter or even no meter type is defined in a reduced setup. Counter 1 is selected. PTS 3.1 C Operation Manual Page 154/202 9.2.2 View test step results View test step results menu In the upper part of the display test sequence, definitions for inputs 1 to 3 with meter name and serial number are shown. The window in the lower part shows the test step list with additional information to the test step: Error measurement status and results for meters (inputs) 1 to 3 on first line of test step Test duration settings (imp, s, kWh) for meters (inputs) 1 to 3 on second line of test step View test step results menu - scroll mode If not all test steps are visible within the window, they can be scrolled. Push THB to activate the scroll mode. Move yellow selection bar by turning the THB. Push THB again to stop scroll mode. Exit, back to calling menu Indications / settings Results and status indications in test step window Additional to the status indications, shown in the test sequence window of the test run menu, status of measurement, error results, test duration and more details of test step name are shown here. The status indications are shown for each meter (input) individual Measurement status / error result Step Not yet executed or not defined at step not selected Waiting for start impulse at actual step First measurement of N measurements running, no error result available yet Last measured error result of selected test step. The value is updated during test runs with several repetitions (N>1). Last measured error result of not selected, finished test step. Test duration (t/n) defined for test step and input Test type error with test mode imp, 50 impulses tested Test type error with test mode time, 30 s tested Test type energy with test mode energy in kWh, 0.1 kWh dosage PTS 3.1 C Operation Manual Page 155/202 9.3 Preparation of test run 9.3.1 Work with Administrative Data Sets (ADS) The example is shown for a completely defined ADS with instructions for selection of impulse outputs and counters for test with a test sequence, which uses the copy from meter function. 1 Load administrative dataset of customer from data base The meters defined in the ADS are automatically loaded. The example shows a configuration with the same meter defined at measurement input 1 and 2. Two impulse outputs and two counters of the same meter shall be tested at the same time. The necessary configurations of impulse outputs and counters can be found in the ADS comment. The test sequence, which shall be used for this test is also noted in the ADS comment. 2 Select impulse output C1 at measuring input M1 (LED impulse output) 3 Select counter 1 at measuring input M1 (E energy counter) 4 Select impulse output R1 at measuring input M2 (S0 impulse output) 5 Select counter 2 at measuring input M2 (Esum total energy counter) 6 Load test sequence file ZMD S01 from data base The configuration is made as described in the comment. The test run can be started. PTS 3.1 C Operation Manual Page 156/202 9.3.2 1 Work with individual meters and test sequences of data base Load meter file for input 1 from data base The meter and the meter type object file name are indicated in the two fields. Impulse output selection and counter selection become accessible. 2 Select impulse output of meter 1 to test Select one of the meter constants Cx, Rx (C = Co: optical constant, R = Ce: electrical constant) of the up to four measuring systems (x = 1,2,3,4) defined in the meter type linked to the loaded meter. For test sequences, where the copy from meter flag is set at least one meter constant (e.g. C1) must be defined to run test steps or type error. For test sequences with fix error measurement parameters and copy from meter flag not set, the impulse output must not be selected. 3 Select counter (register) of meter 1 to test Select one of the defined counters x of the up to four counters x = 1,2,3,4 defined in the meter type linked to the loaded meter. For test sequences, where the copy form meter flag is set at least one counter must be defined to run test steps of type energy. 4 Repeat steps 1 to 3 for input 2 (optional) 5 Repeat steps 1 to 3 for input 3 (optional) 6 9.3.3 Load test sequence file from data base Work with direct entries for meter and test sequence The example shows a minimum directly entered meter and test sequence definition to enable a test run with input 1. 1 Input minimum meter settings for input 1 Select sub menus and activate edit actual object until the meter menu is displayed. Make at least one input (e.g. serial number). Go back with several exit FB’s until setup menu is displayed again with entries Modified at meter and meter type file name. PTS 3.1 C Operation Manual Page 157/202 2 Define a test sequence with one test step directly Select sub menus and activate edit actual object until the test sequence editor is displayed. Insert a new step and define fix load point settings for voltage, current and phase angle and fix parameters for error or energy measurement of input 1. The copy from meter flag must be empty. Go back with several exit FB’s until setup menu is displayed again with entry Modified at test sequence file name. 9.4 Test run examples 9.4.1 Automatic test run The test is running full automatic if the test sequence contains only test steps of type error. The test is running half automatic, if test steps of type energy are included, see [9.4.3]. 1 Prepare test run, see [9.3] 2 Select test mode automatic 3 Select start test step (default position 01) Select any start step with the yellow selection line. The default start step is 01. The selected start step becomes red. The sequence will run automatically form start step until the last step in the sequence PTS 3.1 C Operation Manual Page 158/202 4 Start test run The example shows a running test sequence with total 8 steps. Steps 01 and 02 are already finished and the results are OK. Step 03 is actual running. It is a single phase measurement with only current of phase 1 switched on (L1--). The example shows the same test sequence at a later state with step 07 running. Steps 01 to 03 are already finished with results OK. At step 04 the test sequence was interrupted, therefore the errors are shown bad. Step 07 was chosen as new start step and the measurement was restarted at step 07. The test run stops automatic after last test step 5 Track test step results with result view function More detailed information to the status and settings of the test steps can be seen in the view test steps results menu. The errors of the last measurement are shown for the different steps and meters 1 to 3 (input 1 to 3). 6 Call storage of results menu to save and / or print results [10] PTS 3.1 C Operation Manual Page 159/202 9.4.2 Step by step test run 1 Prepare test run, see [9.3] 2 Select test mode step by step 3 Select start test step (default position 01) 4 Start test run The example shows a step by step test run with point 06 and 01 finished. The step 02 is automatically selected as next step. The user can start this step by pushing with THB on select next step two times or he can push the THB once at select next step, than select any other step by turning the THB and push THB again to select and directly start the new step. Note: Between the steps the voltages remain always on. 5 Track test step results with result view function 6 Define next step and restart 7 Stop test run manually 8 Call storage of results menu to save and / or print results [10] PTS 3.1 C Operation Manual Page 160/202 9.4.3 Test run with test steps of type energy An automatic test run doesn’t run full automatic. It will be stopped at each test step of type energy to enter start and end readings. 1 Enter start readings for defined counters At the begin of a energy type test step the voltage is switched on and the system waits for the input of start readings by the user. In this example two counters are defined for the measuring inputs 1 and 2. Input 3 is not defined and therefore grayed out. The counter format (digits before / after decimal point) is taken from the meter type. Select entry fields with THB and enter start readings of the defined counters. The two counters have different test durations defined (0.1 kWh, 0.2 kWh). The smallest value (0.1 kWh) will be taken as reference Select exit to terminate the input and to start the energy dosage. Status indications during test The green bar graph shows the already dosed amount of the defined dosage energy. The bar graph of input 2 is shown with half length, because the programmed value (0.2 kWh) is double the value of input 1 (0.1 kWh). The test stops, when the bar graph at input 1 reaches the end. 2 Enter end readings for defined counters After automatic stop the system waits for user inputs of the end readings. Select entry fields with THB and enter end readings of the defined counters. The counter error is calculated and displayed. The last line shows the energy, which was really dosed and taken as reference for the error calculation. PTS 3.1 C Operation Manual Page 161/202 9.4.4 Functions to change / interrupt / restart the test run Change test mode within test run The test mode can be changed at any time within an active test run. As soon as the actual test step is finished, the new test mode is used for the next step. E.g. changing form automatic to step by step test mode can be used for a well defined mean stop of an automatic test run. The test run stops, when the actual test step is finished . The voltages are not switched off. Single steps can now be tested or a new start step can be defined and the automatic test run can be restarted by changing back to automatic test mode. Interrupt active test run An active test run can be stopped at any time. The already measured step results remain in the temporary storage as long as no new test sequence is loaded or as long as the test step is not repeated. Note: The source is completely switched off, currents and voltages. During test of electronic meters it may not be advisable to interrupt the test in this way. Restart stopped test run The test run will go on with the selected test mode starting at the marked test step. If an automatic test was interrupted, optional a new start step can be selected before the start / stop button is pressed (e.g. to repeat an already finished part of a test sequence or to omit some test steps). 9.5 Useful functions available during test run The other menu cards are not locked during the test run is active. The following functions can be called at any time during the test run without influencing the measurement results. Function call Description View detailed test step results in storage of results print preview Track test step settings with Source Load point menu Track test step settings with reference measurement functions Work parallel in data base (e.g. to enter or change ADS of customer) PTS 3.1 C Operation Manual Page 162/202 9.6 Error handling Indication / effect Test run start / stop is locked Error reason No valid meter and / or test sequence is defined or communication to units is not ok. Solution Define missing part in meters and test sequence setup. Check communication status. Two meters with different Imax values or different network types are defined. Test each meter individually with two separate test runs. Warning during test run if test step parameters are in conflict with meter parameters, e.g. if test current of test step is higher than maximum current (Imax) defined in meter type. Select NO and change test step parameters or load other test sequence which works fine with the settings of the loaded meter. Exit of menu is locked PTS 3.1 C Operation Manual Select YES only, if you are sure that the meters connected are not damaged under this conditions. Page 163/202 10. Storage and printout of test results In this menu measured results, a so called Test result DataSet (TDS) can be combined with a freely configurable Administrative DataSet (ADS) to one combined result dataset. In this way the link between measured results and measuring identification (customer address, test conditions, tested meters, other checks and comment) can be made. It is up to the user, how many ADS information he likes to define and to link to the TDS. The ADS information can be entered directly with the edit function of the data base or can be loaded full or partially from the data base. It is recommended to define full ADS datasets for customers or measuring places with the optional software CALSOFT, installed on a PC. As preparation for tests in the field the predefined ADS datasets or parts of it can then be uploaded from CALSOFT software into the PTS 3.1 C, either by the serial interface or by direct transfer on the compact flash card. Storage and printout of test results menu The combined result dataset (TDS + ADS) can be: saved to new file appended to file with last saved data set printed previewed The right side shows the file names of the actual loaded ADS and its components: Administrative dataset (ADS) Customer dataset General info dataset Meter datasets for inputs 1 to 3 Other checks dataset Indications / settings Save new or append results and go back to calling menu [10.2] Print data by the serial interface [10.3] Preview of results in printout format [10.1] Call printer and save parameters settings menu [5.1] to define settings for: Save mode (single / continuous) see description in chapter [10.2.1] Printer type / baud rate / line delay see description in chapter [10.3.2] PTS 3.1 C Operation Manual Page 164/202 Load / edit / reset object files The file selection menu [6.1] is called and an object file directory is displayed. Load object file Select and load a predefined object file from the shown directory. Edit actual object Edit the actual dataset, which can be empty or contain the previously loaded data. All data can directly be entered. If another dataset is called in the editor menu, call the edit actual object function again, until you can enter the data directly. Reset actual object to defaults The dataset is reset, the file name field is cleared. No data of this type is linked with the result data. Exit, back to calling menu Use the exit FB to come back to the storage of results menu. Several exit steps may be necessary to come back. A detailed description of the listed datasets can be found in the chapters listed below. FB Directory Description Select Customer Dataset [6.4.2] Select General Info Dataset [6.4.3] Meter selections [6.5.2] Select Other Results Dataset [6.4.4] Other checks dataset This dataset can be used to document additional test results in the form good / bad. These tests could be visual checks as listed or user defined checks, like the attribute tests: no load test and starting current test. Call edit actual object at the file selection menu. Actual other results dataset A set of predefined (01 .. 15) and user defined checks (16 .. 25) is shown with marking: Good Bad No check The marking and user defined checks can be modified with: Change check boxes Define user result For more details regarding this dataset see chapter [6.4.4]. PTS 3.1 C Operation Manual Page 165/202 Comment If a complete ADS dataset is loaded, the ADS comment is displayed here. Enter or modify comment with THB and keypad or external keyboard. This field can also be used for simple measurement documentation, if the complete ADS and the ADS parts are not used and reset to defaults. Exit, back to calling menu 10.1 Preview of results The preview function can be used to view the results before saving or printing them. With this function a fast overview over the complete results data with measured results (TDS) and the linked administrative data (ADS) is possible. During a running test sequence the function can be used to see more detailed results of the already finished test steps. The changeover between running sequence and print preview menu has no influence on the measurement results. Preview of results menu The combined results (TDS + ADS) are shown in the printout format. Details regarding the look of the different printout formats for TDS and ADS parts see examples in chapter [10.3.4]. Scroll up / down by turning the THB Exit menu by push on THB Print results from print preview menu by push on zero key Note: If the results are transferred to CALSOFT, they will have another look, adapted to the CALSOFT user interface. 10.2 Save results The actual combined results of measured results (TDS) and administrative data (ADS) are saved on the compact flash card. 10.2.1 Save mode configuration Call printer and save parameters settings menu [5.1] to define the save mode: Single One measurement results dataset (TDS) is saved Continuous The measurement datasets (TDS) are saved continuously at the defined time interval in s, min, h. PTS 3.1 C Operation Manual Page 166/202 10.2.2 Save single measurement 1 Run measurement 2 Call storage of results menu 3 Load / edit administrative data (optional) 4 Preview results (optional) 5a Call save results and exit to create or select a new file The file selection menu [6.1] is called with the directory Any Test Results displayed. Save as new file 1 Call save actual object 2 Select line new in directory 3 Enter name for result file 4 Push THB to terminate save 5 Back to measurement menu Save to existing file Confirm overwriting file or append new results dataset to existing file. With Append several measurements can be saved in the same file and be transferred to CALSOFT by readout of just one result file. 5b Call append results and exit to save directly to the last selected file. With this function several measurements can be added to the same file (e.g. all measurements of one customer). The FB is only enabled, if a file was created/selected before and a data set saved already regarding point 5a. PTS 3.1 C Operation Manual Page 167/202 10.2.3 Save continuous measurements 1 Call storage of results menu 2 Load / edit administrative data (optional) 3 Call save results and exit to define a result file The file selection menu [6.1] is called with the directory Any Test Results displayed. Create result file, as described under save single measurement step 5. The continuous storage mode is automatically started, when the file selection menu is left with the exit door FB. The calling measurement menu is displayed again. Status indications The camera FB is shown depressed during continuous saving is active. The compact flash status indication changes periodically to the save continuous symbol. The background of the compact flash status indication becomes periodically red during data is saved. 3 Run measurement The measurement results are cyclically saved with the defined time interval 4 Select camera FB and push THB to stop continuous saving. The data saving is stopped. Status indications The camera FB is shown normal again. The save continuous symbol disappears and the normal compact flash status indication is displayed again. 5 Call storage of results menu and preview results (optional) The last saved measurement results are shown. With the preview function only one of the saved result sets can be viewed. To see all the saved results the data must be transferred to CALSOFT. 6 Exit, back to calling measurement menu PTS 3.1 C Operation Manual Page 168/202 10.3 Print data The measured results and also data base objects can directly be printed by the serial interface RS232. The printing format is given. 10.3.1 Printer requirements Following printer types with listed specifications are tested and recommended by the manufacturer: Dot matrix printer: type DATAMEGA DPN-2335-40-V.24 Thermo printer: type CITIZEN PD-04 Specification Portable alphanumeric printer: 40 characters per line, standard ASCII character set supported RS232 serial interface: 8 bit, no parity, 1 stop bit, no control signals used (only RXD, TXD, GND connected), baud rate: 9600 bd Attention! If another printer model than the recommended shall be used, we strongly recommend testing the printer before buying. If another printout format is needed or another printer type should be supported, the data must be transferred to the PC and printed from PC with software CALSOFT or a customer specific solution based on export of the data to Excel. 10.3.2 Printer configuration Call printer and save parameters settings menu [5.1] to define printer settings: Type: Epson (DATAMEGA DPN-2335-40-V.24) / Citizen (PD-04) / No printer Baud rate: 4800 / 9600 / 19200 / 38400 / 57600 / 115200 bd (default: 9600) Line delay: 200ms / 500ms / 1000ms / 2000ms or OFF. 10.3.3 Call of printout Two ways to print: Print by activating the printer symbol at storage of results menu The actual combined results (TDS + ADS), as shown in the storage and printout of test results menu, are printed. The printer symbol is shown depressed as long as printing is active. Print by operating the zero key at print preview menu The actual combined results (TDS + ADS) or viewed object files from data base are printed as shown in the print preview window. PTS 3.1 C Operation Manual Page 169/202 10.3.4 Layout of printout The printout is divided in several parts separated with dashed lines. The parts are printed depending on the defined administrative data and the type of results. The printout looks exactly like shown at the print preview function. Header Administrative data (optional) Test result data Direct printout Date and time of measurement are printed. Printout of result file Date and time of measurement and the result file name are printed. Printout of result file with n datasets Additional to filename, date and time the shown result 1 of n saved datasets (1/n) is indicated. Customer data Customer address and information is printed in the form as defined (e.g. only company name) For different parts of administrative data see separate table Comment Any comment on four lines Reference settings Actual settings of the reference meter during the measurement: Mode: connection mode (4W) and reactive mode (Qn) and time base (t) Inputs used (InU, InI) Activated internal ranges per phase for voltage (RU1) and current (RI1) Definition of the impulse output (Fout1) Load values Voltage (U) Current (I) Phase angle I to U (Phi) Active power (P) Reactive power (Q) Apparent power (S) Power factor (PF) Frequency (f) Error measurement Energy mode (Ref.) Test duration (t/n) Meter constant (C/R) Number of repetitions (N) Tolerance band (Emin, Emax) and the results: Last measured error (E) Mean value of error (Em(5)) Standard deviation (Es(5)) PTS 3.1 C Operation Manual Page 170/202 Energy measurement Energy mode (Ref.) Maximum period (t) and the results: Measured energy (W) Maximum power (Max) for each configured input are printed. Counter test (register test) Energy mode (Ref.) Maximum period (t) Tolerance band (EMin, EMax) and the results: Tested energy (W) Start counter reading (##.#1) End counter reading (##.#2) Counter error (E) Maximum power (Max) are printed for each configured input. For other results see table with examples of different types of results. PTS 3.1 C Operation Manual Page 171/202 Different parts of administrative data Size and content of printout can vary depending on loaded or entered data. Customer data General info data Meter data Other checks data Comment PTS 3.1 C Operation Manual Page 172/202 Examples of different types of results Size and content can vary depending on inputs configured during test. Error measurement Energy measurement Counter test (register test) Burden measurement U Burden measurement I Harmonics PTS 3.1 C Operation Manual Page 173/202 Wave form Sequence results PTS 3.1 C Operation Manual Page 174/202 Example printouts Direct printout Error measurement with input 1, Simple comment Result file RE001 MTE Error measurement inputs 1, Full customer address PTS 3.1 C Operation Manual Result file RE003 Error measurement input 1, General info and comment Page 175/202 10.4 Data transfer to PC 10.4.1 Software for data readout (option) With the optional CALSOFT software administrative data (ADS) can be uploaded to the instrument and saved data can be downloaded for further evaluation of the results and reporting of the measurements. The results are displayed on the PC in a user friendly windows environment. 10.4.2 Data transfer with compact flash (CF) card The data can be transferred directly between instrument and a PC with software CALSOFT installed by using a flash card adapter at PC side, e.g. compact flash to USB adapter. This is the fastest way to transfer data from and to the instrument system. Warning! Do not remove the CF card, if the card is actually accessed, indicated with a red background of the CF status indication. Not following this procedure may lead to corrupted files and loss of data. The most safe procedure is to switch off the power supply before removing or inserting the CF card. 10.4.3 Data transfer by serial interface The data can also be transferred by using one of the two serial interfaces with a direct RS232 connection to a PC. With the software CALSOFT data then can be up- or downloaded. PTS 3.1 C Operation Manual Page 176/202 11. 11.1 Connection examples using test mode Connection examples using test mode 11.1.1 Testing of a direct connected meter up to 10 A Basic Control Mode Test System Reference + Source 10A: PTS 3.1 C Operation Manual Page 177/202 Connections to meter under test (example for IEC-type meter) Adapter pins Direct connected 2-wire meter Uninstalled on site or in laboratory Maximum test current 10 A Test links open Test links closed For other type of meters (ANSI Form S, Form A; British Standard BS etc.) consult the documentation delivered by the manufacturer and adapt the connections to the meter regarding your needs. PTS 3.1 C Operation Manual Page 178/202 11.1.2 Testing of a direct connected meter up to 120 A Basic Control Mode Test System 10A: Reference + Source >10A: PTS 3.1 C Operation Manual Page 179/202 Connections to meter under test (example for IEC-type meter) Adapter pins Direct connected 2-wire meter Uninstalled on site or in laboratory Maximum test current 120 A Test links open Test links closed For other type of meters (ANSI Form S, Form A; British Standard BS etc.) consult the documentation delivered by the manufacturer and adapt the connections to the meter regarding your needs. PTS 3.1 C Operation Manual Page 180/202 11.1.3 Testing of an installed transformer connected meter up to 10 A Basic Control Mode Test System Reference + Source 10A: PTS 3.1 C Operation Manual Page 181/202 Connections to test terminals Use the delivered adapter pins and cables or if available special adapters and cables delivered with the test terminals for the connections to the PTS 3.1 C. Attention! The current transformer must be short connected on the secondary side during the time the current connections to the meter are changed to the PTS 3.1 C. The voltage path from voltage transformer to the meter must be interrupted, before making the connections between test terminal and PTS 3.1 C voltage output. Regard the instructions for the use of the installed test terminals and observe local safety regulations. Warning! The current path on secondary side of an active current transformer must always remain closed. Dangerous high voltages can occur and the current transformer and the instrument can be damaged, if the current path is opened during measurements. PTS 3.1 C Operation Manual Page 182/202 11.1.4 Testing of an installed direct connected meter up to 120 A Basic Control Mode Test System 10A: Reference + Source >10A: PTS 3.1 C Operation Manual Page 183/202 Connections to meter under test (example IEC-type meter) Attention! The meter must be disconnected from mains and load during the time the tests are performed and during the connections to the PTS 3.1 C are made or released. Switch off mains and load circuit breakers. Observe local safety regulations. Adapter pins Direct connected 2-wire meter Installed on site Maximum test current 120 A Test links closed For other type of meters (ANSI Form S, Form A; British Standard BS etc.) consult the documentation delivered by the manufacturer and adapt the connections to the meter regarding your needs. PTS 3.1 C Operation Manual Page 184/202 11.2 Connection examples using reference standard only 11.2.1 Testing of an installed transformer connected meter Basic Control Mode Reference 12A: PTS 3.1 C Operation Manual Page 185/202 Connections to test terminal Use the delivered adapter pins and cables or if available special adapters and cables delivered with the test terminals for the connections to the PTS 3.1 C. Attention! The current transformer must be short connected on the secondary side during the time the current path to the meter is opened and the connections to the PTS 3.1 C are made or released. Use the not fused 120A current input to measure the current. Regard the instructions for the use of the installed test terminals and observe local safety regulations. Warning! The current path on secondary side of an active current transformer must always remain closed. Dangerous high voltages can occur and the current transformer and the instrument can be damaged, if the current path is opened during measurements. Note: In measurement mode the high current connectors can be used for the full specified current range. Currents <10A are measured with the same accuracy, as if measured by the 1A/10A current connectors. Note: Adapter cables from high current connectors to 2.5mm2 laboratory cables with 4mm safety connectors are available, if the high current cables cannot be used together with the existing test terminals. PTS 3.1 C Operation Manual Page 186/202 11.2.2 Testing of an installed direct connected meter with clamp-on CT (100 A) Basic Control Mode Reference PTS 3.1 C Operation Manual Page 187/202 Connections to meter under test (example IEC-type meter) Attention! For safety reasons, whenever possible, switch off the mains circuit breaker during meter manipulations to fix the adapter pins and omega clips for the voltage connections. Observe local safety regulations. Adapter pins Direct connected 2-wire meter Installed on site Maximum test current 100 A Test links closed For other type of meters (ANSI Form S, Form A; British Standard BS etc.) consult the documentation delivered by the manufacturer and adapt the connections to the meter regarding your needs. PTS 3.1 C Operation Manual Page 188/202 11.2.3 Burden measurement of voltage transformer Example A: Secondary current measured direct Basic Control Mode Reference 12A: PTS 3.1 C Operation Manual Page 189/202 Example B: Secondary current measurement with clamp-on CTs Basic Control Mode Reference PTS 3.1 C Operation Manual Page 190/202 11.2.4 Burden measurement of current transformer Example A: Secondary current measured direct Basic Control Mode Reference 12A: PTS 3.1 C Operation Manual Page 191/202 Example B: Secondary current measurement with clamp-on CTs Basic Control Mode Reference PTS 3.1 C Operation Manual Page 192/202 11.2.5 Transformer ratio measurement of current transformer Example A: Primary current measured with clamp-on CTs (3000 A) Secondary current measured with clamp-on CTs (100 A) Basic Control Mode Reference Note: The input selection for current measurements (Prim In, Sec In) is made in the setup of the CT ratio function PTS 3.1 C Operation Manual Page 193/202 Example B: Primary current measured with clamp-on CTs (1000 A) Secondary current measured direct (10 A) Basic Control Mode Reference Note: The input selection for current measurements (Prim In, Sec In) is made in the setup of the CT ratio function PTS 3.1 C Operation Manual Page 194/202 12. 12.1 Technical Details Calculation formulae The following chapter describes the formulae applied for a 3-phase 4-wire system. At the PTS 3.1 C only the formulae for the single phase values of L1 are relevant. All calculations are based on 16 bit samples of the phase voltages u1, u2, u3 and of the phase currents i1, i2, i3. The 6 values are simultaneously sampled at a rate of 4 kHz. Every sample is corrected in amplitude and phase before further calculations are carried out. The correction parameters used have been determined during manufacture and are stored in the internal nonvolatile memory. Table 12-1 Definition of basic measured variables Indications on instrument Name Mode Value L1 L2 L3 Current Voltage phase-to-neutral Voltage phase-to-phase Active power 4-wire Active power 3-wire P4 P3 Ix Ux Uxy P4x P3x I1 U1 U12 P1 P1 I2 U2 U23 P2 I3 U3 U31 P3 P3 Reactive power, artificial, 4-wire K4 QK4x Q1 Q2 Q3 Reactive power, artificial, 3-wire K3 QK3x Q1 Reactive power, natural, 4-wire N4 QN4x Q1 Reactive power, natural, 3-wire N3 QN3x Q1 Apparent power 4-wire S4 S4x S1 Total active power 4-wire P4 P4 P Total active power 3-wire P3 P3 P Total reactive power, artificial, 4-wire K4 QK4 Q Total reactive power, artificial, 3-wire K3 QK3 Q Total reactive power, natural, 4-wire N4 QN4 Q Total reactive power, natural, 3-wire N3 QN3 Q Total apparent power 4-wire S4 S4 S Total apparent power 3-wire S3 S3 S Power factor per phase 4-wire PF1 Q3 Q2 Q3 Q3 S2 PF2 S3 PF3 Total power factor 4-wire / 3-wire PF Angle between current and voltage 1 Angle between voltage and voltage U12 U23 U31 Angle between current and current I12 Frequency 2 I23 3 I31 f PTS 3.1 C Operation Manual Page 195/202 Indications on instrument Name Mode Value L1 L2 L3 Distortion factor current Distortion factor voltage Distortion factor active power Distortion factor reactive power Distortion factor apparent power Harmonics of voltage hi (1) Harmonics of current hi (1) P4 P4 kIx kUx kPx kQx kSx hUxi hIxi kI1 kU1 kP1 kQ1 kS1 U, hi I, hi kI2 KU2 kP2 kQ2 kS2 U, hi I, hi kI3 KU3 kP3 kQ3 kS3 U, hi I, hi Harmonics of active power hi (1) Harmonics of reactive power, artificial, hi (1) P4 K4 hPxi hQKxi P, hi Q, hi P, hi Q, hi P, hi Q, hi Harmonics of reactive power, natural, hi (1) Harmonics of apparent power hi (1) N4 S4 hQNxi hSxi Q, hi S, hi Q, hi S, hi Q, hi S, hi Note (1) i = 1 ... 31 Table 12-2 Calculation formulae Value Sample value x n U1 U2 U3 u1n RMS value / average value of one period Tm Ux u2n 1 N 2 uxn N n1 ; x 1,2,3 u3n U12 U23 U31 u12 n u1n u 2 n I1 I2 I3 i1n 1 N 2 uxy n N n1 Uxy u 23n u 2 n u3n ; x 1,2,3 ; y 1,2,3 u31n u3n u1n Ix i2n 1 N 2 ix n N n1 ; x 1,2,3 i3 n IN iN n i1n i 2 n i3n P41 P42 P43 p 41n u1n i1n P31 P33 QK41 QK42 QK43 p 42 n u 2 n i 2 n IN 1 N 2 iN n N n1 P4 x 1 N p 4 xn N n1 ; x 1,2,3 P3 x 1 N p3 x n N n1 ; x 1,3 p 43n u3n i3n p31n u12 n i1n u1n u 2 n i1n p33n u 23n i3n u3n u 2 n i3n 1 u 2 n u 3n i1n 3 1 qK 42 n u3n u1n i 2 n 3 1 qK 43n u1n u 2 n i3n 3 qK 41n QK 4 x 1 N qK 4 xn ; x 1,2,3 N n1 PTS 3.1 C Operation Manual Page 196/202 Value Sample value x n RMS value / average value of one period Tm QK31 QK33 qK 31n 3 u3n i1n QK 3x 1 N qK 3xn ; x 1,3 N n1 QN 4 x 1 N qN 4 xn ; x 1,2,3 N n1 QN 3x 1 N qN 3xn ; x 1,3 N n1 QN41 QN42 QN43 QN31 QN33 qK 33n 3 u1n i3n 2 qN 41n u1 _ 90 n i1n N 2 qN 42 n u 2 _ 90 n i 2 n N 2 qN 43n u 3 _ 90 n i3n N 2 qN 31n u12 _ 90 n i1n N 2 qN 33n u32 _ 90 n i3n N S1 S2 S3 S1 U 1 I1 S4 Apparent power mode: S=U*I S2 U 2 I2 S3 U 3 I 3 S4 U12 U 22 U 32 I12 I 22 I 32 Apparent power mode: S=sqrt(P2+Q2) S4 P42 Qx42 S3 ; x N, K Apparent power mode: S=U*I S3 U12 2 U 32 2 I12 I 32 Apparent power mode: S=sqrt(P2+Q2) S3 P32 Qx32 P4 P3 QK4 QK3 QN4 QN3 kU1 kU2 kU3 kI1 kI2 kI3 kP1 kP2 kP3 kQ1 kQ2 kQ3 kS1 kS2 kS3 ; x N, K P4 P41 P42 P43 P3 P31 P33 QK4 QK 41 QK 42 QK 43 QK3 QK 31 QK 33 QN4 QN 41 QN 42 QN 43 QN3 QN 31 QN 33 127 kx hx i 2 100 127 hx i1 127 2 i 2 i hx i 2 127 2 i 1 hxi 100 % 2 i 2 x U1, U2, U3,I1,I2,I3, P1, P2, P3, Q1, Q2, Q3, S1, S2, S3 PTS 3.1 C Operation Manual Page 197/202 Definitions f: Tm : Signal frequency Signal period Tm fs : N: 1 f Sampling frequency Samples per signal period fs N abs f n: Index for sample ux _ 90 : Phase-to-neutral voltage with phase displacement of 90°, with digital integrator calculated from sample values ux . n 1...N (Because of the integration this is uxy _ 90 : Phase-to-phase voltage with phase displacement of 90°, with digital integrator calculated from sample values uxy . (Because of the integration this is hxi : N times larger than voltage ux ) 2 N times larger than voltage uxy ) 2 Harmonics content with index i in relation to the fundamental wave hxi Hxi Hx1 i 1...127 RMS value, x U1,U 2,U 3, I1, I 2, I 3 x: Hxi : RMS value of the harmonic of x with index i Fundamental wave (first harmonic), hx1 1 Display during harmonics analysis in percent of the fundamental wave: khxi 100 hxi (%) Hx1 : Time base function The DSP software calculates an average of the RMS and average values over a period Tm using the defined time base (T = 0.2 ... 9999s). In this case, only complete measuring signal periods Tm are considered (T/Tm). Example: in the case of 50 Hz with a measuring signal period Tm = 20 ms and a time base T = 1s, an average is calculated over 50 RMS values or average values for each period. PTS 3.1 C Operation Manual Page 198/202 12.2 Technical data General Auxiliary voltage: Power consumption: Housing: Dimensions: Weight: Operation temperature: Storage temperature: Relative humidity: 88 VACmin ... 264 VACmax, 47 … 63 Hz 320 VAmax Hard plastic, rubber protectors W 430 x D 218 x H 250 mm approx. 11 kg -10 °C … +50 °C -20 °C … +60 °C 85% at Ta 21°C 95% at Ta 25°C, 30 days / year spread Safety Isolation protection: Measurement Category: Degree of protection: Voltage Source Range (phase - neutral): Output power (per phase): Internal ranges (Smax / Imax): CE certified IEC 61010-1:2002 300 V CAT III, 600 V CAT II IP-20 Distortion factor: Resolution: Accuracy: Stability: Bandwidth: Current Source Range (per phase): Output power (per phase): Internal ranges (Smax / Umax): Distortion factor: Resolution: Accuracy: Stability: Bandwidth: Phase angle: Resolution: Frequency: Resolution: 30 V … 480 V 30 VA 300 V … 480 (600) V (30 VA / 0.05 A) 150 V … 300 V (30 VA / 0.10 A) 75 V … 150 V (30 VA / 0.20 A) 30 V … 75 V (30 VA / 0.40 A) < 0.8 % 0.1 V 0.3 % (45 Hz … 100 Hz) 0.03 % (30 min) / 0.1 % (1 h) 30 … 2’000 Hz (3 dB) 1 mA … 120 A 60 VA 10 A … 120 A (60 VA / 0.5 V) 1 A … 10 A (25 VA / 2.5 V) 1 mA … 1 A (10 VA / 10 V) < 0.8 % min. 1 mA 0.5 % (45 Hz … 100 Hz) 0.03 % (30 min) / 0.1 % (1 h) 30 … 1’000 Hz (3 dB) -180.00 ° … +180.00 ° 0.1 ° (45 … 100 Hz) / 1 ° (>100 Hz) 45 Hz … 400 Hz 0.1 Hz (45 … 100 Hz) / 1 Hz (>100 Hz) PTS 3.1 C Operation Manual Page 199/202 Reference Standard - Measurement Range Measuring Quantity Voltage (phase - neutral) Current Range Input / Sensor … 500 V 20 mV … 5V 1 mA … 12 A 10 mA … 120 A 120A (I1) 10 mA … 100 A Clamp-on CT 100A 5V 100 mA … 1000 A 3A … 3000 A L1, N or U1 L1, N (CT Burden) 1A/10A (I1) Clamp-on CT 1000A LEMflex 3000A Reference Standard - Measurement Accuracy ± E [%] 1 2 4 Voltage / Current Measuring Quantity Class 0.1 Range Voltage (L1, N or U1) 30 V … 500 V 0.1 5V … 30 V 0.1 Current direct 1A/10A, 100A 120 mA … 1 mA … 120 A 120 mA 0.1 0.1 Current clamp-on CT 100A 100 mA … 100 A 0.2 20 A … 1000 A 0.2 300 A 30 A 3A … 3000 A … 300 A … 30 A 0.5 + EM Current clamp-on CT 1000A Current LEMflex 3000A Burden Voltage(L1,N) Power / Energy 500 mV … 20 mV … 5V 500 mV Voltage: 30 V… 500 V (L - N) Measuring Quantity / Input I Range Active (P), Apparent (S) Power / Energy 0.5 0.5 ± E [%] 1 2 3 Class 0.1 Direct 1A/10A or 120A 120 mA … 1 mA … 120 A 120 mA 0.1 0.1 Clamp-on CT100A 100 mA … 100 A 0.2 … 1000 A 0.2 Clamp-on CT1000A Reactive (Q) Power / Energy 20 A Direct 1A/10A or 120A 120 mA … 1 mA … 120 A 120 mA 0.2 0.2 Clamp-on CT 100A 100 mA … 100 A 0.4 … 1000 A 0.4 Clamp-on CT1000A Influence of external magnetic fields (45 Hz … 66 Hz): 20 A 0.07 % / 0.5 mT 3 ± TC [%/°C] 3 Temperature coefficient (TC): Class 0.1 Range 0° C ... +40°C 0.015 -10° C ... +50°C 0.025 PTS 3.1 C Operation Manual Page 200/202 ± E [%] 1 2 5 CT Burden I (I1) U (L1, N) 120 mA … 120 A 500 mV … 5V 0.6 120 mA … 120 A 20 mV … 500 mV 0.1 + 0.5 ± E [%] 1 2 5 PT Burden I (I1) 120 mA … 1 mA … 120A U (L1, N) 30 V … 500 V 0.2 … 500 V 0.1 + 0.1 120 mA 30 V ± E [%] / [°] 1 2 6 CT Ratio IP - Input / Range IS (I1) Clamp-on CT 100A 100 mA … 100 A 100 mA … 100 A Clamp-on CT 1000A 120 mA … 1 mA … 120 A 120 mA 0.3 / 0.3 0.2 + 0.1 / - 20 A …1000 A 20 A …1000 A LEMflex 3000A 120 mA … 1 mA … 120 A 120 mA 0.3 / 0.3 0.2 + 0.1 / - 300 A … 3000 A 30 A …300 A 3 A …30 A 120 mA … 1 mA … 120 A 120 mA 0.6 + EM / 0.5 + EM + 0.1 / - ±E Frequency / Phase Angle / Power Factor Measuring Quantity Frequency (f) Range Phase Angle () Power Factor (PF) 40 Hz … 70 Hz 0.00 °… 359.99° -1.000 … +1.000 0.01 Hz 0.1 ° 0.002 Notes 1 x.x :Related to the measuring value x.x :Related to the measuring range final value (full scale, FS), E(M) = FS/M * x.x (e.g. 0.1, FS =120 mA: E(20mA) = 120/20*0.1=0.6 %) 2 Fundamental frequency in the range 45 … 66 Hz 3 S: x.x, P,Q: x.x / PF (related to apparent power), 3- and 4-wire networks 4 EM: Accuracy specified by manufacturer of clamp-on CT or sensor 5 E[%]: Accuracy of operating burden Sn [VA] 6 E[%]: Accuracy of ratio E; [°]: Phase shift of phase displacement . Pulse Input Suitable for scanning head type SH 2003 Input level: Input frequency: Input supply: 4 … 12 VDC (24 VDC) max. 200 kHz 12 VDC (I < 60 mA) Pulse Output Output level: Pulse length: 5V 10s PTS 3.1 C Operation Manual Page 201/202 Meter constant Active, Reactive, Apparent [imp/Wh(varh,VAh)] C = 72’000’000 / (In * Un) [… / Wh] The meter constant depends on the highest selected internal ranges of In, Un. Internal current ranges In [A] Direct I1 0.12 1.2 12 120 Clamp-on CT 100A 0.12 1.2 12 120 Clamp-on CT 1000A 1.2 12 120 1200 Internal voltage ranges Un [V] Direct L1, N or U1 Output frequency: 250 500 Example: In = 12A, Un = 250V C = 72’000’000 / (12 * 250) = 24’000 C’ = C / 3’600 [imp/Ws(vars, VAs)] fo = C’ *P(Q, S) fmax = 72’000’000 / (12 * 250 * 3’600) * * 12 * 250 = 20’000 [imp/s] PTS 3.1 C Operation Manual Page 202/202