1
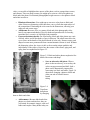
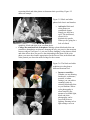
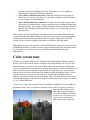
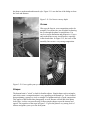
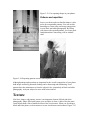
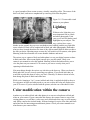
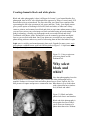
Creating dramatic black and white photos
Black and white photography is how it all began. In Lesson 2, you learned that the first
photograph, shot in 1826, was a black and white exposure by Niépce. It wasn't until 1935
that modern color was introduced. The first color film was a three-layer emulsion film
representing the full color spectrum of red, green, and blue. Today, your digital camera
gives you the option of shooting in full color, black and white, or other tones. Many
cameras, printers, and scanners have black and white or sepia tone enhancements so that
you can even convert your color images to black and white using on-board settings. With
today's technology, virtually any photograph can be converted to black and white.
Traditional color photos, slides, and negatives can be scanned to get them into digital
form so you can work with them. Once your photos are accessible on your computer,
photo editing software makes easy work of converting them to black and white or sepia.
Sepia tone is a widely-used monochromatic photo style. Popular for many years, sepia
gives photos a reddish-brown, aged look like the photo in Figure 3-1. Sepia tones evoke
feelings of nostalgia.
Figure 3-1: Using a sepia tone
gives new photos an oldfashioned feel.
Why select
black and
white?
Now that photographers have the
ability to shoot in vivid, lifelike colors, why is black and white photography still so
popular? Perhaps it is because black and white photos have a classic, ageless feel. We
take pictures to capture and preserve a moment in time. What better way to do this than
with a photo that has a timeless
feel, in black and white?
Figure 3-2: Black and white
photos look classic and timeless.
Black and white photography is
also popular because it allows
you to focus on elements of a
photo other than color. Without
color, you are able to highlight other aspects of the photo, such as composition, texture,
and contrast. There are many reasons you might opt to convert a full-color photo to a
black and white photo. Professional photographers might convert a color photo to black
and white in order to:
•
•
•
Eliminate distractions: You might opt to convert a color photo to black and
white if there are distracting colors that draw your eye from the main subject of
the composition. Eliminating the color removes the distractions, allowing your
subject to take center stage.
Add drama: Because of its very nature, black and white photography relies
heavily on contrast and shadow. Heavily shadowed portraits take on a moody,
emotional feel, evocative of old Hollywood portraiture.
Focus on the minute details: Far from boring, black and white photos are a mix
of black, white, and all the shades of gray in between. The subtle tones allow the
eye to focus on the details of the photo instead of color only. Pattern, texture, and
shapes become more pronounced when a monochromatic scheme is used. Without
the distracting colors, the viewer is able to focus on the unique qualities and
individuality of the subject. Notice how the texture of the stones, aging wall, and
spiky plant are emphasized in Figure 3-3.
Figure 3-3: Black and white photos emphasize fine
details like texture and shape.
•
Save an otherwise dull photo: When a
photo is shot on a dreary, overcast day, the
colors can appear muted and dull. Such a
photo can be dramatically improved by
converting it to black and white. Figure 3-4
shows how changing a photo to black and
white can take it from ho-hum to
breath
taking
.
Figure 3-4:
Transform
dull photos
by changing
them to black and white.
•
Add romance: Because black and white
photos are classic and timeless, they are
well-suited for romantic images, such as of
brides and couples. Many brides today are
requesting black and white photos to document their special day. Figure 3-5
shows an example.
Figure 3-5: Black and white
photos look classic and timeless.
•
•
Add style: Black and
white photos are
considered elegant.
Simply put, they have
style. The uncluttered,
classic feel is
distinctively upscale.
When you are going for a
look of refined
simplicity, black and white is an excellent choice.
Change the emotional feel of the photo: Making a photo black and white can
sometimes deemphasize an element, changing the way you perceive the emotions
between subjects. In Figure 3-6, you can see how changing a color photo to black
and white affects how you perceive the relationship in the photo. In the color
photo, you sense the woman's appreciation for the flowers. But, in the black and
white portrait you detect the man's feelings for the woman.
Figure 3-6: The black and white
rendition gives the photo a
different emotional feel.
•
Increase versatility:
Whether you are shooting
landscapes, architecture,
portraits, or urban
settings, you can achieve
stunning results by
selecting black and white
as your medium. Where
color photography is
often limited by the
amount of available light,
black and white
photography can be
successful in lower
lighting. Shooting in low
light settings can even
•
•
give your photos a moody feel.
Combine light sources: In the first lesson you learned that different light sources
emit light at different temperatures, which can cast color on your subject. When
you are combining different types of lights such as daylight, fluorescent, and
incandescent as additional lighting, you can achieve color balance by converting
the photo to black and white
Focus on the artistic process: With black and white photography, you can
choose to create extreme contrasts or soft, subtle contrasts. This puts the creative
choice in your hands, like any satisfying artistic medium. Figure 3-7 shows how a
not-so-great photo can become a work of art when converted to black and white.
Figure 3-7: Black and white
photography is an artistic
medium.
•
Avoid unpleasant
clothing color:
Sometimes you take a
wonderful photo only to
realize that your subjects'
clothes are clashing
colors. When Mary is
wearing purple and John
is wearing orange, the
effect is visually
unappealing. Fortunately,
the photo can be saved by
converting it to black and
white. In Figure 3-8, the
original combination of
black, blue, and yellow
lacked visual appeal.
Changing the photo to
black and white
eliminated the clash,
creating a striking photo.
Figure 3-8: Clashing colors can
be corrected by converting
photos to black and white.
•
Even out skin tones:
Using a monochromatic
color scheme mellows
•
•
skin tones and uneven shading of the skin. The human eye is less capable of
detecting these imperfections in black and white.
Save a photo with blown-out sectors: When the fill flash causes hot spots or
"blows out" a section of your photo, it's sometimes possible to salvage the photo
by converting it to a black and white.
Turn a backlit photo into a silhouette: Perhaps you have taken a picture where
your subject is strongly backlit, causing your subject to be in shadow. Rather than
deleting the photo, try creating an artistic silhouette with it instead. By turning the
photo to black and white and increasing the contrast, you can sometimes create a
pleasing effect.
In this section, you have learned how choosing to make certain photos black and white
can actually improve the photo. But how can you look at a scene you are photographing
and know that it would make a great black and white shot to begin with? In the next
section, you will learn to recognize what makes a good black and white photo.
Although almost any scene can make a good black and white composition, there are some
fundamentals that help you achieve more exciting and interesting black and white photos.
As you practice, you can train your eye to look for good black and white photo
opportunities.
Color versus tone
Whereas you normally think in color, black and white photographers think in intensity
instead. Look at the scene in terms of a bright to dark scale instead of an array of colors.
Remember that as you convert the scene to black and white, neutral tones become gray.
Colors of equal tones like red and green will look almost identical in black and white, and
some colors that are eye-catching can get washed out. With experience, you will know
how the scene will look in black and white without actually shooting the picture. Select a
subject that does not rely on color for its beauty. A subject that looks interesting or
dramatic will make a good black and white photo. This is the most difficult part of black
and white photography, so don't be discouraged if it takes some time to acquire the ability
to "see" in black and white.
As you view a scene, ask yourself what you would like to emphasize. If your emphasis is
dependent on the colors, by all means, shoot the scene in color. Say you are viewing a
landscape that includes a red
barn against a green hillside. If
you want to emphasize the barn
in Figure 3-9, use color to do so.
If you want to minimize the
barn, shoot in black and white.
Figure 3-9: Shooting in black and white helped the photographer deemphasize the barn.
Contrast and key
Just as you train your eye to look for color value, you can also train your eye to look for
contrast. In general, black and whites need good contrast between the subject and its
surroundings. This helps draw the viewer's eye to the focal point. Without a high level of
contrast, the eye is not immediately drawn to one subject. If however, you wish to convey
a feeling of serenity and peacefulness, a low contrast setting will help you capture that
mood. Figure 3-10 shows the importance of contrast and highlights in black and white
photography.
Figure 3-10: Strong contrast is
the basis of black and white
photography.
Ideally, a black and white photo
should have enough contrast so
that the blacks are black, the
highlights are white, but there is
still detail in the highlights and
shadows. The exception to this
rule is called high key photography.
You may have heard the term high key in fashion and art photography. This term refers
to a photo with predominately light tones. A high key photo artistically emphasizes
shapes, curves and outlines while fine details are generally obscured by light. Low key,
conversely, refers to a photo with predominately dark tones.
Lines, shapes, and patterns
Objects, shadows, and contrasts create lines and shapes in a photo. Pros know that
geometric shapes and repeating patterns can be used to direct the viewer's eye through a
photo. Because the eye can easily recognize geometric shapes, they are visually pleasing.
Lines, shapes, and patterns are especially important in black and white photography
because the lack of color emphasizes them.
Lines
Using lines in a photo can give a composition perspective and dimension. Just like an
artist draws perspective with lines, you can use strong lines in your black and white
photography. Seek out lines in your scene, then try photographing them from different
angles to keep them from looking flat. Straight lines in a black and white photo can give
the photo a modern and architectural style. Figure 3-11 uses the line of the bridge to show
the scale and distance.
Figure 3-11: Use lines to convey depth.
Curves
Who says the lines in your composition need to be
straight? Curved lines are just as helpful in drawing
the eye through the photo as straight ones. Use
curves to create dimension and perspective. Curves
and crooked lines create visual interest, especially
in black and white. In Figure 3-12, the curve of the
assembly line creates a very strong composition.
Figure 3-12: Curves guide your eye through the photo.
Shapes
The human brain is "wired" to look for familiar objects. Simple shapes such as triangles
and circles create a composition that is very appealing to the human eye. You've learned
that positioning a group in a circle or triangle is a fundamental rule of good composition.
This applies to black and white photography as well. Because a black and white photo
lacks color, it relies even more heavily on these simple shapes to provide interest and
appeal. The repetition of the steps in Figure 3-13 gives the photo a very strong level of
interest and guides your eye to the focal point.
Figure 3-13: Use repeating shapes in your photos.
Patterns and repetition
Just as your brain seeks out familiar shapes, it also
seeks out recognizable patterns. You can use this
knowledge to create unity and strong composition
in your black and white photography. By filling
your photo with repeated patterns, you create good
composition that is interesting, with or without
color.
Figure 3-14: Repeating patterns create a unified photo.
Although patterns and repetition are important for the overall composition of your photo,
bold stripes and busily patterned clothing can be distracting and unflattering. Loud
patterns draw the attention away from the subject's face, particularly in black and white
photography. Ask your subjects to wear solid colors instead.
Texture
Like lines, shapes, and patterns, texture is an important element of black and white
photography. Shape filled with texture gives an object its form. A bale of hay has more
visual impact than a slab of marble because it has visual texture. When you are taking a
black and white photo, seek out texture to create visual interest and contrast. Figure 3-15
is a good example of how texture creates a visually compelling effect. The texture of the
brick wall, door, and cart are emphasized by removing color from the photo.
Figure 3-15: Texture adds visual
interest to your photos.
Lighting
Without color, light takes on a
more important role in a black
and white photograph. Train
your eye to look for shadows and
highlights in your subject. The
way a picket fence casts a
shadow on the ground, the way trees cast shadows on a building, and the way light falls
across a basket of fruit will be emphasized in black and white photography. Remember
what you have learned about how the time of day affects natural light in order to achieve
the shot you desire. Shooting on an overcast day will result in a low-contrast, calm photo.
Shooting in the late afternoon will create dramatic shadows and mood.
The easiest way to capture a black and white photo is to set your digital camera to shoot
in black and white. Most recent digital cameras give you this option. Check your
camera's user manual to select this method. Shooting in black and white allows you to
view the photo on your camera's LCD screen so you can see exactly what you're
capturing in black and white.
Like most things, though, the easiest way isn't always the best way. When you shoot in
black and white you are severely restricting your options. If you decide later that you
would like to print this photo in color, you can't. Generally, it's better to shoot in color,
then change the photo to black and white later.
While you're learning to "see" a scene in black and white, it might be helpful to shoot a
few exposures in black and white mode so you can see how the colors are displayed on
your LCD screen. If you're satisfied with the picture, take the rest of the shots in color.
Color modification within the camera
Another way to achieve black and white photos is to convert color photos to black and
white on your camera. If your camera has this feature, the camera creates a copy of the
existing photo so you will have a color copy and a black and white copy on your memory
card. Many cameras also include handy, on-board settings for sepia, color tints, and black
and white tints for interesting monochromatic photos. Check your owner manual to see
what features your camera offers.
Although these methods work well, you might find that you want even more control over
the resulting photo by using computer software to convert color exposures to black and
white.
Computer software
Most photo editing software and many online photo storage sites can convert photos to
black and white. Popular photo-editing applications include Picasa, Jasc Paint Shop Pro,
Adobe Photoshop, and Adobe Photoshop Elements.
Nearly every photo editing application available has a way to convert color photos into
black and white -- and it's usually quite easy! Typically found in the main menu of the
graphics editing program, this feature can be called Change to grayscale, Monotone,
Remove color information, or Change to black and white. On some programs, this
feature can be found under a special effects menu.
Using this conversion method is very easy, but you may feel that the results seem flat.
This happens because the software drops the color information from the photo, resulting
in low contrast between the high and low tones of the photo. To compensate for this
effect, adjust the contrast before saving the black and white image. Most photo software
programs have ways to adjust the contrast directly, while others include a tool called
Levels. The Levels tool, found in Photoshop and other photo software programs, gives
you direct and easy control of the contrast using the highlights, mid-tones, and shadows
in your photo.
Many photographers prefer to convert their digital photos to black and white using color
channels, commonly referred to as RGB (red, green, blue) channels. Although it is
simple to do, this method gives the photographer more control. To modify a photo using
color channels, open the photo in a software program such as Photoshop. Select the tool
that allows you to either separate the colors into RGB or adjust the color channels.
If you have Adobe Photoshop, follow these steps:
1. Open the photo in the program.
2. On the menu at the top, click Image > Adjust > Channel Mixer. The Channel
Mixer tool appears.
3. Click the Monochrome box at the bottom of the Channel Mixer tool and make
sure the Red channel slider is at 100%, and you have the Preview box checked so
you can see the changes as you make them.
Now you have a black and white photo made with the Red channel of RGB. When you
have the Channel Mixer up you can adjust the other sliders of Blue and Green to
manipulate the results to your liking. Finally, save the photo in its black and white form.