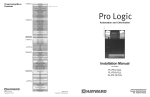
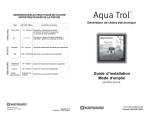
1
FCC Statement
This device complies with part 15 of the FCC rules. Operation is subject to the
following two conditions: (1) This device may not cause harmful interference, and
(2) this device must accept any interference received, including interference that
may cause undesired operation.
Changes or modifications not expressly approved by Hayward could void the
user’s authority to operate this equipment.
NOTE: This equipment has been tested and found to comply with the limits for a
Class B digital device, pursuant to Part 15 of the FCC Rules. These limits are
designed to provide reasonable protection against harmful interference in a residential installation. This equipment generates, uses and can radiate radio frequency energy and, if not installed and used in accordance with the instructions,
may cause harmful interference to radio communications. However, there is no
guarantee that interference will not occur in a particular installation. If this equipment does cause harmful interference to radio or television reception, which can
be determined by turning the equipment off and on, the user is encouraged to try
to correct the interference by one or more of the following measures:
Aqua C
onnect
Connect
Home Network
TM
— Reorient or relocate the receiving antenna.
— Increase the separation between the equipment and receiver.
— Connect the equipment into an outlet on a circuit different from that to which
the receiver is connected.
— Consult the dealer or an experienced radio / TV technician for help.
Industry Canada Statement
This Class B digital apparatus complies with Canadian ICES-003.
Cet appareil numérique de la classe B est conforme à la norme NMB-003 du Canada.
The term “IC” before the certification / registration number only signifies that the
Industry Canada technical specifications were met.
Web-Based Pool Control Interface
Installation Manual
AQ-CO-HOMENET
620 Division St.
Elizabeth, NJ 07207
092445 RevC
Copyright © 2011 Hayward
www.hayward-pool.com
The Aqua Connect Home Network (ACHN) is a communications gateway that allows
a Hayward pool controller to connect to a home network and, if desired, the Internet.
TM
HOME NETWORK: Any home PC connected through the same router as the ACHN
can become a pool control terminal. This is accessible via any web browser and does not
require special software to be installed on the PC. This is known as “local server”
functionality.
INTERNET: If the home has a full time (24/7) Internet connection, then the ACHN will
communicate with the Aqua Connect website. Via an active login account on the Aqua
Connect website, the homeowner is able to monitor and control their pool from any
Internet enabled computer, anywhere. This is known as “web client” functionality.
Installation
Before attempting to install the ACHN, verify compatibility with your system.
Compatibility
The ACHN is compatible with all Pro Logic and Aqua Plus controls operating with
software revision r4.20 or higher and Aqua Rite Pro controls operating with software
revision r1.20 or higher. To verify software revision, perform the following:
Pro Logic - Press the MENU button (possibly multiple times) until “Diagnostic Menu“
is displayed. Press the ">" or "<" keys (possibly multiple times) until the main software
revision level is displayed (the revision should be 4.20 or higher).
Aqua Rite Pro - Press the INFO button and then press the ">" or "<" keys (possibly
multiple times) until the main software revision level is displayed (the revision should be
1.20 or higher).
Installation Requirements
Pool Controller
To communicate with the ACHN, an AQL2-BASE-RF Wireless Base Station must be
connected to the Pro Logic or Aqua Rite Pro. The older AQL-BASE-RF is not supported
and cannot be used.
Home Network
NOTE: The ACHN must never be installed outdoors or in a damp or wet environment.
The ACHN connects directly to the home network's router. The router must have DHCP
enabled and an available ethernet port for the ACHN. A 5ft long CAT5e network cable
is provided or a longer equivalent cable can be used. If using a wireless router, the
ACHN must be located at least 2ft away to prevent interference. Determine the best
location that allows for a hardwire connection to the router and minimizes the obstructions between the ACHN and the pool control's AQL2-BASE-RF.
LIMITED WARRANTY (effective 04/01/09) Hayward/Goldline warrants its Pro Logic and
E-Command pool automation products as well as its Aqua Rite, Aqua Rite Pro, Aqua Plus and
SwimPure chlorination products to be free of defects in materials and workmanship, under
normal use and service, for a period of three (3) years. Hayward/Goldline also warrants its
Aqua Trol chlorination products to be free of defects in materials and workmanship, under
normal use and service for a period of one (1) year. These warranties are applicable from the
initial date of installation on private residential swimming pools in the US and Canada.
Hayward/Goldline warrants all the above-identified pool automation and chlorination products installed on commercial swimming pools and on swimming pools outside of the US and
Canada for a period of one (1) year. Likewise, Hayward/Goldline warrants all accessories
and replacement parts for the above-identified pool automation and chlorination products for
a period of one (1) year. Each of these warranties is not transferable and applies only to the
original owner.
Proof of purchase is required for warranty service. If written proof of purchase is not
provided, the manufacturing date code will be the sole determinant of the date of installation
of the product. To obtain warranty service or repair, please contact the place of purchase or
the nearest Hayward/Goldline authorized warranty service center. For more information on
authorized service centers please contact the Hayward/Goldline Technical Service Support
Center (61 Whitecap Road, North Kingstown RI, 02852) or visit the Goldline web site at
www.goldlinecontrols.com or the Hayward website at www.haywardnet.com.
WARRANTY EXCLUSIONS:
1. Material supplied or workmanship performed by others in process of installation.
2. Damage resulting from improper installation including installation on pools larger than the
product rating.
3. Problems resulting from failure to install, operate or maintain the product(s) in accordance
with the recommendations contained in the owners manual(s).
4. Problems resulting from failure to maintain pool water chemistry in accordance with the
recommendations in the owners manual(s).
5. Problems resulting from tampering, accident, abuse, negligence, unauthorized repairs or
alternations, fire, flood, lightning, freezing, external water, degradation of natural stone used in
or immediately adjacent to a pool or spa, war or acts of God.
DISCLAIMER. THE EXPRESS LIMITED WARRANTIES ABOVE CONSTITUTE THE
ENTIRE WARRANTIES WITH RESPECT TO THE ABOVE-IDENTIFIED HAYWARD/
GOLDLINE POOL AUTOMATION AND CHLORINATION PRODUCTS AND IS IN
LIEU OF ALL OTHER WARRANTIES, EXPRESS OR IMPLIED, INCLUDING WARRANTIES OF MERCHANTABILITY OR FITNESS FOR A PARTICULAR PURPOSE.
THESE WARRANTIES GIVE YOU SPECIFIC LEGAL RIGHTS, AND YOU MAY ALSO
HAVE OTHER RIGHTS OF EQUIPMENT, LOST PROFITS OR REVENUE, COSTS
OF RENTING REPLACEMENTS, AND OTHER ADDITIONAL EXPENSES, EVEN IF
THE SELLER HAD BEEN ADVISED OF THE POSSIBILITY OF SUCH DAMAGES.
SOME STATES DO NOT ALLOW THE EXCLUSION OF LIMITATION OF INCIDENTAL OR CONSEQUENTIAL DAMAGES, SO THE ABOVE LIMITATION OR
EXCLUSION MAY NOT APPLY TO YOU.
NO WHOLESALER, AGENT, DEALER, CONTRACTOR OR OTHER PERSON IS
AUTHORIZED TO PROVIDE, SUPPLEMENT OR MODIFY ANY WARRANTY ON
BEHALF OF HAYWARD/GOLDLINE.
THESE WARRANTIES ARE VOID IF THE PRODUCT HAS BEEN ALTERED IN ANY
WAY AFTER LEAVING THE FACTORY. FOR THE ABOVE-IDENTIFIED CHLORINATION PRODUCTS, THESE WARRANTIES ALSO ARE VOID IF, DURING THE
WARRANTY PERIOD, YOU USE A REPLACEMENT CHLORINATOR CELL OTHER
THAN AN UNMODIFIED, NEW HAYWARD/GOLDLINE CHLORINATOR CELL PURCHASED FROM HAYWARD/GOLDLINE. IF A WARRANTY BECOMES VOID, YOU
STILL MAY PURCHASE SERVICE AND/OR TELEPHONE TECHNICAL SUPPORT
AT THE THEN CURRENT TIME AND MATERIAL RATES.
13
•
Why is the local server so much faster than the web site? The communication
delays for the local server are much smaller than those needed to access the Remote
Control page on the web site.
•
Which browsers have been tested with the local server? Internet Explorer 8 (IE8)
and Firefox (3.0.16). An update is available with a change that is needed to use the
local server with IE7 and IE6 browsers. The update may be requested from
[email protected].
•
What do I do if the local server stops responding? If the local server hangs up,
refresh the browser window. For IE and Firefox this can be done using the F5 key. If
the refresh does not work, restart the browser. If this does not work close your
browser and cycle power to the ACHN.
•
The local server does not update its display and button pushes do not seem to
change status of the associated LEDs. Internet Explorer version 6 and 7 will not
work without updating the local server software. Another potential problem is that
JavaScript might be disabled on your unit.
If
you
have
any
questions
[email protected].
please
contact
Haywardat
Installation Steps
Installation of the ACHN requires that you perform the following steps:
•
•
•
•
•
•
Install AQL2-BASE-RF Base Station if not already on your pool controller
Train the ACHN to the Pool Controller
Perform RF range test
Connect the ACHN to Home Network
Setup local server functionality
Setup web client functionality (if desired)
Install AQL2-BASE-RF Base Station
The ACHN requires an AQL2-BASE-RF base station to be installed on your pool controller. If the Pro Logic or Aqua Rite Pro doesn't already have an AQL2-BASE-RF, one
must be installed. They can be purchased at your local Hayward dealer. Follow the
included instructions for proper installation.
Training the ACHN
The ACHN requires "training" before connecting to your home network. To train the
ACHN, bring it close to the pool controller and power it using a nearby outlet. We want
to ensure a good solid RF (radio frequency) connection to the pool controller. Now
perform the following steps:
The AQL2-BASE-RF attached to the pool controller has a unique ID code that ensures
that your ACHN will not affect other systems in the neighborhood, and likewise, their
remotes will not affect your system. To teach the ID code to the ACHN:
Settings
Menu
a.
Press the “Menu” button (possibly multiple
times) until “Settings Menu” is displayed.
Teach Wireless:
+ to start
b.
Press “<“ or “>” (again, possibly multiple
times) until “Teach Wireless” is displayed.
c.
Press the “+” button. The pool controller
should now say "Press and hold Wireless
button".
d.
Depress the Teach button on the ACHN and
continue to hold it down. For the first 3 seconds all 4 ACHN LEDs will be off. For the next
3 seconds all 4 LEDs will begin to blink in
unison. Continue to hold the Teach button
down until all 4 LEDs are on solid. At this
point you must release the Teach button.
e.
Upon release of the Teach button you should
see rapid blinking of the RF LED on the ACHN
(the topmost LED); this rapid blinking indicates that Teach Mode has been entered.
f.
The pool controller should then report “Teach
Wireless: Successful”. After this, the RF LED
on the ACHN should always be ON.
Press and hold
Wireless button
Teach Wireless:
Successful
12
Training is complete. You can now perform an RF range test.
1
Perform RF Range Test
Take the ACHN to the room in the home where the router is located. The ACHN is
designed for vertical installation and will perform best when standing on a surface.
Place the ACHN in the desired installation location (within 5ft of the router if using the
provided cable) but do not provide power or plug in the ethernet cable yet.
Perform the following steps to initiate RF range test:
With the ACHN power still off, depress the Teach button on the ACHN and continue to hold it down. Plug the power cord into a nearby outlet and power up the
ACHN while holding the Teach button.
•
•
•
•
For the first several seconds all 4 ACHN LEDs will be off. Then all 4 LEDs will begin
to blink in unison and at this point you can release the Teach button and the ACHN
will enter range test mode. Note that this is different than how you initiate Teach
Mode. The ACHN remains in range test mode until you remove power.
For the duration of range test mode the ACHN LEDs will act like bars on a cell
phone; each LED is a bar. If the radio signal is weak then only one LED will light. As
the signal gets stronger, additional LEDs will light, moving from the bottom LED
upwards. For a really weak signal the lowest LED will blink and all other LEDs will be
off.
Add a Pool
This page allows you to add new pools to your account.
Pool Settings
Use this page to set the criteria for alarms and notifications and to manage access to
other users (sub-accounts).
Frequently Asked Questions (FAQs)
and Troubleshooting Notes
ACHN Hardware
• No ACHN LEDs are ON. Check that the ACHN is getting AC power.
•
The RF LED is ON, but all of the other LEDs are OFF. Check the Ethernet cable. As
long as there is an Ethernet connection, the Tx and Rx LEDS should be ON or
blinking.
•
The RF LED is OFF, but the Tx and Rx LEDs are ON or blinking. The Ethernet
connection is good, but the communications link between the ACHN and the pool
controller is down. If the ACHN hasn’t been trained to the pool controller, then do
this now. Otherwise check your other wireless remotes to see if they are functioning. Try doing another range test with the ACHN.
•
ACHN is not communicating with the web site and the LINK LED is OFF. Even if
you aren’t using the web site or the local server, the LINK LED should blink ON at
least four times a minute. Verify that the Internet connection to the home hasn’t
gone down. Try logging on to the web site to make sure that the web site isn’t
experiencing difficulties.
Find a location where ACHN has at least 2 LED's lit and can be easily connected to
the router via a Cat5e (or equiv.) ethernet cable.
Range test works slowly. Once you have initiated range test mode you should wait at
least a minute before you record how many LEDs are lit. If you move ACHN to a different
location or a different orientation then you should likewise wait at least a minute before
you record any changes to the LEDs.
In extreme cases where radio communication is impossible, the ACHN may be connected directly to the pool controller by an RS-485 cable. Contact Hayward at
[email protected].
Once a suitable location has been found, unplug the ACHN to terminate the range test.
Connect the ACHN to your Home Network
With the ACHN in the chosen location, plug in the power jack. Plug the CAT5e cable
into the ACHN and then into an open port on the router. Wait for 30 seconds and then
look at the LEDs on the front panel. What you should see is:
• The RF LED should be on most or all of the time.
• The Tx LED should be blinking.
• The Rx LED should be on most of the time.
• The LINK LED should be blinking on at least once a minute, usually 4 times per
minute.
• If the LEDs do not light up as described above, then disconnect and reconnect the
network (CAT5e) cable connection.
Once there is a successful Internet connection (as shown by the LEDs) the ACHN will
automatically contact the Aqua Connect website and add itself to the database. Once in
the database, the ACHN can be registered to a login account.
2
Local Server
• The local server does not work at all and the browser displays a warning about
executing a script file. The local server is implemented using JavaScript and requires that active scripting be enabled on your browser. Refer to your browser
documentation for the steps needed to enable scripting.
•
What are the valid characters for the last three characters of the URL? The last
three characters of the URL are hexadecimal values. Valid values for these characters are include 0 – 9, A – F and a – f.
•
The local server does not respond to the “mypoolxyz” URL. The “mypoolxyz” may
not work in certain environments. Identify the physical IP address of the ACHN and
enter the IP address into your browser’s address field instead of the URL.
•
How do I find the physical IP address of my ACHN? Refer to the user’s manual for
the router that is used for your LAN. Note: The IP address may also change from
time to time since the assignment of IP addresses is dynamic.
•
Does the local server respond to PCs that use a wireless connection to the LAN?
Yes. However, the wireless connections on some LANs do not work with the logical
name (i.e., mypoolxyz) and may require the physical IP address of the ACHN.
11
Data History
This page shows historical data for the selected pool.
Do Pool Survey
Use this page to manually enter information about your pool. Chemistry values entered
here will shown on the Dashboard and used to calculate water balance.
•
•
•
•
Enter the three chemical values, Calcium Hardness, Total Alkalinity, and Cyanuric
Acid (stabilizer), on the appropriate lines of the survey form.
Make sure to enter date and time. You can leave the remainder of the form blank.
Go to the bottom of the form and select Update. You will be returned to the top of
the form where a message should be displayed saying that the update was successful.
Go to the bottom of the form and select Dashboard. This will return you to the
Dashboard page where the readings you just entered should now be displayed.
Local Server Setup and Verification
The ACHN includes local server software which can be accessed via any PC on the
same Local Area Network (LAN) as the ACHN itself. All that is required is a web browser
such as Internet Explorer (there is no special application needed to connect to the
ACHN). The local server provides a pool control terminal function which will allow you
to control your Pro Logic or Aqua Rite Pro directly fro any PC on the same router as the
ACHN. This local server functionality is independent of the Internet and the website.
You do not need to have an Internet connection for this to work, but it will only work
from a PC connected to the SAME router as the ACHN.
While it is possible to run two instances of the local server simultaneously (on two
separate PCs), it is recommended that ONLY ONE instance of the local server be active
at any given time.
The local server will automatically take the appearance of the pool control's interface. A
sample screen of the local server for a PS-16 controller is shown below in Figure 1.
View Pool Surveys
This page shows a summary of all past pool surveys.
Account Settings
Use this page to make changes to your account or password as well as setting up SubAccounts. Sub-Accounts grant other people access to pools registered to your account.
To create a Sub-Account:
• Select Account Settings from the left navigation bar.
• Scroll down to the bottom field of the Account Settings page, called Account
Management. Select the Create Sub Account link within this field.
• This will take you to the Create Sub Account page. Fill in all of the required information. The account description should be meaningful to you, so that when you look
at a list of sub accounts you can identify the owner of this account.
• You may want to allow the person for whom this account is intended to select their
own username and password. Note that they can change their password at any
time, but they are stuck with the username that you give them.
• You select the access privileges of the account. Select User for a full access account or View Only for a limited access account.
• You will be required to enter a primary email address for the sub-account. This can
be changed later by the account owner.
• When all of the information has been added, click the Add button at the bottom of
the page. Unless you get an error message, the account has been added. You will be
returned to the Dashboard page.
• Select Pool Settings from the Dashboard page. Scroll down to the bottom of this
page and select Manage Access. You should now see a table of all of the subaccounts created beneath your account. Make sure that the new sub-account is in
the table.
• The rightmost column in the table is “Account Unit Access Level”. Go to the drop
down box and set the desired access level for this account. Check the Notification
box if you would like this sub-account to get alarm warning emails from this pool. If
you do not check the box then no alarm emails will be sent to this account.
• Log out of your account and log into the newly created sub-account. Verify that it
is configured as you intended.
Accessing the local Server using the ACHN's URL - the ACHN uses its unique Media
Access Control (MAC) address to identify and access its local server. The MAC address for each ACHN is located on the bottom of each device. The MAC is a string of
the form 00:23:62:00:wx:yz where “wxyz” represents a string of valid hexadecimal
characters (0 – 9 and A – F are valid). To start the local server, type the ACHN’s Uniform
Resource Locator (URL) into your web browser’s address field. The local server’s URL
(i.e., logical name) is the string “mypoolxyz” where the “xyz” consists of the last three
digits of the ACHN’s MAC address. For instance the URL of the ACHN shown in Figure
1 is “mypool319” because its MAC address ends in “319”. Do not type www or any
other prefix. Do not put .com or .org or anything else at the end. Just enter “mypool319”
into the address field at the top of the browser as shown in Figure 2.
10
3
Figure 1
The local server can be accessed by typing in a URL name or an IP address. Some home
networks do not support using a URL to access the local server. If you find this to be
true with your network, use the ACHN's IP address instead. Both techniques are shown
below.
Remote Control
This page is the website equivalent of the local server and allows you to control the
selected pool. Use this page to turn on/off pool features, change heat settings, change
chlorination settings, etc. A sample screenshot of the Remote Control page for a PS-8 is
shown in below:
Figure 2
Once the local server starts, it will show a display that corresponds to the pool controller
associated with your ACHN (Figure 3). If the display and buttons are functional, go to
"Using the Local Server" (page 6) for more information.
Figure 11
•
Note that a hardware terminal has separate buttons and LEDs. For the buttons
below the display, each button has one or more LEDs associated. The Remote
Control page does not have separate buttons and LEDs. On the Remote Control
page, the LEDs are built into the buttons. The appearance of the button indicates
the LED state: A light gray button means the LED is OFF, a bright green button
means that the LED is ON, and a light blue button means that the LED is blinking.
You will get used to this system quickly.
•
On a hardware terminal, Pool, Spa, and Spillover are three LEDs associated with
one button. Pressing that button advances the Pool / Spa / Spillover setting to the
next state. On the Remote Control page, it appears that there are three buttons but
all three buttons function as one. Clicking on Pool does not select pool mode.
Rather, clicking on Pool, Spa, or Spillover will advance the Pool / Spa / Spillover
setting to the next state, just like on the hardware terminal.
•
The button response on the Remote Control page is not as fast as it is on the local
server. Use your mouse to click on a button; the button will turn black momentarily
and show the word “SENT” to indicate that the button press was accepted.
•
The Remote Control page can also unlock the pool configuration menu. This is
done by clicking on the two by twenty text display while the “Configuration MenuLocked” status is displayed. Clicking on the two by twenty text display at any
other time will have no effect.
Figure 3
If the page appears but the buttons do not respond, your home network may not
support URL access to the local server. Try accessing the ACHN using its IP address as
described in following section.
Accessing the Local Server using the ACHN's IP Address - To find the ACHN's IP
address, follow the procedure below:
1) Using the Windows "Start" button, select "Run" (Figure 4).
Figure 4
4
9
Aqua Connect Dashboard
After an account has been established, the ACHN has been registered and your pool
has been added to the Aqua Connect website, an information "Dashboard" of your pool
can be viewed. The Aqua Connect Dashboard page will show a summary of the status
of your pool including pool chemistry information if your pool control is using an AQLCHEM chemistry kit. A sample screenshot of the Dashboard is shown below. The
information displayed on the Dashboard will depend on the equipment that is installed
on the pool.
2)
If using AQL-CHEM Chemistry Kit
If an AQL-CHEM is installed and chemistry sensing is enabled, the Dashboard will
show pH and ORP levels automatically. The Dashboard will also display Calcium Hardness, Total Alkalinity, and Cyanuric Acid (stabilizer), although these measurements
must be entered manually (see DO POOL SURVEY). Based on all measurements, the
Dashboard will compute and display water balance (Langolier Saturation Index).
Enter "CMD" and click "OK" (Figure 5).
Figure 5
3)
At the command prompt, type "ping mypoolnnn" where nnn is the last 3 digits in
the ACHN's MAC address (see "ACHN's URL" on page 3) and press the ENTER
key on your keyboard (Figure 6).
Figure 6
4)
After pressing ENTER, the system will reveal the IP address associated with the
ACHN's URL. This IP address should be found on the line directly below your
request (highlighted in white in Figure 7).
In addition to pool status information, the Dashboard offers navigation links to other
sections of the Aqua Connect website.
Home
The Home page shows all pools that are registered under your account. Select the pool
that you want to display and/or control.
Figure 7
8
5
5)
Enter the IP address (found in step 4) into the address line of Internet Explorer and
press the ENTER key on your keyboard (Figure 8).
Unlocking the Configuration Menu
The local server can also unlock the pool configuration menu. This is done by clicking
on the two by twenty character display while the “Configuration Menu-Locked” status
is displayed. Clicking on the two by twenty character display at other times will have no
effect.
Setup web client functionality
Aqua Connect Website Login Account Creation:
If the homeowner is going to use the Aqua Connect website to control and/or monitor
their pool, a login account on the Aqua Connect website needs to be established.
Figure 8
6)
The local server should start and be functional.
The ACHN needs to be associated with a login account on the Aqua Connect website to
control and/or monitor their pool via the web. A given ACHN can only be associated
with a single manager level account. This is the account that owns the ACHN and that
will be billed for renewals.
You must have the MAC address of the ACHN unit available to complete the registration. Refer to the bottom of page 3 to determine the MAC address for your ACHN.
Using a PC with Internet access, open your web browser and go to the website
www.aquaconnectweb.com. Either log onto your existing account, or create a new account.
Create a new account:
• Select Set-Up New Account.
• Go to the box entitled New Users: Enter New Account Information and fill out all of
the required information.
• After that, you should receive notice that your account has been created. At this
point you are logged into your account.
Figure 9
Using the Local Server
The local server responds to single clicks and forwards the associated key to the pool
controller. Once a button is clicked, local server status will be changed as appropriate.
For instance, the status message displayed on the two by twenty character display may
change.
Led Status
The local server shows LED status for buttons differently than the pool control's local
display keypad or its associated remote controls. The LED status on the local server is
shown as follows:
Register the ACHN and add your pool:
• Select Add a Pool.
• In the window titled Enter Site Information for this ACHN, enter all of the required
information. Note that you can always go back and change information.
• Select Add Pool at the bottom of the page.
• If all of the information has been entered you will now see the Confirm Page which
will give you one final chance to review the information you have entered. If you are
satisfied that the information is correct, select Confirm. This will take you to a page
that displays a receipt. Print this and keep it for your records.
Verify your login account:
• Logout, then login using the username and password you just set up. You must be
•
•
GREEN - LED is ON
BLUE - LED is BLINKING
GRAY - LED is OFF
able to get back into your account.
Once your username and password are accepted, you will be taken to the Dashboard for this pool. The Dashboard is the page where you monitor you pool (see
below). No control is possible from the Dashboard.
Depending on how long it has been since the physical ACHN unit was installed,
you may need to wait for the Dashboard to initialize. If you have to wait longer than
10 minutes, check the ACHN and make sure that the LINK LED is active (blinking).
Display Status
The local server will also display status messages that are shown on the pool controller’s
two by twenty character display. The local server’s display should match that of the
pool controller.
6
7
Aqua Connect Dashboard
After an account has been established, the ACHN has been registered and your pool
has been added to the Aqua Connect website, an information "Dashboard" of your pool
can be viewed. The Aqua Connect Dashboard page will show a summary of the status
of your pool including pool chemistry information if your pool control is using an AQLCHEM chemistry kit. A sample screenshot of the Dashboard is shown below. The
information displayed on the Dashboard will depend on the equipment that is installed
on the pool.
2)
If using AQL-CHEM Chemistry Kit
If an AQL-CHEM is installed and chemistry sensing is enabled, the Dashboard will
show pH and ORP levels automatically. The Dashboard will also display Calcium Hardness, Total Alkalinity, and Cyanuric Acid (stabilizer), although these measurements
must be entered manually (see DO POOL SURVEY). Based on all measurements, the
Dashboard will compute and display water balance (Langolier Saturation Index).
Enter "CMD" and click "OK" (Figure 5).
Figure 5
3)
At the command prompt, type "ping mypoolnnn" where nnn is the last 3 digits in
the ACHN's MAC address (see "ACHN's URL" on page 3) and press the ENTER
key on your keyboard (Figure 6).
Figure 6
4)
After pressing ENTER, the system will reveal the IP address associated with the
ACHN's URL. This IP address should be found on the line directly below your
request (highlighted in white in Figure 7).
In addition to pool status information, the Dashboard offers navigation links to other
sections of the Aqua Connect website.
Home
The Home page shows all pools that are registered under your account. Select the pool
that you want to display and/or control.
Figure 7
8
5
Remote Control
This page is the website equivalent of the local server and allows you to control the
selected pool. Use this page to turn on/off pool features, change heat settings, change
chlorination settings, etc. A sample screenshot of the Remote Control page for a PS-8 is
shown in below:
Figure 2
Once the local server starts, it will show a display that corresponds to the pool controller
associated with your ACHN (Figure 3). If the display and buttons are functional, go to
"Using the Local Server" (page 6) for more information.
Figure 11
•
Note that a hardware terminal has separate buttons and LEDs. For the buttons
below the display, each button has one or more LEDs associated. The Remote
Control page does not have separate buttons and LEDs. On the Remote Control
page, the LEDs are built into the buttons. The appearance of the button indicates
the LED state: A light gray button means the LED is OFF, a bright green button
means that the LED is ON, and a light blue button means that the LED is blinking.
You will get used to this system quickly.
•
On a hardware terminal, Pool, Spa, and Spillover are three LEDs associated with
one button. Pressing that button advances the Pool / Spa / Spillover setting to the
next state. On the Remote Control page, it appears that there are three buttons but
all three buttons function as one. Clicking on Pool does not select pool mode.
Rather, clicking on Pool, Spa, or Spillover will advance the Pool / Spa / Spillover
setting to the next state, just like on the hardware terminal.
•
The button response on the Remote Control page is not as fast as it is on the local
server. Use your mouse to click on a button; the button will turn black momentarily
and show the word “SENT” to indicate that the button press was accepted.
•
The Remote Control page can also unlock the pool configuration menu. This is
done by clicking on the two by twenty text display while the “Configuration MenuLocked” status is displayed. Clicking on the two by twenty text display at any
other time will have no effect.
Figure 3
If the page appears but the buttons do not respond, your home network may not
support URL access to the local server. Try accessing the ACHN using its IP address as
described in following section.
Accessing the Local Server using the ACHN's IP Address - To find the ACHN's IP
address, follow the procedure below:
1) Using the Windows "Start" button, select "Run" (Figure 4).
Figure 4
4
9
Data History
This page shows historical data for the selected pool.
Do Pool Survey
Use this page to manually enter information about your pool. Chemistry values entered
here will shown on the Dashboard and used to calculate water balance.
•
•
•
•
Enter the three chemical values, Calcium Hardness, Total Alkalinity, and Cyanuric
Acid (stabilizer), on the appropriate lines of the survey form.
Make sure to enter date and time. You can leave the remainder of the form blank.
Go to the bottom of the form and select Update. You will be returned to the top of
the form where a message should be displayed saying that the update was successful.
Go to the bottom of the form and select Dashboard. This will return you to the
Dashboard page where the readings you just entered should now be displayed.
Local Server Setup and Verification
The ACHN includes local server software which can be accessed via any PC on the
same Local Area Network (LAN) as the ACHN itself. All that is required is a web browser
such as Internet Explorer (there is no special application needed to connect to the
ACHN). The local server provides a pool control terminal function which will allow you
to control your Pro Logic or Aqua Rite Pro directly fro any PC on the same router as the
ACHN. This local server functionality is independent of the Internet and the website.
You do not need to have an Internet connection for this to work, but it will only work
from a PC connected to the SAME router as the ACHN.
While it is possible to run two instances of the local server simultaneously (on two
separate PCs), it is recommended that ONLY ONE instance of the local server be active
at any given time.
The local server will automatically take the appearance of the pool control's interface. A
sample screen of the local server for a PS-16 controller is shown below in Figure 1.
View Pool Surveys
This page shows a summary of all past pool surveys.
Account Settings
Use this page to make changes to your account or password as well as setting up SubAccounts. Sub-Accounts grant other people access to pools registered to your account.
To create a Sub-Account:
• Select Account Settings from the left navigation bar.
• Scroll down to the bottom field of the Account Settings page, called Account
Management. Select the Create Sub Account link within this field.
• This will take you to the Create Sub Account page. Fill in all of the required information. The account description should be meaningful to you, so that when you look
at a list of sub accounts you can identify the owner of this account.
• You may want to allow the person for whom this account is intended to select their
own username and password. Note that they can change their password at any
time, but they are stuck with the username that you give them.
• You select the access privileges of the account. Select User for a full access account or View Only for a limited access account.
• You will be required to enter a primary email address for the sub-account. This can
be changed later by the account owner.
• When all of the information has been added, click the Add button at the bottom of
the page. Unless you get an error message, the account has been added. You will be
returned to the Dashboard page.
• Select Pool Settings from the Dashboard page. Scroll down to the bottom of this
page and select Manage Access. You should now see a table of all of the subaccounts created beneath your account. Make sure that the new sub-account is in
the table.
• The rightmost column in the table is “Account Unit Access Level”. Go to the drop
down box and set the desired access level for this account. Check the Notification
box if you would like this sub-account to get alarm warning emails from this pool. If
you do not check the box then no alarm emails will be sent to this account.
• Log out of your account and log into the newly created sub-account. Verify that it
is configured as you intended.
Accessing the local Server using the ACHN's URL - the ACHN uses its unique Media
Access Control (MAC) address to identify and access its local server. The MAC address for each ACHN is located on the bottom of each device. The MAC is a string of
the form 00:23:62:00:wx:yz where “wxyz” represents a string of valid hexadecimal
characters (0 – 9 and A – F are valid). To start the local server, type the ACHN’s Uniform
Resource Locator (URL) into your web browser’s address field. The local server’s URL
(i.e., logical name) is the string “mypoolxyz” where the “xyz” consists of the last three
digits of the ACHN’s MAC address. For instance the URL of the ACHN shown in Figure
1 is “mypool319” because its MAC address ends in “319”. Do not type www or any
other prefix. Do not put .com or .org or anything else at the end. Just enter “mypool319”
into the address field at the top of the browser as shown in Figure 2.
10
3
Figure 1
The local server can be accessed by typing in a URL name or an IP address. Some home
networks do not support using a URL to access the local server. If you find this to be
true with your network, use the ACHN's IP address instead. Both techniques are shown
below.
Perform RF Range Test
Take the ACHN to the room in the home where the router is located. The ACHN is
designed for vertical installation and will perform best when standing on a surface.
Place the ACHN in the desired installation location (within 5ft of the router if using the
provided cable) but do not provide power or plug in the ethernet cable yet.
Perform the following steps to initiate RF range test:
With the ACHN power still off, depress the Teach button on the ACHN and continue to hold it down. Plug the power cord into a nearby outlet and power up the
ACHN while holding the Teach button.
•
•
•
•
For the first several seconds all 4 ACHN LEDs will be off. Then all 4 LEDs will begin
to blink in unison and at this point you can release the Teach button and the ACHN
will enter range test mode. Note that this is different than how you initiate Teach
Mode. The ACHN remains in range test mode until you remove power.
For the duration of range test mode the ACHN LEDs will act like bars on a cell
phone; each LED is a bar. If the radio signal is weak then only one LED will light. As
the signal gets stronger, additional LEDs will light, moving from the bottom LED
upwards. For a really weak signal the lowest LED will blink and all other LEDs will be
off.
Add a Pool
This page allows you to add new pools to your account.
Pool Settings
Use this page to set the criteria for alarms and notifications and to manage access to
other users (sub-accounts).
Frequently Asked Questions (FAQs)
and Troubleshooting Notes
ACHN Hardware
• No ACHN LEDs are ON. Check that the ACHN is getting AC power.
•
The RF LED is ON, but all of the other LEDs are OFF. Check the Ethernet cable. As
long as there is an Ethernet connection, the Tx and Rx LEDS should be ON or
blinking.
•
The RF LED is OFF, but the Tx and Rx LEDs are ON or blinking. The Ethernet
connection is good, but the communications link between the ACHN and the pool
controller is down. If the ACHN hasn’t been trained to the pool controller, then do
this now. Otherwise check your other wireless remotes to see if they are functioning. Try doing another range test with the ACHN.
•
ACHN is not communicating with the web site and the LINK LED is OFF. Even if
you aren’t using the web site or the local server, the LINK LED should blink ON at
least four times a minute. Verify that the Internet connection to the home hasn’t
gone down. Try logging on to the web site to make sure that the web site isn’t
experiencing difficulties.
Find a location where ACHN has at least 2 LED's lit and can be easily connected to
the router via a Cat5e (or equiv.) ethernet cable.
Range test works slowly. Once you have initiated range test mode you should wait at
least a minute before you record how many LEDs are lit. If you move ACHN to a different
location or a different orientation then you should likewise wait at least a minute before
you record any changes to the LEDs.
In extreme cases where radio communication is impossible, the ACHN may be connected directly to the pool controller by an RS-485 cable. Contact Hayward at
[email protected].
Once a suitable location has been found, unplug the ACHN to terminate the range test.
Connect the ACHN to your Home Network
With the ACHN in the chosen location, plug in the power jack. Plug the CAT5e cable
into the ACHN and then into an open port on the router. Wait for 30 seconds and then
look at the LEDs on the front panel. What you should see is:
• The RF LED should be on most or all of the time.
• The Tx LED should be blinking.
• The Rx LED should be on most of the time.
• The LINK LED should be blinking on at least once a minute, usually 4 times per
minute.
• If the LEDs do not light up as described above, then disconnect and reconnect the
network (CAT5e) cable connection.
Once there is a successful Internet connection (as shown by the LEDs) the ACHN will
automatically contact the Aqua Connect website and add itself to the database. Once in
the database, the ACHN can be registered to a login account.
2
Local Server
• The local server does not work at all and the browser displays a warning about
executing a script file. The local server is implemented using JavaScript and requires that active scripting be enabled on your browser. Refer to your browser
documentation for the steps needed to enable scripting.
•
What are the valid characters for the last three characters of the URL? The last
three characters of the URL are hexadecimal values. Valid values for these characters are include 0 – 9, A – F and a – f.
•
The local server does not respond to the “mypoolxyz” URL. The “mypoolxyz” may
not work in certain environments. Identify the physical IP address of the ACHN and
enter the IP address into your browser’s address field instead of the URL.
•
How do I find the physical IP address of my ACHN? Refer to the user’s manual for
the router that is used for your LAN. Note: The IP address may also change from
time to time since the assignment of IP addresses is dynamic.
•
Does the local server respond to PCs that use a wireless connection to the LAN?
Yes. However, the wireless connections on some LANs do not work with the logical
name (i.e., mypoolxyz) and may require the physical IP address of the ACHN.
11
•
Why is the local server so much faster than the web site? The communication
delays for the local server are much smaller than those needed to access the Remote
Control page on the web site.
•
Which browsers have been tested with the local server? Internet Explorer 8 (IE8)
and Firefox (3.0.16). An update is available with a change that is needed to use the
local server with IE7 and IE6 browsers. The update may be requested from
[email protected].
•
What do I do if the local server stops responding? If the local server hangs up,
refresh the browser window. For IE and Firefox this can be done using the F5 key. If
the refresh does not work, restart the browser. If this does not work close your
browser and cycle power to the ACHN.
•
The local server does not update its display and button pushes do not seem to
change status of the associated LEDs. Internet Explorer version 6 and 7 will not
work without updating the local server software. Another potential problem is that
JavaScript might be disabled on your unit.
If
you
have
any
questions
[email protected].
please
contact
Haywardat
Installation Steps
Installation of the ACHN requires that you perform the following steps:
•
•
•
•
•
•
Install AQL2-BASE-RF Base Station if not already on your pool controller
Train the ACHN to the Pool Controller
Perform RF range test
Connect the ACHN to Home Network
Setup local server functionality
Setup web client functionality (if desired)
Install AQL2-BASE-RF Base Station
The ACHN requires an AQL2-BASE-RF base station to be installed on your pool controller. If the Pro Logic or Aqua Rite Pro doesn't already have an AQL2-BASE-RF, one
must be installed. They can be purchased at your local Hayward dealer. Follow the
included instructions for proper installation.
Training the ACHN
The ACHN requires "training" before connecting to your home network. To train the
ACHN, bring it close to the pool controller and power it using a nearby outlet. We want
to ensure a good solid RF (radio frequency) connection to the pool controller. Now
perform the following steps:
The AQL2-BASE-RF attached to the pool controller has a unique ID code that ensures
that your ACHN will not affect other systems in the neighborhood, and likewise, their
remotes will not affect your system. To teach the ID code to the ACHN:
Settings
Menu
a.
Press the “Menu” button (possibly multiple
times) until “Settings Menu” is displayed.
Teach Wireless:
+ to start
b.
Press “<“ or “>” (again, possibly multiple
times) until “Teach Wireless” is displayed.
c.
Press the “+” button. The pool controller
should now say "Press and hold Wireless
button".
d.
Depress the Teach button on the ACHN and
continue to hold it down. For the first 3 seconds all 4 ACHN LEDs will be off. For the next
3 seconds all 4 LEDs will begin to blink in
unison. Continue to hold the Teach button
down until all 4 LEDs are on solid. At this
point you must release the Teach button.
e.
Upon release of the Teach button you should
see rapid blinking of the RF LED on the ACHN
(the topmost LED); this rapid blinking indicates that Teach Mode has been entered.
f.
The pool controller should then report “Teach
Wireless: Successful”. After this, the RF LED
on the ACHN should always be ON.
Press and hold
Wireless button
Teach Wireless:
Successful
12
Training is complete. You can now perform an RF range test.
1
The Aqua Connect Home Network (ACHN) is a communications gateway that allows
a Hayward pool controller to connect to a home network and, if desired, the Internet.
TM
HOME NETWORK: Any home PC connected through the same router as the ACHN
can become a pool control terminal. This is accessible via any web browser and does not
require special software to be installed on the PC. This is known as “local server”
functionality.
INTERNET: If the home has a full time (24/7) Internet connection, then the ACHN will
communicate with the Aqua Connect website. Via an active login account on the Aqua
Connect website, the homeowner is able to monitor and control their pool from any
Internet enabled computer, anywhere. This is known as “web client” functionality.
Installation
Before attempting to install the ACHN, verify compatibility with your system.
Compatibility
The ACHN is compatible with all Pro Logic and Aqua Plus controls operating with
software revision r4.20 or higher and Aqua Rite Pro controls operating with software
revision r1.20 or higher. To verify software revision, perform the following:
Pro Logic - Press the MENU button (possibly multiple times) until “Diagnostic Menu“
is displayed. Press the ">" or "<" keys (possibly multiple times) until the main software
revision level is displayed (the revision should be 4.20 or higher).
Aqua Rite Pro - Press the INFO button and then press the ">" or "<" keys (possibly
multiple times) until the main software revision level is displayed (the revision should be
1.20 or higher).
Installation Requirements
Pool Controller
To communicate with the ACHN, an AQL2-BASE-RF Wireless Base Station must be
connected to the Pro Logic or Aqua Rite Pro. The older AQL-BASE-RF is not supported
and cannot be used.
Home Network
NOTE: The ACHN must never be installed outdoors or in a damp or wet environment.
The ACHN connects directly to the home network's router. The router must have DHCP
enabled and an available ethernet port for the ACHN. A 5ft long CAT5e network cable
is provided or a longer equivalent cable can be used. If using a wireless router, the
ACHN must be located at least 2ft away to prevent interference. Determine the best
location that allows for a hardwire connection to the router and minimizes the obstructions between the ACHN and the pool control's AQL2-BASE-RF.
LIMITED WARRANTY (effective 04/01/09) Hayward/Goldline warrants its Pro Logic and
E-Command pool automation products as well as its Aqua Rite, Aqua Rite Pro, Aqua Plus and
SwimPure chlorination products to be free of defects in materials and workmanship, under
normal use and service, for a period of three (3) years. Hayward/Goldline also warrants its
Aqua Trol chlorination products to be free of defects in materials and workmanship, under
normal use and service for a period of one (1) year. These warranties are applicable from the
initial date of installation on private residential swimming pools in the US and Canada.
Hayward/Goldline warrants all the above-identified pool automation and chlorination products installed on commercial swimming pools and on swimming pools outside of the US and
Canada for a period of one (1) year. Likewise, Hayward/Goldline warrants all accessories
and replacement parts for the above-identified pool automation and chlorination products for
a period of one (1) year. Each of these warranties is not transferable and applies only to the
original owner.
Proof of purchase is required for warranty service. If written proof of purchase is not
provided, the manufacturing date code will be the sole determinant of the date of installation
of the product. To obtain warranty service or repair, please contact the place of purchase or
the nearest Hayward/Goldline authorized warranty service center. For more information on
authorized service centers please contact the Hayward/Goldline Technical Service Support
Center (61 Whitecap Road, North Kingstown RI, 02852) or visit the Goldline web site at
www.goldlinecontrols.com or the Hayward website at www.haywardnet.com.
WARRANTY EXCLUSIONS:
1. Material supplied or workmanship performed by others in process of installation.
2. Damage resulting from improper installation including installation on pools larger than the
product rating.
3. Problems resulting from failure to install, operate or maintain the product(s) in accordance
with the recommendations contained in the owners manual(s).
4. Problems resulting from failure to maintain pool water chemistry in accordance with the
recommendations in the owners manual(s).
5. Problems resulting from tampering, accident, abuse, negligence, unauthorized repairs or
alternations, fire, flood, lightning, freezing, external water, degradation of natural stone used in
or immediately adjacent to a pool or spa, war or acts of God.
DISCLAIMER. THE EXPRESS LIMITED WARRANTIES ABOVE CONSTITUTE THE
ENTIRE WARRANTIES WITH RESPECT TO THE ABOVE-IDENTIFIED HAYWARD/
GOLDLINE POOL AUTOMATION AND CHLORINATION PRODUCTS AND IS IN
LIEU OF ALL OTHER WARRANTIES, EXPRESS OR IMPLIED, INCLUDING WARRANTIES OF MERCHANTABILITY OR FITNESS FOR A PARTICULAR PURPOSE.
THESE WARRANTIES GIVE YOU SPECIFIC LEGAL RIGHTS, AND YOU MAY ALSO
HAVE OTHER RIGHTS OF EQUIPMENT, LOST PROFITS OR REVENUE, COSTS
OF RENTING REPLACEMENTS, AND OTHER ADDITIONAL EXPENSES, EVEN IF
THE SELLER HAD BEEN ADVISED OF THE POSSIBILITY OF SUCH DAMAGES.
SOME STATES DO NOT ALLOW THE EXCLUSION OF LIMITATION OF INCIDENTAL OR CONSEQUENTIAL DAMAGES, SO THE ABOVE LIMITATION OR
EXCLUSION MAY NOT APPLY TO YOU.
NO WHOLESALER, AGENT, DEALER, CONTRACTOR OR OTHER PERSON IS
AUTHORIZED TO PROVIDE, SUPPLEMENT OR MODIFY ANY WARRANTY ON
BEHALF OF HAYWARD/GOLDLINE.
THESE WARRANTIES ARE VOID IF THE PRODUCT HAS BEEN ALTERED IN ANY
WAY AFTER LEAVING THE FACTORY. FOR THE ABOVE-IDENTIFIED CHLORINATION PRODUCTS, THESE WARRANTIES ALSO ARE VOID IF, DURING THE
WARRANTY PERIOD, YOU USE A REPLACEMENT CHLORINATOR CELL OTHER
THAN AN UNMODIFIED, NEW HAYWARD/GOLDLINE CHLORINATOR CELL PURCHASED FROM HAYWARD/GOLDLINE. IF A WARRANTY BECOMES VOID, YOU
STILL MAY PURCHASE SERVICE AND/OR TELEPHONE TECHNICAL SUPPORT
AT THE THEN CURRENT TIME AND MATERIAL RATES.
13
FCC Statement
This device complies with part 15 of the FCC rules. Operation is subject to the
following two conditions: (1) This device may not cause harmful interference, and
(2) this device must accept any interference received, including interference that
may cause undesired operation.
Changes or modifications not expressly approved by Hayward could void the
user’s authority to operate this equipment.
NOTE: This equipment has been tested and found to comply with the limits for a
Class B digital device, pursuant to Part 15 of the FCC Rules. These limits are
designed to provide reasonable protection against harmful interference in a residential installation. This equipment generates, uses and can radiate radio frequency energy and, if not installed and used in accordance with the instructions,
may cause harmful interference to radio communications. However, there is no
guarantee that interference will not occur in a particular installation. If this equipment does cause harmful interference to radio or television reception, which can
be determined by turning the equipment off and on, the user is encouraged to try
to correct the interference by one or more of the following measures:
Aqua C
onnect
Connect
Home Network
TM
— Reorient or relocate the receiving antenna.
— Increase the separation between the equipment and receiver.
— Connect the equipment into an outlet on a circuit different from that to which
the receiver is connected.
— Consult the dealer or an experienced radio / TV technician for help.
Industry Canada Statement
This Class B digital apparatus complies with Canadian ICES-003.
Cet appareil numérique de la classe B est conforme à la norme NMB-003 du Canada.
The term “IC” before the certification / registration number only signifies that the
Industry Canada technical specifications were met.
Web-Based Pool Control Interface
Installation Manual
AQ-CO-HOMENET
620 Division St.
Elizabeth, NJ 07207
092445 RevC
Copyright © 2011 Hayward
www.hayward-pool.com