1
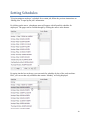
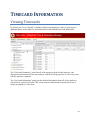
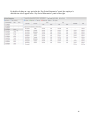
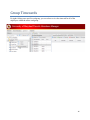
CSTime User Manual
1
CONTENTS
GETTING STARTED ..................................................................................................................................3
Logging In .................................................................................................................................................. 3
Welcome Tab ............................................................................................................................................ 4
Time and Attendance Tab ......................................................................................................................... 5
EMPLOYEES AND SCHEDULING ...................................................................................................................9
Editing Employees ................................................................................................................................... 10
Editing Jobs ............................................................................................................................................. 11
Setting Schedules .................................................................................................................................... 13
TIMECARD INFORMATION ......................................................................................................................14
Viewing Timecards .................................................................................................................................. 14
Group Timecards ..................................................................................................................................... 16
TIME SLICE MODIFICATION .....................................................................................................................18
Adding Time Slices .................................................................................................................................. 19
Editing Time Slices................................................................................................................................... 22
Deleting Time Slices ................................................................................................................................ 23
Printing Time Slices ................................................................................................................................. 24
TIME SLICE ERRORS ..............................................................................................................................25
Identifying Errors .................................................................................................................................... 25
Fixing Errors ............................................................................................................................................ 26
Error Punch Panel ................................................................................................................................... 27
REPORTS ............................................................................................................................................28
Report Overview ..................................................................................................................................... 28
Types of Reports ..................................................................................................................................... 31
“Hours Worked” Report .......................................................................................................................... 32
“Missing Punches” Report ...................................................................................................................... 33
“Tenure Hours” Report ........................................................................................................................... 34
Report Options ........................................................................................................................................ 35
2
GETTING STARTED
Logging In
1.
2.
3.
4.
Navigate to: https://umcardswipe.umd.edu/web/
Type your Directory ID or UID into the first field.
Type your corresponding password into the second field.
Click “Login” to enter the system.
Your login information is the same as used for logging into all University services.
3
Welcome Tab
After logging into CSTime, you will be directed to the welcome tab, which provides a summary
of all clock activity for a selected pay period. The pay period can be changed from the dropdown
menu.
These numbers do not include the current day.
The welcome tab also has an error punch panel that displays all time slice errors within your
departments. This will allow you to quickly fix errors with punches. You can find detailed
instructions for fixing time slice errors in the “Time Slice Errors” section.
4
Time and Attendance Tab
Clicking on the “Time & Attendance” tab changes CSTime to view your department folder(s).
This is a list of all of the departments that you manage.
5
By double-clicking on a department folder, you can view any workgroup folders underneath that
department.
6
These workgroup folders contain employees, which can be viewed by double-clicking on the
workgroup folder.
7
By clicking on “View as”, a menu will drop down with the option to view a list of employees,
rather than organizing them inside of workgroup folders.
By typing a name into the “Search Employee” box and pressing the button to the right, you can
search for all employees with that name.
8
EMPLOYEES AND SCHEDULING
By clicking on the Wrench Icon, a menu will drop down with several options for editing
employees and their schedules.
9
Editing Employees
By right-clicking on an employee’s name, a menu appears with several options.
“View Timecard” will open up information about the employee’s timecard.
“Edit Employee” opens up information about the employee that can be edited. Only certain fields
can be changed.
10
Editing Jobs
By right-clicking on an employee’s job, a menu appears with the option to edit that job.
Clicking on “Edit Job” will open up that job’s information. Only certain fields can be edited.
11
“Punch Type” grants/removes access for employees to punch in and out using different methods.
Most employees will only be given “Card Swipe” access.
“CSTime” allows employees to punch in and out using the CSTime website.
“Mobile” allows employees to punch in and out using the CSTime mobile application.
“IVR” allows employees to punch in and out using Interactive Voice Response (IVR) over the
phone.
Both “Title Code” and “Department” are fields that can either be selected from the dropdown
menu, or can be searched for by typing into the field.
“Workgroup” is a field that can be completed in the same way once the “Department” field has
been completed.
“Schedule” is a field that can either be selected from the dropdown menu, or can be searched for
by typing into the field.
“Note” is a text box that can be filled out with any additional information about the employee
and their job. These notes can be edited or deleted later.
Once all information about an employee’s job is completed, press “Save” to save the
information.
12
Setting Schedules
To begin setting an employee’s schedule for a certain job, follow the previous instructions on
“Editing Jobs” to open up the job’s information.
By clicking on the arrow, a dropdown menu will appear with all possible schedules for
employees. The pages can be scrolled through by clicking the arrows at the bottom.
By typing into the box at the top, you can search for schedules by day of the week and time.
Here, you can see that only schedules that contain “Monday” are being displayed.
13
TIMECARD INFORMATION
Viewing Timecards
By clicking on “View Timecard” or double-clicking on an employee’s name, it opens up two
additional panels to the right: Pay Period Summaries, and detailed Pay Period Information.
The “Pay Period Summaries” panel lists all of the past pay periods for this employee, and
displays the total number of hours the employee worked in each pay period, as well as any errors
with the employee’s punches.
The “Pay Period Information” panel provides detailed information about all of the employee’s
time slices for a given Pay Period. This is also where the administrative options allow you to
modify an employee’s time slices.
14
By double-clicking on a pay period in the “Pay Period Summaries” panel, the employee’s
detailed time slices appear in the “Pay Period Information” panel on the right.
15
Group Timecards
By right-clicking on a specific workgroup, you can select to view the timecard for all of the
employees within the entire workgroup.
16
Once the workgroup has been opened, you can double-click on a pay period to view the entire
workgroup’s timecard.
17
TIME SLICE MODIFICATION
These are the options available to modify time slices:
“Refresh” updates the time slices again after a time slice is added or changed.
“Add Slice” opens another window to add a time slice for the current pay period.
“Edit Slice” opens another window to edit a time slice for the current pay period.
“Delete Slice” prompts if you'd like to delete a time slice for the current pay period.
“Print” opens a printable page for the employee’s time slices for the current pay period.
“Include” opens another dropdown menu that allows you to view punches that have been
deleted, as well as punches that are from other departments.
18
Adding Time Slices
“Add Slice” opens another window to add a time slice for the current pay period.
For “Select Job Code”, open the dropdown menu and select the current job for the employee. If
the employee has multiple jobs, make sure that the job that you select matches the job from the
“Employees” Panel on the left. For Example:
For this slice, the Job Code would be “Sport Turf Technician”, because that is what you already
selected from the left panel.
19
If you would like to add in a break for the time slice, click on the “Break (option) tab.
Once you are done with filling out all of the information in the “Slice” tab and have filled out the
“Break” tab if there was a break, press “Save” to save the time slice to the employee’s record.
20
By right-clicking on a time slice, you can also view the same editing options as listed above.
The only additional button is “Audit”, which allows you to view any changes that have been
made to a time slice.
In this example, we can see that there was a missing Out Punch, but was later added in by the
administrator.
21
Editing Time Slices
Double-clicking on the time slice or selecting the “Edit Slice” option opens up the same menu
used to add a time slice, only there will already be the information for the time slice in the fields.
Time slices that have already transferred to PHR cannot be edited.
Most users will not have privileges to edit time slices.
22
Deleting Time Slices
“Delete Slice” prompts if you'd like to delete a time slice for the current pay period.
Most users will not have privileges to delete time slices.
23
Printing Time Slices
“Print Slice” opens a printable page for the employee’s time slices for the current pay period.
Clicking on “Print” will print out the page for the selected pay period.
24
TIME SLICE ERRORS
Identifying Errors
An important usage of editing time slices is fixing errors with missing punches.
As you can see in this department’s “Pay Period Summaries” tab, there are 2 errors for the
punches in the pay period ending on 7/12/2014.
By opening the pay period information as before, you can see that the employee punched in at
11:03 AM, but did not punch out.
By double-clicking on the time slice or selecting the “Edit Slice” option, the menu to edit the
slice will open.
25
Fixing Errors
In this case, we are going to have to edit the “End date” and “End time”.
By clicking on the calendar icon to the right of the date, we can either select the date for the
punch, or choose to type it in manually.
By clicking on the arrow to the right of the time, we can either select the time for the punch in 15
minute intervals, or choose to type it in manually.
Once we are finished entering this information, pressing “Save” will save the punch to the
employee’s timecard.
26
Error Punch Panel
The error punch panel is a tool located on the welcome tab that allows you quickly identify and
fix errors with time slices.
The error punch panel displays all time slice errors within your departments. The time slices
displayed here can all be fixed directly in the error punch panel by using the same methods
described in the previous section.
By double-clicking on the time slice or selecting the “Edit Slice” option, the menu to edit the
slice will open.
27
REPORTS
Report Overview
Clicking on the “Reports” tab will allow you to view timecard reports.
28
By double-clicking on a department, you can view any workgroups underneath that department.
29
By double-clicking on a workgroup, another panel is opened to the right with buttons for
different reports.
30
Types of Reports
These are the different types of reports that can be viewed:
“Hours Worked” opens a report that details the hours worked by each employee under the
workgroup, as well as their wages for each day.
“Missing Punches” opens a report that details any missing punches for the employees under the
workgroup.
“Tenure Hours” opens a report that details the tenure hours worked by the employees under the
workgroup.
31
“Hours Worked” Report
Clicking on “Hours Worked” opens a report that details the hours worked by each employee
under the workgroup, as well as their wages for each day.
32
“Missing Punches” Report
Clicking on “Missing Punches” opens a report that details any missing punches for the
employees under the workgroup.
In this example, you can see that there are three different time slices where the employee did not
punch out. These would need to be updated under the “Time & Attendance” tab. Missing
punches cannot be edited straight from the report.
33
“Tenure Hours” Report
Clicking on “Tenure Hours” opens a report that details the tenure hours worked by the
employees under the workgroup.
The date for this report can be adjusted above by changing either the “Start Date” or “End Date”
fields above the report.
34
Report Options
By moving your mouse to the right-hand side of the column labels of the report, a small arrow
will appear. Clicking on this arrow will open a dropdown menu with more options for reports.
Clicking on “Columns” will open another dropdown menu that shows which fields are being
currently being displayed on the report. Checking the boxes next to each field will display
additional information.
35