1
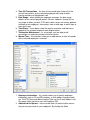
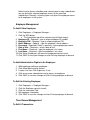
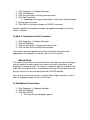
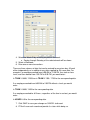
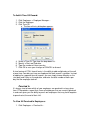
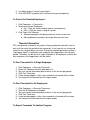
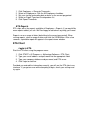
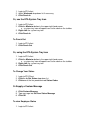
AgVantage PC ETA
Employee Time & Attendance
USER MANUAL
Updated: 6-17-2010
Table of Contents
Introduction to AgVantage ETA ..................................................... 4
How to Use This Manual ................................................................. 4
Administrative Suite ..................................................................................................................................... 4
ETA Client .................................................................................................................................................... 4
ETA Kiosk ..................................................................................................................................................... 5
Manual Conventions ........................................................................ 5
Installation........................................................................................ 5
System Requirements ................................................................................................................................... 5
ETA Installation ........................................................................................................................................... 6
Logging In ........................................................................................ 6
Administrative Suite ........................................................................ 7
Login to ETA ................................................................................................................................................ 7
The Menu Bar ............................................................................................................................................... 7
First Things First .......................................................................................................................................... 8
Setup – Company Information .................................................................................................................... 8
Setup – Payroll Periods ................................................................................................................................ 8
Setup – Time off Types................................................................................................................................. 9
To Add New Time-Off Types: .................................................................................................................. 9
To Change a Time-Off Type: .................................................................................................................... 9
To Delete A Time-Off Type: ..................................................................................................................... 9
Setup – Workcodes ......................................................................................................................................10
To Add A New Workcode: .......................................................................................................................10
To Change A Workcode: ..........................................................................................................................10
To Delete A Workcode: ............................................................................................................................10
The Employee Manager ..............................................................................................................................10
Employee Management ...............................................................................................................................13
To Add A New Employee: .......................................................................................................................13
To Add Administrative Rights to An Employee:......................................................................................13
To Edit An Existing Employee: ................................................................................................................13
Time Record Management .........................................................................................................................13
To Edit A Transaction: .............................................................................................................................13
To Mark A Transaction Active Or Inactive: .............................................................................................14
Manual Entry ...............................................................................................................................................14
To Add Manual Transactions: ..................................................................................................................14
To Add A Time-Off Record: ....................................................................................................................16
Punched In ...................................................................................................................................................16
To View All Punched In Employees: .......................................................................................................16
To Punch Out Selected Employees: ..........................................................................................................17
Timecard Generation ..................................................................................................................................17
To Run Timecards For A Single Employee: .............................................................................................17
To Run Timecards For All Employees: ....................................................................................................17
To Export Timecards To Another Program: .............................................................................................17
ETA Reports ................................................................................................................................................18
ETA Client ..................................................................................... 18
Login to ETA ...............................................................................................................................................18
Punch In / Punch Out ..................................................................................................................................19
To Punch In ..............................................................................................................................................19
To Punch Out ............................................................................................................................................20
To Change Your Status .............................................................................................................................20
To view Employee Status .........................................................................................................................20
To add a time-off record ...........................................................................................................................21
Client Quick Card .......................................................................................................................................21
ETA Kiosk ..................................................................................... 21
To use the ETA Kiosk ..............................................................................................................................21
Kiosk Quick Card ........................................................................................................................................22
Introduction to AgVantage ETA
Save time and money with ETA
Thank you for your decision to use AgVantage ETA: Employee Time and
Attendance as your time-clock system. We are confident that you will be pleased
with the product, its ease of use, and its functionality. ETA will save your
company time and money by eliminating lost, missing, or illegible timecards,
keeping accurate records of time transactions, and freeing your managers from
tedious time card management.
How to Use This Manual
This Manual is broken into three main sections. Each section pertains to one of
the three modules in ETA; the Administrative Suite, the Client, and the Kiosk. In
addition the appendix includes an Employee Quick Card for easy training.
Here is a brief overview of each of the modules and where they apply.
Administrative Suite
The Administrative Suite is the heart of ETA. It is where you will run reports and
time cards, add, edit, or delete employees, and manage employee time records.
Company settings, time off types, and work codes are also managed here.
ETA Client
ETA Client is a desktop interface that gives you employees with their own PC a
richer experience, with more information and management than just the Kiosk.
Employees can punch into and out of various work codes or departments, view
their time cards for the current pay period, add time-off records, and use the
In/Out Board.
ETA Kiosk
ETA Kiosk is perfect for high volume, punch in/out traffic from multiple users.
This touch screen and card reader enabled program is placed on a PC in a break
room or entry way to give an entire shift of employees access to the time clock
system. Punching in or out is as easy as entering their employee PIN or swiping
an ID badge.
Manual Conventions
This manual uses a set of conventions to explain how to use Milo. You will come
across a number of different font styles and conditions that will assist in your
training.
FIELDNAME – is used to reference fields; such as test, drop down, and lists.
Field names will always appear in UPPERCASE.
File > Item 1 > Action – is used where you need to click on a menu option.
Menus are used to start various programs within ETA. In this case, you would
click on the File Menu, then Item 1, then Action.
Click – refers to clicking ONCE with your left mouse button.
Right-Click – refers to click ONCE with your right mouse button.
Double-Click – refers to clicking the left mouse button TWICE rapidly.
When a series of steps are required to perform an action, a numbered list will be
used.
1. Open ETA
2. Click Menu > Manage Employees
3. Click ADD
Installation
System Requirements
ETA is a PC program written in Microsoft .Net and requires that the Microsoft
.Net 3.5 runtime is installed on your computer. If you do not already have the
runtimes installed, the setup program will do it for you, however; it is a good idea
to go to http://windowsupdate.microsoft.com to obtain the latest service packs for
your computer.
ETA also uses the Microsoft .Net 2008 Report Viewer. This feature will also be
installed on your PC if you do not already have it.
ETA requires:
•
•
•
•
PC running Windows XP or Windows Vista
25 MB of unused hard disk space
256 MB of RAM
High-Speed (Cable, DSL, T1) internet connection
ETA Installation
You were e-mailed a copy of ETA in a .zip file. Find this e-mail and save it to your
PC. Locate the .zip file and extract the contents, then proceed with the
installation:
1.
2.
3.
4.
5.
6.
Double Click the setup.exe file (not the .msi)
Click NEXT to continue.
Agree to the EULA and click NEXT.
Specify an installation location or leave as default.
Click NEXT to continue.
When ETA is finished installing, Click FINISH.
If you do not have both the .Net 3.5 runtime and the .Net 2008 report viewer
installed prior to this installation, you will be prompted to download and install
them BEFORE the ETA installation begins.
Logging In
The ETA login screen verifies your identity and company information. Each time
you start ETA, you are asked for your login information, company library and
password, and the ETA server your company uses. In all three of the ETA
modules, you are asked for this information prior to using the program.
When you signed up for ETA, we asked for the E-Mail Address of the “SuperUser” and e-mailed you a Password for that account. Currently, this is the only
account setup within your company library.
You were also given a Company Database and Company Password to use
with your account. This feature lets us keep your data separate from other users
and provides an extra level of security. Keep your password safe.
You should never give your company password to anyone unless you want them
to be able to set up new installations. And remember, we will never ask you for
your login or company password.
Finally, you were given an ETA Server.
ETA remembers the company database, company password, and ETA server
you use after your first successful login. You can also tell ETA to remember your
e-mail address and password as well.
Administrative Suite
Login to ETA
Start the ETA client using the program menu:
1. Click START > All Programs > AgVantage Software > ETA Client
2. Type your e-mail address and password into the appropriate fields
3. Type your company database and password, and ETA server
4. Click Login to continue
Provided you entered the information correctly, you will see the ETA client user
interface. If you got an error while attempting to login, check your settings and
try again.
The Menu Bar
ETA’s menu bar gives you access to all of the features of ETA. The menus
consist of the following:
•
•
•
•
•
FILE – exit menu option
EMPLOYEES – manage employees, timecards, and reports
SETUP – setup program options, work codes, and time off types
WINDOW – shows open windows
HELP – manual and support information
Everything in ETA is accessed via the file menus, and as new program
enhancements are created, new menu options will be added.
First Things First
If this is the first time you have logged into Milo, you need to setup a few items in
order to get started. Your company information should be verified, you will need
at least one work code, you should verify and/or modify your time-off types, and
of course, you will need to setup your payroll date ranges.
Setup – Company Information
Your company’s information is used to keep track of your billing address, primary
contact, and your method of overtime calculation.
Click Setup > Settings… to load the dialog box.
Most information here should already be correct, but make sure you keep this
data up-to-date in the event of personnel changes, billing address changes, etc.
During your company’s setup, the overtime calculation was defaulted to 40 hours
per week. If you run a different overtime schedule, such as 8 hours per day, or
120 hours per month, make those changes here.
Click OK to save any changes or CANCEL to discard.
Setup – Payroll Periods
ETA allows you to automatically create multiple payroll periods beginning on a
specified date and continuing for X number of repetitions. The payroll periods are
used to restrict how much data your employees who use the client see on their
screens, to default date selection ranges throughout the program to the current
pay period, and to calculate total, regular, and overtime hours.
1. Click Setup > Payroll Periods…
2. Select the BEGINNING date of your first payroll on the system.
3. Type the number of repetitions you want.
4. Choose your payroll type from the drop down list.
5. Click SET to continue.
This process will clear out and override any previously set payroll periods.
Use this feature only if you wish to change or create new periods.
The progress bar will notify you of the status and clear when complete.
Click the CLOSE button to close the program.
Setup – Time off Types
ETA supports multiple time-off types, each of which can be configured to, or to
not, add to an employee’s overtime. Most often companies use defaults such as
Personal Time Off, Vacation, Sick Time, and/or Holiday; however, you can
specify as many time-off types as you need.
To Add New Time-Off Types:
1.
2.
3.
4.
5.
6.
7.
Click Setup > Timeoff Types…
Click in the ID column of the last row (Read Header = *)
Type a unique numeric ID for the new time-off type.
Type a Description to display as the time-off type.
Click the Overtime checkbox if this type adds to overtime.
Click the Active checkbox to allow employees to see/use.
Click SAVE to save your changes or CANCEL to discard.
To Change a Time-Off Type:
1.
2.
3.
4.
Click Setup > Timeoff Types…
Click the cell you wish to edit.
Make changes.
Click SAVE to save your changes or CANCEL to discard.
It is important that you do NOT change the ID of a time-off type that is
currently in use on your system. Changing the time-off ID will have adverse
effects on any time transactions associated with that ID.
To Delete A Time-Off Type:
1. Click Setup > Timeoff Types…
2. Click the Active column so that there is NO checkmark in the box.
3. Click SAVE to save your changes or CANCEL to discard.
Setup – Workcodes
Workcodes (or departments, locations, jobs, etc.) are used to track where your
employees are spending their time. You may setup any number of Workcodes
and even tie default Workcodes to your employees.
To Add A New Workcode:
1.
2.
3.
4.
5.
6.
Click Setup > Workcodes…
Click the ID column of the last row (Row Header = *)
Type a unique alpha-numeric ID for the new Workcode.
Type a Description to display as the new Workcode.
Click the STATUS checkbox to allow employees to see/use.
Click SAVE to save your changes or CANCEL to discard.
To Change A Workcode:
1.
2.
3.
4.
Click Setup > Workcodes…
Click the cell you wish to edit.
Make Changes.
Click SAVE to save your changes or CANCEL to discard.
It is important that you do NOT change the ID of a workcode that is
currently in use on your system. Changing the workcode ID will have
adverse effects on any time transactions associated with that ID.
To Delete A Workcode:
Use the STATUS column to decide whether an employee can see/use a
workcode. Deleting the record could cause orphan time transactions
(transactions that point to missing data) that would become unusable.
1. Click Setup > Workcodes…
2. Click the STATUS column so there is NO checkmark in the box.
3. Click SAVE to save your changes or CANCEL to discard.
The Employee Manager
The employee manager is used to add, edit, and delete employees, make
changes or add records to their time cards, and to manage their level of access
within the system. The employee manager gives you quick on-screen timesheets
to keep track of hours logged by each employee with the ability to view current
and historical data.
The first time you run the employee manager, you will notice that only one
employee is listed. Each employee that uses the system must be added here,
before they can start tracking their hours.
1. Employee List – the employee list shows you all of the employees setup
in the system to which you have access. You can modify any aspect of
any employee found in this list.
2. Add/Delete – these buttons allow you to create new employees, or delete
employees out of the system.
3. Standard Time Transaction – the standard time transaction grid shows
all regular (in/out) punches for the selected employee and range of dates.
Inactive records are highlighted in red.
4. Time Off Transactions – the time off transaction gird shows all of the
time off transactions for the selected employee and range of dates.
Inactive records are highlighted in red.
5. Date Range – when loading the employee manager, the date range
defaults to the current payroll period. You can, however, change this to
any range of dates you wish. ETA retains data so you can always go back
and look up an employee’s transactions from a week ago, a month ago, or
even years ago.
6. Total Hours – these boxes show the regular, overtime, and total hours
logged for the selected employee and range of dates.
7. Transaction Maintenance – as a manager, you are able to edit
transactions or make transactions active or inactive.
8. Manual Time – these buttons allow you to add manual or time-off records
to the selected employee’s timecard.
1. Employee Information – this section allows you to specify employee
information such as ID and PIN numbers, e-mail address and password,
etc. The ETA Client and Administrative Suite use the E-mail Address and
Password, while the Kiosk uses the Employee PIN.
2. Administrative Options – there are two levels of administrative access
that you can give each of your employees. By clicking the Allow
Administrative Access checkbox and selecting one or more subordinates,
you are giving the selected employee access to the specified
subordinates. Naturally, selecting super user gives the employee access
to all employees in the system.
Employee Management
To Add A New Employee:
1. Click Employees > Employee Manager…
2. Click the ADD button.
a. The Information tab will be selected (and all fields empty)
3. Employee ID – Required – type a unique employee ID number.
4. Employee PIN – Required – type a unique employee PIN.
5. Email Address – Optional – type the employee’s email address.
6. Password – Required if Email is specified – type employee password.
7. Date of Hire – Required – select a date of hire.
8. First Name – Required – type the employee’s first name.
9. Last Name – Required – type the employee’s last name.
10. Click Active Employee if you want the employee to punch in/out.
11. Click SAVE to save your changes or click Existing employee to discard.
To Add Administrative Rights to An Employee:
1.
2.
3.
4.
5.
While adding or editing an employee…
Click Allow Administrative Access.
If super user then Click Superuser. If not…
Click one or more subordinates to give access to employee.
Click SAVE to save the changes or click Existing employee to discard.
To Edit An Existing Employee:
1.
2.
3.
4.
5.
Click Employees > Employee Manager…
Click the Employee you wish to edit.
Click the Information Tab.
Edit employee information.
Click SAVE to save the changes or click Existing employee to discard.
Time Record Management
To Edit A Transaction:
1.
2.
3.
4.
Click Employees > Employee Manager…
Click the Employee.
Click the transaction in the grid you want to edit.
Click Edit Transaction
a. Depending on the type of transaction, certain fields will be disabled.
5. Edit the necessary data.
6. Click SAVE to save your changes or CANCEL to discard.
Records edited in the employee manager are applied immediately. No further
action is required.
To Mark A Transaction Active Or Inactive:
1.
2.
3.
4.
Click Employees > Employee Manager…
Click the Employee.
Click the transaction in the grid you want to mark.
Click the Mark Active or Mark Inactive button.
Transactions cannot be deleted, but to keep a particular transaction from
appearing on the employee’s timecard, you can use this feature.
Manual Entry
The manual entry feature of the administrative suite allows you to do two things;
you can add one or more regular transactions or time-off transactions to the
employee’s timecard at once. This feature is especially useful for a location that
might not have internet access, and therefore not using ETA, but where you still
want the ease of use for calculating timecards that ETA provides.
You can also use the manual entry system to add a single transaction, such as
when an employee forgets to click in for the day.
To Add Manual Transactions:
1. Click Employees > Employee Manager…
2. Click the Employee.
3. Click Manual Entry
a. The manual entry dialog box appears.
4. Select the Week Of by selecting any date in the week.
a. Sunday through Saturday of the selected week will be shown.
5. Select a Workcode.
6. Enter one or more transactions.
There are three columns of data that can be entered for any given day. All work
either independently or in addition to any data supplied for the same date. For
example if an employee worked from 8:00 AM to 12:30 PM, then took an hour
lunch, and then worked from 1:30 PM to 5:30 PM, you would enter:
In TRAN 1: 0800 / 1230 then in TRAN 2: 1330 / 1730 for the corresponding date.
If an employee worked from 8:00 AM to 2:30 PM without a lunch you would
enter:
In TRAN 1: 0800 / 1430 for the corresponding date.
If an employee worked for 8.5 hours, regardless of the time in and out, you would
enter:
In HOURS: 8.5 for the corresponding date.
7. Click SAVE to save your changes or CANCEL to discard.
8. ETA will save each record and provide its status while doing so.
To Add A Time-Off Record:
1. Click Employees > Employee Manager…
2. Click the Employee.
3. Click Time Off
a. The time-off entry dialog box appears.
4.
5.
6.
7.
Select a Time-Off Type from the drop down list.
Specify a Start and End date.
Type the number of Hours per day.
Click OK to save your changes or CANCEL to discard.
A nice feature of ETA’s time-off entry is the ability to add multiple days of time off
at one time. Consider you have an employee that took a week’s vacation. Instead
of adding five separate time-off records, you can simply choose Monday as the
start date and Friday as the end date, and enter the total number of hours per
day that the employee took off.
Punched In
It’s always nice to know which of your employees are punched in at any given
time. ETA provides a report that shows all employees that are currently punched
in and even gives you the ability to punch out employees that may have forgotten
to punch out at the end of their shift.
To View All Punched In Employees:
1. Click Employees > Punched In…
2. List will be empty if no one is punched in.
3. Click REFRESH to update the list without closing and reopening.
To Punch Out Selected Employees:
1. Click Employees > Punched In…
2. Select one or more Employees
a. Ctrl + Click will select multiple records simultaneously.
b. Shift + Click will select a range of records.
3. Click Punch Out Selected
a. Selected employees will be punched out at the current time.
b. Edit employee transactions to change the punch out time.
Timecard Generation
ETA can generate timecard at any point in the payroll period; you don’t have to
wait until the end of the period to view timecards. In fact you can run a timecard
report for any range of dates you want! During the timecard generation routine a
single page report is created for each employee that logged hours for the given
period. Timecards can be run for a single employee or all employees at once, but
only employees that logged hours will be shown.
To Run Timecards For A Single Employee:
1.
2.
3.
4.
5.
6.
Click Employees > Generate Timecards…
Select the Employee from the drop down list.
Set your starting and ending date or leave as the current pay period.
Click Print Timecards.
A new window appears, after a few seconds the timecard will be shown.
You can print the timecard from this report viewer.
To Run Timecards For All Employees:
1.
2.
3.
4.
5.
6.
Click Employees > Generate Timecards…
Click the All Employees checkbox.
Set your starting and ending date or leave as the current pay period.
Click Print Timecards.
A new window appears, after a few seconds the timecard will be shown.
You can print the timecard from this report viewer.
To Export Timecards To Another Program:
1.
2.
3.
4.
5.
Click Employees > Generate Timecards…
Select an Employee or Click the All Employees checkbox.
Set your starting and ending date or leave as the current pay period.
Select an Export Type from the drop down list.
Click Export Timecards.
ETA Reports
ETA ships with a few reports available at Employees > Reports. If you would like
more reports added, just ask. We’ll be happy to add almost anything you’ll need.
Reports run on a range of dates (defaulting to the current pay period). When
running reports, select a range of dates and click the VIEW button. After a few
seconds, a printable report will appear in the report viewer window.
ETA Client
Login to ETA
Start the ETA client using the program menu:
1.
2.
3.
4.
Click START > All Programs > AgVantage Software > ETA Client
Type your e-mail address and password into the appropriate fields
Type your company database and password, and ETA server
Click Login to continue
Provided you entered the information correctly, you will see the ETA client user
interface. If you got an error while attempting to login, check your settings and
try again.
1. In/Out Status – Update your current status.
2. Activity Buttons – Punch In, punch out, and add time-off records.
3. Current Status – shows whether you are punched in or out and the time
stamp of the last transaction.
4. Timecard – Shows the time card for the current pay period.
5. Timeoff – Shows the time-off records for the current pay period.
6. In/Out Board – Shows the status of all employees.
Punch In / Punch Out
Depending on your current status, eithe rthe Punch In or Punch Out buttons will
be enabled. If you are currently punched out, the Workcode drop down list will
be enabled and your default work code will be selected. If you are currently
punched in, the Workcode drop down list will be disabled, but show the
workcode to which you are punched in.
To Punch In
1. Login to ETA client
2. Adjust Workcode drop down list if necessary
3. Click Punch In
Or, use the ETA System Tray Icon
1. Login to ETA client
2. Click the Minimize button in the upper right hand corner
a. a system tray icon will appear next to the clock on the taskbar
3. Right click the system tray icon
4. Click Punch In
To Punch Out
1. Login to ETA client
2. Click Punch Out
Or, using the ETA System Tray Icon
1. Login to ETA client
2. Click the Minimize button in the upper right hand corner
a. a system tray icon will appear next to the clock on the taskbar
3. Right click the system tray icon
4. Click Punch Out
To Change Your Status
1. Login to ETA Client
2. Click the In/Out Status drop down list
3. Click one of the five predetermined Status Codes
Or Supply a Custom Message
4. Click Custom Message
5. Type message into Set Your Status Message
6. Click OK
To view Employee Status
1. Login to ETA client
2. Click the Employee Status tab
3. Mouse over Employee to view detailed information
4. Click the Refresh button (green and red arrows) to refresh view
To add a time-off record
1. Login to ETA client
2. Click Time Off
a. The time off entry dialog box appears
3. Select a Time Off Type from the drop down list
4. Specify a Start and End date
5. Type the number of Hours per day
6. Click OK to save your changes or Cancel to discard
A nice feature of ETA’s time off entry is the ability to add multiple days of time off
at one time. Consider you are taking a week’s vacation. Instead of adding five
separate time off records, you can simply choose Monday as the start date and
Friday as the end date and enter the total number of hours per day that you are
taking off.
Client Quick Card
ETA Kiosk
ETA Kiosk does one thing; it punches employees in or out. There’s no setup, no
bells and whistles; just one simple time clock behavior. Large groups of
employees can easily use the program to punch in and out at the beginning and
end of their shifts. With the proper hardware, you can even use barcodes,
magnetic strip cards, or a touch-screen monitor to facilitate the punch in and
punch out process. Bar codes and magnetic cards also help reduce the number
of employees who punch other employees in or out.
ETA Kiosk requires that you login to ETA each time the program starts, so it’s a
good idea to create a “dummy” user and on the first login, check the save e-mail
address and save password checkboxes. Once ETA Kiosk is running, however,
anyone with an Employee PIN can punch in or out.
To use the ETA Kiosk
1. Click START > All Programs > AgVantage Software > ETA Kiosk
2. Type or tap (using the touch screen monitor) the Employee PIN
3. Click Enter
a. Or use a barcode ready configured to send a [RETURN] suffix
b. Or use a card reader configured to send a [RETURN] suffix
4. The Employee Status appears for 5 seconds
5. ETA Kiosk recycles the screen, awaiting the next punch in or out
Kiosk Quick Card