1
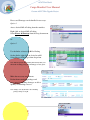
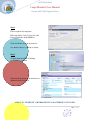
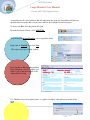
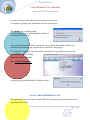
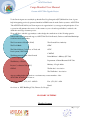
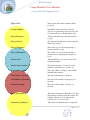
ASYCUDA WORLD
CARGO MANIFEST
USER MANUAL
Grenada Customs ASYCUDA Upgrade Project
2|P a ge
ASYCUDA World
Cargo Manifest User Manual
Customs ASYCUDA Upgrade Project
Table of Contents
1. Foreword………………………………………………………………….....3
2. Introduction………….. .………………………………………...……..........4
3. How to create a Manifest…………………………………………….……...5
4. How to add Bill of Lading to manifest…………………………...…………7
5. How register a manifest…………………………………..………....……...11
6. How to amend a manifest……………………………………..……...…….13
7. How to amend a Bill of Lading …………………………………….……...14
8. Excess & Shortage Procedure……………………………..……….……....17
9. How to print a Manifest and B/L…………...…………………...………....18
10. How to “degroup” a Master B/L………………………………..….……...20
11. Fast Cargo Integration…………………………………………...………................23
12. Acknowledgements.....................................................................................26
ASYCUDA World
Cargo Manifest User Manual
Customs ASYCUDA Upgrade Project
FOREWORD
The implementation of ASYCUDA World in Grenada, Carriacou and Petite Martinique is a
significant and historic moment for the Customs and Excise Department of which I am honoured to
be a part. Upgrading of the IT system is important to the improvement of the Department’s
operations as it continues to strive towards providing effective and efficient service.
ASYCUDA World is being introduced on a phased basis, beginning with the Cargo Manifest
Module. On May 30, 2011 the Department will be taking its first milestone step in the
process; when the Cargo Manifest Module fo r the Port o f St. George’s will be introduced.
Lat er , t he Ma ni fe st Mo du le w i l l be expanded gradually to t he other Ports; namely
Grenville, H il ls bo ro ugh and Maurice Bishop International Airport. The other modules will be
introduced by the end of this year, with the full roll out of the system being scheduled for July
2012.
This manual is presented in a user friendly manner with written instructions and graphic
illustrations to ensure that persons who interact with the system are both knowledgeable and
comfortable. It is intended to complement the hands-on training t hat will be provided
by the ASYCUDA Project Team and will serve as a permanent record for future reference.
I urge you to closely follow the instructions contained therein and to move quickly to become
familiar with these new requirements. The members of the ASYCUDA Project Team are
available to assist you through this transition period and will do everything possible to deal with
any challenges that may arise.
We anticipate that there may be some minor hitches during the transition process, and we
appeal to you to exercise patience and understanding as every effort will be made to minimize
any negative outcomes. This engagement should be seen as an opportunity for Customs and the
general trading community to f o r g e partnerships, which can result in enhanced trade
facilitation that can make a meaningful contribution towards the development of our country.
I look forward to your support and cooperation.
Comptroller of Customs
Carlyle Felix
ASYCUDA World
Cargo Manifest User Manual
Customs ASYCUDA Upgrade Project
INTRODUCTION
The Grenada Customs and Excise Department is very pleased and enthusiastic to launch its
“ASYCUDA WORLD – CARGO MANIFEST USER MANUAL”, thereby maximising the
benefits to the Trading Community and more specifically, Cargo Carriers, Carrier agents and
Cargo Consolidators in Grenada, Carriacou and Petite Martinique.
This User Manual is intended to provide our stakeholders with a series of very detailed
instructions for preparation and submission electronic copies of cargo manifest to the Customs
and Excise Division. Great efforts and sacrifices have been made to ensure that the
instructions contained therein a r e la id o u t i n a s e q u e n t ia l ma n n e r a nd g r a p hic a l
i l lu s t r at io n s ha ve be e n i nc lu d e d fo r e a ch s t e p o f t he p r o c e s s involved in storing
and registering a cargo manifest on the Automated System for Customs Data (ASYCUDA).
Section IV of the Draft Customs Regulations and Section IV f the Draft Customs Bill, requires
that the Master of every vessel arriving at a customs port from any place outside of Grenada, or
carrying goods brought in that vessel from a place outside of Grenada, and not yet cleared on
importation, to deliver a report in such form and manner and containing such particulars as the
Comptroller of Customs may direct.
In keeping with this authority the Comptroller of Customs has directed that the instructions
contained in this user manual will form part of the reporting requirements for vessels arriving
from any place outside of Grenada. Please note that the normal arrival procedures will continue
until such time that the Comptroller has determined otherwise.
These instructions will take effect as of May 30, 2011 and will remain in force until further
notice.
ASYCUDA World
Cargo Manifest User Manual
Customs ASYCUDA Upgrade Project
1. CREATING A NEW MANIFEST
Upon receipt of a paper manifest (hard copy), all the relevant information or data must be
loaded into the ASYCUDA database to create an Electronic Manifest (soft copy).
The Manifest gives a description of the vessel or aircraft transporting the goods and provides a summary of consignments.
The following steps and images will show you how it is done.
Step 1
Log in to ASYCUDA with your user name and password
Step 2
Open Document library
Step 3
Inside the Document Library,
Click on the ASYCUDA Button to expand the menu
Then click On the Cargo Manifest Button
Expanding the menu
5|P a ge
ASYCUDA World
Cargo Manifest User Manual
Customs ASYCUDA Upgrade Project
Right click on Manifest, Select New
The Manifest Screen will open
Input all necessary data in the required fields.
Mandatory fields will turn red if there is no data or selection.
Data is to be entered manually or using the drop
down menu.
Remember that certain fields such as the Office code, voyage number,
and date of departure, are the key identifying fields needed for storing
and retrieving a manifest.
Step 4
Verify and Storing Data.
After all required data or information is entered,
the document must be verified and saved (stored).
To verify the document click on the
icon.
If there are errors, an error message(s) will be displayed.
Please make the necessary corrections and verify again.
To save the document click on the
icon.
6|P a ge
ASYCUDA World
Cargo Manifest User Manual
Customs ASYCUDA Upgrade Project
2. ADDING BILLS OF LADING TO A MANIFEST
Step 1
Bills of Lading (B/L) can be captured in two ways
Option 1
After the manifest has been stored or saved.
A box will appear that matches the manifest stored.
To add a Bill of Lading (B/L) to the manifest,
Select the forward button as indicated by the arrow.
This selection will take you to another box.
To continue, select the second option.
Then select yes to open a new Bill of Lading (B/L).
The BoL screen on manifest will appear.
Click on the Add Bol Icon as shown.
Then select Yes
to open new Bill of Lading.
7|P a ge
ASYCUDA World
Cargo Manifest User Manual
Customs ASYCUDA Upgrade Project
Option 2
Capture a Bill of Lading by the using the following path:
From the Document Library select ASYCUDA.
Then Select Cargo Manifest.
Right Click on Waybill.
Select New.
8|P a ge
ASYCUDA World
Cargo Manifest User Manual
Customs ASYCUDA Upgrade Project
This will generate a new
Manifest – Waybill form.
Note: Option 1 will open a B/L
with information from the
general manifest, however
Option 2 will open a blank B/L.
Step 2
Input data into Bill of Lading (Waybill).
Enter data manually or choose from the
drop down menu. When all data is complete,
cursor will return to the first field of Bill of
Lading (Waybill).
Note: Data that was keyed into the general manifest
segment will be displayed in the relevant
fields of the Bill of Lading.
Step 3
Add Container information to B/L if there are any in
consignment. Select the Containers tab at the bottom of
the screen.
Fill in all required data indicated in “Manifest List
of description guide” then click on the add Container icon
on the menu bar.
9|P a ge
ASYCUDA World
Cargo Manifest User Manual
Customs ASYCUDA Upgrade Project
Repeat the same steps to add any additional
containers for this consignee.
Step 4
Verify documents to check for errors
Verify the document by clicking the verify icon
menu bar.
on
A message will appear indicating the document has been
verified.
10 | P a g e
ASYCUDA World
Cargo Manifest User Manual
Customs ASYCUDA Upgrade Project
Step 5
Store documents to add it to the manifest.
Click on the store
icon on the menu
bar as indicated by arrow.
Bill of Ladings will be automatically
attached to manifest.
3. REGISTERING A MANIFEST
Step 1
Find a manifest using the manifest finder.
Find a manifest by using the following path:
From the Document Library
Expand the ASYCUDA menu
11 | P a g e
ASYCUDA World
Cargo Manifest User Manual
Customs ASYCUDA Upgrade Project
Select Cargo Manifest
Right click on Manifest
Select Find
To locate a particular manifest use the selection
criteria and then click on the magnifier at the
bottom of the screen or just click on the magnifier
to obtain an entire list of manifests.
Step 2
12 | P a g e
ASYCUDA World
Cargo Manifest User Manual
Customs ASYCUDA Upgrade Project
Register Manifest.
A manifest can be registered in two (2) ways
Option 1
From the manifest finder, right click on the manifest
required and click Direct Register in the menu.
Option 2
After selecting required manifest, click on the Register
icon in the menu bar of the manifest.
Note: a message will appear indicating the manifest has been registered.
4. AMENDING A MANIFEST
Step 1
Use manifest finder to locate manifest.
Follow steps in 3. Registering a manifest (Step 1).
Right click on the desired manifest and
click on Modification in the drop down menu.
N.B. A Manifest can only be modified by Customs after being
13 | P a g e
ASYCUDA World
Cargo Manifest User Manual
Customs ASYCUDA Upgrade Project
registered, however, amendments can be made to its Bills of Lading.
Step 2
After making amendments, save changes.
Click on the Save Changes
icon in the menu bar.
Note: (1) Amendments can only be made to the Bill of Lading section on the manifest.
(2) Once amended, manifest can be registered by clicking on the (Register
Icon)
in the menu bar.
5. AMENDING A BILL OF LADING (BoL)
Step1
Find the Bill of Lading (BoL) to be amended.
Bills of Lading can be located in two ways.
Option 1
From the opened manifest click the BoL button menu
at bottom of screen.
Note: A list of Bills of Lading attached to the manifest will
appear on the screen.
14 | P a g e
ASYCUDA World
Cargo Manifest User Manual
Customs ASYCUDA Upgrade Project
Next, right click on desired Bill of Lading
Choose Modification from the drop down menu
which will open the manifest.
Make amendments and save changes using
the Save Changes Icon
.
Option 2
Find the Bill of Lading using the following path: -
From the document library, Select ASYCUDA
Then Click on the Cargo Manifest Icon to expand the menu
15 | P a g e
ASYCUDA World
Cargo Manifest User Manual
Customs ASYCUDA Upgrade Project
Right Click on Way Bill, then select Find.
Use criteria options on the finder to locate the specific B/L.
Or
Click on the finder and select the desired B/L from the list.
Make amendments and save changes.
6. EXCESS AND SHORTAGES
16 | P a g e
ASYCUDA World
Cargo Manifest User Manual
Customs ASYCUDA Upgrade Project
Excess and Shortages can be handled in two ways.
Option 1
Access desired Bill of Lading from the manifest.
Right click on desired Bill of Lading
Select Excess & Shortage from the drop down menu.
Or
Option 2
Use the finder to locate the Bill of Lading
On the finder, right click on desired waybill
Select Excess & Shortages from drop menu.
Note: This will open the Bill of Lading and will only allow you to
amend the remaining packages & remaining gross mass option.
Make the necessary amendments.
Deduct from remaining packages and
gross mass if amending shortages or add to
quantity if amending excesses.
Note: Changes can only be made to the remaining
packages and gross weight.
17 | P a g e
ASYCUDA World
Cargo Manifest User Manual
Customs ASYCUDA Upgrade Project
Save changes by selecting the Save Changes Icon in the menu bar.
All amendments to a registered manifest must be done within the
time frame specified in the Customs & Excise Act.
Note: Changes must be saved before exiting Bill of Lading
7. HOW TO PRINT A MANIFEST & BILLS OF LADING
Step 1
Locate the print option in document library
By using the following path:
From the document library, Select ASYCUDA
Click on Cargo Manifest to expand the menu
Click on Print
Right click on Manifest and Waybill
Select Print
18 | P a g e
ASYCUDA World
Cargo Manifest User Manual
Customs ASYCUDA Upgrade Project
Step 2
Fill in required data and print.
Fill in the Office Code, Voyage No. and
Date of Departure of the Manifest
Select the Printer Icon in the men bar.
Note: Manifest will show as a PDF file for printing
Step 3
To print individual Bills of Lading,
use the finder as shown.
Select the Print option in the menu bar as
indicated by the red arrow.
8. HOW TO “DEGROUP” OR BREAKDOWN A MASTER BILL OF LADING
19 | P a g e
ASYCUDA World
Cargo Manifest User Manual
Customs ASYCUDA Upgrade Project
To allow for customs clearance a Master Bill of Lading must first be split or de-grouped to the
level of the individual consignee. “De-grouping” can be done in two (2) ways.
Option 1 – For Carrier Agents
From the opened manifest select BoL button
to go to the list of Bills of Ladings (B/Ls).
Select the desired Mater Bill of Lading (MST)
Click on the add Bol icon on the menu bar as indicated by arrow.
A prompt will pop up on screen,
Select
to add a new Bill of Lading to the Master Bill.
Fill in the B/L reference number and
all other mandatory data and then store
.
Note: Previous document (Master B/L number) is
automatically added to the new B/L when degrouped from
Master Bill of Lading.
Option 2 – For Consolidators
20 | P a g e
ASYCUDA World
Cargo Manifest User Manual
Customs ASYCUDA Upgrade Project
A consolidator will receive a Master Bill of Lading from the agent; the consolidator will then use
the information from this B/L to create house bills for his individual clients/consignees.
To create new Bills of Lading follow this path: From the Document Library, select ASYCUDA
Then click on the Cargo Manifest icon to expand the menu.
Right click on Waybill, then select New.
(This option will open a blank waybill).
Insert the Master Bill of Lading number,
Date of Departure, Voyage number and
Office Code to link the new B/L to the
Master Bill of Lading.
Use “Manifest List of descriptions form” as a guide to complete all mandatory data then Store
.
21 | P a g e
ASYCUDA World
Cargo Manifest User Manual
Customs ASYCUDA Upgrade Project
A prompt will appear indicating that the document has been stored.
To continue degrouping (add another B/L) select the forward icon.
This will take you to another prompt.
Select the third option to add another Bill of Lading to
your Master Bill of Lading.
After preparing all the House Bills (degrouping) for a particular Master Bill of Lading, the
consolidator should inform the Agent/Carrier to validate the “Degroupage”.
To validate the “degroupage” the Agent will use the manifest or waybill finder to locate the
particular Master Bill of Lading.
Right click on the desired B/L.
Select Validate Degroupage.
A pop up will appear indicating the Validation is done.
9. FAST CARGO INTEGRATION (FCI)
This option allows the user to load or import XML files (previously generated from the carriers
system into ASYCUDA).
22 | P a g e
ASYCUDA World
Cargo Manifest User Manual
Customs ASYCUDA Upgrade Project
From the document library, Select ASYCUDA
Click on the Fast Cargo Integration Icon to expand.
Select the Manifest/Waybill Integration Option.
Note: “Manifest/Waybill Integration” option in the library is
for use by the Carrier Agents and “Degroupage Integration”
is for use by the consolidator.
Click on the Select XML File Icon to find desired manifest.
Select the XML File (Manifest) required.
Click Open to generate manifest.
23 | P a g e
ASYCUDA World
Cargo Manifest User Manual
Customs ASYCUDA Upgrade Project
Click on the Check Xml file icon on the menu bar to
Click Ok in the check done box when it appears.
Note: Manifest information and waybill summary is
automatically imported into the document if all
data is correct.
Click on the Verify and Save Icon as indicated to
complete the process.
A prompt will appear on screen indicating a successful
transaction.
If there is an error in the integration,
the system will indicate as shown below.
A PDF file will open to show the type of error.
The error may be Technical (System Error)
or Functional (incorrect data input).
24 | P a g e
ASYCUDA World
Cargo Manifest User Manual
Customs ASYCUDA Upgrade Project
Click on
to open the file.
A prompt will appear on screen (PDF Export).
Click on
to read error message.
Note: Technical errors should be referred to the System Administrator
and Functional errors should be corrected by the user.
To retrieve a generated manifest,
From the Manifest finder input the office code,
voyage number and date of departure as the search
key.
Right click and select the view option to see the
generated manifest or select Direct Register to
register the manifest.
ACKNOWLEDGEMENTS
The Customs ASYCUDA World Project team hopes that this manual has been helpful in assisting you to
complete, store and register Cargo Manifests, generate Bills of Lading and “Degroup” Master B/Ls using
the ASYCUDA Cargo Manifest Module.
25 | P a g e
ASYCUDA World
Cargo Manifest User Manual
Customs ASYCUDA Upgrade Project
To the Carrier Agents we certainly hope that the Fast Cargo Integration (FCI) Module has been of great
help in integrating previously generated manifest in XML format from the Carrier systems to ASYCUDA.
The ASYCUDA World Project Team expresses its appreciation for your support and participation. Your
cooperation will guarantee the success of this venture as your role and responsibilities is critical to the
declaration and cargo clearance process.
We would like to take this opportunity to acknowledge the contributions of the following agencies
without whose involvement and support, ASYCUDA World in Grenada, Carriacou and Petite Martinique
would not have been a reality:
The Government of Grenada (GOG)
The Grenada Ports Authority
The World Bank
GIDC
The United Nations Conference on Trade and
Development (UNCTAD)
GCIC
CARTAC
The Management & Staff of the Grenada
Customs Department
Prime Minister’s Ministry (I T Unit)
The Ministry of Finance
Department of Inland Revenue/VAT Unit
Project Coordination Unit (PCU)
Ministry of Legal Affairs
GDTAC
The Brokers’ Association
The Traffickers’ Association
Anyone seeking further information or assistance may contact members of the
ASYCUDA World Project Team on:
Telephone numbers: (473) 435 – 9622/23
Fax: (473) 435 – 9624
Email:
Or visit us at: PWU Building (CSA), Tanteen, St. George’s
GLOSSARY OF TERMS
Manifest Segment
26 | P a g e
ASYCUDA World
Cargo Manifest User Manual
Customs ASYCUDA Upgrade Project
“Office Code”
The Customs Office where manifest will be
processed
“Voyage Number”
The number given by the ship or aircraft
operators to a particular voyage from one point
to another inclusive of all intermediate stops.
“Date of Departure”
The date when the ship or aircraft started its
voyage.
“Date of Arrival”
The date when the ship arrives in the territorial
limits of the country.
“Place of Departure”
The location or port code where the ship or
aircraft started its voyage.
“Place of Destination”
The location or port code where the ship or
aircraft arrives to discharge the transported
goods.
“Carrier Code”
The identification code. It may be the VAT
registration number.
“Carrier Name & Address”
The name and address of carrier. It is only
mandatory when there is no carrier code.
“Total Number of Bills”
The count of Bills of Lading or Airway Bills
included in the manifest.
“Total Number of Packages”
The sum of all packages for Grenada.
“Total Number of Containers”
The sum of all containers carrying cargo for
Grenada
“Total Gross Weight”
The sum of all the weight of all cargo for
Grenada
“Mode of Transport”
Recognises the means by which the goods were
imported/exported into/outside the country. For
example, were the goods brought into the
country by air, sea or parcel post?
“Nationality of Transport”
The country in which the carrier is registered.
27 | P a g e
ASYCUDA World
Cargo Manifest User Manual
Customs ASYCUDA Upgrade Project
“Identity of Transport”
The vessel or aircraft name
“Carrier/Principle”
The name of the carrier may be the same as
Agent/cargo reporter
“Registration Number”
The reference of the document registering the
vessel or aircraft.
“Master Name”
The name of the master of the ship or the
commander of the aircraft.
“Time of Arrival”
The time when the vessel or aircraft arrived in
the country.
Bill of Lading Segment
“Registration Date”
The date when the vessel was registered.
“Bill of Lading Reference Number”
The number which uniquely identifies the bill of
lading or airway bill.
“B/L Type”
The code which identifies the type of transport
document issued (710 for House Bill of Lading,
711 for consolidated Master Bill of Lading).
“Nature”
The manner in which the goods will be treated.
These are indicated by the codes 22 (export), 23
(import), 24 (in transit) and 28 (transhipment).
“Previous Document”
The reference of the master bill of lading or
airway bill needed to prepare degrouped bills.
“Name of Shipper/Exporter”
Grenada.
The name of the persons sending the goods to
“Consignee”
The name and address of the person or firm
named in a freight contract to whom goods have
been shipped or turned over for care in Grenada.
“Total Number of Containers”
The sum of all containers carrying goods, which
belong to the bill of lading or airway bill.
“Kinds of Packages”
The description of the packaging of goods;
cartoon, crate, drum, etc.
28 | P a g e
ASYCUDA World
Cargo Manifest User Manual
Customs ASYCUDA Upgrade Project
“Marks & Numbers”
The markings that the shipper placed on the
packages to identify his/her cargo. It follows no
particular sequence and can be any set of words,
numbers or other signs that the shipper affixes.
“Total number of packages”
The piece count of the packages under each bill
of lading or airway bill.
“Total Gross Weight”
airway bill.
The weight for goods under each bill of lading or
“Cubic Metric Volume”
The measurement of the cargo inside the
container. It is not the cubic measurement of the
container unless that container is full.
“Description of Goods”
The narrative that portrays the type of goods
being transported. The description must be
explicit. It must not include terms such STC
(Said to Contain), clothing, tiles, food stuff, etc.
Acceptable terms would be men’s leather shoes,
ceramic tiles, women’s pants of cotton, rice in
packages, etc.
“Terms of Delivery Indicator”
The narrative that describes the agreed terms
between the parties. They may be FAS, FOB,
C&F, etc.
“Location Code”
The process used by the port to identify the exact
place in the port or shed where the goods can be
found.
“Freight Amount”
The cost of freight.
“Freight Currency”
The actual currency in which the payment for
freight is quoted.
“Notify/Code Name”
The address or contact number of a person other
than the consignee.
“Location”
The place where goods are stored for delivery,
may be a transit shed.
“Value Declared for Customs”
The worth of the goods which the importer or
exporter intends to declare to customs.
“Currency Declared for Customs”
The actual currency in which the payment for
transport is quoted.
29 | P a g e
ASYCUDA World
Cargo Manifest User Manual
Customs ASYCUDA Upgrade Project
“Value Declared for Insurance”
The cost of the insurance.
“Currency Code for Insurance Value”
The actual Currency in which the payment for
insurance is quoted.
“Number of Seals”
The count of the seals affixed to the container or
package.
“Marks of Seals”
The markings that identifies the seals placed on
the containers or packages.
“Sealing Party Code”
The code used by the sealer to identify who
sealed the container or package.
“Information”
Any other relevant information which the carrier
or agent deems necessary.
Container Segment
“Container Reference”
The container identification number. Four letters
for container owner, six digit container serial
number, and check digit.
“Number of Packages”
The number of packages in the container.
“Type of Container”
The container type code (e.g. 20BU, 40BK)
states the size and type of container.
“Empty/Full Indicator”
Describes how much space is occupied by goods
inside of the container. (LCL, FCL, FCX).
“Container Goods Description”
The description of goods in the container.
“Gross Mass”
The Gross Mass for good in the container in kg.
“Marks/Seals2
The container 2nd seal number.
“Sealing Party”
The code used to identify who sealed the
container (SH, TO, CU).
“Temp. Min”
The minimum temperature for container, this
field is mandatory for reefer container.
“Temp. Max”
The maximum temperature for container, this
field is mandatory for reefer container.
30 | P a g e
ASYCUDA World
Cargo Manifest User Manual
Customs ASYCUDA Upgrade Project
“Humidity”
The humidity level for reefer container.
“Dangerous Goods Code”
The dangerous goods code (UNDG)
31 | P a g e