1
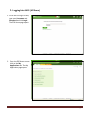
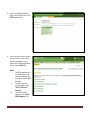
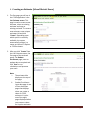
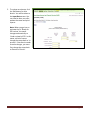
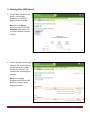
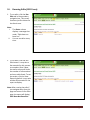
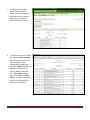
F-203 User Manual
Last Updated
January 10, 2011
F-203 User Manual
Page 1
Contents
1.
Logging Into SAFS (All Users) ................................................................................................................................ 3
2.
Creating an Estimate (School District Users) ........................................................................................................ 5
3.
Selecting an Estimate (School District Users) ..................................................................................................... 10
4.
Copying Estimates (School District Users) .......................................................................................................... 11
5.
Running Edits (School District Users) .................................................................................................................. 12
6.
Printing Reports (School District Users).............................................................................................................. 14
7.
Updating an Estimate Status (School District Users) .......................................................................................... 16
8.
Selecting an Estimate (ESD Users) ...................................................................................................................... 17
9.
Viewing Data (ESD Users) ................................................................................................................................... 20
10. Running Edits (ESD Users) .................................................................................................................................. 21
11
Printing Reports (ESD Users) .............................................................................................................................. 23
12. Updating the Status (ESD Users) ........................................................................................................................ 25
Appendix 1 - Adjusting the Browser Settings ............................................................................................................. 26
F-203 User Manual
Page 2
1. Logging Into SAFS (All Users)
1. Go to the EDS Login screen,
type your Username and
Password and click Login.
The EDS Home page opens.
2. From the EDS Home screen
click on the My
Applications tab. The My
Application page opens.
F-203 User Manual
Page 3
3. From the My Applications
page, click on the link to the
SAFS application.
4. From the Info Center screen,
you can click on the tabs in
the top navigation bar to
access the F-203 application.
Click on the F-203 tab.
Note:
I. The EDS applications
are designed to use
Internet Explorer 6.0
or greater as the Web
browser.
II.
To open the user
manual click on the
`SAFS F-230 user
manual’.
III.
To contact F203
support click `Email
F203 Support’ link.
F-203 User Manual
Page 4
2. Creating an Estimate (School District Users)
1. The first page you will see in
the F-203 application is the
List Estimate screen. This
page is used to create a new
estimate, select an existing
estimate and copy an
existing estimate. To create a
new estimate, enter unique
estimate title and click
`Create’. Depending upon
which option is currently
available, the system
automatically assigns it a
status as either an X-Option
or F-203 estimate.
2. After you click `Create’ from
the List Estimate screen, the
first page of the estimate
opens. On Student
Enrollment page, enter or
update data as required and
click `Save’ to run
calculations and preserve
your work.
Note:
I. The estimate title
displays at the top of
the page.
II.
Student Enrollment
input data page is one
of four data input
pages that displays
when you create or
select an F-203
estimate. It is also
one of the eight
pages displayed when
you create or select
an X-option estimate.
F-203 User Manual
Page 5
3. On Other Enrollment Page
enter or update data as
required and click `Save’.
Note:
I.
Other Enrollment input
data page is one of four
data input pages that
displays when you select
an F-203 estimate. It is
also one of eight pages
displayed when you
select an X-Option
estimate.
4. On Other Staff Factors
screen, enter or update data
as required and click `Save’.
Note:
I.
Other Staff Factors input
data page is one of four
data input pages that
displays when you select
an F-203 estimate. It is
also one of the eight
pages displayed when
you select an X-Option
estimate.
II.
The Other Staff Factors
page displays with prepopulated baseline
numbers and state
constant fields.
III.
The value in the `Decimal’
column describes how
many characters of data
you can enter to the right
of the decimal point.
F-203 User Manual
Page 6
5. On School Level Poverty
screen, enter or update data
as required and click `Save’.
Note:
I.
This page is one of the
eight pages displayed,
when you select an XOption estimate. This
page only displays when
X-Option is open.
II.
Fields with a gray
background are
calculated and cannot be
updated directly.
II.
Use the Tab key on your
keyboard to move
forward through the
screen fields. Use
Shift+Tab to move
backward. To save data,
press Alt+S.
6. On MSOC Page, enter or
update data for each field
and click `Save’.
Note:
I.
This page is one of the
eight pages displayed,
when you select an XOption estimate. This
page only displays when
X-Option is open.
F-203 User Manual
Page 7
7. On Estimated Revenue page,
enter or update data as
required and click `Save’.
Note:
I.
This page is one of the
four data input pages
that displays when you
select an F-203 estimate.
This page is also
displayed when you
selects the X-Option
estimate
II.
The Estimated Revenues
page displays with prepopulated baseline
numbers and state
constant fields.
III.
Click Top of Page’
hyperlink to return to the
top of the page.
8. On Levy page, enter or
update data as required and
click `Save’.
Note:
I.
This page is one of the
eight pages displayed,
when you select an XOption estimate. This
page only displays when
X-Option is open.
II.
Levy page displays with
baseline numbers and
state constant fields prepopulated.
III.
When you move inside a
box with a yellow back
ground and the display
shows no cursor, which
means the values is not
editable by districts or
ESD users.
F-203 User Manual
Page 8
9. On X-Option page, enter or
update data as required and
click `Save’.
Note:
I.
Any statewide constant
values or district baseline
numbers pre-filled by
OSPI appear in their
appropriate fields.
II.
You can enter or edit any
value by clicking inside
the box that has a clear
background, even if it
was pre-populated by
OSPI.
III.
When you move inside a
box with a yellow back
ground and the display
shows no cursor, which
means the values is not
editable by districts or
ESD users.
III.
Fields with a gray
background are
calculated and cannot be
updated directly.
IV.
When you click `Save &
Return’, the data entered
or updated are saved and
the previous page viewed
or updated is displayed.
V.
When you complete a
page or need to move to
a different page, click
`Save’ to run calculations
and preserve your work.
Use the page drop-down
to select a page, then
click `Go’ button to bring
up that page.
F-203 User Manual
Page 9
3. Selecting an Estimate (School District Users)
Once you have created an estimate, and for the remainder of the F-203 school year, you can find and reopen it on demand to view it, print reports of it, or make changes to it or update its status (so long as its
status is ‘In Process at District’ or ‘Ready for ESD Review’).
1. To find an existing estimate
for your district, click the List
Estimates tab in the
secondary navigation bar.
The `List Estimates’ page
opens.
2. (Optional) Using the Status
dropdown menu and F-203
Estimate/X-Option radio
button, narrow the estimate
search to include only results
matching your criteria and
click `Filter List’. The page
repaints to show a list of
estimates.
3. Click the `Go’ button located
next to the estimate you
want to view. The estimate
opens to its first page.
F-203 User Manual
Page 10
4. Copying Estimates (School District Users)
If you need to develop different versions of the estimate, you can make a copy of an existing estimate so long
as its status is 'In Process at District’, ‘Ready for ESD Review', or 'Return to School District for Review'.
1. Use the Estimate dropdown
to select the estimate you
want to copy, type a new title
(it must be unique), then click
the `Copy’ button.
2. The new copy will display on
the List Estimate screen. Its
status will be 'In process at
district'. You can click the `Go’
button to go into this version
of the estimate and make any
changes necessary.
F-203 User Manual
Page 11
5. Running Edits (School District Users)
You can run edits against your F-203 estimate to ensure that it is ready to be submitted to your ESD. Your
ESD will also run edits against your estimates prior to submitting it to OSPI. OSPI runs the same edits against
your estimate before it is approved. You can also run edits against your X-Option estimates as a quality
check, even though you do not submit these to your ESD or to OSPI .
1. Click on the Run Edits tab in
the secondary navigation bar
to go to the Run Edits
screen.
Note:
I.
The Status column
displays a message that
reads, “Edits have not
been run”.
II.
You can run edits at any
time.
2. To run edits, click the Run
Edits button. It may take a
few seconds for this process
to run. After it does, the
status column will display
the number of informational
and error edits. To see the
results, click the `View
Report’ hyperlink. It may
take another few seconds for
the report to display.
Note: After running the edits
if you navigate away from
this page and return to Run
Edits page, the status will
display ` Edits Have Not
Been Run’
F-203 User Manual
Page 12
3. The edit report displays
within a report viewer
frame. You can review the
information online, export
the report to Acrobat or
Excel, or print the report.
Note: When you click the
Print icon within the report
viewer frame work, a dialog
box may display that reads
‘Unable to load print
control', you will see an
ActiveX download bar on top
of the page. Install the
ActiveX and run reports. If
no download appears,
contact your IT support.
4. To export the report to PDF,
use the 'select a format'
dropdown in the top bar of
the report viewer. Choose
Acrobat (pdf) format and
click the Export hyperlink. A
dialog box will ask if you
want to Open or Save the
file. Choose Open and the
report will display in Adobe
Reader. To print, click on the
printer icon in the top left
corner of this window.
F-203 User Manual
Page 13
6. Printing Reports (School District Users)
1. To print the reports, Click on
the Print Report tab in the
secondary navigation bar.
You can print all or individual
reports. Check the box (or
boxes) you want and click
`View Report’. If you print
the Combine reports, it may
take a few seconds for the
report to display.
Notes: If you select
Combined Reports and then
Summary, Assumptions,
Worksheets, Levy or Edit, the
Combined Reports checkbox
is deselected. Similarly, if
you select Summary,
Assumptions, Estimated
Worksheets, or Edit, those
selections are deselected
when you select Combined
Reports.
2. The report displays within a
report viewer frame. You can
review the information
online, export the report to
Acrobat or Excel, or print the
report.
F-203 User Manual
Page 14
3. To print a paper report, click
the Print icon in the top right
of the report viewer frame.
Select the printer, page
range, and number of copies.
Click `OK’ to print the report
Note: When you click the
Print icon within the report
viewer frame work, a dialog
box display that reads
‘Unable to load print
control', you will see an
ActiveX download bar on top
of the page. If no download
appears, contact your IT
support.
4. To return to the Print Report
page, click the Back to
Previous Page button.
Note: If you do not see the
report you have selected,
your browser settings may
need to be adjusted. See
Appendix 1 for details.
F-203 User Manual
Page 15
7. Updating an Estimate Status (School District Users)
1. Click the Update Status tab
in the secondary navigation
bar to go to the Update
Status screen. The screen
displays a history of changes
-each prior status, the date
the status was changed, the
user who made the change
and the comments entered
by the user.
2. When the estimate is ready
to send to the ESD, select
'Ready for ESD review' in the
status dropdown and click
the `Update’ button. A new
row will display with the
updated status.
Note:
I. You can change the
status back to `In
Process’, as long as
the status is in `Ready
for ESD’.
II.
You can only update
the status of an F-203
estimate.
F-203 User Manual
Page 16
8. Selecting an Estimate (ESD Users)
1. After the district user has set
the status to 'Ready for ESD
review', ESD users can
review the F-203 estimate.
After logging in, click the F203 tab in the top navigation
bar. The first screen you will
see is the List Estimates
page.
Note: ESD users can view
Estimates only for those
districts within their ESD.
2. To see estimates that are
ready for ESD review, select
'All' in the school district
dropdown and 'Ready for
ESD review' in the status
dropdown. Click `Filter List’
button. The districts with
estimates in that status will
display.
F-203 User Manual
Page 17
3. To see all estimates which
have been started in your
ESD, select 'All' in the School
District dropdown and 'All' in
the status dropdown. Click
`Filter List’
Note: You will see a `Go’
button for a district if the
status is 'Ready for ESD
review' or higher.
4. To identify all districts in
your ESD that have not yet
submitted an estimate, click
List Districts with No
Submissions. The page will
display a list of all districts
that have not yet created an
F-203 estimate and assigned
it a status of ‘Ready for ESD
Review’ or greater.
F-203 User Manual
Page 18
5. To review an estimate, click
the `Go’ button for that
district. You will be taken to
the Input Data screen. You
can view its data, run edits,
update the status and print
reports.
Note: When you go into an
estimate that is 'Ready for
ESD review', the status
changes automatically to
'Under review by ESD'. In this
status, a district cannot
change the status back to 'In
process'. If the district needs
to make changes, you must
first change the status back
to ‘Return to District’.
F-203 User Manual
Page 19
9. Viewing Data (ESD Users)
1. To view data entered by the
district, use the page
dropdown to select the
page, and then click `Go’.
Note: Click the Return
button to return to the List
Estimates page, where you
can select another estimate
to view.
2. You will be taken to the page
selected. The screen will look
just like the screen used by
the district. However, you
cannot make any changes to
the data.
Note: Use the page
dropdown and click the `Go’
button to navigate to any
other data screen.
F-203 User Manual
Page 20
10.
Running Edits (ESD Users)
1. To run edits, click the Run
Edits tab in the secondary
navigation bar. This screen
functions just like it does for
the district user.
Note:
I.
The Status column
displays a message that
reads, “Edits have not
been run”.
II.
You can run edits at any
time.
2. To run edits, click the Run
Edits button. It may take a
few seconds for this process
to complete. After it does,
the status column will show
the number of informational
and error edits found. To see
the results, click the View
Report hyperlink. It may take
another few seconds for the
report to display.
Note: After running the edits if
you navigate away from this
page and return to Run Edits
page, the status will display`
Edits Have Not Been Run’
F-203 User Manual
Page 21
3. The edit report displays
within a report viewer
frame. You can review the
information online, export
the report to Acrobat or
Excel, or print the report.
4. To export the report to a pdf
file, use the 'select a format'
feature in the top bar of the
report viewer. Choose
Acrobat (pdf) format and
click the `Export’ hyperlink. A
dialog box will ask if you
want to Open or Save the
file. Choose Open and the
report will display in Adobe
Reader. To print, click on the
printer icon in the top left
corner of the window.
F-203 User Manual
Page 22
11.
Printing Reports (ESD Users)
1. Once the status is 'Ready for
OSPI review', the reports can
be printed. To print the Xoption reports, Click on the
Print Report tab in the
secondary navigation bar.
You can print all or individual
reports. Select individual
school district, Check the box
(or boxes) you want and click
`View Report’ button.
Notes: If you select
Combined Reports and then
Summary, Assumptions,
Estimated Worksheets, Levy
or Edit, the Combined
Reports checkbox is
deselected. Similarly, if you
select Summary,
Assumptions, Worksheets, or
Edit, those selections are
deselected when you select
Combined Reports.
2. The report displays within a
report viewer frame. You can
review the information
online, export the report to
Acrobat or Excel, or print the
report.
F-203 User Manual
Page 23
3. To run a query by item
report, navigate to the Print
Report page, then select a
School District using the
dropdown menu near the
top of the page (or leave the
default of ‘All’ to see data for
all districts in your ESD).
Then, specify the School Year
using the dropdown menu at
the bottom of the page.
Enter one or more
alphanumeric Item Codes in
the text fields. Click `View
Query’. A report is generated
that displays the values you
requested.
Note: The query defaults to
current year but you can be
run to query to view the last
seven years of data.
4. The report displays within a
report viewer frame. You can
review the information
online, export the report to
Acrobat or Excel, or print the
report.
Notes: To return to the Print
Report page, so that you can
run another query, click the
`Back to Previous Page’
button.
F-203 User Manual
Page 24
12.
Updating the Status (ESD Users)
1. Click the Update Status tab
in the secondary navigation
bar to go to the Update
Status screen. The screen
displays a history of changes
– each prior status, the date
the status was changed, the
user who made the change
and the comments entered
by the user.
3. When the estimate is ready
to send to the OSPI, select
'Ready for OSPI review' in
the status dropdown and
click the Update button. A
new row will display with the
updated status.
Note: The ESDs can change
the status back to `Ready for
ESDs’, as long as the status is
in `Ready for OSPI’.
F-203 User Manual
Page 25
Appendix 1 - Adjusting the Browser Settings
1. To ensure that pages and
reports display correctly, use
Internet Explorer (IE) version
6.0 (or later) as your web
browser. If necessary, you may
need to adjust the browser
settings for IE. In the top righthand corner of the browser
window, click on the Tools
icon. In the drop-down list
that displays, select Internet
Options.
2. A dialog box displays with
Internet Options. On the
General tab, under the
heading Browsing history,
click the Settings button.
F-203 User Manual
Page 26
3. Another dialog box displays
with Temporary Internet Files
and History settings. Under
the heading Temporary
Internet Files select the first
radio button that says Every
time I visit the webpage. Click
OK.
4. The dialog box closes and the
Internet Options dialog box
displays. Click OK again to
close it. Your browser settings
will be adjusted. The changes
you made are now the default,
used each time you open the
IE browser.
F-203 User Manual
Page 27