1
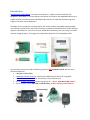
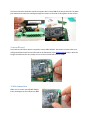
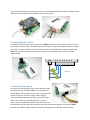
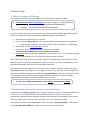
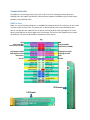
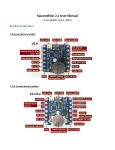
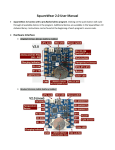
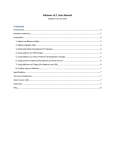
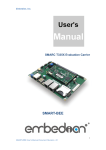
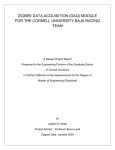
OpenSprinkler Pi (OSBo) v1.1 User Manual (Updated August 6, 2014) Contents Introduction .................................................................................................................................................. 2 Hardware Interface ....................................................................................................................................... 3 Hardware Setup ............................................................................................................................................ 3 1. Test Power Supply ................................................................................................................................. 3 2. Attach BBB to OSBo .............................................................................................................................. 3 3. microSD card ......................................................................................................................................... 4 4. Web Connection ................................................................................................................................... 4 5. Wiring Sprinkler Valves ......................................................................................................................... 5 6. Zone Expansion Board........................................................................................................................... 5 7. Rain Sensor............................................................................................................................................ 6 8. Mini-Relay (Advanced Topic) ................................................................................................................ 6 Software Setup.............................................................................................................................................. 7 1. OSBo Pre-configured SD Image ............................................................................................................. 7 2. OpenSprinkler Interval Program (by Dan Kimberling) .......................................................................... 7 3. OpenSprinkler Mobile App (by Samer Albahra).................................................................................... 8 4. Google Calendar Program ..................................................................................................................... 8 Technical Details ........................................................................................................................................... 9 BBB Pin Uses ............................................................................................................................................. 9 Specifications .............................................................................................................................................. 10 Terms and Conditions ................................................................................................................................. 10 Open-Source Links ...................................................................................................................................... 10 Introduction OpenSprinkler Beagle (OSBo) is an open-source sprinkler / irrigation extension board for the BeagleBone Black (BBB). It’s an easy and low-cost solution to transform your BeagleBone Black into a capable sprinkler controller with up to 48 independent stations, for lawn and plant watering, farm irrigation and other similar applications. The OSBo v1.1 kit includes the enclosure (with a clear acrylic window), assembled and tested OSBo circuit board, terminal blocks, and screws. The built-in components include 24V AC to 5V DC switching regulator, solenoid driver, rain sensor terminal, DS1307 RTC and battery, fuse, mini-relay, per-station transient voltage protector. The image on the right below shows the final assembled product. To get started, you will also need the following, which are NOT included in the kit and have to be purchased separately. a BeagleBone Black (BBB) a nano-size USB WiFi dongle (or alternatively a RJ45 Ethernet cable if not using WiFi) a 2GB or above microSD card (or alternatively, a low-profile SD card) 24V AC sprinkler transformer (output voltage 22V AC ∼ 30V AC, note that it’s AC, not DC!) 24V AC sprinkler valves (note that it’s 24V AC valve, not DC or latching solenoid valve!) (Sold separately) Hardware Interface The left image marks the connectors, and BBB mapped out pins. The right image below marks the locations of the USB WiFi dongle, SD card, and wired Ethernet cable (if not using WiFi) on the BBB. Hardware Setup 1. Test Power Supply Insert the sprinkler transformer wires into the orange screw terminal, then plug it in to the matching terminal on OSBo. The green LED should light up, indicating that power is on. Warning: if the LED doesn’t light up, or if anything smokes, please unplug the power immediately. Check if there is any visible damage. If you can’t figure out the problem, send an email to [email protected], or post a message on the Forum (http://rayshobby.net/phpBB3) Power indicator 2. Attach BBB to OSBo OSBo has two support pillars that match the screw holes on BBB. First remove the top screws from the support pillars; then plug BBB into OSBo through the 2x10 pin headers, with Ethernet jack facing the left, and USB connector facing the right. Double check the orientation, and make sure all pins are aligned. The two screw holes should also match the support pillars. Insert BBB all the way to the end. The power jack and Ethernet connector should go through the cutouts on the PCB. Finally tighten the two screws. 3. microSD card A microSD card of 2GB or above is required to set up OSBo software. Instructions on how to burn preconfigured software onto the microSD card can be found later in the Software Setup section. Once the image is burned onto the card, simply insert it to the microSD card slot on the BBB. 4. Web Connection OSBo v1.1 fits a nano-size USB WiFi dongle. Insert the dongle into the USB port on BBB. If you prefer wired Ethernet connection, you can insert a standard RJ45 Ethernet cable into BBB, and the cable can pass through the opening labled ‘USB’ on the enclosure. 5. Wiring Sprinkler Valves To connect a sprinkler valve, insert one wire to the COM (common) terminal, and the other wire to any of the station terminals (1-8). The COM terminal has two ports – they are internally connected so either port is fine. To connect multiple valves, one wire from each valve should come together and go to the COM terminal; and the other wire from each valve goes to an individual station terminal. See the diagram below. COM 1 2 3 4 5 6 7 8 …… 6. Zone Expansion Board To connect a zone expansion board, use the extension cable you received to link the OSBo’s OUT port to the expansion board’s IN port. The connector on the cable is polarized (with a bump on the top), so there is only one way to plug it. If you have multiple expansion boards, you can daisy chain them in the same way, by following the OUT -> IN links. When using zone expansion boards, the sprinkler valves are wired the same way as before: one wire from each valve should come together and go to the COM terminal on the OSBo; and the other wire from each valve goes to an individual station terminal. Main Controller Zone Expansion Board Extension Cable COM 1 2 3 4 5 6 7 8 …… 1 2 3 4 5 6 7 8 …… 7. Rain Sensor If you have a rain sensor, you can connect it to OSBo v1.1 via the rain sensor terminal. The rain sensor has two wires and is essentially a rain-activated switch. The OSBo software can decide what to do when rain is detected, such as turn off stations or ignore rain. 8. Mini-Relay (Advanced Topic) OSBo v1.1 has an on-board 250VAC / 3A mini-relay, which can be used for general-purpose switching, such as opening garage doors, switching landscape lighting. The three relay pins have been mapped out on the circuit board: CO (change-over), NO (normally-open), NC (normally closed). For example, connect the two wires from the garage door opener to the CO and NO pins; when the relay is activated, it will toggle the garage door. Warning: the PCB traces and pinouts for the relay are designed for low-voltage operation (<=40V) and have not been tested on power-line (120V∼240V) devices. Use your own discretion if you plan to use the relay for power-line devices. Software Setup 1. OSBo Pre-configured SD Image A pre-configured SD card image is provided for you to quickly set up software for OSBo. The latest version: OSBo SD Card Image 2 (with Interval Program v2, update 08/06/14) o SHA1SUM: ee4c08ab5a1dbbfe36cb5609838b31d2f00e4642 o MD5SUM: 7143d32e6542699df1213d7c854e9364 The process to burn the image onto an SD card is the same as burning any BBB image. Below is a brief summary. Detailed instructions can be found on BeagleBone Black’s official website. Decompress the image file to your computer. Insert an SD card (2GB or above) to your computer. Back up any important file on the SD card. When using microSD card, you need a microSD to full-size SD adapter, or USB adapter. On Windows, use the Win32DiskImager software. On Mac or Linux, use the dd command in a terminal. For example: sudo dd bs=1M if=image_file of=/dev/partition_to_burn_to IMPORTANT: make sure you have typed in the correct partition name – if you accidentally typed in the wrong partition name, you may end up wiping out your hard disk! Once the SD card is ready, pop it into your BBB. As WiFi is not configured yet, you should first connect BBB directly to your router with a wired Ethernet cable, or connect it to a screen and keyboard, set the WiFi SSID and password, then you can use the wireless connection. The system will attempt to register host name ‘arm’ on your network. So open a browser, and type in http://arm/ and see if you can get to the one-page instruction. If not, go to your router’s configuration page; find the IP address assigned to your BBB (say, http://192.168.x.x). Next, open a browser and type in the IP address. You should see a welcome page with further instructions. If you see this page, congratulations, the image is successfully burned onto your SD card. To ssh or log in to BBB, the default user name is ubuntu, and password temppwd. 2. OpenSprinkler Interval Program (by Dan Kimberling) The OpenSprinkler interval_program, written in Python by Dan Kimberling, is the default software set to run on start-up. This software provides basic and advanced features, such as interval-based programming, graphical preview of program settings, manual operation, custom station names, station delay, per-station control of master valve, rain delay, rain sensor, watering percentage. The software is available on port 8080. Open a browser and type in http://ospi:8080 (or if that doesn’t work, http://192.168.x.x:8080). You should see the web interface of this program. The user manual of the interval_program can be found on http://www.opensprinkler.com Changing settings in the interval_program requires a password. The initial password is opendoor. To update the program, go to folder /home/ubuntu/OSPi, and run command git pull. The interval_program is under active development with new features and plugins. If you want to find out more or contribute to the development, please check the following resources. Note that the program was initially written for Raspberry Pi, and then made compatible with BeagleBone Black as well, so many items are still under the topic of OpenSprinkler Pi (OSPi). OSPi interval_program Github repository. OSPi MediaWiki page. Rayshobby Forum OSPi development topics. If you need to downgrade to Interval Program v1.8.3, go to folder /home/ubuntu/OSPi, and run the following command: git checkout 0cc07da211000acaf2e6f50a6630fbcd0093c844 The restart. This will downgrade the program to version of 1.8.3. 3. OpenSprinkler Mobile App (by Samer Albahra) The OpenSprinkler Mobile App, written by Samer Albahra, supports the interval_program. The mobile app provides a stylish mobile front-end to easily change station and program settings, as well as check station and program status. The app is available on all major mobile platforms (e.g. iOS, Android, Windows Mobile, BlackBerry, Amazon Kindle). Search opensprinkler in the app store, then download and install the app. The app requires an up-to-date OpenSprinkler interval_program. Check subsection 2 above for update instructions. 4. Google Calendar Program The Google Calendar program, written in Python, makes use of a public Google calendar to schedule watering events. It periodically polls the calendar to check stations that are scheduled to be on at the current time. Each program is simply a calendar event with the title indicating the station name(s). Google calendar makes it easy to schedule complex recurring events, and it’s accessible on most devices. This program is installed in the /home/ubuntu/demos folder. Please check the README.txt therein. The /home/ubuntu/demo folder includes a couple of addition demo programs for testing purposes, and they provide start-up examples to show how to control sprinkler valves in Python and C. Technical Details The OSBo v1.1 circuit design consists mainly of a 24V AC to 5V DC switching converter (based on LM2596S-5.0), shift register (74HC595D), solenoid drivers (based on BT1308W triac), RTC with battery (DS1307), relay (HK4100F-5.0V). BBB Pin Uses OSBo v1.1 uses the following GPIO pins on the BBB’s P9 (shaded in purple). The other pins on P9, as well as all pins on P8, are free to use. The power pins, as well as SDA/SCL pins can be shared with other devices. All GPIO pins are mapped out in the pinout area: P8 (46 pins) at the right edge of the circuit board, and P9 (46 pins) at the top edge of the circuit board. The layout of the mapped out pins match the GPIO pins. The pins used by OSBo are marked by a white outline. GND 3.3V (from BBB) 5V DC Power (to BBB) GND 3.3V (from BBB) 5V DC Power (to BBB) Shift Register DATA Shift Register CLOCK Rain Sensor Shift Register LATCH Shift Register NOE Relay I2C SCL I2C SDA P8 Pinouts P9 Pinouts Specifications Input Voltage: DC Output Current: Number of Zones: AC Output Current: Over-voltage Protection: Over-current Protection: On-board Relay: Size: Weight: 22V AC to 30V AC. 500mA @ 5V (to power BBB). 8 on the OSBo, expandable by linking zone expansion boards. 800mA continues @ 24V AC per zone / station, 8A impulse / inrush. 48V bi-directional TVS on each zone, AC input, and rain sensor terminal. 2A on AC input; 1A on 5V DC. 3A @ 250V AC, or 30V DC. (Though rated at 250V AC, it’s not recommended for power-line voltage due to PCB traces and pinout size) 135mm x 100mm x 32mm (5.3” x 4” x 1.26”) 150g (5.3oz) w/o RPi Terms and Conditions OpenSprinkler Beagle (OSBo) is an open-source project. The hardware design and software code are made publicly available under the Creative Commons Attribution-ShareAlike (CC BY--SA) 3.0 license. The product is open-source for educational purpose and to promote innovations. The hardware and software are provided as is. We (Rayshobby LLC) are not responsible for any damage or accident that may occur due to hardware or software error, or during the assembly, use, and modification of OSPi. Open-Source Links OSBo Github Repository OSBo homepage