1
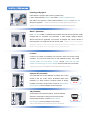
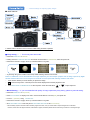
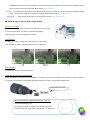
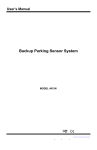
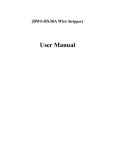
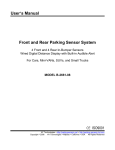
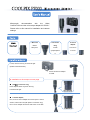
Microscopic
documentation
with
the
Nikon
CoolPixP7000 and the microscope adapter“NY-P7000.”
Please refer to this manual for installation and camera
settings.
P7000
Main Unit
Conversion
C-mount
Attachment
Built-in
Ring
adapter
Relay lens.
Fit with
Connect to
eyepieceφ30m
C-mount
m
*First, remove lens ring as shown at right.
(Rotate counterclockwise).
*
Screw camera into adapter
to install.
★ Installation to microscope on next page
■
φ30mm conversion ring,
Insert adapter all the way down the ring.
It should be fit tight.
■
C-mount adapter,
First, screw C-mount adapter into microscope’s C-mount.
Second, insert main unit (with φ30mm conversion ring)
into C-mount adapter and secure with screw on the side.
Installing to Eyepiece
Insert adapter to eyepiece tube. (remove eyepiece first).
If tube’s inside diameter is φ30mm, first install conversion ring to main unit,
then slide it into eyepiece. If tube’s inside diameter is φ23.2mm, insert main unit
directly into eyepiece.
* Adapter would start rotate when diopter adjusting ring is attached to
eyepiece. In such case, please insert the adapter after turning diopter adjusting ring to either end.
Nikon F phototube
Insert main unit to Nikon F phototube. Recent Nikon trinocular microscopes are usually
equipped with V-T phototube for F-phototube. In older models, Optiphot, Biophot,
SMZ-2T trinocular are applicable. If microscope is equipped with a 35mm camera or
Polaroid system, it is usually the same as the old model.
※SMZ-10 require optional sleeve.
※Adapter would start to rotate when diopter adjusting ring is attached to eyepiece. In such case,
please insert the adapter after turning diopter adjusting ring to either end.
C-mount
C-mounts are usually for installing CCD cameras, which has become trendy
nowadays. A C-mount has male screw of outer diameter 25.4mm. First, install
C-mount adapter into microscope’s C-mount. Second, insert main unit (with
φ30mm conversion ring) into C-mount adapter and secure with screw on the side..
*only direct (1.0x) C-mount is compatible. C-mount with lens inside should not be used.
Olympus PT phototube
A PT phototube has a outer diameter of φ38mm with curving
threads at the top. U-SPT, SZ-PT phototubes follow these
standards. If a 35mm camera or Polaroid system is already
installed, it is usually a PT phototube. It requires fixation sleeve
[NY-BH (option)] to secure adapter to the microscope.
JIS phototube
JIS standard of outer diameter φ25mm, and inner diameter
Φ23.2mm. Old models of Olympus microscopse usually
employed this standard. It requires fixation sleeve
[NY-JIS (option)] to secure adapter to microscope
*Able to connect without NY-JIS, however the image may come out blurry.
・・・Camera settings for capturing quality images..
■ Main features
※ Please refer to camera’s user’s manual for initial setting and basic operation.
○ Easy setting・・・ This is easy semi-auto mode.
・Rotate the MODE DIAL to SCENE.
・Holding down the FUNCTION BUTTON and rotate command dial to LANDSCAPE, Select and press OK.
・Rotate Zoom control to T(right). Zoom up until there will be no vignette.
・Try focusing using focus handle of microscope while watching camera’s LCD viewer.
There is a difference in focus level between the image captured by the microscopes eyepiece and the image captured by digital
cameras. Please make sure to focus using the focus handle of microscopes while watching camera’s LCD viewer.
・
・
・
Press shutter release (or remote shutter) to capture the image.
Press the Play button. The last picture shot will be displayed in full-frame playback mode.
Press EXPOSURE COMPENSATION to alter exposure. Press the multi select
or
to adjust exposure.
○ Manual Setting・・If you are unsatisfied with quality of image captured by easy setting, please try manual setting.
・Rotate the MODE DIAL to M (manual)
・Press FOCUS MODE to display focus menu. Use the multi selector to choose [MF], and press OK.
・Focus to ∞ (INFINITE) using CROSS-KEY.
・Rotate Zoom control to T(right). Zoom up until there will be no vignette.
・Set QUICK MENU DIAL to ISO and press QUICK MENU BUTTON to set ISO sensitivity.
*ISO sensitivity equals to camera’s basic sensitivity. Higher the value, more you will be able to capture images even in darkness.
However, when ISO is set higher than 800, noise starts to appear, therefore please set low level as long as there is no shortage of light.
・Rotate the ROTARY MULTI SELECTOR to choose lowest
APERTURE (F#)value
・Rotate COMMAND DIAL to choose SHUTTER SPEED value. When SHUTTER SPEED value become reds,
keep rotating the COMMAND DIAL until EXPOSURE INDICATOR comes to center (±0)
・Take a picture for a test. If image is too bright on the preview, try shorten the shutter speed(-), if it is too dark try lengthen the
shutter speed(+).
!
Brightness of image depends on following 3 criteria. Please refer when using manual setting.
High・・・
Low・・・
Long・・・
ISO
Aperture(F/#)
Shutter speed
・・・Low
・・・High
・・・Short
・When you have a wireless remote control (ML-L3), press SELF-TIMER, and select REMOTE CONTROL, and press OK.
・ Using wireless remotes or shutter release, start taking pictures once setting is done.
・
・
Press the Play button. The last picture shot will be displayed in full-frame playback mode.
Register the setting in mode dial U1, U2, or U3. Once registered, you can shoot with the same setting by just switching to this
mode.
Press MENU BUTTON. Use multi selector to choose SAVE USER SETTING and press OK.
Other setting・・・Please refer to User’s Manual of P7000 .
・White Balance・・・Manually adjust white balance according to light source. Set it manually when you cannot reproduce color of
subject precisely because of the light source. User’s Manual P76-77
・Picture Control・・・Monochrome, Vivid, etc. This is setting for image color. User’s Manual P92
・Image Size・・・You can choose the size(pixel count) for the picture recorded. Small image sizes are suitable for pictures that will
be distributed by E-mail or used in web pages. Picture shot at large sizes requires more memory and are suitable for printing,
but the number of shots that can be taken will be fewer. User’s Manual P70
・Auto off・・・If no operations are performed for the selected length of time, the monitor will turn off and the camera will enter standby
mode. When the AC adapter is connected, 30miniutes is selected automatically. User’s Manual P181
・Date Imprint・・・Date and time of recording can be imprinted on pictures. User’s Manual P174
■ Other thing you can do with Coolpix P7000
Connect to TV monitor
Using accessory video cable, P6000 can be connected to TV monitor and
Out-put real time images. It is easier to focus with large display.
Also observatio-n with many people can be possib。
Auto Bracketing
It enables you to capture image with varied exposure in a single shot.
Use in situation in which it is difficult to guess the correct exposure.
Active D-lighting
It reduces over exposure and under exposure.
Installing ocular micrometer (sold separately)
Ocular micrometer of size φ21mm can be installed into NY-P6000. Turn the tip of adapter counter-clockwise to remove bracket for
micrometer. Put micrometer on the bracket with printed surface facing down, then reinstall to adapter body.
Printed surface facing down
Micrometer designed for digital camera adapter 【S11-CF】
(10mm/100split pitch 0.1mm)
This special micrometer for digital camera adapter omitted the
numbers entirely and moved scale to the periphery for clearer view.