1
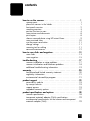
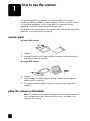
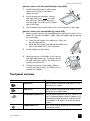
hp
scanjet
4600 series
digital flatbed
scanners
user‘s manual
hp scanjet 4600 series
digital flatbed scanners
user’s manual
copyright information
© Copyright Hewlett-Packard Company 2003
All rights reserved. Reproduction, adaptation, or translation without prior written permission
is prohibited, except as allowed under copyright laws.
This product incorporates Adobe’s PDF technology, which contains an implementation of
Lempel-Ziv-Welch (LZW) data compression licensed under U.S. Patent 4,558,302.
trademark credits
Adobe and the Acrobat logo are registered trademarks or trademarks of Adobe
Systems Incorporated in the United States and other countries and regions.
Energy Star is a U.S. registered service mark of the United States Environmental Protection
Agency.
Microsoft and Windows are registered trademarks of Microsoft Corporation.
All other product names mentioned herein may be trademarks of their respective
companies.
document warranty
The information contained in this document is subject to change without notice.
Hewlett-Packard makes no warranty of any kind with respect to this information.
HEWLETT-PACKARD SPECIFICALLY DISCLAIMS ANY IMPLIED WARRANTY OF
MERCHANTABILITY AND FITNESS FOR A PARTICULAR PURPOSE.
Hewlett-Packard shall not be liable for any direct, indirect, incidental, consequential, or
other damage alleged in connection with the furnishing or use of this information.
The TWAIN Toolkit is distributed as is. The developers and distributors of the TWAIN Toolkit
expressly disclaim all implied, express or statutory warranties including, without limitation,
the implied warranties of merchantability, noninfringement of third party rights and fitness
for a particular purpose. Neither the developers nor the distributors shall be liable for
damages, whether direct, indirect, special, incidental, or consequential, as a result of the
reproduction, modification, distribution, or other use of the TWAIN Toolkit.
NOTICE TO U.S. GOVERNMENT USERS: RESTRICTED RIGHTS COMMERCIAL
COMPUTER SOFTWARE: Use, duplication, or disclosure by the Government is subject to
restrictions as set forth in subparagraph (c) (1) (ii) of the Rights in Technical Data Clause at
DFARS 52.227-7013.
Material scanned by this product may be protected by governmental laws and other
regulations, such as copyright laws. The customer is solely responsible for complying with
all such laws and regulations.
product restricted material
This HP product contains the following materials that might require special handling at
end-of-life:
•
mercury in the scanner fluorescent lamp and transparent materials adapter (< 5 mg)
•
lead in solder
For recycling information, contact www.hp.com/go/recycle, your local authorities, or the
Electronic Industries Alliance at www.eiae.org.
For information about HP’s environmental stewardship program, see environmental
stewardship program on page 21. For product warranty information see hewlettpackard limited warranty statement on page 20.
contents
how to use the scanner. . . . . . . . . . . . . . . . . . . . . . . . . . . . . . 1
scanner parts . . . . . . . . . . . . . . . . . . . . . . . . . . . . . . . . . . . . 1
place the scanner in the holder. . . . . . . . . . . . . . . . . . . . . . . . 1
front panel overview . . . . . . . . . . . . . . . . . . . . . . . . . . . . . . . 2
scanning overview . . . . . . . . . . . . . . . . . . . . . . . . . . . . . . . . 3
position the item to scan . . . . . . . . . . . . . . . . . . . . . . . . . . . . 4
scan pictures and documents . . . . . . . . . . . . . . . . . . . . . . . . . 8
print copies . . . . . . . . . . . . . . . . . . . . . . . . . . . . . . . . . . . . . 8
share a scanned photo using HP Instant Share . . . . . . . . . . . . . 9
scan oversized items . . . . . . . . . . . . . . . . . . . . . . . . . . . . . . 10
use the power save button . . . . . . . . . . . . . . . . . . . . . . . . . . 11
change settings . . . . . . . . . . . . . . . . . . . . . . . . . . . . . . . . . 11
scanning text for editing . . . . . . . . . . . . . . . . . . . . . . . . . . . 11
care and maintenance. . . . . . . . . . . . . . . . . . . . . . . . . . . . . 12
how to scan slides and negatives . . . . . . . . . . . . . . . . . . . . . 13
scan slides . . . . . . . . . . . . . . . . . . . . . . . . . . . . . . . . . . . . . 13
scan negatives . . . . . . . . . . . . . . . . . . . . . . . . . . . . . . . . . . 15
troubleshooting . . . . . . . . . . . . . . . . . . . . . . . . . . . . . . . . . . 17
scanner installation or setup problems . . . . . . . . . . . . . . . . . . 17
scanner initialization and hardware problems . . . . . . . . . . . . . 18
additional troubleshooting information . . . . . . . . . . . . . . . . . . 19
warranty . . . . . . . . . . . . . . . . . . . . . . . . . . . . . . . . . . . . . . . 20
hewlett-packard limited warranty statement . . . . . . . . . . . . . . . 20
regulatory information . . . . . . . . . . . . . . . . . . . . . . . . . . . . . 21
environmental stewardship program. . . . . . . . . . . . . . . . . . . . 21
product support . . . . . . . . . . . . . . . . . . . . . . . . . . . . . . . . . 23
accessibility website . . . . .
hp scanjet website . . . . . .
support process . . . . . . . .
upgraded warranty options
...
...
...
...
....
....
....
....
...
...
...
...
...
...
...
...
...
...
...
...
....
....
....
....
...
...
...
...
..
..
..
..
23
23
23
27
product specifications and options . . . . . . . . . . . . . . . . . . . . 28
scanner specifications . . . . . . . . . . . . . . . . . . . . . . . . . . . . . 28
transparent materials adapter (TMA) specifications . . . . . . . . . 29
environmental specifications for the scanner and transparent
materials adapter (TMA) . . . . . . . . . . . . . . . . . . . . . . . . . . . 29
iii
how to use the scanner
1
This manual describes the operation of HP Scanjet 4600 series scanners,
including installation problems, customer support, and how to use the scanner.
For installation procedures, see the Setup Poster. For scanning software
procedures, see the HP Photo & Imaging software Help.
This chapter of the manual presents an overview of the scanner and information
about how to use and care for the scanner.
scanner parts
hp scanjet 4600 scanner
1
2
1
Scanner
2
Horizontal holder, with a hinge to hold the scanner. Used for positioning
and holding items for scanning.
hp scanjet 4670 scanner
1
2
3
1
Scanner
2
Vertical holder, with folding legs for storage. Used for positioning and
holding items for scanning.
3
Transparent materials adapter (TMA) for scanning 35 mm slides and
negatives.
place the scanner in the holder
Note: The holder can be used for holding the scanner, positioning items to
scan, and providing a flat surface on which to scan. The holder is not
necessary for scanning.
1
how to use the scanner
place the scanner in the horizontal holder (hp scanjet 4600)
1
Set the horizontal holder on a flat surface.
Make sure the hinge in the holder is
rotated forward.
2
Lay the scanner on the holder, viewing
side (light frame) up (
), in contact
with the hinge. The buttons face away
from the hinge. The cord exits the scanner
next to the hinge.
3
Press the back of the scanner down until it clicks into place in the hinge.
place the scanner in the vertical holder (hp scanjet 4670)
1
Make sure both legs are fully extended prior to placing the scanner in the
holder. This ensures the holder is stable. Open the support legs by rotating
them into place:
a. Open the rear support first; make sure it clicks into
the fully open position.
b. Rotate the front support from behind the holder to the
front of the holder until it clicks into place.
2
Set the holder on a flat surface.
3
Place the scanner in the holder, so the viewing
side (light frame) faces you. The buttons are on
the right side of the scanner. The cord exits the
scanner at the lower left.
4
To align the scanner on the holder, slide the
scanner from side to side in the holder until it is
secured in the holder.
front panel overview
Feature
Description
SCAN button
Scans a photo or document and places it in the
destination you specify.
COPY button
Scans a photo or document and sends it to the
default printer to make copies.
HP INSTANT SHARE button Scans a photo and allows you to 1) share it in email; 2) create an album on the HP website; or 3)
order professional-quality prints. (Not all services
are available in all regions or for all operating
systems.)
POWER SAVE button
user’s manual
Turns off the scanner lamp and puts the scanner
in low-power mode.
2
chapter 1
scanning overview
You can start scanning in one of three ways:
•
from the front panel buttons
•
from the HP Director
•
from other applications
Note: Macintosh users, see the HP Photo & Imaging software Help for
information about scanning procedures.
scan from the front panel buttons
The front panel buttons on the scanner provide shortcuts to frequently-used
scanning functions, such as scanning documents and pictures. Descriptions for
using the front panel buttons are located in this manual.
scan from the hp director
Scan from the HP Director when you want more control over your scan, such as
when you want to preview the image before the final scan.
To start the HP Photo & Imaging software, double-click the HP Director icon (
)
on the desktop. The HP Director window appears. From this window you can
scan, view, or print images, use online Help, and more.
If the HP Director icon is not on the desktop, on the Start menu, point to Programs
or All Programs, point to Hewlett-Packard, point to the name of your scanner or
to Scanners, and then click HP Photo & Imaging Director.
scan from other applications
You can bring an image directly into an open file in one of your applications if
the application is TWAIN-compliant. Generally, the application is compliant if it
has an option such as Acquire, Scan, or Import New Object. If you are unsure
whether the application is compliant or what the option is, see the documentation
for that application.
3
hp scanjet 4600 series digital flatbed scanners
how to use the scanner
position the item to scan
Because of the unique design of this scanner, this section describes how to
position different types of items with the scanner.
scanning side and viewing side
The scanner has two sides: the scanning side and the viewing side:
Scanning side (
): The scanning side has a dark
frame around the glass, which always faces the item
being scanned. The scanner lamp shines through this
side when scanning. Keep the scanning side clean.
Viewing side (
): The viewing side has a light frame
around the glass, which shows the HP logo and product
name. You can see the item to scan face up through the
glass as you look at the viewing side. The scanner lamp
shines away from this side when scanning. Fingerprints
and dust on the viewing side do not affect scanning
quality.
position the item face down and face up
You can scan pictures and documents in one of two positions: with the item face
down or with the item face up.
position the item face down
When scanning an item face down, remove the
scanner from the holder and lay it on a flat
surface, scanning side (dark frame) up (
).
Then place the item (for example, a book) printed
side down on the glass.
Tip: The side with the dark frame always
faces the item being scanned.
position the item face up
When scanning an item face up, place the
scanner viewing side (light frame) up (
) on the
item. You can see the picture or text through the
scanner glass. Some examples are:
•
With the scanner in the holder, scan a single
document or photo.
•
With the scanner removed from the holder,
scan a photo laying on the desk.
•
With the scanner removed from the holder, scan an item that is larger than
the scanning glass.
•
With the scanner removed from the holder, scan a photo hanging on the
wall. Note: When scanning items on the wall, you must operate the
scanner in landscape orientation.
Tip: The scan area is the area visible through the glass, bordered
by the light frame on the scanner.
user’s manual
4
chapter 1
scan a single picture or document
scan a single item with an hp scanjet 4600
1
Lift the front edge of the scanner off the holder.
2
While holding the scanner up, position the item face up in the upper left
corner of the holder, with the top of the item towards the hinge. Use the
media placement tabs on the holder to help position the item.
3
Return the scanner to its original position on the holder. You can see the
item face up through the scanner glass.
4
Press the SCAN button (
) on the front edge of the scanner. Follow the
instructions in scan pictures and documents on page 8.
scan a single item with hp scanjet 4670
5
1
Pull the top edge of the scanner away from the holder, rotating the scanner
forward in the holder. The scanner can rest against the front edge of the
holder.
2
Position the item face up in the lower left corner of the holder, with the top
of the item facing left. Use the media placement tabs on the holder to help
position the item.
3
Return the scanner to its original position on the holder. You can see the
item face up through the scanner glass.
4
Press the SCAN button (
) on the edge of the scanner. Follow the
instructions in scan pictures and documents on page 8.
hp scanjet 4600 series digital flatbed scanners
how to use the scanner
scan a page of a thick document
The best way to scan a thick document is to place the document printed side
down on the scanner. This helps to make better contact between the document
and the scanner glass.
1
Remove the scanner from the holder:
– If you have a horizontal holder, remove the scanner by pressing down
on one tab on the hinge and then lifting the scanner off the holder.
– If you have a vertical holder, remove the scanner by lifting it off the
holder.
2
Place the scanner on the desk, scanning side (dark frame) up (
3
Place the document printed side down on the scanner glass. Use the dark
frame to help position the document for scanning. The scan area includes
the entire clear glass area, up to the dark frame edge.
).
Tip: To ensure better contact with the scanner glass, press down
on the document you are scanning.
4
Press the SCAN button (
) on the edge of the scanner. Follow the
instructions in scan pictures and documents on page 8.
If you are using an HP Scanjet 4600 scanner with a horizontal holder, and you
attempt to use the holder to scan a thick document, the scanner may detach from
the holder. This does not break the holder. Return the scanner to the holder and
snap it onto the hinge.
If you are using an HP Scanjet 4670 scanner with a vertical holder, and you
attempt to use the holder to scan a thick document, the scanner will not lay flat
against the document and the image will not be clear. Follow the procedures in
this section to remove the scanner from the holder and scan the document.
user’s manual
6
chapter 1
scan a picture or document on the desk
7
1
Remove the scanner from the holder:
– If you have a horizontal holder, remove the scanner by pressing down
on one tab on the hinge and then lifting the scanner off the holder.
– If you have a vertical holder, remove the scanner by lifting it off the
holder.
2
Place the scanner on the item, viewing side (light frame) up (
can see the document through the scanner glass.
3
Press the SCAN button (
) on the edge of the scanner. Follow the
instructions in scan pictures and documents on page 8.
). You
hp scanjet 4600 series digital flatbed scanners
how to use the scanner
scan pictures and documents
Use the SCAN button (
) to scan pictures and documents.
Note: Macintosh users, see the HP Photo & Imaging software Help for
information about scanning procedures.
1
Position the item on the scanner. For more information, see position the item
to scan on page 4.
2
Press the SCAN button (
3
In the dialog box that appears, select:
– Picture if you are scanning a printed photograph, graphic, slide, or
negative.
– Document if you are scanning text, both text and graphics, or any text
that you want to edit later. (For more information on scanning text to
edit, see scanning text for editing on page 11.)
4
Select a destination (where you want the software to send the image).
5
Click Scan in the dialog box. The item is scanned.
6
A dialog box appears, asking if you want to scan another image.
– If you have more items to scan, place another item and either click
SCAN in the dialog box or press the SCAN button (
) on the
scanner.
– If you have finished scanning your items, click Done.
).
The items appear in the destination specified in Step 4.
Note: By default, the software does not prompt you to preview the picture or
document when you use the SCAN button on the scanner. If you want to
preview the item, either change the button setting in the HP Director, or
initiate the scan from the HP Director instead of the SCAN button on the
scanner.
print copies
Use the COPY button (
make copies.
) to scan an item and send it directly to a printer to
Note: Macintosh users, see the HP Photo & Imaging software Help for
information about copying procedures.
1
Position the item on the scanner. For more information, see position the item
to scan on page 4.
2
Press the COPY button (
) on the scanner. The copies are printed on the
default printer.
A progress dialog box appears that shows the copy progress.
Note: To change any copy settings, such as size, darkness, or the printer,
click Cancel in the Copy in Progress dialog box. The HP Copying dialog box
appears, where you can change settings.
You can also make copies by accessing the HP Copying software from the
HP Director. For more information, see the HP Photo & Imaging software Help.
user’s manual
8
chapter 1
share a scanned photo using HP Instant Share
Use the HP INSTANT SHARE button (
) on the HP Scanjet scanner to share
scanned photos with family and friends. You can easily 1) send someone an email with thumbnails and links to your photos stored on a secure HP website –
no more attachments; 2) upload photos to the HP Photo website to create online
photo albums; or 3) order professional-quality prints from an HP partner web site.
(Not all services are available in all regions or for all operating systems.)
You must be connected to the Internet to use HP Instant Share.
Note: Macintosh users, see the HP Photo & Imaging software Help for
information about using the HP INSTANT SHARE button.
Note: Use the HP INSTANT SHARE button to scan and share only photos. If
you want to scan and share a document, use the SCAN button on the
scanner.
1
Position the original photo on the scanner. For more information, see
position the item to scan on page 4.
2
Press the HP INSTANT SHARE button (
3
A dialog box appears, asking if you want to scan another image.
– If you have more items to scan, place another item and either click
SCAN in the dialog box or press the SCAN button (
) on the
scanner.
– If you have finished scanning photos, click Done.
4
All your scanned photos are sent to the HP Instant Share software. Follow
the instructions on the screen to share your scanned photo.
). The photo is scanned.
Note: By default, the software does not prompt you to preview the photo
when you use the HP INSTANT SHARE button on the scanner. If you want to
preview the photo, use the HP Director instead of the HP INSTANT SHARE
button on the scanner.
You can also access HP Instant Share using the software. For more information,
see the HP Photo & Imaging software Help.
9
hp scanjet 4600 series digital flatbed scanners
how to use the scanner
scan oversized items
If you have an item to scan that is larger than the scanning glass you can scan
it in multiple sections, and then connect the sections with Panorama Maker
software.
Use the Panorama Maker software to connect multiple scans. Use the ReadIris
Pro software if you want to convert a document into editable text. If you did not
install this software when you set up the scanner, insert the scanner CD to install
it now. See the Setup Poster for installation information.
Note: Macintosh users, see the HP Photo & Imaging software Help for
information about scanning procedures.
1
Remove the scanner from the holder:
– If you have a horizontal holder, remove the scanner by pressing down
on one tab on the hinge and then lifting the scanner off the holder.
– If you have a vertical holder, remove the scanner by lifting it off the
holder.
2
Place the scanner with the viewing side (light frame) up (
) on the item
to scan. Place the scanner so you can see the upper left portion of the item
through the scanner, using the frame around the scanner glass to position
the item.
3
Press the SCAN button (
4
In the dialog box that appears, select:
– Picture if you are scanning a photograph or other artwork.
– Document if you are scanning text or both text and graphics. You must
select No when asked Scan for Editable Text (OCR)?
5
Select Panorama Maker as the destination.
6
Click Scan in the dialog box. The item is scanned.
) on the scanner.
Note: If you see a preview dialog now, this procedure will not work as
documented. See turn preview image on or off on page 11 to turn preview
off.
7
Align the scanner on the next section of the item. Overlap the sections by at
least 1.3 mm (1/2 inch). Press the SCAN button (
) on the scanner.
Continue to scan each section of the item until you are done.
8
When you have finished scanning the sections, click Done in the dialog
box on the computer screen.
9
Panorama Maker automatically starts. All the scanned sections are sent to
Panorama Maker.
10 In the Panorama Maker software, arrange the images in the correct order
and follow the on-screen instructions. See the Panorama Maker Help for
instructions.
11 If you scanned a text document and want to use optical character
recognition (OCR) to make the scanned document editable, then from
Panorama Maker, save the combined image as a TIFF file, and then import
the TIFF file into the ReadIris Pro software to perform OCR.
user’s manual
10
chapter 1
use the power save button
The scanner lamp turns off automatically after approximately 15 minutes.
However, you may want to manually turn off the lamp when you have finished
using the scanner.
To turn off the scanner lamp and put the scanner in low-power mode, press the
).
POWER SAVE button (
To use the scanner again, start a scan either from a button on the front panel or
from the HP Director. After a short warm-up cycle, the scan begins.
change settings
You can customize some features of the HP Scanjet scanner, including the front
panel button settings, previewing of images, and other preferences.
change settings from the hp director
When you use the scanner buttons or the HP Director, the scanner uses settings
optimized for the scanned original type, such as a photograph. You can change
scan settings from the Settings menu in the HP Director, including button settings,
scanning preferences, and other settings. To change settings, start the
HP Director, and then click Settings.
turn preview image on or off
Note: Macintosh users, see the HP Photo & Imaging software Help for
information about turning preview on or off.
You can change whether a preview image appears or does not appear. To
change this setting, start the HP Director, and then click Settings. Click Scan
Preferences, and then go to the Preview tab. For more information, see the
HP Photo & Imaging software Help.
scanning text for editing
The scanner uses Optical Character Recognition (OCR) to convert text on a page
to text that you can edit on your computer. OCR is installed automatically when
you install the scanning software during scanner setup.
Note: Macintosh users, see the HP Photo & Imaging software Help for
information about scanning text.
•
•
•
11
If you scan text but cannot edit it, make sure you choose the following
selections during scanning:
– What are you scanning? Select Document.
– Scan for editable text? (OCR) Select Yes.
Scanned text may not appear on your computer exactly as it appeared on
the original, especially if the original contains faint or smudged text. For
example, some characters may be incorrect or missing. As you edit the text,
verify the scanned text and make corrections as necessary.
To change text scanning options, from the HP Director click Settings, and
then click Scan Document Settings.
hp scanjet 4600 series digital flatbed scanners
how to use the scanner
care and maintenance
Occasional cleaning of your scanner helps ensure optimal performance. The
amount of care necessary depends upon several factors, including the amount of
use and the environment. You should perform routine cleaning as necessary.
Note: Avoid placing items with sharp edges in the scanner. Doing so can
damage the scanner. Before placing an item on the scanner glass, make
sure the item is free of wet glue, correction fluid, or other substances that can
be transferred to the glass.
clean the scanner glass
Note: Dust and fingerprints affect scanning quality only on the scanning
side (dark frame) of the scanner.
1
Disconnect the combination USB and power cable from the scanner.
2
Clean the glass using a soft, lint-free cloth sprayed with a mild glass
cleaner.
Caution! Use only glass cleaner. Avoid abrasives, acetone,
benzene, and carbon tetrachloride, all of which can damage the
scanner glass. Avoid isopropyl alcohol because it can leave
streaks on the glass.
Do not spray the glass cleaner directly on the glass. If too much
glass cleaner is applied, the cleaner could run to the edges and
damage the scanner.
3
Dry the scanner glass using a dry, soft, lint-free cloth.
4
When finished, reconnect the combination USB and power cable to the
scanner.
clean the transparent materials adapter
If you have a transparent materials adapter for scanning slides and negatives,
clean the window in the door and the light window using a slightly-damp, soft,
lint-free cloth.
store the scanner
To prevent scratches on the scanning side of the scanner, store the scanner in the
holder provided.
Tip: When not in use, use the scanner to display a favorite photo.
user’s manual
12
how to scan slides and negatives
2
With the HP Scanjet 4600 series scanner, you can use the transparent materials
adapter (TMA) to scan 35 mm slides or negatives. The adapter is included with
the HP Scanjet 4670 scanner, and can be purchased separately for the
HP Scanjet 4600 scanner.
tips for scanning transparent items
• To scan large transparent items, such as a presentation transparency, place
a white piece of paper in back of the transparency, and scan as usual.
•
When scanning a 35 mm slide or negative, the scanner software
automatically enlarges the image to approximately 11x15 cm (4x6 inch). If
you want the final image to be larger or smaller, use the Resize tool in the
scanner software to set the scaling to your desired final size; the scanner
will scan the item at the proper resolution and enlargement for the size you
choose.
Note: Macintosh users, see the HP Photo & Imaging software Help for
information about scanning slides and negatives.
scan slides
1
Remove the scanner from the holder and place it scanning side (dark
frame) up (
) on a flat surface.
–
–
2
If you have a horizontal holder, remove the scanner
by pressing down on one tab on the hinge and
then lifting the scanner off the holder.
If you have a vertical holder, remove the scanner
by lifting it off the holder.
Insert the slide into the transparent materials adapter:
a. Open the door of the adapter.
b. Place the slide on the adapter’s light window. The slide should lay shiny
side up, with the transparent portion seated on the raised light window.
The rectangular orientation of the slide should match the orientation of
the light window on the adapter.
c. Close the door of the adapter.
Note: The viewing lamp on the adapter lights after you start scanning.
13
how to scan slides and negatives
3
Attach the transparent materials adapter to the scanner:
a. Place the adapter on the scanner, with the adapter window against the
scanner. Fit the pegs of the adapter’s clear plastic edge into the
scanner holes.
b. Plug the adapter cord into the scanner, in the TMA port next to the
scanner buttons.
Note: The scanner scans the slide only when the transparent materials
adapter is properly attached to the scanner.
4
Press the SCAN button (
).
A dialog box appears asking what you are scanning.
5
Select Picture, and then click Scan in the dialog box.
6
Select Slides from a Transparent Materials Adapter (TMA), and then click
Scan in the dialog box.
The scanner performs a preview scan, and the preview image appears.
Note: A preview image always appears when scanning slides, regardless
of the HP Director button setting.
7
Select a final scan area within the slide. Click and
drag a border around the area you want for a final
scan (final scan area).
8
Make any adjustments you want to the preview image.
When the image adjustments are complete, click
Accept.
9
A dialog box appears asking if there are more originals to scan. If you
have more slides to scan:
a. Click Yes.
b. Place a new slide in the transparent materials adapter and reposition it
on the scanner.
c. In the preview window, click New Scan, make adjustments, and then
click Accept.
Final scan area
10 When you have finished scanning your items, click No when you receive
the prompt for another scan.
The images appear in the HP Photo & Imaging Gallery or other selected
destination.
11 When finished, remove the adapter and slide.
You can initiate scanning a slide in other ways. For example, in HP Director, click
Scan Picture. Or, if you know you’ll be sharing an item, use the
HP INSTANT SHARE button (
) on the front panel of the scanner.
user’s manual
14
chapter 2
scan negatives
Note: Negatives are easily damaged. Touch them only on their edges. You
can also wear gloves to protect the negative.
1
Remove the scanner from the holder and place it scanning side up (dark
frame up) up (
) on a flat surface.
–
–
2
If you have a horizontal holder, remove the scanner
by pressing down on one tab on the hinge and
then lifting the scanner off the holder.
If you have a vertical holder, remove the scanner
by lifting it off the holder.
Insert the 35mm negative strip into the transparent
materials adapter:
a. Open the door of the adapter, and then open the small hinged flap
towards the light window.
b. Place the negative strip on the adapter’s light window. The negative
should lay shiny side up, with the curled edges pointing down. Use the
media placement guides on the adapter to help position the negative
strip across the light window.
Place the desired negative frame over the light window.
If necessary, thread the negative through the slot in the clear edge of
the adapter.
c. Line up the holes on the side of the negative with the position pegs on
the small hinged flap. Secure the negative by pushing the edges of the
negative on to the position pegs. Be careful to touch only the sides of
the negative.
d. Close the adapter door.
Note: The adapter viewing lamp lights only after you start scanning.
3
Attach the transparent materials adapter to the scanner:
a. Place the adapter on the scanner, with the adapter window against the
scanner. Fit the pegs of the adapter’s clear plastic edge into the
scanner holes.
b. Plug the adapter cord into the scanner, in the opening next to the
scanner buttons.
15
hp scanjet 4600 series digital flatbed scanners
how to scan slides and negatives
Note: The scanner scans the negative only when the transparent materials
adapter is properly attached to the scanner.
4
Press the SCAN button (
).
A dialog box appears asking what you are scanning.
5
Select Picture, and then click Scan in the dialog box.
6
Select Negatives from a Transparent Materials Adapter (TMA), and then
click Scan in the dialog box.
The scanner performs a preview scan, and the preview image appears.
Note: A preview image always appears when scanning negatives,
regardless of the HP Director button setting.
7
Select a final scan area. Click and drag a border
around the area you want for a final scan (final scan
area).
8
Make any adjustments you want to the preview image.
When the image adjustments are complete, click
Accept.
9
A dialog box appears asking if there are more originals to scan. If you
have more negatives to scan, click Yes, and then perform one of the
following steps:
– To scan another frame from the same negative strip, remove the
adapter from the scanner and re-position the negative strip so that the
frame you want to scan is in front of the light window. Reposition the
adapter on the scanner. In the Preview window, click New Scan, make
adjustments, and then click Accept.
– Place a new negative strip in the adapter and reposition the adapter on
the scanner. In the preview window, click New Scan, make adjustments,
and then click Accept.
Final scan area
10 When you have finished scanning your items, click No when you receive
the prompt for another scan.
The images appear in the HP Photo & Imaging Gallery or other selected
destination.
11 When finished, remove the adapter and negative strip.
You can initiate scanning a negative in other ways. For example, in HP Director,
click Scan Picture. Or, if you know you’ll be sharing an item, use the
HP INSTANT SHARE button (
) on the front panel of the scanner.
user’s manual
16
troubleshooting
3
This chapter contains solutions for installation and initialization problems.
scanner installation or setup problems
This section contains solutions for installation and setup problems.
check your computer
•
Ensure that your computer meets the minimum system requirements that are
listed on the scanner box.
•
If you do not have enough hard-disk space, remove unnecessary files or
install the software on a different disk drive.
use administrative privileges
If you are installing the scanner on a Microsoft Windows 2000 or XP system, you
must be logged on as an administrator. See your operating system help for how
to log on as an administrator.
use a valid folder
On a Microsoft Windows computer, if you receive a message such as
“Destination Directory Is Invalid” or “Program Folder Is Invalid” during
installation, you may not have read/write permissions to that folder.
check the cables
Cable type Action
Power
cable
The power cable is connected between the computer and a power
supply.
• Ensure that the power cable is securely connected between the
computer and a live electrical outlet or surge protector.
• If the power cable is connected to a surge protector, ensure that
the surge protector is plugged into an outlet and turned on.
• Disconnect the power cable from the computer and turn off the
computer. After 30 seconds, reconnect the power cable to the
scanner, and then turn on the computer, in that order.
17
troubleshooting
Cable type Action
USB/
power
cable
The combination USB and power cable is connected between the
scanner and the computer.
• Use the cable that was included with the scanner. Another USB
cable might not be compatible with the scanner.
• Ensure that the combination USB and power cable is securely
connected between the scanner and the computer.
For additional USB troubleshooting information, see
www.hp.com/support, select your country/region, and then use
the search tool to find USB troubleshooting topics.
Note: On a Macintosh computer, use the Apple System Profiler to ensure
that the scanner is connected to the computer correctly.
scanner initialization and hardware problems
This section contains solutions for initialization and hardware problems.
reset the scanner
If you receive an error message similar to “Scanner initialization failed” or
“Scanner not found” when trying to use the scanner:
1
Close the error message dialog box and close the application that was
open when you received the error message. (Start a scan to see if the
scanner is working now. If not, proceed with the next step.)
2
Disconnect the combination USB and power cable from the scanner, and
then reconnect it. (Start a scan to see if the scanner is working now. If not,
proceed with the next step.)
3
Shut down your computer, and then turn it off.
Note: It is important that the scanner and computer be turned off for at least
60 seconds before being restarted.
4
Before restarting the computer, disconnect the combination USB and power
cable from the scanner and the computer.
5
Check the cables for any visible, external damage.
6
Firmly reconnect the combination USB and power cable to the computer.
The cable must be inserted completely into the computer’s USB port.
Note: Remove any USB hub, if present. Use another USB port, if possible.
user’s manual
7
Verify that the power cable is firmly and correctly connected to a power
source.
8
Firmly reconnect the combination USB and power cable directly to the
scanner.
9
Restart the computer.
18
chapter 3
run the repair utility
If the scanner still fails to initialize, run the Repair utility (Windows computers
only). For more information, access the Help system: open the HP Director, click
Help, and then click hp scanjet 4600 series scanner help
test scanner hardware
If you think the scanner has a hardware problem, verify that the cables are firmly
connected to the scanner, the computer, and the power source. If the cables are
correctly connected, test the scanner using this procedure.
1
Disconnect the combination USB and power cable from the scanner.
2
Reconnect the combination USB and power cable to the scanner.
The carriage on the scanner will move forward and backward approximately 25
mm (1 inch), and the lamp will turn on.
If the carriage does not move and the scanner lamp does not turn on, a problem
exists with the scanner hardware. See product support on page 23.
additional troubleshooting information
To solve other problems with the scanner, access the Help system: open the
HP Director, click Help, and then click hp scanjet 4600 series scanner help
To solve problems with the scanner software, see the HP Photo & Imaging
software Help.
19
hp scanjet 4600 series digital flatbed scanners
warranty
4
This section contains warranty, regulatory, and environmental stewardship
program information.
hewlett-packard limited warranty statement
HP products
Duration of limited warranty
HP Scanjet 4600 scanner
HP Scanjet 4670 scanner
United States, Canada, and Latin America:
90 days
Europe and Asia Pacific: 1 year
1
HP warrants to you, the end-user customer, that HP hardware, accessories,
and supplies will be free from defects in materials and workmanship after
the date of purchase, for the period specified above. If HP receives notice
of such defects during the warranty period, HP will, at its option, either
repair or replace products which prove to be defective. Replacement
products may be either new or equivalent in performance to new.
2
HP warrants to you that HP software will not fail to execute its programming
instructions after the date of purchase, for the period specified above, due
to defects in material and workmanship when properly installed and used.
If HP receives notice of such defects during the warranty period, HP will
replace software which does not execute its programming instructions due
to such defects.
3
HP does not warrant that the operation of HP products will be uninterrupted
or error free. If HP is unable, within a reasonable time, to repair or replace
any product to a condition as warranted, you will be entitled to a refund of
the purchase price upon prompt return of the product.
4
HP products may contain remanufactured parts equivalent to new in
performance or may have been subject to incidental use.
5
This warranty does not apply to defects resulting from (a) improper or
inadequate maintenance or calibration, (b) software, interfacing, parts, or
supplies not supplied by HP, (c) unauthorized modification or misuse, (d)
operation outside of the published environmental specifications for the
product, or (e) improper site preparation or maintenance.
6
TO THE EXTENT ALLOWED BY LOCAL LAW, THE ABOVE WARRANTIES
ARE EXCLUSIVE AND NO OTHER WARRANTY OR CONDITION,
WHETHER WRITTEN OR ORAL, IS EXPRESSED OR IMPLIED, AND HP
SPECIFICALLY DISCLAIMS ANY IMPLIED WARRANTIES OR CONDITIONS
OF MERCHANTABILITY, SATISFACTORY QUALITY, AND FITNESS FOR A
PARTICULAR PURPOSE. Some countries, states, or provinces do not allow
limitations on the duration of an implied warranty, so the above limitation
20
chapter 4
or exclusion might not apply to you. This warranty gives you specific legal
rights, and you might also have other rights that vary from country to
country, state to state, or province to province.
7
HP’s limited warranty is valid in any country or locality where HP has a
support presence for this product and where HP has marketed this product.
The level of warranty service you receive may vary according to local
standards. HP will not alter the form, fit, or function of the product to make
it operate in a country in which it was never intended to function for legal
or regulatory reasons.
8
TO THE EXTENT ALLOWED BY LOCAL LAW, THE REMEDIES IN THIS
WARRANTY STATEMENT ARE YOUR SOLE AND EXCLUSIVE REMEDIES.
EXCEPT AS INDICATED ABOVE, IN NO EVENT WILL HP OR ITS
SUPPLIERS BE LIABLE FOR LOSS OF DATA OR FOR DIRECT, SPECIAL,
INCIDENTAL, CONSEQUENTIAL (INCLUDING LOST PROFIT OR DATA),
OR OTHER DAMAGE, WHETHER BASED IN CONTRACT, TORT, OR
OTHERWISE. Some countries, states, or provinces do not allow the
exclusion or limitation of incidental or consequential damages, so the
above limitation or exclusion may not apply to you.
9
THE WARRANTY TERMS CONTAINED IN THIS STATEMENT, EXCEPT TO
THE EXTENT LAWFULLY PERMITTED, DO NOT EXCLUDE, RESTRICT, OR
MODIFY AND ARE IN ADDITION TO THE MANDATORY STATUTORY
RIGHTS APPLICABLE TO THE SALE OF THIS PRODUCT TO YOU.
regulatory information
Regulatory information is located on the HP Photo & Imaging software CD that
comes with the scanner. On the CD, browse for the file named
regulatory_supplement.htm.
environmental stewardship program
protecting the environment
Hewlett-Packard Company is committed to providing quality products in an
environmentally sound manner. This product has been designed with attributes to
minimize impacts on our environment.
energy consumption
Energy usage drops significantly while the scanner is in low-power mode, which
saves natural resources and saves money without affecting the high performance
of this product. This product qualifies for ENERGY STAR®, which is a voluntary
program to encourage the development of energy-efficient office products. As an
ENERGY STAR Partner, Hewlett-Packard Company has determined that this product
meets ENERGY STAR guidelines for energy efficiency.
plastics
Plastic parts over 25 g (0.88 oz) are marked according to international standards
that enhance the ability to identify plastics for recycling purposes at the end of
the product's life.
21
hp scanjet 4600 series digital flatbed scanners
warranty
disassembly/end of life
This HP product (the HP Scanjet 4600 series scanner) is designed for ease of
disassembly and to provide end-of-life disposal options by use of common
fasteners and snap-fitting parts.
product restricted material
This HP product contains the following materials that might require special
handling at end-of-life:
•
mercury in the fluorescent lamp in the scanner and transparent materials
adapter (< 5 mg)
•
lead in solder
For recycling information, contact www.hp.com/go/recycle or contact your local
authorities or the Electronic Industries Alliance at www.eiae.org.
recycling materials
HP offers a variety of product end-of-life return programs in a number of
geographic areas. To determine if a program is available in your area, please
contact your nearest HP sales office.
Products returned to HP are reused, recycled, or disposed of in a responsible
manner. Each month, HP reuses or recycles more than 1.6 million kg (3.5 million
pounds) of material at our product recovery centers in Grenoble, France;
Boeblingen, Germany; and Roseville, California, USA. This represents 99 percent
by weight of all the material we receive from customers and HP operations.
user’s manual
22
product support
5
This section contains support information including phone numbers and website
information.
accessibility website
Customers with disabilities can get help by visiting www.hp.com/hpinfo/
community/accessibility/prodserv/.
hp scanjet website
Visit www.scanjet.hp.com to:
•
learn tips for scanning more effectively and creatively
•
access HP Scanjet driver updates and software
•
register your product
•
subscribe to newsletters, driver and software updates, and support alerts
•
purchase accessories, such as the transparent materials adapter (TMA)
support process
The HP support process works most effectively if you perform the following steps
in the order specified:
23
1
Review the electronic help for the software and scanner, including the
troubleshooting section.
2
Access the HP Consumer Support Website for support. If you have access
to the Internet, you can obtain a wide range of information about your
scanner. Visit the HP website for product help, drivers, and software
updates at www.hp.com/support. The HP Consumer Support Website is
available in the following languages: Dutch, English, French, German,
Italian, Portuguese, Spanish, Swedish, Traditional Chinese, Simplified
Chinese, Japanese, Korean. (Danish, Finnish, and Norwegian support
information is available in English only.)
3
Access HP e-support. If you have access to the Internet, connect with HP via
e-mail by going to www.hp.com/support. You will receive a personal reply
from an HP Product Support technician. E-mail support is available in the
languages listed at that website.
4
Contact your local HP dealer. If your scanner has a hardware failure, take it
to your local HP dealer for a solution. Service is free during your scanner’s
limited warranty period. After the warranty period, the dealer will quote a
service charge.
product support
5
Contact the HP Product Support Center for support by phone. Please
consult the following website to check the details and conditions of phone
support in your country/region: www.hp.com/support. As a part of HP’s
continuing efforts to improve phone support information services, we advise
you to check the HP website on a regular basis for new information
regarding service features and delivery. If you cannot solve the problem by
using the above options, call HP while you are in front of your computer
and scanner. For faster service, please be prepared to provide the following
information:
– the scanner’s model number (located on the scanner)
– the scanner’s serial number (located on the scanner)
– the computer’s operating system
– the version of the scanner software (located on the scanner’s CD label)
– messages displayed at the time the situation occurred
The applicable conditions for HP phone support are subject to change
without notice.
Telephone support is free from the date of purchase for the period specified
unless otherwise noted.
Locations
Free phone support period
Africa
30 days
Asia Pacific
1 year
Canada
90 days
Europe
1 year
Latin America
90 days
Middle East
30 days
United States
90 days
phone support in the United States
Support is available both during and after the warranty period.
Within the period of your warranty, telephone support is provided free of charge.
Call (800) HPINVENT.
U.S. phone support is available in both English and Spanish 24 hours a day, 7
days a week (days and hours of support may change without notice).
After the warranty period, call (800) HPINVENT. Charges are $25.00 U.S. per
issue, and are charged to your credit card. If you think your HP product needs
service, call the HP Product Support Center, which can help determine if service
is required.
user’s manual
24
chapter 5
phone support in Europe, Middle East, and Africa
HP Product Support Center phone numbers and polices may change. Visit the
following website to check the details and conditions of phone support in your
country/region: www.hp.com/support.
Algeria
+213 (0) 61 56 45 43
Austria
+43 (0) 820 87 4417
Bahrain
+973 800 728
Belgium
+32 070 300 005 (Dutch)
+32 070 300 004 (French)
Czech Republic
+42 (0) 2 6130 7310
Denmark
+45 70202845
Egypt
+20 02 532 5222
Finland
+358 (0)203 66 767
France
+33 (0) 8 92 69 60 22 (Euro 0.34/min)
Germany
+49 (0) 180 5652 180 (Euro 0.12/min)
Greece
+30 10 60 73 603
Hungary
+36 (0) 1 382 1111
Ireland
+353 1890 923902
Israel
+972 (0) 9 830 4848
Italy
+39 848 800 871
Luxembourg
900 40 006 (French)
900 40 007 (German)
Morocco
+212 224 04747
Netherlands
0900 2020165 (Euro 0.10 per minute)
Norway
+47 815 62 070
Poland
+48 22 865 98 00
Portugal
+351 808 201 492
Romania
+40 1 315 44 42
Russian Federation + 7 095 797 3520 (Moscow)
+ 7 812 346 7997 (St Petersburg)
25
Saudi Arabia
+966 800 897 1444
Slovakia
+421 2 6820 8080
South Africa
086 000 1030 (RSA)
+27-11 258 9301 (Outside RSA)
Spain
+34 902 010 059
hp scanjet 4600 series digital flatbed scanners
product support
Sweden
+46 (0) 77-120 4765
Switzerland
+41 0848 672 672 (German, French, Italian –
Peak time 0.08 CHF/Outside peak 0.04 CHF)
Tunisia
+216 1 891 222
Turkey
+90 216 579 71 71
Ukraine
+7 (380 44) 490-3520
United Arab
Emirates
+971 4 883 845
United Kingdom
+44 (0)870 010 4320
other phone support worldwide
HP Product Support Center phone numbers and polices may change. Visit the
following website to check the details and conditions of phone support in your
country/region: www.hp.com/support.
Argentina
+54 0 810 555 5520
Australia
+63 (3) 8877 8000 (or local (03) 8877 8000)
Brazil
+55 (11) 3747 7799 (Grande São Paulo)
+55 0800 157751 (Outside Grande São Paulo)
Canada
+1 905 206 4663 (During the warranty period)
+1 877 621 4722 (After the warranty period)
Central America
+1 800 711 2884
and the Caribbean
Chile
+56 800 22 5547 (Post-sales Business Computing)
+56 800 360 999 (Post-sales Home Computing)
China
+86 (10) 6564 5959
Colombia
+57 9 800 114 726
Guatemala
+502 1 800 999 5105
Hong Kong SAR
+852 3002 8555
India
1 600 112267 or +91 11 682 6035 (Hindi & English)
Indonesia
+62 (21) 350 3408
Japan
0570 000 511 (Inside Japan)
+81 3 3335 9800 (Outside Japan)
Korea, Republic of +82 (2) 3270 0700 (Seoul)
0 80-999-0700 (Outside Seoul)
user’s manual
Malaysia
+60 1 800 805 405
Mexico
+52 58 9922 (Mexico City)
+52 01 800 472 6684 (Outside Mexico City)
26
chapter 5
New Zealand
+64 (9) 356 6640
Peru
+51 0 800 10111
Philippines
+ 63 (2) 867 3551
Puerto Rico
+1 877 2320 589
Singapore
+65 6272 5300
Taiwan
+886 0 800 010055
Thailand
+66 (2) 661 4000
United States
1 800 474-6836 (800 HPINVENT)
Venezuela
+58 0 800 4746 8368
Vietnam
+84 (0) 8 823 4530
upgraded warranty options
You can select one of the following upgraded warranty options (available in the
U.S. only):
•
Standard Next Day Exchange
•
Accidental Damage Protection with Next Day Exchange
Upgrade your standard factory warranty to three years with the HP SupportPack.
Service coverage begins on product purchase date, and the pack must be
purchased within the first 180 days of product purchase. HP will determine the
hardware service offering based upon the outcome of system self-test programs
run by the customer through the initial call to the HP Product Support Center. If
during your technical support call it is determined that your product needs
replacement, HP will ship you this replacement product next business day free of
charge.
Optional Accidental Damage Protection is also available. This warranty upgrade
protects against accidental breakage such as spills, drops, or falls. Both of these
warranty upgrades offer maximized uptime and productivity, the convenience of
door-to-door pickup with delivery, packaging, and freight prepaid by HP.
For more information call 1-888-999-4747 or visit www.homeandoffice.hp.com
and select warranty upgrades under product support.
27
hp scanjet 4600 series digital flatbed scanners
product specifications and options
a
This section contains the product specifications for the HP Scanjet 4600 series
scanners and accessories.
scanner specifications
Name
Description
Scanner type
Flatbed
Scanner weight
(without holder)
1.4 kg (3.1 pounds)
Holder weight
HP Scanjet 4600: 0.5 kg (1.1 pound)
HP Scanjet 4670: 1.3 kg (2.9 pounds)
Maximum item size
(without holder)
410 x 300 x 17 mm (16.14 x 11.81 x 0.67 inches)
Scanning element
2400 ppi (pixels per inch) linear sensor
Interface
Hi-Speed USB 2.0
Optical resolution
2400 ppi x 2400 ppi
Selectable resolution 12 dpi to 999,999 enhanced dpi at 100 percent scaling
AC line voltage
100-120 V 60 Hz – North America
200-240 V 50 Hz – Continental Europe, United Kingdom, Australia
100-240 V 50 Hz/60 Hz – rest of the world
Power consumption
For power consumption data, see the regulatory_supplement.htm file on
the HP Photo & Imaging software CD.
All HP Scanjet 4600 family scanners are ENERGY STAR compliant. As an
ENERGY STAR partner, Hewlett-Packard Company has determined that this
product meets the ENERGY STAR guidelines for energy efficiency.
28
appendix a
transparent materials adapter (TMA) specifications
The following specifications refer to the transparent materials adapter (TMA) and
not the scanner. The adapter is included with the HP Scanjet 4670 scanner, and
can be purchased separately for the HP Scanjet 4600 scanner.
Name
Description
Media types
1 35 mm slide or 1 frame of a 35 mm negative strip
Media capacity
Slide: 1.05 to 1.9 mm thick and 49.8 to 50.8 mm on any side
Size
24 x 106.8 x 168 mm (0.95 x 4.2 x 6.6 inches)
Weight
0.23 kg (0.5 pounds)
Power requirements
12.0 VDC, 340 mA, 4.22 watts (supplied by scanner)
environmental specifications for the scanner and transparent
materials adapter (TMA)
Name
Description
Temperature
Operating: 10° to 35° C (50° to 95° F)
Storage: -40° to 70° C (-40° to 158° F)
Relative humidity
Operating: 15 percent to 80 percent noncondensing
10° to 35° C (50° to 95° F)
Storage: up to 90 percent at
0° to 65° C or (32° to 149° F)
29
hp scanjet 4600 series digital flatbed scanners
index
A
accessibility website, 23
album
creating on the HP Photo
website, 9
Apple System Profiler, 18
B
buttons
Copy, 2, 8
HP Instant Share, 2, 9, 14, 16
Power Save, 2, 11
Scan, 2, 8
website, 21
environmental
specifications, 29
stewardship program, ii, 21
F
face down scanning, 4
face up scanning, 4
final scan area, 14, 16
H
cables
connecting, 17
types, 17
call support, 23
cancel
printing copies, 8
clean
scanner glass, 12
TMA, 12
contact support, 23
copies
print, 8
Copy button
description, 2
use, 8
customer support, 23
hardware
test mode, 19
help
phone support, 24
support, 23
websites, 23
holder
description, 1
horizontal, 2
place scanner, 2
vertical, 2
horizontal holder, 1, 2
HP Consumer Support
Website, 23
HP Instant Share, 9
use, 9, 14, 16
HP Instant Share button
description, 2
HP Product Support Center, 23
humidity specifications, 29
D
I
destination directory invalid, 17
disabilities assistance, 23
documents
scan large, 10
scanning, 8
driver updates, 23
import scans, 3
install
optical character recognition
software (OCR), 11
Panorama Maker
software, 10
ReadIris Pro software, 10
test hardware, 19
Internet connection
for HP Instant Share, 9
invalid directory or folder
message, 17
C
E
edit text, 11
electrical specifications
TMA, 29
end-of-life return programs, 22
energy consumption
Energy Star, 21
Energy Star
description, 21
L
low-power mode, 11
M
maintain
clean scanner, 12
TMA, 12
merge multiple images, 10
messages
administrative privileges, 17
invalid directory or
folder, 17
N
negatives
adapter, 15
clean adapter, 12
handling, 15
resolution, 13
new drivers, 23
newsletters, 23
O
operating temperature
specifications, 29
optical character recognition
(OCR), 10, 11
P
Panorama Maker, 10
phone support, 24
photo
scan large, 10
pictures
scanning, 8
power consumption
Energy Star, 21
Power Save button
description, 2
using, 11
power specifications
scanner, 28
TMA, 29
preview images
on or off, 11
print
copies, 8
prints
ordering, 9
product specifications, 28
product support, 23
programs
30
index
scan from, 3
R
ReadIris Pro, 10
recycle, 21, 22
register scanner, 23
regulatory information, 21
resolution
slides and negatives, 13
return programs, 22
S
scan
Copy button, 8
from buttons, 3
from HP Director, 3
large items, 10
negatives, 15
overview, 3
positioning, 4
Scan button, 8
Scan button, 2
description, 2
scan documents and
pictures, 8
use, 8
scanner
cleaning, 12
glass cleaning, 12
holder, 1
low-power mode, 11
parts, 1
positioning, 4
31
register, 23
scanning side, 4
storing, 12
viewing side, 4
scanning side, 4
size
scanner, 28
TMA, 29
slides
clean adapter, 12
inserting into adapter, 13
resolution, 13
software
updates, 23
specifications
environmental, 29
product, 28
scanner, 28
TMA, 29
stewardship program, 21
storage specifications, 29
subscribe to newsletters, 23
support
product support, 23
T
technical support, 23
telephone support, 24
temperature specifications, 29
test
scanner hardware, 19
text scanning, 11
TMA
clean, 12
negatives, 15
scan slides, 13
slides, 13
specifications, 29
transparent materials adapter,
see TMA
troubleshoot
scanner hardware, 19
TWAIN, 3
U
update drivers, 23
upgrade warranty, 27
V
vertical holder, 1, 2
viewing side, 4
W
warranty, ii, 20
upgrade options, 27
websites
disability assistance, 23
Energy Star, 21
scanjet, 23
support, 23
weight
scanner, 28
TMA, 29
hp scanjet 4600 series digital flatbed scanners
www.hp.com
Printed in U.S.A. 2003
*Q3122−90111*
Q3112-90111