1
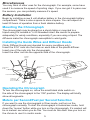
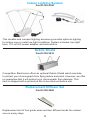
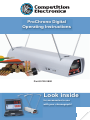
ProChrono Digital
Operating Instructions
Part # CEI-3800
Look inside
for accessories to use
with your chronograph!
Congratulations!
You have purchased a fine quality shooting chronograph.
This chronograph is designed and manufactured in the USA. It’s quality and
accuracy are built in. With proper use and care, it will give you many years
of pleasant, trouble free service.
How It Works
The ProChrono Digital chronograph operates on the principle of measuring
the time it takes for an object to travel from the first projectile sensor to
the second projectile sensor. The sensors, mounted internally in the case,
gather light through the two rectangular openings in the top of the case.
The sensors are actually specially designed electromechanical devices that
can detect changes in light intensity that occur when a projectile interrupts
light rays shining into a sensor when it passes over the opening above.
If you can imagine looking up at the sky through a tube, you will gain an
understanding of what the sensors see. The only light they see is what is
directly above them. Any light blockage caused by an object passing over
them is converted to a signal that is detected by the ProChrono Digital. The
chronograph measures the elapsed time between the light interruptions a
projectile makes as it travels over the front, and then the rear sensor. It then
converts this time into velocity and displays it on it’s front-mounted LCD
screen so that you can read it.
Before You Start, (Or if You Encounter Problems)
Consider The Following
Lighting Conditions
As mentioned above, the ProChrono Digital chronograph is a light-sensing
device. In the course of use, the chronograph must cope with a multitude
of different lighting conditions…sunny clear skies, overcast days, low
light situations, reflections, different colors and shapes of projectiles, etc.
Although the ProChrono Digital works flawlessly over a very wide range of
lighting conditions, there are times when the lighting environment can affect
chronograph performance.
Diffuser Use
It may be counterintuitive, but the best natural conditions for using the
ProChrono Digital chronograph do not occur on a clear, sunny day, but
rather on overcast, cloudy days. This is because the ProChrono Digital
needs a diffused light source to work properly.
1
You can understand what diffused light is by considering two light bulbs.
One light bulb has a clear glass envelope, and one is frosted. The clear light
bulb appears to be brighter when you look at it, but it is also glaring and
gives off uneven light coverage and causes shadows, so it is not as good
for lighting use in most situations. The frosted bulb appears to our eyes as a
round glowing orb of homogenous light. The frosted coating causes the light
to disperse and scatter so that it illuminates in a more even way, providing
better coverage and less shadows. (Note: This is not to say that a frosted
incandescent bulb, by itself, is a good light source when you use your
chronograph indoors. It is not.)
On bright sunny days, you should always use the white plastic diffuser
screens so that the light that the chronograph sensors see from above is
homogenous and scattered. This will greatly reduce errors in velocities and
missed detection.
On an overcast day, it is generally better to remove the diffusers. This is
because the clouds act as diffusers and so no further diffusion is needed;
rather in this case it is more advantageous to allow more light into the
chronograph.
Some Common Conditions that May Cause Problems
You can encounter a wide variety of lighting conditions if you use your
chronograph outside. The following are some things to look out for:
Reflections
On sunny days shiny, light colored or smooth projectiles may cause
reflections which can induce velocity errors. Be sure to use your diffusers
on sunny days. However, this may not be enough, by itself, to correct the
problem.
You can move the chronograph to a location in the field of a shadow cast
by a building or an opaque wall. Make sure the sensors have a clear view
of the sky but the chronograph itself is within the shadow. An alternate
method for this is to use shields taped on the sides of the guide rods to
create the shadow. Be sure to use cardboard or something similar that will
not cause any problems with ricochets. This will eliminate reflections from
direct sunlight, while still assuring that the chronograph has a direct view
of the sky. If you are having problems with reflections from shiny bullets or
arrows, another remedy you can try is to take a black marker and color your
projectiles with it. This will greatly reduce glare and may be needed if you
have to use the chronograph in less than ideal lighting conditions.
2
Trees
Trees do not provide a suitable shadow and in fact you should not locate
your chronograph in the shadow of a tree as it is likely to cause more
problems than it could ever solve.
Sunrise and Sunset
The lighting conditions at sunrise and sunset can cause errors due to
reflections because of the extremely low angle of the sun, or the low light
levels encountered.
Electrical Interference
It is unlikely but possible that use of the chronograph in close proximity to
a radio tower, microwave tower, or large power facility could cause errors
and functional problems. Avoid use in these areas if you encounter these
problems.
Using the Chronograph Indoors
Common problems that occur indoors include the following:
▪ Not Enough Light
Indoor lighting is often not suitable for use with the chronograph. Most
bare incandescent lamps are not a good light source because they
provide an uneven amount of light over the sensing area. A white
background with even amounts of light over the sensing area works
best.
▪ Wrong Kind of Light
Florescent lamps are not at all suitable, because although we cannot
see it with our naked eye, they actually vary in intensity many times a
second and the ProChrono Digital can detect this, which renders it
useless as long as it’s sensors fall under the influence of it.
If you would like to use your chronograph in an area where improper lighting
conditions exist, Competition Electronics offers a specially designed indoor
lighting system. More information on this is found in the “accessories”
section of this manual.
Lighting and Accuracy
Adverse lighting conditions can cause accuracy issues, and having read the
above, you should be able to understand why. Any change in light intensity
that a sensor detects other than the actual passing over the sensor of the
leading edge of the projectile will give errors.
3
Using the ProChrono Digital with Different
Projectile Types
Pistols and Rifles
The main consideration here is probably muzzle blast. Make sure you
stand back far enough from the chronograph to avoid the muzzle blast
triggering the sensors and introducing velocity errors. For pistols, the muzzle
to chronograph distance should be 5 to 10 feet. For rifles, we recommend a
muzzle to chronograph distance of 10 to 15 feet. If muzzle blast is affecting
your readings, move back to resolve the problem. You may also encounter
velocity errors with certain types of shiny ammunition. Try coloring the bullet
tip with a black permanent marker to correct this type of problem. If you are
using a scope, be sure to check the boreline-to-scope distance and aim the
crosshairs on the scope that much higher than the middle of the shooting
area.
Shotguns
To chronograph shotgun loads, stand back at a distance of 5 feet from the
chronograph to the muzzle of the gun. If you stand too far away, the shot
will spread out too far causing inaccurate velocity readings. Also, the wad
will separate from the shot column and may hit and possibly damage the
chronograph. When using sabots or gas checks, there is a chance they
may depart from the projectile path and hit the chronograph. This usually
damages the display.
Bow and Arrow and Crossbow
Make sure that you stand a little more than one arrow’s length away
from the chronograph when shooting to assure that the arrow is not still
accelerating when it reaches the chronograph, otherwise your velocity
readings may be inconsistent. Be aware of shiny arrows and shafts, etc if
you encounter problems.
Paintball Guns
Distance to the muzzle is not a factor with paintball guns, however paint
buildup on the unit may affect it’s performance.. See the CEI Debris Shield
in the accessories section of this manual; it can provide an additional
measure of protection.
Airguns, BB Guns, Pellet Guns and AirSoft Guns
Distance to the muzzle is not a factor with these types of guns. The main
issue here is that BB’s are probably one of the most difficult projectiles
to measure using light-based techniques, because they are round and
shiny. However, at Competition Electronics we achieve good results with
BB’s all the time. You may need to control and modify the lighting conditions
though.
4
Miscellaneous
You may think of other uses for the chronograph. For example, some have
used it to measure the speed of sporting clays. If you can get it to pass over
the sensors, you can probably measure it’s speed.
Battery Installation
Begin by installing a new 9 volt alkaline battery in the chronograph battery
compartment. There is also a space to store a spare. You can expect at
least 20 hours of operation from a fresh alkaline battery.
Mounting the Chronograph
The chronograph may be placed on a sturdy table or mounted to a
tripod using it’s molded-in ¼-20 threaded insert. Be careful to prepare
adequately for windy conditions, especially if you are using a tripod. The
diffusers make the chronograph susceptible to wind gusts.
Installing the Guide Wires and Diffuser Hoods
(Note: Diffuser Hoods are intended for sunny conditions only)
Insert the 3/16” rods into the holes on each side of the plastic diffuser.
Insert one of the rods into the chronograph.
Insert the other rod into the opposite side of the chronograph.
Projectile
Sensors
Battery Compartment
Delete String
Button
Delete Shot
Button
cs, Inc.
ion Electroni
Competit
Display Readout
On/Off Switch
Comm Port
For Remote
Device Connection
o
ProChron
Tripod Mount
Insert 1/4-20 Thread
Review Button
Redisplay
Button
String Change
Button
Operating the Chronograph
To turn the chronograph on, move the small black slide switch on
the side of the chronograph to the “ON” position. The display will briefly
show all segments.
Meters per Second/Feet per Second Selection
If you want to use the chronograph in ft/sec mode, just turn on the
chronograph normally. To start the chronograph in meters/sec mode, hold
down the “review” button while you turn on the chronograph. It’s readout will
be in meters/ sec when you do this. You must do this each time you turn on
the chrono to use it in metric mode.
5
Getting Started: Recording Projectile Velocities
Getting a velocity is a simple as turning on the chronograph and shooting
over it. You must shoot along the long dimension of the chronograph,
within the triangle formed by the rods and the diffuser screens (even if
they are not installed), being careful not to hit any parts of the chronograph.
On detection of the projectile, the display will briefly show the current shot
string and updated number of shots in the string, followed by the velocity
recorded.
Duplicate Velocities
If the chronograph should record 2
shots of the same velocity one after the
other, the “duP” (duplicate) message
will appear (Fig. 2), followed by a single
Fig. 2
digit number representing the duplicate
velocity. If additional shot velocities are
also the same, the number will increment. If 10 sequential duplicate shot
velocities are recorded, the number will be reset to 1.
Low Battery Indication
If the battery voltage becomes low, the
chronograph will flash the word “bAt”
at intervals to signal that it is time to
change the battery.(Fig. 3) If the battery
voltage drops below approximately 6
volts, the low battery indicator becomes
inoperative.
Fig. 3
Error Indication
In the event a signal is recorded by the
first sensor, but no signal is recorded
by the second sensor, an error “Err”
message will flash momentarily.
(Fig. 4) You should try adjusting your
aim position if this occurs.
Fig. 4
Working with Projectile Velocities and Statistics
The Pro Chrono Digital chronograph allows you observe and work with your
velocity data. This is done through the use of the front panel pushbutton
controls, described below. Competition Electronics offers two accessories as
another option for managing the chronograph functions and data remotely.
More information on the Digital USB Remote and Digital Remote Control is
found in the “accessories” section of this manual.
6
String and Shot Navigation
Each time the ProChrono Digital successfully detects a shot, it’s velocity
is stored at the end of the currently selected string. This causes the number
of shot velocities in the string to increase by 1. The currently selected
string holds a maximum of 99 shot velocities.
The Pro Chrono Digital can store up to 9 strings of 99 velocities each and
retain them in non-volatile memory even if you turn the chronograph off
and remove the battery. You can shoot and the chronograph will record
your velocities for later.
Pushbutton Controls
String Change
When the ProChrono Digital is first turned on, it automatically positions itself
at the end of shot string 1 and displays the most recent shot velocity.
By pressing the “String Change” button, the user can sequentially select
each one of the 9 string memories into which the unit will place the shot
velocities as they are detected. When shot string 9 is selected, pressing
the “String Change” button repositions the unit to the last velocity of shot
string 1.
Review Shots and Statistics for a String
The “Review” button will cause the ProChrono Digital to display the
previously fired shot velocity within the current string. On each press of this
button, the previous shot velocity will be displayed, until the user reaches
the first shot in the string. At this point, pressing the “Review” button
again causes the display to begin showing the statistics. The display will
cycle through High Velocity, Low Velocity, Average Velocity, Extreme
Spread, and Standard Deviation. Finally, pressing it again will reposition
the display to show the last recorded shot velocity in the string.
7
NOTE: Most of these statistics are self explanatory, but the following two
statistics may require a bit more explanation:
▪ Extreme Spread(ES)
To get the Extreme Spread, the lowest velocity (for the current string) is
subtracted from the highest velocity.
▪ Standard Deviation(Sd)
Consider an example to illustrate the meaning of standard deviation. If
for example you have a standard deviation of 10 fps with an average
velocity of 1000, 68% of the shots you fire will fall within 990 to 1010 fps.
If you double the 10 fps standard deviation to 20 fps, 95.4% of the
velocities will fall within 980 to 1020 fps. The more shots you fire, the
more accurate the standard deviation. A minimum of 5 shots is needed
and more would be desirable.
TIP: To quickly switch from shot velocities to statistics with large shot
strings, and vice versa, hold down the “Review” button. After a short time,
the unit will switch directly from velocities to the first statistic, or statistics
to the most recent shot velocity.
Delete Shot
While positioned on a velocity, this current velocity can be deleted by
pressing the “Delete Shot” button. When you press this button, the
ProChrono Digital will delete the currently displayed velocity, renumber
all the shot velocities above it in the string, and reposition the display
to the last velocity. It will redisplay the velocity number, which has been
decreased by 1 due to the deletion just performed. Statistics will be
recalculated minus the deleted shot(s). This operation is not reversible.
Delete String
If desired, you may delete all the velocities in the current shot string at
once by pressing the “Delete String” button. This operation is not reversible.
Redisplay
With so many velocities and statistics available for display, it is easy to
forget what you are looking at. The”Redisplay” button will briefly show
you either the string and shot number, or the string and statistic ID. This
allows you to get a second look at the data without scrolling through this
string again.
8
CEI Chronograph Accessories
There are a number of useful accessories available to use with your
ProChrono Digital chronograph listed in the section below.
Digital USB/Remote
Computer-based Remote Control System
Part # CEI-3810
The PCRemote system is a PC program and hardware that allows remote
control of the chronograph, as well as showing you velocities, statistics,
and extended data such as Power Factor and Ft/Lbs. It will also produce
printouts of string and statistics data and shows you color graphs of the
string velocities on screen and print media. It also acts as a remote display.
System includes: Digital remote control, 25 foot connection cable, and
instructions.
9
Indoor Lighting System
Part # CEI-4100
This durable and compact lighting accessory provides optimum lighting
for indoor use or under low light conditions. System includes: two light
bars, 110 volt AC power adapter, and instructions.
Debris Shield
Part # CEI-2519
Competition Electronics offers an optional Debris Shield which can help
to protect your chronograph from flying debris and paint. However, we offer
no guarantee that it will protect your chronograph from damage. This
item is shipped with a protective film to be removed before use.
Replacement Diffuser Set
Part # CEI-2526
Replacement set of four guide wires and two diffuser hoods for outdoor
use on sunny days.
10
Digital Remote Control
Part # CEI-4000
This remote control unit allows the user to control all of the functions of
the ProChrono Digital chronograph from up to 20 feet away. It can interface
with the portable thermal infrared printer, below, to print out all of the
velocities in a string, or to print the statistics or the current string. When
used with the printer, below, it also serves as a remote display by printing
out each shot velocity as it is fired.
The remote control also allows you to interface your ProChrono Digital
chronograph to a PC for collecting shot velocities and statistics data The
Digital Remote requires a serial port or a USB to Serial adapter and a
terminal program, such as HyperTerminal.
System includes: Digital remote control, 25 foot connection cable, and
instructions.
Portable IR Thermal Printer
Part # CEI-1000
This printer can be used to print out shot velocities and statistics. Requires
remote control, above.
Includes paper.
11
SPECIFICATIONS
Velocity Range:
Temperature Range:
Size:
Weight:
Battery Required:
Mounting Hole Thread:
Guide Wire Size:
Memory Capacity:
Minimum Time Between Shots:
Shot Timing Resolution:
Accuracy:
Current Consumption:
21-7,000 feet per second
32-100 degrees Fahrenheit
16x4x3-1/4 inches
2.1 lbs.
One 9-volt alkaline battery (not included)
1/4x20
3/16x16 inches
up to 9 strings of up to 99 shots each
Between 250mSec and 500 mSec
750 nSec Crystal Controlled.
+/-1% of measured velocity, or better
Approx. 15mA
12
NOTES:
NOTES:
Warranty
ProChrono Digital
*****LIMITED WARRANTY*****
COMPETITION ELECTRONICS, INC., warrants the ProChrono Digital manufactured by
it to be free from defects in material and workmanship for a period of 2 years from date of
purchase by the original purchaser for use. COMPETITION ELECTRONICS, INC., at it’s
option, will repair or replace without charge, or refund the purchase price of, any product
which fails during the warranty period by reason of a defect in material or workmanship
found upon examination by COMPETITION ELECTRONICS, INC., to have been the cause
of the failure. This warranty does not cover any failures attributable to abuse, mishandling,
failure to follow operating instructions, alteration or accident.
To make claim under this warranty, the purchaser must return the product to COMPETITION
ELECTRONICS, INC., at the address shown below, properly packed and with
shipping charges prepaid. All claims must be made within (30) days after the product failure
and, in any event, within thirty (30) days after the expiration of the 2 year warranty. All
claims must be accompanied by a sales slip or other written proof of date of purchase.
TO THE EXTENT PERMITTED BY LAW, ANY AND ALL IMPLIED WARRANTIES, INCLUDING
MERCHANTABILITY AND FITNESS FOR PARTICULAR PURPOSE, ARE EXCLUDED;
ANY IMPLIED WARRANTIES NOT EXCLUDED ARE LIMITED IN DURATION TO 2
YEARS FROM DATE OF PURCHASE. INCIDENTAL AND CONSEQUENTIAL DAMAGES
ARE EXPRESSLY EXCLUDED FROM THE REMEDIES AVAILABLE TO THE PURCHASER,
AND THE REMEDIES PROVIDED IN THIS WARRANTY SHALL BE EXCLUSIVE TO
THE EXTENT PERMITTED BY LAW.
(Note: Some states do not allow limitations on how long an implied warranty lasts or the
exclusion or limitation of incidental or consequential damages, so the foregoing limitations
and exclusions may not apply to you. This warranty gives you specific legal rights, and you
may also have other rights which vary from state to state.)
If any product returned by the purchaser is found by COMPETITION ELECTRONICS, INC.,
to require service not covered by warranty, COMPETITION ELECTRONICS, INC., will so
advise the purchaser and request further instructions. COMPETITION ELECTRONICS,
INC., will recondition to working order any ProChrono Digital returned to it regardless of
condition upon the purchaser’s remittance of payment of 1/2 of current retail price, plus
shipping, if it is still manufactured by COMPETITION ELECTRONICS, INC.
Contacting Competition Electronics
Competition Electronics, Inc.
3469 Precision Dr.
Rockford, IL 61109
Ph. 815-874-8001
Fax 815-874-8181
On the web: www.competitionelectronics.com
This manual copyright 2011 Competition Electronics, Inc
All rights reserved.
Rev. B