1
SYSTEM3 POS ‘EDIT FUNCTIONS BUTTONS’
Customizable Function Buttons
The buttons that appear on the far right hand of the 'main menu' screen, as well as the buttons that appear under the 'Options' and
'More Options' tabs can be customized to perform any of these 100+ functions. We highly recommend putting the functions that you
use most, directly on the right hand side of the 'main menu' screen. This will save time in daily operations from having to go back and
forth between the 'main menu' , 'options' and 'more options' screens. Certain functions that we always recommend having in this row
are 'Exit', 'List Functions', and 'Print Receipt', but the choice is strictly up to you.
To change any of these options, you'll need to be on the 'main menu' screen, and you'll have to have a manager's security number.
Go to the 'More Options' tab > on the far right side, you'll see a grey button that runs from the bottom to the top that reads 'Edit
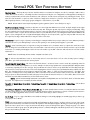
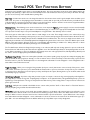
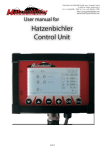
Function Buttons' > press this button > now choose which button you would like to edit > a window will appear (see Figure 1) >
'Caption Name' controls what will appear on the button > 'Function' is what the button will do (See the following descriptions) >
'Get ForeColor' and 'Get Back Color' control the color of
the button > 'Get Font Info' allows you to change the
typeface on the button > 'Font Size' allows you to change
the size of the typeface on the button > 'Visible' checkbox
when checked allows the button to be seen/accessed >
when unchecked the button will be inaccessible (this is a
great way to reduce the number of buttons on screen, and
therefore reduce confusion) > 'Multi-Line' controls
whether or not the 'Caption' will wrap to a second line,
or whether it will try and fit everything on one line. When
finished formatting the button, press ‘Done’ and all
changes take immediate effect. To cancel the changes,
press ‘Cancel’.
NOTE: Any changes to these buttons are reflected
on the current terminal only. To send them to other terminals
> manager side > setup > 'Share Function Button Settings with
other Terminals'
Figure 1
# Pad - Used to input Quantity of an item when the 'Quick Numbers' ('1' to'0' buttons on the main menu) are being used as seat
numbers. To input quantity of an item, press the '#' button > press the amount of the item you'd like to order > press OK > order
the item.
Add Gift Certificate To Order - Will allow a gift certificate to be issued, and charged for on a bill, as if it were an item. This way a
customer can put the entire amount on one bill, and the entire amount can then be pre-authorized (credit card), or settled to any of
the other tender types. The amount of the GC shows up on the tender screen as a payment (negative - Gift Certificates), so that it
will balance with the actual payment type. Positive GC amounts are shown when the GC is redeemed by a customer.
Add Gratuity - To add an automatic gratuity to a bill, select the add gratuity function. There are two options;
1. Auto - If you type in 'a' and press enter, System3 will base the gratuity amount on the number of guests on the bill, as well
as on the preset gratuity percentage that was set for that guest count (manager side > setup > auto gratuity rates). Keep in
mind that upon splitting a bill, if the guest count falls below the count set for auto gratuity, it will not be applied to the bill.
2. Percentage - If you type in '[#]p', where [#] is the percentage amount you want added to the bill. For example 10% would
be 10p.
Add House Account Payment - This button can be used two ways
1. If a customer comes in for dinner or drinks, and wants to make a payment to their House Account (to pay the balance
-1-
SYSTEM3 POS ‘EDIT FUNCTIONS BUTTONS’
down), use this button. Retrieve the order > press the 'Add House Account Payment' > a number pad appears > fill in the
amount of the payment > answer 'yes' or 'no' to the 'are you using a House Account Swipe Card?' question, depending on
whether or not they are using the card > if 'yes' swipe the car; if 'no' select a name from the House Accounts list > the pay
ment does not appear on the order list window (it is not a sale) > but when the tender screen appears, a negative amount
to 'House Accounts' will appear (to decrease the balance)
3.The function can also be used to issue 'Gift Cards' (like Gift Certificates, but on a magnetic card that can be branded, and
used over and over). To issue a gift card > ensure you have some programmed magnetic swipe cards > press the 'Add House
Account Payment' button (it may also be called 'Issue Gift Card') > fill in the amount of the Gift Card on the number pad
that appears > answer 'yes' to the question 'Are you using a House Account swipe card' > swipe the card through the mag
netic card reader > proceed with the order as normal.
Add Item Message - On occasion,you will need to add a very specific preparation message to a specific item, and that prep instruction is not available on any of the existing modifier pages. To add a message to an item > select the item that you would like to add
the message to > press ‘List Functions’ > press ‘Add Message’ > a keyboard will pop up, allowing you to type in a message > when finished press OK > a confirmation message ‘You message was successfully attached’ will appear > press OK again > you will notice that
the message does not appear in the order list window, but WILL BE attached to the item when it prints at the kitchen/bar printer.
NOTE: This function may be disabled by management, and its use will be protected by the management authorization
screen. If this is the case, you will need a manager to complete the function.
Add Tips to Credit Cards - When using the charge card interface, tips need to be added to charge cards for proper batching and
reporting. To add tips to a credit card > press the ‘Add Tips to Credit Cards’ button > all bills settled to credit cards will appear in a
small window > select the payment that you would like to add a tip to > press ‘Add Tip’ > fill in the amount of the tip > press OK.
Apply Promo - A promo is a special offer for a customer. Promos can take many forms - buy one get one free - buy a certain amount,
print a coupon, etc. To apply a promo to a bill > retrieve the order > press the 'Apply Promo' button > a list of ALL currently running promotions will appear > select the promo you would like to apply > if the order meets the criteria of the promo, it will be
applied > if it doesn't, the message 'The items don't meet the required criteria for this promotion'.
NOTE: Depending on how a promo is set up by your system administrator, the promo may apply Automatically.
Assign Drivers to Orders - This button will bring up the 'Assign Drivers' screen, used to assign delivery drivers to specific orders.
This button is sometimes called 'Dispatch'.
Cash Advance - If a customer wants to 'borrow' money from the bar, or server (to play pool, video games, the jukebox, make a phone
call) > retrieve the order > press the Cash Advance button > enter the amount on the number pad that pops up > press OK.
NOTE: The amount is added to the customers bill, but is NOT added to sales.
Check ID - To verify the age of a guest > obtain the Drivers License in question > press the Check ID button > swipe the license
through the magnetic card reader > Name, age and birth date info are all displayed boldly on the screen.
Clean Screen - To clean the touch screen > press the ‘Clean Screen’ button > the touch screen will be disabled for 10 seconds, allowing you to wipe the screen without selecting any buttons.
Clear All New - To delete all new items added to the order > select ‘Clear All New’ > press 'Yes' when asked 'Are you sure…?'
Closed Orders - Will display a screen showing all orders that were closed (the current days orders will display by default. Use the
Choose Date button to select a different day). This function can only be accessed by managers.
Comp Item - ‘Comp’ is short for complementary, so to ‘Comp’ an item, is to make it free for the guest. Comps require management
authorization to perform. Select the item(s) that you want to comp, and press the ‘List Functions’ button > when the Window pops
up select the ‘Comp Item’ button > the management authorization window will pop up > once authorization is entered > select a
reason for the comp from the pop-up list. The item will remain on the bill, but will have a zero charge, this way it can be ‘uncomped’,
and it will show up on reports as a sold item, with a zero total.
-2-
SYSTEM3 POS ‘EDIT FUNCTIONS BUTTONS’
Delete Item - Deletes the selected item, or items. If the item(s) was previously sent, management authorization, and a reason for the
delete will be required.
Discount Item - Discounts can be applied in a number of different ways. They can be discounted by a specific dollar amount, or they
can be discounted by a specific percentage, depending on how it is set up by your manager. Additionally, miscellaneous dollar amount
discounts can be applied. If an entire bill can be discounted (instead of item speicifc), perhaps using the discount function ‘Discount
Order’ may be a better idea.
Select the items that you would like to discount > press the ‘List Functions’ button > press the ‘Discount Item’ button > choose
the discount you would like to apply > if it is a miscellaneous $ amount discount, press the ‘Enter Misc. Amount’ button near
the bottom of the discounts page > the management authorization screen will appear > enter management auth > the item is
now discounted by the selected amount, and will change color to dark purple, to indicate that it has been discounted.
Discount Order - See the above section on ‘Discount Item’
Don't Make/Reprint - (formerly the ‘Make New/Old’ function) - To ring in an item that you don’t want printing at the kitchen/bar, select
the item that you don’t want to print > press the ‘List Functions’ button > press the Don’t Make/Reprint button > the message ‘Do
you want this item to print at the Kitchen/Bar? Yes/No?’ will appear > select No, and the item will not print to the kitchen/bar.
To force an item to print again to the kitchen or bar, without ringing it in again > select the item(s) that you would like to reprint
> answer Yes to the question ‘Do you want this item to print at the Kitchen/Bar? Yes/No?’ > the management authorization
screen will appear > enter management auth > the item wil reprint to the kitchen/bar.
Drop Cash - This feature is used to either start a float, or to hand off cash to a manager if you have too much.
1.To Start a Float - A float is an amount of money that is lent to a server/bartender from the management, for the purpos
es of making change > Select the Drop Cash button > answer 'no' to the question 'Are you giving cash to a manager? If you
choose 'No' it will be treated as starting or adding to a float?' > a number pad titled 'Adding $ to a Float' will appear, allow
ing you to enter an amount for your float > enter the amount > press OK > a receipt will be printed
2.To Drop Cash - A cash drop is used by servers or bartenders who feel they have too much cash on their person, or in their
cash drawer, and they want to give some of it to a manager to put in the safe/office. > answer 'yes' to the question 'Are you
giving cash to a manager…?' > a number pad titled 'Giving Cash to a Manager' will appear > enter the amount of the drop
> press OK > a receipt will be printed.
Edit Group - Same as 'Edit Group Description' under List Functions window. Instead of using seat numbers to keep items on a bill
organized, they can be associated to group names.
For example, four people sit down and order some items, and inform you that they will be on two tabs. You ask them their
names > ‘Jim’ and ‘Bob’ > ring in the items as normal > send to the kitchen > highlight the items for ‘JIm’ > press ‘Edit Group
Description’ > fill in the name on the keyboard > press ‘Enter’ > select the items for ‘Bob’ > press the ‘Edit Group Description’
> fill in the name on the keyboard > press enter. Now, when you would like to split the bills, go to the options Tab on the Main
Menu, and find the ‘Split by Group’ button > press it > a window with a list of group names associated with this bill appear >
select the Group name that you would like to print > press OK > a new window will appear with the items for that group separated > ensure that they are correct (if not, simply touch them to move them back to the bill) > and press OK > the bill for
that Group will print out > if you have more than one group > the window that allows you to select the group name will pop
up again > if you want to continue splitting and printing the bills, select the group and press OK> if not, press cancel to return
to the order
If the ‘Group’ button is enabled (on the far right side of the main menu screen), you will be able to create a group name
AS YOU ORDER. Before you order an item, select the ‘Group’ button, fill in a name for the group, and ring in the items that
you need for that group > press the ‘Group’ button > the keyboard will pop up again> fill in the name of the next group > and
so on.
-3-
SYSTEM3 POS ‘EDIT FUNCTIONS BUTTONS’
Edit Prep Group - The Prep Group of an item describes what it is, and where it will print on a bill. For example, a table orders a
‘steak’, and an order of ‘nachos’. Normally, the ticket in the kitchen would print out ‘***Appetizers’ and all appetizers (including the
nachos), would print first, and the ticket would then read ‘***Entrees’, and all entrees would print out (including the steak). If you
want the order of ‘Nachos’ to print out under ‘***Entrees’, simply select the nachos > press the ‘List Functions’ button > press the
‘Edit Prep Group’ button > a list of prep groups will appear > select ‘Entrees’ > press OK.
NOTE: All items with the same Prep Group will print together, regardless of where on the bill they were rung in.
Edit Price Level (Item / Order)) - Certain (or all) items on a menu might have different “Price Levels’. A simple example of this might
be a restaurant that offers the same items at dinner, that they offer during the day, and only the price changes (automatically). Using
the same example, there may be situation where a customer comes in at night and wants the Lunch portion (and price). Ring the item
in as normal > select it > press the ‘List Functions’ button > press ‘Edit Price Level’ > the Management Authorization Window will
appear > enter management auth > a keyboard will appear, asking for the new price level > type it in and press OK > the item will
be re-priced according to what is filled in for that price level, on that item.
Edit Quantity - If you've rung in a quantity of something (for example 3 Miller Lites), and you realize you need a different quantity >
select the line item > press Edit Quantity > enter the new quantity on the number pad that appears > press OK.
Edit Seat - Some restaurants prefer to ring items in using seat numbers, as it is sometimes easier to separate the checks at a a later
time. To change the seat number that an item is associated with > select the item > press the ‘List Functions’ button > press the ‘Edit
Seat’ button > a number pad will appear > fill in the new seat number > press OK > that item will now have the new seat number
attached to it.
NOTE: Unless entered already, all items will have a ‘default’ seat number of ‘0’.
Exit - To exit from the Main Menu screen to the Security Screen > ensure that there is not an order currently open for editing >
press Exit > you will be returned to the Security Screen
Force Default RC, Default Menu - RC is short for 'Revenue Center'. A revenue center is used to track sales separately, under the
same roof. The easiest way to explain it is to use the example of a dual concept quickservice restaurant (KFC/Taco Bell) that wants
to track sales separately for the two concepts. They would have two revenue centers set up called 'KFC' and 'Taco Bell', with separate menus.The counter person doesn't need to know anything about revenue centers, as we would label the buttons 'KFC', and 'Taco
Bell'. The underlying functions of those buttons might be 'Force RC 1, Menu 1' - 'KFC', and 'Force RC 2, Menu 2' - 'Taco Bell'. That
way when a counter person is in the middle of an order on the 'KFC' menu, and the customer wants to have some 'Taco Bell' items,
they just press the button labeled 'Taco Bell', and System 3 knows that this button's function is to 'Force RC 2, Menu 2'. The menu
will switch, and sales will be attributed to the 'Taco Bell' revenue center.
NOTE: System3 will automatically switch back to the default menu/default RC, when the 'Send', 'Close Check', or 'Fast Cash' button
is pressed. The default menu is controlled by the Menu Scheduler.
Force RC 1 - Default Menu, Force RC 2 - Default Menu, Force RC 3 - Default Menu, Force RC 4 - Default Menu - See the above
explanation
Force Menu 1, Default RC / Force Menu 2, Default RC, etc - To switch quickly between menus in a restaurant that has more than
one menu (lunch, dinner), you can use these buttons. Simply change the caption of the button to 'Lunch' or 'Dinner', and set the function to 'Force Menu [#], default' where '#' is the number of the menu that you want to switch to.
Go To Mods - To go to a page of Modifiers in the middle of making an order, simply highlight the modifier page that you want to go
to, and press "Go to Mods'.
Group - The 'Group' button works hand in hand with the 'Split Order by Group' function. It allows servers to ring in orders under
group names instead of by seat number.Touch the 'Group' button, and the keyboard appears, allowing you to fill in the group name >
type in the name > press enter > ring in the items for that Group > press the Group button again to change the group > etc. When
it comes time to bill the group, press the 'Split by Group' button > a window will appear with all Group names in it > select the group
that you want a bill for press OK > etc.
-4-
SYSTEM3 POS ‘EDIT FUNCTIONS BUTTONS’
Hold Item / Unhold Item - Used to time orders to the kitchen. If you want to ring an entire order, but only send part of it to the
kitchen, select the items that you wish to HOLD back from printing. They will turn blue to remind you that they are held. To make
the items print to the kitchen, select the blue color-coded items and press the UNHOLD button. The items will then print to the
kitchen.
House Accounts - This button will bring up the System3 House Account Manager for anyone that has been given access to house
accounts in their employee security profile.
House Account Balance - If a customer wishes to check their
house account balance, a server can press this button >
select the account from the list > and the house account balance will show on screen.
Issue Gift Certificate - Come back
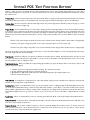
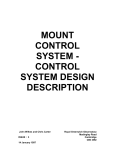
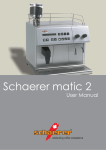
Item Functions - The 'Item Functions' button is a powerful
tool for managers. See Figure 2. With it you can:
Edit Price - Change the price of an item on the fly.
Press 'Item Functions' > the button will change name to
'Touch Button', which is a prompt for you to choose a button that you want to change > choose a button > the 'Item
Functions' window will appear > touch 'Edit Price' > a number pad will appear, prompting for the new price > fill it in >
press OK > answer 'Yes' to the 'Are you sure…?' question
> press 'Done' > the change takes effect IMMEDIATELY on
all terminals.
Edit Description - To change the name that appears
on the button > press the 'Item Functions' button > now
choose the button you want to edit > when the 'Item
Functions' window appears press 'Edit Description > enter the new name of the item > press 'Enter'> answer
'Yes' to the 'Are you sure…?' question > press 'Done' > the change will take effect immediate ly on all terminals
Figure 2
Start Countdown - If only a limited quantity of a particular item is in stock, a countdown can be used to limit staff from ordering an item that isn't there. Determine how much of an item you have > press the 'Item Functions' button > press the 'Start
Countdown' button > fill in the amount of items left > press 'OK' > answer 'Yes' to the question 'Are you sure…?' > a small yellow
box will appear in the bottom left corner of the item button, with the number of items left > as items are rung in, this count will
decrease > when it gets to 0, an 'x' will appear in the yellow box, and servers will be unable to order it without management auth.
Stop Countdown - Will terminate the countdown on that item.
View Recipe - If a recipe has been built for an item, you can view it using this function.
Line - The 'Line' button has two purposes:
App Line - In situations where customers order multiple courses all at once, servers can use the 'Line' button to put a long
red line on the print ticket. This would indicate to the kitchen that the items before the line are the first course, and items
after the line are the next course, etc.
Pizza Pricing - When using System3 in Pizza restaurants, the 'Line' button can be used to mark different 'sides' of the pizza. (If
customers want ½ toppings, etc.)
-5-
SYSTEM3 POS ‘EDIT FUNCTIONS BUTTONS’
List Functions - Sometimes the name of this button is changed to 'Delete / Keep'. The 'List Functions' button , when pressed while
an item or items are highlighted, will bring up the 'List Functions' window, allowing you to perform a variety of functions on the items
highlighted. For more info on these functions see the section in the 'System3 User Manual' titled 'The List Functions Window'.
Long List View - The order list window, by default, will show line items of 'Discount', 'Gratuity', 'Tax', and 'Grand Total'. Because of all
of these lines, the size of the order list window is somewhat limited. To expand the length of the window, and hide these line items,
press the 'Long List View' button.
Main Menu - When on a page of items, or a page of modifiers, the 'Main Menu' button will return you to the main menu, allowing you
to choose another menu group.
Misc. Item - Sometimes used as an 'Open Food' or 'Open Liquor' button, the 'Misc. Item' button allows servers to ring in an item that
is not on the menu. The properties (taxes, printers, etc) of the 'Misc. Item' button will need to be set up in the 'Menu Setup' screen
before it can be used. To use it > press 'Misc. Item' > a keyboard will appear allowing you to fill in a description of the item (it will
print to the kitchen/bar) > press 'Enter' > fill in the price of the item on the number pad that appears (this will also print to the
kitchen) > press OK. This button can be set to require management authorization.
Misc. Modifier - Used the same as the above button, but used for entering miscellaneous modifiers.
Multiply Quantity - If an item is rung in, complete with modifiers, and the server realizes that he/she needs more than one of the item
> select the item > press 'Multiply Quantiy' > fill in the quantity of the item > press OK > both the items AND the modifiers will be
multiplied by that amount, and prices will reflect the change.
Next Page - Sometimes, either the main menu or a page of items will be too large to fit all on one screen. If this is the case, the 'Next
Page' button will take you to the next page of menu groups, or menu items. If there is no next page, this button will do nothing.
Next Seat Number - When using seat numbers to ring orders in, this button will change the seat number to the next higher number
> press 'Seat #' > fill in the first seat number > ring in the items for that seat number > when ready to move to the next seat number, press the 'Next Seat' button > ring in the items for that seat number > etc.
Order Type 0-3 - The default order types that correspond with these numbers are: 0 - Normal (Dine-In), 1 - Delivery, 2 - Takeout, 3
- Drive-Thru. To use them: In a dine-in restaurant that does some take-out, put an 'Order Type 2' button on the right side of the main
menu screen (you can change the caption to 'Take-Out') > take the order as you normally would, but before pressing 'Send' > press
the 'Take-Out' button > the order will then be treated as a takeout order (it will print to the kitchen as 'Take-Out', any discounts affiliated with that order type will be applied, reports will reflect sales correctly for that order type).
Paid Out - Use the 'Paid Out' button to make any cash disbursements directly from the cash drawer. > press the 'Paid Out' button >
if you have common paid out reasons set up (manager side > setup > paid out reasons), this list of reasons will pop up > either choose
the reason from the list, or select 'Enter Reason' from the list > this will pop up a keyboard > fill in the reason for the paid out > fill
in the amount > the cash drawer will open > and a receipt for the transaction will be printed. The 'Paid Out' button is also available
on the Manager Side. (manager side > reports)
Phone Number - Used to bring up the phone number entry screen, which is used in delivery operations, as well as to track 'Customer
Loyalty' profiles. The Terminal Option (manager side > terminal options > program flow) to 'Allow use of Customer Loyalty' must be
turned on to be able to use this feature.
Pick Cash Drawer - When using multiple cash drawers, the 'Pick Cash Drawer' button allows you to change the cash drawer that you
are currently using. To use it, you must have cash drawer access turned on in your employee security profile > press 'Pick Cash
Drawer' > choose which cash drawer you would like access to.
Postponed Orders - Orders that have been sent, but marked as 'Postponed' won't show up on the regular order list window. To have
them show, use the 'Postponed' orders button. Once the postponed orders are listed, they can be activated from this screen as well.
Pre-Auth - Used to Pre-Authorize a credit card transaction. For example, a customer orders a beer and wants to start a tab using his
credit card > the bartender would ring in the beer > press the 'Pre-Auth' button > fill in the amount that he wants to 'Pre-Auth' the
-6-
SYSTEM3 POS ‘EDIT FUNCTIONS BUTTONS’
card for > swipe the card > the bill will then have this Pre-Auth amount > when closing the bill, System3 will ask you if you want a
'New method of payment, or if you want to use the Pre-Auth card > if you choose the card, System3 will then authorize the card for
the actual amount.
Previous Menu - Used in situations where sub-menus are involved. When on a page of items that lie beneath a sub-menu, the 'Previous
Menu' button will take you back to the Sub-Menu level. Pressing it again at this level will bring you back to the Main Menu.
Previous Page - Used in conjunction with the 'Next Page' button, the previous page button will take you back one page on a menu
screen that is more than one page long.
Printer Profile - Printer profiles allow you to create 'Smart' printing situations, whereby printing can be rerouted to different printers
in the kitchen. Some restaurants use this where they have a large kitchen that has 5 cooking stations on the weekend, but only 3 during the week, and therefore need 5 printers to print the same thing on weekends, that 3 printers print during the week. To use the
profiles, they must be first created (terminal options > printer setup > printer profiles).There are three different options for printer
profiles:
Network - This option changes the profile across the entire network, and the change remains in effect until it is changed again.
Temporary - This option changes the profile on the current terminal only, for the current order only.
Terminal- This option changes the profile on the current terminal, and the change remains in effect until it is changed again.
To change the profile > choose the option above that suits you > a list of profiles will appear > choose the appropriate profile > press
OK > the change will take effect immediately.
Print Receipt - This button will print a receipt for the bill that is currently open for editing. System3 will ask 'Do you want to send
this order now that you have printed a copy? Yes/No?' > choose 'Yes' if you would like to exit the Main Menu screen > choose 'No'
if you would like to carry on editing the order.
Print Receipt Screen - Gives you 3 different receipt printing options.When you press this button with an order that is open for editing, four large buttons appear:
1. Standard - Prints the receipt with standard formatting. No subtotals are printed.
2. By Seat - Will break the bill down into subtotals by Seat #.
3. By Department - Will break the bill down into subtotals by Department (Food, Liquor,Wine, etc.)
4. Cancel - Cancels the print job.
Print Schedule - If management is using System3 to create and maintain employee work schedules, those employees can print their
schedule to the receipt printer using this button.
Recall by Table - When on the Main Menu screen, you can open specific order for editing by using the 'Recall by Table' function button. Press the 'Recall by Table' button > fill in the exact table name (number) > press 'Enter' > the order should now be open for
editing. NOTE: Using this function while an existing order is already open for editing will cause System3 to prompt with 'This action
will combine multiple orders. Do you wish to continue?'. If you choose 'Yes' the current order will be combined with the 'recalled'
order.
Recall Order - When on the Main Menu screen, you can bring up the Retrieve Order screen by pressing the Recall Order button..
Refresh Network - In situations where a terminal may have ‘fallen’ off of the network, the ‘Refresh Network’ button will make a network call to try and update network info.
Remove Discount - On occasion it will be necessary to remove a previously applied discount from an item. To do this > select the
item > press ‘List Functions’ > press ‘Remove Discount’ > answer ‘Yes’ to the question ‘Are you sure you want to remove the discount from this item?’ > the item will then be regular price.
-7-
SYSTEM3 POS ‘EDIT FUNCTIONS BUTTONS’
Remove Last - This function will remove the last item rung in (not sent) on the currently active order.
Remove Payments - When payment of a bill has been split up into multiple payments, it is sometimes necessary to remove any payments that were already made on the order. To do this, press 'Remove Payments' > answer yes to the question 'Would you like to
remove all payments on this order?' > the payments are then removed.
Reorder Item - If you would like to re-order an item or items > select the item you would like to reorder > press the ‘List Functions’
button > press ‘Reorder Item’ > the items (including any modifiers that were previously rung in) will then appear in the order list window > ring in any other items that you might need > press ‘Send’. This function can be used before sending an order. This would be
handy in a situation where a customer orders a pizza with numerous toppings, and then says ‘Make it 2 pizzas, with the same toppings’
> simply select the pizza, and press the ‘Reorder Item’ button, and the pizza will be reordered, along with all toppings.
Reorder Round - Used to reorder a 'Round' of items. System3 defines a round's beginning as when the order was reopened and 1
item is added. The round's end is defined at when the send button is pressed. To use the 'Reorder Round' function > press 'Reorder
Round' > a window will appear, with a list of all rounds that were rung in > select the round that you would like to reorder (it can
be more than one) > ensure that you've got the correct items > press 'Send'. NOTE: The 'Reorder Round' function does NOT distinguish between food and beverage items, so if there were food items rung in on a round that you are reordering, they will have to
be manually removed before pressing the 'Send' button. Otherwise, food items will be re-sent to the kitchen.
Replace - On occasion, in the middle of the ordering process, you’ll realize that you’ve rung in an incorrect item/modifier (for example ‘medium well’ instead of ‘medium rare’, or large pizza instead of small pizza). To take you back to the page that contained the modifier or item that you rang in, highlight the mistake > press the List Functions button > press the ‘Replace’ button > the page that contained the original modifier will pop up > choose the correct modifier > continue with the ordering process.
Report Batch - If there has been a report batch created (manager side > reports > batch reports), you can run the batch from any
terminal that has this function turned on. To use it, simply fill the 'Caption' for this button in with the EXACT name of the report
batch.
Reprint Last Receipt - Prints a copy of the last order that was edited, tendered or printed.
Reservations - This will bring up the reservations screen, which will allow you to create and/or edit reservations.
Seat # - Used to enter the seat number that you want associated with an item. Press the 'Seat #' button > fill in the seat number >
any items rung in until the seat number is changed, or until the 'Send' button is pressed will be associated with this seat.
Send Keep Open - The default behavior for System3 is to close the editing of the current order upon 'Send'. To send the order to
the kitchen/bar, but keep the order open for editing, press the 'Send Keep Open' button.
Send Fire - Traditionally used to time the courses in an order, sending 'Fire' tells cooks to cook the order that was sent. Servers ring
in the entire order, but the kitchen doesn't make anything until they have received a 'Fire' message. Press the 'Send Fire' button > a
list of available printers appears > select the printer that you want to 'Send Fire' to > press 'OK' > fill in the table number that you
want 'Fire'd > press 'Enter'
Send Message - To send a message to any printer on the network, press the 'Send Message' button > select the printer from the list
of available printers > type in the message > press 'Enter'
Split Item - The best way to explain the ‘Split Item’ function is by using a couple of examples.
Esample 1 - In order to save some time ringing in the same item repeatedly, you’ve chosen to ring in a quantity of an item,
and then the actual item. ie: ‘3’ > ‘Miller Lite’ , instead of ‘Miller Lite’ > ‘Miller Lite’ > ‘Miller Lite’. In the order list window you
see,
[a] 3
Miller Lite
15.00
-8-
SYSTEM3 POS ‘EDIT FUNCTIONS BUTTONS’
and not,
[b] 1
1
1
Miller Lite
Miller Lite
Miller Lite
5.00
5.00
5.00
Which was fine, until the customer told you that they want each of the 3 beers on a separate tabs. To make [a] look like
[b], select the item you would like to split - in this example the 3 Miller Lite - and press the ‘List Functions’ button > press the
Split Item button > a number pad appears, asking you for how many ways you would like the item split up > in this case, press
‘3’ > now the order list window should look like [b], which will allow you to now separate the tabs.
Example 2 - You’ve rung in a bottle of wine at a table of 4, and the two couples want to share the cost of the bottle of wine.
In the order list window you see;
1 Bottle Valpolicella
35.00
To split the wine bottle two ways, select the bottle > press the ‘List Functions’ button > press the ‘Split Item’ button > a
number pad will appear asking you how many ways you would like to split the item up > in this example, press ‘2’ > you will
then see in the order window
0.5 Bottle Valpolicella
0.5 Bottle Valpolicella
17.50
17.50
Which will now allow you to split the two halves of the bottle of wine, on to two separate bills.
NOTE: You can split an item into as many ways as you like. An item has to have been sent, before it can be split.
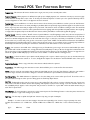
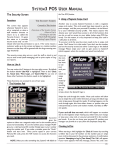
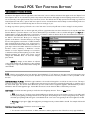
Split Order - Will allow you to create 'Separate Checks'. Press the 'Split Order' button > a new 'window' appears to the right > select
items (by touching them) that you want on the new bill > the items will
jump to the new bill as you touch them > if you make a mistake, touch
the item in the new 'window' to move it back > when satisfied with an
order > press OK > this bill prints out, and a new blank window appears,
allowing you to continue with the splitting > continue splitting until done
> press OK > bills will be numbered the same as they were originally but
the first bill will have an 'A' at the end of it, the second bill will have a 'B'
at the end of it, and so on.
Split Order by Group - If you have entered items using Group names you
can now split them > press 'Split Order by Group' > a list of available
groups appears > select the group (or groups) > press OK > all items
ordered for that group will appear in the new window > ensure that they
are correct > press OK > continue splitting at will.
Split Order by Seat # - See the explanation above on 'Splitting by Group',
but use 'Seat #' instead.
Figure 3
Split Order Evenly - Will split the bill in as many ways as you specify > press 'Split Order Evenly' > select how many ways you would
like the bill split > press OK > System3 tells you 'The bills have been split evenly. You can retrieve them…Would you like to print
copies of the bill?' > press 'Yes' if you want the bills printed. NOTE: Splitting bills this way may result in some ITEMS being split into
fractions, as System3 splits the bill EXACTLY as you specify.
Split Order Screen - Now, instead of having to choose one of the options above to split a bill, the 'Split Order Screen' will provide
you with all of these options on one screen. The current bill will appear on the left side of the screen with several blank boxes next
to it. To split the bill manually > drag items from the original bill to a blank window > each window represents 1 new bill > continue dragging items to the different bills until satisfied > if you have more than three new bills to create, use the arrows to navigate left
-9-
SYSTEM3 POS ‘EDIT FUNCTIONS BUTTONS’
and right to more new bills > press 'Done' > the new bills will print. The screen also allows you all of the other splitting options (by
Group, by Seat #, Evenly). It places the items automatically into the new windows, but does not print until you hit done. This way,
you can ensure accuracy of the new bills before printing them.
Stop Timer - Certain items can be set to be charged for based on the amount of time used. A good example of this would be a pool
table rental. If a person is done playing pool, but would like to continue with an open tab, you would select the pool table from the
order list window > press the ‘List Functions’ button > press the ‘Stop Timer’ button > the timer on the item is stopped immediately, and the charge is calculated (based on the number of minutes used)
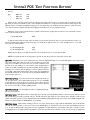
Summary Screen - The following screen can be accessed one of two ways.(See Figure 3., previous page) It can be accessed manually
by pressing the 'Summary Screen' option button on the Main Menu page, or it can be set to pop up automatically after the 'Send' button is pressed. The latter way is set up in Terminal Options > Program Flow > Use Summary Screen on Send.
This screen gives an order taker one more chance to make changes to an order. These changes can be to the order itself, or they
can modify a number of other things. At this point you can correct customer info by using the 'Correct Info' button. Both the 'Promo'
and the 'Discount' buttons display a drop down list of available Promos and Discounts. The user has to simply choose which one to
apply and price information is automatically updated and displayed along the bottom of the screen. There are different prices under
different order types because discounts can be set to automatically apply depending on whether it's a delivery, take-out or dine-in
order. These prices will also take Delivery Surcharges into consideration.
The 'Pre-Auth' button allows for Charge Card processing on an order, but will only work if using System3 to process credit cards.
'Remove Discount' will cancel any discounts that were applied in error. And 'Print Receipt' allows for check printing before the order
is sent. When everything is to the users satisfaction, they simply choose the order type (Drive-Thru, Pick-Up, Delivery, Dine-In) and
the order is sent to the appropriate printers/kitchen displays.
Tax Exempt Item / Order - There are certain places (Canada is one) where specific groups of people are exempt from paying sales
taxes (in Canada, all native peoples are exempt). In order to make an item, or items, tax exempt > select the item(s) > press the ‘List
Functions’ button > press the ‘Tax Exempt’ button > the management authorization screen will appear > enter management auth >
taxes will be removed from these items.
Toggle Pour State - When you are using the Berg interface (for liquor control) this function comes in handy. Every time a server
sends a drink, the drink is put into a 'pool', which will allow the bartender to pour it at his station. If they want to pour a drink for
a customer and not decrement it from the liquor pool, they would press this option, allowing them to pour the drink, which would
automatically ring up on System3.
Upload Logo to Receipt - If you have a logo that you want to print on receipts > ensure the logo is sized properly, and in digital format (.bmp files) > rename the logo file 'receiptlogo.bmp' and place it in the System3 folder (c:\ProgramFiles\System3) > press the
'Upload Logo to Receipt' button. The logo is then placed in the flash memory of the receipt printer. It may need to be redone if the
printer gets turned off.
Void Mode - Will place the terminal in Void Mode for the current order (until the 'Send' or 'Close Check' or 'Fast Cash' button is
pressed). Anything rung in will be decremented from sales.
Waste Item - If an item is rung in, and is made, but something happens to it (dropped, cold, customer hates it), it will need to come
off of the bill, but it will also need to be accounted for, for inventory purposes. This is where the ‘Waste Item’ function comes in
handy. To ‘Waste’ an item > select the item from the order list window > press ‘List Functions’ > press ‘Waste Item’ > the management authorization window will appear > enter authorization > select the reason for the waste from the window that pops up >
press OK > the item will disappear from the bill, but will show up in any Waste report run by management.
-10-