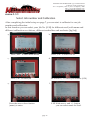
1
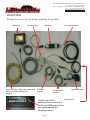
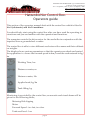
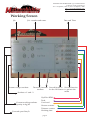
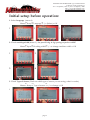
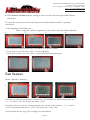
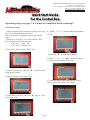
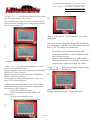
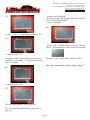
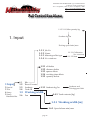
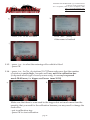
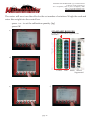
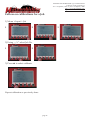
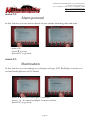
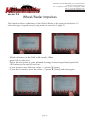
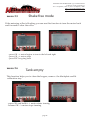
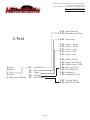
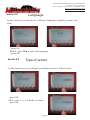
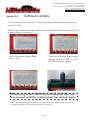
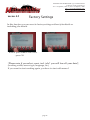
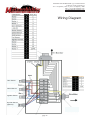
THOMAS HATZENBICHLER Agro-Technik GmbH
A-9433 St. Andrä, Fischering 2
Tel: ++43 (0)4358 / 2287–0 / Fax:++43 (0)4358 / 2208
http://www.hatzenbichler.com
[email protected]
User manual for
Hatzenbichler
Control Unit
page 1
THOMAS HATZENBICHLER Agro-Technik GmbH
A-9433 St. Andrä, Fischering 2
Tel: ++43 (0)4358 / 2287–0 / Fax:++43 (0)4358 / 2208
http://www.hatzenbichler.com
[email protected]
Table of contents:
Overview
Hatzenbichler Control Box Operators Guide
Understanding the Control Box
Working Screen
Initial Setup Before Operation
Short Instruction
Menu 1 Input
1.1.1 Select Job Number
1.1.2 Job Name
1.1.3 Metering Roller Type
1.1.4 No. Rotation
Follow On Calibrations For Job
1.2. Reset Counter
1.3. Seedrate
1.4. Tank Fill
1.5 Working Width
1.6 Fan
Menu 2 Special
2.1 Alarms
2.2 Alarm protocol
2.3 Illumination
2.4 Wheel/Radar impulses
2.5 Shake free mode
2.6 Tank empty
2.7 Correction factor
Menu 3 Test
3.1 Simulation (Test)
3.2 Keys
3.3. Input
3.4 Voltage
3.5 SW Version
4. Menu 4 Setup
4.1 Clock/Date
4.2 Language
4.3 Type of sensor
4.4 Software update
4.5 Factory settings
Wiring Diagram
page 2
page 3
page 4
page 5
page 6
page 7-8
page 9-11
page 12
page 13
page 14
page 14
page 14-15
page 16
page 17
page 18
page 18
page 19
page 19
page 20
page 21
page 22
page 22
page 23
page 24
page 24
page 25
page 26
page 27
page 28
page 28
page 29
page 29
page 30
page 31
page 32
page 32
page 33
page 34
page 35
THOMAS HATZENBICHLER Agro-Technik GmbH
A-9433 St. Andrä, Fischering 2
Tel: ++43 (0)4358 / 2287–0 / Fax:++43 (0)4358 / 2208
http://www.hatzenbichler.com
[email protected]
Overview
Wiring loom for Air 8 electric and Air 16 models
Monitor
Motor
Junction box
Power supply - Must be connected
direct to tractor battery 12v
supply.
Fill level
Sensor
Fan speed sensor
Land wheel
Sensor
Optional radar
Belt Sensor
On the top of the
monitor you can find the
serial and USB connection
for updating and the
memory battery
page 3
THOMAS HATZENBICHLER Agro-Technik GmbH
A-9433 St. Andrä, Fischering 2
Tel: ++43 (0)4358 / 2287–0 / Fax:++43 (0)4358 / 2208
http://www.hatzenbichler.com
[email protected]
Hatzenbichler Control BoxOperators guide
This section of the operators manual deals with the control box which is fitted to
Air 8 (electronic) and Air 16 machines.
You should only start using the control box after you have read the operating instructions and you are familiar with the operation and functions.
The computer controls the drive motor for the seedroller in conjunction with the
impulses from a groundwheel or radar.
The control box is able to store different seed rates with a name and their calibration weights.
The display shows various parameters so that the operator can check and control
the application i.e. shows the forward speed in km/h and the seed metered in kg/
ha.
Working Time, hrs
Distance counter, m
Hectare counter, Ha
Applied seed, kg/ha
Tank filling, kg
Monitoring is provided by the control box, an acoustic and visual alarm will be
given for the following faults;
Metering Belt slipping
Motor
Forward Speed - too fast, too slow
Tank seed level - low
page 4
THOMAS HATZENBICHLER Agro-Technik GmbH
A-9433 St. Andrä, Fischering 2
Tel: ++43 (0)4358 / 2287–0 / Fax:++43 (0)4358 / 2208
http://www.hatzenbichler.com
[email protected]
Understanding the Control Box
Control functions:
The „UP“ and „DOWN“
arrows let you scroll to
the menu points you
want to work with.
The „OK“ button stores
any value or alteration
made to the computer.
The + and - buttons are for
changing values.
page 5
The „ESC“ button will always
move one step back.
THOMAS HATZENBICHLER Agro-Technik GmbH
A-9433 St. Andrä, Fischering 2
Tel: ++43 (0)4358 / 2287–0 / Fax:++43 (0)4358 / 2208
http://www.hatzenbichler.com
[email protected]
Working Screen
Job
Job - number and name
Return to target seedrate
Date and Time
Decrease/increase Second function Second function
seedrate
for the OK button to get into the
menu
Seedrate +% and -%
Hyd Fan RPM
Current working seedrate
quanity in kg/ha
Tank
Used seed
Hectare counter
Distance counter
Forward speed km/h
Working time
page 6
THOMAS HATZENBICHLER Agro-Technik GmbH
A-9433 St. Andrä, Fischering 2
Tel: ++43 (0)4358 / 2287–0 / Fax:++43 (0)4358 / 2208
http://www.hatzenbichler.com
[email protected]
Initial setup before operation:
1. Select Language (menu 4)
OK
OK
OK
Menu > Setup > Language > -/+ (Select) > OK
1
2
3
2. Check working width (menu 1) Are you driving to leg spacing or packer width?
OK
OK
OK
Menu > Input > Working width > -/+ to change machine width > OK
1
2
3
4
3. Check Type of Sensor (Find out which type of sensor you are using, wheel or radar)
OK
OK
OK
Menu > Setup > Type of sensor > +/- to change > OK
1
2
3
page 7
THOMAS HATZENBICHLER Agro-Technik GmbH
A-9433 St. Andrä, Fischering 2
Tel: ++43 (0)4358 / 2287–0 / Fax:++43 (0)4358 / 2208
http://www.hatzenbichler.com
[email protected]
4. Check Wheel or Radar impulse setting to allow accurate forward speed and distance
calculation.
To carry this out you must accuratly measure and mark 100m in field / operating
conditions.
At the begining of the 100m run:
Menu > Special > Wheel - Impulses > Press OK to start the 100m calibration
1,
2,
3,
4,
- Drive the test route and press the OK-button to stop the counter
- if you want to save the new value --> press OK again
- if you don‘t want to save the value --> press ▼ [reset] and start again.
1,
2,
Fan Sensor
Menu > Special > Alarms >
1,
2,
3,
Use arrow to move down Buzzer colum to fan. If a hydralic fan unit is being used, use
„+/-“ to select „ON“, for electric fan select „OFF“.
Use down arrow to move to Alarm column, move down to fan and use „+/-“ to select
„ON“ for hydraulic fan unit or „OFF“ for electric fan - Press „Esc“
For hydraulic fan see page 19 to set high/low fan alarms.
page 8
THOMAS HATZENBICHLER Agro-Technik GmbH
A-9433 St. Andrä, Fischering 2
Tel: ++43 (0)4358 / 2287–0 / Fax:++43 (0)4358 / 2208
http://www.hatzenbichler.com
[email protected]
Quick Start Guide
For the Control Box
Operating steps on page 7 & 8 must be completed before starting!!
Calibration setup
- After connecting the computer to the power sup- 4) With „+“ or „-“ choose the Job number
ply, the working display is shown.
(1-30)
Before you start, read page 6 and carryout the
steps.
- Please note, that the „OK“-key and the „ESC“key both have a double function.
„OK“-key = „Auto“-key
„ESC“-key = „Menü“-key
1) Press the „Menu“-key („ESC“-key)
- press the „▼“ arrow key (name)
5) With „+“ or „-“ or „▲▼“ choose the letter
you want and confirm with „OK“
with the arrow keys „▲“ and „▼“ you can scroll
through the menu
2) choose „Input“ and press „OK“
6) After putting in the name (grass, clover,
rape...) press the „ESC“-key (back)
3) with the arrow keys„▲“ and „▼“ choose „Job“
and press „OK“
page 9
THOMAS HATZENBICHLER Agro-Technik GmbH
A-9433 St. Andrä, Fischering 2
Tel: ++43 (0)4358 / 2287–0 / Fax:++43 (0)4358 / 2208
http://www.hatzenbichler.com
[email protected]
7) with „+“ or „-“ choose the metering roller, which
10)
is to be used (rough - fine - micro)
The seedroller size that you select is only for information and has nothing to do with internal calculation for your computer
- Press „OK“ after 6 - 8 revolutions to stop the
calibration.
The roller is now charged, empty this seed back
into the hopper. Replace the calibration tray and
press „OK“ to restart the calibration.
8)
The electric motor starts turning and
stops automatically – seed is metered into
the calibration tray
Remove the calibration tray and weigh
the seed in the tray, record this value and
repeat twice again recording the value.
- confirm with the „OK“-key
- with „+“ or „-“ key put in the number of revolu- with „+“ or „-“ Enter the average weight of the
tions for the calibration trial.
When using the course metering roller FOR GRASS seed from the 3 calibrations
SEEDS, use 30 revolutions.
11)
When using the fine metering roller FOR SMALL
SEEDS, use 80 revolutions.
Decreasing the value will decrease accuracy, see
page 15 for roller decription
- Remove the metering roller cover of the seeder,
check the brush position (the brush should touch
the metering roller slightly )
* If needed, adjust the lever
* Check the metering roller (black, red,
blue, green)
* Position the calibration tray
* Put seed into the hopper min (3-5kg)
- confirm with „OK“
Display then shows the „Target Seedrate“
9)
page 10
THOMAS HATZENBICHLER Agro-Technik GmbH
A-9433 St. Andrä, Fischering 2
Tel: ++43 (0)4358 / 2287–0 / Fax:++43 (0)4358 / 2208
http://www.hatzenbichler.com
[email protected]
- replace the Backplate
- during seeding the hopper lid of the seeder
must be sealed, air tight.
- turn on the fans
12)
16)
- with „+“ or „-“ choose the seedrate / ha
13)
- press „OK“. On the display you see a small
seeder. The machine is now ready for seeding.
- confirm with „OK“
- Display shows the seedrate and driving
speed max. and min. --> to guarantee precision of seeding
Pressing „OK“ again turns off the seeder.
Have you completed „Initial Setup“ page 7?
14)
- confirm with „OK“
15)
The working display is now shown
For subsequent calibrations in this job see
page 16
page 11
THOMAS HATZENBICHLER Agro-Technik GmbH
A-9433 St. Andrä, Fischering 2
Tel: ++43 (0)4358 / 2287–0 / Fax:++43 (0)4358 / 2208
http://www.hatzenbichler.com
[email protected]
Full Control Box Menu
1.1.3.2.1 Calibr.quantity kg
Seedrate kg/ha
1. Input
Driving speed min/max
1.1.1
1.1.2
1.1.3
1.1.4
Job Nr.
Name
Metering roller type
No. rotations
1.2.1
1.2.2
1.2.3
1.2.4
1.2.5
1 Input
2 Special
3 Test
4 Setup
5 Setup
Hatzenbichler
1.1
Job
1.2
1.3
1.4
Reset Counter
Seedrate
Tank fill
all delete
distance delete
square delete
working time delete
quantity delete
1.3.1 Seedrate kg/ha
1.5 Working width
1.6
1.1.3.1 Calibration
No. rotations
1.1.3.2 Start
Fan
Seedrate and
Drivingspeed Info
1.4.1 Tank contents [kg]
1.5.1 Working width [m]
1.6.1 Speed alarm min/max
page 12
THOMAS HATZENBICHLER Agro-Technik GmbH
A-9433 St. Andrä, Fischering 2
Tel: ++43 (0)4358 / 2287–0 / Fax:++43 (0)4358 / 2208
http://www.hatzenbichler.com
[email protected]
menu 1.1.1
Select Job number and Calibration
After completing the initial setup on page 7, you can start to calibrate for one job
number and calibration.
In this function you can select your Job Nr. [0-30] for different seed (with name and
different calibration revolutions, different seedrollers and seedrates [kg/ha])
a,
b,
Press „ESC“ to enter main menu
Press „OK“ to select INPUT
c,
d,
Press „OK“ to enter Job
1.1.1 With +/- to select Job number (0-30)
e,
f,
Press the arrow down button
(name) to enter
1.1.2 With arrow- and +/- button
you can select name for Seed.
page 13
THOMAS HATZENBICHLER Agro-Technik GmbH
A-9433 St. Andrä, Fischering 2
Tel: ++43 (0)4358 / 2287–0 / Fax:++43 (0)4358 / 2208
http://www.hatzenbichler.com
[email protected]
g,
h,
- Press „OK“ to set the letter
Press „ESC“ (back)
if the name is finished
i,
1.1.3 - press + or - to select the metering roller which is fitted
- press OK
1.1.4 - press + or - for No. of rotations [10-?] Please make sure that the number
of rotation is not to high - because seed may not fit in calibration box
(it depends which type of seed you are using, for example rapeseed
needs 30-80 turns, for bigger seed lower turns 10-30)
a,
b,
Make sure that there is some seed in the hopper but not much more than the
quantity that you need for the calibration because you may need to change the
seed roller
- put in calibration tray.
- press OK to start calibration
page 14
THOMAS HATZENBICHLER Agro-Technik GmbH
A-9433 St. Andrä, Fischering 2
Tel: ++43 (0)4358 / 2287–0 / Fax:++43 (0)4358 / 2208
http://www.hatzenbichler.com
[email protected]
The motor will now turn the roller for the set number of rotations. Weigh the seed and
enter this weight into the control box.
- press + or - to set the calibration quantity [kg]
- press OK
c,
STANDARD ROLLERS
Coarse and fine rollers supplied with
machines
d,
Coarse
e,
f,
page 15
Fine
Micro Whole
Segmented
THOMAS HATZENBICHLER Agro-Technik GmbH
A-9433 St. Andrä, Fischering 2
Tel: ++43 (0)4358 / 2287–0 / Fax:++43 (0)4358 / 2208
http://www.hatzenbichler.com
[email protected]
Follow on calibrations for a Job
1) Menu > Input > Job
1
2
3
2) Using „-/+“ select Job No.
1
2
3) Press ▲ to select calibrate.
Repeat calibration as previously done.
page 16
THOMAS HATZENBICHLER Agro-Technik GmbH
A-9433 St. Andrä, Fischering 2
Tel: ++43 (0)4358 / 2287–0 / Fax:++43 (0)4358 / 2208
http://www.hatzenbichler.com
[email protected]
menu 1.2
Reset counter
In this function you can reset the counter for all functions or for each single one.
But only for the selected Job Nr.
1.2.1 - Press OK to delete all
1.2.2 - Press ▼▲ to select distance, square working time or quantiy
1.2.3 - Press OK to delete these individually
1.2.5 - Press ESC [back] to go back to input
page 17
THOMAS HATZENBICHLER Agro-Technik GmbH
A-9433 St. Andrä, Fischering 2
Tel: ++43 (0)4358 / 2287–0 / Fax:++43 (0)4358 / 2208
http://www.hatzenbichler.com
[email protected]
menu 1.3
Seedrate
In this function you can set your seedrate for the Job Nr. which is active in the
working screen.
1.3.1 - Press + or - [kg/ha]
- Press OK
- Info (Driving speed min/max for seed measured and metering roller used)
- Press OK
- Press „ESC“ (back) --> working screen
Note: When changing between job number you must check the seedrate is correct.
menu 1.4
Tank fill
In this function you can set the kg of seed put into the hopper. The computer can
calculate how much seed is still in the hopper while seeding
1.4.1- press + or - for kg
- press OK
- back to input
- press ESC
page 18
THOMAS HATZENBICHLER Agro-Technik GmbH
A-9433 St. Andrä, Fischering 2
Tel: ++43 (0)4358 / 2287–0 / Fax:++43 (0)4358 / 2208
http://www.hatzenbichler.com
[email protected]
menu 1.5
Working width
1.5.1 In this function you can set up your working width. Are you driving to the
machine legs spacing or packer width?
- press + or - press OK
menu 1.6
Fan
For hydraulic fans with speed sensor fitted the min and max rotation speed alarms
can be set. To activate the alarm see menu 2.1 page 21
- Menu > Input > Fan
1,
2,
1.6.1 - press ▼▲ to select min or max
- press + or - for more or less speed, press „OK“ to save
- press ESC to go back
page 19
THOMAS HATZENBICHLER Agro-Technik GmbH
A-9433 St. Andrä, Fischering 2
Tel: ++43 (0)4358 / 2287–0 / Fax:++43 (0)4358 / 2208
http://www.hatzenbichler.com
[email protected]
acoustic alarms
2.1.1 all (off/on)
2.1.2 Fan (off/on)
2.1.3 Belt (off/on)
2.1.4 Tank (off/on)
2.1.5 Motor (off/on)
2.1.6 speed control (off/on)
2. Special
2.2.1 Number
2.2.2 Date
2.2.3 Time
1 Input
2 Special
2.1
2.2
2.3
3 Test
2.4
4 Setup
5 Setup Hatzenbichler
2.5
2.6
2.7
Alarms
Alarm protocol
Illumination
Wheel/Radar
impulses
Shake free
Tank empty
Correction factor
2.3.1 LCD-Backlight
2.3.2 Contrast Control
2.3.3 backlight (off/on)
2.4.1 Distance [m]
2.4.2 Impulse
2.4.3 Wheel dist. of
impulses 4,75/
Radar dist. of impulses
0,74
2.5.1 Shake free (off/on)
2.6.1 Motor (off/on)
2.7.1 Correction factor %
page 20
THOMAS HATZENBICHLER Agro-Technik GmbH
A-9433 St. Andrä, Fischering 2
Tel: ++43 (0)4358 / 2287–0 / Fax:++43 (0)4358 / 2208
http://www.hatzenbichler.com
[email protected]
menu 2.1
Alarms
In this function you can set the acoustic alarms for different functions [Fan, Belt,
Tank, Motor, speed control].
You can select on or off for the buzzer or visual alarm or both.
- press ▼▲to select different functions [Fan, Belt...]
- press + or - to select off or on
- press ESC to go back
page 21
THOMAS HATZENBICHLER Agro-Technik GmbH
A-9433 St. Andrä, Fischering 2
Tel: ++43 (0)4358 / 2287–0 / Fax:++43 (0)4358 / 2208
http://www.hatzenbichler.com
[email protected]
menu 2.2
Alarm protocol
In this function you can access details of past alarms including date and time.
- press OK
- press ▼ to reset
- press ESC to go back
menu 2.3
Illumination
In this function you can change your display settings. LCD Backlight, contrast control and backlight turn off (0-10min)
- press ▼▲ to select Backlight or contrast
- press + or - for more backlight or more contrast
- press ESC to go back
page 22
THOMAS HATZENBICHLER Agro-Technik GmbH
A-9433 St. Andrä, Fischering 2
Tel: ++43 (0)4358 / 2287–0 / Fax:++43 (0)4358 / 2208
http://www.hatzenbichler.com
[email protected]
menu 2.4
Wheel/Radar impulses
This function allows calibration of the Wheel/Radar to the ground conditions. To
select the type of speed sensor being used see section 4.3, page 32.
- Mark a distance in the field with exactly 100m.
- press OK to start test
- Drive the test route at your planned average forward speed and press the
OK-button at the end of test run
- if you want to save the new value --> press OK again
- if you don‘t want to save the value --> press ▼ [reset] and start again.
page 23
THOMAS HATZENBICHLER Agro-Technik GmbH
A-9433 St. Andrä, Fischering 2
Tel: ++43 (0)4358 / 2287–0 / Fax:++43 (0)4358 / 2208
http://www.hatzenbichler.com
[email protected]
menu 2.5
Shake free mode
If the metering roller is blocking you can use this function to turn the motor back
and forward to clear the roller.
- press OK --> motor begins to turn to the left and right
- press OK --> motor stops
- press ESC for going back
menu 2.6
Tank empty
This function helps you to clean the hopper, remove the blackplate and fit
calibration tray.
-press OK and hold it -> motor starts turning
-release OK --> motor stops turning
page 24
THOMAS HATZENBICHLER Agro-Technik GmbH
A-9433 St. Andrä, Fischering 2
Tel: ++43 (0)4358 / 2287–0 / Fax:++43 (0)4358 / 2208
http://www.hatzenbichler.com
[email protected]
menu 2.7
Correction factor
This allows you to compensate for external factors ie seed size variations or
vibration, etc, this value must be calibrated by the user and is for fine tuning only.
Select „correction factor“
Press „OK“
With +/- you can change the
„correction factor“ percentage
page 25
THOMAS HATZENBICHLER Agro-Technik GmbH
A-9433 St. Andrä, Fischering 2
Tel: ++43 (0)4358 / 2287–0 / Fax:++43 (0)4358 / 2208
http://www.hatzenbichler.com
[email protected]
3.1.1 Speed [km/h]
3.1.2 Simulation (off/on)
3. Test
1 Input
2 Special
3 Test
4 Setup
5 Setup Hatzenbichler
3.2.1 Button test
3.1
3.2
3.3
3.4
3.5
Simulation
Keys
Input
Voltage
SW-Version
page 26
3.3.1
3.3.2
3.3.3
3.3.4
3.3.5
Sensor - motor
Sensor - wheel
Sensor - tank
Sensor - belt
Sensor - fan
3.4.1
3.4.2
3.4.3
3.4.4
3.4.5
3.4.6
3.4.7
battery [Volt]
supply unit [Volt]
output stage [Volt]
Sensors [Volt]
Sens. diag [A]
brightness
temperature [°C]
3.5.1 Version 4.08 ß
3.5.2 Date 02-03-2008
THOMAS HATZENBICHLER Agro-Technik GmbH
A-9433 St. Andrä, Fischering 2
Tel: ++43 (0)4358 / 2287–0 / Fax:++43 (0)4358 / 2208
http://www.hatzenbichler.com
[email protected]
menu 3.1
Simulation (TEST)
In this function you can make a test simulation. The motor and the seed roller turn
without driving, so in other words not using forward speed reading.
This function only works if you input a job No , did the calibration, set up a
working width and seedrate.
3.1.1 - press + or - to set the forward speed
3.1.2 - press OK to turn the simulation on or off
- press „ESC“ to go back to the working screen.
If you are in the working screen, „Test“ is
shown. If you press the „OK“ (AUTO)
button the motor starts turning.
Press „OK“ (AUTO) to stop again.
page 27
THOMAS HATZENBICHLER Agro-Technik GmbH
A-9433 St. Andrä, Fischering 2
Tel: ++43 (0)4358 / 2287–0 / Fax:++43 (0)4358 / 2208
http://www.hatzenbichler.com
[email protected]
menu 3.2
Keys
In this function you can test if the buttons are working or not.
3.2.1 - press ▼▲ or + or - to select the button
- if you press the button you can see „pressed“ or „released“
- press ESC to go back
menu 3.3
Input
In this function you can test different sensors on the machine.
3.3.1-5 If a sensor is in use you can see on the display the number „1“ - if not
you can see „0“
You can check it, if you turn the ground wheel, if you cover up the filling
sensor or turn the seed roller.
page 28
THOMAS HATZENBICHLER Agro-Technik GmbH
A-9433 St. Andrä, Fischering 2
Tel: ++43 (0)4358 / 2287–0 / Fax:++43 (0)4358 / 2208
http://www.hatzenbichler.com
[email protected]
menu 3.4
Voltage
This function gives you informations about Voltage.
Inside the computer is a small battery, which stores, Date, Time, Jobs...
If you recognize that Date, Time, jobs... are not stored any longer, you have to change the battery.
3.4.1-7
- The voltage should be between 10-15. If the Voltage is under 10, you have to
check battery from tractor
On the top end from
the monitor you can
find the USB and
serial ports for
updating and the
memory battery.
Also you can check the supply output stage (2.72 Volt), Sensors (2.27 Volt), Sensor
Diag. (0,08 Amps), brightness (23), temperature (between 25 and 30°C).
menu 3.5
SW-Version
3.5.1-2 Here you can see the software version of your computer. If want
to make a update you have to look to menu 4 Setup (4.4 Software update)
page 29
THOMAS HATZENBICHLER Agro-Technik GmbH
A-9433 St. Andrä, Fischering 2
Tel: ++43 (0)4358 / 2287–0 / Fax:++43 (0)4358 / 2208
http://www.hatzenbichler.com
[email protected]
4.1.1
4.1.2
4.1.3
4.1.4
4. Setup
Day
Date
Time
Go/Set
4.2.1
4.2.2
4.2.3
1 Input
2 Special
3 Test
4.1
4 Setup
4.4
5 Setup Hatzenbichler
Clock / Date
4.2 Language
4.3
4.5
german
english
russian
Type of sensor
Software update
Factory setting
4.3.1 sensor type (wheel/radar)
4.4.1 Software update Yes/No
4.5.1 reset, without jobs
4.5.2 reset, with jobs
page 30
THOMAS HATZENBICHLER Agro-Technik GmbH
A-9433 St. Andrä, Fischering 2
Tel: ++43 (0)4358 / 2287–0 / Fax:++43 (0)4358 / 2208
http://www.hatzenbichler.com
[email protected]
menu 4.1
Clock/Date
4.1.1-4 In this function you can change the day, date and time
Setup > Clock/Date
- press OK
- press + or - to change from GO to SET
- if you want to change day, date or time go to SET
- press ▼▲ for different options
- press + or - minus to change day, date or time
- press + or - minus to change from SET to GO
- press ESC to go back
page 31
THOMAS HATZENBICHLER Agro-Technik GmbH
A-9433 St. Andrä, Fischering 2
Tel: ++43 (0)4358 / 2287–0 / Fax:++43 (0)4358 / 2208
http://www.hatzenbichler.com
[email protected]
menu 4.2
Language
In this function you can choose 3 different languages (english, german, russian).
- press OK
4.2.1-3 - press ▼▲ to select the language
- press OK
menu 4.3
Type of sensor
In this function you can change from Radar-sensor to Wheel sensor.
- press OK
4.3.1 - press + or - for Radar or wheel
- press OK
page 32
THOMAS HATZENBICHLER Agro-Technik GmbH
A-9433 St. Andrä, Fischering 2
Tel: ++43 (0)4358 / 2287–0 / Fax:++43 (0)4358 / 2208
http://www.hatzenbichler.com
[email protected]
menu 4.4
Software update
Control boxes with version 3.** must be updated using the serial port connected to a PC
4.4.1 In this function you can make a software update for your control box if
it uses software version 4.**
Select Software-Update ▼▲
Press „OK“
With arrow button ▼▲ you can
change between „YES“ or „NO“.
Press to start the update
Please plug in the USB-Stick and keep the ESC button pressed until the control panel has started again.
Note: After updating the software you must reset the control box to the factory
setting including all job details (section 4.5, page 34).
page 33
THOMAS HATZENBICHLER Agro-Technik GmbH
A-9433 St. Andrä, Fischering 2
Tel: ++43 (0)4358 / 2287–0 / Fax:++43 (0)4358 / 2208
http://www.hatzenbichler.com
[email protected]
menu 4.5
Factory Settings
In this function you can reset to factory settings without jobs details or
including jobs details.
4.5.1-2- press ▼▲ to select reset
- press OK
[Please note if you select „reset, incl. jobs“ you will lose all your data!]
(working width, sensor type, language, etc.)
If you want to start working again, you have to start with menu 1
page 34
THOMAS HATZENBICHLER Agro-Technik GmbH
A-9433 St. Andrä, Fischering 2
Tel: ++43 (0)4358 / 2287–0 / Fax:++43 (0)4358 / 2208
http://www.hatzenbichler.com
[email protected]
Wiring Diagram
Tank Sensor
Wheel Sensor
Agitator Sensor
Hyd Fan Sensor
(optional)
page 35