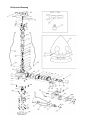
1
CONSTANT SPEED PROPELLERS MADE IN ITALY IN FLIGHT ADUSTABLE PITCH HUB KIT TYPE: QA2SE___R___ BLADES:SENSENICH R70DN CONTROLLER TYPE: Flyspeed GV 8.0-A MANUAL WARNING! THE HUB DEVICE KIT IS NOT CERTIFIED AND IS NOT APPROVED BY FAA, BY PFA OR BY OTHERS AUTHORITIES. IT HAS NOT RECEIVED ANY SAFETY OR DURABILITY TESTING APPROVAL, AND DOES NOT CONFORMS TO NO AIRCRAFT STANDARDS. ITS USE IN STANDARD CATEGORY AIRCRAFT IS PROHIBITED. IT IS INTENDED FOR USE IN EXPERIMENTAL, UNCERTIFICATED AIRCRAFT IN WHICH AN HUB/PROPELLER FAILURE OR BREAKAGE , WILL NOT COMPROMISE SAFETY. USER ASSUMES ALL RISK OF USE, AND ACKNOWLEDGES BY HIS USE THAT HE KNOWS THE STATED LIMITS. . TEL. 0575-842129 FAX 0575-842374 E-MAIL: [email protected] WWW.QUINTIAVIO.COM brevettato AREZZO - ITALY Warning: Flyers should be aware of the risks to which they expose themselves. It is good practice to take every and all safety precautions to minimize risk, while knowing that it cannot be eliminated altogether. A propeller malfunction could be cause for an emergency landing, or create vibrations severe enough to damage the aircraft. Propellers are constantly subject to vibrations deriving from the motor and aerodynamic forces, in addition, they are subject to further stress from centrifugal forces. Because of this, it is essential that the propeller be maintained in accordance with the guidelines set forth in this manual, and that it be inspected regularly in order to identify any minor issues which if left ignored could become larger problems. Any grease escape, new vibration, or any deviance in typical functioning, must be investigated as it could be an indication of something serious which must be resolved. We recommend a thorough read-through of this manual as it contains all information relevant to your new propeller. We especially request a careful reading of the sections dedicated to inspections and maintenances. Thank you for choosing a Quinti Avio propeller. If properly inspected and maintained, it will grant you safe and reliable service. ______________________________________________________________________ List of revision made 2. 5.5.2 4.3 7.0 11.0 12.0 13.0 Condizioni generali di garanzia sui prodotti Regolazione dei fine corsa, concetti generali Specifiche elettriche Ispezioni Manutenzione Riparazioni Spare parts manual Exploded drawing Torque values date 25/03/08 25/03/08 25/03/08 25/03/08 25/03/08 25/03/08 25/03/08 General Index: 1. 1.1 1.1.1 1.1.2 1.1.3 1.2 General Information: Definition of Components Duration Overhaul Repairs Components duration Introduction 2. Product Warranty Conditions: 3. 3.1 3.2 Nomenclature / Part Identification Hub Nomenclature Numbering the blades 4. 4.1 4.2 Hub Technical Specifications Rotax Hub type Electrical information 5. 5.1 5.2 5.3 5.3.1 5.3.2 Installation instructions Preparation Installation Procedures Installing Brush Set Brush Set for hubs with slip ring pre-installed on hub ( ROTAX ) Brush Set for hubs with slip ring to be installed on engine gearbox (ROTAX) 5.4 5.4.1 5.5 5.5.1 5.5.2 Hub set installation Rotax Hub Set Blades assembly Propeller Balancing Pitch stops setting, general concepts 5.7 Installing the Flyspeed GV constant speed governor 5.7.1 General information 5.7.2 Regulating minimum pitch using the manual switch 5.7.3. RPM Sensor and Magnet Support Pylon installation 5.7.3.1 Hubs with flange mounted pre-assembled Slip Ring 5.7.3.2 Hubs with the Slip Ring mounted on the propeller gearbox 5.7.4 Installing Flyspeed GV on the instrument panel 5.7.4.1 General Information 5.7.4.2 Technical Specifications 5.7.4.3 Connecting Flyspeed GV to the Hub’s electric motor 5.7.4.4 Connecting the intake manifold pressure tube (DMP) 5.7.4.5 Initial Flyspeed GV power-up 5.7.5 Preset Parameters and Customization 5.8 Operational Guidelines 5.8.1 General concepts for Flyspeed GV use with standard hubs and DMP control 5.8.2 General concepts for Flyspeed GV use with special hubs and DMP control 5.8.3 OPERATIONAL GUIDELINES using the standard DMP control 5.8.4 Configuration setting and details 5.8.5 OPERATIONAL GUIDELINES using the new CS mode 5.8.5.1 Take off and cruise in constant speed mode 5.8.5.2 Constant speed 101 5.8.5.3 Landing in constant speed mode 5.8.6 Trouble shooting 5.8.7 Preventive maintenance 5.8.8 Error messages 6.0 6.1 6.2 Emergency procedures General concept Using a governor 7.0 7.1 7.2 Inspections, Maintenance, Repairs Inspections and Maintenance Repairs 8.0 Shipping and Storing 9.0 Special tools and materials 10.0 Electrical flyspeed diagrams 11.0 Spare parts Manual 12.0 Exploded Drawing 13.0 Torque values 1. General Information: 1.1 Definition of Components Duration 1.1.1 Overhaul Overhaul occurs periodically and involves: disassembly, components inspection, components maintenance/replacement and reassembly. The overhaul interval is determined by flight hours or calendar days, whichever comes first. During overhaul the hub must be completely disassembled and closely inspected for cracks, excessive wear, corrosion or any other anomaly. Certain parts must be rebuilt or replaced as specified. Overhaul must be performed in accordance with specifications set forth in the overhaul manual. The overhaul service interval is specified in the service bulletin. 1.1.2 Repairs Repairs are understood to be correction of minor problems occurring during normal use. Any repair does not include, and therefore preclude, the normal overhaul schedule. The type and severity of any damage will determine whether a full overhaul is necessary or not. For example, damage to a blade due to a ground strike will always require an overhaul. 1.1.3 Components duration Expected parts lifetime is expressed in hours of use ( Total Time= TT ) and in hours since overhaul ( Time Since Overhaul = TSO ). Both values are important to determining component duration. Certain components may have a limited lifetime, meaning they must be replaced after a specified time in use. All limited-life components are listed on the overhaul manual E.P.O.M. 2. An overhaul will bring all parts to zero hours TSO ( time since overhaul ). Total Time ( TT ) is unaffected by an overhaul. 1.2 Introduction Quinti Avio’s propellers have been designed to maximize performance in all phases of flight: take-off, climb, cruise, max leveled speed, descent and landing. Currently carbon blades produced by the US based Sensenich are used. Pitch increase and decrease is produced along the blade’s longitudinal axis by an electric motor rotating a main screw at the center of the hub. The rotating screw moves a mechanism at the base of each blade, which enacts the pitch variation. Flyspeed GV is an evolution of normal constant speed, variable pitch electric governors and can be thought of as “programmed power and constant speed” by automatically selecting more than 10 pre-set power settings, from a slow descent to a fast climb. Flyspeed GV uses a differential sensor to monitor Manifold Air Pressure (MAP). Intake manifold pressure is constantly compared to atmospheric pressure, yielding a value, which is used to elaborate throttle setting. The DMP setting, constantly visible on the Flyspeed GV display, stands for Differential Manifold Pressure and is achieved subtracting the pressure differential from 30.0 inches. Hence DMP corresponds to MAP only when the ambient pressure is 30.0 inches. At full throttle, and all altitudes, DMP will be between 29.2 and 29.5 inches. With a throttle setting below 30% power, DMP will be beneath 20.0 inches. Flyspeed GV works based on existing conditions and pilot intentions. The primary pilot intentions are: 1) 2) 3) 4) Intention to take off Intention to land Sure to land Intention to abort landing 2.0 Products Limited Warranty: The warranty period is: - All parts composing new propellers and controllers supplied by Quinti Avio srl are warranted for a period of 12 months from the date of shipment or 100 hours of operation, whichever comes first. All accessories supplied by Quinti Avio srl are warranted for a period of three months from the date of shipment or 50 hours of operation, whichever comes first. This warranty is limited on any defect in materials and workmanship. Warranty benefits are subject to the following terms and conditions: - - All parts and/or accessories must be installed and used in accordance with the guidelines in the operating manuals and under normal operating conditions. Parts and/or accessories are not to be repaired or modified outside of direct supervision by Quinti Avio srl. Parts and/or accessories cannot have been damaged as a result of excessive wear, improper use, negligence, accident, abuse, alterations, improper installation, improper maintenance or repairs, improper packaging for shipping or in speed conditions in excess of the guidelines set forth by the manufacturer. Damaged parts and/or accessories should be returned to Quinti Avio srl via pre-paid courier. Import taxes steady from Quinti Avio srl will be also in charge to the customers and billed and payed before re-shipping time. Quinti Avio srl’s obligations under this warranty, do not extend to the labor costs associated with substituting parts, making repairs, making adjustments, or any other work on any propeller. The owner assumes all responsibility concerning installation procedures, proper installation, operation, maintenance, inspection, repair and upgrades of the propeller and any accessories. As a customer service, not a warranty service, Quinti Avio’s personnel and representatives of Quinti Avio srl are available to answer any questions regarding individual use applications. All questions should be accompanied by client address, propeller model and serial number, Total Time and any other relevant details. In case of doubt regarding an aircraft’s airworthiness, the aircraft should not be flow until all problems are corrected. This manual will be periodically upgraded on web. You will find on the web too all the information regarding mandatory upgrades to the products. The customer will pawn his self to make upgrade to proper products. Parts and freights costs for upgrade will be in charge to the costumer. All the warranty conditions have to be considered void if mandatory upgrades to the products will be not performed as specified on the service bullettins written in our official web site. WARNING : BEFORE USE THE PRODUCT OF QUINTI AVIO SRL COMPANY YOU MUST HAVE SIGNED A LIABILITY RELEASE CONTRACT SUPPLIED FROM QUINTI AVIO COMPANY. IF PRODUCTS ARE SOLD THROUGH A DISTRIBUTOR HE WILL MUST SUPPLY TO YOU A QUINTI AVIO LIABILITY RELEASE CONTRACT FORM TO BE SIGNED BEFORE BUYING THE PRODUCTS. IN CASE DISTRIBUTOR DO NOT SUPPLAY TO YOU A QUINTI AVIO’S LIABILITY RELEASE CONTRACT PLEASE ADVISE DIRECTLY QUINTI AVIO SRL COMPANY THAT WILL PROVIDE TO SEND YOU THE FORM. WITHOUT A LIABILITY RELEASE CONTRACT SIGNED AND SENT TO QUINTI AVIO SRL BY FAX MACHINE ALL WARRANTY CONDITION TO THE PRODUCT MUST BE CONSIDERED VOID AND PRODUCTS GROUNDED. 3.0 Nomenclature / Part Identification 3.1 Hub Nomenclature Example: - QA 2 SE 001 R 001 US0001 QA2SE001R001 : : : : : : : Identifies the manufacturer Identifies the hub has 2-bladed or more Identifies the blade manufacturer (Sensenich) Identifies the manufacturing batch (001) Identifies the type of hub drilling for Rotax flange Identifies version Identifies the hub’s serial number ( IT= ITALY ; US= USA ; etc. ) 3.2 Numbering the blades The blade’s serial number is assigned by the blade’s manufacturer (Sensenich) on each blades. Esempio: R70DN - 8118 - R75D-0 R70D-0 R70D-1 R70D-1.5 R70D-2 R70D-2.5 R70D-3 R70D-3.5 R70D-4 : : : : : : : : : Blades type DX 75 inches Blades type DX 70 inches Blades type DX 69 inches Blades type DX 68.5 inches Blades type DX 68 inches Blades type DX 67.5 inches Blades type DX 67 inches Blades type DX 66.5 inches Blades type DX 66 inches - N 10833 : Blade with nickel leading edge protection : Identify the blade’s s/n 4.0 Hub Technical Specifications 4.1 ROTAX type hub Hubs with “Rotax” type mounting flange: no.6 holes for 13mm Ø pins set on a diameter of 4 in. (101.6 mm) and a centering hole of 47 mm Ø. Max power applicable only with engines equipped with gearbox. Type no. of blades max kW/ max. HP max. RPM pitch range Degrees Std approx. 88,17/ 120 2560 20° QA2SE001R001 2 • • • • • Kg / lbs approx. 10.6 / 23.0 All weight values are without spinner plate ( aluminum CNC machined ) and fiber glass spinner which typically up to 2.0 Kg for 13” diameter . Standard propeller Kit diameter mounting carbon fiber Sensenich blades is 70”, R70DN type. Blades are right-hand rotation, with nickel leading edge protection, R70DN All weight values are achieved using 70 in. blade diameters. Blade length,and special parts will affect the weight. Other Sensenich blades can be used instead the R70DN above mentioned. Warning: • Manufacturer approval is required to install on engines other than those listed above. • Aerobatic and extreme maneuvers are not allowed. 4.2 Electrical specifications The propeller is equipped with an high quality motor gear box combination and with a fine stops to prevent contacts on mechanical stops. The electrical stops DO NOT INTGERRUPT THE CURRENT TO THE MOTOR but and assembly of components (electrical contacts, resistor and diode) that generates an additional electrical load of approx. 9A. The governor, sensing this increased load, should disconnect the supply within 200 milliseconds and reverse the polarity of the voltage to the motor. Any controller and any electrical pitch actuator not compatible with this propeller kit could cause the damage and failure of the electrical stop assemblies. Warning: Quinti Avio srl declines all responsibility and liability for non-conforming use of its products and/or improper combinations of components for which approval has not been specifically gained, in writing, directly from Quinti Avio srl. Additionally Quinti Avio srl declines all responsibility and liability associated with unauthorized repair or alteration of components, outside of direct control on the part of Quinti Avio srl. 5.0 Installation instructions 5.1 Preparation In order to avoid problems relating to the improper installation and consequently improper functioning of your new propeller, we strongly recommend you perform the following check on your aircraft: - Verify proper injection jetting Verify proper gearbox functionality Be sure that the air ducts and air-box are not wholly or partially obstructed. Verify that full RPM and full Manifold Pressure are achieved at max throttle setting. Carefully clean all surfaces of the engine flange mount with a mild solvent. Verify that the flange has not been previously damaged by a blade ground strike by having the run-out from the centering point and the axial run-out inspected by a certified mechanic ensuring they are within the tolerance limits as set by the engine manufacturer. Also ensure that there are no visible deformations or cracks which will prevent a perfect contact between the hub and engine flanges. This inspection should also be performed on new engines. Performing all of the above requisites will set us on the right course to achieving a correct propeller installation. 5.2 Installation Procedures Before beginning the installation, carefully check the materials as you remove them from the original packaging. Check the spinner plate, the spinner, the electrical group, the electric motor, the prop speed governor ( if supplied with the hub ), the connecting flange, the blade mounts and the blades. The propeller kit arrives to the client divided into 3 groups: - Brush Set - Hub Set - Blade Set - Flyspeed GV 5.3 Installing Brush Set 5.3.1 Brush Set for hubs with slip ring pre-installed on hub ( ROTAX ) This Brush Set will be installed on the right front side of the gearbox, seeing the gearbox from the side of the engine flange mount, using the two M8 machined holes. - - Bolt the Brush Set using M8x25 screws along with Loctite 222 gripping agent. Place the brush holders and brushes on the slip ring directly above the metal tracks, make them touch, making sure they are centered. Pre-load the brushes on the slip ring rotating the center cam: apply medium tension to allow for standard brush wear. Preloading excessively will result in faster wear. Insufficient pre-load will result in increasingly lighter contact pressure as wear reduces the brushes thickness, a condition which in time could compromise the transfer of current and consequently blade pitch control. Before final tightening of the brushes mounting, be sure that the brushes slide exclusively along the slip ring’s metal tracks by manually rotating the propeller. Repeat until correctly positioned. Once the positioning is correct, tighten the brushes support via the M6x25 screw, once again using a gripping agent like Loctite222 or similar. Caution: Before manually rotating the propeller ensure that both L & R magnetos are in the OFF position in order to avoid inadvertently starting the engine. Is it absolutely unacceptable for the brushes to make contact outside of the metallic tracks. Caution: If necessary cut the engine cowling to ensure there is no physical contact between it and the brush set. We recommend leaving as much space as possible to allow for natural engine oscillation. Be sure that when making modifications to the engine cowling, you do not inadvertently create openings or gaps outside of the spinner’s aerodynamic ‘shadow’. 5.3.2 Brush Set for hubs with slip ring to be installed on engine gearbox (ROTAX) - Insert the slip ring wires from the back side of the gearbox, through the engine block flange passing hole, until the slip ring reaches and engages the appropriate notch in the engine block flange. Install the M4 screw bolt on the top side of the gearbox mounting, after having passed the slip ring wires through the appropriate holes on the mounting bracket. At the same time ensure the M4 anchoring bolt passes through to the opposite side of the gearbox. Tighten the anchoring bolt by adding a washer and self tightening M4 lug-nut to the opposite side, ensure the gearbox is properly tightened. Add two fasteners to the wire ends. Install the brush mounting bracket on the back side of the gearbox using the two M6 screw-bolt mounting holes and M6x25 bolts, apply a gripping agent such as Loctite 222. Ensure that the brushes match up with the metal tracks on the slip ring. Caution: Before manually rotating the propeller ensure that both L & R magnetos are in the OFF position in order to avoid inadvertently starting the engine. Is it absolutely unacceptable for the brushes to make contact outside of the metallic tracks. 5.4 Hub Set Installation Instructions 5.4.1 Rotax Hub Set - Remove the six original engine flange tightening bolts and replace with the six tightening bolts provided in the kit. Ensure a proper seal is regained when tightening, space between any parts is not allowed. Carefully clean all contact surfaces (engine flange and propeller flange). Mount the Hub Set first without the blades or the spinner, ensure the guide notches are well matched up between the hub and the engine flange. With the slip ring mounted behind the gearbox, connect the hub wires with the slip ring wires passing them through the center of the engine mounting flange. Ensure the hub is properly aligned with the principal axis, and is matched up completely with all parts touching. Caution: In the case of hub installations described in section 5.3.2, exercise caution while sliding the various parts into position. Ensure that all wires are carefully wound and completely inside the engine flange cavity to ensure they are not accidentally damaged while positioning the parts. - Next install six washers and M8 self-blocking lug nuts to the six fastening bolts, tightening carefully and lightly in an ‘x’ pattern, until the hub and engine flanges are completely in adherence. Finally tighten the lug-nuts employing a torque wrench being careful to avoid excessive tightening which could result in thread damage to the hub which could result in a general weakening of the part. Caution: If you are installing a hub with directly mounted slip ring, you must install the included magnet mounting pylon beneath one of the six M8 mounting bolts only when using the Flyspeed GV. In this case do not tighten the one bolt hosting the mounting pylon, as it will need to be positioned and tightened only after the brush installation has occurred. In all other cases the mounting pylon will not be necessary as it is incorporated into the slip ring. 5.5 Blade Assembly Installation Once the hub set is mounted to the engine flange, ensure the blade mounting cavities; specifically the threading, the bearing contact surfaces and the o-ring slots. All must be in perfect condition. Repeat for each blade sleeve housing. Ensure that the blade steel mounting support that already has a bearing mounted, resists pressure, and has no superficial cracks or dings which could slow or block its rotation once mounted into the hub housing. Each hub housing is identified by a number corresponding the blade which it will host. The blade has the corresponding number on the aluminum sleeve. - - Vertically position one of the hub blade housings. Insert the bronze key provided with the kit (greased) into the steel spine of the hubs internal support structure, carefully sending it full run positioning it horizontally and parallel to the blade’s mounting flange. Insert the o-ring from the kit (greased) in the specific notch at the end of the hub’s blade housing next to the threading. Install the ball bearing unit from the kit (greased) in the specific notch at the bottom of the hub’s threaded housing cavity. Grease the entire blade housing cavity, including the threading which will host the blade itself. Take the blade with your left hand near the base, with the right hand take the aluminum sleeve. Ensure that the fitting at the base of the blade matches up with the bronze key you previously installed in the hub. Begin to screw-in the aluminum sleeve perpendicularly to the housing. Continue screwing the blade into place until you are 2 or 3 threads from completion, at this point you should guide the bronze key into place by applying downward pressure on the blade while simultaneously rotating it back and forth. You’ll be sure of having fitted the key into place properly once the blade descends further into place and can no longer move at an angle. At this point finish screwing the aluminum sleeve into place. Caution: The aluminum blade sleeve cannot extend out of the hub housing, if it does, this is an indication that the blade is not properly hosted in the hub, and the installation procedure needs to be repeated. Throughout the installation make sure that the o-ring remains in place. - With the particular wrench included in the kit, tighten the aluminum blade sleeve using a torque wrench. We recommend 2 or 3 tightening/loosening cycles in order to expel all the excess grease from the hub blade housing and the blade itself. Once that has occurred tighten for the last time at the recommended torque setting. Caution: Axial play between coupled parts is not allowable. - Install the provided safety lock which will prevent inadvertent blade/sleeve separation. Place the lock by lining up at the bolts on the hub’s rim, tighten with self-blocking lugnuts. The bolt on the aluminum sleeve does not require a self-blocking lug-nut. Repeat the procedure for each blade. Caution: Once the propeller installation is complete, check aircraft weight and balance parameters to ensure that you have not exceeded the parameters as set forth in the aircraft user manual. 5.5.1 Propeller Balancing Balancing the propeller is required in order to avoid the possible waving of warranty coverage. We recommend the use of the most accurate instruments available to identify the extent and location of any imbalance. Once identified and addressed, the remaining imbalance must be equal to or less than 0.20 IPS (inches per second). If the initial imbalance value is 1.20 IPS or greater, the propeller must be removed from the aircraft and balanced statically before being re-balanced dynamically. We recommend weight placement in a radial patter on the spinner plate. 5.5.2 Pitch stops setting, general concepts The hub is equipped with mechanical stops and electrical stops. Mechanical stops must be set to determine minimum and maximum blades pitch traveling into a range of a safe power flight condition as specified in the aircraft operating manual or the engine operating manual. Electrical stops must be set always between the mechanical stops; recommended distance from each mechanical stop and relative electrical stop is about 1° ( degrees ). Electrical stops are installed to prevent hitting on mechanical stops during operations to prevent electrical motor geared from mechanical overloads and therefore from failures/damage. Ground static tests are required to set properly mechanical stops and electrical stops. From 2008 a fixed fine mechanical stop is installed in addition to the others mentioned. The mechanical coarse stop, if present, is set by two M6 thread installed from the hub flange face and they are fixed on the hub ( spare parts # 52 ). If their length will not work properly for your setting, they can be easily removed and switched with longer or shorter screws using Loctite glue 243 for fixing. It is recommended to set the mechanical coarse pitch stops to permit enough propeller thrust at full throttle obtaining always a safe power flight condition. Then set the electrical coarse stop by adjusting washer O.D. 12 mm ( spare parts #54 ) through the lock nut M4 ( spare parts #61 ); washer O.D 12 mm must be in contact position on the two relative contact screws about 1° before the mechanical coarse stop as recommended, this operation will decrease pitch of the blades from coarse mechanical stop resulting in a extra margin for safe operation. The fine mechanical stop must be set by two socket screws M6 thread ( spare parts # 49 ) and relative four lock nuts M6 thread (spare parts # 48 ) located surrounding the electrical motor assembly. With full brakes and chocked wheels, progressively apply full throttle. To avoid potentially going past red-line, we recommend starting with a moderate/high pitch setting. Take-off RPM must be set at approx 5/10 propeller RPM beneath max take-off engine RPM as specified in the aircraft operating manual or the engine operating manual ( example Rotax 5790 RPM ). Then set the electrical fine stop by adjusting washer O.D. 12 mm ( spare parts #54 ) through the lock nut M4 ( spare parts #61 ); washer OD 12 mm must to be in contact position on the two relative contact screws about 1° before the mechanical fine at approx 25 propeller RPM beneath max take-off engine RPM as specified in the aircraft operating manual or the engine operating manual ( example Rotax 5750 RPM ); this operation will increase pitch of the blades from mechanical fine stops resulting in a extra margin for safe operation. See pictures below 5.7 Installing the Flyspeed GV constant speed governor 5.7.1 General Information The standard Flyspeed GV constant speed governor is designed to optimize propeller performance in maximum safety. It evolves from typical electric constant speed governors and can be considered to be ‘power programmed at constant speed’ with the automatic selection of more than 10 pre-programmed cruise settings. What separates the Flyspeed GV from other ‘normal’ governors is that it will choose the ideal RPM setting based upon an interpretation of throttle setting, while ‘normal’ governors will require the pilot to make that decision. The Flyspeed GV uses a differential sensor to monitor Manifold Air Pressure (MAP). Intake manifold pressure is constantly compared to atmospheric pressure, yielding a value that is used to elaborate throttle setting. The DMP setting, constantly visible on the Flyspeed GV display, stands for Differential Manifold Pressure and is achieved subtracting the pressure differential from 30.0 inches. Hence DMP corresponds to MAP only when the ambient pressure is 30.0 inches. At full throttle, and all altitudes, DMP will be between 29.2 and 29.5 inches. With a throttle setting below 30% power, DMP will be beneath 20.0 inches. Normally the Flyspeed Gv works based on existing conditions and pilot intentions. The primary pilot intentions are: 1) 2) 3) 4) Intention to take off Intention to land determined to land Intention to abort landing 1) After completing a Prop Cycle, blade pitch automatically settles on the IDLE setting. Transition to TAXI RPM will occur for RPM increasing over TAXI RPM band. Automatic pitch control will not occur until RPM values reach the set range as established by MOVE T_ OFF RPM. Example: if Flyspeed GV T_OFF RPM are set at 5750 and the broad range (set by MOVE T_ OFF RPM) is set at 5000 RPM, it will be necessary to achieve a minimum of 5001 RPM to initiate automatic pitch control. In this case after a pre-established time interval (normally 20 seconds, as established by T_OFF TIMER ARM parameter) the CLIMB setting will automatically be inserted to avoid an excessive time period at 100% power setting (Ex: Rotax). 2) LAND DMP selects a low pitch setting, very close to T_OFF pitch , thereby yielding moderate thrust, while allowing a smooth descent. This setting can be used for landing. By applying power this flight condition can be exited in order to extend a landing pattern or to remain in a holding pattern. 3) A more pronounced descent can be achieved by reducing power until IDLE appears on the Flyspeed GV display. 4) If the pilot applies full throttle, the increase in RPM to near T_OFF levels alerts the Flyspeed GV to an aborted landing. In this case the CLIMB preset will be engaged, which will allow maximum continuous power. Comments: Unfortunately DMP cannot optimize all flight conditions. We could add additional sensors, such as altitude, temperature and humidity measurement, but this would result in excess complexity. It is however possible to obtain a programmed RPM ‘shift’ relative to DMP Flyspeed Review The Flyspeed Controller provides a high degree of automation for the pilot. By monitoring propeller speed (through RPM signal from the tachometer pickup) and engine power (through Differential Manifold Pressure, referred to as DMP), the Flyspeed will select the optimal blade pitch for the current flight conditions. The pilot controls engine “power” with the throttle and the Flyspeed sets a blade pitch that will maintain the prop RPM best suited for the available power. In addition to this matching of power to pitch, the Flyspeed accommodates the unique requirements of takeoff, cruise, and landing phases of flight. For example, when full power is applied during takeoff, the Flyspeed starts an internal timer, which will automatically initiate a timed transition to a “climb” pitch shortly after takeoff. Similarly, when power is reduced for landing, the pilot presses a button to indicate that the Flyspeed should stop adjusting the pitch, returning power and pitch management to the hands of the pilot during the landing. Inside the Flyspeed controller, is a microprocessor and software program that continuously monitors engine power (DMP) and prop RPM. Pitch selection is based upon an internal lookup table of DMP and RPM value pairs. Based upon the current engine power the closest matching entry in the tables is identified and the blade pitch is adjusted to match, and then maintain, the values specified in the internal table. As you might imagine, the controller’s ability to select the optimal power to pitch combination, is dependent on trustworthy sensor input (tachometer and manifold pressure) and carefully considered internal table values. Because the Flyspeed is designed to work on a wide variety of airframe and powerplant combinations, these internal values, known as “parameters” are user-programmable. Once these parameters are “tuned” to a particular airframe/powerplant combination, the controller will handle the in-flight decisions automatically, leaving the pilot free to fly, making an occasional direct selection for unique situations. The process of tuning the Flyspeed parameters to match an airframe/powerplant combination can be a daunting task without a solid understanding of the many parameters and their interaction with each other and with the aircraft in flight. Factory-specified default values are a good start, but performance can be greatly improved through tuning. This Pilots Guide will take you step by step through this tuning process. Failing to tune your controller does not mean it is unusable. The factory does an admirable job of providing default values. But why settle for having a mysterious “black box” in control when a little effort on your part will greatly improve your flying experience? Simply put; the more you know about the Flyspeed, the sooner you can forget about it and enjoy flying your plane! New features of Flyspeed Version 8.0-A Although many pilots welcome Flyspeed’s high degree of automation, there are inherent drawbacks to any system that attempts to make decisions for the pilot. Computers are great at processing information in a consistent way, arriving at the same conclusion for a given set of input data. While this rigidity is desirable for many industrial control systems, flying has an artistic, fluid component that benefits from flexibility. Put another way, a pilot who always makes the same flight under the same range of conditions, can tune their Flyspeed to perform flawlessly and be perfectly happy with it. However, if the same pilot encounters widely variable or extreme conditions, such as aerobatic flight, a short field, or high density-altitude, the predetermined behavior of the Flyspeed will occasionally need to be overridden to give the pilot the direct control he/she desires. If the task of “taking control” involves numerous button-presses and resulting distraction from primary piloting duties, the controller will become a hindrance rather than a benefit. For this reason, attention has been given to minimizing pilot interaction during the various phases of flight. Additionally, automated systems that are entirely dependent upon stable input sensor signals must be able to accommodate deviations from these expected inputs. For example, if a supercharged engine maintains a constant manifold pressure, then a prop controller that bases its power decisions on manifold pressure won’t fare too well. Flyspeed Version 8.0-A introduces a new, user-selectable “Constant-Speed” (CS) mode of operation, which is closer to that of a conventional lever or knob type constant-speed controller. Additionally, Quinti Avio is introducing a new physical interface that uses a three-function knob instead of the three arrow buttons found on prior controllers. Turning the knob left or right equates to pressing the left or right pushbuttons, while pressing the knob equates to pressing the Enter button. Instead of fully automating decisions based upon DMP/RPM lookup tables, the new CS mode of operation allows the pilot to directly select a desired RPM then control power with the throttle. A few of the nicer automatic features have been retained in this new mode. These will be described in later sections of this document. In CS mode, DMP input is not a factor in pitch control, except during landing, which we will examine in detail. Without DMP, the controller is unaware of engine power, thus it is up to the pilot to manage the power-to-pitch selection with throttle position and buttons (or knob) on the controller, similar to other constant-speed controllers. Whether CS mode is for you, is a decision you are free to make. Flyspeed Version 8.0-A allows you to choose which mode you prefer. High performance fliers will probably prefer to have more direct control. The mode is selected by setting a single parameter: DMP CONTROL. ON = Traditional Automatic Mode, OFF = New CS Mode. The Version 8.0-A Upgrade The Flyspeed Version 8.0 upgrade involves changing internal software. The upgrade requires replacement of a computer chip inside your controller. The chip will contain the new software and parameters. Safety: System overload protection is guaranteed in two ways. In the case of a malfunction due to an external electrical discharge or system anomaly non-responsive to off/on cycling, a specific emergency channel can be activated which bypasses the entire system. Flyspeed GV continuously monitors and limits current according to the limits as specified by the user. Additional protection for all modes of operation is provided by two solid-state fuses, one for Flyspeed GV’s general electronic protection, and the other for the emergency control channel. Simplicity of Use: After completing a Prop Cycle (CYCLE PROP, standard starting procedure/pre-flight), with DMP functionality on, DMP_ON, the Flyspeed GV can be utilized simply through normal manipulation of the throttle as when using a fixed pitch propeller. Alternatively, after CYCLE PROP, with DMP functionality off, DMP_OFF, the ▼▲ buttons can be used to select pre-programmed pitch settings for takeoff, climb, cruise, medium cruise, economic cruise, and landing while maintaining constant speed functionality. In MANUAL mode the ▼▲ buttons increase and decrease blade pitch. Customizing your Flyspeed GV: A Personal Identification Code allows you to access additional functionality, specifically to modify configuration parameters such as response control, initial pitch setting, short-circuit threshold, DMP/RPM matrix modification, and others. We recommend you do not make modifications to Default settings without first receiving approval from the manufacturer. More Options: Flyspeed GV will function with full-feathering and reversing hubs. High Performance fast pitch change hubs are also compatible. High Performance propellers can be used in landing in braking effect. Diagnostics and Error Resolution: By connecting Flyspeed GV to a PC via serial port, you can access and download RPM, DMP, and electrical current data. This is helpful when optimizing motor control and prop pitch parameters. System Components: - Electronic Control and Display Units HALL type solid state RPM sensor, with plastic bracket All necessary wiring for hub motor, battery and sensors Neodymium magneto for use with the HALL magnetic sensor Optional Installation and Diagnostic Accessories: - External knob for RPM selection - PC Interface Cable (serial DB9) Diagnostic and Data Collection Software Flyspeed GV Installation - Instrument Dial diameter 3.500” ( mm 88,9 ) - Dashboard Hole diameter 3.125” ( mm 79,4 ) - Depth 4.00” ( mm 101,6 ) - Approximate weight 0.5 lb. ( gr 250 ) 5.7.2 Regulating minimum pitch using the Flyspeed Gv Caution: Before starting the engine, remove the spinner so as to simplify later adjustments. To ensure safety and reduce incidents choose a location, which is free and clear of objects, obstacles and people. Also, ensure that the area is devoid of gravel, sand and other materials which could be sucked into the path of the propeller potentially damaging it, and/or causing injury to you and others participating in the process. - Verify max take-off RPM: with full brakes and chocked wheels, progressively apply full throttle. To avoid potentially going past red-line, we recommend starting with a moderate/high pitch setting. Max take-off RPM should be set, using the FLY switch, at approx . 5790 engine RPM ( Rotax 912,912S, 914 ); in this case about 10 RPM beneath max take-off engine RPM as specified in the aircraft operating manual or the engine operating manual. Warning: Electrical fine stop system must not work in this setting so regulate it out of the mechanical contact range to be sure to handle on mechanical setting only. This in case the Hub is equipped with electrical fine stop pitch system. - Once the correct RPM value is achieved, throttle back gently and switch the engine off. Regulate the two adjustment points surrounding the electric motor by carefully and uniformly sliding them to touch the support within the hub, this sets the physical fine mechanical end-run limits. Then tighten the adjustment points using the two selfblocking lug-nuts, do this carefully while keeping the adjustment points immobile with a drive screw. - Now, set the electrical fine pitch stop system, adjusting its contact washer by auto lock nut as down shoved, 50 engine RPM less than Mechanical RPM setting. - With brakes applied and simulating a normal flight, verify correct propeller and Flyspeed function in AUTO mode. When Flyspeed is in DMP CONTROL ON mode and not equipped with electric stops, it is not acceptable for mechanical stops to be reached and touched. Electrical stops should also not be reached and touched. NOTE: Electrical fine stop pitch system is suggested, It is strongly recommended in case of use in DMP CONTROL = OFF as for new constant speed mode. Caution: If the adjustment points are not properly registered, damage could occur as the rotating asymmetry will result in greater current loads, greater friction of the movable parts, damage to the adjustment points themselves, and differences in pitch between the propeller blades. Caution: In case of any doubts regarding the hub installation or the electric pitch control system, we ask that you contact the manufacturer or an authorized technician. Caution: Never apply direct current to the hub’s electric motor. Do so only through a Quinti Avio controller. Do not attempt to modify pitch without the blade being mounted, the end-runs could be damaged. Never use a battery charger to power the control unit, only use professional lab quality, stabilized power units that guarantee constant voltage output of 12 – 13.8V. Caution: During the first installation and during overhaul, it is possible for a small quantity of grease to leak from the hub onto the spinner and blades; use a mild detergent to remove the grease in such cases. Any grease loss should end within 15 to 20 hours of operation. 5.7.3 RPM Sensor and Magnet Support Pylon installation 5.7.3.1 Hubs with flange mounted pre-assembled Slip Ring - Mount the support pylon beneath one of the six bolts fastening the hub set to the engine flange, make sure the magnet is facing the brush mounting bracket. The HALL sensor has a DB9 type plug which plugs into the back of the Flyspeed GV, guide the wire through the firewall and bring it to the brush mounting bracket. At this point mount the HALL sensor on the plastic frame and then mount the plastic frame onto the brush mounting bracket. Caution: For all installations, take particular care to route the tachometer pickup cable away from spark plug wires, ignition coils, and other sources of electromagnetic interference. A trustworthy tachometer signal is absolutely essential for proper operation of the controller. - The magnetic sensor needs to be carefully positioned perpendicular to the magnet for proper reading to occur. The ideal distance between the magnet and the sensor tip is 1 to 3 mm. Set at 1.5 mm. Next, tighten the support pylon with a torque wrench being careful not to move the sensor positioning. Also tighten the plastic support frame using a gripping agent such as Loctite 222. To verify correct magnet positioning, connect Flyspeed GV to a 12V power source and then move the propeller manually back and forth so that the magnet passes in front of the sensor. Proper positioning will result in an RPM reading between 100 and 1000 on Flyspeed GV’s display. Caution: Before manually rotating the propeller ensure that both L & R magnetos are in the OFF position in order to avoid inadvertently starting the engine. 5.7.3.2 Hubs with the Slip Ring mounted on the propeller gearbox - The magnet is already in place on the aluminum support on the slip ring. The HALL sensor has a DB9 type plug which plugs into the back of the Flyspeed GV, guide the wire through the firewall and bring it to the prop gearbox. Normally the sensor mounting pylon is already assembled and in place. In any case it is still necessary to tighten it using a gripping agent such as Loctite 222. Caution: For all installations, take particular care to route the tachometer pickup cable away from spark plug wires, ignition coils, and other sources of electromagnetic interference. A trustworthy tachometer signal is absolutely essential for proper operation of the controller. - The magnetic sensor needs to be carefully positioned above the magnet for proper reading to occur. The ideal distance between the magnet and the sensor tip is 1 to 3 mm. Set at 1.5 mm. Next, tighten the support pylon with a torque wrench being careful not to move the sensor positioning. Also tighten the plastic support frame using a gripping agent such as Loctite 222. To verify correct magnet positioning, connect Flyspeed GV to a 12V power source and then move the propeller manually back and forth so that the magnet passes in front of the sensor. Proper positioning will result in an RPM reading between 100 and 1000 on Flyspeed GV’s display. Caution: Before manually rotating the propeller ensure that both L & R magnetos are in the OFF position in order to avoid inadvertently starting the engine. 5.7.4 Installing Flyspeed GV on the instrument panel 5.7.4.1 General Information We recommend installing your Flyspeed GV near the engine instruments, in a position optimized for pilot visibility and access. Avoid placing it near instruments with high electromagnetic emissions, or improper shielding. Complete all wiring and manifold tube connections before fixing the instrument into place. 5.7.4.2 Technical Specifications Input Draw, motor excluded Motor Current RPM Pressure sensor Short-circuit protection 9/16 V <0.1A 0.1-15A 600-20000 10-45 inches Hg 2-15 A Polyswitch, check label for installed version The hub’s electric motor is responsible for most of the current draw. Flyspeed GV itself only draws approx. 0.1A. Keeping in mind maximum electric motor draw, we recommend installing a 10A breaker, only in case of electrical stop system installed use a 15A breaker. Caution: Before Installing Flyspeed GV ensure that the cabling connecting the battery to the engine starter is sufficiently stout. In certain cases, on Rotax engines, during engine start high current draws were observed (approx. 170A at peak) which results in a drop of voltage to the instrument panel master to below the minimum necessary of 9V. In such cases Flyspeed GV goes into ‘tilt’ and will not operate in a standard manner, or it will enact a complete re-set. Flyspeed GV has two separate internal circuits, one for automatic operational mode, and one for emergency mode. - The automatic constant speed circuit can be used with or without DMP control. Manual mode is also available (non constant speed). This circuit is protected by an internal solid state Polyswitch with automatic reset. You can activate the emergency circuit from the instrument panel. The switch can handle currents up to 6A. The circuit includes a resetting breaker (30 second reset interval). When in emergency mode, for best results, manipulate propeller pitch in small increments. Caution: In emergency mode the aforementioned protection limits excessive torque to the pitch adjusting mechanism. Ensure that the electric motor is operating in ranges far from the end-runs. 5.7.4.3 Connecting Flyspeed GV to the Hub’s electric motor Keeping in mind that wire length dictates wire thickness in cases of current transmission, we recommend the use of type 16AWG or 1.38mm/2 cross-section wires. To properly connect the wires to the to the brush mounting will require you to: - Place the Flyspeed GV Emergency/Auto switch in the ‘Emergency’ position. The wires connecting the brush mounting must be connected so that acting on the ‘UP’ arrow will result in blade pitch increase. Switch the Emergency/Auto switch back to ‘Auto’. Activate ‘MANUAL’ mode by pressing the ‘SEL’ key. Press the ▲ (‘UP’) key and verify blade pitch increase. Caution: Different pitch variation between Automatic and Emergency modes is not acceptable. 5.7.4.4 Connecting the intake manifold pressure tube (DMP) Employ a 5-6mm fuel tube of the same quality and for the same fuel type used by the engine. Attach the tube to the appropriate connection on the back of the Flyspeed GV, and then connect the other end to the intake pressure outlet of the engine. Alternatively connect the tube to a standard MAP instrument using a ‘Y’ or ‘T’ connection. Ensure proper fastening at all points in order to avoid accidental disconnections. 5.7.4.5 Initial Flyspeed GV power-up For the first two seconds the screen will display the manufacturer name and product version, then Flyspeed GV will enter the CYCLE PROP automatically. The propeller will automatically complete a cycle from maximum to minimum pitch and then settle to IDLE positions. If AUTO PROP CYCLE is not active, the Flyspeed GV screen will display MANUAL. Scrolling through the menu you can choose AUTO or CYCLE PROP. Before starting the engine it will be necessary to select CYCLE PROP and then ENTER to complete the max/min pitch cycle described above. The CYCLE PROP function will not occur in any case where propeller revolutions exceed the preset value set by INIT PITCH RPM. This is to avoid a CYCLE PROP from initiating while in flight should Flyspeed GV be inadvertently disconnected from the power supply and immediately reconnected again. Once the prop has correctly completed the cycle, the Flyspeed GV will default to AUTO mode and IDLE will be displayed on the screen. Caution: It is mandatory to conduct the CYCLE PROP sequence with engine off before each flight. The sequence runs a series of internal and system checks. During the max/min cycle, the display will show hub motor electrical draw and the time employed to reach the mechanical end-runs or Electrical stop if installed. Both the electrical draw and time values are important indicators of the system’s health. A high draw value or unusually long time can be indicatory of a potential malfunction within the hub. Flyspeed GV will automatically go to MANUAL mode in the case of the instance described above. Check also for correct RPM after the power up of the engine. Please see Operational Guidelines for additional information. 5.7.5 PRESET PARAMETERS AND CUSTOMIZATION Modifying preset parameters should only be attempted once in possession of extreme operational familiarity with Flyspeed GV and under the guidance of the manufacturer. Flyspeed GV is delivered with preset parameters based on the engine type in use. SYSTEM VERSION 8.0 FUNCTIONALITY PARAMETER DESCRIPTIONS It is useful to categorize and discuss the parameters according to function. • • • • • Modes of Operation Feature Selection Parameters Control Parameters Flight Envelope Parameters Servo Control Parameters SETTING MAJOR MODES OF OPERATION This parameters category controls the overall mode of Flyspeed controller operation. MANUAL Manual mode of operation. The pilot must manually select controller presets. Pressing the up/down arrow keys ▼▲ you increase/decrease pitch (not constant speed functionality). AUTO Automatic mode of operation. Manifold pressure select controller presets ( constant speed functionality ). DMP CONTROL Selects traditional Flyspeed mode ( ON ) and Constant_speed mode (OFF). ON = DMP selects pitch based on DMP/RPM OFF = RPM is controlled by: ▼▲ keys CYCLE PROP When displayed, pressing ENTER will start a full prop cycle ( mandatory prior to each flight ). ACCESS CODE When displayed, the pilot must enter and access code to anable parameter tuning. FEATURE SELECTION PARAMETERS This category of parameters selects witch features of your hub controller to enable. AUTO PROP CYCLE Initiates an automatic prop cycle upon power-up. This helps you remember to cycle your prop, but some aircraft starter motors will cause enough voltage drop to reset your controller. If this happens, you can wire your controller into an alternate power source, or turn this parameter OFF and add CYCLE PROP to your checklist. YOU MUST CYCLE YOUR PROP BEFORE EACH FLIGHT. T_OFF TIMER ARM When set to ON, causes an automatic transition between T_OFF and CLIMB settings after T_OFF TIMER SECS seconds. T_OFF TIMER SECS Number of seconds at T_OFF RPM before changing to CLIMB RPM when T_OFF TIMER ARM is set to ON. HIGH PERFORMANCE When set to ON, allows faster pitch changes during prop braking. Servo pulses will be FAST INCR SECS. In CS mode, this parameter should be OFF. EXTENDED PITCH Enables feather and reverse functions of hubs equipped with these features. Not usefull in CS mode. FEATHER/REVERSE Enables feather and reverse features. ON = Feather enabled, OFF = Reverse enabled. Not usefull in CS mode. CONTROL PARAMETERS INIT PITCH RPM If RPM is above this value, the controller will not allow an initial pitch change to occur. To determine its initial pitch, the controller must travel to a full-fine pitch stop. It determines when it has hit a mechanical pitch stop by the sudden increase of Max cycle amps current. If the servo motor current exceeds MAX CYCLE AMPS, the controller stops or reverses the flow of current to the motor. Once the controller has performed a PROP CYCLE and has sensed the stops, it can count how many seconds to run the servomotor to determine its pitch. This is simpler than wiring pitch sensors into the hub, but it stresses the importance of cycling your prop before each flight. MIN CS DMP This is the one DMP related parameter that is critical for the new Constant Speed mode. When you select the LAND setting, if your engine power is above this DMP value, the pitch will change to achieve LAND RPM. If your engine power is below this DMP value, the pitch will remain wherever it currently is. This parameter creates the two landing techniques (HIGH POWER and LOW POWER). It also prevents the “constantspeed” controller from running up to the fine pitch stop on every landing. This parameter tells the controller when power has been reduced. It is not enabled in DMP CONTROL . MAX PROP RPM This is the one parameter which is expressed in PROP speed rather than engine speed. Above this PROP speed, the controller cannot maintain reliable operation. Because the servo motor body is rotating at prop speed, centrifugal forces can cause the servomotor’s internal brushes to lose contact with the motors commutator. At this point, you are grossly over speeding your engine and must take immediate measures to reduce your RPM via throttle. It is wise to set your mechanical pitch stops so that the minimum flyable pitch is always available. ERRATIC RPM As a means of stabilizing the tachometer signal, this parameter specifies an RPM beyond the normal range of the engine. Any noise or spikes on the tachometer signal that indicate an RPM above this value, will be ignored. FLIGHT ENVELOPE PARAMETERS This parameter category controls the tuning of flight behavior. TAXI RPM Exceeding this RPM while in IDLE will cause the controller to enter TAXI setting. The pitch is incremented slightly for better ground maneuvering. MOVE T_OFF RPM On the takeoff roll, this value specified the RPM at which to begin the pitch transition to T_OFF RPM. Setting this value lower than T_OFF RPM gives the prop time to respond to a rapid throttle increase and reduces the chances of over speeding the engine. T_OFF RPM RPM to use for takeoff. CLIMB RPM RPM to use for climb. CRUISE_7 RPM through CRUISE_0 RPM RPM values to use during cruise flight. These values are typically equally spaced across the powerplant and prop’s useful operating. ( normally are separated by 100 RPM ) ECON CRUISE RPM Lowest RPM / Highest pitch cruise setting. This one is typically set much lower than the other cruise settings as a means of saving fuel, or to support power-on descents LAND RPM The RPM to maintain when LAND is selected. This value must be set to an RPM that is suitable for go-around and touch-and-go operations. In case the flyspeed is used in DMP CONTROL ON the combination RPM/DMP will allow you already a fine pitch. In case the flyspeed is used in the new constant speed mode, in DMP CONTROLL OFF, the RPM will be set the same value like CLIMB RPM or less, in this case the RPM to maintain when LAND is selected and manifold pressure is above MIN CS DMP. T_OFF DMP CLIMB DMP CRUISE_7 DMP CRUISE_6 DMP CRUISE_5 DMP CRUISE_4 DMP CRUISE_3 DMP CRUISE_2 DMP CRUISE_1 DMP CRUISE_0 DMP ECON CRUISE DMP LAND DMP Differential Manifold Pressure, DMP, is an altitude-compensated form of manifold pressure. DMP is only measured when operating in the automatic mode with DMP CONTROL set to ON. In Constant Speed mode, DMP values are ignored. The Flyspeed uses the range of pressures specified in these DMP parameters to determine when to switch between preset RPMs. The best way to tune these parameters for your specific aircraft is to record your DMP indication during a takeoff, again in cruise, and again during a landing. Once you have key data points, do the math to interpolate (equally space) the rest of the values between those you recorded. The Flyspeed Parameter Guide lists values that will get you started. Pay careful attention to the actual DMP readings as you fly and see if they match your parameters. If not, tune your parameters accordingly until your controller no longer “hunts” between settings. SERVO CONTROL PARAMETERS This parameter category determines the electrical behavior of the hub servomotor. COARSE PULSE DUR COARSE PULSE DLY COARSE HYST RPM FINE PULSE DUR FINE PULSE DLY FINE HYST RPM How long of a pulse is applied to the servo during a coarse pitch change. How long to wait for RPM stabilization before applying another pulse. An RPM “window” for acceptable coarse pitch movement. How long of a pulse is applied to the servo during a fine pitch change. How long to wait for RPM stabilization before applying another pulse. An RPM “window” for acceptable fine pitch movement. In actual practice, the controller behaves best when setted both COARSE and FINE parameters for short duration movements and make the hysteresis windows closely spaced, even multiples of each other. For example 100 and 50, or 120 and 60, etc. If you make this relationship too large, the servo feedback will be sloppy due to overshooting. If you make this relationship too small, the servo feedback will never be satisfied and will make constant tiny corrections. FULL FINE PITCH % Minimum pitch determined by percentage of ½ prop cycle time. GO AROUND PITCH % Pitch increment percentage when applying power for goaround. It is enabled in DMP CONTROL ON only. MAX DMP RATE Maximum rate of pressure change before using coarse movement. It is enabled in DMP CONTROL ON only with HI PERFORMACE ON. TAXI INCR SECS Number of seconds to increment pitch when moving from IDLE to TAXI. FAST INCR SECS Number of seconds to move servo when HIGH PERFORMANCE is ON. It is enabled in DMP CONTROL ON only with HI PERFORMANCE ON. MIN CYCLE SECS Minimum seconds a CYCLE PROP should take if hub is airworthy. MAX CYCLE SECS Maximum seconds a CYCLE PROP should take if hub is airworthy. MAX CYCLE AMPS Maximum amperage during a CYCLE PROP if the hub is airworthy. In cold climates, the hub bearing grease can become stiff. This can result in prop cycle faults. Except for truly severe climates, simply raising the limits very slightly for prop cycle time and current can resolve the problem. It is also helpful to use the emergency switches to wiggle the pitch a few times before cycling a cold hub. Do not alter the values below as these are strict limits unaffected by temperature. MAX SERVO AMPS Maximum amperage the servo should ever draw. MIN SERVO AMPS The minimum amperage to expect from the servo. Typically set to 0. SERVO STOP AMPS The amperage that indicates the servo has hit a mechanical pitch stop. HIGH AMP DLY Internal signal delay to reduce surging. SHUNT RESISTOR Internal calibration. DMP OFFSET DMP GAIN DMP WINDOW Critical internal calibration data. Unique to each controller. These values are recorded on a label affixed to your controller, and are written on the test paperwork that came with your controller. Be sure to record these values or you may need to return your controller for factory calibration. ENG/PROP RATIO The gear ratio of your Prop Speed Reduction Unit, if so equipped. FACTORY PROP TEST FACTORY TEST MODE FACTORY PRESETS Factory test procedure Factory test procedure Pre-programmed parameter sets. PRE-PROGRAMMED TABLES Table 0 Table 1 Table 2 Table 3 Table 4 Table 5 Table 6 Table 7 Table 8 reserved The user can add/change data keeping count of engine characteristics and propeller use. Rotax 912 80 HP Rotax 912S 100HP Rotax 914 Turbo Midwest Rotare 105 HP Alfa Romeo avionic conversion Continental C85 (non-gearboxed) Lycoming Subaru 1.82 gearbox Tuning intake pressure differential readings: Flyspeed GV is delivered already tuned, complete tuning guidelines can be found however, in the service manual. Useful Status Messages This is a summary of the more useful status messages you may see and their meanings. UP_LIMIT DN_LIMIT Prop has traveled to full COARSE pitch stop. Prop has traveled to FULL FINE PITCH % stop. SHORT CYCLE ERR Prop cycle time was less than expected. (Try wiggling pitch via switches) LONG CYCLE ERR Prop cycle time was greater than expected. (Common in cold climate). RPM TOO HIGH Engine RPM is too high to allow requested transition ( reduce throttle ! ) 5.8 Operational Guidelines 5.8.1 General concepts for Flyspeed GV use with standard hubs and DMP CONTROL ON - - - - - - Take-off maximum power is delivered to the propeller while not exceeding the time allowed at the full power setting. With speed increase, there is a corresponding load decrease on the propeller, creating a condition where applied full power could lead to excessive RPM as defined by the engine manufacturer. Flyspeed GV will automatically increase blade pitch, maintaining constant speed, and avoiding ‘red-lining’ or ‘overspeed’. Once you reach a safe altitude, power must be throttled back to the maximum continuous setting as defined by the manufacturer. Flyspeed GV will automatically transition to CLIMB mode based on pre-programmed parameters where the minimum DMP value for CLIMB will correspond to maximum continuous power. The automatic transition to CLIMB occurs after the number of seconds as specified by T_OFF TIMER SECS. If T_OFF TIMER ARM is OFF the reduction in power setting must occur by throttling back and bringing the DMP value beneath the minimum required by TAKE_ OFF RPM. Current DMP value is constantly visible on the display screen. At cruise altitude any of the many Flyspeed GV cruise settings can be engaged through throttle action. There are nine cruise settings: CRUISE_7 RPM to CRUISE_0 RPM and ECONOMY CRUISE RPM for maximum fuel efficiency. If fewer than nine cruise settings are preferable, they can be reconfigured and reduced through parameter customization. If you choose to do so, be careful to maintain a linear progression through the range of settings you define. While descending, or preparing to land, blade pitch must revert to an angle close to that used for take off. LAND mode achieves that. It is engaged by the combination of RPM and DMP values requiring a reduced pitch setting. Further reduction in power (beneath the minimum DMP setting for LAND) will result in IDLE mode and blade pitch will remain fixed (no longer constant speed). Adding power however, will re-initiate automatic selection of the appropriate mode, from CLIMB RPM to LAND RPM, without the necessity of Pilot interaction with Flyspeed GV. An alternative landing approach is as follows. Reduce power until the Flyspeed GV displays IDLE. Press ENTER (below INIT PITCH RPM and minimum DMP value) Flyspeed GV will select the correct blade pitch specified by GO AROUND PITCH % . This will allow the application of full power for take-off. If GO AROUND PITCH % is not defined, Flyspeed GV can achieve the proper pitch by returning to the minimum allowed. When this is occurring and transition is complete T_ OFF will be displayed confirming that the desired pitch setting has been attained. During this relatively short timeframe, it is important to be careful not to exceed RPM allowances. The pitch angle attained in this manner will be slightly higher than that attained on the ground prior to take-off, the reason being that the motion through the air ‘lightens’ the load on the blades slightly compared to when the aircraft is stationary on the ground. Flyspeed GV during all operational activity, constantly monitors the pitch variation mechanisms to ensure that it is functioning properly and efficiently. This is achieved by constantly checking the electric current levels. High current levels might indicate abnormal mechanical friction. Low current levels indicate and electrical anomaly or an increase in resistance at the slip ring or at the brushes. 5.8.2 General concepts for Flyspeed GV use with special hubs and DMP CONTROL ON 1) Selecting Full Feathering This option may be used when the propeller is turning at a speed below INIT PITCH RPM and IDLE appears on the display. To engage press ▼, FULL-FT<> will appear. Shut the engine off and press ENTER, the propeller will move to full coarse and display MANUAL when it is achieved, Flyspeed GV can be shut off too. Before restarting the engine make a new CYCLE PROP, at this point the engine can be restarted. Normal flight can resume in this way: 1. Initiate a gentle climb adding power gently to avoid an ‘overspeed’ event. AUTO RPM regulation will be engaged over the MOVE T_OFF RPM. Caution: Use this functionality exclusively with hubs/prop sets predisposed for full feathering functionality. Caution: This option should be employed only at a sufficient altitude to guarantee a safe power-off landing in case of failure to restart the engine. Caution: Flyspeed GV and full feathering necessitate HIGH PERFORMANCE parameter to be switched OFF. 2) Selecting Reverse This option may be used when the propeller is turning at a speed below INIT PITCH RPM and IDLE appears on the display. Pressing ▼ will make REVERSE<> available as an option. Selecting ENTER will initiate the propeller’s transition to full fine (which corresponds to reverse) and Flyspeed will enter MANUAL mode. At this point manipulate pitch as necessary with the ▼▲ keys for taxing or using the EMERG mode. To take off again is required to shut off the engine and make a new CYCLE PROP as for a standard Take off. Caution: Always use minimum power settings to avoid ‘redlining’. Caution: This functionality is to employed exclusively with hub/prop sets specifically designed and tested for reverse use. Caution: Reverse functionality is for exclusive use with hydroplanes or amphibious aircraft only after a water landing for taxiing purposes. Caution: Flyspeed GV and reverse necessitate HIGH PERFORMANCE parameter to be switched OFF. 3) High performance This mode should be used in high performance aircraft in which the propeller can serve as a braking device upon landing. In standard operational mode ‘redlining’ becomes a real possibility in case power needs to be reapplied quickly. In such cases the sudden DMP increase ( in excess of MAX DMP RATE ), in additiont to the TAXI INCR SECS, will initiate rapid, within mechanical limits, transition from the very low landing pitch angle to a broader pitch angle suitable for reapplying power. The preset value for this pitch angle transition is determined by FAST INCR SECS. Subsequent to which normal take-off mode will be employed. This option may be used when the propeller is turning at a speed below INIT PITCH RPM and IDLE appears on the display. Selecting ENTER will initiate the propeller’s transition to FULL FINE PITCH % ; once the correct pitch is attained IDLE will be displayed and landing or go-around are both options. In case of a landing, it will be necessary to perform a PROP CYCLE. Caution: Employ this operational mode only at safe approach altitudes as the braking effect it generates can quickly slow the aircraft to near stall speed. As a consequence of the breaking effect, a steeper glide path will be required. Caution: This functionality is to employed exclusively with hub/prop sets specifically designed and tested for high performance use. SAFETY CONSIDERATONS In order to avoid engine damage, never exceed allowed RPM. Flyspeed GV manages maximum power on take-off while avoiding RPM ‘overspeed’. An electrical malfunction could potentially ‘freeze’ the propeller at a high or low pitch setting. In this event the engine may not be able generate sufficient power for take off or climb. In the event of severe turbulence it may be difficult to manage theFlyspeed GV control keys, as it may be difficult to operate in an efficient constant speed manner. In such cases we recommended employing MANUAL mode. 5.8.3 OPERATIONAL GUIDELINES WITH DMP CONTROL ON ( standard operation ) TAKE-OFF 1) Initiate CYCLE PROP with engine off in order to reach minimum pitch setting. If AUTO PROP CYCLE is ON, this event will occur after start up. During the pitch cycling, the Flyspeed GV display will show current level and time, and at the completion of the cycle will display IDLE. If an error occurs it will default to MANUAL mode. 2) Start the engine for warm-up, taxi, and take-off. 3) Apply full power and when max RPM are reached release the brakes. 4) After take-off, CLIMB mode will automatically be engaged. Adjust throttle position for optimal DMP setting. If DMP CONTROL is ON, Flyspeed GV will automatically optimize RPM according to DMP as established through throttle position. Take off from high altitude fields while in Automatic Pitch Control If taking off from a higher altitude field than normal, it is recommended that you employ a different procedure than normal after the CYCLE PROP sequence has been completed. This is to avoid a potential ‘overspeed’ event which could occur due to the lower air density found at higher elevations. 1. 2. 3. 4. 5. Execute a normal CYCLE PROP sequence Start the engine Enter MANUAL mode through the SEL key Re-enter AUTO mode through SEL key and ENTER to confirm At this point, DMP control will take over RPM management. Max allowable RPM will be a determined by the CLIMB parameter. Caution: This procedure will avoid an ‘overspeed’ event. The pilot must recognize that max RPM will be lower than normal, and less quickly attained. This is important to determining the safety of the take-off maneuver. Take off from high altitude fields while in Manual Pitch Control If taking off from a higher altitude field than normal, it is recommended that you employ a different procedure than normal after the PROP CYCLE sequence has been completed. This is to avoid a potential ‘overspeed’ event which could occur due to the lower air density found at higher elevations. 1. 2. 3. 4. 5. 6. Execute a normal PROP CYCLE sequence Start the engine Enter MANUAL mode through the SEL key Increase blade pitch sufficiently to avoid an ‘overspeed’ and take off. At a safe altitude re-enter AUTO mode through SEL key and ENTER to confirm. At this point, DMP control will take over RPM management. Caution: When in MANUAL mode, because of the lower wind resistance after rotation, RPM will tend to increase. The pilot must consider this tendency and take the appropriate steps to avoid an ‘overspeed’ event during this initial phase of flight. CRUISE With DMP CONTROL ON , and flying at high altitude or in non-standard temperature/humidity conditions, the preset RPM/DMP settings may require some intervention as MAP will deviate substantially from DMP because of the lower atmospheric pressure. Use the ▼▲ keys for the following effect: DMP Setting Standard RPM T_OFF 5800 CLIMB 5500 CRUISE_7 5400 CRUISE_6 5300 CRUISE_5 5200 CRUI4E_4 5100 CROISE_3 4900 CRUISE_2 4700 CRUISE_1 4500 CRUISE_0 4300 ECON_CRUISE 4100 LAND 3800 Down once 5800 5800 5500 5400 5300 5200 5100 4900 4700 4500 4300 4100 Up once 5500 5400 5300 5200 5100 4900 4700 4500 4300 4100 3800 3800 Up twice 5400 5300 5200 5100 4900 4700 4500 4300 4100 3800 3800 3800 If you have significantly deviated from standard pre-set ( AUTO ) functionality and chose to re-engage it a new, press SEL bottom, when in AUTO press ENTER bottom. Pitch control will revert to standard DMP control LANDING 1) With DMP CONTROL enabled, reduce power until LAND is displayed, the correct descent/landing pitch will automatically be selected. 2) If additional power reduction is necessary, Flyspeed GV will ‘freeze’ blade pitch and display IDLE. Transitioning from LAND to IDLE or IDLE to LAND is automatic. Applying full power for a go-around will not ‘redline’ however as Flyspeed GV will achieve maximum continuous RPM ( with TAKE OFF TIMER ARM set ON ) or maximum RPM (with TAKE OFF TIMER ARM set OFF). 3) You can achieve reduced pitch for landing in another manner as well; to confirm landing intention while the prop is spinning beneath INIT PITCH RPM and Flyspeed GV displays IDLE, select ENTER. Pitch will transition to FULL FINE PITCH %, when proper pitch angle is achieved Flyspeed GV will display IDLE and will be ready for landing or go-around. 4) You can achieve reduced pitch for landing in another manner as well; to confirm landing intention while the prop is spinning in LAND RPM , select ENTER. Pitch will transition to GO AROUND PITCH %, when proper pitch angle is achieved Flyspeed GV will display T_OFF and will be ready for landing or go-around. Following are possible manual settings: a) After PROP CYCLE pitch angle is determined by the FULL FINE PITCH % parameter value. b) Selecting IDLE and ENTER will determine pitch angle in accordance with FULL FINE PITCH % parameter value. c) Selecting LAND and ENTER will determine pitch angle in accordance with GO AROUNG PITCH % parameter value. d) Selecting IDLE will ‘freeze’ pitch angle. 5.8.4 CONFIGURATION SETTING AND DETAILS Flyspeed GV can manage multiple modes: full feathering, reverse, high performance, as well as standard. a) Standard Hub: Cannot be employed in Full Feathering, Reverse, or High Performance modes because of standard pitch angle change velocity. b) Full Feathering Hub: Cannot simultaneously handle Reverse and High Performance modes. c) Reverse Hub: Cannot simultaneously handle Full Feathering and High Performance modes. d) High Performance hub: Cannot simultaneously handle reverse and full-feathering Parameter Tuning After installation and before first flight with your controller, you must verify and adjust the many Flyspeed internal parameters. Although the Flyspeed has “Factory Presets” for various engine makes and models, these should be considered a starting point if they don’t precisely match your airframe and powerplant combination. Regardless of your aircraft type, it is wise to review and get to know the parameters and their interaction. TO ENTER PROGRAMMING MODE: 1) Apply Power 2) Press and hold the ENTER arrow button for 5 seconds (or until controller finishes self-test) 3) Press the SEL button three times until ACCESS CODE is displayed 4) Press the ENTER arrow button. 5) Press UP, DN, UP, DN 6) Press SEL repeatedly to step through the parameter list. 7) Use the UP and DN buttons to change parameter values and press ENTER to save each change. When you reach the last parameter, normal operation will resume. There is no way to step backwards through the parameters, nor is there a way to speed up data entry. You can reenter Programming Mode whenever you need to once you have entered it after initial power up. 5.8.5 OPERATIONAL GUIDELINES WITH DMP CONTROL OFF ( Constant speed mode ) 5.8.5.1 Take off and Cruise in Constant Speed Mode When you set the parameter DMP CONTROL to OFF, you have selected the new “Constant-Speed” (CS) mode of operation. In CS mode most, but not all, of the power-topitch decisions are in the hands of the pilot. Before we take our first virtual flight together, let’s review one significant safety feature. Because CS mode requires that a pilot understand the dynamics of constant-speed control, a novice or unknowing pilot could find him or herself in a tight spot if they simply hop in and take off without regard to prop control. This is no different than if the same pilot climbed into a high performance aircraft without understanding the relationship between the levers with the black, red and blue handles, only we use buttons instead of levers. However, since the Flyspeed is an intelligent controller, it can lend a hand to assure the safety of a pilot who might not even recognize the controller’s purpose. If a pilot simply starts the engine, the controller will select IDLE pitch to keep the noise down around the airport. As the pilot adds throttle, the controller will select TAXI pitch and increment the blade angle enough to get the aircraft rolling. If the pilot taxis onto the runway and applies full throttle, the controller will switch to T_OFF pitch suitable for takeoff. A few seconds after takeoff, the controller will switch to CLIMB pitch and will remain there for the duration of the flight. In CLIMB pitch, the pilot may not fly as fast as he could if he knew how to use the controller, but he would have plenty of power to fly and safely land the plane. Now that we have saved our uninformed pilot from himself, let’s go flying the correct way! The prior example describes how to perform a normal takeoff sequence with CS mode enabled, but let’s discuss it in greater detail. NOTE: When studying this section of the Pilots Guide, it will help to have a Flyspeed Parameter Worksheet available for reference, such as those provided at the end of this document. TAKEOFF SEQUENCE IN DETAIL 1) If you have set the AUTO PROP CYCLE parameter to ON, the prop will cycle through its full pitch range automatically when you apply electrical power. Engine starter motors draw large amounts of electrical current. On some aircraft this can cause your controller to reset. If you encounter this, I suggest that you set AUTO PROP CYCLE to OFF and cycle the prop manually after starting your engine. Press the SEL button until the display shows “Cycle Prop” then press the Enter button to start the cycle. A normal prop cycle will occur within the time specified by the MAX CYCLE SECS parameter (around 9 seconds if warm or under 14 seconds in cold climates when the bearings and grease are stiff). When the cycle is complete, the controller will display how many seconds it took and will leave you in IDLE pitch setting. Note: It is imperative that you cycle your prop! The Flyspeed can only determine the blade pitch by timing its travel between mechanical stops. If your prop does not cycle correctly, investigate and fix it before flying. Prop cycling before each flight is critical and must be included in your preflight checklist. Failing to cycle your prop is cause for an aborted takeoff. If you do find yourself airborne without cycling, fly the plane at a safe altitude using the manual mode or emergency mode switches and work out a good pitch for landing the plane. It is possible to cycle the propeller in flight if the engine can be operated at idle RPM long enough to complete the cycle, but this is not recommended. 2) With your engine started, the IDLE setting provides minimal pitch. This contributes to smooth idle and minimal noise while still maintaining cooling airflow. Once you leave IDLE by adding throttle, you will have to re-select it to return to IDLE setting if desired. 3) When you are ready to taxi, adding throttle to cause RPM to increase beyond TAXI RPM will cause the controller to move to the TAXI setting, increasing the pitch by running the servo motor for the number of seconds specified by the TAXI INCR SECS parameter. This will give you the necessary thrust for ground maneuvering. 4) To perform an engine run-up, increase the throttle to your desired RPM. If you exceed the RPM specified by MOVE T_OFF RPM, the controller will move to the T_OFF pitch required to maintain T_OFF RPM . The automatic timer will engage (if enabled) and a transition to CLIMB pitch will occur after T_OFF TIMER SECS seconds. If you do not wish to verify the transition to CLIMB, you must limit the throttle to below the MOVE T_OFF RPM. If you do transition to CLIMB, you must reduce the throttle and RPM again and select the TAXI setting to re-arm the timer. Remember to select the desired setting using UP/DN buttons, and then press Enter to activate it. 5) When you are ready to taxi into position, you should be in the TAXI setting. This assures that the timed sequence is armed. When you are in position and ready for your takeoff roll, you can remain in TAXI and let the controller automatically switch to T_OFF as you exceed the MOVE T_OFF RPM value, or you can directly select and activate T_OFF before applying takeoff throttle. Either way will start the timed sequence, assuming you have set your T_OFF TIMER ARM parameter to ON and have specified a value for T_OFF TIMER SECS seconds. 6) T_OFF RPM will be maintained until the timed transition to CLIMB occurs (typically 18 to 30 seconds) at which time the pitch will be increased to maintain CLIMB RPM. 7) At this point, you the pilot are in complete control and it is up to you to determine when to switch to a suitable cruise setting. If you prefer to have total control of pitch changes, then you can set T_OFF TIMER ARM to OFF, and specify zero for T_OFF TIMER SECS. After this, you must directly select T_OFF, CLIMB, and subsequent cruise settings. TAKEOFF_SEQUENCE_SUMMARY 1) 2) 3) 4) 5) 6) 7) 8) Start engine and press CYCLE PROP (if not already cycled). IDLE until ready to taxi. Increasing throttle will activate TAXI as you begin to roll. Run-up as desired and optionally verify T_OFF and CLIMB transitions. Reduce throttle and select TAXI setting again to re-arm timer (if needed). TAXI into position. Apply full throttle to transition to T_OFF then CLIMB settings. Select a cruise setting when desired altitude is reached. CRUISE FLIGHT 1) After climbing to the desired altitude, select a desired cruise setting, CRUSE 7 RPM through CRUISE 0 RPM, or ECON CRUISE RPM. Use the UP/DN buttons then press Enter to activate the selection. Cruise settings are typically programmed for about 100 RPM increments. 2) You are now free to select and activate any of the cruise settings you prefer for the duration of your flight. Don’t overlook your ability to select CLIMB again if you need more altitude. Before we get too far off the subject, Flyspeed Version 8 implements an additional mode of operation called USER mode. After selecting and activating a setting, if you press Enter a second time, the controller will display USER. While in USER mode, each press of the UP/DN buttons will increment or decrement the current pitch by a small amount (the value specified by the FINE HYST RPM parameter). Pressing Enter again will exit USER mode. This simply gives you a way to fine-tune your RPM in case you have a harmonic vibration that you would like to eliminate (although you could fly an entire flight in USER mode if you want to). 5.8.5.2 CONSTANT SPEED 101 Now that we are enjoying a leisurely virtual cruise, let’s talk about “constant speed” theory for a moment. If you have never flown a constant-speed prop, this can be very counterintuitive. Golden Rule #1: In CS mode, the throttle controls available “power” and the prop controller sets the “desired RPM” by changing the blade pitch. If you leave the throttle at full power, selecting a lower cruise setting will move the blades to a coarser pitch to achieve the lower RPM. A coarser prop pitch will result in faster flight as long as your engine has the power it needs to pull the aircraft faster with this greater pitch. Think about this fact and internalize it. Conversely, if you select a higher cruise setting, the controller will move the blades to a finer pitch to achieve the higher RPM. This may have a braking effect, slowing you down. For example, if you wish to slow down for a controlled descent, you could select a higher cruise setting. All of this assumes that you have left the throttle (power lever) alone. You can also initiate a descent by selecting a lower cruise setting and then rob the engine of power by reducing the throttle slightly. At some point, any engine will fail to deliver the power required to pull the aircraft with a coarse pitch setting. Therefore, as you move through the lower cruise settings, you can expect to reach a point where your speed drops off as you exceed the capability of your engine. This is noteworthy, because if you find your airframe and powerplant combination cannot use some of the cruise settings, you can reprogram them as needed. For maximum speed, push your throttle all the way forward, and slowly select lower cruise settings until your maximum speed is achieved. Allow several seconds for your airspeed to adjust as you try the various cruise settings. You can also enter USER mode and increment or decrement the RPM in smaller units to fine-tune your performance. If you determine that some of the lower cruise settings are simply too coarse to be of practical use, then you can reprogram their RPM values if you choose. So what if I reduce the throttle? Reducing the throttle reduces the available power. However, it also reduces the engine noise and fuel consumption. Quite often it is possible to reduce power considerably with very little loss of speed and achieve substantial fuel savings. This can yield a quieter, more economical flight. Keep in mind as you reduce your throttle, that your engine will run out of power much sooner for any given prop pitch. It may be unreasonable to expect your engine to lug the aircraft along in a coarse pitch with very little power, although the ride may be nice and quiet. This combination of power and pitch might be desirable for a long slow descent since it saves fuel and noise. For a fast descent, selecting a higher cruise setting (finer pitch) AND reducing the throttle, will cause the prop to act as a brake and you will achieve rapid loss of altitude, sometimes surprisingly rapid. Experiment at a safe altitude and internalize this behavior. While on the subject of experimenting, always keep in mind that the Flyspeed provides an “emergency” toggle switch and up/dn toggle switch. If you ever need to override the Flyspeed behavior, this is your ticket. The MANUAL mode of operation is still subject to some of the sensor inputs, so in the event of a failure, the emergency switches are your best option. I will touch more on this subject later when we cover the various parameter definitions. 5.8.5.3 Landing in Constant Speed Mode Landing is important… every flight should include one, and every one should be graceful. There is one very important parameter to keep in mind when landing the plane in constantspeed mode: MIN CS DMP – The minimum manifold pressure for which to remain in constant-speed mode. This parameter, is important enough for you to write it on a small sticker placed right next to your controller. Knowing how this parameter works will allow you to land like a pro,,, or not. Consider two scenarios as you descend into a traffic pattern: 1) If you’re a macho Top-Gun type, you’re probably descending into a short-field aircraft-carrier-like landing in a high cruise setting using the prop as a brake with high RPM, dropping like a rock, using prop pitch control. 2) For normal personality types, you are more likely to be in a lower cruise setting gently sinking into the pattern under low RPM and flying by throttle control. Both scenarios have their place in the world. For short-field approaches, it makes sense to take advantage of a fine prop pitch (braking) and high RPM (go-around power). If your local field has strict noise-abatement procedures or a lengthy runway, you’ll make more friends using a low RPM approach. As you enter the pattern, at some point on downwind, base, or final, you need to select and activate the LAND setting. Here is where the magic number MIN CS DMP comes into play. This is the one time in CS mode where the Flyspeed must pay attention to engine power via manifold pressure to make the right decision. Here are your two options: 1) HIGH POWER APPROACH: If your approach RPM is high enough for your DMP (as displayed) to be above MIN CS DMP, then when you select and activate the LAND setting, the controller will continue to operate in constant-speed mode and your pitch will move to a very fine position to achieve the high RPM specified by the LAND RPM parameter (typically climb RPM ). This may have a sudden braking effect as the fine pitch raises the engine RPM. Seasoned hot-dogs (those who live more than one season) might do this as they turn short final, but you need to be aware of this behavior so it won’t catch you off-guard. In a conventional constantspeed aircraft, this is like setting the prop lever to full fine while on final. Many people do this routinely, but it takes some practice to get it right. The high power approach has the benefit of already being at a perfect pitch and power for a goaround. 2) LOW POWER APPROACH: If your approach RPM is low enough for your DMP (as displayed) to be below MIN CS DMP, then when you select and activate the LAND setting, the controller will NOT remain in constant-speed control. Instead, your pitch will remain wherever it was when you selected LAND and you can continue to land the plane under throttle control (like most people were trained to do in a Cessna). If you need to perform a go-around, simply adding full throttle will rapidly increase your DMP to a value above the MIN CS DMP value, at which point the controller will rapidly move to a fine pitch to achieve the LAND RPM (typically climb RPM ), suitable for a go-around. This is why we set LAND RPM to a relatively high value. Now you’ve got two different tools for accomplishing good landings. Either one works, but both take practice. There will be a time and place for either method. LANDING_SEQUENCE_SUMMARY 1) 2) 3) 4) 5) 6) 7) Decide whether to make HIGH or LOW POWER approach. If HIGH POWER, enter traffic pattern above MIN CS DMP power. If LOW POWER, reduce throttle, enter traffic pattern below MIN DMP CS power. Select LAND at desired point on downwind, or base, or final. Rapid throttle increase will initiate go-around pitch and power. Throttle reduction after landing will allow return to TAXI setting. Once in TAXI setting, the T_OFF to CLIMB transition is re-armed. TOUCH-AND-GOES AND STOP-AND-GOES A touch-and-go operation is basically a landing, but with full throttle applied immediately after touching down and retracting your flaps. In CS mode, the Flyspeed can behave in one of two ways: 1) In LAND setting, a rapid application of power will bring your DMP above the MIN CS DMP value and the controller will seek and maintain LAND RPM (typically like climb RPM ). This should be adequate for your takeoff and climb. You can select CLIMB or one of the cruise settings as needed, but if you are remaining in the pattern, you can also just remain in LAND and the behavior should be repeatable. Practice makes perfect. 2) If you roll to a full, or nearly full stop (stop-and-go) or you simply wish to re-arm the timed transition from T_OFF to CLIMB, you must select and activate TAXI pitch in order to re-arm the timer. For example, if you are taxiing back around for another takeoff, it seems intuitive that you would want to select TAXI. The rest is automatic. If you are doing a touch-and-go, but want to re-arm the timed transition, then you must select and activate TAXI around the same time as you are raising your flaps and make sure you have reduced your RPM enough to allow TAXI to be entered (it will take hold when the RPM is below the value of INIT PITCH RPM). As soon as you see TAXI, the timer is re-armed. Apply full throttle and the T_OFF and CLIMB sequence will repeat. TUCKING THE AIRCRAFT BACK IN THE HANGAR When you’ve spent enough money for one day, select and activate TAXI as you taxi back to parking. If you prefer to let the engine idle for a while before shutting down, you can select and activate IDLE once your RPM is below TAXI_RPM . This will allow the engine to idle quietly and smoothly without kicking up a lot of dust. If you need additional airflow for ground cooling, you can always increment the pitch manually or via USER mode. 5.8.6 Trouble shooting 1) If the RPM display shows “-------“ Flyspeed GV is not receiving RPM data. This may be an issue of extremely low RPM or of sensor non-connectivity. Check the following: a) Check all Flyspeed GV connections b) Verify magnet/sensor proximity and magnet polarity c) Ensure secure magnet sensor fastening d) Damaged or inoperable magnet sensor > If the problem persists contact an authorized service provider or the manufacturer. 2) No DMP variation with different throttle settings: a) Disconnect Flyspeed GV pressure-sensing tube from engine placement. Blow into tube lightly, Flyspeed GV should register and display a 5”-10” pressure increase. b) Verify that the tubes connected to the carburetors for MAP reading are intact and that all seals are tight, so as to rule out the possibility of air leaks. > If the problem persists contact an authorized service provider or the manufacturer. 3) Hub motor is inactive a) Verify proper Flyspeed GV display function and no error-messaging. b) Set Flyspeed GV to EMERGENCY mode and connect DVM (Digital Voltmeter) through the slip ring. Move selector switch UP and DOWN and verify +12 and -12 Volts. With voltage reaching the slip ring, ensure motor functionality. In voltage absence check all components for functionality including wiring, brushes, brush mountings etc. c) The LED will illuminate when the hub motor is turning. If that is not occuring be sure the AUTO/EMERGENCY switch is not set to EMERG and that there is not an issue of excess current draw. d) See error message. Footnote 2. > If the Flyspeed GV ‘s display is operating normally, but voltage is still abnormal contact an authorized service provider or the manufacturer. Opening the instrument casing will void warranty coverage. 4) Prop getting stuck in the coarse position 1 Manual controller: If both fine and coarse indication lights are lit upon applying power to the unit then ensure thet the hub wires are not compromised ( grounding ). 2 Flyspeed controller, switch in AUTO position: When in MANUAL mode if hitting the up or down arrow works only one way then suspect one of the hub wires is grounding. Verify by putting controller in EMERG position. If toggle works one way but the unit loses power and reinitialises when tried the other way, then suspect one of the wires to the hub is grounding. 5.8.7 Preventive maintenance Regularly inspect the brushes and the slip ring. Dirty contact patches can be cause of electrical ‘arcing’ which will reduce component service life and cna cause static noise within the aircraft and may eventually damage Flyspeed GV. We recommend periodic wiring inspections, be looking for cracked/frayed wires, loose connections and severe bends/folds. Also look for leaks, crimps, cracks and any other damage, due to aging and wear, to the tubes collecting intake manifold pressure data. 5.8.8 Error messages 1. SHORT CYCLE ERR - The time employed to cycle the propeller was under MIN CYCLE TIME. This can mean that the hub motor required an excess of current, or that MAX CYCLE CURRENT is set too low. Inspect the hub/prop for any mechanical obstructions anomalies. 2. LONG CYCLE ERR - The time employed to cycle the propeller was over MAX CYCLE TIME. This can mean that the hub motor required less current than normal, or that MAX CYCLE CURRENT is set too high. Check that the AUTO/EMERGENCY switch is set to AUTO and that the LED is illuminating. An open circuit somewhere between the Flyspeed GV and the engine can cause this, or the unit may be malfunctioning. See footnote 3 under DOUBT RESOLUTION. 3. PROP UNDER CURR - The hub motor is drawing less current as set by MIN SERVO AMPS. See footnote 3 under DOUBT RESOLUTION. 4. PROP OVER CURR - The hub motor is drawing more current as set by MIN SERVO AMPS. The motor is absorbing excess amperage. Likely causes are increased mechanical resistance (due to damage or dirt) or a damaged electric motor . 5. INVALID PRESET - The selected value is outside of the range of available choices. Review the manual for acceptable values or contact the manufacturer or dealer. 6. NOT PRESET LOADED - Flyspeed GV has not yet been pre-configured for use. See INVALID PRESET above. 6.0 Emergency procedures Following are potential malfunction sequences which could adversely affect the propeller/hub system’s operation. Flyspeed Gv 8.0 The following symptoms of incorrect functionality must be addressed immediately: - Steep Engine and Propeller RPM variation, especially when sudden, and not co relational to correct pitch control functionality. Not to be mistaken for the normal RPM changes that occur when in DMP CONTROL, between one parameter setting and another, and which can be easily stabilized by ‘tweaking’ the throttle setting up or down which clears us from the transitional parameter setting determined by DMP WINDOW (usually pre-set with range of 0.4 inch DMP). - The Flyspeed Gv display no longer gives any indications. In this case, and in all other cases where pitch control is lost due to Flyspeed Gv malfunction, the following steps should be taken: - Throttle back if engine speed is high and an ‘overspeed’ event may be imminent. Select EMERGENCY mode with the appropriate switch and modify pitch as necessary using the switch on the left. Use short pitch movement inputs to maximize accuracy. Caution: A long input on the pitch control switch while in EMERGENCY mode can quickly attain a pitch setting which may be in excess of that which was intended. A long input could also trip the resetable switch, designed to protect the EMERGENCY circuitry, which will then make further pitch settings unavailable until it has reset, approximately 20-30 seconds. Caution: If the EMERGENCY mode cannot be called up, blade pitch will remain on the most recent setting. If the pitch setting is in the range of normal flight, you may proceed with caution. Throttle input should be applied as if employing a fixed-pitch propeller. Caution: The pilot must verify low-speed performance on the current pitch setting before initiating landing maneuvers. This in order to know what behavior to expect in the case a go-around becomes necessary. Caution: In the event that the blade pitch is ‘frozen’ at an extremely high or low setting and performance is affected negatively to the point that it is not safe to continue flying, it is imperative to land immediately. In these cases the engine should be stopped at soon as possible to ensure better glide performance. 7.0 Inspections, Maintenance, Repairs 7.1 Inspections and Maintenance When environmental conditions are characterized by high humidity levels, exposure to corrosive or acidic substances, the owner/operator must protect the external parts of the hub with an anti-corrosive agent such as CRC. Regularly scheduled maintenance consists of the following: - BEFORE EVERY FLIGHT: Check the brushes, their mountings, and the slip ring for wear or damage. Also verify that the brushes are positioned correctly. Visually inspect all bolts, nuts, and screws. Inspect the spinner and spinner plate. Note any grease leaks. Check for excessive prop blade ‘play’ (up to 1° pitch play allowed, no axial or radial play is allowed) . Check all wiring for damage, wear or loose connections. Verify electric motor functionality and blade pitch change on the ground, engine off. Visually inspect each prop blade, check for cracks, dings, and any other damage. Pay particular attention to the root area. Check for correct electrical stops functionality. - ONLY AFTER THE FIRST 10 HOURS: Using a torque-wrench verify the proper setting of the six bolts connecting the hub set to the engine mount. Check for correct torque value of the aluminum rings ( spare parts # 3 ) for their adjustment ( perform the check without o-rings spare parts # 65 ) after the check reinstall the o-rings and adjust the safety plates ( spare parts # 35 ) as required on socket set screw ( spare parts #62 ). - EVERY 10 HOURS: Remove the spinner and check for cracks, corrosion, excess wear, damage, verify that all the seals are intact and that the paint markers for on the bolt/nut connections are correct. Check electrical stop assemblies for correct position assuring their screws and lock nuts torque ( spare parts # 10 and # 61 ), check for visible damages and proper electrical stops functionality making a CYCLE PROP at engine off. Also perform the “before every flight” check. - ONLY AFTER THE FIRST 25 HOURS: Grease the bearing sets of the blades, the central screw and the bronze scroll and keys. Perform the 10 hour check. - ONLY AFTER THE FIRST 50 HOURS: Grease the bearing sets of the blades, the central screw and the bronze scroll and keys. Check proper setting and torque of nuts around electrical motor. Perform the 10 hour check. - EVERY 100 HOURS: Grease the bearing sets of the blades, the central screw and the bronze scroll and keys. In case of salt-air conditions or of high temperature variations increase this interval to every 50 hours or three months, whichever comes first. Using a torque-wrench verify the proper setting of the six bolts connecting the hub set to the engine mount, also check the aluminum blade sleeves. Check proper setting and torque of nuts around electrical motor. Perform: before every flight check, every the 10 hour check and after the first 10 hours check. - EVERY 200 HOURS: Replace the brushes assembly. - AT 500 HOURS: Remove the blades and disassemble their mountings, carefully clean all parts with a mild detergent. Grease everything a new as at 100 hours, repeat 10 hours and pre-flight checks and check as after the first 10 hours. - AT 1000 HOURS: Complete overhaul to be performed by the manufacturer. Overhaul intervals are specified by operational hours and calendar time in months since manufacture. An overhaul must be performed after a maximum of 72 months from manufacture, if no more than 24 months have passed since manufacture/overhaul when properly stored. This means that the calendar time TBO (Time Before Overhaul) can be a maximum of 96 months. Caution: In case of an ‘overspeed’ event up to 110% of maximum engine RPM, a 100 hour inspection will be necessary. Between 111% and 120% a manufacturer overhaul will be required. In the case greater than 120% further propeller use is not allowable. Consistent ‘overspeed’ events can result in structural damage to the propeller which are extremely dangerous. 7.2 Repairs All internal hub components are coated with a special protective lubricant when assembled. It is recommended that you protect hub components using diluted motor oil or other corrosion inhibitor. Spinner and spinner plate repairs are not allowed, when damaged, those components must be replaced. In the case of electrical system malfunction, components must be replaced as they cannot be repaired. Repairs must be performed at an authorized service center and/or by authorized service personnel, all components will be shipped at the owner’s expense. Repairs required by damage resulting from accident or misuse are not covered by warranty coverage; repair of damages resulting from accident or misuse are to be performed exclusively by Quinti Avio srl. Quinti Avio srl should be notified in every case of accident or inoperability diagnosed through inspection or maintenance. The manufacturer or dealer will recommend repair procedures or, if necessary, that the damaged components be returned for factory repair. 8.0 Shipping and Storing If the propeller needs to be stored for an extended period of time, use the original packaging or similar. Store only at temperatures between -20°C and 35°C Centigrade, and 10% and 75% relative humidity. Avoid high humidity, extreme temperatures, and rapid temperature changes. All metal components need to be coated with an anti-corrosion substance which can be easily removed. Most lubricants will be acceptable provided they do not damage other parts. If the components will travel by sea or be stored near the sea (salt air, fog), all metal parts should be coated with a thick layer of light-grade motor oil. 9.0 - Special tools and materials With the hub kit is supplied two special keys to use for maintenance: - #66 Key is for part # 3 in spare parts manual #67 Key is for part # 24 in spare parts manual We suggest to use LOCTITE 222 for light lock, LOCTITE 243 for medium lock. About greasing operation for Hub maintenance we suggest to use: - NICO GREASE GN 22 ( G-395 ) AEROSHELL GREASE 33 MOBILGREASE 22 CF 10.0 Electrical flyspeed diagrams 11.0 Spare parts manual Codice/ Code/ Code/ Kennziffer Denominazione Denomination Dénomination Bezeichnung 1 2 FD02507003 MC07015004 CANOTTO P. PALA O-RING mm 70 SUPPORT O-RING mm 70 SUPPORT O-RING mm 70 TRÄGER O-RING mm 70 3 FD02727004 BLOCKIERGRIFF 2 MC07005001 STOP RING NUT ALLUM. SOCKET SET SCREW BAGUE ARRET 4 GHIERA DI SERRAGGIO ALLUM. GRANO M5X4 INOX VIS SANS TETE GEWINDESTIFT 2 5 MC06035002 CUSCINETTO 95X70 BALL BEARING 95X70 ROULEMENT 95X70 KUGELLAGER 95X70 4 6 FD02507004 SUPPORT SUPPORT TRÄGER 2 7 FD01343003 GUSCIO DI CONTENIMENTO CHIAVETTA SE KEY CLAVETTE PASSFEDER 2 8 MC09000001 MOLLA SPRING 9 FD00307016 Mc02000060 11 FD02723001 SUPPORT A FLASQUE SENS VIS TCEI 4X35 DIN 912 INOX EMBOUT INOX 12 FD06157004 FLANGE SUPPORT SENSENICH SCREW TCEI 4X35 DIN 912 INOX ADJUSTING NUT INOX SCROLL SUPPORT FLANSCH ROTAX SENSENICH SCHRAUBE TCEI 4X35 DIN 912 INOX EINSTELLMUTTER INOX GABELKLEMMSTÜCK 1 10 13 FD04543005 SCROLL 1.25 VIS 2 MC02000015 VIS M4x16 DIN912 15 FD00257005 SCREW M4x16 DIN912 SCREW 1.25 VIS 1.25 MITNEHMERBUCHSE 1.25 NEW SCHRAUBE M4x16 DIN912 SCHRAUBE 1.25 1 14 MOZZO BIPALA SENSENICH TCEI 4X35 DIN 912 INOX GHIERA BLOCC. INOX SUPP. CHIOCC. BIPALA CHIOCCIOLA BIP. PASSO 1.25 NEW VITE M4x16 DIN912 INOX VITE PASSO 1.25 16 MC06040003 MC02000003 18 FD02127003 BALL BEARING 35X11X15 SCREW M3X10 DIN912 INOX SUPPORT ROULEMENT 35X11X15 VIS M3X10 DIN912 INOX SUPPORT KUGELLAGER 35X11X15 SCHRAUBE M3X10 DIN912 INOX TRÄGER 1 17 CUSCINETTO 35X11X15 VITE M3X10 DIN912 INOX SUPPORTO 19 EC15000004 MOTOR RC4312462 MOTEUR RC4312462 MOTOR RC4312462 1 20 FD06127003 SUPPORT SUPPORT TRÄGER 1 21 FD01163002 MOTORIDUTTORE RC4312462 GUSCIO DI RINFORZO TAPPO PER BARRA SUPPORT SUPPORT TRAGER 1 22 EC15000005 FASTOM MASHIO FASTOM MALE FASTOM FASTOM 2 23 MC06040004 FD02123005 BALL BEARING 30X9X10 ADJUSTING NUT ROULEMENT 30X9X10 EMBOUT KUGELLAGER 30X9X10 EINSTELLMUTTER 1 24 CUSCINETTO 30X9X10 TAPPO CARICO VITE 25 FD06233001 BRUSHES SUPPORT SUPPORT TRAGER 1 26 EC15000007 SUPPORTO SPAZZOLE SPAZZOLE 025315/ B Po 27 MC15000006 FASTOM FEMMINA 28* FD06263001 29 MC02000007 SUPPORTO SENSORE 2004 TCEI 6X25 INOX 30* MC02000054 31 MC02000028 32 MC02000055 GRANI 4X10 INOX PUNTA RONDELLA INOX DIA=6 TCEI 5X40 INOX 33 FD01108001 BARRA FIL M4 ZINc 34 MC02000064 TSEI 6X12 35 FD07223007 36 MC02000018 37 FD02707002 38 39 BRUSHES ASSEMBLY FASTOM FEMALE Q t2 4 1 SUPPORT VIS MERE 1 1 1 4 1 4 1 1 1 FASTOM FASTOM 4 SENSOR SUPPORT 2004 SCREW M6X25 INOX DIN912 INOX SOCKET SET SCREW 4X10 WASHER 6DIN125 1 VIS M6X25 INOX DIN912 INOX VIS SANS TETE 4X10 SCHRAUBE M6X25 DIN912 INOX GEWINDESTIFT 4X10 2 RONDELLE 6 DIN125 SCHEIBE 6DIN125 7 SCREW M4X10 INOX VIS M4X10 INOX SCHRAUBE M4X10 2 LONG SCREW VIS SCHRAUBE 1 SCREW M6X12 INOX VIS M6X12 INOX SCHRAUBE M6X12 1 LAMIERINO BLOC. SE PLATE SE PLAQUE SE PLATTE SE 3 SCREW M4X10 DIN912 INOX STOP RING NUT VIS M4X10 DIN912 INOX BAGUE ARRET SCHRAUBE M4X10 DIN912 INOX BLOCKIERGRIFF 2 MC02000065 VITE M4X10 DIN912 INOX GHIERA DI FISSAGGIO PALA BLADE PALE MC02000010 DADO M8 AUTOB. NUT M8 ECROU M8 2 3 2 MUTTER M8 6 Codice/ Code/ Code/ Kennziffer Denominazione Denomination Dénomination Bezeichnung 40 MC02000016 RONDELLA 8 DIN125 WASHER 8DIN125 RONDELLE 8 DIN125 SCHEIBE 8DIN125 41 42 FD04703008 FD02253003 COLONNETTA R TAPPI SUPPORTO DRIVE LUG ARBRE PIN 43 FD05563001 SLIP RING 2004 SLIP RING 2004 44 FD00283007 PRIGIONIERO STUD VIS SCHRAUBE 45 FD PIATTO OGIVA BACK PLATE 47 MC02000020 MC02000066 WASHER 5 IN125 INOX NUT M6 INOX RONDELLE 5 IN125 INOX ECROU M6 INOX SCHEIBE 5 IN125 INOX MUTTER M6 INOX 7 48 49 MC02000067 RONDELLA 5 IN125 INOX DADO M6 AUTOB. INOX GRANO M6X70 INOX SOCKET SET SCREW 50 MC02000024 51 MC02000002 52 Po Q t6 6 4 1 6 1 4 VIS SANS TETE GEWINDESTIFT 2 DADO M5 AUTOBL. NUT M5 INOX INOX LINGUETTA PER FILO LOCK WIRE ECROU M5 INOX MUTTER M5 INOX 6 FD022530059 VITE BATTUTA TCEI 6X40 DIN912 SCREW M6X40 DIN912 INOX VIS M6X40 DIN912 INOX SCHRAUBE M6X40 DIN912 INOX 2 55 MC02000094 VITE TE M6X20 12.9 SCREW TE M6X20 12.9 VIS TE M6X20 12.9 SCHRAUBE TE M6X20 12.9 8 56 FD02223009 TAPPO VITE BUSHING BAGUE BUCHSE 1 57 FD02253010 ASTA M4 LONG STUD M4 VIS 58 FD02253004 WASHER RONDELLE SCHEIBE 1 59 MC02000045 RONDELLA RITEGNO SPACCO SU VITE GRANO M4X25 INOX SOCKET SET SCREW VIS SANS TETE GEWINDESTIFT 4 60 MC02000047 MC02000043 WASHER 4 IN125 INOX NUT M4 INOX RONDELLE 4 IN125 INOX ECROU M4 INOX SCHEIBE 4 IN125 INOX MUTTER M4 INOX 9 61 62 MC02000046 RONDELLA 4 IN125 INOX DADO M4 AUTOBL. INOX GRANO M4X15 INOX SOCKET SET SCREW VIS SANS TETE GEWINDESTIFT 2 63 FD05163001 SUPPORTO 2642 SUPPORT 2642 SUPPORT TRAGER 1 64 MC02000039 GRANO M5X25 DIN912 INOX SOCKET SET SCREW VIS SANS TETE INOX GEWINDESTIFT INOX 4 65 MC07015005 O-RING mm 103 O-RING mm 103 O-RING mm 103 O-RING mm 103 2 66 FD12203003 CHIAVE PER GHIERE RINGS TOOL 67 FD12203002 CHIAVE CON SPINE 68 MC02000056 ELICOIL M8 PINS TOOL ELICOIL M8 ELICOIL M8 ELICOIL M8 69 70 MC15000008 MC02000068 WIRES WASHER 5 NYLON RONDELLE 5 NYLON SCHEIBE 5 NYLON x 71 MC02000068 WASHER 4 NYLON RONDELLE 4 NYLON SCHEIBE 4 NYLON 1 72 MC02000069 SCHEIBE 4 NYLON SP. 1 FD WASHER 4 NYLON SP. BACK PLATE RONDELLE 4 NYLON SP. 74 FILO TRASMISSIONE RONDELLA NYLON DIAM =5 RONDELLA NYLON DIAM = 4 RONDELLA NYLON CON RIPRESA DIA=5 PIATTO OGIVA 75 MC02000077 VITI OGIVA M5 MAGG 79 MC02000090 ELICOIL M6 CREWS ELICOIL M6 80 MC02000097 GRANO M5X10 INOX SOCKET SET SCREW 81 FD06353001 82 FD02223004 TASSELLO TIRO VITE SU PLASTICA BATTUTA MECCANICA BIPALA DISTANZIALE 90 2 1 10 1 1 6 2 1 x ELICOIL M6 ELICOIL M6 8 VIS SANS TETE INOX GEWINDESTIFT INOX 2 2 1 EXTENSION 1 12 Exploded Drawing 13.0 Torque values Pos/teil in spare parts manual ** use special wrench only Pos/teil Pos/teil Pos/teil Pos/teil Pos/teil Pos/teil Pos/teil Pos/teil Pos/teil Pos/teil Pos/teil Pos/teil Pos/teil Pos/teil Pos/teil number number number number number number number number number number number number number number number 36 48 14 29 16 52 39 4 3 24 34 61 32 50 55 ( M4 ) ( M6 ) ( M4 ) ( M6 ) about about about ( use light glue on ) ( if 8 mm ) ( use light glue on ) ** about ( use light glue on ) about ( use light glue on ) 2,6 Nm = 1,898 lbs/ft 8.8 Nm = 6,424 lbs/ft 2,6 Nm = 1,898 lbs/ft 8.8 Nm = 6,424 lbs/ft 2,6 Nm = 1,898 lbs/ft 5,1 Nm = 3,723 lbs/ft 24.6 Nm = 17,97 lbs/ft 0.5 Nm = 0.365 lbs/ft 20/25 Nm = 10,95 lbs/ft 5 Nm = 3,65 lbs/ft 1,5 Nm = 1,095 lbs/ft 2,6 Nm = 1,898 lbs/ft 5,1 Nm = 3,723 lbs/ft 5,1 Nm = 3,723 lbs/ft 14 Nm = 10,22 lbs/ft Note: the manufacturer reserves the right to make any changes to the product anytime and without notice.