1
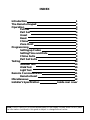
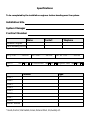
REGENT
User Guide
Intruder Alarm Control Panel
Version 1.00
JSB Electrical plc, Manor Lane, Holmes Chapel, Cheshire CW4 8AB
INDEX
Introduction
The Remote Keypad
Operation
Full Set
Part Set
Unset
Reset
Chime
Zone Omit
Programming
Setting up Codes
Setting Time and Date
Chime Suite
Part Set Suite
Testing
Sounder Test
Walk Test
Light Test
Remote Communication
Remote Reset
Miscellaneous
Installer’s Specification
1
2
3
3
4
4
5
5
6
7
8
9
9
9
10
10
10
11
11
11
12
Inside rear cover
Note: Due to a policy of continued development of the Regent intruder alarm control panel,
the information contained in this guide is subject to change without notice.
Specifications
To be completed by the installation engineer before handing over the system.
Installation Site
System Manager
Contract Number
Name
Contact
Telephone
Installation Engineer
Alarm Receiving Centre
Entry Timer...............seconds
Exit Timer...............seconds
Push To
Set
Communicator YES
YES
NO
Location
Zone 1
Zone 2
Zone 3
Zone 4
Zone 5
Zone 6
Zone 7
Zone 8
Exterior Sounder
NO
Part Set Timer...............seconds
Engineer Reset YES
Type
*
* Guard, Final Exit, Intermediate, Duress, Personal Attack, Fire, Auxiliary etc.
NO
Introduction
This guide will help you to understand your Regent intruder alarm control panel. It is
important to read it carefully in order to get the most from your system. Instructions are
in a step by step form, with diagrams where appropriate. The Regent has been designed
to be as simple to operate as possible.
The Regent will have been programmed by the Installation Engineer to suit your particular
installation. The system is operated from one or more Remote Keypads; all functions are
processed by the main Control Unit which is accessed by the engineer only.
Regent has been designed to allow two different levels of access to the system. The
System Manager is the person who has overall responsibility for the system and this
means that he/she has access to more functions than the General User. To operate your
Regent the Installation Engineer will need to provide you with at least one of two
different types of 4-digit Access Codes:
Master Access Code – used by the System Manager to operate the system and carry out
a range of programming functions:
•
•
•
•
•
Set up and modify all the User Codes.
Carry out Tests e.g. Sounders and Detectors.
Set up a Chime Suite.
Set up a Part Set Suite.
Modify the Time and Date settings.
User Access Codes – individual codes that are employed by up to three General Users
for day-to-day operation:
• Setting and Unsetting the Panel.
• Omitting Zones.
• Reset after an Alarm Activation
The System Manager also has access to the General User functions above.
To Access the Panel
Enter your 4-Digit Access Code using the numeric keys
OPEN Light will flash slowly
Proceed with Operating/Programming/Testing function
Numeric keys and Zone lights
These keys are used for entering
your security code to turn the
system on & off. These buttons
also have a further use.
(See page 7)
Function keys and Status lights
These keys are used to select
different operating modes.
(See page 5)
LIGHT INDICATORS
ON
OFF
SLOW FLASH
Day Mode
Set
Awaiting Function Key
OPEN
Zone Fault
Ok
System Fault
FAULT
Refer to Communication Section
LINE
System Tamper Fault
TAMP
Ok
Panel or Bell Tamper
Engineer Mode
ENGR
Ok
Engineer Reset Required
Mains On
POWER
No Power Mains Off
NUMBERS Zone Standing Fault
Ok
Zone Omitted
QUICK FLASH
Chime Mode
Alarm Activation
RKP Tamper
Engineer Needed
First To Alarm
Operation
False Alarms
Before using the Regent it is important to know how to avoid false alarms. Most false
alarms are caused when setting or unsetting the system. By following these few simple
tips you should avoid any potential problems.
• Make sure that all doors to be set on the system are firmly closed and cannot swing
open accidentally.
• Ensure that any room containing detection devices is free of moving objects such as
pets or moving curtains.
• When re-entering the protected area proceed directly to the nearest Remote Keypad
without delay and do not stray from the exit/entry route.
Day Mode
The Regent is alert to certain types of alarms (e.g.Tamper) at all times; when the system
is Unset it is still operating in Day Mode. Under normal circumstances you should have
the OPEN and POWER lights fully ON (both GREEN) and no other lights showing. In
addition to the Guard Zones which only operate when the system is set, your installation
may include other Zones which operate on a 24 Hour basis (e.g. a Zone with a Panic
Button).
Full Set
You will need to use Full Set when leaving the protected premises unattended.
Enter your 4-Digit Access Code. OPEN light starts flashing
Press FULL
If system clear, Exit Tone will be heard. This is a continuous high pitched tone
Leave via intermediate and final exit zones
Close final door to set (or operate push to set button if fitted)
After 2 seconds the Exit Tone should cease.
If system is not clear, Fault Tone sounds. This is a rapid intermittent tone
Identify which zone light is lit on keypad
Enter your 4-Digit Access Code; this will abandon the setting operation
Investigate fault and remedy if possible
If fault cannot be remedied, call Engineer
If there is a Fault Tone immediately after the system is finally closed you may have a fault
in the Exit /Entry Route; if this does not clear after a few seconds you will need to
re-enter the premises, investigate the fault and turn the system off using your 4-Digit
Access Code.
Part Set
Use Part Set when certain zones (e.g. bedrooms) will be occupied. The Part Set Suite will
automatically omit those Zones which are to be excluded.
Enter your 4-Digit Access Code. OPEN light starts flashing
Press PART
If system is clear, Part Set tone is heard. This is a soft Clicking sound
Those Zones which are excluded will slowly flash
Proceed to unset zone via entry/exit route
System is set after the Part Set timer runs out
If system not clear, Fault Tone sounds
Identify which zone light is lit on keypad
Enter your 4-Digit Access Code.
Investigate fault and remedy if possible
If fault cannot be remedied, call Engineer
Unset
When you re-enter the protected area you will start the Entry Timer and the Entry Tone
(a slow broken Exit Tone) will sound.You must then proceed directly to the nearest
Remote Keypad.You will also start the Entry Timer if you use the Remote Keypad when
the system is Set.
Whenever you hear the Entry Tone:
Enter your 4-Digit Access Code.
Entry Tone stops
The system should now be in Day Mode with OPEN and POWER LIGHTS ON.
If zone and fault lights are lit, there has been an activation
You will now need to Reset the system (see opposite)
To silence an Alarm
It is quite possible for an alarm activation to occur while you are on the premises. The
Alarm Tones are:Fire
Intruder
Tamper
Alternating 2-tone sound
Wailing sound
Loud Rapid Pips (Fault Tone)
Enter your 4-Digit Access Code
Alarm should be silenced
The Remote Keypad lights will indicate what has happened
You will now need to Reset the system (see opposite)
Reset
To reset the system after an Alarm Activation
IMPORTANT NOTE. Reset authorisation depends on the nature of the Alarm Activation
detected by the panel. Some events could indicate that you must contact an Engineer for
advice; the panel records the Alarm Activation in its internal Event Log and may then
enter a Lockout Mode preventing further use until the Engineer has been consulted.
Enter your 4-Digit Access Code. OPEN light starts flashing
Press CLEAR
All lights illuminate, Warble Tone sounds then the lights go out
System is now reset and ready for re-use
If system does not reset
Use Remote Reset option (see Remote Communication section (Page 11))
Chime Mode
Chime is used to give a local audible warning from the Guard Zones including Door
Contacts when the system is in Day Mode. This is useful when the premises are occupied
and you wish to be notified if other persons have entered the building.Your Installation
Engineer may have already programmed the system to automatically turn Chime on
during the day.You can also turn Chime On and Off yourself and set which detectors are
to be included in the Chime system.
Chime On
Enter your 4-Digit Access Code. OPEN light starts flashing
Press CHIME
The FLASHING zones are EXCLUDED from the Chime system
If other Chime Zones are required, press appropriate numbered keys
System automatically enters Chime Mode after a short time delay
The OPEN light flashes quickly when Chime Mode is ON
Chime Off
To unset Chime Mode
Enter your 4-Digit Access Code
OPEN light flashes slowly
Allow the system to time out
OPEN light should now be ON continuously
Zone Omit
This is useful if you need to remove one or more Detection Zones on a temporary basis
if you are unable to fully set the system.You can use Zone Omit on any zone provided
that the Installation Engineer has not programmed the Zone as Non Manually Omittable
(this may have been done because that particular ZONE is a vital element of the system).
The Zone Omit information is automatically discarded next time you open the system.
To Omit Zones prior to setting the system
Enter your 4-Digit Access Code. OPEN light starts flashing
Press OMIT. The OPEN light continues to flash slowly
Press number keys for zones to be omitted. The omitted Zone lights will flash slowly.
Either
Press FULL to full set with omitted zones
Or
Press PART to part set with omitted zones
Note: When using Zone Omit followed by PART, zones which would have been
automatically omitted by the Part Set Suite (see Programming section) will have to be
manually omitted.
To use Zone Omit on Day Zones
Enter your 4-Digit Access Code. OPEN light starts flashing
Press OMIT. The OPEN light continues to flash slowly
Press number keys for zones to be omitted. The omitted Zone lights will flash slowly
Press OMIT again to return to Day Mode with omitted zones
To cancel Zone Omit on Day Zones
Enter your 4-Digit Access Code. OPEN light starts flashing
Press CLEAR
Programming
To carry out each programming function, you must first enter Menu Mode starting from
Day Mode. Once you are in Menu Mode you then enter a 2-Digit Opcode to select a
specific programming function. When that function is completed the system returns to
Menu Mode.
Menu Mode
To enter Menu Mode
Enter the 4-Digit Master Code. OPEN light start flashing
Press 00
All lights illuminate
You are now in Menu Mode
Enter the 2-Digit Opcode for the function you wish to programme
After programming the function
Either
Program next function by entering a new Opcode
Or
Select Opcode 99 to exit Menu Mode
All lights flash, warble tone sounds
The Control Panel is now back in Day Mode
Note. If you get the Error Tone (a short Buzz) you have entered an incorrect Opcode
Duress Code
To enter or change 4-digit Duress Code
(Consult with your Installation Engineer before using this option.)
Select Opcode 02
If zone lights 1-4 flash, code exists
Press OMIT to delete the code
If zone lights 1-4 constant, enter new code
Press 4 numbered keys for new code; the lights will extinguish one at a time
Press ENTER to submit the new code
If Warble sounds, code is accepted
If Buzzer sounds, code is rejected. Try again using a different 4-Digit Code
Master Code
To enter or change 4-digit Master Code
Select Opcode 40
If zone lights 1-4 flash, code exists
Press OMIT to delete the code
If zone lights 1-4 constant, enter new code
Press 4 numbered keys for new code; the lights will extinguish one at a time
Press ENTER to submit the new code
If Warble sounds, code is accepted
If Buzzer sounds, code is rejected. Try again using a different 4-Digit Code
User Codes
To enter or change 4-digit User Codes
Select Opcode 41 for User Code 1
Select Opcode 42 for User Code 2
Select Opcode 43 for User Code 3
If zone lights 1-4 flash, code exists
Press OMIT to delete the code
If zone lights 1-4 constant, enter new code
Press 4 numbered keys for new code; the lights will extinguish one at a time
Press ENTER to submit the new code
If Warble sounds, code is accepted
If Buzzer sounds, code is rejected. Try again using a different 4-Digit Code
Time/Date
Please consult with your Installation Engineer before using this option.
Select Opcode 05
Press two number keys for hour (24hr clock)
Press ENTER
Press two number keys for minutes (e.g. 01)
Press ENTER
Press two number keys for day (e.g. 31)
Press ENTER
Press two number keys for month (e.g.12)
Press ENTER
Press two number keys for year (e.g. 96)
Press ENTER
Warble sound indicates time/date set
Chime Suite
To program zones to be included when Chime Mode is selected by a User
Select Opcode 15
Zone lights lit show zones which are EXCLUDED from the system.
Press numbered keys to select/deselect chime suite zones
Press ENTER
All lights illuminate, Warble sounds
Part Set Suite
To program zones to be EXCLUDED when system is part set
Select Opcode 50
Zone lights lit show zones already included
Press numbered keys to select/deselect zone
Press ENTER
All lights illuminate, Warble sounds
Testing
Enter the 4-Digit Master Code. OPEN light starts flashing
Press 00
All lights illuminate
You are now in Menu Mode
Enter a 2-Digit Opcode to select a specific system testing function as detailed below
Upon completion of each test
Either
Carry out next test by selecting a new Opcode
Or
Select Opcode 99 to exit Menu Mode
Sounder Test
To test internal/exterior sounders and strobe light, if fitted
Select Opcode 60
Press numbered key 1-4 to test required sounder (see table below)
Press key again to end test
Press other numbered keys 1-4 as required
Press CLEAR to terminate the test
Zone Lights
3
1
2
Bell
Strobe
Exit Tone
4
Alarm Tone
Walk Test
To walk test all 8 detection zones
Select Opcode 62
Exit Tone indicates no fault condition
Fault Tone indicates fault condition
Clear all faults before you carry out the walk test
As each detector is activated, Fault Tone sounds
Then Exit Tone resumes
When you have finished Walk Testing press CLEAR to terminate the test
Light Test
To test remote keypad, zone and status lights
Select Opcode 63
Lights will come on in turn
Press CLEAR to terminate the test
Remote Communication
Check with your Installation Engineer whether your system is fitted with a Communicator
connected via the telephone line to an Alarm Receiving Centre. If this is the case you may
need to use some of the following additional features incorporated into Regent:
Remote Reset
To allow the system to be remotely reset by the Alarm Receiving Centre. This option may
have been pre-programmed to appear automatically after an Alarm Activation. The System
Manager is able to access the option from Menu Mode:
Select Opcode 98
All lights will extinguish
Four zone lights will light one digit at a time
Following a short delay, this 4-digit sequence will be repeated
Note this number sequence (e.g. 1234)
Telephone the Alarm Receiving Centre with the number
A new 4-digit Reset Number will be given in return (e.g. 5678)
Press numbered keys to enter the Reset Number
System will reset
Line Status Light
The LINE indicator on the Remote Keypad can be used to indicate that there is a
problem with the telephone line; you will need to ask your Installation Engineer whether
the Communicator has a Line Monitor connected to the Regent. It is also possible that
the Regent has been programmed to give an Audible Warning (Fault Tone) if a Line Fault
is detected during the day.
A continuous LINE indication signifies that the telephone line is unavailable to the
Communicator; if there has been a recent fault during the day which has cleared itself the
LINE indicator will FLASH slowly until the next Reset. A Flashing Fault light with the LINE
indicator is a warning that there has been a Line Fault while the system was set.You
should discuss the implications of this with your Installation Engineer.
Miscellaneous
Tamper Alarms
The Regent provides a comprehensive Anti-Tamper detection system which is designed
to protect all components in the Security System. If there is a Tamper Alarm it is
absolutely vital that the system is subsequently thoroughly checked by an engineer so
that the cause is clearly identified. FAILURE TO DO THIS COULD MEAN THAT THE
SYSTEM MAY BE INSECURE. Tamper Alarms from the Outside Audible Warning device
are especially significant. Check the Remote Keypad Tamper Display for more information.
Loss of Mains Supply
The Regent is designed to run the entire security system for typically 8 hours without
Mains using an internal rechargeable battery fitted by your Installation Engineer. Provided
the loss does not exceed this period, the battery will recharge within less than 24 hours
once the Mains Supply is restored. In the event of a sustained Power Loss the Regent will
attempt to Set automatically following Power On; during this time it will sound the Entry
Tone. If you hear this, enter your 4-Digit Access Code to Cancel the Automatic Setting
process. The MAINS light will flash slowly if the Mains is OFF.
Event Log
The Regent has an internal Event Log with its own Time and Date system. This can be
read by your Installation Engineer using a Portable Printer plugged into the Control Unit.
If there are any problems with your installation a printout will allow the recent history
of the installation to be checked.
Lost Codes
The Installation Engineer has no way of finding out what your 4-Digit Access Codes are.
If you lose the Master Code he will need to clear out the Code Table and re-instate the
Factory Default codes. It will then be necessary to set up a new set of Codes for the
Master and General Users. Note that the Regent Codelock system incorporates special
features to frustrate attempts to find out the code by a trial and error method.
Accidental Alarms
If you know that a false alarm has just occurred it may be possible for you to immediately
contact your Alarm Receiving Centre and give them a special Password so that the alarm
can be registered as an accidental activation by the User.
Engineer On Site
If the Engineer is working on the Regent the ENGR light should be continuously lit on
the Remote Keypad. This means that the security system is effectively out of commission
until the Engineer restores the system to normal operation. If there is a flashing indication
on the ENGR light you will need to investigate and clear this before the system is fit for
re-use.