1
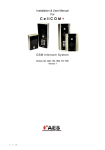
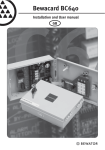
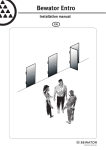
Remo Installation & User manual EN 1 2 3 4 5 6 7 8 9 A 0 B Copyright © 2005 Bewator AB, Solna. Material from this manual may only be copied with the consent in writing of Bewator. Bewator reserves the right to alter both the content of the manual and the design of the product. Document number: 80834-2 Bewator AB is part of the Swedish Bewator Holding AB, which develops and markets a complete security product range that includes access control and alarm. Sales, installation and servicing are handled by a national dealer network. Actions (such as unauthorised manipulation, copying etc.) must not be taken with the software contained in the products and systems. Such actions are regarded as copyright violation and may result in imprisonment or fines and may likewise lead to an obligation to pay damages and compensation for using the software. REMO Installation & User Manual Content Remo – remote programming from your PC...................................... 4 Installation...................................................................................... 5 Check version number.................................................................................... 5 Replace the PROM.......................................................................................... 5 Connect modem and PC.................................................................................6 Two telephone lines – the Telecode works during programming...................... 7 Change settings.............................................................................................8 Set system password......................................................................................8 Installing Remo..............................................................................................9 Start Remo................................................................................................... 10 Programming..................................................................................11 Registrera anslutna system...........................................................................11 Log in to a connected system........................................................................ 12 Change system password............................................................................. 13 Change user name and password................................................................. 13 Set time and date......................................................................................... 14 Programme time zones................................................................................. 15 Programme doors........................................................................................ 16 Programme codes........................................................................................ 18 Programme telephone and quick numbers................................................... 19 Events..........................................................................................................20 Print events to file........................................................................................ 21 Technical Specification....................................................................21 Notes............................................................................................. 22 REMO Installation & User Manual Remo – remote programming from your PC Using Remo you can programme the codelock central unit (KC 5000) or the Telecode central unit (TC5000) from your PC. The PC can be connected directly to the central unit or via modem. Telecode/code lock PC Central unit PC directly connected to the central unit. Telecode/Codelock PC Telephone Central unit Modem PC connected via modem. REMO Installation & User Manual Installation The following sections describe how to install Remo software. Check version number Before installing Remo ,check the version number of the central unit’s software. 1. Open the central unit. 2. Press 3. on the small keyboard located on the inside the unit. ESC Press . The version number is displayed. If the version is 3.09 or earlier, the central unit’s PROM (Programmable Read Only Memory) must be replaced. See instructions below. Replace the PROM Follow these instructions only if the central unit’s version number is 3.09 or earlier. 1. Switch off the power to the central unit. 2. Remove the PROM carefully, using a small lever to lift the PROM symmetrically from its socket. The PROM is located under the display on the central unit’s door. Display Keyboard Memory PROM 3. Insert the new PROM. Note that the indent in the PROM should point downwards and that two pins of the socket below the PROM should be empty when it is inserted. Indent 4. Switch on the power. Check that the new version number is displayed on the LCD screen. REMO Installation & User Manual Connect modem and PC Connect a modem or a PC according to the diagram below. 1 LINE CARD KC5000 PL 1 2 3 PL 2 4 1 5 2 PL 3 3 1 4 2 5 3 6 4 Modem connection 25 pin DSUB PC connection Wall socket 9 pin DSUB 25 pin DSUB 7 RX 5 3 1 3 2 8 TX 6 2 2 2 3 9 DTR 7 10 0V 8 7 5 5 7 11 4 12 5 13 20 Jumper 14 15 16 17 18 19 20 21 22 23 24 Minimum requirements for modem: 9600 baud on DTE Autoanswer enabled Ignore DTR Local echo disabled Recommendation: Watchdog should be integrated in the modem. The watchdog automatically resets the modem if dialup connection breaks or if power failure appears. REMO Installation & User Manual Two telephone lines – the Telecode works during programming If it is possible to connect the central unit to one telephone line and the modem to another, the Telecode can be used while the central unit is being programmed. If only one telephone line is used, the central unit will be busy during programming which means the Telecode will not work until the programming is finished. See the illustrations below: Door telephone line Central unit Modem The Telecode will not work during programming. Door telephone Line Central unit Line Modem The Telecode will work during programming. REMO Installation & User Manual Change settings For remote programming to work, certain settings must be changed in the central unit. Proceed as follows: 1. Press 2. Press 3. . The text TO STEP! is displayed. until ADVANCED OPTIONS is displayed. . ENTER PARAM., VALUE is displayed. Enter 620 (displayed as 62,0) and press . This disconnects the DTR input that is used for the printer. ADVANCED OPTIONS is redisplayed. To reinstall the printer, follow steps 1-5, only enter 621 in step 5 instead. 6. Press 7. three times. The OPTIONS MENU is displayed. Press 4. Press 5. ESC . ENTER PARAM., VALUE is redisplayed. Enter 631 (displayed as 63,1) and press . Now you have disconnected the option for the central unit to receive incoming calls. 8. Press ESC . The central unit goes back to normal mode. Set system password To prevent unauthorised people programming the central unit, a system password must be set. This password will be required at a later stage in the Remo software, as you register the system to be programmed from Remo. This is how to set the system password: 1. Press 2. Press 3. ESC three times. The OPTIONS MENU is displayed. . The text TO STEP! is displayed. Press once. CHANGE PASSWORD is displayed. 4. Press . The text ENTER PASSWORD (XXXXXX) is displayed. If a system password already exists it will be within the parenthesis. 5. 5 Enter a six-digit password or keep the password that is displayed. 6. Press . ESC 7. Press to go back to normal operation. The central unit is now set up to be programmed from the Remo program. REMO Installation & User Manual Installing Remo This is how to install the Remo software on your PC: 1. Go to the Start menu; choose Settings and then the Control panel. 2. Double click the Add/Remove Programs icon. The following window is displayed: 3. Click Install. The following window is displayed. 4. Insert the first installation diskette in the diskette drive and click Next. 5. Follow the instructions on the screen. 10 REMO Installation & User Manual Start Remo 1. Go to the Start menu; choose Programs, Bewator Remo and finally Remo. The login window is displayed: 2. Enter bewa in the User name field and press TAB. 3. Enter pass in the Password field. 4. Click OK. This window will be displayed: You are now logged on. REMO Installation & User Manual Programming This chapter describes how to use Remo to programme the central units Registrera anslutna system To be able to programme the system or systems, they have to be registered in Remo. Proceed as follows: 1. Choose Edit on the System menu. The following window is displayed: 2. Click New. The following window is displayed: 3. Choose a name for the system in the Name field. 4. Enter the system password in the System password field. The system password must have been chosen and set in the central unit by the installer 5. Click in the Type of connection list box and choose the required type • If the central unit is connected directly to the PC via a communications port (COM. port), choose Serial. Then choose the desired COM. port in the listbox displayed • If the central unit is connected via modem, choose Modem. Then enter the telephone number of the modem connected to the central unit 6. Type any additional information you require in the Notes field, for example the location of the system. 7. Click OK. The Available systems window is redisplayed. 8. To register yet another system, click New and proceed the same way as described above. Otherwise click Close. 11 12 REMO Installation & User Manual Log in to a connected system There are two ways of logging in to a connected system, depending on whether Remo is running or not If Remo is running: 1. Choose Log in to another system on the File menu. The following window is displayed: 2. Choose the desired system in the listbox and click OK. If Remo is not running: 1. Start Remo. The login window is displayed. 2. Enter your logon name and password and choose the desired system in the System listbox. 3. Click OK. By selecting the Show data off-line check box before clicking OK, the system’s information can be viewed without logging in. Note that in this case Remo will have no contact with the central unit, which means that any information registered at the central unit since the last time Remo was online will not be displayed. Note! If the system is modem connected, transferring information from the system may take between 5 and 30 seconds (depending on the size of the system). REMO Installation & User Manual Change system password The system password set by the installer for contact between the PC and the central unit should be changed. Proceed as follows: 1. Log in to the desired system. 2. Choose System password on the System menu. The following window is displayed: 3. Enter the new six-digit password in the New system password field. 4. Click OK. Change user name and password The user name and password used to log on to Remo should also be changed from the default. 1. If you are not already logged on, log on to Remo using the bewa user name and the pass password. 2. Choose Change user name on the File menu. The following window is displayed: 3. Enter the new user name in the User name field. 4. Enter the new password in the Password field. 5. Click OK. 13 14 REMO Installation & User Manual Set time and date This is how to check whether Remo and the central unit are synchronised regarding time and date. Proceed as follows: 1. Choose Time and date on the System menu. The following window is displayed: The central unit’s time and date settings are displayed 2. To change these settings, enter the desired time and date and click OK. The information is transferred to the central unit. REMO Installation & User Manual Programme time zones This section describes how remote programming of time zones via the Remo software is done. For information about how time zones are used, read the Telecode 5000 or KC 5000 manuals. This is how to programme time zones 1. Click the Time zones tab. This is what the window displayed might look like: This field shows what is going on in Remo, for example ”Importing time zones…”. If time zones are programmed in the central unit, these are displayed here. The information is imported from the central unit. • To delete a time zone, select it and click Remove. • To change a time zone, select it and click Edit. • To create a new time zone, click New. In the two latter cases the following window is displayed: 2. Enter the desired time interval in the fields next to Time. 3. Select which days the time zone should apply by clicking on the check boxes next to the desired days. 4. Click OK 15 16 REMO Installation & User Manual Programme doors This is how to programme information about doors: 1. Click the Doors tab. This is what the window displayed might look like: If any door information is programmed in the central unit, it is displayed here. The information is imported from the central unit. 2. Select the top row (door 1). 3. Click Edit. The following window is displayed: 4. Find a name for the door and type it in the Name field. Note that this name will not be stored in the central unit, so if another PC connects to the central unit, this name will not be shown on that PC. REMO Installation & User Manual 5. If needed, change the door information listed below: • Door release time (0-99 seconds). The time during which the door remains unlocked following a correct code or opening from a telephone. • Door unlocked. Time zones defined for unlocked door can be chosen here. • Exit button. Time zones defined for egress buttons to work can be chosen here. • Registration. Time zones defined for event registration (for example transactions) can be chosen here. • Quick no. Time zones defined for use of quick numbers can be chosen here. (Does not apply to KC 5000.) • Telephone no. Time zones defined for use of telephone numbers can be chosen here. (Does not apply to KC 5000.) 6. Click OK. This is what the result might look like . 7. Select the next row and supply information about this door in the same way as described above 17 18 REMO Installation & User Manual Programme codes This is how to programme codes: 1. Click the Codes tab. This is what the window displayed might look like: If there are codes programmed in the central unit, these are displayed here. The information is imported from the central unit. • To remove a code, select the row and click Remove. • To change a code, or register the name of the person using the code, select the row and click Edit. • To register a new code, click New. In the two latter cases, this is what the window displayed might look like: 2. Enter the desired four-digit code in the Code field. 3. In the User name field, enter the name of the person or group (for example Tenants) using the code. Note that this name will not be stored in the central unit so if another PC connects to the central unit, this name will not be shown on that PC 4. Choose the time zones (three at the most) when the code is required to work. 5. Select the doors where the code should apply. 6. Click OK. The Codes tab is redisplayed. 7. To register or change a new code, proceed as described above. REMO Installation & User Manual Programme telephone and quick numbers 1. This instruction only applies to programming of Telecode 5000. This is how to programme telephone and quick numbers: 2. Click the Telephone numbers tab. This is what the displayed window might look like: If there are telephone and quick numbers programmed in the central unit, these are displayed here. The information is imported from the central unit. • To delete a number, select the row and click Remove. • To change a number, select the row and click Edit. • To programme a new short number, click New. In the two latter cases, the window displayed might look like this: If you clicked Edit, the selected quick number is displayed but you can only change information about name, real telephone number and at which doors the quick number should work. If you clicked New, a new quick number is generated automatically. 3. In the Tel no field, enter the actual telephone number corresponding to the quick number. 4. In the Name field, enter the name of the person to which the quick number goes. 5. Select the doors where the quick number should work. 6. Click OK. The Telephone numbers tab is redisplayed. 7. To register or change a new quick number/telephone number, proceed as described above. 19 20 REMO Installation & User Manual Events The latest 400 events are stored in the central unit. This is how to choose which events to register: 1. Choose Change filters on the Events menu. The following window is displayed: The default setting is that all types of events are registered. 2. Deselect the check boxes for event types not to be registered or keep the default settings. Deselecting the Logging events check box means that no events will be registered. 3. Click OK. REMO Installation & User Manual 21 Print events to file If needed, events can be saved as a file and be printed. In the file and on the printout, registered events are listed under the Date, Time and Type of event headings. Proceed as follows 1. Choose Print to file on the Events menu. The following window is displayed: 2. Go to the folder where you want to save the file. 3. Enter a name for the file in the File name field. 4. Click Save. Events printed to file are automatically erased from the central unit’s memory. Technical Specification System requirements: • 486 processor, 66 MHz. Pentium recommended. • 16 Mb RAM. 32 Mb recommended. • At least 10 Mb free hard disk space. • CD ROM drive. • VGA colour screen. • Serial port with UART circuit 16C550 for connection of central unit/modem. • Parallel port for connection of printer. • Windows 95 (OSR2,) Windows 98, Windows 2000 or Windows XP. 22 REMO Installation & User Manual Notes __________________________________________ __________________________________________ __________________________________________ __________________________________________ __________________________________________ __________________________________________ __________________________________________ __________________________________________ __________________________________________ __________________________________________ __________________________________________ __________________________________________ __________________________________________ __________________________________________ __________________________________________ __________________________________________ __________________________________________ __________________________________________ __________________________________________ __________________________________________ __________________________________________ __________________________________________ __________________________________________ __________________________________________ __________________________________________ __________________________________________ __________________________________________ __________________________________________