1
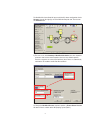
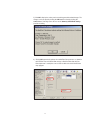
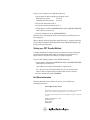
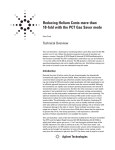
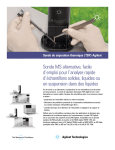
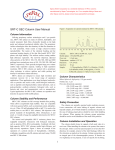
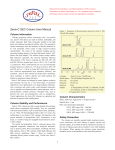
User Quick Guide to Pressure
Controlled Tee (PCT) Operation - Post
Run Backflushing
Harry Prest
Technical Overview
Introduction
This document is for GC/MS users with an installed configuration of the PCT. This
assumes the GC has been properly configured and an acquisition method is, or can
be, loaded and operated to acquire samples. As a Quick Guide, the document will
show how to:
• Add rapid Post Run backflushing to an existing PCT GC-MS method
• Develop a PCT maintenance method used to service the injection port, exchange
a section of guard or disposable column, or exchange the front column.
• Develop a PCT standby method which leaves the GC in backflush mode when not
acquiring samples, to keep the columns and MS as clean as possible.
This document is not a substitute for the PCT Users Manual which is supplied with
the Agilent G1472A Rapid Universal Backflushing Kit, but meant to accelerate use
of a properly configured system. A diagram of the overall PCT configuration is
shown in Figures 1A and 1B.
When the GC-MS system has been configured for the PCT, the injected samples
travel through a single capillary column the same as in normal GC operation.
However, the user now controls flows for two columns instead of just one. To audit
the status of flow, it helps to configure the GC monitors (using the menu item
Instrument \ GC Monitors) to display both column 1 and 2 flows and their pressures (Figure 2). The displayed column 1 and 2 flows may appear the same but in
fact column 2 is set about 3-5% higher than column 1. In this example, column
1 = 1.20 mL/min and column 2 = 1.25 mL/min, but the display is limited to one
decimal point as shown in Figure 2.
Injection Port
EPC
Vent
Pepc
Pinlet
Makeup line
Agilent
MS System
Purged Ultimate
Union (PUU)
Z+ mL/min
5975C MSD
7000A QQQ
Z mL/min
Column 2
Column 1
Agilent 7890A GC
Figure 1A. The PCT configuration schematically shown in the forward flow mode operating during analysis. The EPC device supplies just enough pressure to prevent backflow into the connecting
EPC device line (Pinlet> Pepc).
Injection Port
EPC
Vent
Pepc
Pinlet
Makeup line
Agilent
MS System
Purged Ultimate
Union (PUU)
X mL/min
5975C MSD
7000A QQQ
-x mL/min
Column 1
Column 2
Agilent 7890A GC
Figure 1B. The PCT configuration schematically shown in backflush mode. After completing the analysis
the EPC pressure has been raised to send flow back through the forward section of the
column (Column 1) into the inlet and out the split vent (Pinlet< Pepc).
2
Figure 2.
Suggested configuration of the GC monitors for display of the actual pressures and calculated
flows for both column 1 and 2.
Post Run Backflush
Adding Post Run backflush to a PCT GC-MS method that has been tested on standards is very easy. With the working PCT GC-MS method loaded:
1) Select the Backflush Assistant from the GC method parameters.
3
The Backflush Assistant Panel will appear with the GC column configuration. At the
Vacuum system on the right (A), select the Diffusion Pump for now. Then click on
the Evaluate button.
A
2) The next screen, titled Summary of Backflush Calculations, has three important
parameters that must be edited to produce the necessary method setpoints.
Once these setpoints are selected and confirmed, these values are automatically
added to the GC method to enable Post Run backflush.
A
B
C
A) Change the Backflush Pressure setpoint to produce a Flow at Chosen Pressure
for column 2 that is suitable to the MS pumping system (Table 1).
4
Table 1
Maximum Suggested Flow at Chosen Pressure Settings for the Backflush Setpoint
MSD type
Suggested backflush flow
7000 Triple Quadrupole
8-mL/min
5973 or 5975 Turbo Pump systems
10-mL/min
5973 or 5975 Diffusion Pump systems
3-mL/min
Try a few pressures until you achieve a pressure producing near the correct flow
that can still be easily supplied by the carrier gas regulator and plumbing. A value of
about 28 psi produces a forward flow of about 3 mL/min (lower panel) for the 15 m
× 0.25 mm id Column 2 of this configuration example and the value for the Flow At
Chosen Pressure is updated.
B) Set the Inlet Pressure during Backflush to 2.0 psi.
C) Finally, increment the Void Volumes to 10 to extend the backflush Post Run
duration. The backflush time is automatically calculated.
The final parameters should be similar to the figure below.
5
3) Click OK to display the review panel summarizing potential method changes. The
changes can be accepted by clicking the OK button or refused by clicking the
Cancel button. Canceling returns the user to the Summary of Backflush Settings
panel for re-editing
4) Clicking OK automatically updates the method Post Run parameters as shown in
the Post Run Time and column flow settings at Post Run. Note that the Post
Run temperature is usually the same as that reached at the end of the GC oven
ramp program.
6
5) Save the method.
6) Run the method and watch the Post Run conditions by watching the Post Run
monitors. An example is shown in Figure 3. Notice the inlet pressure is 2 psi and
Column 1 flow is negative while Column 2 is approximately 3 mL/min as configured in the setup for this example.
Figure 3.
Typical display during Post Run backflushing. Status shows the system is in Post Run.
Column 1 flow is negative and the inlet pressure set to 2 psi. Column 2 is near the 3 mL/min
setpoint of this example.
The method should be tested on samples followed by blanks to examine whether
there is any carryover. The period of backflush, which is the Post Run Time, can be
extended or shortened according to the nature of the samples.
Setting up a PCT Maintenance Method
During tasks such as the replacement of the injection port liner, or septum, and
other column maintenance (such as the exchange of the precolumn section as
described in the PCT User Manual, Agilent G1472A Rapid Universal GC/MS
Backflushing Kit, page 60), the flow in Column 2 is raised to prevent air intrusion.
Because septum and liner replacement is quite frequent, it is worth having a
defined method that can be loaded or employed in a sequence to automatically prepare the instrument for servicing. For example, after a series of samples are run via
a sequence, a line in the sequence can load the PCT Maintenance method (for
example, MAINTAIN-INLET.M) to set the inlet ready for servicing when the analyst
returns to the instrument.
7
To create such a method, use the 7890 GC keyboard to:
1. Set the Column 2 flow according to the pumping system.
Diffusion Pump systems
3 mL/min
Turbomolecular Pump Systems
8 mL/min
2. Set the oven temperature to 20 °C.
3. Set the injection port temperature to 10 °C.
4. Change Column 1 mode from RAMPED FLOW mode to CONSTANT PRESSURE
mode and the pressure to 2 psi.
5. Save the method to the name, MAINTAIN-INLET.M.
When the inlet is cool enough to touch, set the inlet pressure to OFF and service
the needed parts.
When a complete exchange of the front column (Column 1) is required, consult the
PCT User Manual, Agilent G1472A Rapid Universal GC/MS Backflushing Kit, pages
61–62, for the proper procedure.
Setting up a PCT Standby Method
A standby method has the utility of setting carrier flow back into the inlet thereby
preventing the head of the column from accumulating trace components that
appear in the first injection. This method is very simple to generate.
To create a PCT Standby method, use the 7890 GC keyboard to:
1. Change Column 1 Mode from RAMPED FLOW mode to CONSTANT PRESSURE
mode and the pressure to 2 psi.
The readout on the Column 1 flow should be a negative flow.
If it is not, increment the Column 2 flow by 0.1 mL/min increments until
Column 1 flow is negative. Do not exceed the flow capacities of Table 1.
2. Save the method to file name, STANDBY.M.
For More Information
For more information on our products and services, visit our Web site at
www.agilent.com/chem.
www.agilent.com/chem
Agilent shall not be liable for errors contained herein or for incidental or consequential damages in connection with the furnishing, performance, or use of this material.
Information, descriptions, and specifications in this publication are subject to change without notice.
© Agilent Technologies, Inc., 2010
Printed in the USA
March 16, 2010
5990-5484EN