1
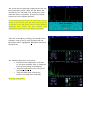
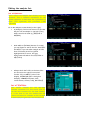
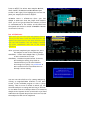
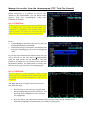
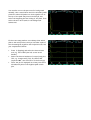
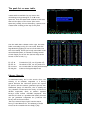
User Manual
“System operators”
Peter M. van Galen
Helene I.V. Amatdjais-Groenen.
Version 1.3.1 2004-02-11
Please check the following before you start with the measurements:
·
·
·
·
·
Check if there is enough solvent in the bottle besides the auto sampler and if the waste bottle
is not to full (please empty in a waste container).
Check if the pressure of the Helium is at least 50 bars, at 30 bars the operator has to replace
the cylinder.
Check the pressure on the GC-column: 14-15 PSI.
Check on the GC whether the right standby temperatures are displayed: COLumn 110,
INJector 110, AUX 260, and DETector 110.
Check if the computer is on and the program Saturn active is, normally the main menu is
displayed.
Make a GC-chromatogram prior to the measurement:
Make a solution of 5 mg/ml of your sample and inject on a GC with the most suitable column (normally a
HP-1 or similar column) and method. Gives this a good chromatogram, then make the dilution from this
solution. Dilute in the ratio of 1:100 with preferably toluene and transfer it to the vial (make sure the
septum is placed in the right way, with the red side down). Do not use the GCMS for optimalisation.
WARNING:
Never use labels on the vial, because the injection
needle could be bent when the vial gets stuck. A new
needle costs € 190,-.
Checking the status of the MS:
Go to:
· I ( Instrument control ). See screen on the
right
· SETUP ® CHECK for Air/Water and
Normalize the spectrum (by clicking N next
to the Y-axis).
The screen you see must look roughly like the one you
see on the right, (100% < 4056, Air OK, Water OK
ratio 28/32 < 4:1, 28 width ~0.8, 19/18 ratio ~10%)
otherwise there is a problem. In case of a problem
contact one of the system operators.
If the mass spectrum seems to look right and the
button on the bottom gives OK, then you can go one
by clicking on the OK button. If the button displays
something else, please do not continue, but
immediately contact one of the system operators.
Then turn on the MS by clicking in the middle of the
schematic view of the ion trap, FILament, RF and
MULTiplier will be ‘highlighted’. Normalize and look at
the spectrum.
The following values must be checked:
· Ionization time 24999 µsec or 25 msec
(if this gives a smaller value, it means the
Ion trap is becoming contaminated).
· That the Total Ion Current (TIC) is low
(normally ~2500).
· That the 100% value is low (a few
honderd, normally lower than 100).
Is all OK, than EXIT.
Editing the analysis list:
PAY ATTENTION:
Never remove the samples that already have been
measured. This is essential information for the
system operators to determine the replacement of
septa (~50 injections) and precolumn (~200
injections).
Go to the analysis screen shown (on the right):
· A (Analysis). The screen exists of a list that
has per line one sample or injection. Every
week a new list is made (e.g. WEEK45 &
WEEK46).
·
With ADD or EXPAND (bottom of screen)
you can expand or add to the list; with EDIT
and SELECT you can make changes to lines
that are already in the list (yellow
highlighted line is active, the gray
background tells which item is EDITed or
SELECTed).
·
Always check the PATH, so the data files
are stored in the right direction and
further fill in; SAMPLE (code of the
sample), OPERATOR (who is doing this
analysis), COMMENTS (name, date,
concentration, solvent, code), DATAFILE.
PAY ATTENTION:
This system contains the Old MS_DOS
filename convention 8.3, this means that you
can only use 8 positions for the data filename,
it is the best to use your sample-code and
reserve a position for a number in case you want
to make multiple injections from the same vial.
Press on SELECT to select Auto Sampler Method,
VIAL number, GC-Method and MS-Method (see
screen on the right). First highlight the correct line
(with your sample) and click on SELECT.
ALWAYS insert a STOOK-run after your last
sample to make sure that the people that measure
after you do not get problems like memory effects
or contaminations of the column. At the same time
the system will return to normal STANDBY situation
at the end of the run.
PAY ATTENTION:
Make sure you pick the right vial position (rack &
vial-nr). In the outer holes the vials with the odd
numbers are placed and on the inner holes the ones
with the even numbers. You can change a method
only after consultation with one of the system
operators.
After you have completed your analysis list, start
the analysis on one of the following ways:
CONTROL ® Start Auto sampler Run: if you want
to start a new series of runs.
CONTROL ®Continue Acquisition Run; if there’s
still a analysis running, they must be
finished before you can start another.
According to our policy it is prohibited to
start a new series of runs when there is
already a series running.
You can view the STATUS of a running analysis by
clicking on AQUISITION STATUS in the main
screen of the SATURN program or with U (Acqu
Status). Than a screen is shown on which you can
see what analysis is running and how long it still has
to run. When a series of analysis have to be measured,
always set the system on this screen before you leave.
Otherwise the System stops after the active run and
the analysis list will not be completed.
Manage the results from the chromatogram (TIC Total Ion Current)
During acquisition it is possible to look at the
results of the measurement, you can derive mass
spectra from the chromatogram (TIC) and
eventually print them.
PAY ATTENTION:
At this point you cannot extract your chromatogram
to a floppy disc, you have to wait until the
acquisition is completed. The system gives the
highest priority to writing to the hard disc and
there can perform no disk-IO during acquisition.
Go to:
· F (File Manager) and select the correct data file
by highlighting and press ENTER.
· Press function key F2 and insert the desired scan
area (Chro Plot Range) to go to the chromatogram
(TIC).
If you only have measured one sample and it has, you
can go directly to the TIC with C (Chromatogram)
from the main screen. On the bottom of the main
screen on the right you can see the active data file
(Acquisition Status). You always have to select your
data file before you can open it in Chromatogram.
PAY ATTENTION:
Set the system to the Acquisition Status screen
before you leave. Otherwise the System stops after
the active run and the analysis list will not be
completed.
The Mass Spectrum of a peak can be retrieved on
two different ways:
1.
Go to the top or near the top of a peak with
the arrow keys and press function key F1. The
spectrum that is displayed is not corrected
for background.
2. Go to the top of the peak and at the same time press the control key B. The spectrum
that then is displayed is automatically corrected for background.
You can also correct the spectrum for background
manually, this is useful when there are shoulder peaks
present or when the peaks are close together. Go to
the top of the peak and press control key B, now
select the beginning and the ending of the peak. Then
select the area to be used for the background
subtraction.
If there are many peaks it is not always clear which
peak is the main product, then you can make a plot of
the chromatogram together with expected ions from
your compound as follows:
·
·
·
Press D (Display) and select the desired scan
area, e.g. 45 to 1500 (see left screen in the
header).
Insert the desired numbers of traces (ions) plus
TIC, e.g. 4 respectively TIC, 93, 105 en 228
(expected MH+, auto CI effect of the Ion trap).
After the plot is displayed on screen press F4 to
normalize all plots to the highest peak in each
plot.
The peak list or mass table.
A mass table is available for any scan in the
chromatogram by pressing F3 or on M in the
spectrum. Then the mass table is shown of the scan
where at the place of the cursor (the active
spectrum). Usually, but not necessary, a spectrum or
a mass table is taking at the top of the peak.
Like the table that is shown on the right, the mass
table is normally too big for one screen. With the
Page Down key (PgDn) you can scroll the table, but
this is not handy. Often you’re only interested in the
most abundant peaks, so instead of taking several
screen dumps you can use the function keys at the
bottom of the screen, e.g :
F1 =1% th
F5=5% th
F6=init sort
F9=bkg sub
Threshold of 1%, cut off peaks <1%.
Threshold of 5%, cut off peaks <5%..
Sort initial table on mass peak intensity.
Subtract backgroundspectrum.
Library Search:
A sometimes-handy tool in the search after the
identity of an unknown component is a library
search. Because the reference spectra are impure
EI spectra and the Saturn generates spectra with
substantial (auto) CI character, this is usually not
very valuable. Furthermore the library is limited to
40.000 compounds, while on modern systems
library’s often contain ~150.000 compounds. This
and the fact that in a synthesis-lab usually new and
not yet published compounds are produced the
library will not be used often.
There are several ways to perform the search,
Purity, Fit and Reverse fit. The meaning of these
terms can be revealed with the Help (?) key.
Chromatogram Backup :
Because the limited size of the hard disk, it is the best to backup your data after the measurements
on a floppy disk. Most data files are several of hundreds of KB, so it is common to reduce the files by
saving only the important part of the chromatogram. Selecting an extraction range can do this.
·
·
·
·
·
·
Chose the EXTRACTion range by pressing E in the Chromatogram screen.
Select the desired area by setting the cursor left of the desired area and pressing the
spacebar.
Set the cursor right of the desired area and again press on the spacebar.
Then the parameter menu pops up, to change the parameters press P.
Give the extracted chromatogram a different name; put X in front of the sample name (e.g.
STOOK01 becomes XSTOOK01).
Press the return key and the extracted chromatogram is saved to the new datafile.
It is possible to change the scan range and the threshold manually to reduce data even further, but
this is not recommendable.
Go to Filemanager and the right directory and select the extracted data file (click only 1 time):
· Press on C (opy) and ENTER, a menu pops up.
· Press on L (og to another drive) and key A to activate the floppy disk drive.
· The same menu pops up, press ENTER and the data file will be save on the floppy disc (be sure
to put one in).
If you want to save more than one data file at once press on T(ag) to select the desired data files.