1
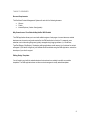
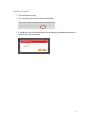
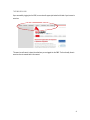
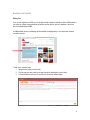
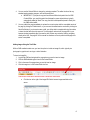
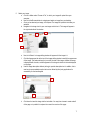
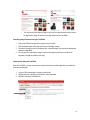
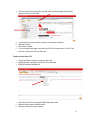
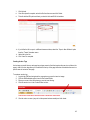
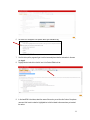
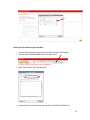
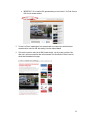
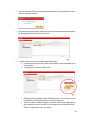
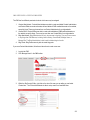
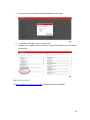
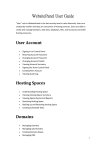
WEBSITE CONTENT MANAGEMENT SYSTEM USER MANUAL CMS Version 2.0 CMS Manual Version 1.0 – 2-25-13 CONTENTS Things to Remember ..................................................................................................................................... 2 Browser Requirements ................................................................................................................................ 2 Why Some Areas of Your Website May Not Be CMS Enabled ................................................................... 2 Editing Design Templates ............................................................................................................................ 2 Logging Into the CMS .................................................................................................................................... 3 The CMS Menu Bar ........................................................................................................................................ 4 Managing Page Content ................................................................................................................................ 5 Editing Text.................................................................................................................................................. 5 Adding Images Using the Text Editor .......................................................................................................... 6 Controlling Image Placement Using the Text Editor .................................................................................... 8 Inserting Links Using the Text Editor ........................................................................................................... 8 Creating a Link to Open a File ..................................................................................................................... 9 Creating Anchor Tags Using the Text Editor ............................................................................................. 10 Inserting YouTube Videos Using the Text Editor ....................................................................................... 12 Adding a New Page...................................................................................................................................... 14 Managing the Website Menu....................................................................................................................... 16 Adding a New Page to the Menu ............................................................................................................... 16 Removing a Page from the Menu .............................................................................................................. 18 Version History ............................................................................................................................................ 19 Drafts ............................................................................................................................................................ 20 Blog Management ........................................................................................................................................ 21 Creating a New Blog Post.......................................................................................................................... 22 CMS User Roles & Creating CMS Users .................................................................................................... 23 Need Additional Help?................................................................................................................................. 24 1 THINGS TO REMEMBER Browser Requirements The Red Hawk Content Management System will work with the following browsers: Chrome Firefox Internet Explorer (Version 8 and greater) Why Some Areas of Your Website May Not Be CMS Enabled The CMS application allows you to work with editable regions of web pages. In some instances, website designers may choose to omit code required for the CMS application to function. For example, many websites now include a blog. Blogs are typically managed using blogging software (i.e., WordPress, TypePad, Blogger, BlogEngine). Overlapping editing applications would cause a lot of problems for content managers. If you believe a region of your website should be editable using the CMS application, contact the developer of your site for support. Editing Design Templates You will need to work with the website designer that produced your website to modify your website templates. The CMS application does not allow content managers to modify website templates. 2 LOGGING INTO THE CMS 1. Go to the website home page. 2. Click on the CMS Login link at the bottom of the home page: 3. In the login box, enter the User Name (always an email address) and Password designated when your CMS user account was created: 3 THE CMS MENU BAR Upon successfully logging into the CMS, a menu bar will appear just below the left side of your browser’s menu bar: This menu bar will remain in place the entire time you are logged into the CMS. The functionality of each menu bar item is covered later in this manual. 4 MANAGING PAGE CONTENT Editing Text Once you are logged into the CMS, you will be able to make changes to website text that is CMS-enabled. If the content on a page is programmatically pulled from another source, such as a database, it will not be able to be edited using the CMS. All CMS-enabled content on a webpage will automatically be highlighted by a color block when hovered over with the cursor: To edit text on a specific page: 1. Navigate to the page you want to edit. 2. Click the area you want to edit on the page (should be highlighted by a color block). 3. A Content Editor box will launch if the area you clicked is an editable region: 5 4. You can use the Content Editor to change the content as needed. The editor functions like any standard word processing program, such as Microsoft Word. a. IMPORTANT: If you plan to copy text from Microsoft Word and paste it into the CMS Content Editor, you must first paste it into Notepad to remove styles that are typically automatically added by Word. Then copy the text from Notepad and paste it directly into the CMS content editor. 5. You can publish the page immediately to replace the current version with the new edited version of the page by clicking the Publish button, or you can save the edited version as a draft by clicking the Save Draft button. If you choose to save a draft, you will be able to complete edits at a future date, or share the draft with others for approval. To share a draft, make note of the page URL in your browser window immediately after you save the draft. Others may review the draft by navigating directly to the URL. See page 20 in this manual for directions on how to publish a draft page once review is completed. Adding Images Using the Text Editor Within a CMS-enabled content area, you have the option to include an image file, which typically is a photograph or graphic such as a logo or other illustration. To insert an image file: 1. Log into the CMS and navigate to the page where you want to insert an image. 2. Click the CMS-editable region to launch the Content Editor. 3. Click in the area of the page where you want to insert an image. 4. Click the image icon in the Content Editor tool bar: a. Click the icon to the right of the Image URL field to browse images available on the server: 6 5. Select your image. a. Click on a folder under “Choose a File,” to which your image will upload from your computer. b. Next, click the Browse button to navigate and select an image from your desktop. c. Once you’ve selected your image, click Upload. The image will upload to the folder you selected. d. Navigate to the image icon for your new image and click on it. The image will appear in the right-hand side of the window: b . c . e a . d . e. Next, click Select. An image editing window will appear with the image in it. f. Click the Appearance tab at the top of the image editing window to modify the appearance of the image. This feature allows you to control the size of the image, whether the image is displayed with a border, and the alignment of the image in relation to the text displayed on the page. g. Use the image description attribute (alt tag) to provide descriptive text. In addition, this is used as a human-readable caption that can be utilized by third party applications for accessibility for the handicapped. f. g . h . h. Click Insert to insert the image into the text editor. You may then choose to create a draft of the page or to publish it to replace the current live version of the page: 7 i. You may also click and drag the image or right click the image and select various options for alignment to change its position on the page while using the Text Editor. Controlling Image Placement Using the Text Editor 1. 2. 3. 4. Login to the CMS and navigate to the page you want to modify. Click the editable region of the page to launch the Text Editor window. Right click the image you wish to modify and click “Insert/Edit Image” from the options displayed to launch the image editor. You may also click and drag the image or right click the image and select various options for alignment to change its position on the page. Inserting Links Using the Text Editor Using the Text Editor, you may make a word or series of words link to another page within your website or to an external web page. 1. Log on to CMS and navigate to a page you wish to edit. 2. Highlight the word or phrase for which the link will be associated. 3. Right click and select "Insert/Edit Link.” 8 4. Click the browse icon to the right of the “Link URL” filed, and select the page within the site to where you want to link. Click Select. 5. 6. 7. 8. This will add the URL path and direct you back to the Insert/Edit Link window. Add a title to the link. Click Insert to complete. To link to an external web page, simply enter the full URL for the page into the “Link URL” field from Step 4, give the link a title, and click Insert. Creating a Link to Open a File 1. 2. 3. Log into the CMS and navigate to a page you wish to edit. Highlight the word or phrase for which the link will be associated. Right click and select Insert/Edit Link. 4. 5. 6. Click on the Link URL icon to display the CMS File Browser window Select the folder you want to upload the file to. Browse to locate the file on your computer. 9 7. 8. 9. Click Upload. Once the upload is complete, select the file from the menu and click Select. This will add the URL path and direct you back to the Insert/Edit Link window: 10. If you’d like the file to open in a different browser window, select the “Open in New Window” option from the “Target” dropdown menu. 11. Add a title to the link. 12. Click "insert" to complete. Creating Anchor Tags Anchor tags are useful when a web page has a large amount of text that requires the user to scroll down the page to read it. Anchor tags allow you to add links to the top of the page that when clicked take the user to a specific area of content on the page. To create an anchor tag: 1. Log into the CMS and navigate to the page where you want to insert an image. 2. Click the CMS-editable region to launch the Content Editor. 3. Place your cursor in the text where you want to insert the tag. 4. Click the anchor icon in the Content Editor tool bar: 5. Give the anchor a name (may not include spaces between words) and click Insert: 10 6. An anchor icon will appear in the position where you inserted the tag. 7. Scroll to the top of the page and type in text that accurately describes the information in the area you tagged. 8. Highlight the text and click on the link icon in the Content Editor tool bar: 9. In the Insert/Edit Link window, select the name of the anchor you set from the “Anchors” drop-down menu and click Insert to make the highlighted text a link that leads to the area where you inserted the anchor. 11 Inserting YouTube Videos Using the Text Editor 1. Log on to CMS and navigate to a page on which you wish to embed a YouTube video. 2. Click the Insert/Edit Embedded Media button in the editor tool bar: 3. Select “Flash” from the “Type” drop-down menu: 4. Locate the video on YouTube and copy and paste the YouTube URL the File/URL field. 12 a. IMPORTANT: Do not use the URL generated when you click “share” in YouTube. Use the URL from the browser window: 5. To keep YouTube’s “related videos” from appearing after your video plays, add the following characters to the end of the URL after pasting it into the window: &rel=0 6. Click Insert to insert the video into the Edit Content window. You will not see a preview of the video, but a yellow box where the video will be inserted. Click Save Draft or Publish to see the actual video embedded on the page: 13 ADDING A NEW PAGE 1. Log into the CMS. 2. Click Manage Site from the CMS toolbar: 3. In the new Site Management window displayed, you'll see a list of directories and pages on the left and the list of drop down menu items listed on the right. 4. Locate the directory where you want to add the new page in the list on the left side of the window. 5. Locate a page to copy by right clicking the page you want to copy and select "Copy as New Page" from the options displayed. 6. Add a Page Title and Page Name for the new page and click Save. a. The page title is displayed in the top of browser windows. Page Titles are very important when optimizing websites for search engines. Give the page a title containing descriptive keywords representative of the content found on the page. b. The Page Name is important because it appears in the website navigation once the page is added to your website menu. c. The Keywords field should contain words that relate to the content on the page. This information is important for search engine optimization as well. d. The Description field should contain descriptive sentences that summarize the content contained on the page. It is also important for search engine optimization. 14 7. Once you complete the fields, click Save and your page will appear in the left-hand directory: 8. Right click on the new page and select "Navigate To.” 9. Now you can edit the new page, inserting new text and images as described in the Managing Page Content section of this manual. You may save the new page as a draft or publish it immediately. If you choose to publish it, the navigation (menu) on your website will not include a link to the new page until you add the new page to the menu. Read below for instructions on how to manage the menu. 15 MANAGING THE WEBSITE MENU Adding a New Page to the Menu 1. Log into the CMS. 2. Click Manage Site from the CMS tool bar. 3. Locate the page you want to link to from the website menu on the left side of the Manage Site window. 4. Click and drag the page to the menu displayed on the right side of the Manage Site window. Be sure to hover over the name of the directory in which you want the new page to be included with the new page until you see a “+” sign appear to the left of the directory name. Your new page will appear in the proper directory once you release your mouse button. In the example below, the directory is “Development Process,” which appears in the main navigation of the website. 5. Click “Save.” 16 6. If your website was built with certain specifications for how its navigation operates, you will need to click on your new page from where you just placed it on the right-hand Navigational Menu and will need to fill in any applicable information in the blank fields shown below. The best way to do this is to click on a like page in the Navigational Menu and copy the same information from its Menu Information fields into the Menu Information fields for the new page. Don’t forget to scroll down, as several fields may not be visible when you first open the Menu Information tab. 7. Click Publish to update the menu. 8. When you visit your website, the new page will be live in the navigation position that you chose. 17 Removing a Page from the Menu 4. Log into the CMS. Click Manage Site from the CMS tool bar. Locate the page you want to remove in the menu displayed on the right side of the Manage Site window. Right click the page and select “Delete” from the options displayed. 5. 6. Click Publish to update the menu. The page will no longer appear in your website’s navigation. 1. 2. 3. 18 VERSION HISTORY The Content Management System automatically saves the previous version a website page each time you publish a change to one. To revert to an older version of a web page: 1. Log into the CMS 2. Navigate to the page you’d like to change. 3. All the previous saved versions of the page are listed by date and time in a drop-down menu that appears when you click on Version History from the CMS menu bar. 4. To revert to a previous version of the page, click on the appropriate link in the drop-down menu to open the page. NOTE: Be sure the Content Editor is not open, as you will not be able to open a version history if it is. 5. Click within a CMS-enabled content area to open the Content Editor window. 6. Click Publish to make this the live version of the page on your website. 19 DRAFTS As described on page 6 of this manual, you may save a draft page to allow for review before you publish the edited page to your live website. All saved drafts are accessible by the following method: 1. Log into the CMS. 2. Navigate to the page for which a draft has been saved. 3. All the saved draft versions of the page are listed by date and time in a drop-down menu that appears when you click on Drafts from the CMS menu bar. NOTE: Be sure the Content Editor is not open, as you will not be able to open a saved draft if it is. 4. To publish one of the draft pages, click on the appropriate link in the drop-down menu to open the page. 5. Click within a CMS-enabled content area to open the Content Editor window. 6. Click Publish to make the draft the live version of the page on your website. 20 BLOG MANAGEMENT If your website uses Red Hawk’s blog engine, you will be able to manage blog posts via the Content Management System. You will know that your website uses the blog engine if a “Blog” button is included in the CMS menu bar once you are logged in. In some cases, the blog engine is used to manage content in more than one location on the website. If this is the case, you will see the different blogs represented in the management area, once you click on “Blog” in the CMS tool bar. Creating a New Blog Post 1. Log into the CMS. 2. Click on “Blog” in the CMS menu bar to open the Blog Directory window. 3. To create a new post, right click on the blog folder you plan to manage and select “Create Post” from the menu to open the Create Post window. 21 4. Give your new post a title (title will appear as the post’s headline) and include the author’s name (name is not required, however). 5. Click Create and you will be able to compose the post using the same techniques as described in the “Managing Page Content” section of this manual: 6. To include a date on the post, use the date picker to select a date. a. It’s important to note that you are not able to pre-schedule a post to automatically go live at a future date. b. To make a post live, click the “Publish” button. c. Although a post is automatically saved in the Drafts directory, once you create it, you will be required to click the Save Draft button in order to save your work. d. There is no preview available for blog posts. If you save a draft, use the “Blog Directory” folder navigation to return to the draft, click on the page icon to open the draft and click “Publish” to make the post live on your website. 22 CMS USER ROLES & CREATING CMS USERS The CMS has four different permission levels to which users may be assigned. 1. Content Administrator: Content Administrators are able to create and delete Content Administrator and Content Editor accounts and create, edit and delete all CMS-enabled elements on the website, except for blogs. There may be more than one Content Administrator for a single website. 2. Content Editor: Content Editors are able to create, edit and delete all CMS-enabled elements on the website, except for blogs. There may be more than one Content Editor for a single website. 3. Blog Administrator: Blog Administrators will only have access to the blog. They won't have access to anything other CMS features, including Version History, Saved Drafts, Manage Users, or Manage Site. The Blog Administrator is able to add or delete blogs to the site. 4. Blog Poster: Blog Posters are only able to create blog posts. If you are a Content Administrator, follow these instructions to create a new user: 1. Log into the CMS. 2. Click “Manage Users” in the CMS toolbar: 3. Within the Site Security Editor, right click on the role of the user you are setting up, and select “Create User.” The Content Administrator is able to set up users for all available roles. 23 4. Enter the new user’s email address and desired password and click Create: 5. The new user is now ready to log into the CMS or Blog 6. To delete a user, navigate to the user’s information in the Site Security Editor, right click, and select “Remove User.” NEED ADDITONAL HELP? Visit www.redhawk-tech.com/agency-toolkit/CMS for access to video tutorials and FAQs. 24