1
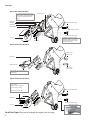
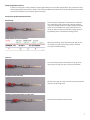
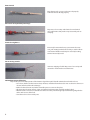
Hand Crimp Tool
User Manual
North America
Power & Signal Group
World Headquarters
6675 Parkland Blvd
Solon, OH 44139
USA
Phone: 1-800-722-5273
440-836-6600
Fax:
440-836-6122
E-mail: [email protected]
[email protected]
Europe, the Middle East & Africa
Power & Signal Group GmbH
Balcke-Duerr-Allee 2
40882 Ratingen
Germany
Phone: +49 2102/1677-0
+49 800 10 10 772
Fax:
+49 (0)2102/1677-160
E-mail: [email protected]
[email protected]
South America
Power & Signal Group, an Arrow Company
Rua José Gomes Falcão, 111
Attn:
Roberto Cutrupi,
Sales Manager South America
01139-010 - Barra Funda - São Paulo - S.P. Brasil - BR
Phone: 55 11 3613 9371
Email: [email protected]
Asia
Power & Signal Group
11F, BM Intercontinental Business Center
100 Yu Tong Road
Shanghai 200070
China
Phone: +86 21 22152000
Fax: +86 21 22152435
E-mail: [email protected]
Table of Contents
General hand crimp tool (HCT) information
• Introduction
• Function of HCT ratchet
• Scope of usage
• Responsibilities of user
• Note regarding HCT manual dimensions
HCT Power Assist Devices
Tool Types
• Tool Type 1: Blade & Box Terminals
• Tool Type 2: Pin & Sleeve Terminals
Assembly and Removal of HCT Die Sets
• Die selection
• Die insertion
• Die removal
• Crimp verification
• Crimp Height Adjustment
Crimp Tool Reference Data Sheet
Crimping Instructions
• Terminal Loading
• Terminal Crimping
• Crimp Height Measurement
Visual Crimp Quality Recommendations
• Good crimp
• Crimp dimensions not in tolerance
• Low core
• Insulation under core wing
• Twisted or distorted terminals or cable seals
• Excessive Tab
• All strands not captured by core wings
• Terminal straightness
• Cut or missing strands
HCT Maintenance & Cleaning
HCT Visual Inspection
Wire Stripper Instructions
HCT Support
2
General Hand Crimp Tool (HCT) information
Introduction
Power & Signal Group’s HCTs have been designed to optimize crimp quality for low volume, repair, or
prototype usage. In North America and Asia, the HCTs may be ordered as individual die sets . In
Europe, the Middle East & Africa, the HCTs may be ordered pre-assembled or as individual
compo nents to crimp multiple Delphi Connection System terminals to various cable sizes. The HCT
is sold in one of two designs, both ensuring optimum crimp quality. Type 2 crimps pin and sleeve
terminals while Type 1 crimps blade and box terminals.
Function of HCT ratchet
The Power Signal Group HCT ratchet has detents. There are six audible “clicks” from opening to
closing. The crimp tool is designed to complete the full cycle of detents in order to assure a quality
crimp.
If it is necessary to open the HCT prior to full closure, press the handles together slightly. Turn the
emergency unlocking release clockwise (direction of the arrow) and open the handles
simultaneously.
NOTE: If the emergency release is utilized, the crimped terminal is not to be used.
Scope of usage
Power & Signal Group Hand Crimp Tools (HCT) have been developed for optimal crimping in:
• Low volume production
• Repair
• Field Service
• Prototyping
The HCT should not be used for other purposes. Repetitive Stress Injury (RSI) can result from a
prolonged use of manually powered hand crimp tools. Power & Signal Group hand crimp tools are
intended for occasional and low volume applications only. Please call Power & Signal Group for
availability of power applicator dies and equipment for high-volume applications.
Responsibilities of user
The operation, maintenance and service of the Power & Signal Group HCT requires a degree of
practice and skill. Each person who is working with the HCT must be familiar with the tool’s operation
and follow the manual’s instruction. Therefore, the instruction sheet must be constantly within reach
of the HCT. In addition, any other instructions resulting from current national regulations in terms of
health and safety should be maintained with the tool’s instruction sheet. The user shall not make any
revisions to the HCT without the consent of the manufacturer or supplier. Before using the HCT, the
operator should conduct a visual inspection of the tool to verify that it is not damaged, maladjusted,
or otherwise malfunctioning. Power & Signal Group declines to accept any liability for damages that
occur due to inappropriate use of the HCT or disregard for the guidelines set forth in the tool’s
insruction sheet. The user of the HCT is responsible for the quality of the crimp.
Note Regarding HCT manual dimensions
Dimensions provided in this HCT Usage Manual are in millimeters (mm). Figures and illustrations are
not drawn to scale.
HCT Power Assist Devices
Power & Signal Group can also recommend or, in limited instances, supply Pneumatic or Mechanical Assist devices for
use with standard PSG Hand Crimp Tools. For more information, please contact the technical support group for your
region.
3
Tool Types
Type 1: Box & Blade Terminal
Donotovertightenthewirestop
M4nut.Makecertainthatthewire
stopspringloadedblademoves
freely.
Stationaryjaws
WireStop
Chamfer
UpperDie
M4LockNut
M4X25mmAllenScrew
DieRetaingScrews
M4X16mmAllenScrew
Locator
LowerDie
Assemblescrewswithoutfully
tightening.Tightenscrewsafter
closinghandlestofullyseatthe
upperandlowerdie.
Type 2: Pin & Sleeve Terminals
M4X11mm
AllenScrew
WireStop
M4RegularNut
M4X18mm
AllenScrew
Turnsmallknobtoopenandclose
holdterminal.
Type 3: Pin & Sleeve Terminals
-PresstoOpen
-Insertcontact
-ReleasetocloseonContact
-Opentoreleasecontact
-Aligntobottomdie-Snap
M4X11mmAllenScrew
WireStop
M4X16mmAllenScrew
Locator
For All Tool Types: Placeendofstrippedwireagainstthewirestop.
4
Emergencyrelease
Assembly and Removal of HCT Die Sets
If you have purchased a pre-assembled HCT begin with the crimp verification instructions.
Die selection
• Select the appropriate die for the terminal part and gauge size as defined in the Crimp Tool Reference
Data Sheet.
Die insertion
• Assemble the upper and lower die inserts together with the terminal locator and wire stop.
• Be sure that the beveling side points to the left.
• The proper nut and allen screws are provided with each tool kit.
Die Removal
• Open the tool handles.
• Loosen and remove the two die retaining screws by means of an Allen wrench
• Slide the dies out of the tool jaws.
Crimp verification
In order to ensure proper crimping and to control the wearing of the tool and die, crimp verification must be done after
every die set change and regularly thereafter.
Step One
Measure the crimp height and width with a caliper.
Step Two
Compare the caliper results to the specified tolerance range found in the Crimp Height Reference Data Sheet included
with each die set.
If the crimp height is out of the specified tolerance range, the HCT needs to be adjusted.
Crimp Height Adjustment
• Remove set screw.
• Rotating the adjustment wheel counterclockwise increases the crimp force and decreases the crimp height.
• Rotating the adjustment wheel clockwise decreases the crimp force and increases the crimp height.
• Reinsert set screw
5
Crimp Tool Reference Data Sheet
Power & Signal Group supplies specific required information with each shipment of its pre-assembled hand crimp tools
and with individual die inserts. Information includes terminal part number, cable type, strip length, and other information
relevant to obtaining a quality crimped terminal. Additional validation data is available upon request.
Crimping Instructions
The proper inserts, terminal locator and wire stop should always be used for the intended terminal and wire gauge size
(See Crimp Tool Reference Data Sheet).
• Reference tool number, terminal name and wire gauge sizes on tool parts.
• Reference terminal part numbers and cable gauge sizes from authorized wiring prints or other documents.
• Use the specific cable strip length from the Crimp Tool Reference Data Sheet.
Terminal Loading
Insert loose piece terminal into holder opening as shown in Figure 1. Type 2 (Pin & Sleeve Terminal) locators must be
opened with knurled wheel and closed to orient terminal so as to capture terminal wings. Use correct cable seal if
required (Figure 2).
Figure 1
Figure 2
Make sure terminal is fully inserted so wings are over the crimp anvils. If wings do not catch properly,
slightly bend inward to clear upper plate. Partially close ratchet handles to capture terminal. (Use
wrench to turn square nut clockwise to release handles if terminal is not captured properly.)
Position stripped wire end against wire stop in bottom of crimp wings for Type 2 or in upper die for
Type 1. Make sure the spring loaded wire stop returns after each crimp. (If wire stop does not return,
the locking nut is too tight or the stop needs to be lubricated.) If a cable seal is used, make sure the
seal is positioned so that the insulation wings capture the seal. Make sure no strands are cut or are
missing in the stripping process.
Terminal Crimping
Complete the ratcheting closure of handles until they spring open. Remove crimped leads carefully.
Inspect crimped lead according to the Visual Crimp Quality Recommendations to eliminate nonconformances:
Measure all crimp dimensions with calibrated measuring equipment. Compare to crimp dimensions supplied with the
tool inserts for specific cable size and terminal part number.
6
If crimps are too high, remove set screw and turn serrated wheel counterclockwise (+) until proper crimp height is
achieved. (Reinsert screw before trying again.) If core crimp height is too tight, follow the same procedure except turn in a
clockwise direction.
Crimp Height Measurements
In order to insure proper crimp quality, the crimp height must be measured and readjusted if it does not meet the Core
Crimp Height (CCH) requirements as shown in the Crimp Tool Reference Data Sheet for the specified terminal and cable
size. The CCH should be measured with approved calipers.
Visual Crimp Quality Recommendations
Good Crimp:
Correct crimp tool application will minimize or eliminate
non-conforming crimps. Improperly crimped terminals
may fail electrically. Practice on samples until good quality
crimps are consistently made. Crimped terminals must
always be 100% visually inspected after crimping process
by following the non-conformance listings below.
Crimp dimensions not in tolerance:
Wrong insert tooling, crimp adjustment not right, inserts
not seated, wrong insert jaw, wrong cable or terminal
(See data sheet with tooling.)
Low core:
Core not showing in front of terminal core wings due to
short strip, not using wire stop or incorrect placement.
No strip, short strip, wire stop not used, incorrect placement
(may also result in high core).
Terminal not positioned correctly in tool.
Insulation under core wing:
Twisted or distorted terminals or cable seals:
7
Excessive Tab
May damage seal or cause seal to not seal properly.
Terminals not cut off strip properly.
All strands not captured by core wings:
May cause a loose crimp and electrical or mechanical
non-conformance. May need to inspect strands prior to
crimping.
Terminal straightness:
Excessively bent terminals may cause terminals not to
seat, push mating terminal out of cavity, or not be able to
seat Terminal Position Lock. May be caused by locating
terminal incorrectly in tool.
Cut or missing strands:
Incorrect stripping of cable. May cause a loose crimp and
electrical or mechanical non-conformance.
HCT Maintenance and Cleaning
Responsible personnel and operators of the Power & Signal Group HCT should maintain the tool with each use.
• Use a clean, lint-free cloth to remove dust, moisture, and debris from the tool. Do not use abrasive cleaners on
the tool, which could result in damage.
• Make sure that all screws and other removable parts are secure and in place.
• All pivot points, bearing surfaces, joints, and other movement points should be regularly oiled.
• When the tool is not in use, its handles should be closed to prevent foreign objects from being lodged in the
niches and recesses of the tool.
• Store the tool in a clean and dry area.
8
HCT Visual Inspection
• Quality control personnel should regularly check up on the HCT to ensure that crimp quality is optimal.
• Inspections on the tool should be made regularly and logged.
• The frequency of use, working environment, company standards, and operator training, strength, and
proficiency are some factors to take into consideration when inspecting the tool.
• When visually inspecting the tool, grease should be removed by using a commercial degreaser that will not
negatively affect the tool.
• After the tool has been degreased, make sure that the range of motion on the tool is quick and clean when you
open and close the tool.
• Inspect that the wire stop, holders, jaws, and other moving parts are in place.
• Make sure that the unit is not missing any screws and that the emergency release is operational.
• If there is any damage spotted, make sure it is noted and properly cared for. If the tool is still in useable
conditions, then lubricate the tool and return to service. Do not use excessive amounts of oil.
• If any adjustments or replacements need to be made, please contact the Power & Signal Group service number
for your region.
Wire Stripper Instructions
Obtain the proper strip length from the Crimp Tool Reference Data Sheet, which is listed for each cable gauge size of the
specified terminal part number. (Wire Strippers are not included with all HCTs)
• Adjust the red wire stop on the stripper to the proper strip length.
• Inspect the stripped leads carefully for cuts, scrapes, missing strands or deformed insulation in the strip area.
• Readjust wire stripper if necessary.
• A complete visual inspection is recommended prior to crimping.
Imperial scale (inches)
(for wire gauge 32-7)
Metric scale (mm)
(for wire gauge 0.03-10)
HCT Technical Support
For assistance, please contact:
Power & Signal Group NA
4670 Richmond Road, Suite 120
Cleveland, OH 44128 USA
Engineering Tech Line: (800) 610-4837 or (216) 378-6600 ext. 5422
Sales: (800) 722-5273 or (216) 378-6600 or [email protected]
Power & Signal Group EMEA
Itterpark 9-11
40724 Hilden Germany
Engineering Tech Line: +49 2103 250 510
Sales: +49 2103 250 0 or [email protected]
Power & Signal Group Asia
6/F Building 1
3000 Long Dong Avenue
Pudong, Shanghai 201023 China
Sales: +86 21 289 32000 or [email protected]
9
Notes:
____________________________________________________________________________________________________________
____________________________________________________________________________________________________________
____________________________________________________________________________________________________________
____________________________________________________________________________________________________________
____________________________________________________________________________________________________________
____________________________________________________________________________________________________________
____________________________________________________________________________________________________________
____________________________________________________________________________________________________________
____________________________________________________________________________________________________________
____________________________________________________________________________________________________________
____________________________________________________________________________________________________________
____________________________________________________________________________________________________________
____________________________________________________________________________________________________________
____________________________________________________________________________________________________________
____________________________________________________________________________________________________________
____________________________________________________________________________________________________________
____________________________________________________________________________________________________________
____________________________________________________________________________________________________________
____________________________________________________________________________________________________________
____________________________________________________________________________________________________________
____________________________________________________________________________________________________________
____________________________________________________________________________________________________________
____________________________________________________________________________________________________________
____________________________________________________________________________________________________________
____________________________________________________________________________________________________________
____________________________________________________________________________________________________________
____________________________________________________________________________________________________________
____________________________________________________________________________________________________________
____________________________________________________________________________________________________________
____________________________________________________________________________________________________________
____________________________________________________________________________________________________________
____________________________________________________________________________________________________________
____________________________________________________________________________________________________________
____________________________________________________________________________________________________________
____________________________________________________________________________________________________________
10