1
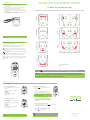
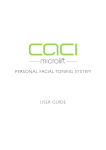
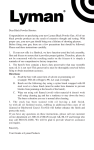
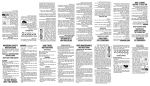
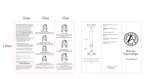
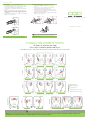
TONING PROGRAM
PINCH TECHNIQUE
1.
2.
3.
4.
RELEASE TECHNIQUE
(for toning treatment steps 1-12)
With the handset open, place the upper probes on the start
points and the lower probes on the start points (see example
fig.1). Ensure all 4 probes are in contact with the skin.
The upper probes should always remain in a fixed stationary
position.
Grip the muscle between the probes and gently squeeze the
handset moving the lower probes towards the stationary upper
probes until the lower probes reach the finish points (see
example fig.2).
Hold in position for approximately 6 seconds or until the audible
‘BEEPS’ become more rapid.
1.
2.
3.
4.
(for toning treatment steps 13-18)
Grip the handset using both hands and close the probes
together.
Place the probes on the start points (see example fig.3).
Ensure all 4 probes are in contact with the skin.
Gradually open the probes using both hands until they reach
the finish points (see example fig.4). Do not extend the probes
beyond the targeted treatment area.
Hold in position for approximately 6 seconds or until the audible
‘BEEPS’ become more rapid.
PERSONAL FACIAL TONING SYSTEM
Fig.3
Fig.4
Fig.1
TREATMENT GUIDE
To avoid damage do not open the handset too wide apart.
Fig.2
NOTE: The start and finish points are indicative only and should be
adapted according to your face shape. Do not extend the probes beyond the
targeted treatment area.
NOTE: The finish points are indicative only. Facial muscles should be
squeezed firmly between the probes to a point where the hold is comfortable.
TONING TREATMENT STEPS
18 Steps (6 seconds per step)
Each steps should be performed twice.
PLEASE READ USER GUIDE CAREFULLY BEFORE USING THE CACI MICROLIFT PERSONAL FACIAL TONING SYSTEM
JAWLINE
PINCH TECHNIQUE STEPS 1-12
STEP 1
STEP 2
STEP 3
Repeat Steps
CHEEKS
Repeat Steps
STEP 4
STEP 5
STEP 6
STEP 7
Repeat Steps
STEP 8
Repeat Steps
BROWS
PINCH Technique
RELEASE Technique
Stationary Probes
Moving Probes Start Position
STEP 9
STEP 10
STEP 11
Repeat Steps
STEP 12
Moving Probes Finish Position
Repeat Steps
FOREHEAD
EYES
MIDDLE-BROW
RELEASE TECHNIQUE STEPS 13-18
STEP 13
Repeat Steps
STEP 14
STEP 15
STEP 16
Repeat Steps
STEP 17
STEP 18
Repeat Steps
DO NOT USE THE H (HIGH) INTENSITY AROUND THE EYES.
NOTE: If the Electro Bud tips become dry, moisten with water. When the Electro Bud serum has been completely
absorbed or the Electro Buds become worn, replace with new ones.
WRINKLES TREATMENT STEPS
WRINKLES PROGRAM
ERASER TECHNIQUE E (for wrinkles treatment steps 1-10)
1.
2.
3.
10 Steps (30 seconds per step)
PLEASE READ USER GUIDE CAREFULLY BEFORE USING THE CACI MICROLIFT PERSONAL FACIAL TONING SYSTEM
EYES
FOREHEAD
4.
Close the handset and move the Slide Lock into the
closed position.
Place the probes to the treatment area (see example fig.5).
Ensure all 4 probes are in contact with the skin.
Without using any pressure move the probes continuously
back and forth across the treatment area using a rapid up and
down movement.
Continue movement for approximately 30 seconds or until the
audible ‘BEEPS’ become more rapid.
E
E
STEP 1
STEP 2
E
STEP 3
NOTE: All 4 probes must maintain contact with the skin when performing each
treatment step.
CHEEKS
MIDDLE-BROW
Fig.5
E
E
STEP 4
STEP 5
E
STEP 6
(MODE) Mode Button – Toggles between the three available
intensity modes L (Low), M (Medium) and H (High).
Power Button – Press and hold the power button to turn the
handset On/Off. It is also used as a reset button when cancelling a
treatment program.
JAWLINE
(PROG) Program Button – Toggles between the two available
programs (TONING and WRINKLES).
UPPER LIP / CHIN
BUTTON FUNCTIONS
E
Start/Pause Button – Starts and Pauses the selected treatment.
E
STEP 7
STEP 8
E
STEP 9
Slide Lock – Opens the probes (use during the Toning program).
Locks the probes in a closed position (use during the Wrinkles
program).
NECK
Mute Switch – Turns the audible ‘BEEPS’ On/Off. The mute icon will
appear on the LCD screen when mute has been switched ON.
E
E
ERASER Technique
STEP 10
DO NOT USE THE H (HIGH) INTENSITY AROUND THE EYES.
NOTE: If the Electro Bud tips become dry, moisten with water. When
the Electro Bud serum has been completely absorbed or the Electro
Buds become worn, replace with new ones.
HANDSET OPERATION
NOTE: Press the
Power button to reset your selections at any time.
1. Select Treatment Program
3. Start the Treatment Program
Press the PROG button to toggle between
programs.
Press the
button to start the treatment
program. (see fig. 8)
The following programs are displayed
• TONING
• WRINKLES
The Clock icon will begin to flash and the
5 minute Countdown Timer will commence.
The selected program will flash.
(as shown in fig.6)
Fig.6
NOTE: If Countdown Timer runs out before completing
the treatment reselect the Treatment Program and
perform the remaining steps.
Fig.8
Audible ‘BEEPS’ will commence shortly after all 4
probes are in contact with the skin. This indicates
the system is working and electrical impulses are
being delivered.
2. Select Treatment Intensity
Press the MODE button to toggle between
intensity levels.
The following intensity levels are displayed:
• L (Low)
• M (Medium)
• H (High)
The selected intensity level will flash.
(as shown in fig.7)
To Pause The Treatment Program
To pause during treatment press the
button twice in rapid
succession. Press again to re-start. (see fig. 8)
Fig.7
To Stop/Reset The Treatment Program
Press the
NOTE: Use a L (Low) or M (Medium) intensity for the first 4 treatments.
If the intensity level is comfortable use the H (High) setting for the remaining
treatments.
button. (see fig. 8)
Ensure Electro Buds are inserted to all 4 probes and that the Electro Bud
tips are completely filled with serum before commencing treatment.
NOTE: The CACI Microlift will automatically switch off after 3 minutes when
not in use.
CACI Microlift Limited.
Herts, WD6 3FG United Kingdom
www.cacimicrolift.com
MS33/TG01-12