1
Horizon DataSys
Rollback Rx
Server Edition
User Manual
Horizon DataSys
Copyright © 2015 – All Rights Reserved
Last Updated: April 15, 2015
Rollback Rx Server Edition
Table of Contents
Table of Contents ............................................................................................................................ 2
Introduction .................................................................................................................................... 5
Chapter 1: Installation and Setup ................................................................................................... 6
Minimum Requirements for RollBack Rx Server Edition ............................................................. 6
Install RollBack Rx Server Edition ................................................................................................ 6
RollBack Rx Server Edition Activation ......................................................................................... 8
Uninstall RollBack Rx Server from Windows ............................................................................. 10
Uninstall RollBack Rx Server When Windows Fails to Boot ...................................................... 11
Chapter 2: Rollback System .......................................................................................................... 12
Different Ways to Rollback System ........................................................................................... 12
Rollback System from the Application Console ........................................................................ 12
Rollback System When Windows Fails To Start Up ................................................................... 13
Rollback System from Desktop Shortcut ................................................................................... 13
Rollback System with Scheduled Tasks ..................................................................................... 14
Rollback System with Batch Commands ................................................................................... 15
Chapter 3: Recover Files ............................................................................................................... 15
Search Snapshots to Recover Files ............................................................................................ 15
Explore Snapshots to Recover Files ........................................................................................... 16
Revert Files to Old Time Stamp ................................................................................................. 16
2
Rollback Rx Server Edition
Chapter 4: Taking Snapshots......................................................................................................... 17
Taking new snapshot from the Application Console................................................................. 17
Take New Snapshots When Windows Fails to Start Up ............................................................ 18
Take New Snapshots from Desktop Shortcut ........................................................................... 18
Scheduling Snapshots ...................................................................... Error! Bookmark not defined.
Take New Snapshot with Batch Commands................................. Error! Bookmark not defined.
Chapter 5: Manage Snapshots ...................................................................................................... 19
Manage Snapshots .................................................................................................................... 19
View Snapshot Properties ...................................................................................................... 19
Delete Snapshots ................................................................................................................... 19
Lock or Unlock Snapshots ...................................................................................................... 20
Rename Snapshots................................................................................................................. 20
Explore Snapshots .................................................................................................................. 21
Chapter 6: System Security ........................................................................................................... 22
RollBack Rx Access Control ........................................................................................................ 22
Create New Users ...................................................................................................................... 23
Chapter 7: Scheduled Tasks .......................................................................................................... 24
Rollback System with Scheduled Tasks ..................................................................................... 24
Take Snapshots with Scheduled Tasks ...................................................................................... 25
Chapter 8: Program Settings ......................................................................................................... 27
Program Appearance................................................................................................................. 27
Network Settings ....................................................................................................................... 27
Chapter 9: Command Line Switches ............................................................................................. 28
Command Line Switches ........................................................................................................... 28
3
Rollback Rx Server Edition
Product Support ............................................................................................................................ 32
F.A.Q. ......................................................................................................................................... 33
4
Rollback Rx Server Edition
1
Introduction
This User's Guide is designed to familiarize PC users with features and benefits of the Rollback
Severs software. You can find the complete list of all the product's features and a brief
description of each feature in this document. It is highly recommended that you read this User's
Guide thoroughly before installing/setup. The information contained in this User's Guide is
subject to change without notice. Horizon DataSys assumes no responsibility or obligation of
any kind for any errors contained herein or in connection with the furnishing, performance, or
use of this document.
Overview
Rollback Rx Server Edition is a robust Windows Server backup and restore utility that enables IT
Professionals a instant backup capability that can quickly restore mission critical systems back
to any number of multiple restore points with unrivaled speeds. Rollback Rx Server Edition
makes it quick and easy to safely sandbox updates and service patches with a failsafe approach
to system recovery
How does Rollback Rx compare to Windows built in Windows System Restore?
Windows System Restore can only restore Windows "System Files" and "Some" Program
files. RollBack Rx functions at the sector level of the hard drive and restores every bit of data in essence making your PC a virtual time-machine. Furthermore, if a student or virus attack
were to crash you system and you experience the BSOD (blue screen of death) and your PC is
unbootable - Windows system restore would not be able to assist you, as you need to be able
to load Windows for System Restore to function.
Unlike system restore - If Windows is corrupted or if your server can not boot into Windows RollBack Rx can still restore your entire system! Since RollBack Rx installs below Windows, it
can be accessed prior to Windows boot-up by pressing the “HOME” key. Once you enter into
the RollBack Rx sub-console you can roll-back to any snapshot. - Furthermore, you can recover
any and all data up-to-the second of the System Crash!
5
Rollback Rx Server Edition
Chapter 1:
Installation and
Setup
Minimum Requirements for Rollback Rx Server Edition
Verify that your system meets the following minimum requirements before attempting to
install Rollback Rx Server
Intel© Pentium Processor
Windows Server Operating System
2GB of RAM
1GB of free disk space for installation
CD/DVD ROM, if installing from a CD
Internet Connectivity for software license activation
At least two partitions or disks
Install Rollback Rx Server Edition
Before installing Rollback Rx Server Edition, please close any applications that are running.
To install Rollback Rx Server Edition, download the setup files, extract the “ZIP” file then run the
“Setup.exe”
A welcome screen will appear at the start of the installation process. Click Next to continue
installation of Rollback Rx Server Edition.
6
Rollback Rx Server Edition
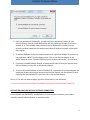
Read and accept the End User License Agreement. Then click “Next”. Then the installation will
start. Once it the installation is completed it will ask you to restart.
Click “Next”. Once all files have been installed, a window will display notifying you that setup is
complete. Click Finish to restart your computer now.
7
Rollback Rx Server Edition
Once the PC restart it will started the installation outside of Windows
Rollback Rx PC Edition Activation
Horizon Datasys committed to the protection of intellectual property rights and the reduction
of software piracy. Everyone in the economic chain, not just the software developer, is hurt by
piracy, including the reseller, the support provider, and you, the end user.
Rollback Rx contains a software-based product activation technology, which means you must
activate your Rollback Rx installations in order to authenticate its license.
ACTIVATE ROLLBACK RX OVER INTERNET CONNECTION
If the computer has Rollback Rx installed is connected to the Internet, you can easily activate
Rollback Rx over the Internet connection.
8
Rollback Rx Server Edition
1. Upon the purchase of Rollback Rx, you will receive an authorized Product ID from
Horizon Datasys. You can install Rollback Rx with the authorized Product ID and then
activate it, or if you already have a demo version of Rollback Rx installed, you can
activate the demo setup with the authorized Product ID without uninstall and reinstall
the program.
2. To activate Rollback Rx over the Internet connection, right click Rollback Rx system tray
icon and select ABOUT from the popup menu. Click on the Activate button on the
ABOUT Window, select "Activate Rollback Rx over Internet connection", click on Next.
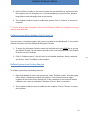
3. If you have installed Rollback Rx with an authorized Product ID that you received from
Horizon Datasys, simply click on the Activate button.
4. If you have installed a demo version of Rollback Rx, you need to first copy and paste the
authorized Product ID that you received from Horizon Datasys into the product ID field
replacing the demo product ID, and then click on the Activate button.
That is it! You will not need to supply any other information for the activation.
* You can only activate the number of installations licensed by the authorized Product ID.
ACTIVATE ROLLBACK RX WITHOUT INTERNET CONNECTION
If the computer has Rollback Rx installed does not have Internet connection, you need to
manually activate Rollback Rx with an activation code.
9
Rollback Rx Server Edition
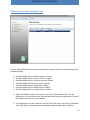
1. To manually activate Rollback Rx, right click Rollback Rx system tray icon and select
ABOUT from the popup menu. Click on the Activate button on the ABOUT Window,
select "Activate Rollback Rx without Internet connection", click on Next.
2. On the Product Activation Window, you will see a Product ID and an Activation ID, write
down those two IDs and send them to Horizon Datasys tech support by fax or phone.
3. Horizon Datasys tech support will reply you with an Activation Code based on the
Product ID and Activation ID you provided.
4. Copy and paste the Activation Code into the Activation Code field and then click the
Activate button.
Uninstall Rollback Rx from Windows
You can remove Rollback Rx from your computer through one of the two options provided in
Windows:
1. Uninstall Rollback Rx from Control Panel Add/Remove Programs.
2. Uninstall Rollback Rx by running Start All Programs Rollback Rx Uninstall.
Uninstaller will prompt you to select a snapshot to uninstall the system to. You can choose to
keep the current system and data or return the computer to another snapshot during uninstall.
The snapshot selected here will be the final state of the PC after uninstalling Rollback Rx.
**If you have problem with your computer, DO NOT attempt to uninstall Rollback Rx first.
Rollback the system to a good snapshot might fix the problem. If you have problem to access
either Rollback Rx Application Console or Subsystem Console to perform a rollback, contact
Horizon Datasys technical support before attempting to uninstall Rollback Rx.
10
Rollback Rx Server Edition
Uninstall Rollback Rx When Windows Fails to Boot
If you cannot boot into Windows and you need to uninstall Rollback Rx, you can uninstall it from the
Subsystem Console.
Restart your PC, press the HOME key as you see the Rollback Rx screen to enter the Subsystem Console.
You will need to provide a user name and password if Rollback Rx access control is enabled.
Select Uninstall from the Subsystem Console menu.
Uninstall will prompt you to select a snapshot to uninstall to. The snapshot you selected will be the final
state of the PC. Click on Next to continue.
**Assuming the PC is not booting when you uninstall Rollback Rx from the subsystem console, uninstall
to the current system will result in an unbootable system.
11
Rollback Rx Server Edition
Chapter 2: Rollback
System
Different Ways to Rollback System
You can rollback system with one of the following methods:
Rollback system from Rollback Rx main program console in Windows
Rollback system from Rollback Rx subsystem console when Windows O.S. fails to start
up
Rollback system from desktop shortcut in system tray
Rollback system with command line switches or batch files
Setup scheduled tasks to automatically rollback system
Rollback System from the Application Console
To rollback system from the Rollback Rx application console:
1. Right click Rollback Rx icon in the system tray. Select "Open Rollback Rx" from the
popup menu. You will need a password to access the main program console if the
Rollback Rx access control is enabled.
2. In the main program console, under the Common Tasks, click on "Rollback system", the
right-hand panel will display all the available snapshots. The current snapshot you are in
is indicated by a big green arrow. Select the snapshot you want to rollback system to.
You can choose to take a snapshot of the current system before rollback by checking the
"Take a snapshot of the current PC before rollback in case I want to come back"
checkbox. Click on "Next" to continue.
** Rollback system to a snapshot will reset everything on the hard drive to the time of the
snapshot. To keep the latest user data created after the snapshot, you might select files or
folders to transfer to the restoring snapshot, so your data will remain current after rollback as if
it's excluded from rollback. To exclude files from the rollback, click on the Exclusion button.
12
Rollback Rx Server Edition
3. Select the files or folders in the current system that you would like to synchronize with
the snapshot you are rolling back to. It is recommended you only select files, because
large folders could take longer time to synchronize.
4. The computer needs to restart to rollback the system. Click on "Restart" to restart the
computer.
** You can select to take a snapshot of the current PC before rollback to a snapshot in case you
want to come back later
Rollback System When Windows Fails To Start Up
If you encounter a complete system crash, you are not able to start Windows O.S., you need to
rollback the system from the Rollback Rx Subsystem Console.
1. To access the Subsystem Console, restart the computer press the HOME key as you see
the Rollback Rx logo. You will need to provide a user name and password if the Rollback
Rx access control is enabled.
2. Click on "Rollback system". You will see a list of available snapshots. Select a snapshot
and click on "Next" to rollback to the snapshot.
13
Rollback System from Desktop Shortcut
To rollback system from the desktop shortcut:
1. Right click Rollback Rx icon in the system tray, select "Rollback system" from the popup
menu. Select a snapshot to rollback the system to. You can also choose to take a
snapshot of the current PC by checking the "Take a snapshot of the current PC before
rollback in case I want to come back" checkbox. Click on "Next" to continue.
2. The computer needs to restart to rollback to the snapshot. Click on "Restart" to restart
the computer.
13
Rollback Rx Server Edition
Rollback System with Scheduled Tasks
You can schedule Rollback Rx to automatically rollback system with one of the following seven
schedule settings:
Schedule Rollback Rx to rollback system on restart
Schedule Rollback Rx for system restore on log off
Schedule Rollback Rx for a one-time system rollback
Schedule Rollback Rx for hourly system rollback
Schedule Rollback Rx for daily system rollback
Schedule Rollback Rx for weekly system rollback
Schedule Rollback Rx for monthly system rollback
1. Right click Rollback Rx icon in the system tray. Select "Open Rollback Rx" from the
popup menu. You will need a user name and password to log into Application Console if
the Rollback Rx access control is enabled.
2. In the Application Console, under the Control Panel Task menu, click on the "Scheduled
tasks" and "Add" to bring up the new schedule settings window, Select "Rollback
14
Rollback Rx Server Edition
system" in the schedule task drop-down list; Select "your restore schedule type" in the
schedule type drop-down list.
3. For the restore settings, you need select which snapshot you want to rollback the
system to. You can select to a). rollback system to the latest snapshot, b). rollback
system to a specific snapshot. You also need to choose what to do with other snapshots
after rollback the system. a). keep all the other snapshots. b). remove all the other
unlocked snapshots. Click on "Save" to save the new schedule setting.
4. You will then see a new scheduled task entry. You can select to view the properties of
the scheduled task or delete it.
Rollback System with Batch Commands
You might incorporate Rollback Rx instant recovery ability into your application by calling a
command line switch, refer to the Command Line Switches section of this user’s guide for
details on how to rollback system with batch commands.
Chapter 3: Recover
Files
Search Snapshots to Recover Files
To recover files or folders from a snapshot:
1. Right click Rollback Rx icon in the system tray. Select "Open Rollback Rx" from the
popup menu. You will need a user name and password to logon Rollback Rx Application
Console if the access control is enabled.
2. In the Application Console, under the Common Tasks, click on "Recover files". The right
side panel shows the recover files option. Choose one of the three search options
provided and then input the search string. Click on "Next" to continue.
3. From the snapshot list, select the snapshot you want to recover the files from. If you are
not sure which snapshot to recover the files from, use the calendar and clock to
approximate your time. Click on "Next" to continue.
15
Rollback Rx Server Edition
4. On the search results window, select and right click the files or folders you want to
recover. You can choose to recover the files to a new location or to its original location.
If you choose to recover the files to the original location, the existing files with the same
name will be overwritten.
Explore Snapshots to Recover Files
To explore snapshots to recover files or folders:
1. Right click Rollback Rx icon in the system tray. Select "Open Rollback Rx" from the
popup menu. You will need a user name and password to access the Application
Console if the Rollback Rx access control is enabled.
2. In the Application Console, under the Common Tasks, click on "Recover files". The right
side panel shows the recover files options. Choose "I want to explore snapshots to find
files to recover" option, click on "Next" to continue.
3. From the snapshot list, select the snapshot you want to recover the files from. If you are
not sure which snapshot to recover the files from, use the calendar and clock to
approximate your time. Click on "Next" to continue.
4. Rollback Rx will create virtual drive(s) for the selected snapshot. You can see the virtual
drive(s) in My Computer and browse them as regular drives to find files. To recover a file
or folder, copy it to your other drives in My Computer.
Revert Files to Old Time Stamp
If you have made unwanted changes to a file, or you just want to look at an earlier version of a
document. You can use Rollback Rx to revert a file to its earlier versions.
1. Right click the file you want to revert. Select "Restore from snapshot" on the popup
menu. You will need a user name and password to logon Rollback Rx Application console
if the access control is enabled.
2. From the snapshot list, select a snapshot you want to recover the file from. If you are
not sure which snapshot to recover files from, use the calendar and clock to
approximate the time.
3. You can choose to save the file to a new location or to overwrite the existing file. Click
on "Next" to continue.
16
30
Rollback Rx Server Edition
Chapter 4: Taking
Snapshots
The magic of Rollback Rx is with its snapshots. You recover a crashed system by rollback the
system to a good snapshot; you recover a corrupted file from a snapshot archive. A snapshot
can be viewed as the picture of the system at a specific time. It is very important to take new
snapshots to include changes on your system, so in the case of system rollback, you won't be
rolled back to weeks or months ago. You can take a new snapshot in seconds with Rollback Rx.
You can take a new snapshot with one of the following methods:
Take new snapshots from Rollback Rx main program console in Windows
Take new snapshot from Rollback Rx Subsystem console when Windows O.S. fails to
start up
Take new snapshots from desktop shortcut in system tray
Take new snapshots with command line switches or batch files
Setup scheduled tasks to automatically take new snapshots
Taking new snapshot from the Application Console
To take new snapshots from the Rollback Rx Application Console:
1. Right click Rollback Rx icon in the system tray. Select "Open Rollback Rx" from the
popup menu. You will need a password to logon Rollback Rx Application Console if the
access control is enabled.
2. In the Application Console, under the Commons Tasks menu, click on "Take snapshot".
You need to enter a name and description for the new snapshot. You can also choose to
lock the new snapshot by checking the "lock the new snapshot" option. Locking the
snapshot will prevent it from being deleted. Click on "Next" to continue.
* Snapshot name is limited to 20 characters.
* Snapshot description is limited to 50 characters.
3. New snapshot will be created instantly.
**To ensure best snapshot’s integrity, it is recommend you save all the files and close all
running applications before taking a new snapshot.
17
Rollback Rx Server Edition
Take New Snapshots When Windows Fails to Start Up
If you encounter a complete system crash, you are not even able to start Windows operating
system. Before you choose to rollback system to another snapshot from the Rollback Rx
Subsystem Console, you can take a new snapshot from the Subsystem Console to preserve your
data up to the moment of crash. You can later access the crash snapshot for file recovery
1. Restart the computer. Press the HOME key as you see the Rollback Rx Subsystem
Console screen. You will need a user name and password if the Rollback Rx access
control is enabled.
2. Click on "Take snapshot" button. You need to enter a name and description for the new
snapshot. Click on "Next" to take the new snapshot instantly.
* Snapshot name is limited to 20 characters.
* Snapshot description is limited to 50 characters.
**By taking a snapshot of the crashed system, you preserve whatever it is available in that
crashed system. After you rollback the system to an earlier snapshot, you can search the
snapshot of the crashed system for possible data recovery.
Take New Snapshots from Desktop Shortcut
To take new snapshots from the desktop shortcut in system tray:
1. Right click Rollback Rx icon in the system tray, select "Take snapshot" from the popup
menu. You will need a user name and password if the Rollback Rx access control is
enabled.
2. Enter a name and description for the new snapshot. You can also choose to lock the new
snapshot by checking the "Lock the new snapshot" option. Locking the snapshot will
prevent it from been deleted. Click on "Next" to continue.
3. New snapshot will be created instantly.
**To ensure best snapshot’s integrity, it is recommended you save all the files and close all
running applications before taking a new snapshot.
18
Rollback Rx Server Edition
Chapter 5: Manage
Snapshots
Manage Snapshots
View Snapshot Properties
To view the properties of a snapshot:
1. Right click Rollback Rx icon in the system tray. Select "Open Rollback Rx" from the
popup menu. You will need a user name and password to logon Rollback Rx Application
Console if the access control is enabled.
2. In the Application Console, under Common Tasks, click on "Snapshot history". The right
side panel shows all the available snapshots. The current snapshot you are in is
indicated by a big green arrow.
3. Right click a snapshot and select "Properties" from the popup menu. You can change the
snapshot name and description on the properties. The used space information reveals
how much drive space is taken by all snapshots and how much is taken by this snapshot.
Delete Snapshots
To delete Rollback Rx snapshots:
1. Right click Rollback Rx icon in the system tray, select "Open Rollback Rx" from the popup
menu. You will need a user name and password to logon Rollback Rx Application
Console if the access control is enabled.
2. In the Application Console, under Common Tasks, click on "Snapshot history". The right
side panel shows all the available snapshots. The current snapshot you are in is
indicated by a big green arrow.
19
Rollback Rx Server Edition
3. Right click a snapshot and select "Delete" from the popup menu. To delete multiple
snapshots, hold down Ctrl key while selecting snapshots.
4. You can also use Delete All Unlocked button to delete all the unlocked snapshots.
** You can only delete unlocked snapshots. To delete locked snapshots, unlock it first.
Lock or Unlock Snapshots
You can lock snapshots to prevent it from being accidentally deleted or removed by program
settings. To delete a locked snapshot, you have to unlock it first.
1. Right click Rollback Rx icon in the system tray, select "Open Rollback Rx" from the popup
menu. You will need a user name and password to logon Rollback Rx Application
Console if the access control is enabled.
2. In the Application Console, under Common Tasks, click on "Snapshot history". The right
side panel shows all the available snapshots. The current snapshot you are in is
indicated by a big green arrow.
3. Right click a snapshot and select "Lock/Unlock" from the popup menu. To lock/unlock
multiple snapshots, hold down Ctrl key while selecting snapshots.
4. You can also use Lock All/Unlock All buttons to lock/unlock all the snapshots.
Rename Snapshots
To rename a snapshot:
1. Right click Rollback Rx icon in the system tray, select "Open Rollback Rx" from the popup
menu. You will need a user name and password to logon Rollback Rx Application
Console if the access control is enabled.
2. In the Application Console, under Common Tasks, click on "Snapshot history". The right
side panel shows all the available snapshots. The current snapshot you are in is
indicated by a big green arrow.
3. Right click a snapshot and select "Rename" from the popup menu.
20
Rollback Rx Server Edition
Explore Snapshots
You can mount a snapshot as virtual drives and explore it as local drives to recover files. To
explore a snapshot:
1. Right click Rollback Rx icon in the system tray, select "Open Rollback Rx" from the popup
menu. You will need a user name and password to logon Rollback Rx Application
Console if the access control is enabled.
2. In the Application Console, under Common Tasks, click on "Snapshot history". The right
side panel shows all the available snapshots. The current snapshot you are in is
indicated by a big green arrow.
3. Right click a snapshot and select "Explore snapshot" from the popup menu.
4. The snapshot will be mounted as virtual drive(s). You can open and explore the virtual
drive(s) as local disk in My Computer. Click on "Dismiss virtual Drive(s) to dismount the
snapshot or rebooting the PC will dismount the snapshot as well.
21
Rollback Rx Server Edition
Chapter 6: System
Security
Rollback Rx Access Control
To prevent unauthorized users from rollback your system or recover your hidden files, you can
password protect access to Rollback Rx consoles by enabling Access control. The Access
Control’s user accounts and password apply to both Rollback Rx Application Console and the
Subsystem Console.
Enable Rollback Rx Access Control during Setup
To enable Rollback Rx Access Control during setup, you need to use either Custom Setup or
Advanced Setup:
1. To enable the Access Control in the Custom Setup. Select the enable Access Control
checkbox and provide a password for the administrator account. You must remember
this password. You will need it to access the Rollback Rx program consoles. You also
need this password to uninstall Rollback Rx.
2. To enable the Access Control in the Advanced Setup, you need to use the Advanced
Setup Configuration Wizard (ASCW) provided in the support folder on the program
CD. For more information on ASCW, refer to the Rollback Rx deployment whitepaper in
the document folder on the program CD.
Enable Rollback Rx Access Control after Setup
1. To enable Rollback Rx Access Control after setup, right click Rollback Rx icon in the
system tray. Select "Open Rollback Rx" from the popup menu.
2. In the Application Console, under Control Panel, click on "Access Control". Check
"Enable access control" checkbox and then click on "Apply".
22
Rollback Rx Server Edition
3. You will be prompted to set a password for the administrator account. You must
remember this password. You will need it to access the Rollback Rx program consoles.
You also need this password to uninstall Rollback Rx.
** If you have installed Rollback Rx using the Default Setup, access control is disabled by default
Create New Users
Enable Rollback Rx Access Control only actives the build-in administrator account. The
administrator account has access rights to all the program features. Rollback Rx allows you to
create new users and grant them rights to certain features of the program.
1. Right click Rollback Rx icon in the system tray, select "Open Rollback Rx" from the popup
menu. You will need a user name and password to logon the Rollback Rx Application
Console if the access control is enabled.
2. In the Application Console, under Control Panel, click on "Access Control". Click on
"Add" to create a new user account. You can grant access rights to the new user. Click
on "Add" to create the new user.
23
Rollback Rx Server Edition
3. The new user will be listed in the Access Control window. As the new user logs into the
Application Console, he will only have access to the features he was granted rights to.
** Remove "delete snapshots" right from a user will also deny him from locking or unlocking
snapshots.
Chapter 7: Scheduled
Tasks
Rollback System with Scheduled Tasks
You can schedule Rollback Rx to automatically rollback to a snapshot with one of the following
seven schedule settings:
Schedule Rollback Rx to rollback system on restart
Schedule Rollback Rx for system restore on log off
Schedule Rollback Rx for a one-time system rollback
Schedule Rollback Rx for hourly system rollback
Schedule Rollback Rx for daily system rollback
Schedule Rollback Rx for weekly system rollback
Schedule Rollback Rx for monthly system rollback
1. Right click Rollback Rx icon in the system tray, select "Open Rollback Rx" from the popup
menu. You will need a user name and password to logon the Application Console if the
access control is enabled.
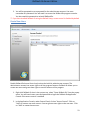
2. In the Application Console, under Control Panel, click on the "Scheduled tasks". The
right side panel shows the scheduled tasks. Click on "Add" to bring up the new schedule
settings window. Select "Rollback system" in the schedule task drop-down list and select
"a schedule type" in the schedule type drop-down list.
24
Rollback Rx Server Edition
3. For the restore settings, you can select which snapshot you want to rollback the system
to. You can select to a). rollback system to the latest snapshot, b). rollback system to a
specific snapshot. You can also choose what to do with other snapshots after rollback,
such as a). keep all the other snapshots. b). remove all the other unlocked snapshots.
Click on "Save" to save the new schedule task.
4. You will then see a new scheduled task entry. You can select to view the properties of
the scheduled task or delete it.
Take Snapshots with Scheduled Tasks
You can schedule Rollback Rx to automatically take new snapshots with one of the following
seven schedule settings.
25
Rollback Rx Server Edition
Schedule Rollback Rx to take new snapshots on restart
Schedule Rollback Rx to take a one-time new snapshot
Schedule Rollback Rx to take hourly new snapshots
Schedule Rollback Rx to take daily new snapshots
Schedule Rollback Rx to take weekly new snapshots
Schedule Rollback Rx to take monthly new snapshots
Schedule Rollback Rx to take event based snapshots
1. Right click Rollback Rx icon in the system tray, select "Open Rollback Rx" from the popup
menu. You will need a user name and password to logon the Application Console if the
access control is enabled.
2. In the Application Console, under Control Panel, click on the "Scheduled tasks". The
right side panel shows the scheduled tasks. Click on "Add" to bring up the new schedule
settings window. Select "Take snapshot" in the schedule task drop-down list and select
"a schedule type" in the schedule type drop-down list. Click on "Save" to save the new
scheduled task.
3. You should see a new scheduled task entry. You can select to view the properties of the
scheduled task or delete it.
26
Rollback Rx Server Edition
Chapter 8: Program
Settings
34
Program Appearance
To customize Rollback Rx program appearance:
1. Right click Rollback Rx icon in the system tray, select "Open Rollback Rx" from the popup
menu. You will need a user name and password to logon the Application Console if the
Rollback Rx access control is enabled.
2. In the Application Console, under Control Panel, click on "Program settings". The right
side panel shows the program settings options, click on the "Program Appearance" tab.
There you can customize the following Rollback Rx program settings:
Do not show Rollback Rx icon in the system tray
Do not show Rollback Rx logo during startup
Network Settings
To connect Rollback Rx to a remote management console (Rollback Rx RMC) for centralized
client management in a network environment:
1. Right click Rollback Rx icon in the system tray, select "Open Rollback Rx" from the popup
menu. You will need a user name and password to logon the Application Console if the
access control is enabled.
2. In the Application Console, click on "Program settings".
Rollback Rx Remote Management Console (RMC) server name or IP address
Rollback Rx RMC 's server port 900 must be turn on.
If the computer is behind a proxy or firewall, you need to provide proxy server's settings in
order to connect to the remote management console server.
27
Rollback Rx Server Edition
Chapter 9: Command
Line Switches
Command Line Switches
Rollback Rx provides you a set of command-line switches to take snapshot and restore system
with batch files or network scripts.
Rollback System
Shieldcmd.exe /restore
/baseline //Restore to the baseline snapshot.
/current //Restore to current snapshot.
/n "snapshot name" //Restore to a snapshot by name.
/t "08/11/2004 18:00" //Restore system to the snapshot that is closest to 08/11/2005 18:00.
/run "path to the executable" //Spawn a process after the restore.
[/u "user"] //user name, only required if the access control is enabled.
[/p "password"] //user password, only required if the access control is enabled
Manage the Baseline
Shieldcmd.exe
/resetbase //Reset PC back to the baseline snapshot.
/updatebase //Update the current system as the new baseline.
[/u "user"] //user name, only required if the access control is enabled.
[/p "password"] //user password, only required if te access control is enabled.
Take Snapshot
Shieldcmd.exe /snapshot
/n "snapshot name" //Take a new snapshot with given snapshot name.
[/d "snapshot description"] //Take a new snapshot with given description, optional.
/overwrite //Take a new snapshot with given snapshot name and overwrite the existing
snapshot with the same name.
[/u "user"] //user name, only required if the access control is enabled.
[/p "password"] //user password, only required if the access control is enabled.
28
Rollback Rx Server Edition
Program Settings
Help
ShdCmd.exe {/Help | ?}
Setup and Uninstall
Unattended Setup
Setup.exe /s
Uninstall
ShdCmd.exe /Uninstall {/baseline | /current | /i snapid | /n snapname | /t createtime} /u
administrator /p password
*Snapid can be retrievd by runing ShdCmd.exe /list
Program Settings
Tray Icon
ShdCmd.exe /TrayIcon [/show | /hide] /u administrator /p password
Language
ShdCmd.exe /Lang [/set langid] /u administrator /p password
*Langid can be retrievd by runing ShdCmd.exe /Lang
Subsystem Display Mode
ShdCmd.exe /StartMode [text | color16 | color256 | colortrue] /u administrator /p password
Show Protected Partitions
ShdCmd.exe /Part /u administrator /p password
29
Rollback Rx Server Edition
Import Program Settings from Setup.ini
ShdCmd.exe /Import {/path inifilepath} /u administrator /p password
Access Control
Access Control
ShdCmd.exe /AccessCtrl [/enable] [/disable] /u administrator /p password
/enable: Enable access control
/disable: Disable access control
*ShdCmd.exe /AccessCtrl: Show access control status
Add Users
ShdCmd.exe /AddUser /n username [/d description] [/right hexvalue] [/pwd password]
[/disable] /u administrator /p password
Delete User
ShdCmd.exe /DelUser {/i userid | /n username} /u administrator /p password
List Users
ShdCmd.exe /ListUser /u administrator /p password
ChangePwd
ShdCmd.exe /ChangePwd {/i userid | /n username} /pwd [password] /u administrator /p
password
*Userid can be retrievd by runing ShdCmd.exe /ListUser
Snapshots
Create New Snapshots
ShdCmd.exe /Snapshot /n snapname [/c comment] [/lock] /u administrator /p password
30
Rollback Rx Server Edition
Delete Snapshots
ShdCmd.exe /Delete {/i snapid | /n snapname | /t createtime} /u administrator /p password
*Snapid can be retrieved by running ShdCmd.exe /list
Lock Snapshot
ShdCmd.exe /Lock {/all | /baseline | /current | /i snapid | /n snapname | /t createtime} /u
administrator /p password
*Snapid can be retrieved by running ShdCmd.exe /list
Unlock Snapshots
ShdCmd.exe /Unlock {/all | /baseline | /current | /i snapid | /n snapname | /t createtime} /u
administrator /p password
*Snapid can be retrieved by running ShdCmd.exe /list
Mount Snapshots
ShdCmd.exe /Mount {/baseline | /current | /i snapid | /n snapname | /t createtime} /u
administrator /p password
*Snapid can be retrieved by running ShdCmd.exe /list
Dismount Snapshots
ShdCmd.exe /Unmount /u administrator /p password
List All Snapshots
ShdCmd.exe /List /u administrator /p password
31
Rollback Rx Server Edition
Product Support
Product Limitations
The following limitations still exist in Rollback Rx v9.0:
Hard Disk Support – Rollback Rx can only protect one IDE/SATA/PATA hard drive. If a system
has more than one hard disk, Rollback Rx will protect the drive designated as the “Primary.”
Rollback Rx does not support SCSI, RAID or MIRROR hard drive configurations.
Booting From an External Media (OS) – Rollback Rx cannot protect the hard drive when
changes are made to the hard drive from an external or foreign (non-Windows) operating
system bypassing Rollback Rx protection drivers. For example, booting from a CD-ROM will start
a different OS that may be able to change the hard drive and produce unpredictable results.
Disk Encryption Programs that Intercept Low-Level Disk I/O – Rollback Rx may conflict with
some applications that proxy low-level disk I/O.
Compressed Drives – Rollback Rx cannot be installed on compressed NTFS drives. (The
workaround is to un-compress the drive, install Rollback Rx and then re-compress the drive)
Disk Repartitioning – The disk with Rollback Rx installed cannot be re-partitioned without
uninstalling Rollback Rx.
Dual Boot of Windows and Linux OS on the Same Hard Drive – Rollback Rx does not support
systems that have multiple Windows Operating Systems with non-Windows Operating System
(like Linux) loaded on the same hard drive.
Support Options
Horizon Datasys is committed to provide satisfying support and excellent service to our valued
customers. Our goal is to provide you with professional assistance in the use of our software
through the variety of methods including documentations, online or personal contacts.
According to our experience with customers, most of their questions can be answered in our
Frequently Asked Question or other various technical white papers. Please check your
questions in the F.A.Q. and knowledge base before proceeding with other support options.
If you were not able to find answers to your questions in the Rollback Rx FAQ and knowledge
base, you can go to Horizon Datasys web site support page for more product related
documents, white papers and other information.
32
Rollback Rx Server Edition
http://support.horizondatasys.com/ics/support/default.asp?deptID=4443
You can submit an online support case with Horizon Datasys technical support team through
our online support forum.
http://support.horizondatasys.com/ics/support/ticketNew.asp
The Horizon Datasys customer service department can assist you with non-technical questions.
Visit Horizon Datasys support and service web site to find your local customer service number
to:
Order an upgrade
Find a distributor in your area
Update your registration information
F.A.Q.
For a list of Frequently Asked Questions about Rollback Rx, please visit:
http://www.horizondatasys.com
Knowledge Base
Horizon Datasys online knowledge base contains general information about Horizon Datasys
products and problems reported by users on various laptop and desktop computers.
You can find answers for most of your questions or problems in the knowledge base:
http://support.horizondatasys.com/ics/support/KBSplash.asp
Help Desk
Horizon Datasys provides an easy to use helpdesk for you to submit online support tickets and
get response from our support technicians:
http://support.horizondatasys.com/ics/support/ticketNew.asp
33
Rollback Rx Server Edition
34