1
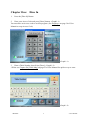
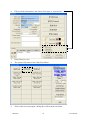
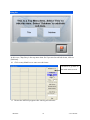
MCPOS for Restaurant
User Manual 1.2.9.0
English Version
A.D.S Group
Phone: 312-791-1886
Fax: 312-791-1885
A.D.S Group
Phone: 312-791-1886
Fax: 312-791-1885
Introduction
Using ADS POS to improve your restaurant's profitability
ADS POS Restaurant Software is a reliable, feature-rich restaurant point of sale &
back office solution. It is also affordable, easy to use, Windows based, touch operated
point of sales, and store management solution. Whether you're operating a small
restaurant, or part of a multi-national franchise, our technology and expertise can help
you improve your restaurant operations and increase your profitability.
Saving your time & money
ADS POS Restaurant software can help you increase operations efficiency, improve
customer service, control inventory more effectively, and much more.
100% Multilingual & Internationalized
Are you running an ethnic restaurant, with staff that cannot speak fluent English?
Don’t worry! ADS POS is multi-lingual, so the screen interfaces will be displayed in
your staff's preferred language.
ADS POS can also be configured so that it will send the order to the kitchen or bar in
a different language than the guest receipt. ADS POS currently supports 100%
multi-lingual operation at POS & Back Office with English, Traditional Chinese, and
Simplified Chinese.
Table of Contents
z
Manual Overview
1) Overview .....................................................................................................................1
2) Touch Screen Button Operation ..................................................................................2
z
Frequently Asked Questions (FAQ)
1) How to change quantity in bill? ..................................................................................1
2) How to change item price or item discount in bill entry? ...........................................1
3) How to split a bill? ......................................................................................................2
4) How to hold a bill? ......................................................................................................3
5) What if customers order something not on the menu?.................................................3
6) How to change customers receipt font size? ...............................................................4
7) How to change kitchen receipt language?....................................................................4
8) How to settle driver’s receipts quickly if there is more than one driver?....................5
9) Can I print Chinese words on customers’ receipt? ......................................................5
10) How to input or change customers’ name after placed an order?..............................5
11) How to delete bill? ....................................................................................................5
12) How to set up automatic discount? ...........................................................................6
13) How to add special words at the bottom of the receipt? ...........................................7
14) How to get pending bill report? .................................................................................7
15) How to waive penny in receipt total? ........................................................................7
16) Can printer buzz when it prints? How to set up buzz time?.......................................7
17) What if printer doesn’t work? ...................................................................................7
18) How do I know the best sell item on the day or by the end of month?....................10
19) How to take away the black highlight on printing receipt? .....................................10
20) How to backup the database? ..................................................................................10
21) New or modified menu items did not show up in the system .................................10
22) What if the system shows an error, such as “Password Wrong” or “Access is
denied”........................................................................................................................10
23) Fail to process credit card, or the “Time Out” message appears .............................10
24) System freeze or strange codes appears for no reason ............................................11
z
User Manual
Main Window ....................................................................................................................1
Chapter One: Dine In ..................................................................................................3
[Modify] ............................................................................................................................6
[Pay Bill] ........................................................................................................................10
1)
[Miscellaneous] ...............................................................................................................13
2)
Chapter Two: Carry Out ..................................................................................................15
3)
Chapter Three: Delivery ..................................................................................................16
4)
Chapter Four: Settle ........................................................................................................17
[End of Day] ....................................................................................................................19
5)
Chapter Five: Recall ........................................................................................................24
6)
Chapter Six: Table Map....................................................................................................25
[Reserve Table] ................................................................................................................26
7)
Chapter Seven: Open Cash Drawer .................................................................................28
8)
Chapter Eight: Refund .....................................................................................................28
9)
Chapter Nine: Time Card ................................................................................................30
10) Chapter Ten: Driver Status ..............................................................................................31
11) Chapter Eleven: Back Office ...........................................................................................32
[Employee] ......................................................................................................................34
[Report Center] ................................................................................................................35
[Category] ........................................................................................................................37
[Group Editor] .................................................................................................................38
[Menu Editor] ..................................................................................................................41
[Forced Modify] ..............................................................................................................57
[Modification] .................................................................................................................64
[Modifier] ........................................................................................................................65
[Tax Rate] ........................................................................................................................70
[Map Editor] ....................................................................................................................71
[Back Up] ........................................................................................................................72
12) Chapter Twelve: Buffet ...................................................................................................73
z
Advance Setup
User Security Setting .........................................................................................................1
Void Bill ............................................................................................................................3
Modify Credit Card Transaction .......................................................................................6
Offline Transactions ..........................................................................................................9
Update .............................................................................................................................10
Google Map .....................................................................................................................13
Manual Overview
1.
[ ]: When you see [Dine In], it means
. You can either press button or
click the button on the screen. [] means the button you need to press.
2.
Press [F2] on the keyboard to switch program’s languages (IE: English to Chinese,
and Chinese to English)
3. The MCPOS system is case sensitive. For example: Table# A1 and Table# a1 means
different tables.
4.
If it is a holding order, a message will appear on the bottom of the screen telling
you which orders have been waiting to print out in the kitchen. To see the
printing status, please check page 13, section [Go] and [Hold] of User Manual.
-MCPOS-
1
- Manual Overview-
Touch Screen Button Operation:
When you have done something on accident, press this retrieve last
saved data.
Press the button to create a brand new entry. It has the same
function as <Add>.
Save your data & configuration.
Delete unwanted items.
Press this to leave or to go to the main page
Drop down menu: click on the arrow to select an item from the
list.
Go to the previous page.
Go to the next page.
This shows at customer entry. Press this to add a new entry.
Sort data. You may sort by code, name, or any way you wish.
Export data to an outside file.
Import data from an outside file.
Press the arrow to go back a day or go back an hour.
Press the icon to pick a date from calendar.
Press this button to print.
Enter a time by pressing the button. Input 0330 for 03:30.
Press the button to create a brand new entry. It has the same
function as <New>.
This is only shows in Bill Entry. This shows a deleted status.
-MCPOS-
2
- Manual Overview-
This is only shows in Bill Entry. This shows a new status.
Press this for a free or complimentary meal.
Write important or temporary information here.
Help you to search data you need.
Save your data & configuration.
Return to the main menu or the previous page.
Add a new entry or input information.
Delete an existing entry or delete information.
Enter an English name.
Enter a secondary name, like a Chinese name.
Add another kitchen printer.
Add
Delete a kitchen printer.
Delete
Get more detail of that function.
Detail
-MCPOS-
3
- Manual Overview-
Frequently Asked Questions
*** Don’t forget to click on Save after you make a change ***
1)
How to change quantity in bill?
Method 1: First click the item that
needs to change quantity, and then
press [Adjust]. Enter a new
quantity amount to finish.
Method 2: Double click the item
quantity in the quantity column,
and enter the new quantity amount.
2)
How to change item price or item discount in bill entry?
Change item price: click the item that
needs to change price, and then press
[Adjust]. Choose [New Price] in the
dialog box. Enter the correct price to
finish.
Add Discount: click the needed item,
and then press [Adjust]. Choose either
[Cash Discount] or [Item Discount] in
the dialog box to continue. Enter the
discount amount to finish.
- MCPOS -
1
- FAQ -
3)
How to split a bill?
A-1:
Split bill by item
Step 1
Settle
Step 3
1. Press [Pay Bill] button on the bill entry screen, and then select [Split Item].
2. Press [Item] on the Split Order screen.
3. Select [Split Ticket], and then press the right arrow key to pick item(s) for this ticket.
4. Repeat step 3 to split more tickets.
5. After you have done with splitting tickets, press the [Save] button. Also, you can use
the settle button (located on each spitted tickets) to pay the bill.
**Hint: If you need to make any adjustments on the split tickets, first click on the item
(the background will turned green), and then press the [Remove] button and make
adjustments.
A-2:
Split bill evenly
1. Press the [Pay Bill] button on the bill entry screen, and then select [Split Amount].
2. Press the [Even] button.
3. Enter a number for splitting bill evenly.
- MCPOS -
2
- FAQ -
4. Finally, select a payment method (cash, credit card, check, or gift card) to settle each
spitted ticket.
**Hint: If the customers need receipts for each split ticket, you need to press the [Save]
button first, and then select [Print] button to print receipts. For example, if you need 3
receipts for each customer, then press the [Print] button three times.
4)
How to hold a bill?
1-How to hold a Dine In bill?
A: 1. Enter the bill entry screen, and taking customer orders.
2. Press the [Miscellaneous] button.
3. Press the [Hold] button.
4. Select the [Save] button and press [Exit]. Then, this bill becomes on hold, and it
will not be print out in the kitchen printers.
5. When you need to send the bill to the kitchen printer, select [Recall] button on
the system main screen.
6. Select [Pending Order].
7. Click on the bill, next the system will jump to the bill entry screen.
8. Press the [Miscellaneous] button on the bill entry screen, and then select [Go].
9. Select needed item(s), or just click [Select All].
10. After you are done, press the [Finish] button.
2-How to hold a Carry Out or Delivery bill?
A: please use the same method for holding a Dine In bill.
5)
What if customers order something not on the menu?
A: You can enter the item manually on the bill entry screen.
1. Locate the [F12 Key] box at the bottom right corner of the bill entry screen.
2. Enter the item by using this format: /Item name/price
3. After you have entered the item, then press the [Enter] key. The new item should
show up in the bill entry.
For Example: If a customer wants a Mushroom Beef, which is not on the menu. Key in:
/Mushroom Beef/5.50 ,and press [Enter] key to continue.
- MCPOS -
3
- FAQ -
6)
How to change customers receipt font size?
Step 4
Step 2 - 3
A: 1. Click on [Back Office],and select [Set Up].
2. Click on the [+] icon to expand the list (icon is located next to [Print])
3. Click the “Guest Receipt Font Size” option
4. Enter 1 for small fonts, and enter 2 for large fonts in the value box.
5. After that, press the [Save] button, and then press the [Exit] button to go back to
the [Back Office] screen.
7)
How to change kitchen receipt language?
A: 1. Press[Back Office],then select [Set Up]
2.
3.
4.
5.
8)
Click on the [+] icon to expand the list (icon is located next to [Print])
Select the “Kitchen Printout Form” option
Enter 0 for both Chinese and English, enter 1 for English only in the value box.
After that, press the [Save] button, and then press the [Exit] button to go back to
the [Back Office] screen.
How to settle drivers’ receipts quickly if there is more than one driver?
- MCPOS -
4
- FAQ -
A:
1. on system’s main screen, select [Settle]
2. Enter your [Access Code],then press [Enter]
3. Press [Driver],and then enter [Driver Code]. Press [Enter] to finish.
4. Select the bill that need to be settle. If needed, press [Tip] and [Payment Method]
to add tip or change payment method.
5. If you need to print the receipt, just press the [Print] button.
9)
Can I print Chinese words on customers’ receipt?
A: 1. Enter [Back Office],and then select [Set Up].
on
2. Click on the [+] icon to expand the list (icon is located next to [Print])
3. Select “Print Chinese on Guest Receipt”.
4. Enter 1 for printing Chinese on guest receipt, and enter 0 for not printing Chinese
guest receipt in the value box.
5. After that, press the [Save] button, and then press the [Exit] button to go back to
the [Back Office] screen.
10) How to input or change customers’ name after placed an order?
A: 1. Click [Recall] on system’s main screen.
2. Select [Search] button.
3. Click on the bill that needs to modify.
4. Press the [Miscellaneous], and then press [Customer].
5. Add or modify the customer name, and press [Done] to save/ exit.
11) How to delete bill?
A: 1. enter [Back Office],and select [Check Bill].
2. Pick the bill that needs to be deleted, and press [Mark Delete]. The amount of
this bill has been zero out, but the record will remain in the record.
- MCPOS -
5
- FAQ -
3. If you need to permanently delete the data, please click on [Back Office], select
[System],and then select [Delete Data].
4. Select range for deleting data, and press the [OK] button.
5. A new confirmation window will pop up. Press [OK] to confirm delete data.
12) How to set up automatic discount?
A: 1. Enter [Back Office],and then select [Set Up].
2. Click on the [+] icon to expand the list (icon is located next to [Print])
3. Select “Default Coupon %”
4. Enter the discount in the value column, such as: enter 10 for 10% off, enter 20
for 20% discount, etc.
5. Press the [Save] button, and select [Exit]
**Hint: you can also set the discount period from the back office)
1. Click [Back-Office], select [Master] from the horizontal bar, then select
[Discount].
2. Press [New].
3. Enter discount time, enter a start time for [From],enter a end time for [To], and
enter [Discount%].
4. Press the [Save] button and then click [Exit].
- MCPOS -
6
- FAQ -
13) How to add special words at the bottom of the receipt. (For example: Today’s
Special, Happy Holidays)?
A:
1. Click [Back-Office], and then select [Master] from the horizontal bar, and click
[Remark].
2. Press [New]
3. Enter a start time for [From], enter a end time for [To], and then enter [Remark].
4. Press the [Save] button and then click [Exit].
14) How to get pending bill report?
A: 1. Click on [Back-Office]
2. Select [Daily] from the horizontal bar, and then click Print Pending.
15) How to waive penny in receipt total?
A: 1. Enter [Back-Office],and then select [Set Up].
2. Click on the [+] icon to expand the list (icon is located next to [Print])
3. Select “Penny Roundup”.
4. Enter 1 for roundup to dime, enter 2 for roundup to nickel, enter Null for no
roundups in the value column.
5. After that, press the [Save] button, and then press the [Exit] button to go back to
the [Back-Office] screen.
16) Can printer buzz when it prints? How to set up buzz time?
A: 1. Enter [Back-Office],and then select [Set Up].
2. Click on the [+] icon to expand the list (icon is located next to [Print])
3. Select “Printer Buzzer Time”.
4. Enter 0 for no beep, enter 1 for beep once, enter 2 for beeps twice in the value
column.
5. After that, press the [Save] button, and then press the [Exit] button to go back to
the [Back-Office] screen.
17)What if Printer doesn’t work?
A: Method One:
i.
ii.
iii.
iv.
- MCPOS -
Turn off the printer power
Take out paper roll and put it back properly
Wait for 10 seconds and turn it on again. It should be ready to use.
If not, exit the program. Disconnect all cables. Wait for 10 seconds
7
- FAQ -
v.
and reconnect the cables.
Restart the computer, if the problem still exist, please check method
2.
Method Two:
1. Exit MCPOS program.
2. Click on “Start” button from Windows;
select “Control Panel” (like graph on top)
3. Double-click Printer and Faxes
4. Double –click on the printer icon.
5. You will see the print list.
6. Select all printer jobs, and right click on
the mouse, and choose “Cancel All
Documents” from the list.
7. Close the window of print job list.
- MCPOS -
8
- FAQ -
Hint: make sure all item
have no checkmarks.
8. As Graph on top, go to “File”,
select “Properties”
9. Click on “Print Test Page” This
is just to make sure the printer is
connecting with computer.
10. If the printer is still not
working, check if the printer cable
is connects well with printer. Also,
check hub by unplug it then put it
back. Sometimes, hub may not
connect to the printer. Usually it
happens when power shortage, and
surge protection causes the
problem.
Step 9
11. However, if printer is still not
response after all the testing, restart
your computer again.
- MCPOS -
9
- FAQ -
18) How do I know the best sell item on the day or by the end of month?
A:
1. Click on [Back-Office], then select [Report Center].
2. Press the [Item Sale Report] button.
3. Enter the time range for data, then press [OK].
(Hint: you can export the data into Excel by choosing the [Excel] button.
19)How to take away the black highlight on printing receipt?
A: 1. Enter [Back-Office],and then select [Set Up].
2.
3.
4.
5.
Click on the [+] icon to expand the list (icon is located next to [Print])
Select “Do not Reverse on Printouts”
Enter 1 for no black highlight, enter 0 for black highlight on the value column.
Press the [Save] button, and select [Exit]
20) How to backup the database?
A:
1. Click on [Back-Office], and select [Back up].
2. Select all items.
3. Choose the file path, and click [OK].
21)
New or modified menu items did not show up in the system.
A: after you have added or modified any menu items, you should restart the MCPOS
program to make the changes effective.
22)
What if the system shows an error, such as “Password Wrong” or “Access is
denied”.
A: 1. Press down both [Alt] and [F4] on the keyboard to exit the current screen.
2. If a confirmation window pops up, click [End Now]。
3.
After that, restart the MCPOS program. It should run smoothly.
23) Fail to process credit card, or the “Time Out” message appears.
A: 1. Enter the back office.
2. Click [Interface].
3. Type in any website on the address bar to test the internet connection.
4. If “This page cannot be display appears”, please contact your internet provider to
fix the problem.
- MCPOS -
10
- FAQ -
24) System freeze or strange codes appears for no reason.
A: 1. Exit the MCPOS program.
2. Restart computer.
3. Click “Shortcut to update” on the desktop.
4. After the installation window disappear, re-open the MCPOS program.
- MCPOS -
11
- FAQ -
User Manual
This is the Main Window of the MCPOS system:
[Dine In]: Enter table number to continue with Dine In operation.
[Carry Out]: Carry Out operation.
[Delivery]: Delivery operation.
[Settle]: Server settle, search bill, driver settle, add tips, end of day management.
[Recall]: Search receipt, pending item list, pending item.
[Table Map]: Placement map of the restaurant. This can be used alternatively with [Dine In]
button.
[Open Drawer]: Open cash drawer.
[Refund]: Refund cash to customers.
- MCPOS -
1
- User Manual -
[Time Clock]: Employee check-in or check-out.
[Driver Status]: Driver arrival, departure, and settle report.
[Back Office]: Employee database, customer database, report center, menu editor, etc.
[Exit]: Exit the MCPOS system, shut down computer or restart the computer.
Hint: Press <F2> on the keyboard to switch between languages (IE: English to Chinese, and
Chinese to English)
- MCPOS -
2
- User Manual -
Chapter One: Dine In
1.
Press the [Dine In] Button
2. Enter your Access Code and press [Enter] button. <Graph1-1>
You must have an Access code to use this program. (See Employee on page 34 of User
Manual to setup Access Code)
<Graph 1-1>
3. Enter a Table Number, then Select [Done] <Graph 1-2>
**Hint: see Chapter Six [Table Map] on page25 of User Manual for quicker way to enter
<Graph 1-2>
- MCPOS -
3
- User Manual -
4. Enter the Number of Guests by selecting the Number buttons and pressing [Enter], or type
the number by keyboard. <Graph 1-3>
<Graph 1-3>
5. You’ll see new window “Bill Entry”, please check the Graph below:
Menu Group
Bill Preview Area
Adjust: adjust
quantity or
price, etc.
Merge items
into one row.
Press it once
to change to
list items in
separate row.
Item Detail:
cooking
ingredients.
Seat#: setup
customer’s
seat number.
Quantity: To
setup order
quantity for a
same item.
Check the
following
page for
detail.
Void Item:
Voids any item when you place an
order
- MCPOS -
Back Page:
returns to
main menu
screen.
KeyIn Item:
Enter: /Item name/Price,
and then press the
[Enter]. i.e. /beef/2.50
4
Exit:
Exit bill
entry
window.
- User Manual -
[Modify]: Add or take away cooking ingredients and more.
[Pick Time]: To enter the desired pickup time for the customer.
[Save/Send]: Save bill entry or sent the bill to kitchen printer.
[Pay Bill]: Settle bill.
[Guest Receipt]: Print a copy of guest receipt to customers.
**Hint: if you need to print both Chinese and English on receipts, please see page 4 of
FAQ-(7)How to change kitchen receipt language?
[Miscellaneous]: change any details of the order when placing the bill.
6. Press any button on upper left to pick a group
For Example: When you press [Appetizers], the screen will jump into the Appetizers menu
item. <Graph 1- 4>
Change quantity:
Double-click on
the quantity or
by pressing the
[Adjust] key.
Change price:
Double-click on
the price or by
pressing the
[Adjust] key.
<Graph1-4>
7. At the time you click an item, it will appear on the Bill Preview Area (located on the right
side of the bill entry screen).
8. Press [Save/Send] to finish bill entry, and this bill will be sent to kitchen printer.
9. After done, press [Exit] to return to the system main window.
- MCPOS -
5
- User Manual -
[Modify]:
When you click on [Modify], the following window appears <Graph 1-5>
For Example: if customer orders [Kung Pao Chicken], press [Modify], the following screen
shown. <Graph1-5>
List of actions
you need to
perform.
Side order,
ingredients,
sauces options.
To delete the
item from the
list
<Graph1-5>
[With]: with other ingredients or sauces
[Add]: add other ingredients or sauces
[No]: without some ingredients or sauces
[Light]: light on ingredients or sauces
[Extra]: Extra ingredients or sauces
[Half]: half of the ingredients, side orders, or sauces
[Double]: double the cooking ingredients, side order, or sauces
[Split]: split apart sauces or ingredients
[Only]: cooking with certain ingredients, or sauces
1. On the right side of the window, choose an action you need to perform.
For Example: if the customer orders no spicy, first click on the “no” button. <Graph1-6>
**Hint: another way to perform is choose “no” from the drop-down menu: <Graph1-7>
<Graph1-6>
- MCPOS -
6
- User Manual -
<Graph1-7>
2.
Choose [Spicy] from the sauce menu.
3. After that, press [Back to Menu] <Graph1-8>
Step 2:
Choose sauces,
ingredients,
etc.
Step 1:
Choose an
action
Step 3:
Back to
Menu
<Graph1-8>
- MCPOS -
7
- User Manual -
z Special Case A: KeyIn Modifier
If customer orders something not on the menu, you could enter it manually through [KeyIn
Modifier]
For Example: if customer orders [Kung Pao Chicken] with peanuts, please follow the steps in
<Graph1-9A> and <Graph1-9B>
z
¾
<Graph1-9A>
Pick the [With] action
¾
After that click [KeyIn Modifier]。
z
¾
<Graph1-9 B>
Enter [Modifier Name], and then click [Add
Cost] to enter a price for this item. Skip this
step if the item is free
¾
Press [Done] to finish.
<Graph9-1A>
<Graph1-9B>
- MCPOS -
8
- User Manual -
z Special Case B: To add price for a modifier
Use the [Price] button to add cost to the sauces or ingredients.
1. Repeat steps on <Graph1-8>.
2. Click the [Price] button.
3. Input a price, and press [Enter]
4. Click [Back to Menu] to finish.
- MCPOS -
9
- User Manual -
[Pay Bill]:
Click [Dine In] or [Table Map] to find the bill, and then press [Pay Bill], or press the [Settle]
button on system main screen. Settle Center window will be like <Graph1-10>
Split the bill
evenly
Split the bill by
items
Add discount
Print customer
receipt
<Graph1-10>
Pay by
cash
z
Pay by credit
card
Pay by
check
Pay by
owner
After done, press Save to
finish.
[Pay by Cash]
- MCPOS -
10
- User Manual -
z [Credit Card]:
Click the [Credit Card] button, then swipe the credit card or choose [Manual] to enter the
credit card number.
**Special Case A: if the system shows [Time Out], try to swipe the card again, or choose
[Close] to select other payment methods.
**Special Case B: if the system has lost internet connection, then please choose the [Offline]
option. It will save customer’s credit card information, and you can choose to settle the
transaction at a later time. For further details, please check Offline Transactions on page 9 of
Advance Setup
z
[Split Amount] and [Split Item]:
Swipe gift card
or choose key in
gift card
numbers
manually.
Case One: split the bill evenly <Graph1-11>
Add Gratuity:
by cash
amount or by
%
Enter gift card
amount. This is
same like the
“Discount”
function
Enter the
amount for
tips, and then
click “enter” to
finish.
Graph1-11
After click this button, the bill
status will changed to “unsettle”
1.
2.
3.
4.
Check credit card
transaction details
Put a deposit
remark in front
of the payment
Click [Pay Bill], and then select [Split Amount].
Press the [Even] button.
Enter the number for split.
Choose settle methods to settle the bill.
- MCPOS -
11
- User Manual -
**Hint:If you need to print more than one receipts, press the [Print] button more times.
Case two: split amount by item<Graph1-12>
* Press this [Amount] once if the ending total is not “0”
A
Step 2
B
Step 5
Step3
1. Click [Pay Bill], and then click [Split Item].
2. Press [Item] to start. If it is a buffet, press [Guest].
3. A) press [Split Ticket] to add a ticket, B) Select the items that each customer pays
by pressing the arrow key to add items to this ticket. The payment will show on the right
side of the window.
4. Repeat the step 3 to add more tickets.
5. After done, press [Save] button, and then press the [Settle] button to settle each
ticket.
**Hint: if you need to remove items on the ticket, please click on the ticket (background will
turned green), and then click the [Remove] button to remove an item.
- MCPOS -
12
- User Manual -
[Miscellaneous]:
z
Change Type: change dining type to [Dine In], [Delivery], or [Take Out].
z
Print: to print additional tickets
z
[Go] and [Hold]:
1. Enter the bill entry screen, and start taking customer orders
2. Press the [Miscellaneous] button.
3. Press the [Hold] button.
4. Select [Save] button and press [Exit]. Then, this bill becomes on hold, and it will
not be print out in the kitchen printers.
5. When you need to send the bill to the kitchen printer, select [Recall] button on
the system main screen.
- MCPOS -
13
- User Manual -
6. Select [Pending Order].
7. Click on the bill, and it will return to the bill entry window.
8. Press the [Miscellaneous] button in the bill entry, and then select [Go].
9. Select desired item(s), or just click [Select All].
10. After you are done, press the [Finish] button.
z
[Modify]: same as the [Modify] key on the bill entry screen. Please check <Graph1-5>
on page 6 of User Manual for more details.
z
[Split Bill]: same as the [Split Bill] button on the pay bill screen. Please check
<Graph1-12>on page 12 of User Manual for more details.
z [Discount]: Discount Item %, Cash Off $, and New Price $.
You can only choose one of these three. If you choose Cash Off $, the amount will be
deducted from the after tax total. If you choose New Price $, the old price will be replaced by
the new price. The same process applied to the Discount Item % function.
z
[Note]: to make a note about the bill
z
[Combine]: after you click this button, you will see the [Recall Bill] window. Search for
bills that needed to combine payment with the current bill.
z
[Customer]: to store customer information.
- MCPOS -
14
- User Manual -
Chapter Two: Carry Out
1. Press the [Take Out] Button.
2. Enter your Access Code.
3. Enter the Customer Phone Number. If your program has Caller ID function, just select the
phone number which is on screen. Please see Graph2-1
Press this button for
walk in customers
because you don’t
need to enter phone
number.
<Graph2-1>
4. Check and see if customer information is correct. If not, enter new information, and
select [Done]. Please see Graph2-2.
This area is the
customer’s
historical
ordering
information.
<Graph2-2>
- MCPOS -
15
- User Manual -
*** For walk-in customers, you can enter their name in “Walk In Note” after pressing the
[Walk In] button. You can also wait till a later time to enter a name in “Misc--Note.”
5. For more instructions on bill entry, please check Dine-in on Page 4 of User Manual.
The following are some examples of printing tickets generated after placing a take out order.
Ticket to Customer
Send to cooks in Kitchen
MCPOS Restaurant
*** Kitchen***
2956 S Wallace St
Order#: 0001
Chicago, IL 60616
Server: SUPERVISOR
(312)791-1885
Take Out
--------------------------------------------------------
Time: 13:00
Order#: 0001 Chk #: 1
Take Out
Guests:2
外賣
--------------------------------------------------1
Server: SUPERVIOSOR
1
Phone: (312)456-789
Table #:1
Shrimp Veg Lo Mein
蝦瓜菜撈面
---------------------------------------------------------- ---------------------------------------------------1
Shrimp Veg Lo Mein
8.25
1
BBQ Pk Lo Mein
7.55
SubTotal:
15.80
Tax:
1.38
Amount:
17.18
2
1
BBQ Pk Lo Mein
叉燒撈面
------------------------------------------------------7/2/2007 18:13 PM
remark
07/02/2007 18:13 PM
Thank You!
***Receipt for Walk In customers will show [Waiting] on the receipt, but Take Out and
Delivery will not.
Chapter Three: Delivery
Please see Chapter Two: Take Out on page 15 of User Manual for instructions.
- MCPOS -
16
- User Manual -
Chapter Four: Settle
1.
Press the [Settle] button.
2.
Enter your access code.
3.
Select a way to Settle the Order, as graph below:
z
[Receipt#]: Search bill by receipt number
1. Enter the receipt number of the bill
2. Choose a payment option to settle the bill.
If you enter an invalid receipt number, the following screen will be shown<Graph4-1>
1. Presses the [settle] to
check a list of unsettle
bills.
2. Click the desired bill from
the list
<Graph4-1>
- MCPOS -
17
- User Manual -
**Hint: [Settled] indicates tickets that have been settled; [Settle] indicates tickets that
HAVE NOT been settled.
z
[Table#]: Search bill by table number
1. Enter table number. The table number is case sensitive, A1 and a1 means different
tables
2. Choose payment option to settle the bill.
If you enter an invalid receipt number, the following screen will be shown<Graph4-1>
z
[Phone#]: Search bill by customer’s phone number
1. Choose payment option to settle the bill.
z
[Add Gratuity]:
1. Choose the desired bill from the list, see <Graph4-2>:
<Graph4-2>
2. Confirm the server name, and then click on the tip column to enter tip.
**Hint: After done, click on [Save]. If you need to add tip to other servers, please click
[Change Server].
- MCPOS -
18
- User Manual -
z
[End of Day]: Daily sales management
Click on the arrow key or the calendar button to
choose range of closing dates and time.
Click on the
boxes to
choose
desired
reports.
Print Preview button
End of day
closing.
Closing time report
Exit
Cash count report
Settlement: daily sales and refund report
Cashier Sum: cash transaction report by each cashier
Type Sum: Dine-in, Carry Out, and Delivery sum report
Shift Work Sum:
- Shift Sum by Bill
- Shift Sum by Settled & Bill Type
Sum: receipt type sum
Hour Sum: Dine-in hour report
Server Sum: Server credit card tip report
- MCPOS -
19
- User Manual -
Group Sum: Menu groups sales report
Void Checks: void checks report
Free Item: free item report
Bottle Item: Liquor item sales report
Special Item: Special item sales report
Discount: Discount sum report
Receipt List:
- All: print all receipts, regardless of type
- Delivery: print delivery receipts only
- Take Out: print take out receipts only
- Dine In: print dine in receipts only
Items: Items sales sum report
Item Sum: Item type sum sales report
Category Sum: Item category sum sales report
Credit Card: Credit card payment
Card Gratuity: Credit card gratuity report
Tips Out: Tips out sum report
Gift Sales: Gift certificate sales report
Time Card: Time-in and Time-out report
Before requesting any reports, you should select the data range first: see Graph4-3:
Select from
calendar
One day
backward or
one hour
backward
One day
forward or one
hour forward
Select time
periods
<Graph4-3>
Go back one day
Go to the next day
Export to Excel file
- MCPOS -
20
- User Manual -
PC Settle: Sales report by each PCs, list by payment methods
Cashier: Sales report by each cashiers, list by payment methods
Driver: Driver settlement report
Server: Deliver server settlement report
Settle: Settled bill report, list by payment methods
Gift Card: Swipe gift certificate or enter the gift certificate number to check balance
Item Sales: Detail item sales report
Time Card: Time-in and time-out report
Card Tip: Credit card tip sum report
Card Detail: Credit card detail report
Add Tip: Add tips to credit card sales
Offline: Offline credit card transaction and settle report
To batch credit card transactions.
<Graph4-4>
Export into.txt file
Credit card daily closing report
To record any expenses or purchasing activities.
- MCPOS -
21
- User Manual -
**Hint: you cannot enter the information directly in the account book entry. You should press
the
button to add account title, and then save the data. After that, go back to the account
book entry screen to select account title from the drop-down menu.
Select the account book entry from here
z
[Driver]: Driver settlement
Enter tip amount
here.
- MCPOS -
Select payment
options from
drop-down menu.
22
- User Manual -
z
[Server]: sever settlement
Claim Tips: Server tips report
Share Tips (Bills): Per bill share tips report
Share Tip: Per item share tips report
Unsettle: unsettle bill total
Cash: cash amount that server collects
House Cash: cash amount that owner should gained
Return Cash: cash amount that server should return, include share tips
% Share Tip (Bill): per bill share tip amount
Share Tip (Item): per item share tip amount
- MCPOS -
23
- User Manual -
Chapter Five: Recall
1.
Press the [Recall] button.
2.
Enter your Access Code.
3.
Select the search parameter, see Graph5:
<Graph5>
z
[Pending Order]: check on hold bills
1. Double-click on the pending bill. Next, it will jump into the bill entry screen
2. Press [Miscellaneous] button
3. Press the [Go] key to send bills to kitchen.
z
[Pending Item]: check on hold items
1. Double-click on the pending item. Next, it will jump into the bill entry screen
2. Press [Miscellaneous] button
3. Press the [Go] key to send bills to kitchen
z
[Search]: list all the receipts by date, and then search for desired bills.
** If the receipt has been settled, you cannot change things like type of payment or reorder
foods.
- MCPOS -
24
- User Manual -
Chapter Six: Table Map
1.
Select [Table Map] from the Main Window.
2.
Select a table from the Screen. If the Button is Green,
this means it is in use
and the table has not been settled.
Click box to
share a taken
table.
<Graph6>
3.
Enter you access code
4.
Enter number of guests.
5.
Enter the [Bill Entry] screen.
**Attention: Six colors (gray, purple, green, pink, yellow and white) are used to determine
the table status.
a.
b.
c.
d.
e.
Gray: The table is available for use
Purple: Guests have been seated but no order has been placed.
Green: Guests have been seated and orders have been placed.
Pink: Guests have been seated and placed orders, but orders or few items are on hold.
Yellow: Guests have completed their meal and are ready to pay. You must press the
[Guest Receipt] button to print a receipt for the customer. After you have settled the
order, the table color will change from yellow to gray again, allowing you to place a
new order.
f. White: Reserved tables.
- MCPOS -
25
- User Manual -
[Reserve Table]:
1.
Press [Table Map].
2.
Click on [Reserve].
3.
Choose any grey icon to reserve a table.
White icon
means this
table has been
reserved for
other guests
4.
Complete settings for reserving a table, and then click [OK].
- MCPOS -
26
- User Manual -
5.
System will jump back to the reserve table map, and the new reserved table is shown as
below:
6. If you need to edit or delete booking, press the [View/ Edit Booking] button.
**Attention: you cannot modify the booking time or date. All you can do is delete the
booking first, and then go back to the reserve table map to create a new booking.
- MCPOS -
27
- User Manual -
Chapter Seven: Open Cash Drawer
1.
Press [Open Drawer].
2.
Enter your access code to open the cash drawer.
Chapter Eight: Refund
**Attention: this function is for refunding payment amount to customers. This is NOT void
bill or void payment. In addition, refund can be applied to batched transactions only.
**To void a Un-Batch credit card transaction, please see instructions on Void Bill on page 3
of Advance Setup.
1. Press the [Refund] button.
2. Enter your access code
3. Enter the Order Number. If this order is from the past, you can input the date and find out
the order number by pressing the
icon.
4. Enter the refund amount, and then select refund method from drop-down list, see Graph8
<Graph8>
- MCPOS -
28
- User Manual -
5. Confirmed information, then press [Save].
6. New dialog box will pop-up, please click [yes] to confirm refund.
7.
Open the cash drawer with your key.
If you need to refund amount to credit card, follow steps from 1 to 5. After that, new window
will pop-up to request you swipe credit card or manually enter credit card number.
**Hint: if you need to check the refund report, please click the [Settlement] box in the [End
of Day Management]. For more assistance, please see End of Day Management on page 19 of
User Manual.
- MCPOS -
29
- User Manual -
Chapter Nine: Time Card
1.
Press the [Time Card] button.
2.
Enter your access code
3.
New window will be shown, like Graph9:
<Graph9>
4.
Choose to sign-in, sign-out, or to see the time card report.
**Attention: Once you check-in or check-out, you cannot change your status again for
another 5 minutes.
**Hint: Supervisors and Bosses can go to the Back Office, and look at the top of the screen
for the “Time Card” button and press it. Then choose “Time Card” again. This gives you the
total working hours of every employee and how much they have earned for the day.
- MCPOS -
30
- User Manual -
Chapter Ten: Driver Status
1.
Press the [Driver Status] button.
2.
Enter your access code
3.
New window will be shown, like Graph10:
Choose [Report], and
then [All] to see Driver
Status. It includes time,
total, but not tips. Every
delivery order is
calculated separately for
each driver.
Graph10
z
[Departure]: Driver delivery schedule
1. Confirm with the driver
name, if you need to
switch to other driver,
then press [Change
Driver]。
If you need to
make any
adjustment,
please select
order number
first
Press this button to
enter [Driver
Settlement].
- MCPOS -
31
2. Click on the bill list to
add bill to driver
schedule.
3. After done, press
[Departure].
- User Manual -
Chapter Eleven: Back Office
1.
Press [Back Office] button.
2. Enter your access code
Attention: for security purpose, only Boss and Supervisor are authorized to enter the
back-office. If you want to let employees to access to the back-office, please see User
Security Setting on page 1 of Advanced Setup.
3.
Back-office screen, like Graph11-1:
Graph11-1
[Employee]: Employee info, employee account set up.
[Settlement]: Server settlement, search bill, driver settlement, add gratuity, end of day
management.
**Hint: Same as the [Settle] button on the main screen.
- MCPOS -
32
- User Manual -
[Report Center]:Sales report, settlement report, server report and etc.
[Book Keeping]:Transaction account record.
[Bill Checking]:Bill detail report, or void bill.
[Category]:Menu Category setting.
[Group Editor]:Creates a new Group under category from your menu
[Menu Editor]:Modify Menu, add/ delete items.
[Modification]:Menu item action modification, such as with, or add cooking ingredients.
[Modifier]:Modification options.
[Table Map Editor]:Edit Table Map
[Station Setting]:Setting computer station or printers.
[Printer Setting]:Printer setup.
[Tax Rate]:Edit or modify tax rate.
[Buffet Price]:Buffet price, buffet time setup.
[Customer]:Customer information database.
[Set Up]:System setup.
[Interface]:Internet Explorer.
[Back Up]:Back up system database.
[Exit]:Exit back office, and return to system main window.
- MCPOS -
33
- User Manual -
[Employee]:
Password Setup:
1. Select employee
name from list.
2. Enter password.
3. Press [Save] to
finish.
Add employee account:
Graph11-2
Graph11-3
1. Press [Add]
2. Fill in employee
information
3. If you need to set up
employee card,
please enter
Employee Card
number.
4. Press the [Addition]
tab to enter more
information. See
Graph11-3.
5. You can also enter
more information in
the [Note] tab.
6. Press [Save] to
finish.
Hint: if you have included employee wage in the data, system could help you to calculate
employee payroll. As graph shown below, click [Time Card] in the back office.
- MCPOS -
34
- User Manual -
[Report Center]:
[Sale Report]: Daily sales report.
[Settled Rept]: Detail settle report, includes server report.
[DineIn Time]: Customer dine-in time report.
[Hour Sum]: Dine-in hour sum.
[Item Sale]: Detail item sales report.
[Server]: Bill total and guests total served by each server.
- MCPOS -
35
- User Manual -
[Cashier]: Cashier transaction total report.
[PC Settled]: Sales report by each PC, list by payment methods.
[Void Items]: Void item report.
[Tip]: Tips report by each server.
[Tribe]: Customer tribe report.
[Area Sum]: Sales report by each area.
[Print Pending]: Pending order report, list of all [On Hold] items.
[Guests Price]: Same as buffet price setup.
[Disc Rept]: Discount report.
[Exit]: Exit the report center, and return to the back office screen.
- MCPOS -
36
- User Manual -
[Category]:
1. Double click on each box and type in all categories in order from your menu.
2. Type in English name, Chinese name from menu.
3. Under Kitchen, choose the place where you want your tickets sent to, which is defaulted
to your printer.
4. Under Setup, click and choose the type of food, such as appetizer, entree or dessert.
5. Click [Retrieve] to correct any mistakes.
6. To create a new category, press [New].
7. Press [Save] to save settings after making changes.
8. Press [Delete] to delete items
9. Press [exit] to exit from the menu category.
- MCPOS -
37
- User Manual -
[Group Editor]:
Click to add
a new group
Graph11-5
z
Adding new group:
1.
2.
Click any blank button to add a new group.
Enter the Group Name; if you are using Chinese names, type it in the Name2 field, see
<Graph11-6>
Enter the group
name and secondary
name
Press [Done] to save
Graph11-6
- MCPOS -
38
- User Manual -
3.
Press [Done] to continue.
4.
To add a text color or background color, click on
or
.
z
Adding colors?
Pick a color
Click [ok]
when done
z
Hide and pick.
For Example: [Side Order] needs to be placed at the bottom left corner. See Graph11-5
1.
Click the [Side Order] button
2. New window pop-up, click on [Hide].
- MCPOS -
39
- User Manual -
Graph11-7
3.
4.
To retrieve an item from the Hide list, press the place you want to replace.
Menu Group window pop-up, press [Pick].
5. Look from the Hide Group list. Choose the one
you want to pick, and press [Done].
6. It will back to Graph11-7 screen, click on [Done]
to save. Now [Side Order] is moved to the bottom
left corner, as shown in Graph11-8.
Graph11-8
- MCPOS -
40
- User Manual -
[Menu Editor]:
When you click on Menu Editor, the following will appear:
Choose the
category
which you
would like
to add
items to
z
1.
Adding new item
For example: adding a new item to the appetizers. First, you select the appetizers group.
2.
- MCPOS -
Click on any blank box to enter your new item.
41
- User Manual -
2.
New window pop-up, fill in item information, like Graph11-9:
2. English Name
3. Chinese Name
1. Item Code cannot be
duplicated
4. Item Price
5. Choose Category
6. Choose Tax rate
7. From this menu,
you can assign
where tickets go and
how they are
presented to the
chefs.
8. Use [add] or [delete] to setup your
default printer in different kitchens.
z
9. Press [Done] to save
settings.
Hide/ Pick: to change the item position.
1. Choose [F4 Hide] to hide the item. It will be saved automatically in the Hide Group.
2. To retrieve an item from the Hide list, press the place you want to replace. Press [F3 Pick],
and look from the Hide Group list. Choose the one you want to pick and press [Done] to
finish.
3. Press [F12 Done] to continue. The item will be replaced at the location you previously
chose.
- MCPOS -
42
- User Manual -
z [Parent Item]: The parent item contains sub-items
For Example: customers can choose chicken, beef or shrimp for chop suey.
1. Enter [Back Office]
3.
Click [Menu Editor]
4.
Select Chop Suey menu group
4.
It will jump into the Chop Suey menu
5.
Click any blank box to enter a new item.
- MCPOS -
43
- User Manual -
6.
Fill out all the information, and choose Item type as “parent item”.
7.
8.
Enter [Done] to save.
The system will return to the Chop Suey Menu.
9.
Click on the new item again, a dialog box will be shown as below.
- MCPOS -
44
- User Manual -
In this case, Chop Suey is the top menu item. So if you need to add sub-items, click on
[Subitem].
10. Click on any blank box to enter new sub items.
Click here to go back to
the main menu screen.
11. Restart the MCPOS program after entering all sub items.
- MCPOS -
45
- User Manual -
Here’s an example of the parent type menu listing:
¾
This is the top menu:
Graph11-9
¾
This is the second-top menu with all item groups.
Graph11-10
- MCPOS -
46
- User Manual -
¾
This is the sub-menu, with selection of items.
Graph11-11
Hint: to simplify the placing order process, you could put down all sub-items under the same
item group, like Graph11-10.
z [Package Item] -A
Like Graph11-12,Meal Packages can be listed as the [Package Item] type.
- MCPOS -
47
- User Manual -
Graph11-12
1.
Enter [Back Office]
2.
Enter your access code
3.
Press the [Menu Editor] button
4.
Select menu group from the drop-down menu
5.
It will then jump into the set dinner menu
6.
Click any blank button to enter a new item
7.
Fill out all the information, and choose Item type as “Package Item”
- MCPOS -
48
- User Manual -
8. Press [Done] to save
9. The system will be back to the set dinner menu
10. Click the new item, and then select [Sub Item]
11. The sub item is shown as below. Click any blank box to enter sub-items.
- MCPOS -
49
- User Manual -
12. New dialog pop-up, press [Pick Item]:
13. Put down first letter of item name in filter, select item from the list, and then click [Done]
**Attention: if you cannot find the item in the list, you need to add it to the database
manually. Please go to Back Office, click Master, and then click Menu Item to enter new
items.
- MCPOS -
50
- User Manual -
14. After you have picked the item, you can click [Done] to save.
15. The system will be back to sub item menu.
16. Repeat step 11- 15 to enter more items. After you’re done, click [Exit].
17. It will be back to the top menu, click [Done] to finish.
- MCPOS -
51
- User Manual -
z [Package Item] –B
Some Meal Packages offer item options for customers to choose. Like Graph11-1 and
Graph11-14, the customer can choose “Won ton soup” or “Egg flower soup”.
Graph11-13
Selectable items
Pre-set items
Graph11-14
- MCPOS -
52
- User Manual -
1.
Please repeat steps 1 to 13 from page 48 to page 50.
14. After you have picked the item, click the [Choose] box.
**Attention: this option is for selectable items only. For pre-set items please leave the
[Choose] box blank.
After that, click [Done] to save.
18. The system will be back to sub item menu.
- MCPOS -
53
- User Manual -
Won Ton Soup
16. Repeat step 1-15 to enter more items. After you’re done, click [Exit] to continue.
17. It will return to the top menu, click [Done] to finish
**Hint: after you have added or modified any menu items, you should restart the MCPOS
program to make the changes effective.
- MCPOS -
54
- User Manual -
z [Self-Package Item]
Unlike package item type, self-package item type offers selections of dishes for customers to
choose from.
Free selection of items
Graph11-15
1. Enter the [Back Office]
2. Enter your access
3. Press the [Menu Editor]
4. Select menu group from the drop-down list
5. It will then jump into the set dinner menu
6. Click any blank space to enter new items
- MCPOS -
55
- User Manual -
7.
Fill out all the information, and select item type as “Self-Package Item”
7. Repeat step 8 to 17 from page 49 to page 51.
17. Restart the MCPOS system to make the changes effective.
- MCPOS -
56
- User Manual -
z
[Forced Modify]
Forced modify offers specified ingredient choices for items, as shown in Graph11-16 to
Graph11-19.
Graph11-16
Graph11-17
- MCPOS -
57
- User Manual -
Forced modify options
Graph11-18
As shown in Graph11-19, forced
modify items will be listed below
main dish.
Graph11-19
1.
2.
3.
4.
Enter the [Back Office]
Enter your access code
Press [Menu Editor]
Select menu group, like Graph11-20
- MCPOS -
Graph11-20
58
- User Manual -
5.
Then it will jump into the Lunch Special menu screen.
6.
Click any blank box to enter a new item.
7.
Fill out all the information and then click the “Forced Modify” box.
8.
9.
Press the [Forced Modifiers] button.
Enter the forced modifier screen, and click any blank box to enter new item.
10. Click [Query]
- MCPOS -
59
- User Manual -
10. Enter first letter of item name in the filter, select item from the list, and then click
[Done].
**Attention: if you cannot find the item in the list, you need to add it to the database
manually. Please go to Back Office, click Master, and then click Modifier to enter new items.
11. System then will return to the forced modifier screen, click other blank boxes to enter
more modifier items.
- MCPOS -
60
- User Manual -
12. After you have enter all forced modifier items, click [Exit]
13. It will be back to the menu item entry screen, click [Done] to save.
Hint: you can use the [Copy Modifiers] function to apply same set of forced modifiers to
other items.
1. Press the [Copy
Modifiers] button
2. New dialog box pop-up,
enter code of the item
(which has the same set of
forced modifiers) in the
filter.
For example: Tender Beef
Chop Suey has same set of
forced modifiers, then you
enter its item code “a41” in
the code filter.
- MCPOS -
3. Select item from the
list, and then click [OK].
61
- User Manual -
4.
A dialog box appears and indicated operation has finished. Click [Exit].
19. Make sure you have click the “Forced Modify” box, and then click [Done] to finish.
- MCPOS -
62
- User Manual -
z
Active Item Library
Make sure this box
is checked, so that
you can see Chinese
words when you add
new items.
Click here to add a new item
1. Use the Active Item Library when you want to add a new item. Press empty gray
button in Item Name to add a new item.
2. Like following Graph, click under item name.
3. Pick one item you need, and press enter.
4. Provide a unique item code. (Item codes cannot be duplicated)
5. Enter Price and Press [Done].
6. The item should now be visible on the menu item editor.
- MCPOS -
63
- User Manual -
[Modification]:
1.
Enter the [Back Office]
2.
Enter your access code
3.
Press the [Modification] button.
4.
Click the boxes to change options.
5.
If you need to add a new modify action, click [New]
6.
Remember click [Save] after making any changes
7.
After done, click [Exit] to return to [Back Office] screen.
- MCPOS -
64
- User Manual -
[Modifier]
z
1.
Add a new modifier
As shown above, click on any blank box to enter a new modifier group.
2.
Fill in English name, Chinese name, and price if needed.
3.
Press [Done] to finish.
- MCPOS -
65
- User Manual -
4.
Back to Modifier menu, click on the modifier group.
5.
Click on [Subitem]
6.
In the sub-item menu, click on any blank box to enter new sub-items.
- MCPOS -
66
- User Manual -
7.
Fill in item information, and then click [Done].
8.
After you have entered all the sub-items, click [Back] button to return to [Modifier]
Screen.
9.
After done, click [Exit] to return to [Back Office] menu.
z
1.
Modify or delete sub-items
Click on a modifier group button. For Example, if you need to modify sub-items under
the [Soft Drink] group, then click on [Soft Drink].
- MCPOS -
67
- User Manual -
2.
Press the [Subitem] button.
3. Sub-item menu is shown as below, click on the items that need to be modified. For
example: if you need to remove Dr. Pepper, then click on [Dr. Pepper].
4.
Choose the [Delete] button to remove this item.
- MCPOS -
68
- User Manual -
5.
A Dialog box will pop-up, click [Yes] to confirm to delete.
6.
After that, it will return to [Soft Drink] sub-item menu.
7.
After done, click [Back] to return to [Back Office] menu.
- MCPOS -
69
- User Manual -
[Tax Rate]:
Sales tax is automatically calculated by the computer when an order is placed.
1. Click [New] to set a new sales tax and [Save] after any changes.
2. Note: You can set up two different tax rates for various items. For example, food and
liquor have different taxes. You may need to use this option in cases like that.
- MCPOS -
70
- User Manual -
[Table Map Editor]:
z
1.
2.
To add a table
Select a dinning area.
New Dialog box pop-up, click [Done].
Give a name to
create a table area
Dinning Area
Selection
Click this
button to add
more area
Hint: If you need to set up a new dinning area, click on any blank box from [Dinning Area
Selection]. Enter a name for this area, and then click [Done].
3. Click on any blank square to add a table.
Enter table name,
select table icon from
drop-down menu, and
click [Done] to finish.
4.
After you have added all tables, click [Exit] to return to the [Back Office].
- MCPOS -
71
- User Manual -
[Back Up]
We recommend backing up your data every month to keep the record updating.
1. Click the [Back Up] button in [Back Office].
2. New dialog box will be shown as below:
3. Check all the boxes.
4. Make sure the back-up locations are correct.
Hint: if you need to back-up data to other folders, manually enter the address in the box.
5. Click [OK] to finish.
- MCPOS -
72
- User Manual -
Chapter Twelve: Buffet
z
Buffet Dinein
Attention: If this box
is checked, customers will be charged under holiday
price.
z Buffet Price Set Up
1. Click [Back Office]
2. Enter your access code.
3. Press the [Buffet Price] button.
4. You will see the Buffet Price Setup Window.
- MCPOS -
73
- User Manual -
5. Enter price in the price column.
(L): lunch price
(D): diner price
(S): special price, such as weekend price.
6. Drag the scroll bar to right to change time options.
Enter Start Time and End Time, and enter “A” or “P” to switch from AM to PM. After that,
check boxes to choose effective date for buffet prices.
- MCPOS -
74
- User Manual -
7. After done, click [Save] to finish.
8. Finally, click [Exit] to return to [Back Office] menu.
- MCPOS -
75
- User Manual -
Advance Setup
User Security Setting
1. Click the [Back Office].
2. Enter your access code.
3. In the back office, select “Security”, and then click “User”.
4. Select a user name from the list.
5. Select a group name to start. There are four different categories, including boss, manager,
cashier and server. You may assign different levels of authorities to each group.
List of system security IDs
- MCPOS -
List of user security IDs
1
-Advance Setup-
6. Click on security IDs that apply to this user.
7. Click the [Add ID] button, and then it will be added to user security IDs list.
8. After done, press [Save] to finish. Restart the MCPOS program to make the changes
effective.
- MCPOS -
2
-Advance Setup-
Void Bill
A: Void a unpaid bill
1.
Click [Recall] on the system main screen.
2.
Press the [Receipt #] button.
3.
In the bill entry window, click [Miscellaneous].
4.
Press [Void Bill].
5.
A new dialog window will pop-up, press [Yes] to confirm void bill.
6.
Select a void reason from the list, and press [Done] to finish.
7.
A void record will be print out. Supervisor should sign the ticket to confirm the
operation.
B: Void a paid bill.
1.
Click [Settle] on the main screen.
2.
Press the [Search] button, and then choose [Settled].
- MCPOS -
3
-Advance Setup-
3.
Click on the bill that needed to be voided.
4.
Choose [Void Payment] in the settle center window.
- MCPOS -
4
-Advance Setup-
5.
A new window will be pop-up, choose [Yes] to confirm void settle.
6. After done, click [Exit] to return to the main window.
**Attention: after voiding payment, this bill will be marked as unsettle.
If you need to delete this bill, please see A: Void an unpaid bill on page 3 of Advance Setup
for further instruction.
- MCPOS -
5
-Advance Setup-
Modify Credit Card Transaction
For Example: credit card paid bill that needs to modify payment transaction.
**Attention: this method is for un-batch credit card transactions only. For batched credit card
transaction, please check Refund on page 31 of User Manual.
1. Click [Settle] on the main screen.
2.
Enter your access code.
3.
Press [End of Day] button.
4.
Click [Card Detail] in End of Day Management.
5.
Click on the calendar icon to search for credit card bill that needs modification.
6.
Click on credit card bill that needs to modification.
Drag the scroll bar to the
right for more options.
- MCPOS -
6
-Advance Setup-
7.
Double click on the card number. Usually only the last four digits of credit card number
will be shown.
8.
Enter your access code in the new window. For security purpose, only supervisors have
access to customers’ credit card information.
9.
If the access code is correct, a dialog box with credit card number and expiration date
will be shown. Please mark down the card number and expiration date on paper.
10. Click [Exit] to return to system main screen, and then choose [Settle].
11. Press [Receipt #] to search credit card bill that needs to modify payment.
12. Click [Void Payment] in the settle center.
- MCPOS -
7
-Advance Setup-
13. In the system main screen, click [Recall], and then choose [Receipt #].
14. After entering receipt number, it will jump to the bill entry screen.
- MCPOS -
z
Now this bill is unsettle, to settle after
making modification:
1.
Press [Pay Bill].
2.
Click [Credit Card].
3.
Choose [Manual] to enter credit card
information.
4.
After done, press [Save] to finish.
8
-Advance Setup-
Offline Transactions
1.
Click [Settle] on the main screen.
2.
Choose [End of Day].
3.
Press the calendar icon to search for offline transactions.
4.
As shown below, click [Offline] button.
5.
Choose needed offline transaction from the list.
6.
Press [Settle] button.
7.
Press [Yes] to confirm settle.
8.
Click [Save] to finish.
9.
Press [Exit] to return to main screen.
- MCPOS -
9
-Advance Setup-
Update
1.
You need to exit the MCPOS program before performing updates.
2.
Open the Internet Explorer.
3.
Enter the following address in the address bar
4.
Restaurants should download software versions that start with Dine In. Buffets should
download software versions that start with Buffet.
5.
Select software versions to update, and then click [Run].
6.
If there’s a security warning pop-up, click [Run] again.
- MCPOS -
10
-Advance Setup-
7.
Updates will run automatically when it finishes downloading. Click [Install] to install
the update
8.
Press [Yes to All] to confirm file replace.
- MCPOS -
11
-Advance Setup-
9.
After the installation dialog disappears, go back to the system main screen, and double
click on [Shortcut to Update.bat]
Double click on
this shortcut.
10. Restart the MCPOS program when installation finishes. The new version number should
be shown as below.
- MCPOS -
12
-Advance Setup-
Google Map
**Attention: Google Map can only be used on 1.2.8.0 versions or above. If you need to
update your system, please check Update on page 10 of Advance Setup.
z
To Active Google Map
1. Enter the [Back Office].
2. Click on [Set Up].
3. Click to open [system], and then choose “Integrated Map Software”.
4. Enter “2” in the [value] box.
5. Under the same [System] sub-menu, click “Map Start Address”
6. Enter the restaurant address in the [Value] box.
7. Press the [Save] button.
8. Exit the [Back Office] and restart the MCPOS program.
z
Using Google Map
1. Click on [Delivery].
2. Enter your access code.
3. Enter customer’s phone number. If you have Caller ID, customer’s phone number will be
shown in the dialog box.
4. Enter customer’s information.
- MCPOS -
13
-Advance Setup-
5. Click [Google Map]
6. Internet Browser will pop-up with driving directions.
- MCPOS -
14
-Advance Setup-
7. You can click on the camera icon to show road photos.
Also, you can click and drag photo to get a 360˚ view.
Press + to zoom in
- MCPOS -
Press – to zoom out
15
-Advance Setup-
You should click X to exit the current photo before switching to other photos.
8. If you need to print out the driving direction, please click [Print] button on the top.
- MCPOS -
16
-Advance Setup-