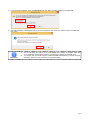
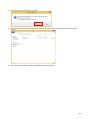
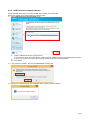
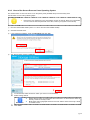
1
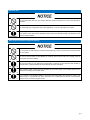
TOSHIBA Storage Utilities Version 3.00 User’s Manual Version 1.0 Notice The information contained in this manual, including but not limited to any product specifications, is subject to change without notice. TOSHIBA CORPORATION AND ITS AFFILIATES (“TOSHIBA”) PROVIDE NO WARRANTY WITH REGARD TO THIS MANUAL OR ANY OTHER INFORMATION CONTAINED HEREIN AND HEREBY EXPRESSLY DISCLAIM ANY IMPLIED WARRANTIES OF MERCHANTABILITY OR FITNESS FOR ANY PARTICULAR PURPOSE WITH REGARD TO ANY OF THE FOREGOING. TOSHIBA ASSUMES NO LIABILITY FOR ANY DAMAGES INCURRED DIRECTLY OR INDIRECTLY FROM ANY TECHNICAL OR TYPOGRAPHICAL ERRORS OR OMISSIONS CONTAINED HEREIN OR FOR DISCREPANCIES BETWEEN THE PRODUCT AND THE MANUAL. IN NO EVENT SHALL TOSHIBA BE LIABLE FOR ANY INCIDENTAL, CONSEQUENTIAL, SPECIAL, OR EXEMPLARY DAMAGES, WHETHER BASED ON TORT, CONTRACT OR OTHERWISE, ARISING OUT OF OR IN CONNECTION WITH THIS MANUAL OR ANY OTHER INFORMATION CONTAINED HEREIN OR THE USE THEREOF. DISCLAIMER We assume no responsibility whatsoever for any damage or loss resulting from the use of this application. THIS APPLICATION IS PROVIDED "AS IS" WITHOUT WARRANTIES OF ANY KIND. WITHOUT LIMITING THE FOREGOING, TOSHIBA DISCLAIMS ALL WARRANTIES AND REPRESENTATIONS OF ANY KIND RELATING TO THE APPLICATION, WHETHER EXPRESS, IMPLIED, OR STATUTORY, INCLUDING WITHOUT LIMITATION THE IMPLIED WARRANTIES OF MERCHANTABILITY, FITNESS FOR A PARTICULAR PURPOSE, ACCURACY, OR NONINFRINGEMENT OF THIRD PARTY RIGHTS. TOSHIBA DOES NOT WARRANT THAT THE OPERATION OF THE APPLICATION WILL BE UNINTERRUPTED, ERROR-FREE, OR SECURE. ANY INSTALLATION AND/OR USE OF THE APPLICATION SHALL BE AT YOUR OWN RISK. About Trademarks Microsoft, Windows, Internet Explorer, SuperFetch are either registered trademarks or trademarks of Microsoft Corporation in the United States and other countries. Linux is the registered trademark or trademark of Linus Torvalds in the U.S. and other countries. Adobe, Adobe Reader are either registered trademarks or trademarks of Adobe Systems Incorporated in the United States and other countries. All other brand names and product names are the registered trademarks or trademarks of their respective companies. pg. 2 Contents Notice .................................................................................................................................................................................... 2 DISCLAIMER ........................................................................................................................................................................ 2 About Trademarks ................................................................................................................................................................. 2 Safety Precautions ................................................................................................................................................................ 4 1. Introduction ............................................................................................................................................................... 6 2. System Requirements .............................................................................................................................................. 7 3. Installation Guide ...................................................................................................................................................... 8 4. Storage Utilities Usage ........................................................................................................................................... 11 4.1. Start Storage Utilities .......................................................................................................................................... 11 4.2. Drive Information ................................................................................................................................................ 13 4.2.1. Summary .................................................................................................................................................... 13 4.2.2. Support Features........................................................................................................................................ 16 4.3. Performance Optimizer ....................................................................................................................................... 17 4.4. Diagnostic Scan .................................................................................................................................................. 18 4.5. Over Provisioning ............................................................................................................................................... 19 4.6. System Optimizer ............................................................................................................................................... 20 4.7. Secure Erase ...................................................................................................................................................... 21 4.8. Supplementary Tools .......................................................................................................................................... 24 4.8.1. Bootable USB Creator ................................................................................................................................ 24 4.8.2. Steps for Bootable CD/DVD ....................................................................................................................... 26 4.8.3. USB Flash Drive Capacity Restore ............................................................................................................ 28 4.9. Operation Features on Linux Operating System ................................................................................................. 29 4.9.1. How to boot from the bootable media......................................................................................................... 29 4.9.2. How to Run Secure Erase on Linux Operating System .............................................................................. 30 4.9.3. How to Run Drive Backup on Linux Operating System .............................................................................. 32 4.10. Scheduler ........................................................................................................................................................... 34 4.11. Log Information ................................................................................................................................................... 35 4.12. Export System Information ................................................................................................................................. 36 Explanation of marks in this document Describes functions, restrictions, and matters for reference. Information Describes additional instructions and notes. Note pg. 3 Safety Precautions This section lists important precautions which users of our product(s) (and anyone else) should observe in order to avoid injury to human body and damage to property and to ensure safe and correct use of our products. Please be sure that you understand the meanings of the labels and graphic symbols described below before you move on to the detailed descriptions of the precautions, and comply with the precautions stated. Explanation of Labels 1 Indicates practices that may cause property damage and other problems, but not personal injury 1. Property damage is defined as damage to a customer or third party’s machines and equipment. Explanation of Graphic Symbols Prohibited Indicates prohibited actions. Instructions Indicates actions that must be undertaken for safety purposes. pg. 4 General Use Prohibited Do not remove the drive from your system while the system is powered on. It may cause damage to the drive. Do not change any configuration files of this application. To do so could harm your system. Prohibited Instructions If your system or the Storage Utilities is terminated abnormally while Storage Utilities is running, your system or the drive may be damaged or data may be lost. Please backup your data before you use the Storage Utilities. Use of Secure Erase and Drive Backup Prohibited Prohibited Instructions Instructions Instructions Do not power off while the Secure Erase or Drive Backup is running as this could corrupt the drive or your system. Do not run Secure Erase or Drive Backup on a battery driven system. Be sure to supply power to the system via the AC adapter. Be sure to backup of your data before erasing data or backing up drive because data erased by Secure Erase or data overwritten by Drive Backup cannot be recovered. The bootable media creating process will delete all your data stored on the media. Back up your data before creating any bootable media. If your system or the Storage Utilities is terminated abnormally while Secure Erase is running, the drive may be in a password lock state. If the drive is in a password lock (Security Locked) state, please contact a customer support center. pg. 5 1. Introduction This manual describes the procedure for installing and using TOSHIBA Storage Utilities (hereinafter “Storage Utilities”). Please read carefully the DISCLAIMER and Safety Precautions section before using the application Storage Utilities. The Storage Utilities is software for management of TOSHIBA Solid State Drives (hereafter “TOSHIBA SSDs”) and optimize their performance. The Storage Utilities provides the following features: Drive Information Displays various information of the drives Performance Optimizer Optimizes performance of the TOSHIBA SSD by TRIM command Diagnostic Scan Scans the whole or part of the TOSHIBA SSD for read errors Over Provisioning Reserves free space in the TOSHIBA SSD to improve performance System Optimizer Tunes your system configuration in a manner designed to optimize performance of the system drive Secure Erase Erases all data on the TOSHIBA SSD Supplementary Tools ® Provides Linux bootable media creation function for data erasing and drive backup and USB flash drive capacity restore function. pg. 6 2. System Requirements Storage Utilities requires the following: a) Supported SSDs TOSHIBA SSD Q300 Series Model Number on the label (the part number printed on the bottom of packaging box): HDTS712 (HDTS712*ZSTA), HDTS724 (HDTS724*ZSTA), HDTS748 (HDTS748*ZSTA), HDTS796 (HDTS796*ZSTA) TOSHIBA SSD Q300 Pro Series Model Number on the label (the part number printed on the bottom of packaging box): HDTS412 (HDTS412*ZSTA), HDTS425 (HDTS425*ZSTA), HDTS451 (HDTS451*ZSTA) Note: An asterisk mark (*) is different for each destination. b) Supported Hardware Computers that satisfy requirements of supported operating system. c) Disk space 12 MB of available disk space d) Supported operating systems ® Microsoft Windows 8.1 (x86 and x64) Microsoft Windows 8 (x86 and x64) ® Microsoft Windows 7 (x86 and x64) with SP1 e) File system Works only on storages formatted with NTFS. f) Screen resolution 32 bits color and greater than 800 x 600 pixels g) Adobe Reader X or later h) Internet Explorer 8 or later ® ® Information When DPI size is set at more than 100%, the Storage Utilities application window may not be displayed properly. Storage Utilities is designed to work with single drives, but does not work with drives that are part of RAID configurations. Storage Utilities does not work with drives that are encrypted by software. Storage Utilities does not work with the drives with USB connections. pg. 7 3. Installation Guide To install Storage Utilities follow these steps: Note Requires username and password of administrator account in order to be installed by general users. 1) Save the “Storage Utilities_v3.00.exe” to a folder on your computer. 2) Double-click the “Storage Utilities_v3.00.exe” to start the Storage Utilities Setup Wizard. 3) Select language by Choosing Setup Language and click “Next >”. 4) Click “Next >” on the Welcome to TOSHIBA Storage Utilities Setup Wizard. pg. 8 5) Review the License Agreement, If you agree with it, click “I accept …” and then click “Next >”. 6) Click “Next >” to install to the default folder, or click “Change…” to install to a different folder and then click “Next >”. 7) Click “Install” to start the installation. pg. 9 8) Click “Finish” when the InstallShield Wizard complete dialog box appears. pg. 10 4. Storage Utilities Usage 4.1. Start Storage Utilities You can start the Storage Utilities application by one of the following ways: Requires username and password of administrator account in order to be started by a general user. Note Click the “Start” button then choose “All Programs” -> “TOSHIBA” -> “Storage Utilities” -> “Storage Utilities” Click on “Storage Utilities” icon on the system tray and select “Open” from the pop-up menu. 2 1 3 4 1 2 3 Menu Drive Information Performance Optimizer Diagnostic Scan Over Provisioning System Optimizer Secure Erase Supplementary Tools : Goes to the Drive Information screen (See 4.2. Drive Information) : Goes to the Performance Optimizer screen (See 4.3. Performance Optimizer) : Goes to the Diagnostic Scan screen (See 4.4. Diagnostic Scan) : Goes to the Over Provisioning screen (See 4.5. Over Provisioning) : Goes to the System Optimizer screen (See 4.6. System Optimizer) : Goes to the Secure Erase screen (See 4.7. Secure Erase) : Goes to the Supplementary Tools screen (See 4.8. Supplementary Tools) Title Button i (Information) ? (Help) _ (Minimize) X (Exit) : Displays the product information and license agreement. : Displays User’s Manual : Minimizes the Storage Utilities application : Closes the Storage Utilities application Update Information for Storage Utilities Display if there is update information for Storage Utilities. Click “Update Information for Storage Utilities”, display current version and the latest version of the Storage Utilities. Click “Detailed Information” to see more detailed information. Click “Update” to start download of Storage Utilities and you can update to the latest version. Note If update target file has been locked, you may need to restart your system. To get updated information and detailed information, and to update, you need to connect to the Internet. pg. 11 4 Checkbox of Update Notice for Firmware / Software If you want to be notified about firmware and software update information by a pop-up window, enable the checkbox. If checkbox is enabled and it is connected to the Internet, it detects update information at computer startup and every 24 hours. pg. 12 4.2. Drive Information The Drive Information displays summary and support features about the drives connected to your system. 4.2.1. Summary The “Summary” tab displays status and summary of the selected drive. 1 2 4 1 5 Select a Drive Displays the list of all available drives on your system. In the Select a Drive list, click the name of drive for which you want to view the information. Information 2 3 Displays warning icon on drive list when the status is caution or warning. Displays information icon on the drive list when there is firmware update. If the status is caution or warning, and if there is firmware update, displays warning icon . When a SSD is Read Only Mode (status is warning), it may take time to recognize the SSD, or may not recognize the SSD. Status Displays the information about status of the selected drive. Based on the indications of the SSD endurance, the status shall be displayed as normal, caution, or warning. The meter indicates the change in the status. When using NAND Flash memory storage, the individual storage cell can be gradually damaged by frequent reading and/or rewriting. Normal (green): Drive working normally. Caution (yellow): Rewrite cycle has exceeded the rated cycle for the device. The rated cycle is the upper limit designated by TOSHIBA for operational reliability. It is strongly recommended to back up the drive and replace it, as the drive has exceeded the limit and reliability may be compromised. Warning (red): Drive is Read Only Mode by lifetime or failure. Try to rescue the data by backing up the drive immediately. Discontinue use of the drive once data has been backed up to a separate device. If the drive is in Read Only Mode, you may still be able to read stored data in order to back up the data. However, if the mode is caused by another issue, back up may not be possible. Please see “4.9.3.How to Run Drive Backup on Linux Operating System” for drive backup. pg. 13 3 SMART Information Click “SMART” to display the SMART information. Click “Export” to export the SMART information to CSV format file. Then, right-click to use copying function. Information SMART information, necessary to maintain compatibility with hard disk drives does not change and is not displayed. Displays warning icon on the left of ID when the value of SMART attribute falls under the threshold value. SMART attribute items are as follows: ID Hex value of SMART attribute Attribute Name Name of SMART attribute Value Normalized current value of the attribute Worst Value Lowest value in the past Threshold Normalized threshold value for the drive RAW Value Raw value assigned to SMART attribute Detailed information about SMART attribute is as follows: ID Attribute Explanation 09 Power-on Hours Count Value is fixed. Raw Value shows the cumulative number of power-on hours since factory shipping. 0C Drive Power Cycle Count Value is fixed. Raw Value shows the cumulative number of power on/off cycles since factory shipping. A7 SSD Protect Mode Value is fixed. Raw Value (Byte 0) reports the current mode of the drive. 0: Read/Write Mode Others: Read Only Mode A8 SATA PHY Error Count Value is fixed. Raw Value shows cumulative number of errors in SATA physical layer since factory shipping. A9 Total Bad Block Count Value shows the normalized number of spare area in the drive. When this attribute falls below the threshold, performance of the drive may significantly slow down. AD Erase Count Value shows the maximum normalized cumulative number of erase cycles per block since factory shipping. C0 Unexpected Power Loss Count Value is fixed. Raw Value shows the cumulative number of unexpected power loss since factory shipping. C2 Temperature Value shows the thermal sensor value in the drive, which is subtracted the centigrade temperature from 100. Raw Value shows current, minimum, and maximum centigrade temperature. pg. 14 4 5 Byte1-0: Current centigrade temperature Byte3-2: Minimum centigrade temperature (since factory shipping) Byte5-4: Maximum centigrade temperature (since factory shipping) Drive Summary Displays model name, serial number, firmware version, ATA version, SATA version, SATA speed. Update Information Displays updating information of firmware. If you want to refer to updating information for firmware, click “Update Information”. pg. 15 4.2.2. Support Features The Support Features display detailed information of the selected drive on the “Support Features 1”, and “Support Features 2 & Status” tabs. 1 2 3 4 1 1 2 3 4 4 Select a Drive Displays the list of all available drives on your system. In the Select a Drive list, click the name of drive for which you want to view the information. Support Features 1 Displays unchangeable support features of the selected drive. Non-supported features are displayed in grey. Support Features 2 & Status Displays changeable support features of the selected drive and displays for each feature the enable or disable status. Non-supported features are displayed in grey. Detailed Information Click “Detailed Information” to see Identify information of the selected drive. Click “Export” to export the detailed information to a CSV format file. Then, use the right-click to access the copying function. Enter keyword, and click “Search” to search the detailed information. Detailed Information displays the data acquired from the result of IDENTIFY DEVICE command. Refer to ATA specifications for detail. http://www.t13.org/ pg. 16 4.3. Performance Optimizer The Performance Optimizer helps to keep the TOSHIBA SSD of its optimum performance with the TRIM function. This function informs the device which data is no longer valid or unused (i.e. deleted files). This reduces wear by allowing the device to no longer manage the invalid/unused data. If the operating system on your computer is Windows 7 or Windows 8 or Windows 8.1, you do not need to use this feature because Windows 7 and Windows 8 and Windows 8.1 support TRIM natively. However, please use this feature if you have disabled the setting of TRIM. The Performance Optimizer can be run manually or automatically by using the Scheduler. The result of executing the Performance Optimizer can be viewed in the Log Information screen. Note Do not run Defragmentation and the Performance Optimizer simultaneously. Make sure to disable Defragmentation or disable the schedule of Defragmentation before running the Performance Optimization. The optimization feature does not work on TOSHIBA SSD Q300. 1 2 3 1 2 3 To the Scheduler screen To the Log Information screen Select a Drive Displays the list of all available drives on your system. In the Select a Drive list, click the drive for which you want to optimize performance. Layout of Drive, Progress Bar Displays the used area, free area, and free area for the optimization of the selected drive in different colors. Displays progress of optimizing task and analyzing task on Progress Bar. Analyze, Start / Stop Click “Analyze” to analyze the usage of the selected drive and display the analysis result in the Layout of the Drive field. Click “Start” to optimize performance of the selected drive. During execution of optimization, click “Stop” to stop the optimization process. When finished, the execution result of performance optimization is shown in the Log Information screen. Information The optimization feature does not work on the SSD that has less than 1 GB of free drive space. The optimization feature does not work while your computer is running on battery. The optimization feature does not work on the SSD in Read Only Mode (status is warning). pg. 17 4.4. Diagnostic Scan The Diagnostic Scan can scan the whole or part of the TOSHIBA SSD for read errors. There are two kinds of the Diagnostic Scan: Quick Scan and Full Scan. The Quick Scan runs self-test routine on one part of the drive. In the next scanning, the Quick Scan runs self-test routine on another part of the drive. When running the Quick Scan repeatedly, the whole of drive will be scanned. Typically, it takes several minutes to complete a Quick Scan. The Quick Scan can be run manually or automatically by using the Scheduler. The Full Scan runs self-test routine on the whole drive. Typically, it may take several tens of minutes or more to complete a Full Scan. The Full Scan can be run only manually. The result of executing the Diagnostic Scan can be viewed in the Log Information screen. 1 2 3 To the Scheduler screen To the Log Information screen 1 2 3 Select a Drive Displays the list of all available drives on your system. In the Select a Drive list, click the drive that you want to scan. Scan, Progress Bar Quick Scan : Check this option to run self-test routine on one part of the selected drive. Full Scan : Check this option to run self-test routine on the whole of the selected drive. Displays progress of scanning task. Start / Stop Click “Start” to scan the selected drive. During execution of the scan, click “Stop” to stop the scan process. When finished, the result of the scan is shown in the Log Information screen. Information The Diagnostic Scan feature does not work while your computer is running on battery. The Diagnostic Scan feature does not work on the SSD in Read Only Mode (status is warning). pg. 18 4.5. Over Provisioning The Over Provisioning feature allows you to reserve free space in the TOSHIBA SSD. The reserved area in the SSD is used mainly as a work area for garbage collection. By raising the efficiency of garbage collection, it can assist in preventing performance degradation. The sizes of reserved area can be changed from 0% to 30% of available free space. The reserve area can be allocated and released at any time. The result of executing the Over Provisioning can be viewed in the Log Information screen. Note Do not run Defragmentation and the Over Provisioning simultaneously. Make sure to disable Defragmentation or disable the schedule of Defragmentation before running the Over Provisioning. The Over Provisioning feature does not work on TOSHIBA SSD Q300. 1 3 2 4 5 1 2 3 4 5 To the Log Information screen Select a Drive Displays the list of all available drives on your system. In the Select a Drive list, click the drive for which you want to run Over Provisioning. Select a Partition Select the partition on which you want to run Over Provisioning. Over Provisioning Size Select the percentage of reserve area to free area in the selected partition to specify the size of reserve area you want to allocate for Over Provisioning. Layout of Drive, Progress Bar Displays the used area, free area, and the Over Provisioning area in different colors, in the case of analyzing the selected partition. Displays the capacity and occupancy ratio in the right side of the legend of each area. Displays progress of Over Provisioning task on Progress Bar. Analyze, Allocate / Release Select the size of “Over Provisioning Size”, and click “Analyze” to analyze the usage of the selected drive and display the analysis result in the Layout of Drive field. The Over Provisioning Area has not been allocated as of the analyzed stage. Click “Allocate” to allocate the specified size of reserve area on the selected partition. When finished, the result of allocating is shown in the Log Information screen. Click “Release” to release the allocated reserve area. When finished, the result of releasing allocated reserve area is shown in the Log Information screen. Information The Over Provisioning feature does not work on the SSD that has less than 1 GB of free drive space. The Over Provisioning feature does not work while your computer is running on battery. The Over Provisioning feature does not work on the SSD in Read Only Mode (status is warning). pg. 19 4.6. System Optimizer The System Optimizer feature allows you to tune your system configuration to optimize performance of the system drive. 1 2 3 1 2 3 DIPM Displays the current setting and the recommended setting for DIPM (Device Initiated Power Management). Select the value you want to set. DIPM is the power management feature that is effective in reducing the power consumption. DIPM should generally be enabled on the drive. ® SuperFetch / Prefetch Displays the current setting and the recommended setting for SuperFetch / Prefetch. Select the value you want to set. Windows SuperFetch /Windows Prefetch is a Windows technology designed to reduce load times by preloading frequently used applications into memory. SuperFetch/Prefetch is generally not needed for TOSHIBA SSDs and should be disabled. In the case of HDD, SuperFetch/Prefetch is strongly recommended to be enabled. Apply Click “Apply” to apply the specified setting value on your system. You will likely need to restart your system to apply the configuration change. pg. 20 4.7. Secure Erase Secure Erase is designed to erase all data stored on the TOSHIBA SSD including user data, OS or recovery OS. There are four kinds of Secure Erase. Normal Secure Erase and Enhanced Secure Erase are part of Security Erase Unit command. Block Erase (BLOCK ERASE EXT command) and Cryptographic Erase (CPRYPTO SCRAMBLE EXT command) are part of Sanitize Device feature set. Block Erase and Cryptographic Erase can be selected for drives that support the Sanitize Device feature set. We recommend Block Erase or Cryptographic Erase, which are safer than Normal Secure Erase and Enhanced Secure Erase, when the drives support the Sanitize Device feature set. The table below shows four types of Secure Erase methods and whether they are available on the Non-SED (Not Self Encrypting Drive) and/or the SED (Self Encrypting Drive). Non-SED SED Normal Secure Erase Logical Erase Logical Erase (Physical Erase) (*1) Crypto Erase Enhanced Secure Erase Logical Erase Logical Erase Physical Erase Crypto Erase Block Erase Logical Erase Logical Erase Physical Erase Physical Erase Crypto Erase Cryptographic Erase Crypto Erase Logical Erase : Runs a logical erasing process designed to clear data on the logical-physical conversion table. Physical Erase : Runs a physical erasing process designed to clear data on NAND flash memory. Crypto Erase : Runs a sanitize operation designed to change the internal encryption keys that are used for user data. (*1) In the case of TOSHIBA SSD Q300, Normal Secure Erase runs physical erase. There are two versions of Secure Erase, one on Windows OS, and one on Linux OS. The Secure Erase on Windows OS cannot be run on the primary drive (bootable drive), but can be run on the secondary drive. Refer to “4.9.2.How to Run Secure Erase on Linux Operating System”, when you perform Secure Erase by the primary drive (bootable drive). The table below shows the support for Secure Erase on Windows OS. Please use Secure Erase on Linux OS if your system is non-supported OS. Windows 7 Windows 8 Windows 8.1 Normal Secure Erase Support Non-support Non-support Enhanced Secure Erase Support Non-support Non-support Block Erase Support Support Non-support Cryptographic Erase Support Support Non-support Note Remove the user password on the drive before running the Secure Erase. (For information on how to remove the user password on the drive, refer to your system’s user manual.) pg. 21 To run the Secure Erase on Windows operating systems, perform the following steps: 1) Click Secure Erase menu. 2) If you accept the conditions, check “I understand” and click “Yes”. 3) The “Secure Erase” screen is displayed. 1 2 3 1 2 On the drive list, select the drive on which you want to run Secure Erase. Select erasing method. Normal Secure Erase and Enhanced Secure Erase will be displayed estimated required time. The estimated required time show the estimated time in 2 minutes that obtained from Word 89 and Word 90 on “IDENTIFY DEVICE data”. It shows in hour (h) and minute (min). Information 3 Normal Secure Erase and Enhanced Secure Erase do not work with the status of Security Locked or Security Frozen. Block Erase and Cryptographic Erase do not work with the status of Security Locked or Sanitize Frozen. Normal Secure Erase time and Enhanced Secure Erase time may exceed the estimated required time depending on the operating conditions. Click “Start”. pg. 22 4) If you accept the conditions, check “I understand” and click “Yes”, and start Secure Erase. 5) Displays the progress for the Secure Erase task on Progress Bar. 6) Displays the completion screen after Secure Erase finished. Information The length of the erasure time depends on the capacity of the target drive. The Secure Erase feature on Windows OS does not work on the SSD in Read Only Mode (status is warning). Refer to “4.9.2.How to Run Secure Erase on Linux Operating System”. pg. 23 4.8. Supplementary Tools The Supplementary Tools feature enables additional functions for the Storage, 4.8.1. Bootable USB Creator The Bootable USB Creator creates the bootable USB of Linux operating systems for erasing data and drive backup. Creating the bootable USB requires the capacity of about 250 MB. Prepare a USB flash drive of 256MB or above to create the bootable USB. Note If you create the bootable USB for the first time, you need to connect to the Internet to download the bootable module. Create a bootable USB by following steps. 1) Select “Bootable USB Creator” tab. 1 2 1 2 2) Select a USB flash drive for creating the bootable USB from the drive list box. If a USB is not shown in the drive list box, close the Storage Utilities and insert an empty USB into a port on your system before starting the Storage Utilities. Then start the Storage Utilities. Click “Start” to create a bootable USB. While creating the bootable USB, click “Stop” to stop the process. A Progress Bar is displayed while the system creates a bootable USB. When you create the bootable USB for the first time, if you accept the conditions, then click “Yes”, You can start downloading the bootable module. During the download, the progress screen is displayed. If you have already downloaded, please skip to step 3. pg. 24 3) If you accept the conditions, check “I understand” and click “Yes”, and start creating the bootable USB. 4) After the completion of the bootable USB, if you want to shutdown and restart your system from the bootable USB, click “Yes”. Information Size of USB flash drive will be set to about 250MB when creating the bootable USB. See “4.8.3. USB Flash Drive Capacity Restore” for restoring the capacity of USB flash drive. Your system may not restart using the created bootable USB depending on some computer operations. (See 4.9.1.How to boot from the bootable media) pg. 25 4.8.2. Steps for Bootable CD/DVD “Steps for Bootable CD/DVD” tab describes the steps to create CD/DVD bootable media for data erasing and drive backup. The Storage Utilities does not include any CD/DVD media creation functions. Besides the Storage Utilities, optical disc authoring software is necessary when creating CD/DVD bootable media. You will be unable to create CD/DVD bootable media if optical disc authoring software is not installed in your computer. Note Please follow the specification of optical disc authoring software on writing operation of CD/DVD. If you create CD/DVD bootable media for the first time, you need to connect to the Internet to download the bootable module. 1) Start optical disc authoring software. 2) Select “Step for Bootable CD/DVD” tab. Click “Open ISO File Folder”. 3) When you create CD/DVD bootable media for the first time, if you accept the conditions, then click “Yes”, and start downloading the bootable module. During the download, the progress screen is displayed. If you have already downloaded, please skip to step 4. pg. 26 4) If you accept the conditions, then click “Yes”. 5) Check stored location of the ISO file and then import the ISO file to optical disc authoring software from stored location. 6) Write the ISO file to CD/DVD media using optical disc authoring software. pg. 27 4.8.3. USB Flash Drive Capacity Restore Size of USB flash drive will be set to about 250MB when creating the bootable USB. Restore the capacity of the USB flash drive by following steps: 1) Select “USB Flash Drive Capacity Restore” tab. 1 2 1 2 Select a USB flash drive from the drive list box. If the USB is not shown in the drive list box, close the Storage Utilities and insert the created bootable USB into a port on your system before opening the Storage Utilities. Then start the Storage Utilities. Click “Start”. 2) If you accept the conditions, then check “I understand” and click “Yes”. 3) Displays the completion screen after USB Flash Drive Capacity Restore is finished. pg. 28 4.9. Operation Features on Linux Operating System Provides features which can be operated using the bootable media created by Supplementary Tools. 4.9.1. How to boot from the bootable media Note BIOS SETUP UTILITY menu displayed differs depending on the device on your system. (For information on how to start BIOS SETUP UTILITY, refer to your system’s user manual.) You will need to disable UEFI Secure boot. To boot your computer from the bootable media, perform the following steps: 1) Power on your computer. 2) Start BIOS SETUP UTILITY. 3) Select Boot menu. 4) Select Boot Device Priority in the Boot Options menu. 5) Specify the created bootable media as 1st Boot Device in the Boot Device Priority menu. 6) Save the configuration changes and exit BIOS SETUP UTILITY. Information In AMD chipset, Storage Utilities may not work. The created bootable media (Linux) may not start in a computer with USB3.0. However, if the BIOS is updated to the latest version, there is a possibility that a computer with USB3.0 will be able to boot. When the bootable media (Linux) does not start with an internal CD/DVD drive, it may start with an external USB CD/DVD drive. pg. 29 4.9.2. How to Run Secure Erase on Linux Operating System The Secure Erase on Linux OS can be run on the primary drive (bootable drive) or the secondary drive. Secure Erase on Linux OS by following steps: Note Remove the user password on the drive before running the Secure Erase. (For information on how to remove the user password on the drive, refer to your system’s user manual.) 1) Boot from the bootable media. (See 4.9.1. How to boot from the bootable media) 2) Click Secure Erase menu. 3) If you accept the conditions, check “I understand” and click “Yes”. 4) The “Secure Erase” screen is displayed. 1 2 3 1 2 On the drive list, select the drive on which you want to run Secure Erase. Select erasing method. Information 3 Normal Secure Erase and Enhanced Secure Erase do not work with the status of Security Locked or Security Frozen. Block Erase and Cryptographic Erase do not work with the status of Security Locked or Sanitize Frozen. Click “Start”. pg. 30 5) If you accept the conditions, check “I understand” and click “Yes”, and start Secure Erase. 6) Displays the progress for the Secure Erase task on Progress Bar. 7) Displays the completion screen after Secure Erase finished. Information The length of the erasure time depends on the capacity of the target drive. SSD in Read Only Mode (status is warning) may fail in erasing depending on the status of the drive. pg. 31 4.9.3. How to Run Drive Backup on Linux Operating System Backup the drive that needs to be rescued. Use normal drive or new drive as the destination drive. Note Backup drive on Linux OS by following steps: 1) Boot form the bootable media. (See 4.9.1. How to boot from the bootable media) 2) Click Supplementary Tools menu. 3) If you accept the conditions, check “I understand” and click “Yes”. 4) The “Supplementary Tools (Drive Backup)” screen is displayed. 1 2 4 3 1 Select the source SSD for Drive Backup from source drive list. Source drive can select only supported SSD. Information pg. 32 2 Select a SSD from the Destination Drive list. Information 3 4 If the destination drive has the capacity equal to or more than the source drive, it may be possible to use a non-supported SSD as the destination drive. However, since it is non-supported SSD, the status of drive is not displayed. If you wish to ignore the read errors, enable the checkbox. Click “Start”. 5) If you accept the conditions, check “I understand” and click “Yes” and start Drive Backup. 6) Displays the progress for the backup process on detailed progress. 7) Displays the completion screen after Drive Backup finished. Information The SSD may enter Read Only Mode due to some problem with the file system. It may be possible to correct this condition by running check disk (CHKDSK) after Drive Backup. Drive Backup is intended to rescue as much data as possible, but the Drive Backup will not copy data in areas where it encounters read error. pg. 33 4.10. Scheduler The Scheduler allows you to schedule the time to run the Performance Optimizer and Diagnostic Scan. Do not run Defragmentation and the Performance Optimizer simultaneously. Make sure to disable Defragmentation or disable the schedule of Defragmentation before running the performance optimization. Note 1 2 3 4 1 2 3 4 Select a Drive Displays the list of all available drives on your system. In the Select a Drive list, click the drive for which you want to set an automated scheduled optimizing or scanning. Schedule Task Select the task from the dropdown list box. Enable the schedule Check the “Enabled this schedule” box to set an automated scheduled optimizing or scanning. Then, set the interval, time, day and week to run the optimizing or scanning task. OK/Cancel Click “OK” to register the schedule setting. pg. 34 4.11. Log Information Log Information displays the result of executing the Performance Optimizer / Diagnostic Scan / Over Provisioning / Secure Erase task. 1 2 3 1 2 3 The task to display Select the task result from dropdown list box that you want to view. Result Displays the result of executing the Performance Optimizer / Diagnostic Scan / Over Provisioning / Secure Erase task. Export / Close Click “Export” to export the log information to CSV format file. Click “Close” to close the Log Information dialog. pg. 35 4.12. Export System Information Export system information (without user information) and drive information of supported drive. Select “About Storage Utilities…” from title button (i), and click “Export System Information” to export system information to text format file. pg. 36 Semiconductor & Storage Products Company 1-1, Shibaura 1-Chome, Minato-ku, Tokyo 105-8001, Japan Issued in September 2015 (c) 2015 TOSHIBA CORPORATION. All Rights Reserved. pg. 37