1
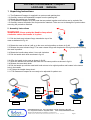
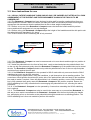
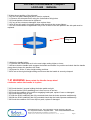
LOCOMOTOR Rotastand...Compact
LOCO-600 MANUAL
ENSURE THESE INSTRUCTIONS ARE READ AND FULLY UNDERSTOOD BEFORE USE.
PLEASE KEEP IN A SAFE PLACE FOR FUTURE REFERENCE.
HEALTH AND SOCIAL SERVICES THESE INSTRUCTIONS SHOULD BE LEFT WITH THE USER OF THE LOCOMOTOR ROTASTAND
COMPACT TO CONSULT AS REQUIRED.
The Rotastand...Compact is packed in a strong purpose built carton, to ensure safe delivery.
Please retain the carton if possible.
This user manual contains
1
2
3.1
3.2
4
5
6
7
8
Unpacking instructions
Assembly instructions
User instructions for adjustments
User instructions for use
Maintenance and cleaning
Some Do`s and Don’ts
Technical Specification
Service instructions
Spare parts list
Select Healthcare (UK) Ltd, Unit 2 Albert Road, Rushden, Northants, NN10 0BU
Tel: +44( 0)1933 411729 Fax: +44(0)1933 410213
Email [email protected]
Designed and Developed by: Proto Magic Innovations Ltd
Rotastand Compact OPERATING AND SERVICE INSTRUCTIONS Ver 02 .doc 10/01/2013
Page 1
LOCOMOTOR Rotastand...Compact
LOCO-600 MANUAL
1 Unpacking Instructions
1.1 The Rotastand Compact is supplied in a custom made packing box.
1.2 Carefully remove the Rotastand Compact from the packing box.
1.3 Retain the packing box if possible.
1.4 The Rotastand Compact is in two parts that are packed together and held as one by a plastic film.
1.5 Carefully remove the plastic film and protective materials. Take care not to damage the product when
removing the protective materials.
2 Assembly instructions
WARNING
Never rotate the Handle clamp wheel
clockwise unless the handle is in place
2.1 Pull the black mast release flange towards the top of the
mast as indicated in Fig A1.
2.2 Rotate the mast as far as it will go to the near vertical position as shown in fig A2.
2.3 Release the mast release flange. The mast release flange will drop back to its original position locking
the mast in position.
2.4 Rotate the handle clamp wheel 1 turn anti clockwise.
2.5 Pull the handle latch knob as shown in fig A2.
2.6 Offer the handle to the mast as shown in fig A2.
2.7 Insert the handle into the mast and lower it to its lowest position as shown in fig A3.
2.8 Release the mast latch knob.
2.9 Pull the handle up until the mast latch knob returns to its original position and locates in the lowest
hole in the handle.
2.10 Tighten the handle clamp wheel.
2.11 The Rotastand Compact is now ready to be adjusted for patient use.
Handle
Handle
latch
knob
Handle
clamp
wheel
Mast
Mast release flange
Fig A3
Fig A1
Fig A2
Select Healthcare (UK) Ltd, Unit 2 Albert Road, Rushden, Northants, NN10 0BU
Tel: +44( 0)1933 411729 Fax: +44(0)1933 410213
Email [email protected]
Designed and Developed by: Proto Magic Innovations Ltd
Rotastand Compact OPERATING AND SERVICE INSTRUCTIONS Ver 02 .doc 10/01/2013
Page 2
LOCOMOTOR Rotastand...Compact
LOCO-600 MANUAL
3 User Instructions
3.1 User Instructions for adjustments
3.1 Adjust the Rotastand Compact to suit the patient.
3.1.1 The Shin pad has 3 height settings, LOW, MIDDLE and HIGH, providing an overall adjustment of
80mm in 40mm steps.
3.1.2 The Rotastand Compact is supplied with the shin pad set to the middle height.
3.1.3 To change the height, remove the 2 fixing screws and fit using the offset holes in the shin pad.
3.1.4 Note the shin pad may need to be rotated half a turn to obtain the desired height.
Alternative screw hole
Fixing screw
3.1.5 The handle has been set to its lowest position during assembly.
3.1.6 There are 17 possible positions for the handle with an adjustment discrimination of 25mm.
3.1.7 To raise the handle height, rotate the handle clamp wheel 2 turns anticlockwise and pull the handle
release knob.
3.1.8 Raise the handle to the required height and release the handle latch knob.
3.1.9 Move the handle up or down a little untill the handle latch knob returns to its original position and
retains the position of the handle.
3.1.10 Tighten the handle clamp wheel.
3.1.11 The Rotastand Compact is now ready for use.
Select Healthcare (UK) Ltd, Unit 2 Albert Road, Rushden, Northants, NN10 0BU
Tel: +44( 0)1933 411729 Fax: +44(0)1933 410213
Email [email protected]
Designed and Developed by: Proto Magic Innovations Ltd
Rotastand Compact OPERATING AND SERVICE INSTRUCTIONS Ver 02 .doc 10/01/2013
Page 3
LOCOMOTOR Rotastand...Compact
LOCO-600 MANUAL
3.2 User instructions for use
3.2.1 NB ALL PATIENT HANDLING TASKS SHOULD ONLY BE CARRIED OUT AFTER A FULL RISK
ASSESSMENT OF THE PATIENT AND THE ENVIRONMENT IN WHICH THE TASK IS TO BE
CARRIED OUT.
3.2.2 The Rotastand...Compact has been designed to allow staff to transfer a patient/client from one
seated position to another. Before a transfer can take place staff should satisfy themselves through an
appropriate risk assessment that the patient/client is able to bear weight independently
3.2.3 Before every use of the Rotastand...Compact ensure that both the handle and shin pad are
secure and that the equipment is in no way damaged.
3.2.4 Before using your Rotastand...Compact adjust the height of the handlebar and the shin pad to suit
the patient/client as described in 3.1 above.
3.2.5 Ensure that the SOLO stabilising bar is fully retracted.
SOLO stabilising bar
fully retracted
SOLO stabilising bar
fully extended
3.2.6 The Rotastand...Compact can now be manoeuvred on its rear wheels and brought to a position in
front of the patient/client
3.2.7 Assist the patient/client to the front of their chair, ready to stand and place the patient/client’s feet
on the non slip foot plate and gently wheel the Rotastand...Compact up to the patient/client on its central
wheels. The Rotastand...Compact should end up with the patient/client’s feet on the non slip foot plate
and shins firmly against the shin pad.
3.2.8 If the Rotastand...Compact is to be operated in SOLO mode with only one carer then the SOLO
stabilising bar must now be fully extended
3.2.9 Encourage the patient/client, using the handlebar, to pull themselves into a standing position. The
nurse/carer should position themselves(s) at the side of the patient/client with one hand on the handlebar
bar ready to assist if required. Once the patient/client is in a standing position, ensure SOLO stabilising
bar is fully retracted then gently rotate the Rotastand...Compact to the position required. Ensure the
SOLO stabilising bar is fully extended before encouraging the patient/client to sit, reversing the above
procedure.
3.2.10 If the Rotastand...Compact is to be operated by 2 carers then extending the SOLO stabilising
bar is optional.
3.2.11 The Rotastand…Compact can also be used in the same way as a conventional Rotastand. In
this way a carer would counterbalance the Rotastand…Compact from the front by holding the handle
bar, and placing a foot on the brake as the patient/client brings themselves to a standing position. The
SOLO stabilising bar is thus not needed to perform this transfer
Select Healthcare (UK) Ltd, Unit 2 Albert Road, Rushden, Northants, NN10 0BU
Tel: +44( 0)1933 411729 Fax: +44(0)1933 410213
Email [email protected]
Designed and Developed by: Proto Magic Innovations Ltd
Rotastand Compact OPERATING AND SERVICE INSTRUCTIONS Ver 02 .doc 10/01/2013
Page 4
LOCOMOTOR Rotastand...Compact
LOCO-600 MANUAL
4 Maintenance and cleaning
4.1 Wash with detergent and hot water, then dry thoroughly.
4.2 Decontaminate during general use with Universal sanitising wipes.
4.3 Decontaminate before reissue with 70% isopropyl alcohol or 10,000 ppm chlorine solution or dry
superheated steam vapour cleaning. No other methods are approved or recommended please contact
customer service if more advice is needed.
4.4 Before every use always ensure that the handlebar and knee pad height adjustment means are fully
tightened and that the brake is functional.
4.5 Always be vigilant and check for damage.
4.6 Annual servicing is recommended. See service instructions.
4.7 Check for grit or other contamination between the bearing disc and the metal base, such
contamination must be removed by removing the turning disc
5 Some Do's and Don'ts.
5.1 DO ensure that you have read these instructions and understood them fully.
5.2 DO ensure that you carry out an inspection of the Locomotor Rotastand Compact on a regular
basis and have it serviced annually.
5.3 DON'T let children play with the Locomotor Rotastand Compact.
5.4 DON'T exceed the safe working load of a 200kgs person (31 stones).
5.5 Always ensure that the SOLO stabilising bar is fully extended before a single carer starts standing or
sitting a client.
6 Technical Specification
6.1 Warranty to specification
6.2 Safe working load
6.3 Overall length
6.4 Width
6.5 Height
6.6 Height adjustment discrimination
6.7 Number of height adjustment steps
6.8 Weight
6.9 Construction
6.10 Approvals
12 months
200Kg, 31 Stone
610/700 mm
510 mm
880/1280 mm
25 mm
16
10.9 Kg
Mostly aluminium and plastic
CE marked
Select Healthcare (UK) Ltd, Unit 2 Albert Road, Rushden, Northants, NN10 0BU
Tel: +44( 0)1933 411729 Fax: +44(0)1933 410213
Email [email protected]
Designed and Developed by: Proto Magic Innovations Ltd
Rotastand Compact OPERATING AND SERVICE INSTRUCTIONS Ver 02 .doc 10/01/2013
Page 5
LOCOMOTOR Rotastand...Compact
LOCO-600 MANUAL
7 Annual service procedure
7.1 Check all the welds for cracks and damage.
7.2 Check all the frame work and shin pad for any signs of mechanical damage.
7.3 If any cracks or damage is detected then QUARANTINE the product and contact Service at
Select Healthcare on Tel 01933 411 729.
7.4 Check the condition of the moulded tyres on the 4 wheels, if damaged then replace.
7.5 Check that the 4 wheel nuts are tight.
7.6 Check that the 4 screws attaching the rear wheel brackets are tight.
Rear wheel bracket screws
7.7 Put the Rotastand Compact on a flat surface and check that the centre wheels hold the large
blue base moulding off the surface the same distance each side within 8mm.
7.8 Push the large blue moulding down and check that the base of the Rotastand Compact goes
smoothly to the flat surface. Remove the downward force on the large blue moulding and check
that it returns smoothly to its original position, keeping the turning disc off the flat surface
Select Healthcare (UK) Ltd, Unit 2 Albert Road, Rushden, Northants, NN10 0BU
Tel: +44( 0)1933 411729 Fax: +44(0)1933 410213
Email [email protected]
Designed and Developed by: Proto Magic Innovations Ltd
Rotastand Compact OPERATING AND SERVICE INSTRUCTIONS Ver 02 .doc 10/01/2013
Page 6
LOCOMOTOR Rotastand...Compact
LOCO-600 MANUAL
7.9 Note the set position of the shin pad.
7.10 If the shin pad is damaged then it must be replaced.
7.11 Remove the shin pad and fit using the 2 alternative fixing holes.
7.12 Check that the screws can be tightened .
7.13 If any of the screws are damaged, then replace them.
7.14 Re fit the shin pad in its original position and check that the screws tighten.
7.15 If the screws cannot be tightened in any of the 4 holes in the shin pad then the shin pad must be
replaced.
Alternative
fixing hole
7.16 Note the handle height.
7.17 Release the handle and set it to the next height setting higher or lower.
7.18 Ensure that the handle latch engages the handle and retains it in position and check that the handle
clamp wheel clamps the handle to the mast.
7.19 Repeat for all the 15 other height setting positions.
7.20 Re set to the original height setting and ensure that the handle is securely clamped.
7.21 WARNING
Never rotate the Handle clamp wheel
clockwise unless the handle is in place
7.22 Check that the 2 screws holding the brake pedal are tight.
7.23 Check that the SOLO stabilising bar is free to move in and out.
7.25 Check the condition of the soft floor engaging brake pad, replace if worn or damaged.
7.26 Check that the fixing is tight.
7.27 With the SOLO stabilising bar fully retracted check that the brake operates satisfactorily.
7.28 With the SOLO stabilising bar fully extended check that the brake operates satisfactorily.
7.29 Check the condition of the non slip foot pads, replace if damaged.
Select Healthcare (UK) Ltd, Unit 2 Albert Road, Rushden, Northants, NN10 0BU
Tel: +44( 0)1933 411729 Fax: +44(0)1933 410213
Email [email protected]
Designed and Developed by: Proto Magic Innovations Ltd
Rotastand Compact OPERATING AND SERVICE INSTRUCTIONS Ver 02 .doc 10/01/2013
Page 7
LOCOMOTOR Rotastand...Compact
LOCO-600 MANUAL
7.30 Remove the turning disc and check the underside for contamination and wear, replace if worn or
damaged.
7.31 Remove any grit or contamination from the underside of the disc and the mating surface of the
Rotastand Compact.
7.32 Check the condition of the non slip pads, replace if damaged or worn.
7.33 Replace the turning disc.
7.34 Check that the turning disc fixing screw is tight to 4 NM
Top hat bush
Turning disc
Fixing screw
Non slip pad
Stabilising bar
retention pad
7.35 Check that the screws attaching the top blue cover to the metal base are tight.
7.36 If the blue cover cannot be tightened to the metal base then the blue cover must be replaced.
7.37 Stand on the Rotastand Compact and hold the handle.
7.38 Check that there is no back or forward movement of the handle with respect to the base when back
and forward pressure is applied to the handle.
7.39 Apply pressure to the left and to the right side, there will be some movement as the chassis under
the blue moulding flexes, this is normal. if it is deemed that there is something moving or lose, then
tighten as required.
7.40 Release the black mast release flange and fold the mast down.
7.41 Check that the mast release flange returns under its spring pressure and locks the mast in place.
7.42 Check that the stabilising bar is locked in place by the stabilising bar retention pad.
7.43 Replace the SOLO stabilising bar retention pad if required
8 Spare parts
8.1 Wheel for centre or back position.
8.2 Turning disc.
8.3 Turning disc top hat bearing.
8.4 Turning disc fixing screw.
8.5 Handle.
8.6 Handle clamp wheel.
8.7 Brake pad.
8.8 Stabilising bar retention pad.
8.9 Shin Pad
8.10 Non slip pads for turning disc (set of 3)
8.11 Stabilising bar complete with foot pedal
8.12 Foot pedal for stabilising bar
8.13 Complete clamp assembly for locking handle
Select Healthcare (UK) Ltd, Unit 2 Albert Road, Rushden, Northants, NN10 0BU
Tel: +44( 0)1933 411729 Fax: +44(0)1933 410213
Email [email protected]
Designed and Developed by: Proto Magic Innovations Ltd
Rotastand Compact OPERATING AND SERVICE INSTRUCTIONS Ver 02 .doc 10/01/2013
Page 8