1
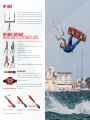
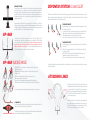
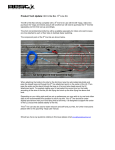
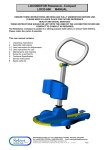
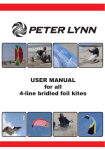
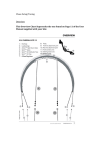
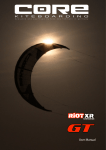
BARS
USER MANUAL
BARS
USER MANUAL
BEST BAR
ADVICE
RP-BAR AND GP-BAR
SAFETY ADVICE
PLEASE READ CAREFULLY AND KEEP FOR FUTURE REFERENCE
- The Pro-Cuff+ quick release is designed to work with riders between 50-150kgs in weight.
- The Pro-Cuff+ QR will function with front line loads in excess of 10kg, up to and including 200kgs.
- The Pro-Cuff+ QR will not function without any front line tension.
- The RP-bar is compatible with any 4-line or 4-line bridled LEI kite up to 17m2 in size.
- The GP-Bar is compatible with our 5-line range of GP C-kites.
- The Pro-Cuff+ is a push-to-release, front line safety system based on a flexible internal hinge and movable
external cuff. The cuff is retained by bungees.
- Neither the RP or GP bars provide any ‘dead man safety’ functionality.
- Safety is the result of proper learning and a careful assessment of the kiting conditions, including but not
limited to wind speed, direction and geographical layout of the surrounding area. Never base your own
assessment of safety solely on the function of your QR.
- Never kite in conditions beyond your own ability.
- You cannot learn how to use your safety equipment in an emergency situation, take the time to familiarize
yourself with all aspects of your gear and safety equipment functionality and practice its safe activation.
- Your safety system must be regularly maintained and checked. Please rinse your bar after every use.
Always check your QR function before and after every session.
- Check your bar before and after every session for signs of wear or damage.
- If you see wear or damage to any part of your bar or notice a decrease in the function of any part of the
safety system, stop using your bar immediately and discuss this with your local retailer, or online at
www.bestkiteboarding.com with our support staff for advice on potential replacement of worn parts.
LEGAL NOTES AND WARNING:
Kiteboarding is an extreme sport. Participants must be aware of the potential risks and danger from cuts,
scrapes, bruises, broken bones, loss of limbs, loss of vision, paralysis, and other serious, permanent and
disabling injuries and death to the rider and 3rd parties.
When using this product, you are responsible for your own safety and the safety of others around you. Never
attempt to use this product as a flying device. Never touch flying lines when the kite is in use.
RELEASE OF LIABILITY AND ASSUMPTION OF RISK
DO NOT USE THIS PRODUCT UNLESS YOU AGREE WITH THE FOLLOWING TERMS AND CONDITIONS:
Before using this product, the purchaser/user has carefully reviewed, understood and agrees to comply with
the terms of this User Manual. Use of this product and any of its components involves certain inherent risks,
dangers and hazards, which can result in serious personal injury or death. The purchaser/user of this product understands that the seller is not responsible for any damage to property or injury caused by negligent
operation of this product by the purchaser/user, and the purchaser/user releases the seller from all such
liability. In the event of your death or incapacity, this Agreement shall be effective and binding upon your
heirs, next of kin, executors, administrators, assigns and representatives.
The purchaser/user of this product expressly assumes the risk of any and all bodily injury, death and/or liability which may result from the purchaser or user’s participation in kiteboarding. The purchaser/user agrees to
hold Ride Best, LLC harmless from any and all liability, and waive and release any and all claims or potential
claims against Ride Best, LLC and any of its respective agents, affiliates, subsidiaries, employees, instructors,
officers, directors, shareholders, suppliers and manufacturers in the event of any such bodily injury or death
which may result from the purchase and/or use of Ride Best LLC (d/b/a Best Kiteboarding) products.
© 2013 RIDE BEST, LLC, d/b/a BEST KITEBOARDING
RP-BAR AND GP-BAR
CORRECT ATTACHMENT TO RIDER AND HARNESS
The Pro-Cuff+ quick release on both the RP-Bar and GPBar requires being attached to a harness spreader bar
for correct function. It is compatible with either waist
or seat harness’s according to rider preference. Correct
fitment using the Donkey Stick to retain the Chickenloop in the bar is shown below.
With the Donkey Stick passed over the Chickenloop and
back through the spreader bar hook you will not be
able to unhook easily from your kite without activating
your Pro-Cuff+ quick release. If you prefer being able
to unhook easily and quickly and do not mind the risk
of accidently coming unhooked from your kite then we
recommend that you do not use the Donkey Stick.
LEASH RING
DONKEYSTICK
SPREAD BAR
CHICKEN LOOP
RP-BAR
The RP-Bar is a four line kite specific control bar and is suitable for
all our kites except the GP. The RP-Bar is intended to be used with the
Mini-leash as shown below. Clip directly to the Redline attachment
ring, do not clip over the chickenloop and then into the attachment
ring. The RP-Bar mini leash is not intended to be used in suicide mode
and does not provide any form of dead man release functionality.
RP-BAR / GP-BAR
BYPASS SAFETY ATTACHMENT MODE
- We recommend that riders use the bypass leash arrangement with
all 4-line Best kites.
- Leash should be clipped to Redline safety attachment ring - marked
green-1st image.
- Push cuff upwards to start activation.
- Continuing pushing until hinge opens.
- QR fully open, chickenloop line withdraws under pull of kite.
- Chickenloop completely released, kite attached to bar instantly
depowers.
You can re-assemble your QR by following the steps in reverse order.
RP-BAR MINI-LEASH:
The RP-Bar is fitted with a mini-leash with Pinless Safety QR. The
carabiner end clips to the Redline ring on your chickenloop, the
Velcro loop attaches to either your spreader bar or the rings mounted
on the side of your harness.
RP-BAR MIN-LEASH ATTACHMENT POINTS
The Pinless Safety QR will not function correctly if you attach the leash
backwards, the carabiner end must be attached to the bar to ensure
correct function.
TO KITE
PUSH
TO OPEN
TO HARNESS
1. Grasp the mini-leash QR in one hand
LEASH RELEASES
2. Push firmly towards the kite
to activate the QR
• Only use in an emergency, an untethered kite poses a significant risk.
3. The QR-cuff will slide upwards,
open and disconnect from the harness line.
DEPOWER STOPPER:
The Depower Stopper on the RP-Bar can be positioned by hand at any point
along the depower rope. When the bar makes contact with the Depower
Stopper the stopper will grip the depower ropes and resist the movement of
the bar. This reduces the strain on your elbows when flying and allows you
to trim your bar travel for a comfortable bar position when flying without
adjusting your lines.
In gusty riding conditions or in an emergency it is possible to override the
Depower Stopper simply by pushing the bar firmly upwards with both hands.
The Redline Safety will automatically override the Depower Stopper whenever
you activate the Pro-Cuff+ QR or unhook from the bar.
GP-BAR
The GP-Bar is a 5-line bar designed for our GP C-kite. The GP-Bar can be
rigged with the safety leash in bypass mode, as shown in the RP-Bar example, or in suicide mode as shown below. Selecting suicide mode reduces the
available depower of the kite and should only be used by highly experienced
kiters in moderate wind speeds. We do not recommend that any rider rigs
their safety in suicide mode when riding in high winds.
GP-BAR SUICIDE MODE
- Suicide mode is only suitable for experienced riders, it reduces
depower and safety.
- Attachment Ring should be placed over chickenloop line prior to
closure of QR.
- Leash should be clipped to 5th-line ring- marked green.
- Push cuff upwards to activate QR.
- Chickenloop line withdraws pulling through attachment ring.
- Attachment ring and 5th-line are tensioned by leash, kite depowers.
You can re-assemble your QR by following the steps above in reverse order.
GP-BAR LEASH:
The GP-Bar leash is fitted with a karabiner and swivel at opposite ends. The
Pinless Safety QR is the same as on the RP-Bar.
GP-BAR LEASH ATTACHMENT POINT
The QR cuff will not function correctly if you attach the leash backwards, the
swivel and QR must be attached to the harness.
DEPOWER SYSTEM CLAM CLEAT
All Best bars are fitted with out new Clam Cleat depower system. The Clam Cleat depowers and repowers the
kite by shortening and lengthening the front flying lines relative to the back flying lines. This is achieved
through the adjustment of a single depower rope.
To depower the kite:
• Pull the depower rope towards you and slightly upwards to loosen
it from the clam cleat.
• Continue to pull the rope towards your chest to depower the kite.
• When the kite is depowered sufficiently pull the depower rope
sharply downwards to engage it back into the cleat.
• You can let go when you feel no tension on the depower rope.
To repower the kite:
• Pull the depower rope down and towards you to loosen it from the
clam cleat.
• Lift the rope upwards and allow it to feed back through the cleat
to repower the kite.
• When the kite is repowered sufficiently pull the depower rope
downwards to engage it back into the cleat.
• You can let go when you feel no tension on the depower rope.
For detailed instructions on how to adjust the depower throw on your new bar please check the video page
on the Best website.
ATTACHING LINES
The RP-Bar and all 4-line Best kites come with come
fitted with Kookproof attachments to help ensure that
you match up the correct flying lines from your bar
with the corresponding attachment point on the kite.
The GP-Bar and GP kites retain the older none kookproof connection style.
Older kites and bars can be mixed and matched with
gear, simply follow the diagrams above to ensure you
have the correct line layout remembering to knot the
ends of your front flying lines where required.
THANKS
FOR
RIDING
WITH
US!
BACK LINE
ADJUSTMENT
All Best Bars come with back line adjusters located inside the rear line floats. You can trim the back line
length to compensate stretch and recalibrate your lines. All 4 lines should always have the same lengths.
Reveal back line adjusters by pulling the To adjust loosen the larkshead knot and Moving the larkshead down toward the bar
lines visible at the connection between bar move it up or down to select the knot you extends the lines and vice versa.
ends and float.
require.
Once adjusted, cinch up the larkshead knot When adjusting the backlines, you will also Put all lines back into position inside the
and pull on it to ensure it is tight.
need to re-adjust the bungee to move in the float by pulling the back leader line above
direction and amount of knots that you the float.
moved the backline.
For example, you moved the backline down Never attempt to fly your kite with one back
one knot, move the bungee down one knot line longer than the other.
also.
Added RP-Bar Features:
The stopper ball can easily be removed for riders that do not prefer to have this feature included while
riding. Just use a flat head screwdriver to click the ball open and remove.
The red ball with screw located on the front line along with the front line safety system is adjustable.
This ball has a default location 10m high above the bar. This distance is meant to allow a 17m kite to flag
out when activating the safety. If you are using a smaller kite, you can use a screwdriver to move the ball
toward the bar which then shortens the throw of the depower. Once you have chosen a new location for
the ball, test the safety to make sure that the flags out completely.
RIDE
WITH US
bestkiteboarding.com
INSPECTION
Before and after every session we recommend that you check the following.
- Inspect the Kookproof connection points for wear. Do not use your bar if the Kookproof loops are damaged
or worn; seek replacement lines from your local dealer.
- Inspect all flying lines. Replace any damaged sections and remove any knots from flying lines.
Do not fly with knotted or damaged lines.
- Should any part of your bar become damaged at any time please immediately seek out replacement
components from your local dealer or online direct from Best Kiteboarding.
PACKING AND STORAGE OF BAR
We recommend that you rinse your bar prior to storage. Open the Pro-Cuff+ QR and flush with water.
Rinse down through the top of the swivel with running water. Hang the bar up to dry before storing for
any length of time. Store the bar with the QR left in the open position.
SAFETY ADVICE
- Wherever possible launch with an assistant.
- Always walk out your lines.
- Never launch or fly with crossed lines.
- Never fly with knotted or damaged lines.
- Never touch your lines when flying.
LIFETIME WARRANTY
To download a detailed USER MANUAL for your chosen Best Kiteboarding product
please go to: bestkiteboarding.com/en-us/support/
REGISTRATION REQUIRED
Register your product today or you could miss out!
Scan the QR code for more info or visit our website at:
bestkiteboarding.com/en-us/warranty-registration/
bestkiteboarding.com